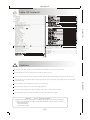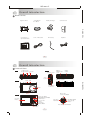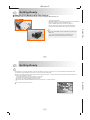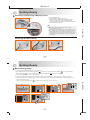
1
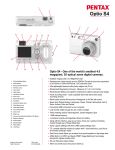
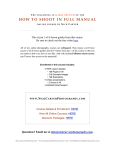
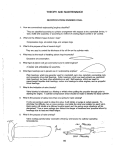
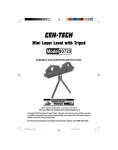
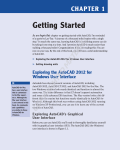
pa ntone
3.
80P
,
165 mm+-2
Use r M a nua l
122 mm+-2
: X R 4041020 2.
T his ma nua l ca n guide you to us e this ca mera
with proper opera tion a nd correct s etting.
P lea s e rea d it carefully a nd optimiz e the
performa nce in a ccorda nce with your
preference.
122 mm+-2
1.
X R 4041020
165 mm+-2
Table Of Contents
SETUP Setting
122 mm+-2
Cautions ---------------------------------------------------------------------------------- 03
Overall Introduction
------------------------------------------------------------------ 04
Acces s ories -------------------------------------------------------------------------- 04
E xternal V iew ----------------------------------------------------------------------- 05
Icon Introduction --------------------------------------------------------------- 05
Icon Dis play-------------------------------------------------------------------------- 06
Getting Ready
-------------------------------------------------------------------------- 07
T urn On or Off the C amera ---------------------------------------------------- 07
Loading the B attery------------------------------------------------------------------ 07
C harging the B attery with the C harger ------------------------------------------ 08
Ins erting or R emoving a Memory C ard ------------------------------------------ 10
Attaching the Wris t S trap ------------------------------------------------------ 10
B as ic P hotography ------------------------------------------------------------------ 11
Under Image Shooting Mode ( )
----------------------------------------------- 12
W IDE / T E L E B utton----------------------------------------------------------- 12
Macro Mode --------------------------------------------------------------------- 13
F las h Mode ---------------------------------------------------------------------- 13
S elf-timer Mode
----------------------------------------------------------------- 14
V oice Memo Mode
------------------------------------------------------------ 14
E xpos ure / Delete B utton ----------------------------------------------------- 15
Image S ize S etting ------------------------------------------------------------- 16
Image Quality S etting ---------------------------------------------------------- 16
Metering S etting ---------------------------------------------------------------- 17
S harpnes s S etting -------------------------------------------------------------- 17
E ffect S etting ---------------------------------------------------------------------- 18
White B alance S etting --------------------------------------------------------- 18
P hoto F rame S etting ----------------------------------------------------------- 19
Night S cene S etting ----------------------------------------------------------- 20
His togram ------------------------------------------------------------------------ 20
C ontinuos S hooting S etting ------------------------------------------------------- 21
S E T UP ---------------------------------------------------------------------- 21
Under Image Stabilizing Helper Mode ( ) ISH --------------------------------------- 22
Under Playback Mode
(
) ----------------------------------------------------- 23
P layback of a S till Image ------------------------------------------------------ 23
P layback of a Movie C lip ------------------------------------------------------ 23
T humbnail Dis play (S mall Images ) ----------------------------------------- 24
E xploring an Image ------------------------------------------------------------- 24
Dis playing Image Information ------------------------------------------------ 25
S tarting a S lide S how --------------------------------------------------------- 25
38
39
40
Under Digital Music Player Mode
Printer Connection (PictBridge
TV Connection
(
)
41
Mode) ------------------------------------ 43
-------------------------------------------------------------------48
PC Connection ------------------------------------------------------------------ 49
Error Message Table ------------------------------------ ------------------------60
Specifications
-------------------------------------------------------------------61
Appendix
-------------------------------------------------------------------------62
2
Cautions
D o not try to dis a s s e mble the c a me ra by yours e lf, whic h ma y da ma ge the c a me ra or c a us e e le c tric s hoc k.
D o not fire the fla s h in a c los e dis ta nc e ( le s s tha n 1 me te r) ; it ma y hurt your e ye s .
K e e p the c a me ra a wa y from the re a c h of c hildre n or a nima ls to pre ve nt the m from s wa llowing the ba tte rie s or s ma ll a c c e s s orie s .
D o not ope ra te this c a me ra with we t ha nds ; it ma y c a us e e le c tric s hoc k.
T he c a me ra ma y be da ma ge d in a n e nvironme nt of high te mpe ra ture .
T o a void e le c tric ity le a ka ge , ple a s e re move the ba tte ry if the c a me ra is not in us e for a long pe riod.
It is norma l tha t the te mpe ra ture of the c a me ra body ris e s if the c a me ra works for a long time .
Small Tip
to Save You Big Headache
A digita l c a me ra is in a wa y ve ry s imila r to a c ompute r. If the digita l c a me ra ha ngs its e lf during
ope ra tion, ple a s e follow the proc e dure s be low a nd mos t like ly the c a me ra c a n be re -a c tiva te d.
1. R e move the ba tte ry.
2. R e loa d the ba tte ry.
3. S witc h on the c a me ra .
3
122 mm+-2
S top us ing the c a me ra if a ny kind of liquid or fore ign obje c t e nte r the c a me ra . If it ha ppe ns , powe r off the c a me ra a nd c onta c t with
your de a le r for he lp.
165 mm+-2
O v e r a ll In tr o d u c tio n
A c c e s s o r ie s
C a me ra D rive r
& S oftwa re
U s e r Ma nua l /
Q uic k S ta rt G uide
U S B / V ide o C a ble
B a tte ry & C ha rge r
C a me ra P ouc h
W ris t S tra p
122 mm+-2
D igita l C a me ra
E a rphone
4
O v e r a ll In tr o d u c tio n
E x te r n a l Vie w
Top
S hutte r P owe r
B utton B utton S pe a ke r
S id e
E a rphone J a c k
B attery /
Memory C ard
C over
T ripod
S oc ke t
S tra p
E ye le t
Memory C ard S lot
F la s h
LE D
U S B / V ide o
C onne c tor
L e ns
122 mm+-2
F ront
B attery C hamber
Mic rophone
Ma c ro / la y /
P a us e / U p B utton
B ack
TFT LC D
Montior
OK
MENU
W ide / Te le B utton
Digital Mus ic P layer B utton
Mode B utton
K e y F unc tion
B utton
E xpos ure /
D e le te B utton
P layback
B utton
5
S e lf- time r /
L e ft B utton
OK
MENU
O K / Me nu B utton
F la s h / R ight
B utton
V oic e Me mo / D own B utton
165 mm+-2
Icon Introduction
Icon Display
17
1
1
3
16
7
6M
2
15
14
4
5
6
7
8
9
13
12
11
10
100
18
ISO
1
Battery Status
( )Battery Full
( )Battery Half
Drained
( )Battery Drained
2
Working Mode
( )Image Shooting Mode
(ISH) Image Stabilizing
Helper
( )Playback Mode
( )Night Scene Mode
( 5 )Photo Frame Mode
( )Movie Clip Mode
( )Voice Recording
Mode
3
Shooting Status
( 1 ) Single
( 2 ) Continuous
( 4 ) AEB
4
Flash Mode
( )Auto Flash
( )Auto Flash with
Red-eye Reduction
( )Slow Sync
( )Fill-in Flash
( )Flash Off
EFFECT
( ) Black & White
(NOR) Normal
( ) Sepia
( RGB ) RGB
10
(
5
Self-timer
( )10 Seconds
( ) 2 Seconds
( ) Double
6
( ) Voice Memo
13
9
)Exposure +
-0
11
White Balance
( )Auto
( )Daylight
( )Cloudy
( )Fluorescent
( )Tungsten
( )Sunset
( )Custom
2S
7
Focus Range
( ) Macro
8
Metering
( )Spot
( )Multi
Sharpness
( )Soft
( )Normal
( )Vivid
14
Quality
( )Super Fine
( )Fine
( )Normal
15
Size
(
)3264x2448
(
)2816x2112
(
)2560x1920
(
)2304x1728
(
)2048x1536
(
)1600x1200
17
Zoom Status Indicator
(
)
18
ISO
( AUTO
ISO ) AUTO adjust
( 100
ISO ) ISO=100
200
( ISO ) ISO=200
( 400
ISO ) ISO=400
122 mm+-2
19
19
HISTOGRAM
(
)Histogram
12
(
)Memory Card
16
( 7 ) Available Shots
6
Getting Ready
Turn On or Off the Camera
Press down the "POWER" button to turn on the camera.
Loading the Battery
1.
2.
3.
4.
Power off the camera.
Slide out Battery / Memory Card Cover to open it.
Following the polarity indications and load the battery.
Close the Battery / Memory Card Cover.
The below symbols on the TFT LCD Monitor are the indication
of the battery status.
( ):Battery power is full.
( ):Battery power is half drained. Have new battery ready.
( ):Battery power is drained. Replace with new battery.
The battery may run off if the battery is kept inside the camera
for a long time without using. Please remove the battery when
the camera is not in use.
The battery may not work normally under 0 C or over 40 C .
It's normal that the temperature of the camera rises after
used for a long period.
7
122 mm+-2
Repeat the way above to turn off the camera.
165 mm+-2
Getting Ready
Charging The Battery With The Charger
The battery is not charged when the camera is shipped. Charge the battery before use.
It is recommended to charge a new battery for more than
4 hours.
It's normal that the temperature of the battery and
camera body rises after a period of time of using.
122 mm+-2
Charging Procedure
(a) Insert the battery to the battery slot by the polarity indications.
(b) Connect the charger to the electrical outlet.
(c) The LED will light up in red color when charging.
(d) The charging is completed when the LED turns green.
(e) Remove the battery when the charging is completed.
8
Getting Ready
A message of "Low Light!" appearing on the TFT LCD Monitor is a warning to remind you to go to the Flash Mode and select Auto Flash
or Fill-in flash to get more light sources so as to compose a superior quality image.
Do not touch the lens when it is in use.
14
6M
9
122 mm+-2
In such cases shown as follows, please release the shutter button, then try to re-compose the shot and focus again because the Auto Focus
function may be difficult to use with.
The subject is far away from the photographer or in the dark.
The subject is viewed through a piece of glass or window.
A fast-moving or a flashing subject is passing through.
The subject has a reflection attribute like a mirror, a luminous body, or a lustrous subject.
165 mm+-2
Getting Ready
Inserting or Removing a Memory Card
1. Power off the camera.
2. Open the Battery / Memory Card Cover.
3. Insert the memory card into the card slot and press it
down until a click sound happens. (Please press the
memory card again to get it out once a click sound happens.)
4. Close the Memory Card Cover.
The image(s) can be stored either in built-in flash memory
or in memorycard. When the memory card is inserted, the
images willbe stored in the memory card rather than the
built-in flash memory.On the other hand, the images will be
stored in the built-in flashmemory when a memory card is
not inserted.
Attaching the Wrist Strap
2
1
122 mm+-2
Formatting a brand new memory card is strongly
recommended for first use.
3
10
Getting Ready
Basic Photography
1. Press down the POWER Button to turn on the camera.
2. Set the Mode button at Image Shooting Mode (
) for still image, Image Stabilizing Helper ( ISH ) for image stabilizing,
Movie Clip Mode (
) for movie recording and Voice Recording Mode(
) for voice recording.
3. Use TELE/WIDE Button to zoom in and zoom out.
1
2
5
6
2
3
100-0021
Blinking
11
4
14
6M
122 mm+-2
4. Press the shutter button half way to do the focusing and then press the shutter button fully down to capture an image.
5. The LED Indicator starts blinking right after the Shutter Button is released. Once the LED Indicator stops blinking, you are
ready to take another shot.
Or you can press Playback Button ( ) to view the images or movie clips you just took.