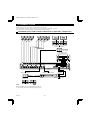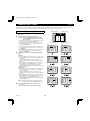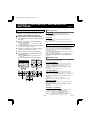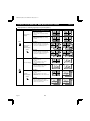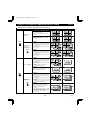
1
L8QR5/XE (VQC-801P, VQM-801P GB) 1999. 12. 2
VQC-801P
VQM-801P
INSTRUCTION MANUAL
Quad Compressor
English
GB
Quad Compressor
Deutsch
D
Compresseur quadruplex
Français
F
Compresor cuádruple
Español
E
Compressore per quadranti
Italiano
I
About this manual
• Before installing and using this unit, please read this manual
•
carefully. Be sure to keep it handy for later reference.
This manual gives basic connections and operating
instructions for 2 models (Colour VQC-801P, B/W
VQM-801P).
Über diese Anleitung
• Lesen Sie bitte diese Bedienungsanleitung vor der
•
Installation und der Verwendung des Gerätes sorgfältig
durch. Bewahren Sie die Anleitung zum späteren
Nachschlagen auf.
In dieser Anleitung werden die Anschlüsse und die
Bedienungsanleitungen für 2 Modelle (Farbe VQC-801P,
Schwarzweiß VQM-801P) beschrieben.
À propos de ce manuel
• Avant d’installer et d’utiliser cet appareil, veuillez lire ce
•
manuel attentivement. Assurez-vous de le garder à portée de
la main pour référence ultérieure.
Ce manuel couvre les instructions de branchement et
d’utilisation de base pour deux modèles (couleur VQC-801P,
noir et blanc VQM-801P).
Acerca de este manual
• Antes de instalar y usar este aparato, lea detenidamente este
•
manual. Asegúrese de guardarlo a mano para futuras
referencias.
Este manual le indica las conexiones básicas y las
instrucciones de funcionamiento de dos modelos (Color
VQC-801P, Blanco y negro VQM-801P).
Nota su questo manuale
• Leggere attentamente questo manuale prima di passare
•
all’installazione ed all’uso di questo apparecchio.
Questo manuale contiene istruzioni per i principali
collegamenti ed il funzionamento di due modelli (il modello a
colori VQC-801P, ed il modello in bianco e nero VQM-801P).
L8QR5/XE (VQC-801P, VQM-801P GB) 1999. 12. 2
PRECAUTION
WARNING: TO REDUCE THE RISK OF FIRE OR
ELECTRIC SHOCK, DO NOT EXPOSE THIS
APPLIANCE TO RAIN OR OTHER MOISTURE.
To avoid electrical shock, do not open the cabinet.
Refer servicing to qualified personnel only.
If the power supply cord (AC power cord) of this
appliance is damaged, it must be replaced. Return to a
SANYO Authorised Service Centre for replacement of
the cord.
Location
For safe operation and satisfactory performance of your unit,
keep the following in mind when selecting a place for its
installation:
• Shield it from direct sunlight and keep it away from sources of
intense heat.
• Avoid dusty or humid places.
• Avoid places with insufficient ventilation for proper heat
dissipation. Do not block the ventilation holes at the top and
bottom of the unit. Do not place the unit on a carpet because
this will block the ventilation holes.
• Install the unit in a horizontal position only.
• Avoid locations subject to strong vibrations.
• Avoid moving the unit between cold and hot locations.
• Do not place the unit directly on top of a monitor TV, as this
may cause interference.
Avoiding Electrical Shock and Fire
• Do not handle the power cord with wet hands.
• Do not pull on the power cord when disconnecting it from an
•
•
AC wall outlet. Grasp it by the plug.
If any liquid is spilled on the unit, unplug the power cord
immediately and have the unit inspected at a
factory-authorised service centre.
Do not place anything directly on top of this unit.
SERVICE
This unit is a precision instruments and if treated with care, will
provide years of satisfactory performance. However, in the event
of a problem, the owner is advised not to attempt to make
repairs or open the cabinet. Servicing should always be referred
to your dealer or Sanyo Authorized Service Centre.
CAUTION
Danger of explosion if battery is incorrectly replaced.
Replace only with the same or equivalent type recommended
by the manufacturer.
Discard used batteries according to the manufacture’s
instructions.
English
1
L8QR5/XE (VQC-801P, VQM-801P GB) 1999. 12. 2
CONTENTS
FEATURES
Date/Time function
PARTS NAMES . . . . . . . . . . . . . . . . . . . . . . . . . . . . 3
FRONT PANEL . . . . . . . . . . . . . . . . . . . . . . . . . . . . 3
REAR PANEL . . . . . . . . . . . . . . . . . . . . . . . . . . . . . 4
Up to 10 characters title function
• Title and time display can be turned on/off
• Title and time display position can be selected
CONNECTION . . . . . . . . . . . . . . . . . . . . . . . . . . . . . 5
RECORDING LIVE PICTURES IN QUAD
SCREEN DISPLAY MODE ONLY
CONNECTIONS . . . . . . . . . . . . . . . . . . . . . . . . . . . . 5
REMOTE CONTROLLER CIRCUIT
CONNECTIONS . . . . . . . . . . . . . . . . . . . . . . . . . . . . 6
INSTALLING THE RACK MOUNTING
BRACKETS (SOLD SEPARATELY) . . . . . . . . . . . . 6
Up to 100 alarm recordings log on-screen display
Timer function allowing to record only when necessary (night
and/or day) for each camera
• Sequential speed for each camera can be adjusted
• Important cameras to be displayed in quad screen can be
selected
Video loss warning function that can switch the display to
colour bars or to a frozen image
BASIC OPERATIONS . . . . . . . . . . . . . . . . . . . . . . . 7
MODE SWITCHING . . . . . . . . . . . . . . . . . . . . . . . . .
SECURITY LOCK FUNCTION . . . . . . . . . . . . . . . .
SETTINGS BACKUP FUNCTION . . . . . . . . . . . . . .
RESET FUNCTION . . . . . . . . . . . . . . . . . . . . . . . . .
7
8
8
8
3 alarm functions
External alarm, video loss alarm, video sensor alarm
Security lock function
Computer control function using an RS232C connection
LIVE PICTURE MODE . . . . . . . . . . . . . . . . . . . . . . . 9
LIVE PICTURE MODE OPERATIONS STEPS . . . . 9
QUAD SCREEN OPERATIONS . . . . . . . . . . . . . . 10
FULL SCREEN OPERATIONS . . . . . . . . . . . . . . . 13
ACCESSORIES
VCR PLAYBACK MODE . . . . . . . . . . . . . . . . . . . . 14
1 Power cord x1
QUAD SCREEN OPERATIONS . . . . . . . . . . . . . . 14
FULL SCREEN OPERATIONS . . . . . . . . . . . . . . . 14
2 Fixer Power cord tie x1
MENU SETTING MODE . . . . . . . . . . . . . . . . . . . . 15
LANGUAGE SETTING . . . . . . . . . . . . . . . . . . . . .
CLOCK AND SUMMER TIME SETTING . . . . . . . .
CAMERA TITLE SETTING . . . . . . . . . . . . . . . . . .
ALARM SETTING . . . . . . . . . . . . . . . . . . . . . . . . .
VIDEO SENSOR SETTING . . . . . . . . . . . . . . . . . .
VIDEO SENSOR ALARMS . . . . . . . . . . . . . . . . . .
TIMER SETTING . . . . . . . . . . . . . . . . . . . . . . . . . .
CLOCK, TITLE DISPLAY AND MONITOR
SETTINGS . . . . . . . . . . . . . . . . . . . . . . . . . . . . . . .
VIDEO LOSS SETTING AND COMPUTER
CONTROL SETTING . . . . . . . . . . . . . . . . . . . . . . .
ALARM DATA DISPLAY . . . . . . . . . . . . . . . . . . . .
3 Rack mounting brackets bolts x4
16
17
18
19
20
20
21
2
3
22
25
26
SETTING UP THE VCR SIGNAL OUTPUT
(SW IN) AUTOMATIC SWITCHING SPEED . . . . . 26
ALARMS OPERATIONS . . . . . . . . . . . . . . . . . . . . 27
EXTERNAL ALARMS . . . . . . . . . . . . . . . . . . . . . . 27
VIDEO LOSS ALARM . . . . . . . . . . . . . . . . . . . . . . 27
VIDEO SENSOR ALARMS . . . . . . . . . . . . . . . . . . 27
RS232C CONTROL . . . . . . . . . . . . . . . . . . . . . . . . 28
CONNECTION . . . . . . . . . . . . . . . . . . . . . . . . . . . . 28
INTERFACE SPECIFICATIONS . . . . . . . . . . . . . . 28
COMMANDS . . . . . . . . . . . . . . . . . . . . . . . . . . . . . 28
SPECIFICATIONS . . . . . . . . . . . . . . . . . . . . . . . . . 32
2
English
L8QR5/XE (VQC-801P, VQM-801P GB) 1999. 12. 2
PARTS NAMES
FRONT PANEL
2
1
3 4 5 6 7 8 9
F
ALL RESET
POWER
1
2
3
4
5
6
7
8
STILL
ZOOM
SEQUENCE
QUAD
LIVE
VCR
MENU
MENU RESET
EXIT
NEXT
G
This unit is not equipped with a power switch. The power is turned on/off when the supplied power cord is connected/disconnected at
the power source.
1 POWER indicator
7 LIVE button and indicator
Press this button to select the live input mode.
2 Camera select buttons and camera indicators
8 VCR button and indicator
Use these buttons to select the picture from the
corresponding camera. When a camera is selected, the
corresponding indicator will light.
Press this button to select the VCR playback input mode.
9 MENU button (see page 7)
3 STILL button and indicator
Press this button to display the menus. Press repeatedly to
select the different menus in order. Buttons 3 to 8 are
used for menu control.
In live picture quad screen display mode, press this button
to set the freeze mode.
4 ZOOM button and indicator
F ALL RESET button (see page 8)
In live picture quad screen display mode, press this button
to set the 2x zoom in mode.
G MENU RESET button (see page 8)
5 SEQUENCE button and indicator
Press this button for an automatic sequential quad screen
or full screen display of the pictures.
6 QUAD button and indicator
In live picture mode, press this button repeatedly to switch
between quad screens A and B.
English
3
L8QR5/XE (VQC-801P, VQM-801P GB) 1999. 12. 2
PARTS NAMES
REAR PANEL
1
1
5
2
CAMERA
6
3
23
7
4
8
VCR
IN
4
5
VIDEO OUT
QUAD
FULL
6
CONTROL
QUAD
ONLY
RC C SW C AL C 1 2 3 4 5 6 7 8
RS232C
7
1 CAMERA input terminals (1 – 8)
8
9
(RS232C terminal)
1 2 3 4 5
2 VCR IN (Video cassette recorder input) terminal
3 VCR OUT QUAD FULL (Video signal output) terminal
Output in quad screen and full screen display modes.
6 7 8 9
4 VCR OUT QUAD ONLY (Video signal output) terminal
Output only in quad screen display mode.
However, the output display mode at this terminal can be
switched from quad screen mode only to quad screen and
full screen display modes (see (MONITOR SET) on page
22, and Tables 1 and 2 on pages 23 and 24).
5 RS232C (RS-232C) terminal
To control this unit using a personal computer, connect the
computer serial terminal to this terminal using a 9-pin
D-SUB cable (sold separately).
6 CONTROL terminal
7 Battery compartment
Pin No.
Signal
Function
1
–
–
2
RXD
Data reception
3
TXD
Data transmission This unit → Computer
4
DTR
Normally “H”
5
GND
Common
6
–
–
7
–
–
8
CTS
9
–
No reception
–
Signal direction
–
Computer →This unit
–
–
–
This unit → Computer
–
(CONTROL terminal)
8 Power cord holder
Pin
Using the supplied tie, attach the power cord to the holder
as illustrated.
RC
C
SW
C
AL
9 AC Power socket
Insert the power cord female plug firmly into this socket.
When the other plug of the power cord is connect to a live
power source, the POWER indicator on the front panel will
light.
4
Signal
Remote input
Common
Switching input (DC 5V)
Common
Alarm input (DC 5V)
C
Common
1
Alarm input 1
2
Alarm input 2
3
Alarm input 3
4
Alarm input 4
5
Alarm input 5
5
Alarm input 6
7
Alarm input 7
8
Alarm input 8
English
L8QR5/XE (VQC-801P, VQM-801P GB) 1999. 12. 2
CONNECTION
Before making any connection, make sure all the devices are turned off.
Before making the connections, please refer to the instruction manual accompanying each device.
If the devices are not connected properly, that may cause a fire and/or damages.
RECORDING LIVE PICTURES IN QUAD SCREEN DISPLAY MODE ONLY CONNECTIONS
01
05
02
06
01
05
02
06
01
05
01
02
05
06
03
04
07
08
Monitor (sold separately)
1
2
3
4
Live pictures in
quad screen/full
screen display
External alarm sensors
(door bell, interphone, etc.)
1
5
CAMERA
6
3
2
7
4
8
VCR
IN
VIDEO OUT
QUAD
FULL
CONTROL
QUAD
ONLY
RC C SW C AL C 1 2 3 4 5 6 7 8
RS232C
Video input
terminal
Monitor (sold separately)
1
2
3
4
Timelapse VCR (sold separately)
Common
Video input
terminal
Video output
terminal
Common
Switching output
terminal
For playback in
quad screen only
01
02
05
06
03
04
07
08
NOTE:
With model VQM-801P, use black and white cameras only.
If colour cameras are used, that may cause image beat, etc.
English
Alarm input
terminal
5
L8QR5/XE (VQC-801P, VQM-801P GB) 1999. 12. 2
CONNECTION
REMOTE CONTROLLER CIRCUIT CONNECTIONS
Use the layout below to make a remote controller and make the connections to the remote input pins (RC, C) of the
CONTROL terminal as indicated. This will permit remote controlled operation of this unit. (make contact LOW input)
1.8kΩ
220Ω
SW 1: Camera 1
SW 2: Camera 2
SW 3: Camera 3
SW 4: Camera 4
7.5kΩ
470Ω
SW 5: Camera 5
RS232C
SW 11 : Camera sequential
display
SW 12 : Quad screen
4.7kΩ
360Ω
RC C SW C AL C 1 2 3 4 5 6 7 8
SW 10 : Zoom
3.3kΩ
300Ω
CONTROL
SW 9 : Still image
2.2kΩ
220Ω
SW 13 : VCR playback
13kΩ
680Ω
SW 6: Camera 6
SW 14 : Live picture
27kΩ
820Ω
SW 7: Camera 7
SW 15 : Menu selection
1.2kΩ
SW 8: Camera 8
SW: switch
INSTALLING THE RACK MOUNTING BRACKETS (SOLD SEPARATELY)
To mount this unit onto a rack, please use the rack mount hardware (model VA-RACMK 1) sold separately.
1
2
3
Insert the head of two of the supplied bolts into the
keyhole opening on the side of the unit.
Insert the head of the bolt in the larger side, then slide it to
the smaller side of the opening.
1
Align the slot on the mounting bracket with the two
bolts.
Make sure the bolts have not moved from their position,
then place a flat washer, a locking washer, and fix with a
nut.
NOTE:
Make sure to use the bolts provided with this unit, as the
bolts provided with the rack mount hardware are too short.
2
Install the second mounting bracket on the opposite
side, then attach the unit onto the rack using the rack
mount bolts.
3
6
English
L8QR5/XE (VQC-801P, VQM-801P GB) 1999. 12. 2
BASIC OPERATIONS
MODE SWITCHING
When the unit is connected to a power source, the default display mode will be: live picture from the four cameras 1 – 4 in a
quad screen. You can use the VCR, LIVE and MENU buttons to switch to the desired mode (see below for further information).
LIVE picture mode
VCR playback mode
LIVE picture mode
Menu mode
(LANGUAGE/LANG./SPRACHE)
ENGLISH
FRANCAIS
DEUTSCH
Power on
VCR
LIVE
MENU
Live Picture Mode (see page 9)
Menu Setting Mode (see page 15)
When the LIVE button is pressed, the live (direct) picture from
cameras 1 – 4 connected to the camera input terminals on the
unit rear panel, will be displayed. While in live picture mode you
can use the still and zoom functions.
Press the MENU button to display the menu. The buttons used
for menu control are indicated below.
Menu control buttons
NOTE:
• The unit will automatically start in the live picture or VCR
playback display mode (quad screen or full screen display)
last selected. Therefore, when a mode is selected, the
display mode will remain the same.
• In quad screen mode, if a camera is not connected at one of
the input terminals, “NO VIDEO” will be displayed on the
monitor screen.
ALL RESET
STILL
ZOOM
SEQUENCE
QUAD
LIVE
VCR
MENU
MENU RESET
EXIT
1
NEXT
2
3
4
1 EXIT (STILL) button
To exit the menu mode.
2 NEXT (ZOOM) button
NO VIDEO
NO VIDEO
To select a sub-menu in order to set the title position, etc. Press
the NEXT button to switch between the menu and the sub-menu.
NO VIDEO
NO VIDEO
3 +, – (QUAD, SEQUENCE) buttons … Press repeatedly
Use these buttons to select numbers, letters, symbols.
• + button: for forward selection
• – button: for backward selection
VCR Playback Mode (see page 14)
Start playback on the VCR. If the video signal is correctly
recorded, the VCR playback image will be displayed when the
VCR button is pressed.
4 c, l (VCR, LIVE) button … Press repeatedly
Use these buttons to move the cursor to the right or down.
• c button: will move the cursor towards the right.
• l button: will move the cursor down.
English
7
L8QR5/XE (VQC-801P, VQM-801P GB) 1999. 12. 2
BASIC OPERATIONS
SECURITY LOCK FUNCTION
RESET FUNCTION
This function lets you lock the camera live picture mode or VCR
playback mode, so that it cannot be switched to another mode.
The menus can be reset or cleared.
Security lock
ALL RESET
LIVE
Press the LIVE or the VCR button for about 3 seconds.
The buzzer will be heard and all the buttons will be locked. If a
button is pressed by mistake, the buzzer is heard and the
corresponding function will not operate.
LIVE
VCR
MENU
MENU RESET
VCR
Using the MENU RESET Button
or
A: While a menu is displayed, press the MENU RESET button
to reset all the values of the displayed menu to the default
values.
B: If no menu is displayed, press the MENU RESET button to
reset the time to the nearest hour.
Canceling the Security Lock
To cancel the security lock, press the same (LIVE or VCR)
button again for about 3 seconds. A buzzer will be heard and the
mode will be unlocked.
NOTE: For example, between 10:30:00 and 11:29:59 the
clock will be reset to 11:00:00.
Using the ALL RESET button
SETTINGS BACKUP FUNCTION
Press this button to reset the following:
• Reset the time and date in the (CLOCK SET) menu to the
default setting.
• The display will return to the default quad screen display
mode.
This unit is equipped with a backup battery (lithium battery) to
maintain the clock settings. When the unit is used under normal
conditions, the backup battery is recharged. The battery is fully
recharged after a minimum of about 30 hours, and will maintain
the clock settings for up to 30 days.
NOTE:
NOTE: The settings may not be maintained properly if the
backup battery has been recharged for less than 30
hours when the power goes off.
If the unit does not function properly, press the
ALL RESET button.
Please note that all the settings mentioned above
will be reset.
Battery Life
If the power is turned off for about one hour or more, when the
power is restored, the (CLOCK SET) menu is displayed so the
clock settings can be checked.
If the clock settings are reset to: 01-01-2000 SAT 00:00:00, that
may indicate that the battery is dead and must be replaced.
Replacing the Battery
To replace the battery, please consult your dealer. After the
battery has been replaced, press the ALL RESET button, then
in the (CLOCK SET) menu set the date and time (see page 17).
8
English
L8QR5/XE (VQC-801P, VQM-801P GB) 1999. 12. 2
LIVE PICTURE MODE
(VIDEO OUT QUADFULL)
Press the LIVE button.
Operations with the monitor connected
The live pictures from the cameras connected to the CAMERA terminals (1 – 4) on the unit
to the VIDEO OUT QUADFULL
back panel will be displayed.
terminal.
Refer to the diagrams below for the buttons to press in order to select the desired operation
mode.
VIDEO OUT
LIVE
1
2
3
4
QUAD
FULL
QUAD
ONLY
LIVE PICTURE MODE OPERATIONS STEPS
b Automatic switching between quad screen A and B
SEQUENCE
01
02
03
04
05
06
08
07
(Quad screen A)
LIVE
01
02
03
04
STILL
4
01
02
03
04
01
02
03
04
01
02
03
Z4
S4
QUAD
ZOOM
4
(Quad screen B)
05
06
07
08
ZOOM
4
Z4
STILL
4
01
02
03
SZ4
SEQUENCE
4
01
04
b Selecting the quad screens A and B displayed cameras (☞ 21)
Settings entered in the (TIMER SET) menu.
b Automatic sequential switching speed (delay) set for each camera (☞ 21, 22)
Settings entered in the (TIMER SET) and the (MONITOR SET) menus.
English
9
L8QR5/XE (VQC-801P, VQM-801P GB) 1999. 12. 2
QUAD SCREEN OPERATIONS
(Live picture)
Press the QUAD button once.
01
03
02
05
04
07
QUAD
06
The camera select indicators (1 – 4) light and quad screen A is displayed.
Press the QUAD button one more time to switch to quad screen B.
08
NOTE: The quad screen (A or B) last selected is memorised and will be selected first
when switching to quad screen mode again.
QUAD
Sequential display of quad screen A and quad screen B at 1
second interval
01
Press the SEQUENCE button.
Quad screen A and quad screen B are displayed sequentially at 1 second interval.
The camera select indicators (1 – 4, 5 – 8) light sequentially according to the
displayed quad screen.
02
03
04
07
08
03
NOTE:
The sequential display speed (screen interval) is set to 1 second in the (MONITOR
SET) menu. The sequence speed setting can be set as desired, refer to “QUAD SEQ.
TIMER” on page 22.
04
07
08
SEQUENCE
Selecting the quad screens A and B displayed cameras
TIMER SETTING: see page 21
(TIMER SET)
TIME 00:00
00:00
SEQ. QUAD SEQ. QUAD
CAM1 T1
OFF T1
ON
CAM2 T1
OFF T1
ON
CAM3 T1
OFF T1
ON
CAM4 T1
OFF T1
ON
CAM5 T1
ON
T1
OFF
CAM6 T1
ON
T1
OFF
CAM7 T1
ON
T1
OFF
CAM8 T1
ON
T1
OFF
Camera number
Example 3:
Set the cameras to
be ON/OFF during
the night.
Example 2:
Set the cameras to be ON/OFF
during the day.
Example 1:
CAMERA 1: ON
CAMERA 2: ON
CAMERA 3: ON
CAMERA 4: ON
(Quad screen A)
CAMERA 5: ON
CAMERA 6: ON
CAMERA 7: ON
CAMERA 8: ON
Example 2:
CAMERA 1: OFF
CAMERA 2: OFF
CAMERA 3: OFF
CAMERA 4: OFF
CAMERA 5: ON
CAMERA 6: ON
CAMERA 7: ON
CAMERA 8: ON
Example 3:
CAMERA 1: ON
CAMERA 2: ON
CAMERA 3: ON
CAMERA 4: ON
CAMERA 5: OFF
CAMERA 6: OFF
CAMERA 7: OFF
CAMERA 8: OFF
Example 4:
CAMERA 1: OFF
CAMERA 2: OFF
CAMERA 3: OFF
CAMERA 4: OFF
CAMERA 5: OFF
CAMERA 6: OFF
CAMERA 7: OFF
CAMERA 8: OFF
(Quad screen B)
01
02
05
06
03
04
07
08
05
06
05
06
07
08
07
08
01
02
01
02
03
04
03
04
01
02
01
02
03
04
03
04
NOTE:
• When the timer is set, the quad screen will be selected according to the day/night
settings.
• When the timer is not set, the day setting quad screen will be selected.
10
English
L8QR5/XE (VQC-801P, VQM-801P GB) 1999. 12. 2
QUAD SCREEN OPERATIONS
(Live picture)
Example: To freeze the image from camera 4
1
2
STILL
4
☞
Press the STILL button.
The STILL indicator flashes and the still image display mode is selected.
Press the camera select 4 button.
The camera 4 indicator flashes, the image from camera 4 is frozen, and “S”
flashes on-screen.
To cancel the still image display mode
Press the camera select 4 button one more time, then press the STILL button.
Example: To zoom in the image from camera 4
1
2
ZOOM
4
☞
Press the ZOOM button.
The ZOOM indicator flashes and the zoomed in image display mode is selected.
Press the camera select 4 button.
The camera 4 indicator flashes, the image from camera 4 is zoomed in, and “Z”
flashes on-screen.
To cancel the zoomed in image display mode
Press the camera select 4 button one more time, then press the ZOOM button.
Example: To freeze the zoomed in image from camera 4
1
2
ZOOM
4
3
4
STILL
English
4
Press the ZOOM button.
The ZOOM indicator flashes and the zoomed in image display mode is selected.
Press the camera select 4 button.
The camera 4 indicator flashes, the image from camera 4 is zoomed in, and “Z”
flashes on-screen.
Press the STILL button.
The STILL indicator flashes and the ZOOM indicator lights.
Press the camera select 4 button.
The camera 4 indicator flashes, the zoomed in image from camera 4 is frozen,
and “SZ” flashes on-screen.
NOTE: To use the zoom function again, first cancel the still image display mode.
☞
To cancel the still and zoomed in image display mode.
Press the camera select 4 button, then press the STILL button.
Press the camera select 4 button, then press the ZOOM button.
☞
To cancel all the still image displays and zoomed in image displays
Press the STILL button, then press the ZOOM button.
11
L8QR5/XE (VQC-801P, VQM-801P GB) 1999. 12. 2
QUAD SCREEN OPERATIONS
(The zoomed in area is set
by the frame position.)
1
2
Example: To zoom in the image from camera 4 and set the
zoom range
You can select the portion of the image to zoom in. The default zoomed in area is the
centre of the image, but if a different zoom range is selected it will be memorized until
changed or cancelled.
ZOOM
1
4
3
LIVE
VCR
2
Z
•
•
(Live picture)
c button:
will move the frame to the right
l button:
will move the frame down
4
3
4
4
☞
Press the ZOOM button.
The ZOOM indicator flashes and the zoomed in image display mode is selected.
Press the camera select 4 button for about 3 seconds.
In full screen mode, “Z” (flashing) and the zoom range frame are displayed.
NOTE: If during the zoom range setting, the displayed frame is not moved for
about 10 seconds, the display mode will automatically return to quad
screen display mode. To return to the setting mode, press the camera
select 4 button again for about 3 seconds.
Press the c (or l) button to move the zoom range frame to the desired
area of the image.
Press the camera select 4 button.
The area selected by the zoom range frame is now zoomed in.
If necessary, follow the same procedure to set the zoom range for the other
cameras.
NOTE: You can switch from zoomed in mode to normal (no zoom) mode by
pressing the camera select 4 button repeatedly.
To cancel the zoomed in image display mode.
Press the ZOOM button.
12
English
L8QR5/XE (VQC-801P, VQM-801P GB) 1999. 12. 2
FULL SCREEN OPERATIONS
(Live picture)
Press a camera select (1 – 8) button.
The camera select indicator lights and the live picture from the corresponding camera
is displayed full screen.
04
1
2
3
4
5
NOTE: In full screen mode, still and zoomed in image display modes are not possible.
6
7
8
Sequential display of each camera pictures at 1 second
interval
SEQUENCE
Press the SEQUENCE button.
The pictures from each camera are displayed sequentially at 1 second interval. The
camera select indicators (1 – 8) light sequentially according to the displayed camera.
01
08
Setting the sequential display speed for each camera
Camera number
(TIMER SET)
07:30
19:30
SEQ. QUAD SEQ. QUAD
CAM1 T1
ON
T1
OFF
CAM2 T2
OFF T1
ON
CAM3 T1
ON
T1
OFF
CAM4 T2
OFF T1
ON
CAM5 T1
ON
T2
OFF
CAM6 T2
OFF T2
ON
CAM7 T1
ON
T2
OFF
CAM8 T2
OFF T2
ON
TIME
Example 1
NOTE:
• The sequential display speed (image interval) is set to T1 or T2 in the (MONITOR
SET) menu. The default setting for T1 and T2 is 1 second (see page 22).
• The sequential display speed (image interval) T1 or T2 can be set for each camera
in the (TIMER SET) menu.
Example 2
(DISPLAY SET)
CLOCK
OFF
TITLE
ON
1
2
In the (TIMER SET) menu, set the item “SEQ.” to “T1” or “T2”.
In the (MONITOR SET) menu, set the desired speed for items “FULL SEQ.
TIMER T1” and “FULL SEQ. TIMER T2”.
Example 1: Sequential display speed for daytime (7:30 AM ~ 7:30 PM)
Camera 1: T1 (2 sec.)
Camera 2: T2 (5 sec.)
Camera 3: T1 (2 sec.)
Camera 4: T2 (5 sec.)
Camera 5: T1 (2 sec.)
01
Camera 6: T2 (5 sec.)
Camera 7: T1 (2 sec.)
Camera 8: T2 (5 sec.)
LIVE
POSITION SET†PRESS NEXT
(MONITOR SET)
FULL SEQ.TIMER
T1
02 S
T2
05 S
QUAD SEQ.TIMER
01 S
QUADONLY QUADFULL N
Set the sequential display speed
(see page 22)
English
Example 2: Sequential display speed for nighttime (7:30 PM ~ 7:30 AM)
Camera 1: T1 (2 sec.)
Camera 2: T1 (2 sec.)
Camera 3: T1 (2 sec.)
Camera 4: T1 (2 sec.)
Camera 5: T2 (5 sec.)
01
Camera 6: T2 (5 sec.)
Camera 7: T2 (5 sec.)
Camera 8: T2 (5 sec.)
13
L8QR5/XE (VQC-801P, VQM-801P GB) 1999. 12. 2
VCR PLAYBACK MODE
(VIDEO OUT QUADFULL)
Operations with the monitor connected to
the VIDEO OUT QUADFULL terminal.
VIDEO OUT
VCR
1
2
3
4
QUAD
FULL
QUAD
ONLY
Press the VCR button.
The VCR playback mode is selected. When a tape is played back, the recording of
the live pictures will be displayed on the monitor.
Refer to the diagrams below for the buttons to press in order to select the desired
operation mode.
If live pictures are recorded in full screen mode, playback will only be available in full
screen mode. Quad screen playback of such a recording is not possible.
QUAD SCREEN OPERATIONS
Press the QUAD button.
01
02
03
04
The camera select indicators (1 – 4) light and quad screen A is displayed.
NOTE: It is not possible to switch to quad screen B of the recorded pictures.
QUAD
FULL SCREEN OPERATIONS
Press a camera select (1 – 4) button.
The recorded pictures from the selected camera will be displayed full screen.
04
1
2
3
4
5
6
7
8
NOTE:
• In full screen and quad screen modes, still and zoomed in image display modes
are not possible.
• If the recording has been made using the quad screens (A and B) auto switching,
and if, for example, camera select button 1 is pressed, the display will switch
between the images from camera 1 and camera 5.
Full screen sequential display at 1 second interval
Press the SEQUENCE button.
The pictures are displayed sequentially at 1 second interval. The camera select
indicators (1 – 4) light sequentially according to the displayed camera.
SEQUENCE
01
02
03
04
NOTE:
• The sequential display speed (image interval) is set in the (MONITOR SET) menu.
To change the sequence speed setting, refer to “FULL SEQ. TIMER” on page 22.
• The sequential display speed (image interval) “FULL SEQ. TIMER T1” or “T2” can
be set for each camera in the (TIMER SET) menu.
14
English
L8QR5/XE (VQC-801P, VQM-801P GB) 1999. 12. 2
MENU SETTING MODE
MENUS DISPLAYS
To display the menus, press the MENU button.
Menu 1
Menu 2
MENU
(CLOCK SET)
01-01-2000 SAT 00:00:00
(LANGUAGE/LANG./SPRACHE)
ENGLISH
FRANCAIS
STILL
STILL
DEUTSCH
EXIT
(SUMMER TIME SET)
MODE
NO USE
WEEK MON TIME
ON
LST-SUN 03 02:00
OFF LST-SUN 10 02:00
MENU
EXIT
Menu 3
(TITLE SET)
STILL
1
2
3
4
5
6
7
8
EXIT
TITLE
---------1
---------2
---------3
---------4
---------5
---------6
---------7
---------8
MENU
Menu 4
STILL
(ALARM SET)
BUZZER
ON
DURATION
10 S
RETRIGGER
OFF
DATA
ON
VIDEO OUT
FULL
MENU
MENU
EXIT
DOUBLE ALARM
SWITCH
Menu 5
(Monitor)
STILL
MENU
EXIT
CAM1 OFF
Menu 6
(TIMER SET)
00:00
00:00
SEQ. QUAD SEQ. QUAD
CAM1 T1
ON
T1
ON
CAM2 T1
ON
T1
ON
CAM3 T1
ON
T1
ON
CAM4 T1
ON
T1
ON
CAM5 T1
ON
T1
ON
CAM6 T1
ON
T1
ON
CAM7 T1
ON
T1
ON
CAM8 T1
ON
T1
ON
TIME
STILL
EXIT
MENU
Menu 7
(DISPLAY SET)
CLOCK
OFF
TITLE
ON
CAM1
CAM1
CAM3
CAM4
LIVE
STILL
EXIT
POSITION SET†PRESS NEXT
(MONITOR SET)
FULL SEQ.TIMER
T1
01 S
T2
01 S
QUAD SEQ.TIMER
01 S
QUADONLYíQUADFULL N
ZOOM
MENU
NEXT
ZOOM
Menu 8
return
STILL
EXIT
(VIDEO LOSS SET)
VIDEO LOSS
ON
DATA
ON
DISPLAY
FREEZE
(RS232C SET)
DATA SPEED
19200
MENU
Menu 9
STILL
EXIT
1
2
3
4
5
6
7
8
(ALARM DATA)
1/13
CAM DATE TIME ITEM
-- ----- --:-- -- ----- --:-- -- ----- --:-- -- ----- --:-- -- ----- --:-- -- ----- --:-- -- ----- --:-- -- ----- --:-- -
Normal live picture display
English
15
MENU
NEXT
L8QR5/XE (VQC-801P, VQM-801P GB) 1999. 12. 2
LANGUAGE SETTING
Menu 1
(LANGUAGE/LANG./SPRACHE)
The default menu language is English. The available language
settings are English, French and German.
Setting the language
1
2
3
Press the MENU button once to display the
(LANGUAGE/LANG./SPRACHE) menu.
Press the l button to highlight the desired language.
☞ Press the MENU button to go to the next menu, or
☞ Press the EXIT button to exit the menu display, the
selected language is set.
All the on-screen menus and settings will be displayed in
the selected language.
(LANGUAGE/LANG./SPRACHE)
(HORLOGE)
01-01-2000 SAM 00:00:00
ENGLISH
MODE
FRANCAIS
MAR
ARR
DEUTSCH
MENU
(HEURE ETE)
NON
SEM.
MOIS HEURE
DER-DIM 03 02:00
DER-DIM 10 02:00
LIVE
(UHRZEIT)
01-01-2000 SA 00:00:00
(SOMMERZEIT
BETRIEBSART
WOCHE
EIN LZT-SO
AUS LZT-SO
EINST.)
AUS
MT ZEIT
03 02:00
10 02:00
16
English
L8QR5/XE (VQC-801P, VQM-801P GB) 1999. 12. 2
CLOCK AND SUMMER TIME SETTING
TO MAKE CHANGES TO THE SETTINGS
(CLOCK SET)
1
The default setting is as indicated below. The clock will start
after the actual time and date are set and the operations under
(SUMMER TIME SET) are completed.
Default clock settings: 01:01:2000 SAT 00:00:00
(January 1, 2000 at 00:00)
1
2
3
2
Press the MENU button twice to display the (CLOCK
SET) menu.
Example: Setting the clock to October 15, 1999 at 3:20 PM
1 Press the + (or –) button to set the day (15), then press
the c button.
2 Press the + (or –) button to set the month (10), then
press the c button.
3 Press the + (or –) button to set the year (1999), then
press the c button.
4 Press the + (or –) button to set the hours (15), then
press the c button.
5 Press the + (or –) button to set the minutes (20), then
press the c button.
NOTE: The day of the week (SAT) will be automatically set
according to the date entered.
☞ Press the l button to go to the (SUMMER TIME SET)
3
menu.
☞ Press the MENU button to go to the next menu
screen, or
☞ Press the EXIT button to exit the menu display.
2-1
QUAD
VCR
Example: Setting the summer time from the second
Tuesday of May at 3:00 AM, to the fourth
Tuesday of September at 3:00 AM.
1 Press the + (or –) button to set the WEEK (2ND), then
press the c button.
Setting: 1ST, 2ND, 3RD, 4TH or LST (first, second,
third, fourth or last)
2 Press the + (or –) button to set the WEEK (TUE), then
press the c button.
Setting: SUN, MON, TUE, WED, THU, FRI, SAT or SUN
3 Press the + (or –) button to set the MON (05), then press
the c button.
Setting: 1, 2, 3, 4 ..... 11, 12
(for January, February, March ..... December)
4 Press the + (or –) button to set the TIME (03), then press
the c button.
• Following the same procedure as above, set when the
time is changed back from daylight saving time to
standard time (the OFF settings).
☞ Press the MENU button to go to the next menu
screen, or
1
(CLOCK SET)
15-10-1999 FRI 15:20:00
QUAD
Press the l button to highlight the NO USE setting,
then press the + (or –) button to select “USE”, and
press the l button one more time.
☞ Press the EXIT button to exit the menu display.
2-2~5
(CLOCK SET)
15-01-2000 SAT 00:00:00
2-1
(SUMMER TIME SET)
MODE
USE
WEEK MON TIME
ON
LST-SUN 03 02:00
OFF LST-SUN 10 02:00
(SUMMER TIME SET)
MODE
USE
WEEK MON TIME
ON
2ND-SUN 03 02:00
OFF LST-SUN 10 02:00
LIVE
QUAD
LIVE
LIVE
2-2
NOTE: To set the display mode for the clock, refer to
“DISPLAY SET (CLOCK, TITLE)” on page 22.
QUAD
VCR
2-4
(SUMMER TIME SET)
MODE
USE
WEEK MON TIME
ON
2ND-TUE 05 03:00
OFF LST-SUN 10 02:00
The default summer time function setting is “NO USE”, so the
summer adjustment will not be made.
If the unit will be used in an area where there is a summer time
change, set it to “USE”, then if necessary, set when the summer
time is changed.
QUAD
The default settings are:
Summer time from the last Sunday of March, at 2:00 AM
(LST-SUN 03 02:00) to last Sunday of October, at 2:00 AM
(LST-SUN 10 02:00).
17
QUAD
VCR
2-3
(SUMMER TIME SET)
MODE
USE
WEEK MON TIME
ON
2ND-TUE 03 02:00
OFF LST-SUN 10 02:00
(SUMMER TIME SET)
English
Menu 2
LIVE
(SUMMER TIME SET)
MODE
USE
WEEK MON TIME
ON
2ND-TUE 05 02:00
OFF LST-SUN 10 02:00
QUAD
VCR
L8QR5/XE (VQC-801P, VQM-801P GB) 1999. 12. 2
CAMERA TITLE SETTING
Menu 3
When a picture from a camera is displayed on-screen the camera number (1 to 8) is displayed at the bottom of the image. You can
enter a camera title, such as the camera location (up to 10 characters), that will be displayed instead of the camera number.
(TITLE SET)
1
2
3
Press the MENU button 3 times to display the (TITLE
SET) menu.
2-1
Example: To set the title “GATE-1F” for the camera 1
and “HALL-2F” for camera 2.
1 Press the + (or –) button to set the first character “G”,
then press the c button.
By pressing the + (or –) button repeatedly, the characters
are selected as follows:
• Letters: A, B, C,....X, Y, Z
• Numbers: 0, 1,....8, 9
• Symbols: – : . / * _
2 Following the same procedure, enter the rest of the title
“ATE-1F”.
3 Press the l button to set the cursor at the first character
location for camera 2.
Press the + (or –) button to set first character “H”, then
press the c button.
4 Following the same procedure, enter the rest of the title
“ALL-2F”.
2-2
(TITLE SET)
1
2
3
4
5
6
7
8
(TITLE SET)
TITLE
G--------1
---------2
---------3
---------4
---------5
---------6
---------7
---------8
QUAD
1
2
3
4
5
6
7
8
VCR
QUAD
2-3
☞ Press the MENU button to go to the next menu
screen, or
☞ Press the EXIT button to exit the menu display.
LIVE
VCR
2-4
(TITLE SET)
1
2
3
4
5
6
7
8
TITLE
GATE-1F--1
---------2
---------3
---------4
---------5
---------6
---------7
---------8
(TITLE SET)
TITLE
GATE-1F--1
H--------2
---------3
---------4
---------5
---------6
---------7
---------8
QUAD
1
2
3
4
5
6
7
8
VCR
TITLE
GATE-1F--1
HALL-2F--2
---------3
---------4
---------5
---------6
---------7
---------8
QUAD
VCR
NOTE: To set the display mode for the title, refer to
“DISPLAY SET (CLOCK, TITLE)” on page 22.
18
English
L8QR5/XE (VQC-801P, VQM-801P GB) 1999. 12. 2
ALARM SETTING
Menu 4
When an alarm trigger is received from sensors such as a door bell, movement sensor, etc. you can set the display mode and the
recording mode for the pictures from the concerned camera.
VIDEO OUT (A)
(ALARM SET)
(ALARM SET)
BUZZER
ON
DURATION
10 S
RETRIGGER
ON
DATA
ON
VIDEO OUT
FULL
Changing the Settings
1
2
3
4
Press the MENU button 4 times to display the (ALARM
SET) menu.
DOUBLE ALARM
(ALARM SET)
BUZZER
ON
DURATION
10 S
RETRIGGER
ON
DATA
ON
VIDEO OUT
NC
SWITCH
Press the l button to highlight the setting to modify.
Using the + (or –) button, select the desired setting,
then press the l button.
• Repeat step 3, until all the settings are as desired.
(ALARM SET)
BUZZER
ON
DURATION
10 S
RETRIGGER
ON
DATA
ON
VIDEO OUT
QUAD
STILL
OFF
ZOOM
OFF
☞ Press the MENU button to go to the next menu
screen, or
☞ Press the EXIT button to exit the menu display.
1, 2
3
(ALARM SET)
BUZZER
ON
DURATION
10 S
RETRIGGER
OFF
DATA
ON
VIDEO OUT
FULL
DOUBLE ALARM
SWITCH
LIVE
FULL: If an alarm trigger is received while in quad screen, the
picture from the camera corresponding to the alarm input
will be displayed full screen. (Default setting)
(ALARM SET)
BUZZER
ON
DURATION
10 S
RETRIGGER
OFF
DATA
ON
VIDEO OUT
FULL
DOUBLE ALARM
QUAD
DOUBLE ALARM
SWITCH
This item is only displayed and can only be set if “VIDEO
OUT” above is set to “FULL”.
SWITCH: The picture from each concerned camera will be
displayed sequentially at 1 second interval.
(Default setting)
FIRST: The picture from the first alarm received only is displayed.
LAST: The picture from the last alarm received is displayed.
LIVE
ALARM SET menu
BUZZER
VIDEO OUT (B)
ON: A buzzer will be heard when an alarm trigger is received.
(Default setting)
OFF: The buzzer will not be heard.
QUAD: If an alarm trigger is received while in full screen, the
display mode will switch to quad screen.
STILL
DURATION
ON:
The image from the camera corresponding to the
alarm trigger will be frozen.
OFF: The image will not be frozen. (Default setting)
The alarm duration can be set to: 1, 2, 3, 4, 5, 10 (Default
setting), 30 seconds, CC, NC
CC: The alarm will go on for as long as the alarm signal is
received (minimum 1 second).
NC: The alarm will continue until canceled.
ZOOM
ON:
The image from the camera corresponding to the
alarm trigger will be zoomed in.
OFF: The image will not be zoomed in. (Default setting)
RETRIGGER
To set if an alarm is received while the unit is already in alarm
mode.
OFF: The unit will not receive another alarm, while one is
already being received. (Default setting)
ON: During alarm mode, other alarm triggers will be received
and the alarm duration will be extended.
VIDEO OUT (C)
NC: The display mode will remain unchanged when an alarm
trigger is received.
DATA
The camera number, date, time, type of the alarm can be
recorded. (To view the recorded alarm data, refer to “ALARM
DATA DISPLAY” on page 26.)
ON: The alarm data is recorded. (Default setting)
OFF: The alarm data is not recorded.
English
19
L8QR5/XE (VQC-801P, VQM-801P GB) 1999. 12. 2
VIDEO SENSOR SETTING
Menu 5
You can set an area of the image on the screen to be used as a video sensor ( ). The video sensor detects movement in the selected
area of the image and sends an alarm trigger that will initiate priority recording of the images from the concerned camera.
VIDEO SENSOR ALARMS
(VIDEO SENSOR SET)
Example: If an alarm trigger is received for camera 4
SETTING THE VIDEO SENSOR POSITION AND
SENSITIVITY LEVEL
1
2
3
4
(in quad screen)
1
Press the MENU button 5 times to display the video
sensor setting screen.
The video sensor is displayed on the live picture from
camera 1.
Press the NEXT button repeatedly to select the video
sensor setting screen for the other cameras.
2
The buzzer is heard and the camera 4 indicator light.
The alarm output changes from HI (5V) to LOW (0V).
The image from camera 4 and the camera number (04)
will be displayed, SA (Video Sensor Alarm) will flash at
the left of the camera number.
Using the l (or c) button move the video sensor down
(or right) to the desired alarm sensor area position.
SA
Press the + (or –) button to raise (or lower) the sensor
sensitivity level.
The available sensitivity levels are:
OFF (not used), 01, 02, 03, 04, 05, 06, 07, 08, 09, 10 (10
being the least sensitive)
(ALARM SET)
BUZZER
ON
DURATION
10 S
RETRIGGER
ON
DATA
ON
VIDEO OUT
FULL
DOUBLE ALARM
screen, or
☞ Press the EXIT button to exit the menu display.
01
02
03
04
SWITCH
(ALARM SET)
BUZZER
ON
DURATION
10 S
RETRIGGER
ON
DATA
ON
VIDEO OUT
QUAD
STILL
OFF
ZOOM
OFF
2
Video sensor
Camera number
Example of display when there is an alarm trigger.
☞ Press the MENU button to go to the next menu
1
04
Video sensor alarm
01
LIVE
CAM1 OFF
SA
01
SA 01
02
03
04
SA B Z 01
02
03
04
(ALARM SET)
BUZZER
ON
DURATION
10 S
RETRIGGER
ON
DATA
ON
VIDEO OUT
QUAD
STILL
ON
ZOOM
ON
CAM1 OFF
01
3
01
02
03
04
QUAD
CAM1 03
NOTE: The display mode (quad or full screen) selected for the
alarm operation is set by the item “VIDEO OUT” in the
(ALARM SET) menu (see page 19).
Sensitivity Level
Resetting the Alarm
•
•
For an alarm in full screen display mode, press the
corresponding camera select button twice.
For an alarm in quad screen display mode, press the
corresponding camera select button to switch to full screen
display mode then press the corresponding camera select
button one more time.
NOTE:
• During normal monitoring operations, the camera select
indicator lights according to the displayed camera. If there is
an alarm trigger for another camera, the indicator will flash.
• When in quad screen A, even if a video sensor alarm is
triggered at a quad screen B camera, the display will not
switch to quad screen B.
20
English
L8QR5/XE (VQC-801P, VQM-801P GB) 1999. 12. 2
TIMER SETTING
Menu 6
The timer can be set to record during the daytime and/or nighttime. According to the timer settings, each camera picture full screen
display switching speed can be set, and the cameras to be displayed in the quad screens can be selected.
(TIMER SET)
1
2
3
Daytime start time
(TIMER SET)
00:00
00:00
SEQ. QUAD SEQ. QUAD
CAM1 T1
ON
T1
ON
CAM2 T1
ON
T1
ON
CAM3 T1
ON
T1
ON
CAM4 T1
ON
T1
ON
CAM5 T1
ON
T1
ON
CAM6 T1
ON
T1
ON
CAM7 T1
ON
T1
ON
CAM8 T1
ON
T1
ON
Press the MENU button 6 times to display the (TIMER
SET) menu.
TIME
Set the daytime period start and end times.
Example: To set the daytime period from 7:30 AM to
7:30 PM (the nighttime will then be from 7:30
PM to 7:30 AM).
1 Using the + (or –) button, select the starting hour (7) (the
first part of the first setting of the TIME line).
2 Press the c button, then using the + (or –) button select
the starting minutes (30) (the second part of the first
setting of the TIME line).
3 Press the c button, then using the + (or –) button select
the end hour (19) (the first part of the second setting of
the TIME line).
4 Press the c button, then using the + (or –) button select
the end minutes (30) (the second part of the second
setting of the TIME line).
Daytime setting area
2-1
Nighttime setting area
2-2
(TIMER SET)
TIME 07:00
00:00
SEQ. QUAD SEQ. QUAD
CAM1 T1
ON
T1
ON
CAM2 T1
ON
T1
ON
CAM3 T1
ON
T1
ON
CAM4 T1
ON
T1
ON
CAM5 T1
ON
T1
ON
CAM6 T1
ON
T1
ON
CAM7 T1
ON
T1
ON
CAM8 T1
ON
T1
ON
(TIMER SET)
TIME 07:30
00:00
SEQ. QUAD SEQ. QUAD
CAM1 T1
ON
T1
ON
CAM2 T1
ON
T1
ON
CAM3 T1
ON
T1
ON
CAM4 T1
ON
T1
ON
CAM5 T1
ON
T1
ON
CAM6 T1
ON
T1
ON
CAM7 T1
ON
T1
ON
CAM8 T1
ON
T1
ON
QUAD
Set the timer operations for each (daytime/nighttime)
period.
(Daytime)
1 Press the l button, then using the + (or –) button select
the switching speed “T1” or “T2” in the first SEQ. column
for camera 1.
(This sets the duration the image from camera 1 is
displayed, when in full screen mode, during the daytime
period.)
2 Press the c button, then using the + (or –) button select
“ON” or “OFF” in the first QUAD column for camera 1.
(This determines if the image from that camera is
displayed (ON) or not (OFF), when in quad screen mode,
during the daytime.)
(Nighttime)
3 Press the c button, then using the + (or –) button select
the switching speed “T1” or “T2” in the second SEQ.
column for camera 1.
(This sets the duration the image from camera 1 is
displayed, when in full screen mode, during the nighttime
period.)
4 Press the c button, then using the + (or –) button select
“ON” or “OFF” in the second QUAD column for camera 1.
(This determines if the image from that camera is
displayed (ON) or not (OFF), when in quad screen mode,
during the nighttime.)
VCR
VCR
QUAD
3-2
(TIMER SET)
TIME 07:30
19:30
SEQ. QUAD SEQ. QUAD
CAM1 T1
ON
T1
ON
CAM2 T1
ON
T1
ON
CAM3 T1
ON
T1
ON
CAM4 T1
ON
T1
ON
CAM5 T1
ON
T1
ON
CAM6 T1
ON
T1
ON
CAM7 T1
ON
T1
ON
CAM8 T1
ON
T1
ON
VCR
(TIMER SET)
TIME 07:30
19:30
SEQ. QUAD SEQ. QUAD
CAM1 T1
ON
T1
ON
CAM2 T1
ON
T1
ON
CAM3 T1
ON
T1
ON
CAM4 T1
ON
T1
ON
CAM5 T1
ON
T1
ON
CAM6 T1
ON
T1
ON
CAM7 T1
ON
T1
ON
CAM8 T1
ON
T1
ON
QUAD
VCR
QUAD
3-4
3-3
(TIMER SET)
TIME 07:30
19:30
SEQ. QUAD SEQ. QUAD
CAM1 T1
ON
T1
ON
CAM2 T1
ON
T1
ON
CAM3 T1
ON
T1
ON
CAM4 T1
ON
T1
ON
CAM5 T1
ON
T1
ON
CAM6 T1
ON
T1
ON
CAM7 T1
ON
T1
ON
CAM8 T1
ON
T1
ON
VCR
21
(TIMER SET)
TIME 07:30
19:30
SEQ. QUAD SEQ. QUAD
CAM1 T1
ON
T1
ON
CAM2 T1
ON
T1
ON
CAM3 T1
ON
T1
ON
CAM4 T1
ON
T1
ON
CAM5 T1
ON
T1
ON
CAM6 T1
ON
T1
ON
CAM7 T1
ON
T1
ON
CAM8 T1
ON
T1
ON
QUAD
3-1
screen or,
☞ Press the EXIT button to exit the menu display.
QUAD
2-4
(TIMER SET)
TIME 07:30
19:00
SEQ. QUAD SEQ. QUAD
CAM1 T1
ON
T1
ON
CAM2 T1
ON
T1
ON
CAM3 T1
ON
T1
ON
CAM4 T1
ON
T1
ON
CAM5 T1
ON
T1
ON
CAM6 T1
ON
T1
ON
CAM7 T1
ON
T1
ON
CAM8 T1
ON
T1
ON
☞ Press the MENU button to go to the next menu
English
VCR
2-3
NOTE: The settings for the sequential display speeds T1
and T2 are entered in the (MONITOR SET) menu.
4
Daytime end time
QUAD
(TIMER SET)
TIME 07:30
19:30
SEQ. QUAD SEQ. QUAD
CAM1 T1
ON
T1
ON
CAM2 T1
ON
T1
ON
CAM3 T1
ON
T1
ON
CAM4 T1
ON
T1
ON
CAM5 T1
ON
T1
ON
CAM6 T1
ON
T1
ON
CAM7 T1
ON
T1
ON
CAM8 T1
ON
T1
ON
VCR
QUAD
L8QR5/XE (VQC-801P, VQM-801P GB) 1999. 12. 2
CLOCK, TITLE DISPLAY AND MONITOR
SETTINGS
DISPLAY SET menu
(DISPLAY SET)
LIVE CLOCK
The clock and the camera title settings entered in the menus
(CLOCK SET) and (TITLE SET) can be displayed on-screen.
ON: The clock is displayed during live picture mode.
OFF: The clock is not displayed during live picture mode.
(Default setting)
SETTING THE CAMERA TITLE AND THE
CLOCK DISPLAY POSITION (POSITION SET)
1
2
3
4
5
6
LIVE TITLE
Press the MENU button 7 times to display the (DISPLAY
SET) menu.
ON: The camera title is displayed during live picture mode.
(Default setting)
OFF: The camera title is not displayed during live picture mode.
Using the + (or –) button, select the desired setting,
then press the l button.
• Following this procedure, select the settings for LIVE
CLOCK and TITLE.
(MONITOR SET)
From the (DISPLAY SET) menu, press the NEXT button.
The quad screen A display is selected.
You can set the sequential display speed T1 and T2, and the
quad screen A and B switching speed. Switching the display
mode on the monitor connected to the VIDEO OUT (QUAD
ONLY) terminal from quad screen to full screen display is also
possible in this menu.
These FULL and QUAD SEQ.TIMER settings must only be done
when not using a SW IN signal.
When using a SW IN signal, please refer to “Setting up the
VCR signal output (SW IN) automatic switching speed” on
page 26.
Using the + (or –) button, set the camera title display
position. (Select among the 3 positions.)
Using the l button, set the clock display position.
Press the NEXT button. The display will return to the
(DISPLAY SET) menu.
☞ Press the MENU button to go to the next menu
screen, or
☞ Press the EXIT button to exit the menu display.
2
MONITOR SET menu
3 (Quad screen A)
(DISPLAY SET)
LIVE
CLOCK
ON
TITLE
ON
POSITION SET†RESS
(MONITOR SET)
FULL SEQ.TIMER
T1
T2
QUAD SEQ.TIMER
QUADONLY QUADFULL
QUAD
CAM1
CAM2
CAM3
CAM4
Press the l button to select the desired item, then using the +
(or –) button, select the desired setting.
FULL SEQ. TIMER T1
NEXT
01 S
01 S
01 S
N
Set the desired speed at which the full screen image will be
switched. The sequential display speed T1 (or T2) setting is
applied in the (TIMER SET) menu (see page 21).
The automatic switching speed is entered in seconds of
interval.
01 (default), 02, 03, 04, 05, 10, 20, 30
1999-10-20
15:40:00
ZOOM
LIVE
NEXT
4
5
CAM1
CAM2
CAM3
CAM4
CAM1
CAM1
CAM3
Menu 7
FULL SEQ. TIMER T2
CAM2
Set the desired speed at which the full screen image will be
switched. The sequential display speed T2 (or T1) setting is
applied to each camera in the (TIMER SET) menu (see page 21).
The automatic switching speed is entered in seconds of
interval.
01 (default), 02, 03, 04, 05, 10, 20, 30, OFF
OFF: The camera this setting is applied to will be skipped.
CAM2
CAM4
CAM3
CAM4
1999-10-20
15:40:00
CAM1
CAM2
CAM3
CAM4
QUAD SEQ. TIMER
Set the desired speed at which the display will switch between
quad screen A and B.
The automatic switching speed is entered in seconds of
interval.
01 (default), 02, 03, 04, 05, 10, 20, 30
QUADONLY ← QUADFULL
Y: A quad screen and full screen display will be output to the
monitor connected to the QUADONLY terminal.
N (Default): A quad screen only will be output to the monitor
connected to the QUADONLY terminal.
NOTE: For more information on the monitor displays, please
refer to Table 1 and 2 (see pages 23, 24).
22
English
L8QR5/XE (VQC-801P, VQM-801P GB) 1999. 12. 2
CLOCK, TITLE DISPLAY AND MONITOR SETTINGS
Menu 7
Display when no switching signal input is present (Table 1)
(MENITOR SET) menu
Quad screen A or
B display
QUAD
Quad screen A or
B automatic
switching display
SEQUENCE
QUADONLY ← QUADFULL setting
N (normal setting)
Image output at the VIDEO OUT terminal
QUAD ONLY
• Either setting (Y or N)
Quad screen A or B (manual switching
possible)
QUAD FULL
• Either setting (Y or N)
Quad screen A or B (manual switching
possible)
QUAD ONLY
• Either setting (Y or N)
Automatic switching of the display will
depend on the quad screen A/B settings
entered in the (TIMER SET) menu.
01
02
01
02
03
04
03
04
01
02
01
02
03
04
03
04
01
02
03
04
Full screen display
02
03
04
06
08
01
02
03
04
07
08
01
02
03
04
06
07
QUAD ONLY
• N setting:
Quad screen A or B
• Y setting:
Full screen display of a live picture
(manual switching possible)
01
06
07
QUAD FULL
• Either setting (Y or N)
Automatic switching of the display will
depend on the quad screen A/B settings
entered in the (TIMER SET) menu.
Y
08
01
02
03
04
06
07
08
01
QUAD FULL
• Either setting (Y or N)
Full screen display of a live picture
(manual switching possible)
01
01
1
(1 – 8)
Automatic
switching display
SEQUENCE
QUAD ONLY
• N setting:
Quad screen A or B
• Y setting:
Full screen display of a live picture
switched according to the setting entered
in the menu
01
02
03
04
01
QUAD FULL
• Either setting (Y or N)
Full screen display of a live picture
switched automatically according to the
setting entered in the menu
01
English
23
01
L8QR5/XE (VQC-801P, VQM-801P GB) 1999. 12. 2
CLOCK, TITLE DISPLAY AND MONITOR SETTINGS
Menu 7
Display when a switching signal input is present (Table 2)
(MONITOR SET) menu
Quad screen A or
B display
QUAD
Quad screen A or
B automatic
switching display
SEQUENCE
Full screen display
QUADONLY ← QUADFULL setting
N (normal setting)
Image output at the VIDEO OUT terminal
QUAD ONLY
• Either setting (Y or N)
Quad screen A or B (manual switching
possible)
QUAD FULL
• Either setting (Y or N)
Quad screen A or B (manual switching
possible)
QUAD ONLY
• Either setting (Y or N)
Automatic switching of quad screen A/B
according to the switching signal input at
the SW terminal.
The minimum switching speed delay will
be 1 second.
QUAD FULL
• Either setting (Y or N)
Automatic switching of quad screen A/B
according to the switching signal input at
the SW terminal.
The minimum switching speed delay will
be 1 second.
QUAD ONLY
• N setting:
Automatic switching of quad screen A/B
according to the switching signal input at
the SW terminal.
The minimum switching speed delay will
be 1 second.
• Y setting:
Full screen display of a live picture
(manual switching possible)
QUAD FULL
• Either setting (Y or N)
Full screen display of a live picture
(manual switching possible)
Y
01
02
01
02
03
04
03
04
01
02
01
02
03
04
03
04
01
02
03
04
01
02
03
04
06
07
06
08
01
02
03
04
07
01
02
03
04
06
07
08
01
02
03
04
06
07
(1 – 8)
Automatic
switching display
SEQUENCE
QUAD ONLY
• N setting:
Automatic switching of quad screen A/B
according to the switching signal input at
the SW terminal.
The minimum switching speed delay will
be 1 second.
• Y setting:
Automatic switching of a full screen display
of a live picture according to the switching
signal input at the SW terminal
QUAD FULL
• N setting:
Full screen display of a live picture
switched automatically according to the
setting entered in the menu
• Y setting:
Automatic switching of a full screen display
of a live picture according to the switching
signal input at the SW terminal.
The minimum switching speed delay will
be 1 second.
24
08
06
07
01
08
01
1
08
01
02
03
04
01
06
07
01
01
08
01
English
L8QR5/XE (VQC-801P, VQM-801P GB) 1999. 12. 2
VIDEO LOSS SETTING AND COMPUTER
CONTROL SETTING
DISPLAY
(VIDEO LOSS SET)
You can set the display mode when there is an interruption in
the video signal feed.
FREEZE: When there is video loss, the image just previous to
the interruption is frozen on-screen. (Default setting)
TEST:
When there is video loss, colour bars are displayed
on-screen.
When the live picture signal feed is interrupted, you can set the
action taken, and if the video loss is recorded as alarm data.
This function will only operate in quad screen display, to select it,
set “VIDEO LOSS” to “ON”.
Setting the Video Loss Mode
1
2
3
NOTE: If the (VIDEO LOSS SET) menu, “DISPLAY” is set to
“FREEZE”, when there is a loss of the video signal,
“VIDEO LOSS” and the image just previous to the
interruption will be shown frozen on screen. To switch to
a colour bars display, press the camera select button or
QUAD button.
Press the l button to highlight the setting to modify.
Using the + (or –) button, select the desired setting,
then press the l button.
Following this procedure, select the settings for DATA and
DISPLAY.
☞ Press the l button to go to the next menu, or
☞ Press the MENU button to go to the next menu
(RS232C SET)
screen, or
Connect this unit to a computer, using a 9-pin D-SUB cable (sold
separately), then set the maximum communication speed with
the computer.
For detailed information, refer to “RS232C CONTROL” on page
28.
☞ Press the EXIT button to exit the menu display.
1, 2
(VIDEO LOSS SET)
VIDEO LOSS
ON
DATA
ON
DISPLAY
FREEZE
LIVE
Changing the Setting
QUAD
1
2
Press the l button to highlight the setting to modify.
3
☞ Press the MENU button to go to the next menu
VIDEO LOSS SET menu
VIDEO LOSS
Using the + (or –) button, select the desired setting.
The available speeds are:
2400, 4800, 9600, 19200 (Default setting) bps
screen, or
You can set the action to take when there is an interruption in
the video signal feed.
ON: When there is video loss, the image just previous to the
interruption is frozen on-screen or colour bars are displayed
(see “DISPLAY” right) and “VIDEO LOSS” is displayed
on-screen. (Default setting)
OFF: When there is video loss, “NO VIDEO” is displayed
on-screen.
☞ Press the EXIT button to exit the menu display.
1, 2
(VIDEO LOSS SET)
VIDEO LOSS
ON
DATA
ON
DISPLAY
FREEZE
(RS232C SET)
DATA SPEED
19200
LIVE
NOTE: If no camera is connected to one of the terminals, then
“NO VIDEO” will be displayed on a grey screen. This will
not trigger a video loss alarm.
DATA
You can set the data (date, time, etc) of the video losses to be
recorded as alarm data. (To view the recorded data, refer to
“ALARM DATA DISPLAY” on page 26.)
ON: The video losses data is recorded as alarm data. (Default
setting)
OFF: The video losses data is not recorded.
English
Menu 8
25
QUAD
L8QR5/XE (VQC-801P, VQM-801P GB) 1999. 12. 2
ALARM DATA
DISPLAY
SETTING UP THE VCR
SIGNAL OUTPUT (SW IN)
AUTOMATIC SWITCHING
SPEED
Menu 9
According to the settings entered in the (ALARM SET), (VIDEO
SENSOR SET) and (VIDEO LOSS SET) menus, information
about the alarms (alarm data) can be recorded. Up to 100 alarm
data entries can be displayed on-screen (on up to 13 screens).
1
(ALARM DATA)
2
Set the VCR recording speed.
The settings entered for the SEQ. TIMER in menu 7 (MONITOR
SET) will be ignored, and the full screen image and quad screen
(A and B) switching speeds will be the speed set by the VCR.
Displaying the Alarm Data
1
2
3
Connect the unit SW IN terminal to the VCR SW OUT
terminal (see page 5).
Press the MENU button 9 times to display the (ALARM
DATA) menu.
• The first screen (1/13) of alarm data entries is displayed.
NOTE:
• Even if the screens switching speed is set to a very quick
timing, the minimum switching speed delay will be 1 second.
• Even when the switching timing is set using the SW IN
terminal signal, the minimum switching speed delay will be 1
second (see page 24).
To display the next screen of alarm data entries, press
the NEXT button.
☞ Press the EXIT button to exit the menu display, or
☞ Press the MENU button to return to the normal
picture, then press the MENU button once more to
display the menu display.
1
2
1
2
3
4
5
6
7
8
(ALARM DATA)
1/13
CAM DATE TIME ITEM
4 08-22 08:48 E
2 08-21 08:51 S
4 05-04 16:22 E
3 05-04 07:45 V
1 04-30 14:37 E
1 04-21 18:26 V
2 04-12 05:31 E
4 04-12 12:51 S
9
10
11
12
13
14
15
16
(ALARM DATA)
2/13
CAM DATE TIME ITEM
4 03-29 17:40 E
2 03-26 08:49 V
4 03-13 09:25 E
3 03-05 08:15 S
1 02-11 15:18 E
1 02-29 12:30 V
2 02-21 08:21 S
4 01-15 11:34 E
MENU
ZOOM
NEXT
The codes in the ITEM column indicate the type of alarm
data.
E: External alarm trigger (see page 27)
V: Video loss (see page 25, 27)
S: Video sensor alarms (see page 20, 27)
NOTE:
• When the number of recorded alarm data entries reaches
100, the oldest ones are erased as new ones are recorded.
• The alarm data screens are only displayed when alarm data
entries are recorded.
26
English
L8QR5/XE (VQC-801P, VQM-801P GB) 1999. 12. 2
ALARMS OPERATIONS
There are three types of alarms; the alarms set by an external alarm trigger, the alarms set by a loss of the video signal and the alarms
set by the video sensor.
EXTERNAL ALARMS
VIDEO LOSS ALARM
When external inputs such as a door bell, an interphone, etc.,
are connected to the CONTROL terminal (pins 1 – 8), they will
send alarm triggers automatically. On the monitor screen, the
alarm display will identify the camera corresponding to the alarm
trigger.
If there is an interruption of the video signal, the buzzer is heard,
and the image just previous to the interruption is frozen
on-screen or colour bars are displayed and “VIDEO LOSS” will
flash on-screen.
The action taken will depend on the settings entered in the
(VIDEO LOSS SET) menu (see page 25).
Example: If an alarm trigger is received for camera 4
(in quad screen)
1
2
The buzzer is heard and the camera 4 indicator flashes.
The alarm output changes from HI (5V) to LOW (0V).
External alarm
VIDEO LOSS
VIDEO LOSS
VIDEO LOSS
VIDEO LOSS
VIDEO LOSS
04
Resetting the Alarm
Camera number
•
•
For an alarm in full screen display mode, press the
corresponding camera select button.
For an alarm in quad screen display mode, press the
corresponding camera select button to switch to full screen
display mode. Then, press the corresponding camera select
button one more time.
NOTE:
• The alarm display mode is selected according to the settings
entered in the (ALARM SET) menu.
• During normal monitoring operations the camera select
indicator lights according to the displayed camera. If there is
an alarm trigger for another camera, the indicator will flash.
• If the alarm is not reset, “VIDEO LOSS” will be displayed until
normal live picture signals are restored.
Resetting the Alarm
•
VIDEO LOSS
NOTE:
• If a video signal is not present from the beginning, then “NO
VIDEO” will be displayed on a gray screen. This will not
trigger a video loss alarm.
• The video loss alarm is recorded until the video signal is
restored.
• In full screen display mode, video loss alarm is not possible.
NOTE:
• When the alarm operation is over, the display will return to
the mode preceding the alarm trigger.
• An alarm trigger can also be received at a terminal for which
a camera is not connected to. In such a case, a grey screen
will be displayed.
• The display mode (quad or full screen) selected for the alarm
operation is set by the item “VIDEO OUT” in the (ALARM
SET) menu.
•
VIDEO LOSS
(Colour bars)
The image from camera 4 and the camera number (04)
will be displayed, EA (External Alarm) will flash at the
left of the camera number.
The action taken here will depend on the settings entered in
the (ALARM SET) menu (see page 19).
EA
VIDEO LOSS
For an alarm in full screen display mode, press the
corresponding camera select button twice.
For an alarm in quad screen display mode, press the
corresponding camera select button to switch to full screen
display mode then press the corresponding camera select
button one more time.
VIDEO SENSOR ALARMS
The video sensor area is set in the (VIDEO SENSOR SET)
menu. The brightness and contrast levels in the video sensor
frame are used to trigger the alarm, and the alarm display (type
of alarm and camera number) is shown on a live picture of the
alarm trigger channel (see page 20).
NOTE:
• The alarm display mode is selected according to the settings
entered in the (DISPLAY SET) menu.
• During normal monitoring operations the camera select
indicator lights according to the displayed camera. If there is
an alarm trigger for another camera, the indicator will flash.
SA
Video sensor alarm
English
27
04
Camera number
L8QR5/XE (VQC-801P, VQM-801P GB) 1999. 12. 2
RS232C CONTROL
CONNECTION
COMMANDS
Connect a 9-pin D-SUB cable (sold separately) from the
RS232C terminal on the rear panel to the computer serial
connector.
COMMANDS AVAILABLE FROM THE
COMPUTER
1-8 (90-97)
To select the picture from a camera to be displayed full screen.
Computer
QUAD (83)
To display a quad screen.
CONTROL
RC C SW C AL C 1 2 3 4 5 6 7 8
SEQUENCE (87)
In full screen mode, the display will be switched in order,
automatically.
In quad screen mode, the display will switch between quad
screen A and B automatically.
RS232C
9-pin D-SUB cable
(sold separately)
ZOOM (85)
To zoom a picture in quad screen.
Setting the Data Transmission Speed
After the connection is made, set the data transmission speed in
the (RS232C SET) menu (see page 25).
STILL (86)
To freeze a picture in quad screen.
LIVE (80)
To select the live input mode.
INTERFACE SPECIFICATIONS
For the RS232C terminal specifications, refer to page 4.
VCR (81)
To select the VCR playback input mode.
DATA FORMAT
Mode
Asynchronous
Character length
8 bits
Data transmission
speed
2400, 4800, 9600, 19200 bps
(set in the (RS232C SET) menu)
Parity check
None
Stop bit
One bit
MENU (74)
To display the menu or switch to the next menu.
+ (65), – (66)
To select settings for the menu items (ON/OFF, etc.)
« (63), 2 (64)
To change selection in the menus. (To move the cursor right,
down.)
TRANSMISSION PROTOCOL
NEXT (75)
To switch to the sub-menus.
The transmission is based on 1 byte units. After the computer
has transmitted 1 byte, it will wait for an answer from this unit,
then send the following byte of data.
The command ON (F6) is sent to start, and the command OFF
(F7) is sent to finish. This unit will receive the commands, and
will reply to each command by ACK (OA). (Refer to “COMMAND
TABLE 4” on page 31.)
EXIT (76)
To go to the next menu, or to exit the menu mode.
MENU RESET (E1)
To reset all the values of the displayed menu to the default
values.
CLOCK ADJUST (E0)
To reset the clock minutes and seconds setting to 00:00.
SECURITY LOCK ON (69)
To set the security lock.
SECURITY LOCK OFF (6A)
To cancel the security lock.
28
English
L8QR5/XE (VQC-801P, VQM-801P GB) 1999. 12. 2
RS232C CONTROL
INFORMATION GATHERING COMMANDS
STATUS SENSE(D7)
ALARM STATUS SENSE(D5)
When this command is sent from the computer, this unit will
send a 5-byte response (see Table 1).
The external, video loss and video sensor alarm states are
indicated by a 6-byte response (see Table 2).
RXD
TXD
RXD
TXD
D7
d1
d2
d3
d4
d5
STATUS SENSE(D7) byte assignment (Table 1)
6
5
4
3
2
1
0
3-bit indication of the
display mode
4-bit indication of the
channels and quad
screen displayed
First byte
Bit
7
6
5
4
3
2
1
0
Bit state information
0: LIVE picture mode
1: VCR playback mode
000: Full screen
001: Quad screen
010: Menu display
(Full screen mode)
0000: Channel 1
0001: Channel 2
0010: Channel 3
0011: Channel 4
(Quad screen)
0000: Quad screen A (1, 2, 3, 4)
0001: Quad screen B (5, 6, 7, 8)
(Menu display)
0000: Menu 1
(LANGUAGE/LANG./SPRACHE)
0001: Menu 2 (CLOCK SET)
0010: Menu 3 (TITLE SET)
0011: Menu 4 (ALARM SET)
0100: Menu 5 (VIDEO SENSOR SET)
0101: Menu 6 (TIMER SET)
0110: Menu 7 (DISPLAY SET)
0111: Menu 8 (VIDEO LOSS SET)
1111: Menu 9 (ALARM DATA)
English
ALARM ON 8
ALARM ON 7
ALARM ON 6
ALARM ON 5
ALARM ON 4
ALARM ON 3
ALARM ON 2
ALARM ON 1
Third byte
Bit
7
6
5
4
3
2
1
0
SENSOR 8
SENSOR 7
SENSOR 6
SENSOR 5
SENSOR 4
SENSOR 3
SENSOR 2
SENSOR 1
Fifth byte
Bit
7
6
5
4
3
2
1
0
Second byte
Bit
7 EXT/ALARM
indication
6 VIDEO LOSS
indication
5 SENSOR indication
4 Reserved
3 4-bit indication of the
2 display mode
1
0
d1
d2
d3
d4
d5
d6
ALARM STATUS SENSE(D5) byte assignment
(Table 2)
The third, fourth and fifth bytes are reserved.
First byte
Bit
7 LIVE/VCR indication
D5
Bit state information
EXTERNAL ALARM is ON
VIDEO LOSS is ON
SENSOR is ON
0
0000: Normal display mode
0001: Sequential display mode
0010: Zoomed in mode
0011: Still image mode
0100: Frozen zoomed in image
0101: Zoomed in still image
0110: Zoom range setting mode
0111: Zoomed in still image range setting
mode
29
VIDEO LOSS 8
VIDEO LOSS 7
VIDEO LOSS 6
VIDEO LOSS 5
VIDEO LOSS 4
VIDEO LOSS 3
VIDEO LOSS 2
VIDEO LOSS 1
Second byte
Bit
7
6
5
4
3
2
1
0
0
0
0
0
0
0
0
0
Fourth byte
Bit
7
6
5
4
3
2
1
0
0
0
0
0
0
0
0
0
Sixth byte
Bit
7
6
5
4
3
2
1
0
0
0
0
0
0
0
0
0
L8QR5/XE (VQC-801P, VQM-801P GB) 1999. 12. 2
RS232C CONTROL
COMMANDS AVAILABLE FROM THE QUAD
COMPRESSOR
ACK(0A)
Response when this unit receives a command.
NAK(0B)
Response if this unit did not receive the command.
ALARM(BF)
When there is an alarm, this command is sent as header. Then,
the alarm information is sent in a 1-byte transmission (see Table
3).
ALARM information (Table 3)
Bit
7 2-bit indication of the
6 alarm type
5
4
3
2
1
0
Reserved
Reserved
4-bit indication of the
camera number
Bit state information
01: External alarms
10: Video loss alarms
11: Sensor alarms
0
0
0011: CAMERA NO. 4
0010: CAMERA NO. 3
0001: CAMERA NO. 2
0000: CAMERA NO. 1
OTHER COMMANDS
ENTER(40)
When numeric commands are all sent, this command is used to
enter the transmitted value.
CLEAR(56)
To erase multiple byte commands.
30
English
L8QR5/XE (VQC-801P, VQM-801P GB) 1999. 12. 2
RS232C CONTROL
COMMAND TABLE (TABLE 4)
The commands available are indicated in the table.
If a function is not available on the unit, the command will not operate even if sent.
3
4
0
0
1
0
ENTER
1
1
2
2
3
3
(»)
4
4
(1)
5
5
6
6
7
7
8
8
9
2
5
CLEAR
9
A
ACK
B
NAK
6
7
8
9
LIVE
FULL 1
VCR PB
FULL 2
(VERSION)
(MULTI)
FULL 3
«
(SHIFT)
QUAD
FULL 4
O
MENU
(PLUS)
FULL 5
+
NEXT
ZOOM
FULL 6
–
EXIT
STILL
FULL 7
SEQ.
FULL 8
SECURITY LOCK ON
SECURITY LOCK OFF
(POWER ON/OFF)
C
(SET ON)
D
(SET OFF)
E
F
A
B
C
D
E
0
CLK. ADJ.
1
MENU RESET
2
3
4
5
ALARM STATUS SENSE
6
7
STATUS SENSE
8
9
A
B
C
D
E
F
English
ALARM
31
F
L8QR5/XE (VQC-801P, VQM-801P GB) 1999. 12. 2
SPECIFICATIONS
Signal format
Camera signal input synchronization
Camera input terminals (CAMERA)
VCR input terminal (VCR IN)
VIDEO output terminal 1
(VIDEO OUT QUAD FULL)
VIDEO output terminal 2
(VIDEO OUT QUAD ONLY)
Control terminal (CONTROL)
• Alarm input (1 – 8)
• Remote input (RC)
•
•
Alarm output (AL)
Switching input (SW)
RS-232C terminal
Monitor on-screen display
Menu settings
Video alarm sensor
Back-up function
Operations
• Still
• 2x zoom
Display automatic switching speed
Power
Consumption
Operating temperature range
Operating humidity range
Dimensions
Weight
: Based on PAL colour signal standard (VQC-801P)
Based on PAL B/W signal standard (VQM-801P)
: Asynchronous
: VS/VBS, 1.0 Vp-p/75 Ω, BNC connector x 8
: Composite input, VS/VBS, 1.0 Vp-p/75 Ω, BNC connector x 1
: Composite output: Quad screen/Full screen VS/VBS, 1.0 Vp-p/75 Ω, BNC connector x 1
: Composite output: Quad screen only VS/VBS, 1.0 Vp-p/75 Ω, BNC connector x 1
: Push-type terminal
: No voltage, make-contact switch input x 8 (Low input)
: 2-wire type with resistance-based identification system, can be used with a remote control
circuit
: DC 5V, 5.7 kΩ (Low output)
: 1 low input, for switching signal from SW OUT of a timelapse VCR (as per this
manufacturer specifications)
: 9-pin D-SUB
: Title (up to 10 characters), date, time selectable
: 9 menus screens
: Internal, 8 channel (each camera input, selectable)
: Back-up for up to 30 days of the clock settings after connected for 30 hours continuously
: Available for camera live in quad screen, full screen and zoomed in picture
Can be set using a menu to operate automatically when there is an alarm trigger
: Available for camera live in quad screen
: 8 settings (1, 2, 3, 4, 5, 10, 20 and 30 seconds interval) available in full screen mode and
quad screen A and B
: AC 220 – 240 v, 50 Hz
: 16 W (VQC-801P), 14 W (VQM-801P)
: 5 to 40˚C
: 10 to 80%
: 420 (W) x 44 (H) x 325 (D) mm
: Approx. 3.4 kg
Products are subject to change in design and specifications without notice and without incurring any obligation.
32
English
L8QR5/XE (VQC-801P, VQM-801P GB) 1999. 12. 2
SANYO Electric Co., Ltd.
1AC6P1P2092-L8QR5, L8QS5/XE (0799KP-NI01)
Printed in Japan