1
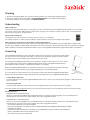
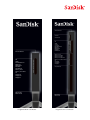
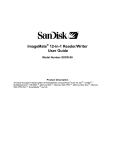
English
ImageMate® USB 2.0
Reader/Writer
User Guide
The Multi-Function Hi-Speed USB 2.0 Reader/Writer for:
SDDR-189 All-in-One Reader/Writer:
CompactFlash®, SD™, SDHC™, miniSD™, miniSDHC™, microSD™, microSDHC™, MultiMediaCard™, MMCplus™,
MMCmobile™, RS-MMC™, RS-MMC Dual Voltage, Memory Stick™, Memory Stick PRO™, Memory Stick Duo™,
Memory Stick PRO Duo™, Memory Stick PRO-HG Duo™, xD™, xD Type M™, xD Type M+™, xD Type H™
SDDR-199 Multi-Card Reader/Writer:
SD, SDHC, MultiMediaCard, MMCplus, MMCmobile,
RS-MMC, RS-MMC Dual Voltage, Memory Stick,
Memory Stick PRO and xD & xD Type M & H
Download the Transfer Button Application from www.sandisk.com/imagemate
Magnet in stand has no impact on the data stored on a card that is inserted in the reader.
Congratulations
Congratulations on your purchase of the ImageMate USB 2.0 Reader/Writer. With a simple USB cable, the ImageMate Reader/
Writer can quickly move multimedia data and large files to and from your computer. The ImageMate Reader/Writer supports both
Hi-Speed USB 2.0 and Full Speed USB 1.1 and is backward compatible with USB 1.1 ports. The ImageMate Reader/Writer is easy to
use. You don’t have to turn off or restart your computer to attach it, and you don’t need to open your computer for any reason. And
since the ImageMate Reader/Writer is powered by the USB connection, an AC/DC power adapter is not required. In most cases, all
you need to do is plug the ImageMate Reader/Writer in and get going.
System Requirements
Connection
USB 2.0 port for Hi-Speed data transfer (or USB 1.1 port for Full Speed data transfer)
Operating System Support
• Windows
– Windows 2000
– Windows XP
– Windows Vista
• Macintosh
– Mac OS 10.3
– Mac OS 10.4
– Mac OS 10.5
Unpacking Package Contents
• ImageMate Reader/Writer (storage card not included)
• Reader stand
• USB cable
• Quick Start Guide
Checking
1. Unpack the packaging. Make sure you have everything listed in the “Unpacking Package Contents.”
2. Check your system requirements. Refer to SYSTEM REQUIREMENTS or the outside of the packaging.
3. Locate the USB port on your computer. See UNDERSTANDING.
Understanding
What’s a USB port?
The Universal Serial Bus (USB) port is an easy way to connect a new device like the ImageMate Reader/Writer to your computer.
Connecting a device to the USB port doesn’t require that you open your computer to install an add-in card or set complicated
switches. You just plug it in and get started.
How do I find the USB port?
The USB ports are often located on the front or back of your PC, or on a USB hub.
On a laptop computer or a Macintosh, the USB port may be located on the side. The USB port looks like this:
What is the difference between Hi-Speed USB 2.0 and Full Speed USB 1.1?
Hi-Speed USB 2.0 supports the transfer of data up to 480 megabits per second (Mbps), and Full Speed USB 1.1 supports data
transfer up to 12 Mbps. Hi-Speed USB 2.0 provides a dramatic improvement in data transfer performance compared to Full Speed
USB 1.1. USB 2.0 is backward compatible with USB‑1.1 ports. The ImageMate Reader/Writer supports both USB 2.0 and USB 1.1.
Connecting
The ImageMate Reader/Writer can be used with and without the metal stand. To attach the reader, put the
stand on a flat surface and position the reader on the stand as illustrated. To detach the reader, hold the
stand down with one hand and pull up the reader with the other hand.
Connecting the ImageMate Reader/Writer to the USB port is simple. You don’t need to turn off or restart
your computer when attaching the ImageMate Reader/Writer. Since the ImageMate Reader/Writer is
powered by the USB connection, an AC/DC power adapter is not needed.
When the ImageMate Reader/Writer is connected for the first time, your computer may display a message
that the device is being installed (may vary slightly depending on your operating system).
It is not necessary to install software on your computer to transfer files with the ImageMate Reader/Writer.
But there are two free utilities available that will enhance the experience of your ImageMate Reader/Writer:
• Transfer Button Application
The Transfer Button on top of the ImageMate Reader/Writer lets you launch your favorite (photo) program or web site with the
touch of a button.
• Drive Letter Application
The Drive Letter application makes it easy to find the right drive letter for the card that you want to access.
Go to www.sandisk.com/imagemate to learn more and follow the instructions on how to download, install and use the software.
Windows Disk Icons
• ImageMate Multi-Card Reader/Writer:
When you connect the ImageMate Multi-Card Reader/Writer on a Windows operating system, one removable disk icon
representing the card slot shows in My Computer with newly assigned drive letter.
• ImageMate All-in-One Reader/Writer:
When you connect the ImageMate All-in-One Reader/Writer on a Windows operating system, four removable disk icons
representing the card slots show in My Computer with newly assigned drive letters:
– 1st new removable drive: microSD/microSDHC
– 2nd new removable drive: SD/SDHC/miniSD/miniSDHC/MultiMediaCard/MMCplus/MMCmobile/RS-MMC/
RS-MMC Dual Voltage
– 3rd new removable drive: Memory Stick/Memory Stick PRO/Memory Stick Duo/Memory Stick PRO Duo/
Memory Stick PRO-HG Duo/xD/xD Type M, M+ & H
– 4th new removable drive: CompactFlash
When the Drive Letter application has been installed (see above), drive letter icon(s) will only show up when a card is inserted. Also
the generic icon at each drive letter will be replaced by an icon representing the main card format(s) of each card slot.
Macintosh Disk Icons
When you connect the ImageMate Reader/Writer on a Macintosh operating system, removable disk icons labeled ‘no name’
representing the card slots show on desktop when a card is inserted.
When the Drive Letter application has been installed (see above), the generic disk icon will be replaced by an icon representing the
main card format(s) of the occupied slot(s).
Using
Inserting Card
To install a card into the ImageMate Reader/Writer’s card slot, insert the connector end of the card with the label facing to the
right (when placed on the stand).
Do not force the card into the slot.
LED Activity
Each card slot has a blue LED:
• The LED turns on when a card is properly inserted
• The LED blinks when data is transferred from or to the card
If the LED is not on, check to make sure the ImageMate Reader/Writer is connected and the card is inserted properly.
NEVER remove the card when the LED is FLASHING.
Using it on a PC with the transfer button application
1.Go to www.sandisk.com/imagemate to download the ImageMate software and installation instructions for model
SDDR-189/SDDR-199.
2. Install the software according to the instructions.
3.After the software has been installed successfully and you have selected the application to launch every time you press the
button, press the button and access the files on the card through your favorite application.
Using it on a PC without the ImageMate software being installed
Here is the way to create a Folder on your Desktop and Copy and Paste your photos to it.
1.
How to create a FOLDER on your Desktop
A.Place your mouse pointer somewhere on the Desktop but not on an icon.
B.Click once with the RIGHT mouse button, move your mouse pointer over NEW then click FOLDER with the LEFT mouse button.
C.This will create a NEW FOLDER on your Desktop. At this time you can name anything you like, i.e. My Pictures or Photos, by
typing the name in. When you are finished typing press the ENTER key on your keyboard. Now the folder name is saved.
2. How to copy and paste your photos into a folder
A.Double click on the icon “My Computer”.
B.Double click on the removable disk drive (for the ImageMate Reader/Writer), i.e. F: or G: or maybe E: Now you should see a
DCIM folder (that stands for Digital Camera Images).
C.Double click on the DCIM folder. Now you should see your camera folder, i.e. 100Olymp or 100Canon or 100Fuji.
D.Double click on the camera folder. Now you should see your pictures or picture file names (depending on what Operating
System you are using).
E.Go up to the menu bar where it says “EDIT” and click on “SELECT ALL”. You will see all your pictures HIGHLIGHTED.
F.Go back to “EDIT” and now click “COPY”. Close or minimize this window.
G.Double click on the folder you created on your Desktop, go to “EDIT” then click “PASTE” and you should see the pictures
being copied to the folder.
H.To View your Pictures Double click on the File name and the Picture will open up.
Using it on Macintosh without the ImageMate software being installed
1. Connect the ImageMate Reader/Writer to the USB port on your Mac (do not connect to Monitor or Keyboard).
2. To transfer files place a card into the Reader/Writer unit. A new drive will appear on your desktop called “untitled”.
3. Drag and drop files to and from the new drive as you would to any other disk or folder.
Removing Card
To remove the card in Windows:
1. Double click on the icon “My Computer”.
2. Right-click on the corresponding ImageMate Reader/Writer drive icon.
3. Select Eject (this is not needed for Windows XP and Vista).
4. Pull the card out of the slot.
To remove the card on a Macintosh:
1. Drag the “untitled” icon into the Trash.
2. Pull the card out of the slot.
Disconnecting
You don’t need to shut down your computer to disconnect the ImageMate Reader/Writer, but you should NEVER remove the device
from the USB port without first reading the steps below.
If a drive window is open or the ImageMate Reader/Writer is active, close any associated windows before attempting to remove
the ImageMate.
Windows
Use the hotplug icon in the notification area of the taskbar to safely stop the device before unplugging it. The notification area is on
the right side of the taskbar where you usually see the time displayed.
These steps are not required for Windows XP and Vista:
1. In the notification area, right-click on the hotplug icon.
2. Select the device you want to unplug then click STOP.
3. When Windows notifies you that it is safe to do so, unplug the ImageMate Reader/Writer from your computer.
Macintosh
1. Drag the ImageMate Reader/Writer “untitled” icon into the Trash.
2. Unplug the device.
Troubleshooting
For questions on error messages, please check our knowledgebase at kb.sandisk.com.
For technical support and warranty service, please go to www.sandisk.com/techsupport to find a number in your area.
SanDisk’s 2 Year Limited Warranty
SanDisk warrants that this product will be free from material defects in design and manufacture and will substantially conform to
the published specifications under normal use for two years from your date of purchase, subject to the conditions below.
This warranty is provided to the original end user purchasing from SanDisk or an authorized reseller, and is not transferable. Proof
of purchase may be required. This product must be used with memory cards that are compliant with the specifications of the SD
Card Association, the MultiMediaCard Association, or Memory Stick or TransFlash requirements as applicable; use with any other
product voids this warranty. SanDisk is not responsible for any failure or defect caused by any third party product or component,
whether authorized or not. This warranty does not apply to any third party software provided with the product and you are
responsible for all service and repair needed for such software. This warranty is void if the memory card is not used in accordance
with the product instructions, or if it is damaged as a result of improper installation, misuse, unauthorized repair, modifications
or accident.
You must return the product in tamper resistant packaging, freight prepaid, as instructed by SanDisk.You must obtain a tracking
confirmation number, which you may be required to provide to SanDisk. SanDisk will, at its option, repair or replace the product
with new or refurbished product of equal or greater capacity and functionality, or refund the purchase price. The warranty duration
on replaced product will be that time period remaining on the original product. THIS CONSTITUTES SANDISK’S ENTIRE LIABILITY
AND YOUR EXCLUSIVE REMEDY FOR BREACH OF THIS WARRANTY.
SanDisk does not warrant, and shall not be responsible for, any lost data or images contained in any product (including in any
returned product), regardless of the cause of the loss. SanDisk’s products are not warranted to operate without failure. SanDisk
products should not be used in the life support systems or other applications where failure could threaten injury or life. This
warranty gives you specific legal rights, and you may also have other rights which vary by jurisdiction.
THE FOREGOING IS SANDISK’S SOLE WARRANTY. SANDISK DISCLAIMS ALL OTHER EXPRESS AND IMPLIED WARRANTIES TO
THE FULLEST EXTENT PERMITTED BY APPLICABLE LAW. THE IMPLIED WARRANTIES OF MERCHANTABILITY AND FITNESS FOR
A PARTICULAR PURPOSE ARE LIMITED TO THE DURATION OF THE EXPRESS WARRANTY. SOME JURISDICTIONS DO NOT ALLOW
LIMITATION ON HOW LONG AN IMPLIED WARRANTY LASTS, SO THE ABOVE LIMITATION MAY NOT APPLY TO YOU. IN NO EVENT SHALL
SANDISK OR ANY AFFLIATED OR SUBSIDIARY COMPANY BE LIABLE UNDER ANY CIRCUMSTANCES FOR ANY DIRECT, INDIRECT,
OR CONSEQUENTIAL DAMAGES, ANY FINANCIAL LOSS OR ANY LOST DATA OR IMAGE, EVEN IF SANDISK HAS BEEN ADVISED OF
THE POSSIBILTY OF SUCH DAMAGE. SOME JURISDICTIONS DO NOT ALLOW THE EXCLUSION OR LIMITATION OF INCIDENTAL OR
CONSEQUENTIAL DAMAGES, SO THE ABOVE LIMITATION OR EXCLUSION MAY NOT APPLY TO YOU. IN NO EVENT WILL SANDISK’S
LIABILITY EXCEED THE AMOUNT PAID BY YOU FOR THE PRODUCT.
Failure to register your product will not diminish the rights you have under the product warranty.
SanDisk, the SanDisk logo, ImageMate and CompactFlash are trademarks of SanDisk Corporation registered in the United States
and other countries. The SD , SDHC, miniSD, miniSDHC, microSD and microSDHC marks and logos are trademarks. SanDisk is an
authorized licensee of the xD-Picture Card and the MultiMediaCard trademarks. MMCmobile, MMCplus, MultiMediaCard and
RS-MMC are trademarks of the MultiMediaCard Association. Memory Stick is a registered trademark of Sony Corporation. The
MagicGate mark and logo, Memory Stick PRO, Memory Stick Duo, Memory Stick PRO Duo and Memory Stick PRO-HG Duo are
trademarks of Sony Corporation. Other brand names mentioned herein are for identification purposes only and may be trademarks
of their respective holder(s).
© 2008 SanDisk Corporation. All rights reserved.
Transfer Button
microSD
microSDHC
Transfer Button
SD
SDHC
MultiMediaCard
MMCplus
MMCmobile
RS-MMC
RS-MMC DV
Memory Stick
Memory Stick PRO
xD
xD Type M
xD Type M+
xD Type H
Detachable
Metal Stand
ImageMate Multi-Card Reader
SD
SDHC
miniSD
miniSDHC
MultiMediaCard
MMCplus
MMCmobile
RS-MMC
RS-MMC DV
Memory Stick
Memory Stick PRO
Memory Stick Duo
Memory Stick PRO Duo
Memory Stick PRO-HG Duo
xD
xD Type M
xD Type M+
xD Type H
CompactFlash
Detachable
Metal Stand
ImageMate All-in-One Reader