1
Contact SAMSUNG WORLD WIDE
If you have any questions or comments relating to Samsung products, please contact the SAMSUNG customer care center.
Country
CANADA
Customer Care Center
1-800-SAMSUNG (726-7864)
U.S.A
1-800-SAMSUNG (726-7864)
Web Site
Address
www.samsung.com/ca (English)
www.samsung.com/ca_fr (French)
Samsung Electronics Canada Inc., Customer Service 55
Standish Court Mississauga, Ontario L5R 4B2 Canada
www.samsung.com/us
Samsung Electronics America, Inc. 85 Challenger Road
Ridgefield Park, NJ 07660
Thank you for purchasing this Samsung product.
To receive more complete service, please register your product at www.samsung.com/register
Model______________ Serial No.______________
© 2013 Samsung Electronics Co., Ltd. All rights reserved.
[UN85S9AF-ZA]BN68-05182B-05ENG.indb 1
BN68-05182B-05
✎✎ If you have any questions, please call us at 1-800-SAMSUNG (1-800-726-7864) for assistance.
2013-10-30 �� 10:03:24
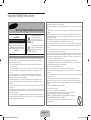
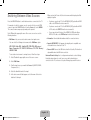
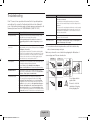
Important Safety Instructions
Warning! Important Safety Instructions
CAUTION
RISK OF ELECTRIC SHOCK DO NOT OPEN
CAUTION: TO REDUCE THE RISK OF ELECTRIC
SHOCK, DO NOT REMOVE COVER (OR BACK).
THERE ARE NO USER SERVICEABLE PARTS
INSIDE. REFER ALL SERVICING TO QUALIFIED
PERSONNEL.
This symbol indicates that high
voltage is present inside. It is
dangerous to make any kind of
contact with any internal part of this
product.
This symbol indicates that important
literature concerning operation and
maintenance has been included
with this product.
• The slots and openings in the cabinet and in the back or bottom are provided for necessary ventilation. To
ensure reliable operation of this apparatus, and to protect it from overheating, these slots and openings
must never be blocked or covered.
−− Do not place this apparatus in a confined space, such as a bookcase, or built-in cabinet, unless proper
ventilation is provided.
−− Do not place this apparatus near or over a radiator or heat register, or where it is exposed to direct sunlight.
−− Do not place vessels (vases etc.) containing water on this apparatus, as this can result in a fire or electric
shock.
• Do not expose this apparatus to rain or place it near water (near a bathtub, washbowl, kitchen sink, or
laundry tub, in a wet basement, or near a swimming pool etc.). If this apparatus accidentally gets wet,
unplug it and contact an authorized dealer immediately.
• This apparatus uses batteries. In your community, there might be environmental regulations that require
you to dispose of these batteries properly. Please contact your local authorities for disposal or recycling
information.
• Do not overload wall outlets, extension cords or adaptors beyond their capacity, since this can result in fire
or electric shock.
• Power-supply cords should be placed so that they are not likely to be walked on or pinched by items placed
upon or against them. Pay particular attention to cords at the plug end, at wall outlets, and the point where
they exit from the appliance.
• To protect this apparatus from a lightning storm, or when it is left unattended and unused for long periods of
time, unplug it from the wall outlet and disconnect the antenna or cable system. This will prevent damage to
the set due to lightning and power line surges.
• Before connecting the AC power cord to the DC adaptor outlet, make sure the voltage designation of the
DC adaptor corresponds to the local electrical supply.
• Never insert anything metallic into the open parts of this apparatus. Doing so may create a danger of electric
shock.
• To avoid electric shock, never touch the inside of this apparatus. Only a qualified technician should open this
apparatus.
• Make sure to plug the power cord in until it is firmly seated. When unplugging the power cord from a wall
outlet, always pull on the power cord's plug. Never unplug by pulling on the power cord. Do not touch the
power cord with wet hands.
• If this apparatus does not operate normally - in particular, if there are any unusual sounds or smells coming
from it - unplug it immediately and contact an authorized dealer or service center.
• Be sure to pull the power plug out of the outlet if the TV is to remain unused or if you are to leave the house
for an extended period of time (especially when children, elderly or disabled people will be left alone in the
house).
−− Accumulated dust can cause an electric shock, an electric leakage or a fire by causing the power cord to
generate sparks and heat or the insulation to deteriorate.
• Be sure to contact an authorized service center for information if you intend to install your TV in a location
with heavy dust, high or low temperatures, high humidity, chemical substances, or where it will operate 24
hours a day such in an airport, a train station, etc. Failing to do so may lead to serious damage of your TV.
• Use only a properly grounded plug and wall outlet.
−− An improper ground may cause electric shock or equipment damage. (Class l Equipment only.)
• To turn this apparatus off completely, you must disconnect it from the wall outlet. Consequently, the wall
outlet and power plug must be readily accessible at all times.
• Do not allow children to hang onto the product.
• Store the accessories (battery, etc.) in a location safely out of the reach of children.
• Do not install the product in an unstable location such as a shaky self, a slanted floor or a location exposed
to vibration.
• Do not drop or apply any shock to the product. If the product is damaged, disconnect the power cord and
contact a service center.
• To clean this apparatus, unplug the power cord from the wall outlet and wipe the product using a soft,
dry cloth. Do not use any chemicals such as wax, benzene, alcohol, thinners, insecticide, air fresheners,
lubricants, or detergent. These chemicals can damage the appearance of the TV or erase the printing on the
product.
• Do not expose this apparatus to dripping or splashing.
• Do not dispose of batteries in fire.
• Do not short-circuit, disassemble or overheat the batteries.
• There is danger of an explosion if you replace the batteries used in the remote with the
wrong type of battery. Replace only with the same or equivalent type.
• WARNING - TO PREVENT THE SPREAD OF FIRE, KEEP CANDLES OR OTHER OPEN
FLAMES AWAY FROM THIS PRODUCT AT ALL TIMES.
• This product contains chemicals known to the State of California to cause cancer and
reproductive toxicity.
English - 2
[UN85S9AF-ZA]BN68-05182B-05ENG.indb 2
2013-10-30 �� 10:03:24
Contents
Basic Features
5
12
6 Connecting to the TV
13
7 Low Battery Power Warning
7
Using the touch pad
8 Changing Channels by
Entering Numbers
8 Show Status and
Notification Banner
9Searching
9 Using the Virtual
Remote Control
10 Installation Height &
Angle Adjustment
10
Turning on the TV
18
13
External Device Connections
18 Closing the e-Manual
18 Jumping to a Menu Item
14 One Connect - Front
16
18 Updating the e-Manual
Switching Between
19 Network Security Protocols
Video Sources
19 Network Connection - Wired
Universal Remote Setup
16 Add the External Device
Viewing the e-Manual
17
Screen Brightness
26
Maintenance
26
TV Upgrade using One
Connect
(sold separately)
Specifications
27
Specifications
27
Licenses
Guides
20
3D Active Glasses
28
Warranty Information
20Features
30
Regulatory Compliance
21 Pairing 3D Active Glasses
Statements
22 Pairing for the first time
17 Scrolling a Page
(For 3D Active Glasses)
17 Using the Top Icons
17 Returning to the Home Page
17 Searching Pages
Eco Sensor and
3D Basics
Viewing the e-Manual
17 Searching the Index
25
18 Wireless Network
Precautions
13 TV - Side
15
Connecting to a Network
18 Network Connection
- Wireless
Connecting the TV
to One Connect
8 Recommended
8 History
12 Camera angle adjustment
12 Extending the TV Camera
Using the Smart Touch Control
6 Inserting the Batteries
(AAA X 2)
12 Retracting the Camera
Network
Configuration
Built-in TV Camera
Troubleshooting and
Other Information
23
What is Remote Support?
24
Troubleshooting
31
SAMSUNG BRAND
PRODUCTS
31 LIMITED WARRANTY TO
ORIGINAL PURCHASER
English - 3
[UN85S9AF-ZA]BN68-05182B-05ENG.indb 3
2013-10-30 �� 10:03:25
Figures and illustrations in this User Manual are provided for reference only
and may differ from the actual product appearance. Product design and
specifications may change without notice.
Features of your new TV
On TV: Check a listing of programs that are currently airing or are
scheduled to air.
Movies & TV Shows: Purchase and watch movies and series without a
separate external device.
•• 3D: This new feature enables you to view 3D content.
•• SMART HUB:
This TV features Smart Hub, a multi-purpose entertainment and family
center. With Smart Hub, you can surf the web, download applications, and
stay in touch with family and friends through social networking services.
In addition, you can view or play photo, video, and music files stored on
external storage devices.
Press the ™ button to launch Smart Hub. Choose a service using the icons
displayed in the top part of the screen.
Smart Hub services and functionality include:
Social: Watch the latest YouTube videos and your and your friends' video
posts on Facebook and Twitter. You can also make video calls to friends by
the TV camera.
Apps: Samsung Apps offers an extensive collection of free and paid news,
sports, weather, and gaming content you can directly download to and
enjoy on your TV.
Photos, Videos & Music: Play back photo, video, and music files from an
external storage device.
•• Anynet+ (HDMI-CEC): This allows you to control all connected Samsung
devices that support Anynet+ with your Samsung TV’s remote.
•• e-Manual: Provides a detailed, on-screen user's manual built into your TV.
•• SMART Interaction: Using this function, you can access and control menu
options and functions using motions.
•• Device Manager: Use the TV features with a USB or Bluetooth keyboard
and mouse.
•• MHL & Screen Mirroring: Displays mobile device screens on your TV
using a wired or wireless connection.
English - 4
[UN85S9AF-ZA]BN68-05182B-05ENG.indb 4
2013-10-30 �� 10:03:25
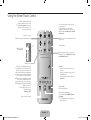
Using the Smart Touch Control
Use Voice Recognition function with the
microphone embedded in remote control.
✎✎The Voice Recognition function can be
affected by unclear pronunciation, voice
level, or surrounding noise.
TV
STB
MIC
Turn on and off the satellite or cable set-top box
connected to the TV.
For this, the Smart Touch Control must be
configured as a universal remote control. See the
e-Manual chapter, Controlling the TV > Universal
Remote Setup.
Turns the TV on and off.
TV
VOICE: Take your voice command and enter a text
using your voice.
SOURCE
Displays and selects
the available video sources.
STB
MIC
SOURCE
MUTE
VOL
CH
VOL
MORE
MORE
Changes channels.
MUTE
VOICE
VOICE
CH the
MUTE:
Cuts off
sound temporarily.
Displays a virtual remote panel on the screen. See
the e-Manual chapter, Controlling the TV > Using
the Virtual Remote Control.
Adjusts the volume.
LIGHT: Turn on the backlight for the buttons.
The backlight lasts for only a few seconds. Turns
the remote control light on or off. When on, the
buttons
become
illuminated
for a moment when
LIGHT
DVR
MENU
3D
pressed. (Using the remote control with this button
set to On will reduce the battery usage time.)
RETURN
GUIDE
SMART HUB
EXIT
DVR: This
button is only available when the Smart
Touch Control is configured to function as a
universal remote control to control a set-top box.
Run DVR (Digital Video Recording) in set-top box.
MENU: Opens the OSD.
3D: Turns the 3D function on or off.
See e-Manual chapter,
TV Viewing > 3D TV.
Touch Pad
• Drag on the touch pad to move the focus on
the screen.
• Press the touch pad to run, activate, or select
the highlighted item.
• Press and hold the touch pad to display the
Channel List.
LIGHT
RETURN
EXIT
DVR
MENU
SMART HUB
3D
GUIDE
Displays the EPG
(Electronic Program Guide).
Brings up Smart Hub applications.
See the e-Manual chapter, SMART TV Features
> Smart Hub.
✎✎To exit an application that is running easily,
press the ™ button.
Returns to the previous menu.
English - 5
[UN85S9AF-ZA]BN68-05182B-05ENG.indb 5
2013-10-30 �� 10:03:25
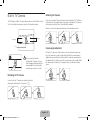
Connecting to the TV
Inserting the Batteries (AAA X 2)
In order to operate the TV using a Smart Touch Control, you must first pair it
to the TV via Bluetooth. However, the Smart Touch Control is only available for
the paired Samsung TV.
1
2
3
✎✎ We recommend to use the Smart Touch Control in less than 20ft(6m).
A usable distance may differ depending on the wireless environmental
conditions.
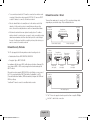
1. To turn on the TV, point the Smart Touch Control at the remote control
receiver of the TV and press the P button. The remote control receiver's
location may vary depending on the model.
2. A Bluetooth icon will appear at the bottom left of the screen as shown
below. The TV will then attempt to connect to the Smart Touch Control
automatically.
1. Slightly lift the battery cover using a plastic card. Next, pull on the cover’s
notch with a fingernail to remove the cover completely.
✎✎ Check the location of the battery cover groove. The groove's location
may vary depending on the type of Smart Touch Control is provided
with the product.
2. Insert 2 AAA batteries, making sure to align the positive and negative ends
correctly.
3. Align the battery cover with the back of the remote control, and then press
down along the edges until it is completely attached to the remote control.
<Attempting to connect and completion icons>
English - 6
[UN85S9AF-ZA]BN68-05182B-05ENG.indb 6
2013-10-30 �� 10:03:26
Reconnecting the Smart Touch Control
If the Smart Touch Control stops operating or works abnormally, replace the
battery as this may be caused by insufficient battery power. If the problem
persists, press the PAIRING button on the Smart Touch Control to restore
pairing with the TV. The PAIRING button cannot be accessed without removing
the Smart Touch Control's battery cover. Within a distance between 1ft to
13.1ft(30cm to 4m), point the Smart Touch Control to the TV receiver and
press the PAIRING button. When pairing is complete, the pairing image
displays at the bottom left of the TV screen.
Using the touch pad
Use the touch pad to implement various commands. Navigate to Tutorial
(System > Device Manager > Smart Touch Control Settings > Tutorial) to
view an on-screen guide to using the Smart Touch Control.
Dragging
Pressing
Drag on the touch pad to move the focus, pointer, or
highlight in the direction the finger is dragging.
Press the touch pad to select the item highlighted or in
focus. When watching TV, press and hold the touch pad
for 2 seconds displays the channel list. On some apps,
press and hold the touch pad for 2 seconds displays a
list of functions available for the app.
<The Smart Touch Control's pairing button>
Low Battery Power Warning
If the battery becomes low while using the Smart Touch Control, the following
alarm window appears at the bottom of the left screen. If the alarm window
pops up, replace the batteries of the Smart Touch Control. Use alkaline
batteries for longer usage.
<Low battery alarm window>
English - 7
[UN85S9AF-ZA]BN68-05182B-05ENG.indb 7
2013-10-30 �� 10:03:26
Changing Channels by Entering Numbers
Show Status and Notification Banner
While watching TV, tap on the protruding line
on the left or right edge of the touchpad to
bring up the numerical input window on the
screen. Use your finger to enter the number
for the channel you want to watch. The
recognized number is displayed on the screen
and the TV switches to the corresponding
channel. However, the number you have
entered may not be recognized properly by
the TV. Refer to the guide below to ensure
that your numerical entries are recognized
accurately.
Press the MORE button on the Smart Touch Control and then select STATUS
on the virtual remote panel that appears on the screen. The status and
notification banner appears at the top of the screen. For more information
about using the status and notification banner, refer to e-Manual > SMART
TV Features > Status and Notification.
Recommended
Press the RECOMM. / SEARCH button and then select the Recommended
from the list on bottom of the screen. This shows the current/scheduled
program and application recommendations.
Select a program that is currently airing to jump to the corresponding channel
or a program that is scheduled to air to set up a Schedule Viewing setting.
Refer to e-Manual > SMART TV Features > On TV for more information.
Numerical Input Guide
Refer to the diagrams below when entering numerical values. The TV may not
recognize your entries if you do not follow the sequences shown below.
Select an application to launch. Samsung Apps will launch if the selected
application is not installed on the TV. Refer to e-Manual > SMART TV
Features > Apps > Samsung Apps for more information.
History
Press the RECOMM. / SEARCH button and then select History from the
list displayed at the bottom of the screen. This displays an interactive list of
recently accessed channels, media content and applications.
English - 8
[UN85S9AF-ZA]BN68-05182B-05ENG.indb 8
2013-10-30 �� 10:03:27
Searching
Changing the Virtual Remote Panel
Press the RECOMM. / SEARCH button on the Smart Touch Control. The list
appears at the bottom of the screen. Press the RECOMM. / SEARCH button
again. The keypad will appear on the screen. Enter search criteria to search
not only many apps and their contents on the TV but also the Web.
You can change which virtual remote panel is displayed on the TV screen. To
shift between panels, move the focus highlight beyond the left or right edge of
the displayed panel.
Refer to e-Manual > SMART TV Features > Searching for more information.
Using the Virtual Remote Control
Press the MORE button to display the virtual remote panel on the TV screen.
The virtual remote panel consists of the number panel, a playback control
panel, and the quick access panel. Use the touch pad to highlight and select
icons, numbers, and buttons on the panels.
✎✎ The displayed virtual remote panel on the TV screen may differ depending
on the country.
Channel History
D
E
F
G
Netflix
STATUS
S
No Channel numbers
have been saved.
P.Size
INFO
TOOLS
Ext. Speaker
Amazon
3D
STATUS
MENU
MTS
Web
Brow...
P.Mode
Change a position of the Virtual Remote Panel
Press the MORE button on the Smart Touch Control. The virtual remote panel
appears on the screen. Press and hold the touch pad for one second. Users
can change a position of the virtual remote panel of the screen.
Using the Number Panel
Use the number panel to enter numbers on a keypad screen or webpage or
to change the channel while watching TV. Changing the channel using the
number pad leaves a record, allowing you to easily return to previous channels.
Using the Playback Control Panel
PIP
CC
B
TOOLS
Use left/right scroll function on the touch pad to change the panel easily.
e-Manual
Use the playback control panel to pause, rewind, fast forward, skip to the next
file, select a function with the a, b, {, } buttons, and much more while
enjoying media content.
Using the Quick Access Panel
Use the buttons on the quick access panel to bring up the TV's INFO, TOOLS
or e-Manual screens. Note that the buttons that appear may vary depending
on the operating mode of the Smart Touch Control (with the TV only, as a
universal remote, etc.).
English - 9
[UN85S9AF-ZA]BN68-05182B-05ENG.indb 9
2013-10-30 �� 10:03:28
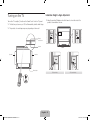
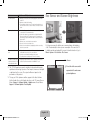
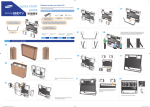
Turning on the TV
Installation Height & Angle Adjustment
Turn on the TV using the P button on the Smart Touch Control or TV panel.
1. Using the provided Delphinus, unlock the frame lock on either side of the
product's rear middle as shown.
✎✎ The first time you turn on your TV, it will immediately start the initial setup.
✎✎ The product color and shape may vary depending on the model.
Remote
control sensor
Camera
Speakers
Speakers
Power button
<TV Screen Lock>
<TV Screen Unlock>
English - 10
[UN85S9AF-ZA]BN68-05182B-05ENG.indb 10
2013-10-30 �� 10:03:28
2. Refer to the diagram and adjust the height of the TV.
4. Use the DELPHINUS (included) to tighten the locking devices attached to
the frame on both sides and secure the TV in place.
5. Grab the middle part of the top or bottom edge of the product and push or
pull to adjust the TV angle.
✎✎ Adjustable angles
Front angle:
•• When installing the TV, the maximum height is: 2.7 ± 1.0°
•• When installing the TV to the minimum height: 7.7 ± 1.0°
<Diagram 1> Pull the product up slowly while holding it
at the bottom center.
<Diagram 2> Push the product down slowly while
holding it at the top center.
Rear angle: 9.5 ± 1.0°
[[ When moving the product, make sure there are no small children
nearby. In addition, the improper handling of the product may result in
injury.
3. When adjusting the height of the TV, make sure the frame ends up in the
designated position.
[[ When adjusting the TV angle, make sure there are no small children
nearby. In addition, the improper handling of the product may result in
injury.
English - 11
[UN85S9AF-ZA]BN68-05182B-05ENG.indb 11
2013-10-30 �� 10:03:29
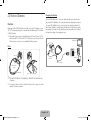
Built-in TV Camera
Retracting the Camera
This TV features a built-in TV camera that can be used for the Motion Control,
Voice Control (built-in microphone), and Face Recognition features.
If you are not using the TV camera, keep it retracted inside the TV. The Motion
Control and Face Recognition features cannot be used while the TV camera is
in the retracted state, but Voice Control will still be available.
Push in a corner of the camera until you hear a click and then release it.
Microphone
Microphone
경고
Lens
경고
주의
Camera angle adjustment
주의
Do not touch the lens while
operating the TV camera. You can
leave fingerprints that may affect the
image quality. If the lens gets dirty,
clean it using a soft piece of cloth.
Pull out the TV camera, hold the camera on its sides using two fingers, and
move the camera up or down to adjust its angle. When the camera angle is
slightly lowered, you will hear a clicking sound. To return the camera angle to
its original position, hold either side of the camera and move it up a little. When
the camera angle is returned to its original position, you will hear a clicking
sound.
Extending the TV Camera
In order to use the TV camera, you must first extend it.
Gently press and release the top portion of
.
English - 12
[UN85S9AF-ZA]BN68-05182B-05ENG.indb 12
2013-10-30 �� 10:03:31
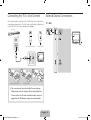
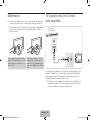
Connecting the TV to One Connect
External Device Connections
One Connect must be connected to the TV via the One Connect cable before
connecting an external device. The One Connect cable has two different ends,
Connect the TV to One Connect referring to the diagram.
TV - Side
One Connect
<One Connect-end Connector>
<TV-end Connector>
TV
<One Connect-end Connector>
<TV-end Connector>
[[ The connectors at both ends of the One Connect cable are
different from each other in shape. When connecting the One
Connect cable to the TV, make sure that the right connector is
plugged into the TV. Otherwise, it may cause product failure.
English - 13
[UN85S9AF-ZA]BN68-05182B-05ENG.indb 13
2013-10-30 �� 10:03:32
One Connect - Front
English - 14
[UN85S9AF-ZA]BN68-05182B-05ENG.indb 14
2013-10-30 �� 10:03:33
Switching Between Video Sources
When you view the Source list, the device name and the input port will be
displayed together.
Press the SOURCE button to switch between devices connected to the TV.
−− If you have connected a PC to the HDMI IN 2 (DVI) port with an HDMI
cable, select PC from the device name list.
For example, to switch to a game console connected to the second HDMI
connector, press the SOURCE button. From the Source list, select HDMI2.
The connector names may vary depending on the product.
−− If you connected an AV device to the HDMI IN 2 (DVI) port with an
HDMI to DVI cable, select DVI Devices from the device name list.
Select Tools at the upper-right corner of the source screen to access the
following functions.
•• Information: View detailed information about the connected devices.
•• Edit Name: Lets you associate a device name to an input source.
You can select the following device names in the Edit Name option:
VCR / DVD / Cable STB / Satellite STB / PVR STB / AV Receiver /
Game / Camcorder / PC / DVI PC / DVI Devices / TV / IPTV / Blu-ray /
HD DVD / DMA
To associate a device name to an input source, follow these steps:
1. Select Tools in the upper right corner of the source screen.
2. Select Edit Name.
−− If you have connected a PC to the HDMI IN 2 (DVI) port with an HDMI
to DVI cable, select DVI PC from the device name list.
•• Anynet+ (HDMI-CEC): A list appears showing Anynet+ compatible ones
of external devices connected to the TV.
•• Remove USB: Remove the USB device from the list safely. This function is
only available when the USB device selected.
Universal Remote Setup: Use to configure universal remote control settings.
Using the universal remote control, users can control external devices
connected to the TV, such as a set-top box, Blu-ray player, and AV receiver.
3. Find the input source you want in the Source list (HDMI1, HDMI2,
Component, etc.).
4. Select the blank field next to the input.
5. In the device name list that appears, select the name of the device
attached to the input.
English - 15
[UN85S9AF-ZA]BN68-05182B-05ENG.indb 15
2013-10-30 �� 10:03:34
Universal Remote Setup
This TV has a universal remote control feature that lets you control cable
boxes, Blu-ray players, home theaters, and other third-party external devices
connected to the TV using the TV's remote control.
Keep a distance of 2 inches at least between the IR Extender and the external
device, as the illustration shows. Face the IR Extender toward the external
device’s remote control signal receiver. Note that it should be no obstacle
between IR Extender and external device. The presence of an obstacle will
interfere with the transmission of the remote control signal.
Add the External Device
1. Turn on the external device you wish to set up universal remote function for
and then press the SOURCE to bring up the Source screen.
2. Select Universal Remote Setup from the top of the screen. This initiates
the universal remote setup process.
3. Follow the on-screen instruction and set up the universal remote control. If
it does not work, set up the remote control by entering the model number
manually.
2 inches
English - 16
[UN85S9AF-ZA]BN68-05182B-05ENG.indb 16
2013-10-30 �� 10:03:34
Viewing the e-Manual
Using the Top Icons
This TV has a built-in e-Manual that contains information about your TV's key
features and instructions for using them. To view the e-Manual, use one of the
following methods:
Returning to the Home Page
•• Open the Support menu and choose e-Manual (Troubleshooting).
•• Press the MORE button on the Smart Touch Control to display the virtual
remote panel on the TV screen. Flick the touch pad until the quick access
panel appears, select the e-Manual icon, and then press the touch pad.
✎✎ In the e-Manual, words in blue refer to screen menu options and words in
light blue refer to remote control buttons.
✎✎ A printable version of this guide is also available at www.samsung.com/
support.
To return to the home page, select the a button or select
of the screen.
on the top right
✎✎ To select a letter button (a, b, {, }), press the MORE button on the
Smart Touch Control to display to display the virtual remote panel on the
TV screen. Flick the touch pad until the playback control panel appears,
select the a button, and then press the touch pad.
Searching the Index
Scrolling a Page
Select the b button or select
on the top right of the screen to display the
index. Select a term to display the page containing the term.
To scroll a page, use of one of the following methods:
•• Place the focus on the
or
and then press the touch pad.
Use the Back, Forward, and Opened pages icons on the top left of the
screen to navigate through pages. These icons are available after you have
viewed two or more pages.
button at the right edge of the screen,
•• Drag or flick up or down the line on either the left or right edge of the touch
pad.
Searching Pages
Select the { button or select
on the top right of the screen, and enter
search criteria. Select a page from the list of search results to display it.
or
button at the right edge of the screen,
•• Place the focus on the
drag or flick up or down on the touch pad.
English - 17
[UN85S9AF-ZA]BN68-05182B-05ENG.indb 17
2013-10-30 �� 10:03:35
Connecting to a Network
Closing the e-Manual
To close the e-Manual, press and hold the RETURN button or select
upper-right corner of the screen.
at the
Jumping to a Menu Item
To jump directly to the menu item that is described in the current section,
select
. It is possible to jump from a menu item directly to the related
section in the e-Manual. On a menu screen, press the MORE button on the
Smart Touch Control and then select e-Manual on the virtual remote panel
that appears on the screen.
Connecting the TV to a network gives you access to online services such
as Smart Hub and lets you update the TV's software online directly from
Samsung.com.
Network Connection - Wireless
Connect the TV to the Internet using a standard wireless router or modem.
Wireless IP Router or Modem
that has a DHCP Server
✎✎ This feature may not be available, depending on the menu.
The LAN Port on the Wall
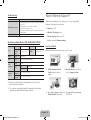
Picture
Picture Mode
Standard
•• Backlight
14
•• Contrast
100
•• Brightness
45
•• Sharpness
50
•• Color
•• Tint (G/R) G50
e-Manual
50
Try Now
LAN Cable (Not Supplied)
R50
Updating the e-Manual
Wireless Network Precautions
Press the ™ button and select Apps, and then select More Apps. The
e-Manual can be updated in the same way with an application update.
•• This TV supports the IEEE 802.11a/b/g /n communication protocols.
Samsung recommends using IEEE 802.11n. Otherwise, when you play
video over a network connection, the video may not play smoothly.
On the More Apps screen, select Update Apps, and then select e-Manual
from the list. The e-Manual starts updating to the latest version. However,
Update Apps appears on the screen only when the update is required.
English - 18
[UN85S9AF-ZA]BN68-05182B-05ENG.indb 18
2013-10-30 �� 10:03:36
•• To use a wireless network, the TV must be connected to a wireless router
or modem. If the wireless router supports DHCP, the TV can use a DHCP
or static IP address to connect to the wireless network.
•• Select a channel that is not currently in use for the wireless router. If the
channel set for the wireless router is currently being used by another
device, the result is usually interference and/or a communications failure.
Network Connection - Wired
There are three main ways to connect your TV to your network using cable,
depending on your network setup. They are illustrated below:
One Connect
The Modem
Port on the Wall
•• Most wireless networks have an optional security system. To enable a
wireless network's security system, you need to create a security key using
characters and numbers, and then enter that key into the router through
its menu. You then must enter this security key into any other devices you
want to connect to the wireless network.
External Modem
(ADSL / VDSL / Cable TV)
Modem Cable (Not Supplied)
LAN Cable (Not Supplied)
Network Security Protocols
The Modem
Port on the Wall
The TV only supports the following wireless network security protocols:
•• Authentication Modes: WEP, WPAPSK, WPA2PSK
One Connect
External Modem
(ADSL / VDSL / Cable TV)
IP Router that has
a DHCP Server
•• Encryption Types: WEP, TKIP, AES
In compliance with the newest Wi-Fi certification specifications, Samsung TVs
do not support WEP or TKIP security encryption in networks running in the
802.11n mode.
If the wireless router supports WPS (Wi-Fi Protected Setup), you can connect
the TV to your network using PBC (Push Button Configuration) or a PIN
(Personal Identification Number). WPS automatically configures the SSID and
WPA key settings.
Modem Cable
(Not Supplied)
LAN Cable
(Not Supplied)
LAN Cable
(Not Supplied)
One Connect
The LAN Port
on the Wall
Your Smart TV cannot connect to uncertified wireless routers.
LAN Cable (Not Supplied)
✎✎ The TV does not support network speeds less than or equal to 10Mbps.
✎✎ Use Cat 7 cable for the connection.
English - 19
[UN85S9AF-ZA]BN68-05182B-05ENG.indb 19
2013-10-30 �� 10:03:37
Charging the Battery
3D Active Glasses
If the red LED blinks every 2 seconds, charge the battery as shown below.
Features
Samsung's SSG-3570CR 3D glasses enable you to view 3D images on your
3D TV. The Samsung 3D glasses communicate with Samsung 3D TVs via the
2.4GHz RF band.
The orange LED will blink every second when battery charging is in progress.
The green LED will blink every 2 seconds when the charging is finished. (It
takes about 30 minutes to fully charge the battery that is dead; however, the
time required to charge it to full capacity may vary depending on the battery
level and the voltage of the supplied power.)
✎✎ This product can be used only with Samsung D, E, and F series 3D TVs
released in 2011 to 2013 or with 3D TVs that have any of the logos below.
Other wireless devices are not compatible with this product.
SAMSUNG TV
Parts
PC
Nose pad
Note Book
USB PORT
Micro USB Cable
Liquid-crystal
shutter
pairing button
The nose pads are adjustable.
✎✎ To wear the 3D glasses over eyeglasses, detach the nose pad from the
3D glasses.
✎✎ For details on how to attach or detach the glasses' Nose pad, refer to the
separate 3D glasses manual.
English - 20
[UN85S9AF-ZA]BN68-05182B-05ENG.indb 20
2013-10-30 �� 10:03:37
Pairing 3D Active Glasses
•• Operating range
✎✎ What is Pairing? Pairing is a process that prepares devices to exchange
data so that, in operation, the devices can transmit and exchange data
instantly.
Recommended pairing distance
•• Pairing
50cm
Press the pairing button on the 3D glasses
for more than 1 seconds. Pairing will start.
2~6m
•• Turning the glasses on and off
Put on the 3D glasses. The glasses will
automatically power on and the green
LED will be lit for 3 seconds. To power off
the glasses, take off the glasses. Several
minutes later, the glasses will automatically
power off and the red LED will be lit for 3
seconds.
(Make sure that 3D is activated on the TV
before using the 3D glasses.)
Recommended viewing distance
Recommended viewing distance
Recommended pairing distance
2~6m (6.5 to 19.5 ft)
50 cm or less (19.5 in)
✎✎ The working distance depends on obstacles (a person, metal, walls, etc.)
or electromagnetic waves.
✎✎ Note that if you take off the 3D glasses while viewing 3D video and the
3D mode remains enabled on your TV, it will take 5 minutes for the 3D
glasses to power off.
✎✎ If the glasses do not operate immediately when you put them on while the
TV is in 3D mode, put the glasses on again.
✎✎ This product is rechargeable. It may not operate due to the dead battery
when you attempt to use it for the first time. In this case, charge the
battery.
English - 21
[UN85S9AF-ZA]BN68-05182B-05ENG.indb 21
2013-10-30 �� 10:03:38
Pairing for the first time
How to pair again: Press the pairing button on the 3D glasses for more than
1 seconds.
1. Turn on the TV and wait until the TV is fully on.
Pairing is needed again in the following occasions:
2. Press the pairing button on the 3D glasses shortly. The 3D glasses will
power on and pairing will start.
−− Pairing may be needed again after you have had your 3D TV repaired.
3. The message “3D glasses are connected to TV.” will be displayed on the
TV screen when the pairing is successfully completed.
4. Enjoy 3D video after configuring the 3D function settings on the TV.
−− If you want to play 3D content on another Samsung 3D TV model that
belongs to the D, E, or F series released in 2011 through 2013.
Watching 3D Video
•• After the first pairing, putting on the 3D glasses will automatically power
on the glasses. To power off, take off the glasses.
Some 3D modes may not be available depending on the format of the image
source.
•• If the pairing fails, the 3D glasses will power off.
To watch in 3D, you must wear 3D Active Glasses and turn the glasses on by
pressing the power button.
•• If the first attempt to pair fails, turn the TV off and on again, and then go
to Step 2.
•• The LED will blink green and red alternately for 1 seconds if pairing is in
progress.
1. Go to the 3D screen. (Picture > 3D)
2. Select the 3D Mode. The 3D Mode screen appears.
3. Set the 3D Mode of the image you want to view.
English - 22
[UN85S9AF-ZA]BN68-05182B-05ENG.indb 22
2013-10-30 �� 10:03:38
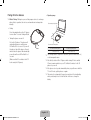
What is Remote Support?
Troubleshooting
If you encounter...
Try this...
My 3D glasses do not work.
The 3D glasses should be close to the TV. Move the 3D glasses to within 6m
(19.5 ft) of the TV.
Try the paring again in order to check if it is completed.
Check the 3D function settings on the TV.
Take off the glasses and put them on again. The glasses may not be turned
on if not properly worn.
The LED keeps blinking
The battery is low. Charge the battery.
Shutters
Liquid crystal
Transmittance
37±2%
Recommended
operating
distance
2~6m (6 to 19.5 ft)
Field Rate
120 fields/second
Weight
Glasses
29g (0.99 oz)
Power
Glasses
Built-in 3.7V Lithium-polymer battery
Glasses
1.12mA
Power
consumption
Operating
conditions
Battery
Type
65mAh, 3.7V
Operating time
40Hr
Operating
temperature
50 °F ~ 104 °F (10°C ~ 40°C)
Custody
temperature
-4 °F ~ 113 °F (-20°C ~ 45°C)
•• Diagnose your TV
•• Adjust the TV settings for you
•• Perform a factory reset on your TV
Specifications (Model Number: SSG-3550CR/SSG-3570CR)
Optics
Samsung Remote Support service offers you one-on-one support with a
Samsung Technician who can remotely:
•• Install recommended firmware updates
How Does it Work?
Having a Samsung Tech remotely service your TV is easy.
1. Call the Samsung Contact
Center and ask for remote
support.
2. Open the menu on your TV and
go to the Support section.
3. Select Remote Management and
Provide the Pin# to the agent.
4. The agent will then access your
TV. That's it!
✎✎ Product specifications may be changed without notice in order to
enhance product performance.
✎✎ The continuous operating time may differ depending on the wireless
communication environment and usage conditions.
English - 23
[UN85S9AF-ZA]BN68-05182B-05ENG.indb 23
2013-10-30 �� 10:03:38
Troubleshooting
Issues
Solutions and Explanations
Trouble Powering On
When the TV is turned on, the remote control receiver flashes 5 times
before the screen turns on.
If you find that you are having problems powering on your Samsung
television, there are a number of things to check before calling the service
department.
If the power cord is connected properly and the remote control is operating
normally, the problem might be with the antenna cable connection or the
cable/satellite box not being turned on. Check the antenna connection or
turn on the cable/satellite box.
Stand Assembly
If you have any trouble assembling the stand, review the stand assembly
instruction in the Quick Start Guide.
Cannot Find a Channel
Re-run Setup (Go to Menu > System > Setup) or run Auto Program. (Go
to Menu > Broadcasting > Auto Program).
If the TV seems to have a problem, first review this list of possible problems
and solutions. Also, review the Troubleshooting Section in the e-Manual. If
none of the troubleshooting tips apply, visit www.samsung.com/support or call
Samsung Customer Service at 1-800-SAMSUNG (1-800-726-7864).
Issues
Solutions and Explanations
Flickering and Dimming
If your Samsung Television is flickering or dimming sporadically, you may
need to disable some of the energy efficiency features.
Disable Energy Saving (System > Eco Solution > Eco Sensor) and/
or Energy Saving (System > Eco Solution > Energy Saving) and check
again.
Component Connections /
Screen Color
Screen Brightness
Auto Motion Plus/Blur
Unwanted Powering Off
If you find that the color on your Samsung television screen is not correct or
the black and white colors are off, run a Self Diagnosis Picture Test (Support
> Self Diagnosis > Picture Test).
If the picture problem is caused by the TV, the problem should be visible in
the Picture Test. If the problem is not visible, next confirm that the TV's video
input ports are connected to the correct external video device output ports
and that none of the connections are loose. Finally, if possible, test your
external video devices by connecting them to another TV.
✎✎ For detailed troubleshooting information, watch the troubleshooting
videos at www.samsung.com/spsn.
Make sure you have the correct cable before plugging it in. Illustrations of
common plugs and Ports are shown below.
Cable Plugs
If you find that the colors on your Samsung TV are correct but just a little too
dark or bright, try adjusting the following settings first.
Navigate to Picture and adjust Backlight, Contrast, Brightness,
Sharpness, Color, Tint (G/R) and other picture quality adjustment settings.
HDMI
If you find that there is a blur or “ghost” shadow to the images on your
television screen, you might be able to correct the issue using Auto Motion
Plus (Picture > Picture Options > Auto Motion Plus).
USB
If your Samsung TV appears to turn off by itself, try disabling some of
the TV's energy efficiency and automatic off features. Check if Sleep
Timer (System > Time > Sleep Timer) has been enabled. Sleep Timer
automatically turns off the TV after an amount of time that you select. If the
Sleep Timer has not been enabled, see if No Signal Power Off (System >
Eco Solution > No Signal Power Off) or Auto Power Off (System > Eco
Solution > Auto Power Off) has been enabled. No Signal Power Off turns
off the TV if no signal has been received by the TV for a specified period time.
Auto Power Off turns off the TV if there has been no user input in four hours.
Ports
Do not plug cables in
upside down.
Optical
Warning
Be sure to check the
orientation of the plug
before plugging it in.
English - 24
[UN85S9AF-ZA]BN68-05182B-05ENG.indb 24
2013-10-30 �� 10:03:40
Issues
Solutions and Explanations
The TV won’t turn on.
• Make sure the AC power cord is securely plugged in to the wall outlet
and the TV.
• Make sure the wall outlet is working.
• Try pressing the P button on the TV to make sure the problem is not
the remote. If the TV turns on, refer to “Remote control does not work”
below.
There is no picture/video.
• Check the cable connections. Remove and reconnect all cables
connected to the TV and external devices.
• Set the video outputs of your external devices (Cable/Sat Box, DVD,
Blu-ray etc) to match the TV's input connections. For example, if an
external device’s output is HDMI, it should be connected to an HDMI
input on the TV.
• Make sure your connected devices are powered on.
• Be sure to select the correct input source.
• Reboot the connected device by unplugging it, and then reconnecting
the device’s power cable.
The remote control does not
work.
• Replace the remote control batteries. Make sure the batteries are
installed with their poles (+/–) in the correct direction.
• Clean the sensor’s transmission window on the remote.
• Try pointing the remote directly at the TV from 5~6 feet away.
The cable/set top box remote
control doesn’t turn the TV on
or off or adjust the volume.
• Program the Cable/Set remote control to operate the TV. Refer to the
Cable/Set-Top-Box user manual for the SAMSUNG TV code.
Eco Sensor and Screen Brightness
Eco Sensor measures the light in your room and optimizes the brightness
of the TV automatically to reduce power consumption. This causes the TV
to brighten and dim automatically. If you want to turn this function off, go to
Menu > System > Eco Solution > Eco Sensor
✎✎ This TFT LED panel uses a panel consisting of sub pixels which require
sophisticated technology to produce. There may be, however, a few bright
or dark pixels on the screen. These pixels will have no impact on the
performance of the product.
Eco Sensor
[[ Do not block the sensor with
any material. It can decrease
picture brightness.
✎✎ To keep your TV in optimum condition, upgrade to the latest software.
Use the Update Now or Auto Update functions on the TV's menu (Screen
Menu > Support > Software Update > Update now or Screen Menu >
Support > Software Update > Auto Update).
English - 25
[UN85S9AF-ZA]BN68-05182B-05ENG.indb 25
2013-10-30 �� 10:03:40
Maintenance
✎✎ If a sticker was attached to the TV screen, some debris can remain after
TV Upgrade using One Connect
(sold separately)
you remove the sticker. Please clean the debris off before watching TV.
✎✎ The exterior and screen of the product can get scratched during cleaning.
Be sure to wipe the exterior and screen carefully using a soft cloth to
prevent scratches.
One Connect
(sold separately)
TV
Do not spray water directly onto the
product. Any liquid that goes into the
product may cause a failure, fire, or
electric shock.
Clean the product with a soft cloth
dampened with a small amount of
water. Do not use a flammable liquid
(e.g. benzene, thinners) or a cleaning
agent.
Connecting a more current version of One Connect (sold separately) to your
Samsung TV will allow you to enjoy the latest features and content without
having to purchase a new TV. Experience the latest features and services
offered by Samsung Electronics via One Connect.
✎✎ One Connect is sold separately. Purchasing One Connect will allow you
to upgrade the software to the version from the year in which your One
Connect was released. Not supported on all models.
English - 26
[UN85S9AF-ZA]BN68-05182B-05ENG.indb 26
2013-10-30 �� 10:03:41
Specifications
✎✎ Design and specifications are subject to change without prior notice.
✎✎ The actual appearance of the TV may differ from the images in this
manual, depending on the model.
Display Resolution
Environmental Considerations
Operating Temperature
Operating Humidity
Storage Temperature
Storage Humidity
Stand Swivel (Left / Right)
3840 x 2160
50°F to 104°F (10°C to 40°C)
10% to 80%, non-condensing
-4°F to 113°F (-20°C to 45°C)
5% to 95%, non-condensing
0˚
Model Name
UN85S9AF
Screen Size
(Diagonal)
85˝ Class
(84.5 measured diagonally)
Sound
(Output)
Dimensions (W x H x D)
Body
With stand
Weight
With Stand
120W
(front top 20 x 2, front bottom 20 x 2, woofer 20 x 2)
78.9 x 64.4 x 2.8 inches
(2004.3 x 1635.9 x 71.6 mm)
78.9 x 63.9 x 22.8 inches
(2004.3 x 1624.4 x 581.5 mm)
✎✎ This device is a Class B digital apparatus.
✎✎ For information about the power supply, and more information about
power consumption, refer to the label attached to the product.
✎✎ Typical power consumption is measured according to Energy Star
Program requirements for Televisions.
Dispose unwanted electronics through an approved recycler.
To find the nearest recycling location, go to our website:
www.samsung.com/recyclingdirect or call, (877) 278 - 0799
Standby mode
To decrease power consumption, unplug the power cord when you don't
intend to use the TV for a long time.
189.1 lbs (85.8 kg)
Licenses
English - 27
[UN85S9AF-ZA]BN68-05182B-05ENG.indb 27
2013-10-30 �� 10:03:42
Warranty Information
FCC Radiation Exposure Statement:
This equipment complies with FCC radiation exposure limits set forth for an
uncontrolled environment. This equipment should be installed and operated
with minimum distance 20cm between the radiator & your body.
Federal Communication Commission Interference Statement
This equipment has been tested and found to comply with the limits for a
Class B digital device, pursuant to Part 15 of the FCC Rules. These limits
are designed to provide reasonable protection against harmful interference
in a residential installation. This equipment generates, uses and can radiate
radio frequency energy and, if not installed and used in accordance with
the instructions, may cause harmful interference to radio communications.
However, there is no guarantee that interference will not occur in a particular
installation. If this equipment does cause harmful interference to radio or
television reception, which can be determined by turning the equipment off
and on, the user is encouraged to try to correct the interference by one of the
following measures:
•• Reorient or relocate the receiving antenna.
•• Increase the separation between the equipment and receiver.
This Class B digital apparatus complies with Canadian ICES-003.
Cet appareil numérique de la classe B conforme á la norme NMB-003 du
Canada.
This device complies with Industry Canada license-exempt RSS standard(s).
Operation is subject to the following two conditions: (1) this device may not
cause interference, and (2) this device must accept any interference, including
interference that may cause undesired operation of the device.
Le présent appareil est conforme aux CNR d'Industrie Canada applicables
aux appareils radio exempts de licence. L'exploitation est autorisée aux deux
conditions suivantes: (1) l'appareil ne doit pas produire de brouillage, et (2)
l'utilisateur de l'appareil doit accepter tout brouillage radioélectrique subi,
même si le brouillage est susceptible d'en compromettre le fonctionnement.
For product available in the USA/Canada market, only channel 1~11 can be
operated. Selection of other channels is not possible.
•• Connect the equipment into an outlet on a circuit different from that to
which the receiver is connected.
This device and its antenna(s) must not be co-located or operation in
conjunction with any other antenna or transmitter.
•• Consult the dealer or an experienced radio/TV technician for help.
FCC Caution: Any changes or modifications not expressly approved by the
party responsible for compliance could void the user’s authority to operate this
equipment.
This device complies with Part 15 of the FCC Rules. Operation is subject
to the following two conditions: (1) This device may not cause harmful
interference, and (2) this device must accept any interference received,
including interference that may cause undesired operation.
Under Industry Canada regulations, this radio transmitter may only operate
using an antenna of a type and maximum (or lesser) gain approved for the
transmitter by Industry Canada. To reduce potential radio interference to other
users, the antenna type and its gain should be so chosen that the equivalent
isotropically radiated power (e.i.r.p.) is not more than that necessary for
successful communication.
IC Radiation Exposure Statement:
For product available in the USA/Canada market, only channel 1~11 can be
operated. Selection of other channels is not possible.
This equipment complies with IC RSS-102 radiation exposure limits set forth
for an uncontrolled environment. This equipment should be installed and
operated with minimum distance 20cm between the radiator & your body.
This device and its antenna(s) must not be co-located or operation in
conjunction with any other antenna or transmitter.
English - 28
[UN85S9AF-ZA]BN68-05182B-05ENG.indb 28
2013-10-30 �� 10:03:42
IMPORTANT WARRANTY INFORMATION REGARDING
TELEVISION FORMAT VIEWING
✎✎ See the warranty card for more information on warranty terms.
Wide screen format LED Displays (with 16:9 aspect ratios, the ratio of the
screen width to height) are primarily designed to view wide screen format
full-motion video. The images displayed on them should primarily be in the
wide screen, 16:9 ratio format, or expanded to fill the screen, if your model
offers this feature, with the images constantly in motion. Displaying stationary
graphics and images on the screen, such as the dark sidebars on nonexpanded standard format television video and programming, should be
limited to no more than 5% of the total television viewing time per week.
Additionally, viewing other stationary images and text such as stock market
crawls, video game displays, station logos, web sites or computer graphics
and patterns, should be limited as described above for all televisions.
Displaying stationary images that exceed the above guidelines can cause
uneven aging of LED Displays that leave subtle, but permanent burned-in
ghost images in the LED picture. To avoid this, vary the programming and
images, and primarily display full screen moving images, not stationary
patterns or dark bars. On LED models that offer picture sizing features, use
these controls to view different formats as a full screen picture.
Be careful about the television formats you select and the length of time you
view them. Uneven LED aging as a result of format selection and use, as well
as burned in images, are not covered by your Samsung limited warranty.
•• SAMSUNG ELECTRONICS NORTH AMERICAN LIMITED WARRANTY
STATEMENT
Subject to the requirements, conditions, exclusions and limitations of the
original Limited Warranty supplied with Samsung Electronics (SAMSUNG)
products, and the requirements, conditions, exclusions and limitations
contained herein, SAMSUNG will additionally provide Warranty Repair
Service in the United States on SAMSUNG products purchased in Canada,
and in Canada on SAMSUNG products purchased in the United States, for
the warranty period originally specified, and to the Original Purchaser only.
The above described warranty repairs must be performed by a SAMSUNG
Authorized Service Center. Along with this Statement, the Original Limited
Warranty Statement and a dated Bill of Sale as Proof of Purchase must be
presented to the Service Center. Transportation to and from the Service
Center is the responsibility of the purchaser. Conditions covered are limited
only to manufacturing defects in material or workmanship, and only those
encountered in normal use of the product.
Excluded, but not limited to, are any originally specified provisions for, inhome or on-site services, minimum or maximum repair times, exchanges
or replacements, accessories, options, upgrades, or consumables.
For the location of a SAMSUNG Authorized Service Center, please call
toll-free:
−− In the United States: 1-800-SAMSUNG (1-800-726-7864)
−− In Canada: 1-800-SAMSUNG
Still image warning
Avoid displaying still images (such as jpeg picture files), still image elements
(such as TV channel logos, stock or news bars at the screen bottom etc.),
or programs in panorama or 4:3 image format on the screen. Constantly
displaying still pictures can cause image burn-in on the LED screen, which
will affect image quality. To reduce risk of this effect, please follow the
recommendations below:
•• Avoid displaying the same TV channel for long periods.
•• Always try to display any image in full screen. Use the TV set’s picture
format menu for the best possible match.
•• Reduce brightness and contrast to avoid the appearance of after-images.
•• Use all TV features designed to reduce image retention and screen burn.
Refer to the e-Manual for details.
English - 29
[UN85S9AF-ZA]BN68-05182B-05ENG.indb 29
2013-10-30 �� 10:03:42
Regulatory Compliance Statements
(For 3D Active Glasses)
•• Reorient or relocate the receiving antenna.
•• Increase the separation between the equipment and receiver.
•• Connect the equipment to an outlet on a circuit different from that to which
the receiver is connected.
FCC COMPLIANCE
•• Consult the dealer or an experienced radio/TV technician for help.
Federal Communication Commission Interference Statement
1. Changes or modifications not expressly approved by the party responsible
for compliance could void the user’s authority to operate the equipment.
2.NOTE: This equipment has been tested and found to comply with the
limits for a Class B digital device, pursuant to Part 15 of the FCC Rules.
These limits are designed to provide reasonable protection against harmful
interference in a residential installation. This equipment generates, uses
and can radiate radio frequency energy and, if not installed and used in
accordance with the instructions, may cause harmful interference to radio
communications. However, there is no guarantee that interference will
not occur in a particular installation. If this equipment does cause harmful
interference to radio or television reception, which can be determined by
turning the equipment off and on, the user is encouraged to try to correct
the interference by one or more of the following measures:
FCC Caution: Any changes or modifications not expressly approved by the
party responsible for compliance could void the user’s authority to operate this
equipment.
This device complies with Part 15 of the FCC Rules. Operation is subject
to the following two conditions: (1) This device may not cause harmful
interference, and (2) this device must accept any interference received,
including interference that may cause undesired operation.
CALIFORNIA USA ONLY
This perchlorate warning applies only to primary CR
(Manganese Dioxide)
Lithium coin cells in the product sold or distributed ONLY in California
USA
" Perchlorate Material - special handling may apply,
See www.dtsc.ca.gov/hazardouswaste/perchlorate."
English - 30
[UN85S9AF-ZA]BN68-05182B-05ENG.indb 30
2013-10-30 �� 10:03:42
SAMSUNG BRAND PRODUCTS
LIMITED WARRANTY TO ORIGINAL PURCHASER
This SAMSUNG brand product, as supplied and distributed by SAMSUNG and delivered new, in the original
carton to the original consumer purchaser, is warranted by SAMSUNG against manufacturing defects in
materials and workmanship for period as shown below:
Categories
UN85S9AF
Parts
2 Year
Labor
2 Year
Size
85"
Service
In Home
For Commercial Use, the warranty is 90 Days Parts and Labor.
This limited warranty begins on the original date of purchase, and is valid only on products purchased and
used in the United States. To receive warranty service, the purchaser must contact SAMSUNG for problem
determination and service procedures. Warranty service can only be performed by a SAMSUNG authorized
service center. The original dated bill of sale must be presented upon request as proof of purchase to SAMSUNG
or SAMSUNG's authorized service center.
SAMSUNG will repair or replace this product, at our option and at no charge as stipulated herein, with new
or reconditioned parts or products if found to be defective during the limited warranty period specified above.
All replaced parts and products become the property of SAMSUNG and must be returned to SAMSUNG.
Replacement parts and products assume the remaining original warranty, or ninety (90) days, whichever is
longer.
Certain products are eligible for In-home service at Samsung’s discretion. To receive in-home service, the
product must be unobstructed and accessible to service personnel. If during in-home service, repair cannot not
be completed, it may be necessary to remove, repair and return the product. If in-home service is unavailable,
SAMSUNG may elect, at our option, to provide for transportation of our choice to and from a SAMSUNG
authorized service center. Otherwise, and for 37" and smaller LCD/LED TV, transportation to and from the
SAMSUNG authorized service center is the responsibility of the purchaser.
This limited warranty covers manufacturing defects in materials and workmanship encountered in normal, and
except to the extent otherwise expressly provided for in this statement, noncommercial use of this product, and
shall not apply to the following, including, but not limited to: damage which occurs in shipment; delivery and
installation; applications and uses for which this product was not intended; altered product or serial numbers;
cosmetic damage or exterior finishes; accidents, abuse, neglect, fire, water, lightning or other acts of nature;
use of products, equipment, systems, utilities, services, parts, supplies, accessories, applications, installations,
repairs, external wiring or connectors not supplied or authorized by SAMSUNG which damage this product or
result in service problems; incorrect electrical line voltage, fluctuations and surges; customer adjustments and
failure to follow operating instructions, cleaning, maintenance and environmental instructions that are covered
and prescribed in the instruction book; reception problems and distortion related to noise, echo, interference
or other signal transmission and delivery problems; brightness related to normal aging, or burned-in images.
SAMSUNG does not warrant uninterrupted or error-free operation of the product.
THERE ARE NO EXPRESS WARRANTIES OTHER THAN THOSE LISTED AND DESCRIBED ABOVE, AND
NO WARRANTIES WHETHER EXPRESS OR IMPLIED, INCLUDING, BUT NOT LIMITED TO, ANY IMPLIED
WARRANTIES OF MERCHANTABILITY OR FITNESS FOR A PARTICULAR PURPOSE, SHALL APPLY
AFTER THE EXPRESS WARRANTY PERIODS STATED ABOVE, AND NO OTHER EXPRESS WARRANTY
OR GUARANTY GIVEN BY ANY PERSON, FIRM OR CORPORATION WITH RESPECT TO THIS PRODUCT
SHALL BE BINDING ON SAMSUNG. SAMSUNG SHALL NOT BE LIABLE FOR LOSS OF REVENUE OR
PROFITS, FAILURE TO REALIZE SAVINGS OR OTHER BENEFITS, OR ANY OTHER SPECIAL, INCIDENTAL
OR CONSEQUENTIAL DAMAGES CAUSED BY THE USE, MISUSE OR INABILITY TO USE THIS PRODUCT,
REGARDLESS OF THE LEGAL THEORY ON WHICH THE CLAIM IS BASED, AND EVEN IF SAMSUNG
HAS BEEN ADVISED OF THE POSSIBILITY OF SUCH DAMAGES. NOR SHALL RECOVERY OF ANY KIND
AGAINST SAMSUNG BE GREATER IN AMOUNT THAN THE PURCHASE PRICE OF THE PRODUCT SOLD BY
SAMSUNG AND CAUSING THE ALLEGED DAMAGE. WITHOUT LIMITING THE FOREGOING, PURCHASER
ASSUMES ALL RISK AND LIABILITY FOR LOSS, DAMAGE OR INJURY TO PURCHASER AND PURCHASER’S
PROPERTY AND TO OTHERS AND THEIR PROPERTY ARISING OUT OF THE USE, MISUSE OR INABILITY TO
USE THIS PRODUCT SOLD BY SAMSUNG NOT CAUSED DIRECTLY BY THE NEGLIGENCE OF SAMSUNG.
THIS LIMITED WARRANTY SHALL NOT EXTEND TO ANYONE OTHER THAN THE ORIGINAL PURCHASER OF
THIS PRODUCT, IS NONTRANSFERABLE AND STATES YOUR EXCLUSIVE REMEDY.
Some states do not allow limitations on how long an implied warranty lasts, or the exclusion or limitation of
incidental or consequential damages, so the above limitations or exclusions may not apply to you. This warranty
gives you specific legal rights, and you may also have other rights which vary from state to state.
To obtain warranty service, please contact SAMSUNG at:
Samsung Electronics America, Inc.
85 Challenger Road
Ridgefield Park, NJ 07660-2112
1-800-SAMSUNG (7267864) – www.samsung.com
1-800-749-0260: Projectors only
English - 31
[UN85S9AF-ZA]BN68-05182B-05ENG.indb 31
2013-10-30 �� 10:03:42
This page is intentionally left blank.
[UN85S9AF-ZA]BN68-05182B-05ENG.indb 32
2013-10-30 �� 10:03:42
This page is intentionally left blank.
[UN85S9AF-ZA]BN68-05182B-05ENG.indb 33
2013-10-30 �� 10:03:42
This page is intentionally left blank.
[UN85S9AF-ZA]BN68-05182B-05ENG.indb 34
2013-10-30 �� 10:03:42