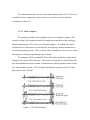
1
Autonomous Underwater Vehicle:
Powered Glider
Florida Institute of Technology
Department of Marine and Environmental Sciences
Ocean Engineering
Design Team:
Todd Allen
Joseph Caldwell
Sean Kuhn
Seth Noyes
Abstract
The AUV Powered Glider is the future of underwater surveying. The glider
opens up research possibilities in oceanography, geology, marine biology, and many
more fields. This AUV Powered Glider provides a mobile platform that is controlled by
a central computer. This computer can be programmed to allow the glider be tasked
with missions of any length or type. The computer on the glider also provides the
means to be configured with any kind of sensor, this allows it to do any number of
things while on a mission even altering the mission based on sensor readings. The
AUV Powered Glider provides endless opportunities for a number of different fields.
With the glider’s universal design and advanced computer system the AUV Powered
Glider is the ideal vehicle for any underwater research.
Table of Contents
1. Front Matter............................................................................................... 5
1.1. Table of Figures............................................................................................... 5
1.2. Table of Tables................................................................................................ 5
1.3. Glossary........................................................................................................... 6
2. Introduction................................................................................................
2.1. Executive Summary.........................................................................................
2.2. Key Objectives.................................................................................................
2.3. Key Obstacles..................................................................................................
2.4. Example Application Scenarios.......................................................................
2.4.1. Area Survey...........................................................................................
2.4.2. Specimen Tracking................................................................................
7
7
7
8
8
8
9
3. Background................................................................................................ 11
3.1. Other AUVs.................................................................................................... 11
3.1.1. AUV Gliders........................................................................................ 11
3.1.2. Deepwater AUVs................................................................................. 12
3.2. Current Technology....................................................................................... 13
3.2.1. Control Systems................................................................................... 13
3.2.2. Depth Survivability.............................................................................. 14
4. Prototype Model.................................................................................... 15
4.1. Design............................................................................................................. 16
4.1.1. Structure............................................................................................... 16
4.1.1.1. Aluminum Frame........................................................................... 17
4.1.1.2. Fiberglass Hull............................................................................... 17
4.1.1.3. Oil Filled Housings........................................................................ 18
4.1.1.4. Instrumentation Spheres................................................................. 18
4.1.2. Central Electronics............................................................................... 19
4.1.2.1. Onboard Controller........................................................................ 19
4.1.2.2. Control Board................................................................................. 20
4.1.2.3. Recovery System............................................................................ 20
4.1.2.4. Main Thrusters............................................................................... 21
4.1.2.5. Servos............................................................................................ 21
4.1.2.6. Power Management....................................................................... 22
4.1.3. Scientific.............................................................................................. 22
4.1.3.1. Prototype Sample Containers........................................................ 22
4.1.3.2. Simulating Future Sensors............................................................. 25
4.2. Construction.................................................................................................... 26
4.2.1. Sub-Assemblies.....................................................................................26
4.2.1.1. Main Hull........................................................................................26
4.2.1.2. Buoyancy Foam.............................................................................. 29
4.2.1.3. Side Beams......................................................................................30
4.2.1.4. Bottom Rails................................................................................... 31
4.2.1.5. Servo Box........................................................................................31
4.2.1.6. Ailerons & Rudders........................................................................ 33
4.2.1.7. Aileron Coupler & Camera Mount................................................. 33
4.2.1.8. Main Thrusters................................................................................34
4.2.2. Assembly.............................................................................................. 36
4.3. Budget and Finances....................................................................................... 37
4.3.1. Price List...............................................................................................37
4.3.2. Sponsors and Contributors................................................................... 38
5. Production Model................................................................................. 40
5.1. Design............................................................................................................. 40
5.1.1. Structure............................................................................................... 40
5.1.1.1. Aluminum Frame........................................................................... 40
5.1.1.2. Fiberglass Hull............................................................................... 41
5.1.1.3. Oil Filled Housings........................................................................ 41
5.1.1.4. Instrumentation Spheres................................................................. 42
5.1.2. Central Electronics............................................................................... 43
5.1.2.1. Control Board................................................................................. 43
5.1.2.2. Main Computer...............................................................................43
5.1.2.3. Recovery System............................................................................ 45
5.1.2.4. Main Thrusters............................................................................... 45
5.1.2.5. Servos............................................................................................ 45
5.1.2.6. Power Management........................................................................ 46
5.1.3. Scientific.............................................................................................. 46
5.1.3.1. Sample Containers......................................................................... 46
5.1.3.2. Basic Sensor Pack.......................................................................... 49
5.1.3.3. Advanced Modular Sensors........................................................... 50
5.2. Budget and Finances....................................................................................... 51
5.2.1. Consumables........................................................................................ 51
5.2.2. Maintenance......................................................................................... 52
6. Analysis and Testing.......................................................................... 54
6.1. Planned Tests.................................................................................................. 54
6.1.1. Deployment Test.................................................................................. 54
6.1.1.1. Introduction.....................................................................................54
6.1.1.2. Methods...........................................................................................55
6.1.1.3. Results.............................................................................................56
6.1.2. Seals Test............................................................................................. 57
6.1.3. Operations Test.................................................................................... 58
6.2. Ideal Tests...................................................................................................... 59
6.2.1. Software Tests..................................................................................... 59
6.2.2. Pressure Chamber Test........................................................................ 60
6.2.3. Long Duration Ocean Test.................................................................. 60
6.2.4. Short Duration Deepwater Test........................................................... 61
6.2.5. Trial Mission........................................................................................ 61
7. Liabilities...................................................................................................... 62
7.1.
7.2.
7.3.
7.4.
Health.............................................................................................................. 62
Safety.............................................................................................................. 62
Environmental................................................................................................. 63
Legal................................................................................................................ 63
8. Conclusion and Recommendations....................................... 64
9. References.................................................................................................... 66
10. Appendix....................................................................................................... 70
1. Front Matter
1.1. Table of Figures
Figure 3.1: Seaglider (Photo Courtesy of University of Washington, Applied Physics
Laboratory) ..................................................................................................11
Figure 3.2: Spray Glider (Photo Courtesy of Bluefin Robotics) .................................. 11
Figure 3.3: Slocum Glider (Photo courtesy of Webb Research Corp.) .........................12
Figure 3.4: ABE (Photo courtesy of Woods Hole Oceanographic Institute) ................12
Figure 4.1: Prototype AUV Powered Glider Rendering................................................ 15
Figure 4.2: Prototype AUV Powered Glider Rendering................................................ 15
Figure 4.3: Prototype Sample Container........................................................................23
Figure 5.1: PC104 board stack....................................................................................... 44
Figure 5.2: Production Sample Container......................................................................47
1.2. Table of Tables
Table 4.1: Prototype AUV Powered Glider Specifications............................................ 16
Table 4.2: Average Sensor Weight Specifications......................................................... 25
Table 4.3: Prototype Estimated Price List...................................................................... 37
Table 4.4: Contributors................................................................................................... 39
Table 5.1: Production AUV Powered Glider Specifications.......................................... 40
Table 5.2: Maintenance Supplies.................................................................................... 53
1.3. Glossary
AUV
Autonomous Underwater Vehicle
COLREG
Collision Regulations
CTD
Conductivity, Temperature, Depth Sensor
ESA
Endangered Species Act
GPS
Global Positioning System
GUI
Graphical User Interface
INS
Inertial Navigation System
MMPA
Marine Mammal Protection Act
NAV
Navigation
SBC
Single Board Computer
SONAR
Sound Navigation and Ranging
UV-VIS
Ultra Violet – Visual Light Spectrums
2. Introduction
2.1. Executive Summary
The AUV Powered Glider is an underwater vehicle that can lead to numerous
papers and years of research. As a result we focused on the main systems and the
considerations for future systems. We addressed the major objectives and obstacles to
design a universal mobile platform that is ready to be controlled by an autonomous
computer system. This platform is fully ready for operation at 4,000 meters water depth
and can operate both in power and glide modes. The glider platform is also takes into
consideration the placement and requirements for future systems. These systems range
from new sensors, thrusters, servos, computers, and batteries.
The AUV computer is cutting edge technology that requires some of the most
demanding programming out there. As a result we focused more on the platform aspect
of the vehicle and have created a control board where a user can test all of the glider’s
current features. The glider will however be ready to accept the commands of an
autonomous computer system when it’s complete and will take the place of the
operator.
2.2. Key Objectives
-
Functional at 4,000 meters underwater
-
Able to collect samples
-
Operate self propelled
-
Fully capable of gliding
-
Platform for module sensors
2.3. Key Obstacles
-
Limited Resources
-
High Levels of Ambient Pressure at Target Depths
-
Finding and Developing a long lasting Power Supply
-
Planning for future Maintenance
-
Developing emergency protocols
-
Planning for future not yet invented sensors
2.4. Example Application Scenarios
The AUV Powered Glider is capable of doing a multitude of different missions.
These missions range from all fields of underwater studies including seabed research
and exploration. The AUV Powered Glider provides a mobile platform that can be
equipped and programmed for the user’s needs. This flexibility makes it the perfect
tool for any kind of mission or task. Two of the main types of scenarios you could do
are area surveying and specimen tracking. With area surveying you could set the AUV
Powered Glider to hover, circle, or search in a grid pattern over a specific area and
search for something in particular and/or record anything it does find. Another main
type of mission scenario is specimen tracking. The AUV Powered Glider will have the
ability to actively read the sensors instead of just archiving the data. This ability allows
the glider to actively track any specimen, marine animal, or even track a chemical to its
source.
2.4.1. Area Survey
The AUV Powered Glider’s computer can be programmed to circle a predesignated area or to work in a grid pattern over the area collecting sensor data and if
desired the glider can even act on the data and investigate further.
The AUV Powered Glider can be equipped with numerous sensors for this type
of mission. Some of the sensors you could equip the glider with are:
- Profiling Sonar
- Side Scan Sonar
- Hydrophones
- UV VIS Mass Spectrometer
- Digital imaging devices
- Many more…
The flexibility of the AUV Powered Glider makes it the perfect platform for
surveying and monitoring subsurface ocean conditions. Uses include:
- Surveying future oil drilling site
- Monitoring pollution affects over time
- Cataloging all local marine life
- Many more…
2.4.2. Specimen Tracking
The AUV Powered Glider’s already built in AUV computer can be programmed
to actively collect and use sensor readings instead of just recording and archiving them.
Usually when an underwater vehicle collects data it just stores it on a hard drive or
some sort of flash memory for future review. In this instance you could feed a sensor
directly into the navigation part of the glider’s computer and adjust your course based
on the sensor readings.
The AUV Powered Glider can be equipped with numerous sensors for this type
of mission. These sensors include but are not limited to:
- UV VIS mass spectrometer
- Aqua III fluorimeter
- Hydrophones
- Many more…
The combined power of the onboard computer and the glider’s sensors give the
AUV Powered Glider the ability to investigate, track, and follow things like:
- Large marine animals
- Algae Blooms
- Chlorophyll Sources
- Chemical Spills
- Many more…
3. Background
The concept of the AUV Powered Glider called for an independent vehicle
capable of enduring a depth of four thousand meters and being able to carry a variety of
sensors down with it for an extended period of time. The development of this concept
looks at the current AUV gliders to determine how to conserve power for longer
mission duration. The concept also needs to bring the variety of sensors,
maneuverability, and depth rating of the more common AUVs.
3.1. Other AUVs
3.1.1. AUV Gliders
The purpose of an AUV Glider is to
collect information for an extended amount
of time. To be able to operate for this
duration the gliders rely on expending as
little power as possible. To minimize their
power usage these gliders have no thrusters
for propulsion. The only power drain they
have is for their sensors, computer, and
buoyancy control. There are currently
three such gliders the University of
Figure 3.1: Seaglider (Photo Courtesy
of University of Washington, Applied
Physics Laboratory)
Washington’s Seaglider, Bluefin’s Spray
Glider, and Webb Research Corporation’s
Slocum Glider. The gliders are a slightly
altered torpedo shape. The gliders use
their buoyancy control system to gain their
Figure 3.2: Spray Glider (Photo
Courtesy of Bluefin Robotics)
initial ascending or descending motion.
The gliders then alter the angle of their
fins to turn a portion of their vertical
motion into a horizontal motion. This
gives the gliders a saw tooth pattern to
follow through the water column. While
moving through the water column these
gliders have a CTD, fluorimeter, and
Figure 3.3: Slocum Glider (Photo courtesy
of Webb Research Corp.)
optical backscattering sensors to take
measurements with. At the peak of the saw tooth pattern, when the gliders are at or
near the surface, they are able to send and receive information via a satellite antenna.
The gliders transmit the data they just collected and are able to receive any changes to
the mission it was sent out to do. All of these gliders rely on pumping water into and
out of a space. This type of system limits the depths these gliders could reach to
between a thousand and fifteen hundred meters. Despite the limit in depth the gliders
are able to operate for months at a time since the power drain on their batteries is only a
minimal draw needed by the sensors and computer. (Bluefin) (Webb) (Light)
3.1.2. Deepwater AUVs
There are several deepwater
AUVs. Current Deepwater AUVs are
built for a specific mission to be repeated.
The majority of these AUVs deal with
ocean floor surveying. The use of these
AUVs is more based on the inconvenience
of a tether long enough to reach where
these AUVs operate rather than the
Figure 3.4: ABE (Photo courtesy of
Woods Hole Oceanographic Institute)
timeframe they operate in. The time limit for these AUVs is dependent on their battery
supply and how quickly the thrusters, sensors, and computers drain them. Several of
the deepwater AUVs that are currently in use are Echo Ranger from Boeing, Fugro
N.V. and Oceaneering International, Inc.; Hugin 3000 from Kronsberg Maritime; and
ABE from Woods Hole Oceanographic Institute. The Echo Ranger and Hugin 3000
both are rated to a depth up to three thousand meters. (Boeing) The Hugin 3000 unlike
the Echo Ranger, which is designed only for ocean floor surveying, can be outfitted
with whatever sensors their customer wants installed. (Kronsberg Maritime) ABE is
different from the other two by being able to reach a depth of five thousand meters, but
is similar to the Echo Ranger in its sensors are for ocean floor surveying as well. ABE
uses a weight release system to control its buoyancy. ABE would be deployed and use
minimal maneuvering to get close to its target location. At this location ABE would
release several weights to make it neutrally buoyant. ABE would then carry out its
assigned surveying. At the end of its surveying ABE would release a last set of weights
to return to the surface. At the last weight release ABE would have expended the
majority of its battery power which depending the level of detail used in the sensor
payload could be between fifteen and thirty hours. (Woods Hole Oceanographic
Institute)
3.2. Current Technology
3.2.1. Control Systems
The control systems used in an AUV is all tied into the software operating the
various equipment in the AUV and handling the independent navigation of the AUV.
This software would be on an onboard computer. In order to properly navigate the
computer would need to take input from several sensors aboard an AUV. These sensors
would allow for an approximation of the position, direction, speed, orientation, and
location of nearby objects. The computer would use this information to follow a pre-
determined course as closely as it was capable of and decide to alter the course if
needed to avoid something unforeseen. The accuracy the computer will be able to
follow this will depend on the error associated with the sensors and calculations used.
The effectiveness of any control system would be in how small the errors it generated
from calculations and sensors are. The sensors that would be needed to plot the
position, course, speed, and object avoidance are inertial sensor, gyro compass, forward
and downward facing sonar, a GPS receiver, and a pressure sensor. (Wood)
3.2.2. Depth Survivability
The current technology to survive the pressures of the deep ocean requires either
no contained gases or pressure housings. These restrictions create two problems for
vehicles, the vehicle’s buoyancy and how to house electronics safely. The buoyancy
problem requires either a pressure housing large enough to provide enough excess
buoyancy for the vehicle to float or a material less dense than water and strong enough
to have little deformation with the pressure change. A material that meets the criteria of
being less dense than water and strong enough to withstand the pressure is the syntactic
foam made by Syntech Technologies, Inc. This material is a foam with small glass
beads embedded in it. The beads give the strength the material needs while the foam
gives the added volume. The air filled pressure housing also solves the problem of
housing electronics safely since an air filled area would be ideal to house a computer or
other circuitry. Housing that meet these conditions are the Benthos or Vitrovex glass
spheres. These spheres rely on the ambient pressure to strengthen the seal made by the
two hemispheres of each sphere. Since the glass is thick enough to withstand the
pressure up to certain depths these spheres hold air well up to their specified depth. The
only electronics that would not be able to be held by these spheres are motors, since
they require a shaft going out to what they move. The housings for these can be done
either with sealed pressure housing designed to house the motor or a housing filled with
a non-conductive oil to allow the motor to spin without corrosion and shorting sensors.
The fluid filled housings would also require a tube extruding from them to allow space
for the fluid to compress to equalize the pressure inside the container with the exterior
pressure. (Wood)
4. Prototype Model
Figure 4.1: Prototype AUV Powered Glider Rendering
Figure 4.2: Prototype AUV Powered Glider Rendering
4.1. Design
The design of the AUV Powered Glider can be split into three main sections.
The structure, central electronics, and the scientific aspects are all essential parts to the
design of the glider. The structure includes the physical body and frame of the glider,
which holds everything together. The central electronics include everything from the
control boards to the motors and servos. And the scientific aspect includes everything
from sample containers to most sensors.
Prototype AUV Powered Glider Specifications
Running Properties
Property
% Running Time
Value
Max Speed (Vmax):
5%
2.0 m/s
Endurance (powered):
20%
2 hours
Endurance (glide):
80%
8 hours
Dimensions
Property
Value
Vehicle Width:
62.5 inches (66.5 inches at flares)
Vehicle Length:
76 inches
Vehicle Height:
20 inches
Table 4.1: Prototype AUV Powered Glider Specifications
4.1.1. Structure
The main structure of the AUV Powered Glider is composed of four main parts.
The four main parts of the structure are the aluminum beam, the fiberglass hull, the oil
filled housings, and the instrumentation spheres. Each one of these parts are vital to the
operation of the AUV Powered Glider and each one requires great care in both their
construction and usage.s
4.1.1.1. Aluminum Frame
The aluminum frame makes up the bulk of the structural support for the glider.
The structural support frame consists of two 4” x 4” aluminum beams that are 1/8” thick
and made of T6063 aluminum. Attaching these two beams together through the beam is
two additional support beams that add rigidity to the overall glider and lightening the
load on the fiberglass hull.
The two side support beams themselves are not sealed so they do not have to
withstand the pressure. The beams provide the mounting points for several key features
of the glider. The motors, ailerons, sample containers, rails and even the main foil are
directly mounted to the beams. The beams also contain a joint near the back of the
main foil where the two halves of the beam can be unbolted. This allows the glider to
be split into smaller sections that make it both easier to store and to transport.
4.1.1.2. Fiberglass Hull
The main fiberglass hull is made to the shape of a foil. The hull was constructed
using a foam mold that was machined. The mold was made out of General Plastics
6700 aircraft grade modeling foam and machined at VectorWorks Marine in Titusville,
FL. The fiberglass hull is mounted directly to the two side support beams as well as the
two support cross members that pass through the main foil. The fiberglass hull holds
many of the features that are essential to the glider. Contained within the glider is the
power supply, instrumentation spheres, syntactic buoyancy foam, trim ailerons,
specimen collector, and the weights for both the buoyancy control and to simulate the
future sensors.
4.1.1.3. Oil Filled Housings
At depths of 4,000 meters underwater, the water pushes in at a pressure of
around 6,000 psi. Such a high pressure puts a very high demand on the materials and
parts being used. In this case if all the parts were made of materials and material
thicknesses that could withstand the high pressure both the weight and the cost would
grow exponentially. An efficient solution to this problem is to fill all of the housings
with non-conductive oil such as mineral oil, more specifically transformer oil. This oil
is usually used in capacitors and transformers. It provides an insolating barrier between
power feeds and won’t short the circuit like seawater. The housing or part will be
assembled inside an oil-filled bucket, minimizing the possibilities of air bubbles.
Attached to each housing will be a pressure tube that will help equalize the pressure
outside and the pressure inside the container so the housing walls won’t have to
withstand the force of the pressure.
4.1.1.4. Instrumentation Spheres
The AUV Powered Glider uses two 17” glass instrumentation spheres. While
different manufacturers make the two spheres, they do contain very similar specs and
identical sizes. Both of these spheres also have pressure release valves for reopening
them and multiple ports for cables to pass through for wiring. These spheres are the
only part of the glider that contains air and is the only part that has to directly withstand
the 6,000psi of water pressure pushing in on it.
The first sphere is made by Benthos Inc, and is model number 2040 -17H. It has
a 17” outer diameter and weighs in at 39lbs. This gives the spheres a net buoyancy of
56lbs assuming they are empty. The Benthos sphere has been tested at depths of 6,700
meters. The Benthos sphere is also equipped with two ports for cables to pass through
the sphere. (Benthos)
The second sphere is made by Victrovex and is the 17”/14 (standard) model. It
also has a 17” outer diameter and weighs in at 38.14 lbs with about 61.13lbs of
buoyancy. This sphere is also rated for depths of 6,700 meters. The Victrovex sphere
also has three ports for cables and another port for a pressure sensor. (Vetrovex)
4.1.2. Central Electronics
The central electronics onboard the prototype model will be simple enough to be
cost effective, yet complex enough to support the project goals. Working with these
criteria it was prudent to choose a series of microcontrollers to adequately run
operations on the AUV. PIC microcontrollers provide a very cheap, yet very
programmable, system that can easily be designed for and expanded in the future. In
addition microcontrollers have better resources for handling motor and servo control
versus a standard computer. Because the prototype model will be tethered and human
controlled, the priority lies in making a functional system. A functional system is a
direct translation from the control boards to the motors and servos onboard the AUV.
However, when the time is appropriate the human element could be removed, and
simply match the computers output to that of the original control board and the
computer will no be able to control the AUV.
4.1.2.1. Onboard Controller
The onboard controller will be one or more PIC (PIC18F) microcontrollers.
They utilize a very simplistic programming language (i.e. PICbasic ). The
microcontrollers have onboard memory for programs and data. Each PIC has three
programmable 8-bit input/output connections. We chose to use the PIC
microcontrollers due to economical constraints. We were able to get sample chips from
the manufacturer of the PIC microcontroller, instead of buying a single board computer
(sbc).
4.1.2.2. Control Board
The main control board for the prototype model will be a very simplistic control
station with two joysticks and various toggle switches. The two joysticks will control
the port and starboard systems respectively. These systems include the main thrusters,
the rudders, and the main aileron. Each joystick will also be configured such that the
main trigger will turn the main thruster on forward, and the top trigger will turn the
main thruster on in reverse.
Further, the toggle switches will control various other parts of the AUV. Toggle
switches are good to use in on/off scenarios. Each collector has two doors and a screen
(which is reversible). Opening/Closing of the doors, and the rotation of the screen are
all examples of on/off scenarios. Other points that the toggle switches will be used for
is the lights, the camera, and the weight release system.
Our reasoning for going with this design is ease of use, economical, and fits with
the other electronics. Having more of a control station versus a single remote control
will allow for more than one operator, one controlling the steering while the other
controls the remaining systems. On the economical side it is far cheaper to buy a
couple joysticks and some toggle switches than a multi-channel remote control. And
since we are planning to use the PIC microcontrollers on the prototype model, we can
easily use a PIC microcontroller to accept input from the control board and pipe it to the
other PIC microcontrollers on the sub using a very simple RS-232 serial connection.
4.1.2.3. Recovery System
The recovery system we are planning to use will be two fold. The first will be a
high intensity light on an extended arm. The second will be a radio beacon, which can
easily be tracked by a radio direction finder. The light will be mounted on a swing up
arm so that at surface level the light is visible.
In the event of a control system failure the arm will be released and swing
upward, in addition the radio beacon will be turned on. The entire recovery system will
be self-contained having its own batteries and electronics pressure sealed. This is to
ensure that a power failure in the rest of the AUV will not interfere with the recovery
system.
The overall reason for this design is to allow for multiple recovery techniques as
well as provide a fail-safe system, so that the AUV doesn’t become unrecoverable.
For lifting the vehicle onto the research vessel there are four lifting points, one
on each corner of the vehicle, requiring a four-point harness system. Each lifting point
consists of a bolt running vertically through the side beams with an eye at the top.
Together, the lifting points can support the weight of the vehicle with a factor of safety.
4.1.2.4. Main Thrusters
In the prototype model the main thrusters will be controlled by the two triggers
on the joysticks. The main trigger will engage the main thruster in forward, while the
top trigger will engage the main thruster in reverse. Thus the requirement for power
will be a simple H-Bridge. An H-Bridge is an electronic device that allows for the
reversing of polarity at the device. This will allow the computer to control the polarity
of the signal to the motor, and thus control its direction. The motors we chose for the
main thrusters are 12V and draw nominal amperage of 55A.
4.1.2.5. Servos
Early in the design we had initially thought of using stepper motors to control
various devices on the AUV. These devices were: the rudders; the ailerons; the
collection screens, the main screen. While stepper motors are fairly common place they
generally require a number of pin-outs to be available on the microcontroller. In order
to avoid the high pin count we decided to instead go with pulse width modulated (pwm)
servos. Servos require a single pin-out from the microcontroller and a power feed. The
major drawback in choosing servos is that they are not 360 rotating. However, we
analyzed the systems that would require a servo this was not a requirement. Thusly, the
various systems originally designed to use stepper motors for control have all been
switched to using servos.
4.1.2.6. Power Management
The original design is for a fully autonomous AUV, thus no tether for control or
power. However, due to battery cost the prototype will use a tether to feed its power
need. The main thrusters and vertical thrusters will run on a 12V power system. While
the remaining components will run a 5V system, that will down-converted from the 12V
system. Thus, only one 12V line will be needed to power the AUV.
4.1.3. Scientific
Since the AUV Powered Glider is a scientific vehicle, it will be equipped with
several instruments and sample collecting devices. These unique devices were
developed specially to suit this vehicle and are used to collect either water or specimen
samples on the vehicle are referred to as the sample containers. Most of the instruments
included on the final production model vehicle will not be part of the prototype. They
will, however, be simulated as explained later in the section titled “Simulating Future
Sensors.”
4.1.3.1. Prototype Sample Containers
The sample containers for this AUV Powered Glider are there to allow the
researcher to collect both water and small specimen samples from many depths. The
prototype model has four of these containers, one mounted on the top of each beam and
one mounted on the bottom of each beam. Each container is set up to be activated
independently. When triggered the sample containers would rotate the screen inside
from being parallel to the direction of motion to perpendicular to it. After a set amount
of time after this rotation occurs, the time is dependent on what the researcher wants,
the two doors would release closing and sealing the containers. To obtain the sample
the researcher would then have to remove the container by unhooking the nylon strap
holding the container down then moving pulling it off the box being careful
The containers are made of clear
tubing to allow the researcher to view
the contents before opening the
container. The tubing for each container
is four and a quarter inches in diameter,
an eighth of an inch thick, and six inches
long. The tubes have three six tenths of
an inch diameter holes cut into them,
two vertical and one with its axis offset
by forty-five degrees. The holes are two
Figure 4.3: Prototype Sample Container
inches back from the front of the container. These holes allow for the pivot points and
stopper for the rotating screen in each container. Each hole is lined with a rubber seal to
allow the container to be watertight. The pivot points and stopper are made of a halfinch diameter aluminum rod that is .95 inches long. The interior portions of the pivot
points and stopper have a half-inch by half-inch section removed parallel to the side of
the rod going in by .4375 inches. This cut is for the screen to fit into. The top pivot
point and stopper have an eighth of an inch thick and three quarters of an inch diameter
head on their exterior portion to keep them attached to the tube. The bottom pivot point
has an eighth of an inch thick quarter inch square keyed to the connector attached to the
servo. The screen is held in place by 2 thin aluminum plates. One plate is mounted to
the pivot points and the other is pressed against both the mounted plate and the screen
by thumbscrews. The plates are rings with a 3.8 inch outer diameter and 2.8 inch inner
diameter. The plates are 3.8 inches to give them room to be able to rotate freely rather
than be completely up against the edge of the container. The plates have two eighth of
an inch holes cut opposite of each other 1.65 inches from the center of the rings. The
screens are replaceable so that a variety of gauges can be used to collect what the
researcher is interested in. Each screen has a circular shape that is 3.8 inches in
diameter with the top and bottom quarter inch removed. There also are 2 eighth of an
inch holes cut into the screen a quarter inch from the left and right edges for the
thumbscrews to pass through. The doors to the sample container are eighth of an inch
thick aluminum plates, the edges have been beveled to allow for a rubber seal to be
attached to them to seal the container when closed. The door and rubber seal together
are 4 inches in diameter. The doors are closed by a mouse trap spring attached to the
tube and outside of the door. Each door is held open before it needs to be deployed by
an arm of a servo. The servo holding the door closed is a HS-125MG slim wing servo
made by Hitec RCD USA, Inc. The sample containers rest on a trapezoidal platform
made an eighth of an inch thick aluminum. The box is one and one eighth inches high,
has a four inch long and three and a half inch wide top, the two diagonal pieces extend
down at a forty-five degree angle. The top portion of the box has an eighth of an inch
diameter hole cut into each of the four corners a quarter of an inch from each side.
These holes are used to bolt the box to the side beams of the aluminum container.
There is another hole .6 inches in diameter centered one and three quarters of an inch
from the side of the box and one inch from the front of the top portion. This hole is
lined with a rubber seal to reduce friction from the rotating connector that goes through
it. The connector is made out of the same half-inch diameter aluminum rod as the pivot
points and stopper. The connector is 0.225 inches long and has an eighth of an inch
deep quarter inch square hole cut in the top to allow the bottom pin of the container to
connect to it. The servo this connector is mounted to is a HS-55 standard feather servo
made by Hitec RCD USA, Inc. On the bottom of the box is a nylon strap that loops
over the sample container to hold it down.
4.1.3.2. Simulating Future Sensors
Many sensors needed for the final production model will not be present on the
prototype AUV Powered Glider. The sensors not present, however, will be simulated in
the prototype.
Most of the future sensors that will be used on the final production model AUV
Powered Glider will be represented in the form of weights, equivalent to the weights of
the actual sensors, on the prototype model. The placement of these weights will be
representative of the locations of the actual sensors of the production model. This will
shift the center of gravity of the prototype close to that of the actual production model.
Also, it will add to the overall weight of the vehicle affecting the overall buoyancy of
the vehicle when it is submerged.
Below is a table of the values of the average weights in air and in water of some
of the instruments that may be included in the final production model. The Inertial
Navigation Unit must be contained in one of the glass spheres, so its weight in water is
irrelevant. Its weight in air, however, was added to the total average weight in water.
Average Sensor Weight Specifications
Average Weight in
Average Weight in
Air (lbs)
Water (lbs)
CTD
7.63
4.26
Fluorimeter
8.27
5.16
UV VIS Spectrometer
7.93
1.58
Object Avoidance Sonar
3.61
1.70
Bottom Profiling Sonar
6.26
2.98
Hydrophone Array
14.83
9.25
Inertial Navigation Unit
18.46
-
Total Weight
66.99
43.39
Sensor Type
Table 4.2: Average Sensor Weight Specifications
4.2. Construction
The construction phase of this project is a long and sometimes tedious process.
During this process you are converting the plans and theory into an actual vehicle. This
often results in numerous problems ranging from manpower to a part’s fit. Some of the
main construction obstacles we came across were:
- Manufacturing delays on the syntactic foam at Vectorworks Marine Inc.
- Material and parts arriving with dimensions outside stated tolerances.
- Servos from Hitec RCD not arriving with horn in specified position.
- Lack of sufficient skilled labor. Several times one more person would have
helped in the machine shop since you have to work in groups of two or more at
the machines.
- Then of course like every other project funding is always an obstacle.
4.2.1. Sub-Assemblies
The construction of this project was separated into several smaller subassemblies. These sub-assemblies allowed us to more efficiently allocate resources and
organize the order of construction. Some of the main sub-assemblies include but are
not limited to the main hull, buoyancy foam, side beams, bottom rails, servo boxes,
ailerons and rudders, aileron coupler and camera mount, and the main thruster.
4.2.1.1. Main Hull
The main foil of the glider was used to hold both the main syntactic foam blocks
and instrumentation spheres. The structure of the main glider revolved around creating
a fiberglass shell in the desired size and shape that had an embedded support to
maintain the integrity of the glider.
The construction of the main foil started with the machining of the molds at
Vectorworks. This was carried out by first epoxying the set of three blocks used for one
mold to a sheet of plywood. The blocks and sheet were then screwed onto
Vectorworks’ five axis cnc milling machine. The cnc machine proceeded to cut the
foam blocks in the pre programmed path to cut out the necessary shape. This process
was then repeated for the second mold. After the molds were machined they required
some minor sanding to remove ridges left in the foam from the machining process.
After the molds were sanded and obtained the desired shape of the glider the needed to
be prepared for their fiberglassing. This was accomplished by coating the surfaces of
the mold that were to be fiberglassed in epoxy. This was done using a foam brush to
apply the epoxy over the foam. The epoxy was then given 12 hours to cure. After the
epoxy was cured a second layer was applied and allowed to cure. This layer was then
sanded with a 220 grit sandpaper. This was followed by another layer of epoxy and
sanding and a last finishing layer of epoxy. This completed the molds for the main hull.
The last step in preparing the molds was to add the mold release agents. We went with
the combination of PVA, paste unbuffed paste car wax and hairspray as our releasing
agents. We applied 4 coats of the PVA to the molds were going to fiberglass. The
coats were done in 4 sections, one for each side, the front region and the remainder of
the glider. Each section was done while having the mold propped up to have as close to
a flat surface as possible. Each coat of each section was allowed three hours to dry.
After the PVA had dried the Meguiar’s Gold Class Paste Car Wax was applied over the
surface. After this application a thick layering of Rave 4x Mega Hair Spray was
applied. With this the mold was ready to be fiberglassed. The fiberglassing was done
by first cutting the size strips of fiberglass being used. The actual fiberglassing was
carried out by first applying a good amount of epoxy over the area the fiberglass strip is
to be placed over. The strip would then be laid over the epoxy and dabbed into place
with the brush being used for the epoxy. The next strip would be placed halfway over
the first strip. This method was replicated for each and every strip used with sufficient
dabbing to remove air bubbles and stick the strip to the mold’s shape. The layers of
fiberglass were done first a vertical pass, followed by a horizontal, then a diagonal, and
lastly a long vertical layer. After the fiberglass had cured for twelve hours the shell was
popped out by slowly prying it up from the excess over the edges of the mold and
pulling small increments out at a time. Removing the shell caused damage to the
corners of the mold. This problem was solved before the second shell made by
clamping the corner in place and applying epoxy on the crack. After this epoxy had
cured the exterior of the mold several fiberglass strips applied to add extra support to
the front corners. The second shell was prepared in the same manner and the
fiberglassing was done in much the same manner up till the completion of the second
layer. When the second layer was done fiberglassing was stopped to determine the
sizes of the support beams being embedded into the second shell, which was the bottom
shell. We lined up to rectangular aluminum plates and made a diagonal cut to allow the
piece to better fit roughly an inch below the top surface of the foil. Next the cross
support was constructed. An extended ‘L’ piece was cut to fit across the foil and two
other sections were cut out to be used as vertical supports. The vertical supports has a
section of one of the sides of the ‘L’ shape removed to allow for the other section to be
bent to create a corner piece. The cut section was bent using a cement block and a
mallet by repeated hitting the piece that was being bent till it moved to the desired
shape. The support pieces were then lined up in the shell being worked on to see if they
would fit in as was required. The cross support required more fiberglass built up
underneath it to have a flat surface. The supports were fiberglassed into the shell by
first clamping the side aluminum plates onto the mold and fiberglassing over the
unclamped sections. Extra fiberglass was then put down along where the cross support
was to go to create a level surface for it. The beam was then placed on this and
fiberglassed down. With the excess fiberglass built up on the sides the center of the
beam needed to be held down while fiberglassing. To minimize the time needed for
someone to hold the beam down so as not to create an air bubble a heat gun was applied
to the curing fiberglass to speed up its timing. While this fiberglass was curing the third
layer was applied followed by the fourth layer. After the fourth layer cured the shell
was then popped out originally by the same method but required the use of small two by
two parts to pry out the shell. After the shells were popped they were trimmed with a
dremel to get them to closer the desired shape. The holes for the instrumentation
spheres were also trimmed out. After trimming the inside of the shells were sanded
with a 220 grit sandpaper to smooth out the edges left by the fiberglass strips.
Following this two holes were drilled to both the cross support and vertical supports
together. These holes then had a nut and bolt put through them and siliconed into place.
The shells were then given faired to smooth out the small imperfections in the
fiberglass. This was done by sanding the exterior with a 120 grit sandpaper, cleaning
the resulting dust off with compressed air and damp rags, and applying epoxy with the
410 Microlight Fairing Filler to the visible holes. This process was done twice followed
by the final sanding and cleaning before being painted by Maaco. After we received the
painted shell back the final part involving the shell was to drill holes for bolts into the
aluminum side beams and to bolt the shell into the aluminum side beams.
4.2.1.2. Buoyancy Foam
The buoyancy foam is located both inside the main hull, inside the side support
beams, inside the rudders, and inside the ailerons. While we will talk about the main
hull and side support beams now, the ailerons and rudders construction will be
discussed later.
The main foil is composed of a relatively thin fiberglass shell that is not capable
of withstanding the pressure at depths of 4,000 meters. As a result, early in the design it
was decided to use syntactic foam blocks to fill the main part of the hull. This syntactic
foam is capable of both withstanding the pressure at these depths and provides
buoyancy for the vehicle. The syntactic foam is about 38 lbs per cubic foot so to figure
out how much buoyancy the foam provides you take the density of sea water which is
about 64.1 lbs per cubic foot and subtract the density of the foam to get 26.1 lbs of
buoyancy per cubic foot.
In the main foil the syntactic foam was split into six blocks for ease of
manufacturing and ease of assembly. These blocks contain within them many features
and parts many of which are essential to the vehicle. Some of these are the
instrumentation spheres, the battery compartment, the main sample collection tunnel,
and the wiring harness. As a result we had to have the shaping of the main blocks done
with the use of a CNC machine. To do this we found Vectorworks Marine Inc. out of
Titusville, FL. Vectorworks has a 5-axis milling machine with over 13 feet of travel
made by Thermwood. This machine had the ability to machine any and all of our parts
with ease. Vectorworks first started off squaring up all the blocks and beams.
Following the squaring of the beams they customized the table to hold the blocks
without them sliding. They did this by adhering a disposable foam board down and
machining into it then fitting the part into the machined out part. After the part was
secured we took our ProE model and programmed in a tool path with the assistance of a
production engineer from Vectorworks. Once tested and calibrated we started the tool
path on the milling machine and monitored the machining process of the blocks.
4.2.1.3. Side Beams
The Aluminum Side beams were constructed from 4 inch square aluminum
beams with a thickness of 1/4 inch. The first step was to cut the beams to length. The
beams were cut with a horizontal band saw into two pieces 43 inches long and two
pieces 29 inches long. The 43 inch pieces were designed to be in the front and be able to
bolt into the main hull of the vehicle, while the 29 inch pieces were designed to be in
the rear and carry the servo boxes, ailerons, rudders, and motor mounts. After being cut
to length the ends of the beams were squared using the endmill.
A 3-1/2 inch wide corner piece was cut out of the middle of both of the 29 inch
long beams for the servo boxes. Within the 3-1/2 inch width of the cut, the cut removed
all of the metal of the sides adjacent to the corner being cut out, save the ¼ inch
thickness of the remaining sides. These pieces were cut out using a torch cutter and the
edges were cleaned and squared using an endmill.
To make the motor mounts a 1 3/8 inch diameter hole was drilled through the
side of each aluminum beam. Then a 4-3/4 inch long 1/4 inch thick aluminum cylinder
was placed in each hole so that an inch of each cylinder protruded from each beam and
the cylinders were welded into place.
Four connector plates were also constructed in order to connect the two pieces
on both sides of the vehicle. These plates were cut to 8 inch by 4 inch dimensions,
squared up, and then their edges were beveled. Holes were then drilled into the
connector plates and the aluminum beams to bolt the beams together.
All outer facing surfaces of the beams and connector plates were also sanded
and polished to remove the oxidation and to shine the surfaces.
4.2.1.4. Bottom Rails
The bottom rails are made from 1 inch diameter 2024 aluminum solid round
rods. There are two of these rails, each is composed of five parts. The five parts are the
main horizontal rods, the two vertical legs, and the two mounting plates at the top of the
legs.
The horizontal rods were ordered from onlinemetals.com. These rods were first
bent in the front using a pipe bender at Mazworx. Then the rods were cut to length so
they didn’t extend to far out from the vehicle. The legs were then prepared by cutting
them to length. Then the legs were trimmed with the end mill so they had a round slot
on the end so they would couple with the horizontal rods nicely. Then the mounting
plates were made to fit at the top of the legs so the entire rail assembly could be bolted
to the beams. The mounting plates were made from some scrap aluminum. The plates
were cut to 4 inches by 10 inches. We then drilled four holes in each plate for 3/8 inch
bolts. After all of these parts were machined and ready, Bill Bailey from the Florida
Tech machine shop welded each of the parts together.
4.2.1.5. Servo Box
The Servo Boxes for the glider are two sets of mirrored apparatuses designed to
secure the servos for the ailerons and rudders. To do this the box has to both position
the servo horns where the rudder and aileron shafts are meant to be and hold the servos
onto the beams of the glider.
The construction of the Servo Boxes started with cutting sections out of scrap
aluminum beams close to the width of the cut outs on the aluminum side beams using
the horizontal ban saw. The vertical ban saw was then used to change the square piece
cut into an L piece. Two cuts were made in the sides not being used for the servo boxes
using a vertical ban saw. The longer piece created from these cuts then had its edges
trimmed to fit into the slot cut in the servo box. Two holes were then drilled into the
servo box slightly larger than the servo horn. These holes where centered around where
the servo horn is supposed to be. This created one hole on the top front and another in
the bottom back. The servo box was then sanded with the following order of grits 220,
400, and 600. After sanding the box was polished using a hand held power drill with
buffing wheel. After the box was polished the tabs to hold the servo were cut out of
scrap aluminum. The tabs were two sets of three quarter inch by one and a quarter inch
and one and a quarter inch by three and a half inch. These tabs were also sanded with
the 220, 400, and 600 grit sandpaper. The tabs were also polished using the hand held
drill and buffing wheel. The tabs were then welded having the smaller tab with its
largest surface welded on the corner side of each of the holes for the servo horn and the
center of the hole aligned with the center of the tab. The other tab was positioned
identically to the first tab, but away from the hole it was centered on far enough to allow
the servo to be put in between the tabs. After the tabs were welded in place the welds
were cleaned up to remove excess material interfering with the servos fitting into the
space for them. The servos then had to be secured to the tabs by bolts. To do this we
lined up the servo and sighted the two mounting holes on the servo onto the tab. The
holes were then drilled out and countersinked. This process was repeated for the other
tabs. When we were able to mount the servos the next step was to mount the servo box
to the aluminum side beam. To accomplish this we had first drilled the holes for
mounting it in the beams. We then lined the servo box up with the slot and marked the
2 holes used to mount the servo box. One of the mounting holes going into the
horizontal suspended tab and the other one going through the side of the servo box. The
hole in the tab was drilled with a #21 drill bit to allow it to be tapped with a 10-32 tap.
The process for created these boxes was carried out at the same time with one box being
the mirror image of the other.
4.2.1.6. Ailerons & Rudders
The ailerons and rudders were made in a nearly identical fashion. Both the
ailerons and rudders started off in halves that were machined at Vectorworks out of
Syntactic foam. As a result the ailerons and rudders will be both rigid and buoyant.
The Syntactic foam blocks started off as 2 inches thick and 6 inches wide. They were
first machined with a 3/4 inch groove on the bottom followed by the machining of the
foil shape on the reverse side. The shafts were then prepared by welding a small disk
on the end with tiny holes for #3 bolts so the shaft could be attached to the servos.
Once this disk was welded in place, small flanges were attached to the shaft so the shaft
would not slip inside of the ailerons or rudders. Once the shaft was completed it was
sandwiched between the two halves of the ailerons and rudders then the two halves
were epoxied together. Once cured some filler and epoxy was added to the tip so the
ailerons and rudders came to more of a point since the Syntactic foam couldn’t be
machined that thin. Following some light sanding the ailerons and rudders were
covered in three layers of fiberglass to help give them some resilience. After the
fiberglass cured we applied sand-able filler to the ailerons and rudders to prepare them
for painting at Maaco.
4.2.1.7. Aileron Coupler & Camera Mount
A unique feature of the glider was the central funnel. To optimize the
use of this funnel mounting points for lights and a camera would be needed. The mount
we designed to satisfy this solves the problem of where to mount the camera in addition
to supporting the ailerons.
The construction of the camera mount started with creating all the pieces of the
mount. The first piece cut was an aluminum tube with an inside diameter slightly larger
than the outside diameter of the aileron shafts. This tube was cut to a four inch section
to hold the ends of each aileron shaft. A Plate was then cut slightly wider than the
diameter of the tube. This plate had a semicircle cut into one end the diameter of the
tube to allow it to be easier to weld to. The plate was then welded to the tube. The ‘L’
beam pieces where then cut to their desired length. The final part of the camera mount
was the mounting piece between the ‘L’ beams and the plate. To do this we cut a small
trapezoidal piece whose diagonal edges would coincide with the positioning of the ‘L’
beams. The plate/tube assembly was then cut to the desired length for the positioning of
the ailerons relative to the main foil. After this cut the trapezoidal plate, two ‘L’ beams,
and plate/tube assembly were welded together to complete the camera mount assembly.
The remaining portion of this assembly involves the bolting of the mount into the main
foil.
4.2.1.8. Main Thrusters
The main thrusters did not require much work compared to other aspects of the
glider. The main thrusters arrived as fully functional 55 lb thrust trolling motors from
Minn-Kota. These motors are already in watertight enclosures with strong yet
lightweight carbon fiber mounting shafts. The trolling motors were first tested to
confirm they worked and to see how much current they required. After they were tested
they were completely disassembled. The trolling motors also came with their own
speed controller, which had to be disconnected before using.
The first modification was the trimming of the mounting shaft. This shaft is a
strong lightweight tube made from carbon fiber. We measured out the tube then cut it
to length with a diamond cutter on a dremel. After cutting the shaft we drilled a small
hole in the shaft close to the motor housing. We then used this hole to feed the motor’s
wires through so the motor would fit in the motor mount. After feeding the wires we
placed cotton balls in the tube to make a blockage, then poured in some epoxy on them
to form a waterproof bulkhead of epoxy. After the bulkhead cured we drilled a hole in
the side of the motor mount and secured a barbed hose fitting with epoxy through it.
We then attached clear vinyl tubing to the hose fitting and secured it with a hose clamp.
We then placed a barbed fitting on the other end with a removable cap. This system
allows us to fill and empty the oil without any hassle. The motors were then secured
into the motor mount and bolted in so they couldn’t move.
The next part of the main thrusters is the propeller tubes. These tubes were
added so that the propellers would be protected. Another added benefit to these tubes is
that they increase the propeller efficiency by directing the prop wash in the proper
direction. The prop tubes are made with a fiberglass shell with syntactic foam strips
filling the inside. We decided to add these syntactic foam strips for two reasons. First
we wanted to increase the rigidity of the tubes so they would not flutter from the
turbulent fluid flow off the propeller. Second we found in our initial designs that the
center of volume for the vehicle was forward of the center of gravity so adding more
volume to the back of the vehicle became necessary. One of the ways we did this was
by increasing the thickness of the propeller tubes.
To make each of the propeller tubes we started off cutting two 12” diameter
circles out of a sheet of ABS plastic. We then bolted the two disks together using a 4
inch spacer. We then wrapped the circumference of the disks with aluminum foil
followed by a coat of PVA to ensure the epoxy wouldn’t stick. After the first 3 layers
of fiberglass we placed small 4 inch by 3/4 inch by 1/4 inch syntactic foam strips along
the circumference of the tube. After these strips were epoxied in place a thick coat of
epoxy and 410 microlight sand-able filler were applied to the tubes so they could be
sanded and faired round before the final layers of fiberglass were applied. After the
tubes were sanded the final three layers of fiberglass were applied. After those only
light amounts of the filler was needed to prepare the surface for painting.
4.2.2. Assembly
The assembly of the vehicle was completed in stages and sections. The main
sections of the vehicle that were constructed separately are: the main foil hull, buoyancy
foam, side beams, bottom rails, servo boxes, ailerons & rudders, camera mount, and
main thrusters. Following their construction the main structure of the powered glider
was assembled.
The first step in the main structure construction was joining the aluminum side
supports with the cross members that give it rigidity. Then both the cross supports and
the main beams were then attached to the main foil’s fiberglass hull making sure that
the load is distributed and not on one point. Following this stage each of the parts were
added and assembled into the vehicle working out away from the main foil leaving the
motor assemblies and ailerons for last.
4.3. Budget Finances
4.3.1. Price List
Prototype Estimated Price List
Part
Vendor
Value
Actual Cost
Syntactic Foam
Syntech Technologies Inc.
$13,100
$0 (Donated)
FM-6706 Modeling Foam
General Plastics Inc.
$1185
$250 (shipping)
Servos
Hitech RCD Inc
$690
$446.69
Minn-Kota Trolling Motors
West Marine Inc.
$479.98
$445.98
West System Epoxy +
West Marine Inc.
$459.31
$359.24
Additives
Extra Epoxy
West Marine Inc.
$425
$320
Seven: 4”x 50 yard Fiberglass
U.S Composites
$172.43
$172.43
Hardware
Home Depot & Ace
$700
Tools
Ace, Home Depot, etc
$750
PIC Microcontrollers
Microchip
$50
$0 (samples)
Motors + Wiring, Joysticks
Astro Too
$300
$100
Misc Parts
Table 4.3: Prototype Estimated Price List
$600
4.3.2. Sponsors and Contributors
For any project to be a success you need a certain amount of resources available
for the design and construction process. Usually these resources come in the form of
money, however that is not always the case. For some companies it is in their interest
to donate product to help them in both taxes and publicity.
Considering the tax benefits, an example is if a company donates one thousand
dollars then they can deduct one thousand dollars from their taxable assets. On the
other hand if a company were to donate two thousand dollars worth of product that only
cost them one thousand to make, they get to write off two thousand dollars even though
it only cost them one thousand. Companies often use this approach to help them save
money on taxes. A company will usually determine how much they want to donate for
the fiscal year based on how close they to the next lower tax bracket, the further they
are the more they donate.
For other companies the motivation is publicity. When product is donated
usually the company gets some sort of public recognition from the recipients. This
publicity can get an otherwise unknown name a place in an already crowded field. This
publicity will show how the company is supportive of research and development of any
kind. The last most important part of the publicity is if a person was deciding between
an identical product except one was made by company A and the other by company B.
When looking at the products the consumer remembers that company B has been giving
donations for research and has been contributing to the society so the consumer gets that
product instead of the one made by the profit hording company A.
Our project owes its thanks to several key people, organizations, and companies
that have made this project what it is today.
Contributors
Who
Dr. Stephen Wood
How they contributed
Without Dr. Wood’s help this project would
haven’t ever gotten off the ground so while he
might not have personally donated funds he
donated his time and experience.
Syntech Technologies Inc.
Contributed to us by working with us on the
foam design and by donating the large amounts
of deep submergence foam.
General Plastics Inc.
Contributed by donating the FR-6700 aircraft /
modeling foam for the machining and molding
of the main hull of the glider. This mold will be
kept intact for future products of the vehicle.
VectorWorks Marine
Is contributing to us by donating their time,
experience, and machinery for the construction
and machining of our hull mold and the
machining of the syntactic buoyancy foam
Scandia Plastics
Donated product consisting of two four and a
quarter diameter tubes that will be used for the
sample containers and possibly the vertical
thruster duct tube
Table 4.4: Contributors
5. Production Model
5.1. Design
Production AUV Powered Glider Specifications
Running Properties
Property
% Running Time
Value
Max Speed (Vmax):
30%
2.0 m/s
Endurance (powered):
10%
15 hours
Endurance (glide):
90%
135 hours
Dimensions
Property
Value
Vehicle Width:
62.5 inches (66.5 inches at flares)
Vehicle Length:
76 inches
Vehicle Height:
20 inches
Table 5.1: Production AUV Powered Glider Specifications
5.1.1. Structure
The main structure of the AUV Powered Glider is composed of four main parts.
The four main parts of the structure are the aluminum beam, the fiberglass hull, the oil
filled housings, and the instrumentation spheres. Each one of these parts are vital to the
operation of the AUV Powered Glider and each one requires great care in both their
construction and usage.
5.1.1.1. Aluminum Frame
The aluminum frame makes up the bulk of the structural support for the glider.
The structural support frame consists of two 4” x 4” aluminum beams that are 1/8” thick
and made of T6063 aluminum. Attaching these two beams together through the beam is
two additional support beams that add rigidity to the overall glider and lightening the
load on the fiberglass hull.
The two side support beams themselves are not sealed so they do not have to
withstand the pressure. The beams provide the mounting points for several key features
of the glider. The motors, ailerons, sample containers, rails and even the main foil are
directly mounted to the beams. The beams also contain a joint near the back of the
main foil where the two halves of the beam can be unbolted. This allows the glider to
be split into smaller sections that make it both easier to store and to transport.
5.1.1.2. Fiberglass Hull
The main fiberglass hull is made to the shape of a foil. The hull was constructed
using a foam mold that was machined by VectorWorks Marine out of Titusville, FL.
The mold was made out of General Plastics 6700 aircraft grade modeling foam that was
machined in six parts. The fiberglass hull is mounted directly to the two side support
beams as well as the two support cross members that pass through the main foil. The
fiberglass hull holds many of the features that are essential to the glider. Contained
within the glider is the power supply, instrumentation spheres, syntactic buoyancy
foam, trim ailerons, specimen collector, and the weights for both the buoyancy control
and to simulate the future sensors.
5.1.1.3. Oil Filled Housings
At depths of 4,000 meters underwater, the water pushes in at a pressure of
around 6,000psi. Such a high pressure puts a very high demand on the materials and
parts being used. In this case if all the parts were made of materials and material
thicknesses that could withstand the high pressure both the weight and the cost would
grow exponentially. An efficient solution to this problem is to fill all of the housings
with non-conductive oil such as mineral oil, more specifically transformer oil. This oil
is usually used in capacitors and transformers. It provides an insolating barrier between
power feeds and won’t short the circuit like seawater. The housing or part will be
assembled inside an oil-filled bucket, minimizing the possibilities of air bubbles.
Attached to each housing will be a pressure regulator that transmits the pressure to
inside without allowing the water to pass. The equalized pressure will then eliminate
any force from the pressure that would normally be exerted onto the housing.
5.1.1.4. Instrumentation Spheres
The AUV Powered Glider uses two 17” glass instrumentation spheres. The
spheres used in the production model do not have to be made by the same manufacturer,
however they will have to have similar specs. Both of these spheres also need to have
pressure release valves for reopening them as well as multiple ports for cables to pass
through for wiring. These spheres are the only part of the glider that contains air and is
the only part that has to directly withstand the 6,000psi of water pressure pushing in on
it. Two example spheres made for this task are the Benthos and Victrovex ones used
for the prototype.
The first sphere is made by Benthos Inc, and is model number 2040 -17H. It has
a 17” outer diameter and weighs in at 39lbs. This gives the spheres a net buoyancy of
56lbs assuming they are empty. The Benthos sphere has been tested at depths of 6,700
meters. The Benthos sphere is also equipped with two ports for cables to pass through
the sphere. (Benthos)
The second sphere is made by Victrovex and is the 17”/14 (standard) model. It
also has a 17” outer diameter and weighs in at 38.14 lbs with about 61.13lbs of
buoyancy. This sphere is also rated for depths of 6,700 meters. The Victrovex sphere
also has three ports for cables and another port for a pressure sensor. (Vetrovex)
5.1.2. Central Electronics
The central electronics package onboard the production model of the AUV will
include the same microcontroller setup of the prototype model; however, the human
element will be removed and a computer designed to output the same information, that
a human would have, to the microcontrollers that already control the AUV. The
computer will connect to a wireless network. Following this the AUV will use a clientserver model application that will allow someone to update mission criteria,
microcontroller programs, and various other AUV functions. After all criteria have
been entered the AUV will then be placed in the water and told “GO,” which will
initiate the computer’s control system to take control and perform the mission. All
control will solely be placed at the fingertips of the computer, while the customer waits
for data.
5.1.2.1. Control Board
In the production model of the AUV Powered Glider the control board will most
likely be a laptop computer. This is because the AUV will have an onboard computer
that will actually perform the maneuvering and mission requirements. The control
board/laptop will setup the mission criteria on a nice graphical user interface (GUI), and
then basically tell the AUV to “GO.”
The communication between the control board/laptop and the AUV will be over
a standard wireless connection, using a client server model to issue the mission
requirements to the AUV.
5.1.2.2. Main Computer
The production model will be equipped with its own onboard computer. The
reason for using a full computer instead of a simple microcontroller is that setting up
mission requirements will be easier on a standard computer. In addition the various
scientific devices and sensors we will hopefully be using may already contain drivers
for normal operating systems. Thus, it will be easier to install these devices on a system
that requires no further programming to get working.
The computer will use standard PC104 or PC104plus boards for a single board
computer and various add on modules. The reason for using this size board is that they
have been standardized, and a number of manufacturers already produce boards of that
size with stackable systems. This will make installing the computer into the 17-inch
glass sphere easier. (Wood)
Figure 5.1: PC104 board stack
The main computer will connect into the system built for the prototype
configuration in place of the control board. The PIC microcontrollers will still be
responsible for the majority of onboard operations, while the main computer will be
responsible for the attaining mission objectives and navigation. The main computer
will then send the signals that would be coming from the operators I the prototype
model to the same microcontrollers used in the prototype.
5.1.2.3. Recovery System
The recovery system on the prototype will be further augmented in the
production model. In the production model we will be using a satellite transmitter.
When the AUV reaches surface level, it will begin to send pulses to a satellite that will
then update its location to the prospective user. This will allow for a direct GPS
location updated feed that can be tracked to its exact location. The recovery system on
the prototype model will still be used for closer range recovery efforts. Furthermore the
satellite transmitter will also be powered by the separate power system in the recovery
system.
5.1.2.4. Main Thrusters
The main thrusters are controlled by the glider’s computer instead of by an
operator. Since, the computer will be controlling all major systems to fulfill mission
requirements. The thrusters will also move out of a simple on/off configuration and
move to a speed controlled operation. However, this will still require the H-Bridge in
the configuration.
5.1.2.5. Servos
The servos on the prototype will basically be the standard by which the
production will be designed. The servos should have the durability and reliability to
work in the constraints already designed and proposed on the prototype model.
5.1.2.6. Power Management
The power system on the production AUV model will consist of either battery
stacks or a hydrogen fuel cell. Both systems will have a high initial cost. The battery
system could use rechargeable batteries. Thus, the recharge cycle is the only cost
incurred between missions. While the hydrogen fuel cell would require new hydrogen
between missions. Both systems would do the job, and not require the tether that will
be used in the prototype model.
5.1.3. Scientific
The AUV Powered Glider is a scientific research vehicle. The methods for
doing scientific research are through its uniquely designed sample containers and
through the multitude of instruments, which it can be equipped with. The sample
containers are designed for obtaining water or specimen samples as discussed later. The
sensors can be divided into two groups: basic sensors and advanced modular sensors.
The basic sensors are essentially what the vehicle needs to be equipped with to navigate
and survive. The advanced modular sensors are sensors that may or may not be
equipped due to the nature of the specific mission.
5.1.3.1. Sample Containers
The sample containers for this AUV Powered Glider are there to allow the
researcher to collect both water and small specimen samples from many depths. Unlike
the prototype model the number of the containers and there positions are more up to the
researcher using the vehicle. The prototype only has space for the four standard ones,
but several rectangular sections fifteen inches long and five inches wide could easily be
removed from the top and bottom of the main foil to allow for additional containers. In
addition to adding these if the researcher was more interested in water samples than
collecting specimens a smaller container could be used without the screen only
consisting of the doors and tube. The smaller size of these containers could allow for
additional containers to be mounted to the beam or smaller sections removed from the
main foil, thus allowing more containers to be mounted there also. Even with the
variety of containers to be used by the production model each one would still be able to
activate separately. The activation of the sample containers would change based on
which containers were being used. The containers with the screen would rotate the
screen inside from being parallel to the direction of motion to perpendicular to it. After
a set amount of time, based on the researcher wants, the two doors would release
closing and sealing the containers. To obtain the sample the researcher would then have
to remove the container by unhooking the nylon strap holding the container down and
pulling the sealed container vertically away from the box. During the removal the
researcher would need to be careful so as not to damage the connector from the
container to the glider.
The standard containers are made
of clear tubing to allow the researcher to
view the contents before opening the
container. The tubing for each container is
four and a quarter inches in diameter, an
eighth of an inch thick, and six inches
long. The tubes have three six tenths of an
Figure 5.2: Production Sample Container
inch diameter holes cut into them, two vertical and one with its axis offset by forty-five
degrees. The holes are two inches back from the front of the container. These holes
allow for the pivot points and stopper for the rotating screen in each container. Each
hole is lined with a rubber seal to allow the container to be watertight. The pivot points
and stopper are made of a half-inch diameter aluminum rod that is .95 inches long. The
interior portions of the pivot points and stopper have a half-inch by half-inch section
removed parallel to the side of the rod going in by .4375 inches. This cut is for the
screen to fit into. The top pivot point and stopper have an eighth of an inch thick and
three quarters of an inch diameter head on their exterior portion to keep them attached
to the tube. The bottom pivot point has an eighth of an inch thick quarter inch square
keyed to the connector attached to the servo. The screen is held in place by 2 thin
aluminum plates. One plate is mounted to the pivot points and the other is pressed
against both the mounted plate and the screen by thumbscrews. The plates are rings
with a 3.8 inch outer diameter and 2.8 inch inner diameter. The plates are 3.8 inches to
give them room to be able to rotate freely rather than be completely up against the edge
of the container. The plates have two eighth of an inch holes cut opposite of each other
1.65 inches from the center of the rings. The screens are replaceable so that a variety of
gauges can be used to collect what the researcher is interested in. Each screen has a
circular shape that is 3.8 inches in diameter with the top and bottom quarter inch
removed. There also are 2 eighth of an inch holes cut into the screen a quarter inch
from the left and right edges for the thumbscrews to pass through. The doors to the
sample container are eighth of an inch thick aluminum plates and a four-inch diameter
including the rubber seal on the door and container. The doors are closed by a spring
attached to the tube and outside of the door. Each door is held open before it needs to
be deployed by an arm of a servo. The servo holding the door closed is a HS-125MG
slim wing servo made by Hitec RCD USA, Inc. The sample containers rest on a
trapezoidal platform made an eighth of an inch thick aluminum. The box is one and one
eighth inches high, has a four inch long and three and a half inch wide top, the two
diagonal pieces extend down at a forty-five degree angle. The top portion of the box
has an eighth of an inch diameter hole cut into each of the four corners a quarter of an
inch from each side. These holes are used to bolt the box to the side beams of the
aluminum container. There is another hole .6 inches in diameter centered one and three
quarters of an inch from the side of the box and one inch from the front of the top
portion. This hole is lined with a rubber seal to reduce friction from the rotating
connector that goes through it. The connector is made out of the same half-inch
diameter aluminum rod as the pivot points and stopper. The connector is 0.225 inches
long and has an eighth of an inch deep quarter inch square hole cut in the top to allow
the bottom pin of the container to connect to it. The servo this connector is mounted to
is a HS-55 standard feather servo made by Hitec RCD USA, Inc. On the bottom of the
box is a nylon strap that loops over the sample container to hold it down.
5.1.3.2. Basic Sensor Pack
The basic sensor pack is the group of sensors that should be equipped to the
AUV Powered Glider for all missions. The two main functions of this basic sensor pack
are navigation and survivability. While many of these sensors can provide useful
scientific data as well, such as the CTD, they also ensure that the vehicle is safe and on
course.
The basic sensor pack for the production model AUV Powered Glider will
consist of a CTD, Object Avoidance SONAR, Bottom Profiling SONAR, and the
Inertial Navigation Unit.
The CTD’s primary use in the basic sensor pack is that of an altimeter. Its ability
to provide an accurate depth of the vehicle will be essential to ensuring that the vehicle
is does not exceed its maximum depth. Also it will help ensure that the vehicle is in the
appropriate level in the water column to complete its mission.
The Object Avoidance SONAR is in the basic sensor pack to be able to detect an
object in front of the vehicle that the vehicle is in danger of colliding with. The
detection of an object would trigger either the ailerons or the rudders to steer the vehicle
around the object depending on the circumstances.
The Bottom Profiling SONAR will be able to tell the vehicle how far the bottom
of the ocean is to the bottom of the vehicle. This will be helpful if a mission involves
study near an ocean floor, or if the vehicle is diving and the bottom (or an object) is
directly below it. Detections such as these would trigger the vehicle to level off at its
present depth.
The Inertial Navigation Unit is primarily a navigational tool. It will detect an
acceleration of the vehicle in any direction, which can track where the vehicle travels
relative to its starting point. The inherent problem with the Inertial Navigation Unit is
the error. The error accumulates over a period of time, the longer the vehicle is running
off of those sensors the larger the error gets. While it is an extremely useful navigational
instrument, it requires that a reference point be provided after a period of use to ensure
reasonable accuracy. (Wood)
5.1.3.3. Advanced Modular Sensors
There will be several sensors included with the AUV Powered Glider that are
for the sole purpose of collecting scientific data. Since these sensors are not vital to the
operation, navigation, or survivability of the vehicle they may be replaced by other
sensors of similar size and weight and shape, or they may be entirely left out for certain
missions. It should be noted that the scope of scientific sensors that can be employed by
this vehicle is by no means limited to these specific instruments.
The sensors included with the prototype AUV Powered Glider as Advanced
Modular sensors are the Fluorimeter, the UV VIS Spectrometer, and the Hydrophone
Array.
The Fluorimeter will be able to detect the chlorophyll present in living
organisms such as phytoplankton. This instrument will be useful for marine biology
focused missions to track or document where microorganisms are present.
The UV VIS Spectrometer can identify a chemical by detecting the light
absorption properties of the chemical. It can also be used to identify certain chemical
species. This instrument would be useful in either an oceanic chemical focused mission
or a marine biology focused mission.
The Hydrophone array is a set of precise underwater microphones, which can
detect underwater sounds. These would be useful for missions in many fields, notably
acoustics and marine biology.
5.2. Budget and Finances
5.2.1. Consumables
During the lifetime of the AUV Powered Glider there are a few parts that will
have to be regularly replaced and updated. Some of these parts might only see a little
use and rarely have to be replaced while some other parts might see frequent heavy use
and need to be replaced on a regular basis. Some of these parts include rubber seals,
transformer oil, mesh screens, weights, buoyancy floats, and batteries.
The rubber seals will most likely need to be replaced on a semi regular basis
depending on use. These rubber seals tend to deteriorate when submerged in saltwater
and the intense pressure adds additional stress to the progressively fragile seals. The
seals around the motor shafts and servos will probably have to be replaced the most
often since they are fitted around moving parts that cause wear. While the seals on the
sample containers and instrument packs will probably rarely have to be replaced since
they just form a seal instead of sealing moving parts.
The transformer oil is the almost incompressible fluid that is used to protect the
instruments and parts inside the oil filled housings. These housings will have a small
amount of leaking around seals especially as they age and whenever maintenance is
done on the parts oil will surely have to be replenished. It is also wise to change the oil
in the four motor housings if the thrusters are under relatively heavy use just for extra
protection.
The mesh screens will be a very inexpensive item in comparison to the rest of
the resources for this kind of vehicle. It is recommended that the screens be replaced
for each deployment in order to reduce risk of contamination between studies. The
mesh screens also have a tendency to deteriorate quicker then other parts due to how
thin they are.
The weights used in the AUV powered glider will need to be replaced for each
deployment when the active buoyancy system is used. These weights can be purchased
from West Marine and are a relatively inexpensive part to replenish and since the part is
massed produced it should be readily available.
The buoyancy floats are made out of Syntech Technology’s AM-37 syntactic
foam. These floats will need to be replenished after each deployment when the active
buoyancy system is used just like the weights. The floats are more expensive then the
weights however a design change is being considered for the production model where
the floats would have radio beacons so they would yield a higher probability of being
recovered.
The final major consumable will be the batteries. Batteries have a tendency to
loose their charging capabilities over time. This will happen progressively over a
period of time and will be up to the end user to determine when the battery length
impedes his ability to conduct his research. Any batteries matching the voltage and
continuous amperage requirements can replace the old batteries so if new technology
allows for it larger capacity batteries can be used in place of the older ones.
5.2.2. Maintenance
To maintenance that would be needed to be performed on this vehicle would
consist of replacing or repairing any damage or malfunctioning pieces of the vehicle.
Any damaged component outside of hull parts would have to be replaced. To replace
the servos or motors the housing would have to be emptied of their oil and refilled. To
do this they would have to be reassembled in the oil leaving no room for air bubbles.
Damage to the fiberglass foil could be patched with excess epoxy and fiberglass. This
would maintain the strength of the foil and keep it relatively aerodynamic. Several
parts that could be lost and spares would be needed are the bolts holding the motors,
servo boxes and main foil together.
Maintenance Supplies
Part
Model
Price
Aileron/Rudder Servo
Hitech HS-805BB
$29.99 each
Sample Container Door Servo
Hitech HS-125MG
$26.99 each
Sample Container Screen Servo
Hitech HS-55
$10.99 each
West System Epoxy
Epoxy/Fiberglass
Resin 105-A
West System Epoxy Slow
Hardener 206-A
Table 5.2: Maintenance Supplies
$29.80 / 1 qt
$13.90 / .44 pt
6. Analysis and Testing
The AUV Powered Glider, like every other vehicle or part made, must undergo
a series of tests before going into production. The AUV Powered Glider is a new and
highly innovative vehicle with most of its parts only known to work out of theory.
These theories need to be backed with real world proof.
6.1. Planned Tests
Testing is an expensive and time-consuming phase of the design process. Every
part must undergo rigorous testing if it is to withstand the repeated abuse that is sure to
happen to any production model in its lifetime. We do have a few planned tests that we
feel are essential to confirming the readiness of the glider. These tests will mostly test
some of the physical and mechanical aspects of the glider.
6.1.1. Deployment Test
6.1.1.1. Introduction
The AUV Powered Glider is an underwater vehicle being designed to be
deployed off the R/V Delphinus. The glider will be an autonomous vehicle capable of
being equipped with a variety of scientific sensors. An important part of the design of
the glider is to make it able to be safely deployed and recovered by the R/V Delphinus.
The goal of this test is to find the best design and method of deploying and recovering
the glider. To test various designs and methods a model that is the same size, shape and
close to the same center of gravity of the actual glider. The model would have several
‘U’ bolts to test various arrangements of support points for the vehicle to be held with
ropes, polls, or winch.
6.1.1.2. Methods
The model was built by cutting up pine two by two beams into four seventy six
inch beams, three sixty six inch beams, two thirty inch beams at the longest point with
forty five degree angle cuts at each end, four fifteen inch beams, one sixty two and half
inch beam, and one thirty eight and a half inch beam. The vehicle was the put together
by placing the three sixty six inch beams parallel to each other. Between the front two
sixty six inch beams place the trapezoidal thirty inch beams so they have one face flush
and close to the center of the front beam and the outer edge of the trapezoidal beams
touching the second sixty six inch beam. Then lay two seventy six inch beams across
the top of the 5 other beams. The positioning of the beams would then need to be
adjusted so the front and back sixty six inch beams corners are below the two seventy
six inch beams corners. Adjust the diagonal members so that there outer most edge is
parallel with the seventy six inch beam on top of it. Make sure the middle sixty six inch
beam is still touching the rear most edge of the diagonal beams. Drill quarter inch
diameter horizontal holes through the diagonal pieces and the front beam where they
meet. Drill quarter inch diameter vertical holes through the seventy six inch beams and
the beams below them at every intersection of the beams. Connect the beams together
by putting the quarter inch diameter four inch long carriage bolts through each hole and
tightening them with a nut. Position the four fifteen inch beams on there end at each
corner of the frame. Drill a quarter diameter hole through the fifteen inch beam and
seventy six inch beam and another quarter diameter hole through the fifteen inch beam
and sixty six each beam, repeat this for each fifteen each beam. Connect the final two
seventy six inch beams to the vertical fifteen inch beams by lining them up with the
seventy six inch beams below them and the top of the fifteen inch beams. While
holding the seventy six inch beams together drill two quarter inch diameter holes
through the fifteen inch beams and seventy six inch beams for each seventy six inch
beam on each side. Place carriage bolts through each newly drilled hole and tighten
with nut. Mark the distance the center of gravity should be from the front of the actual
glider on the bottom most seventy six inch beams, these should be the last two beams
attached. The center of gravity is 30 inches back from the front of the model. Place a
tube under the model at this mark and apply weights to the front to balance out the
glider. We found that the added weight of a sixty two and a half inch and thirty eight
and a half inch beam would pull the center of gravity far enough forward. Attach the
two extra beams to the front beam by applying gorilla glue to them then clamping the
pieces onto each other and allowed to dry for three to six hours. Along the top seventy
six inch beams mark the center of gravity again and every inch forward and behind it.
Label each hole with a number make sure to label the hole on each individual beam.
After labeling the model should be disassembled to be brought onboard.
For the test the model should first be reassembled lining up each numbered hole
with its corresponding numbered hole on another beam. Attach two ‘U’ bolts to the top
of the model at the center of gravity line earlier marked and another two along the side
of the vehicle. Attach tag lines to each of the other two side mounted ‘U’ bolts and the
wires connected to the hook on the winch and boom to the ones lined up with the center
of gravity. Hold the vehicle steady with the tag lines and standoff poll while the model
is raised and lowered into the water. Make certain to keep the model from impacting
the R/V Delphinus. Note the difficulty in keeping the model from moving while
keeping in mind the model is several pounds while the actual glider would be around
eight hundred pounds. Repeat this trial for a variety of positions of the ‘U’ bolts to find
the best locations to control the glider while recovering and deploying.
6.1.1.3. Results
The model was deployed with the two points connecting to the winch and found
it to be difficult to keep it level. The model would pivot between the two ‘U’ bolts to
lower on end of the model. When the person manning the tag lines compensated for the
drop the model would shift to the other side. Although we were able to deploy the
model this way, the actual glider would gain too much moment with it tipping back and
forth for a person to be manning the tag lines guiding the glider. The failure of the two
point lift method was noticed by the group and the captain. The Captain advised us
from his experience deploying and recovering other equipment to use either a single lift
point method or a four point lift method. The design of the glider favored the four point
method since there were no planned supports going along the top of the glider to
position an ‘I’ bolt at the center of gravity of gravity. The group then loosened and
detached the ‘U’ bolts and repositioned them to create the setup for a four point lifting
method. The lines connecting the model to the winch’s hook were then tied together.
The lines then needed to be adjusted so the force pulling the model up was above where
the center of gravity of the model was. This was accomplished by raising the model
slightly to determine which lines needed to be adjusted then lowered to allow for
enough slack to make the adjustments. After the harness was finished the four point lift
was tested. It proved to be much easier to manage with the tag lines than the two point
method. When lowering the model a third person with a stand off pole was needed to
hold the model away from the transom of the R/V Delphinus.
This test showed us that the four point system worked best. The Captain
advised us that for the actual glider the harness used would require a quick release
mechanism for safety. The quick release would also allow for a faster deployment of
the vehicle by releasing all 4 hooks at the same time. Dr. Kent recommended quick
release hooks used in sailing that were designed to hold the lines. These hooks have a
pin connected to another line that can be pulled to remove the pin and release the hook.
These hooks along with the four point method would be the optimal design and method
for deploying the actual glider.
6.1.2. Seals Test
A seals test will test the construction quality and methods just as much as the
design of the glider. Getting a perfect seal on various components is extraordinarily
difficult, especially when the component has a moving part passing through the seal or
even opens and close on the seal. In this glider there are many parts that will have to be
tested for good seals however there are three seals that have the greatest likelihood for
failed seals due to the very high machining demands.
The first part that we feel is a trouble spot is where the sample containers open
and close. The flaps will be made to fit the opening on the tubes perfectly however with
it closing by a hinge and being such a large diameter it’s likely the seal can easily be
breached. Another part that we have concern for is the seals for the rotating screens
inside the sample containers. The servo connection for those introduces a spinning
shaft through a seal in a small area so getting a perfect seal will be challenging. The
third but not final point to keep an eye on is the shaft for the vertical thrusters. The
motors will be relatively high velocity compared to other servos that the seal around
them is even more likely to fail.
This test will be conducted in stages. First each of the components will be
sealed and held in a situation that will confirm their seal. An example of this will be to
fill the sample containers with water and place them with a cloth under them so when
you return later you can determine how much water leaked if any. A way to test the
vertical thrusters will be to fill their housing with oil and place the thruster directly over
a bucket of water in such a way if the seal were to be compromised around the shaft that
the oil would drip into the water. The oil would separate from the water in the bucket
and become readily noticeable. This test would continue for several hours with
intermittent parts with the thruster running.
6.1.3. Operations Test
The operations test would test the mechanical aspects of the AUV Powered
Glider. This test is important because it determines whether or not the components
made for the AUV Powered Glider are working together or at all. For the test the given
component would be instructed to do one or more actions and then the observer will be
able to judge if the part is working properly.
This test is more of an ongoing test then the other ones. This test would be
conducted at multiple stages throughout the building of the glider then a final test at the
end. An example of this would be to test each servo individually when unpacking to
confirm that each is operational and each works they way they are designed to. This
same test would also apply to both the vertical thruster motors and the main forward
thrusters. It is important to retest each part after working on it so you can confirm that
any changes you made didn’t adversely affect the components operation. At the end
when the vehicle is placed in the water tank or pool for the seals test, this test can also
be re-performed in order to check for full operation of the glider. This test would
include forward, backward, up, and down motion. The test would also include the
rotation of all the sample container screens and the closing of the sample containers.
6.2. Ideal Tests
Some tests require equipment, materials, personal, and time that most projects
can’t afford. These tests usually don’t come in until the prototype model is approved
and the final steps are being made towards a production model. These following tests
are tests that we would conduct if the resources were available. Each of these tests
would also be for the glider during a later stage of development such as after the
completion of the main computer.
6.2.1. Software Tests
One test of the software will be the compilation stage. The next test is a visual
test of each device out of the water. Basically, the idea would be "Does joystick left
equal ruder left?" In this manner any systems that fail can be easily fixed, without too
many issues. After the AUV is in water, then test all systems once more. At this point it
is much harder to update the software. And final testing would be to send it on a short
mission to a shallow depth. The short duration would allow a more narrow time
window of expected arrival, and because it is moving, a narrower area of the water to
look for it in. Furthermore, the shallow depth would allow for visual tracking of the
AUV, this would allow us to properly test the computer's ability to control the AUV.
6.2.2. Pressure Chamber Test
The pressure chamber test is the best way to test first individual parts then the
glider as a whole to see if it can withstand the awesome power of the pressure at 4,000
meters ocean depth. The use of a pressure chamber allows you to recover the glider in
the event of a failure in one of the parts. You would then be able to take the part that
failed and analyze it to find out why it failed. If this test were to be skipped the first
indication to the user that there was a failure would be when it didn’t resurface. This
test would save allot of money in the long run despite its high initial cost. This test can
cost several thousands of dollars for the use of a pressure chamber for the day as well as
the cost of replacing any parts that do break in the process. Despite these high costs, the
cost of loosing the glider as a whole would be much greater and you wouldn’t have the
opportunity to learn from the failure.
6.2.3. Long Duration Ocean Test
The long duration ocean test is meant more for testing the AUV powered
glider’s functionality then anything else. The long duration ocean test is meant to be
conducted in relatively shallow water, which we specify as no more then 500 meters
preferably even shallower. During this test the AUV computer will be tasked with a
series of actions that it needs to carry out. These actions include taking sensor readings
and record them, adjusting buoyancy, closing the sample containers, maneuvering with
all ailerons and running all the thrusters. This test will test the glider’s ability to operate
underwater by itself for a prolonged period of time. This test will require a small to
medium sized research vessel in order to deploy the glider however since this test isn’t
testing deep water the vessel doesn’t need to have a very large range.
6.2.4. Short Duration Deepwater Test
The short duration deepwater test is meant for the purpose of testing the
structural integrity and the functionality of the AUV powered glider at the design depth.
This test would be conducted by first programming the AUV powered glider to
dive to 4,000 meters. Once there the vehicle would release a small set of weights giving
it neutral or slightly positive buoyancy. At this depth the AUV powered glider would
then test and use all of the servos, motors, and sensors that the glider is equipped with.
The AUV powered glider would also run each thruster for several second periods every
once in awhile reversing direction and speed in order to fully test the seals and
components under pressure.
After only a few hours the AUV powered glider would release one or more of its
weights giving the glider positive buoyancy that would push it up to the surface for
recovery. At the surface the glider would be programmed to activate its recovery
beacon. The glider will then emit its radio beacon as well as flash a bright LED strobe.
6.2.5. Trial Mission
The trial mission would be the final and most comprehensive of the AUV
powered glider’s tests. The trial mission would consist of a preprogrammed mission
like one of the missions described above in section 2.4 “Example Application
Scenarios.” The glider would be deployed for deepwater operations for extended
lengths of time. While deployed, the AUV powered glider would conduct a mission
using all of its available functions. When the AUV powered glider either completed its
mission or ran out of energy it would in act its recovery system that would bring it to
the surface and signal for its recovery.
7. Liabilities
For matters of liability, or of any question of the operation of the AUV Powered
Glider, it will be urged that any user of this vehicle consult the user manual. The manual
will clearly warn users against performing any procedure not mentioned in the manual
and against using the vehicle in any manner. Many issues will still be addressed in the
manual to inform users of the potential hazards and legal matters pertaining to the
operation of this vehicle
7.1. Health
The housings for the thrusters and servos will contain mineral oil and may
eventually contain transformer oil. It will be recommended to users that eye protection
should be worn at all times when working with either of these oils. Users should avoid
prolonged or repeated contact with these oils. For prolonged contact with mineral oil or
transformer oil for repairing of the housings it is recommended that the user wear nonlatex gloves as prolonged contact with either may cause dermatitis. Neither mineral oil
nor transformer oil should be ingested, as both may be mild toxins. (Mineral Oil), (Day,
L, and R. McGehee)
When working with fiberglass users should always be in a well-ventilated area and
wear a mask. Users will also be notified that fumes from epoxy and fiberglass dust are
harmful when inhaled.
7.2. Safety
Users will be advised to use caution when working with thrusters. Thrusters
have considerable torque and can cause serious injury.
Users will also be advised to take precautions when working with the battery,
especially when working near the terminals of the battery. Connecting the terminals will
shock and cause serious injury to the user.
7.3. Environmental
It will be urged that if a leak of the mineral oil or transformer oil should occur
an effort should be made to contain the oil and minimize the spillage. (Mineral Oil),
(Day, L, and R. McGehee)
A take is defined by the MMPA as, “to harass, hunt, capture, or kill, or attempt
to harass, hunt, capture, or kill any marine mammal”. If an incidental take of an
endangered species or marine mammal is to occur with the AUV, it is required that the
user has an incidental take permit under the ESA or the MMPA. (Showalter, 81)
7.4. Legal
Since it is still unclear whether AUVs are considered vessels and some cargo
carrying AUVs are already considered AUVs, is it recommended that the user follow
the International Regulations for Preventing Collisions at Sea (COLREG). COLREG
requires inconspicuous partly submerged vessels to display a white all-round light
visible to a minimum of 3 miles. The AUV Powered Glider will be equipped with this
and it will be imperative that the user replaces the light when necessary. (Showalter, 80)
8. Conclusion and Recommendations
At this point in time there are many parts of the vehicle that will still have to be
tested and analyzed for optimal operations. Everything from vehicle dynamics, vehicle
statics, abuse, and ease of use need to be analyzed over and over again.
In terms of vehicle dynamics there are a few areas that need to be analyzed and
optimized. The most important area is fluid flow in and around the vehicle. The unique
shape and functions of the vehicle produce a very unique fluid flow pattern. As a result
it would be quite difficult to compare this vehicle to any vehicle ever made before.
Therefore the only solution is to first create a computer model and run it through a
series of simulations. Then the next step would be to produce a scale model of the
glider and place it in a water tank similar to a wind tunnel where the fluid flow can be
observed and measured. Once the affects of the fluids flow can be analyzed perhaps a
more streamlined and efficient glider can be produced.
The vehicle statics need to be analyzed in several different aspects. The first
aspect and probably most important is part and joint stresses. Each part and joint is
designed to take the load and stresses introduced to the vehicle during operation and
handling. Despite this history has proven that repeat fluctuations in stress and strain can
cause micro-fractures in some of the most critical parts of the vehicle. This instance
first showed itself in airplanes when the stress and strain of the flights added cumulative
damage to the airplane that ultimately led to a failure despite the materials and parts
being well within the threshold required.
Both laborers and end users will handle the AUV powered glider, as a result
handling needs to be looked at very closely. While we will know how to properly
handle the vehicle that doesn’t mean that everyone will. This type of use falls under the
category of abuse. This abuse can be introduced in ways it’s assembled, moved,
deployed, or even stored. The best way to do this is first sit down and make educated
guesses on how an inexperienced person would handle the vehicle and make design
changes accordingly. The next thing to do would be to make a full-scale replica and use
several groups of people, preferably both experienced and inexperienced deck hands.
Then we would set up the replica and ask them to handle and deploy the vehicle without
any guidance from us so we can observe what abusive mistakes people are likely to
make in the AUV powered glider’s handling.
One of the other major aspects of the AUV powered glider that need to be
analyzed is the ease of use. This involves everything from ease of assembly,
maintenance, programmability, deployment, and collection. Each of these areas as well
as others, need to be fully analyzed in terms of the most inexperienced end user. Also
stemming from this study will be the manual and any kind of training course of video
necessary.
9. References
"2005-2006 Price List." West System. 10 June 2005. West System, Inc. 2 May 2006
<http://www.westsystem.com/frames/tier2/productinfo/pricelist.htm>.
"ABE: the Autonomous Benthic Explorer." Woods Hole Oceanographic Institute. 15
Aug. 2005. Woods Hole Oceanographic Institute. 1 May 2006
<http://www.whoi.edu/sbl/image.do?id=12974&litesiteid=4050&articleId=6343
>.
"Application / Advisor: Motors." Net Motion. 10 Dec. 2002. NetMotion Inc. 12 Apr.
2006 <http://www.netmotion.com/htm_files/adv_motors.htm>.
"AQUA Tracka." Advertisement. 1 May 2006
<http://www.chelsea.co.uk/LAquatracka1.pdf>.
"Autonomous Underwater Vehicle -." Kronsberg Maritime. Kronsberg Maritime. 1 May
2006
<http://www.km.kongsberg.com/KS/WEB/NOKBG0240.nsf/AllWeb/6DE7508
561515DB5C1256E450036EE3B?OpenDocument>.
"Bluefin Spray Glider." Bluefin Robotics. Bluefin Robotics Corp. 29 Apr. 2006
<http://www.bluefinrobotics.com/bluefin_glider.htm>.
A Compact, Cost-Effective Conductivity,. Cataumet, MA: Falmouth Scientific, Inc.,
2001.
Day, L, and R. McGehee. "Transformer Oil." CAMD MSDS Management 20 Aug.
1991. Material Safety Data Sheets. 18 Apr. 2006
<http://www.camd.lsu.edu/msds/t/transformer_oil.htm>.
"DIGITAL MULTI-FREQUENCY PROFILING SONAR." Advertisement. 1 May
2006 <http://www.imagenex.com/881A_Profiling_Specs.pdf>.
"Echo Ranger." Boeing. Boeing. 1 May 2006 <http://www.boeing.com/defensespace/ic/sis/ais/echo_ranger.html>.
"Edgetech Full Spectrum." Advertisement. 1 May 2006 <http://www.seatronicsgroup.com/product.cfm?productid=195>.
"Electric Glider." Webb Research Corporation. 19 July 2004. Webb Research
Corporation. 29 Apr. 2006 <http://www.webbresearch.com/electric_glider.htm>.
FSI NXIC CTD SERIES. Cataumet, MA: Falmouth Scientific, Inc., 2006.
"GeoPulse Hydrophone Array." Advertisement. 1 May 2006
<http://www.geoacoustics.com/Specifications/5110a.htm>.
Goodwin, Nigel. "WinPicProg PIC Tutorial." Nigel's PIC Tutorial. 22 Apr. 2006
<http://www.winpicprog.co.uk/pic_tutorial.htm>.
Heuermann, Rüdiger, Rainer Reuter, and Rainer Willkomm. RAMSES a Modular
Multispectral Radiometer for Light Measurements. Univeristy of Oldenburg. 17. 1 May 2006 <http://las.physik.unioldenburg.de/publications/paper/ramses.pdf>.
"Hydrogen Basics." Fuel Cells 2000. Department of Energy. 22 Apr. 2006
<http://www.fuelcells.org/hydrogen/basics.html>.
"Inertial Navigation System." Advertisement. 1 May 2006
<http://www.ixsea.com/downloads/sales_documentation/uk_Phins_v0503.pdf>.
"LBV Object Avoidance Sonar." Advertisement. 1 May 2006
<http://www.seabotix.com/products/sonar.htm>.
Light, Russ, Craig Lee, and Marc Stewart. "SeaGlider." Applied Physics Laboratory,
University of Washington. University of Washington. 29 Apr. 2006
<http://www.apl.washington.edu/projects/seaglider/specifications.html>.
"Micro and Mini Servos." Hitec RCD USA, Inc. Hitec RCD USA, Inc. 2 May 2006
<http://www.hitecrcd.com/homepage/product_fs.htm>.
Performance/Specifications. Northrup Grumman. 1 May 2006
<http://www.nsd.es.northropgrumman.com/Html/LN-100M/specification.htm>.
"Product Datasheet." Microchip Programing. Microchip Technology, Inc. 15 Apr. 2006
<www.microchip.com>.
Products for Research DiveSpec Underwater Spectrometer. Andover, MA: NightSea
LLC.
"Profiling Natural Fluorometer System." Advertisement. 1 May 2006
<http://www.biospherical.com/BSI%20WWW/Products/BSI%20PDFs/Brochure
s/PNF.pdf>.
Showalter, Stephanie. "The Legal Status of Autonmous Underwater Vehicle." The
Marine Technology Soceity Journal 38.1 (2004): 80-83.
"Stepper Motors Vs. Servo Motors." Torchmate. 15 Mar. 2004. Applied Robotics Inc.
20 Apr. 2006 <http://www.torchmate.com/motors/electronics_selection.htm>.
"Super SeaKing." Advertisement. 1 May 2006
<http://www.tritech.co.uk/products/datasheets/super-seaking-dfs.pdf>.
"Super SeaKing DFP." Advertisement. 1 May 2006
<http://www.tritech.co.uk/products/datasheets/super-seaking-dfp.pdf>.
Wood, Stephen. Mobile Autonomous Underwater Surveillance System. D.M.E.S.,
Florida Institute of Technology. Melbourne, FL.
Zubaly, Robert B. Applied Naval Architecture. 2nd ed. Centreville, Maryland: Cornell
Maritime P, 1996.
10. Appendix
10.1. Financial Sheets
10.2. Mold Releasing Agent Lab #1
10.3. Mold Releasing Agent Lab #2
10.4. Model Glider Test Deployment Experiment
10.5. General Plastics Modeling Foam Data Sheet
10.6. Syntech Technologies Syntactic Foam Product Sheet
10.7. Benthos Instrumentation Sphere Data Sheets
10.8. Minn-Kota Trolling Motor Data Sheet
10.9. Hitec Servo Data Sheets