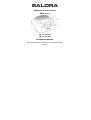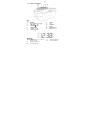
1
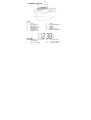
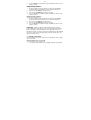
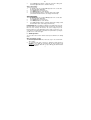
AM/FM PLL Klokradio
Model CR 612
AM: 522-1620 kHz
FM: 87.5-108 MHz
GEBRUIKSAANWIJZING
Gelieve de gebruiksaanwijzing te lezen alvorens het toestel te
gebruiken en bewaar hem voor later gebruik.
NL
1
BEDIENINGSTOETSEN
Toestel
1.
2.
3.
4.
5.
6.
7.
AAN/UIT
LED digitale klok
VOLUME / AL1
VOLUME /AL2
FM ANTENNE
TUNING /HR
TUNING / MIN
8.
9.
10.
11.
12.
13.
LED Display
14.
PM indicatie (voor versie met
12 uur indicatie)
15.
AL1 zoemer indicatie
16.
17.
18.
1
SLEEP
INSTELLINGEN (SET)
SNOOZE
BAND
MEM (geheugen)
Batterijencompartiment
AL1 radio indicator
AL2 zoemer indicator
AL2 radio indicator
NL
2
Back-up modus (geheugen voor ingestelde tijd en
voorkeuzezenders)
Het is aangeraden om back-up batterijen (niet meegeleverd) te plaatsen om te
vermijden dat de tijd, de ingestelde alarmtijd en de instelling van de
voorkeuzezenders verloren zouden gaan in geval van een
stroomonderbreking.
1.
2.
3.
3
Open het batterijencompartiment (13) op de onderkant van het
toestel.
Sluit 2 batterijen AAA/LR03 (of gelijkaardig) aan en let op de polariteit
+/Sluit het batterijencompartiment (13).
Basisbediening
Stand-by modus
Nadat de netstroom is aangesloten staat het toestel in stand-by en zal er op
de display 0:00 (kloktijd) knipperen in geval van een uitvoering met 24-uurs
aanduiding of 12:00 (AM) in geval van een 12-uurs aanduiding.
Zie onder ‘Instellen van tijd en alarmtijd’ om de tijd in te stellen. Druk op
POWER (1) om het toestel/radiomodus in te schakelen en druk opnieuw op
deze toets om het toestel uit te schakelen.
Ingeschakeld/Radiomodus
Druk op POWER (1) om het toestel in te schakelen. De huidige
radiofrequentie verschijnt gedurende 5 seconden en vervolgens wordt de tijd
weergegeven.
4
Instellen van tijd en alarmtijd
Instellen van de tijd
Hou, in stand-by modus, de toets SET (9) gedurende 2 seconden ingedrukt en
de indicaties van de uren en de minuten knipperen.
2
NL
1.
2.
3.
Druk op HR (6) om de uren in te stellen.
Druk op MIN (7) om de minuten in te stellen.
Druk opnieuw op SET (9) om de tijdsinstelling te bevestigen (de uren en
minuten aanduiding staan nu vast).
Instellen van alarmtijd 1
1.
2.
3.
4.
Hou, in stand-by modus, de toets AL1 (3) gedurende 2 seconden
ingedrukt en de indicaties van de uren en de minuten knipperen.
Druk op HR (6) om de uren in te stellen.
Druk op MIN (7) om de minuten in te stellen.
Druk opnieuw op AL1 (3) om de tijdsinstelling te bevestigen (de uren
en minuten aanduiding staan nu vast).
Instellen van alarmtijd 2
1.
Hou, in stand-by modus, de toets AL2 (4) gedurende 2 seconden
ingedrukt en de indicaties van de uren en de minuten knipperen.
2.
Druk op HR (6) om de uren in te stellen.
3.
Druk op MIN (7) om de minuten in te stellen.
4.
Druk opnieuw op AL2 (4) om de tijdsinstelling te bevestigen (de uren
en minuten aanduiding staan nu vast).
OPMERKING: wanneer alleen batterijen als voeding gebruikt worden, zal de
display uitgaan en blijft de klok alleen gedurende een korte tijd correct. De
juistheid van de klok vermindert met het afnemen van de capaciteit van de
batterij. Het is belangrijk zo snel mogelijk terug de netstroom aan te sluiten.
Indien er geen back-up batterij aangebracht is, moet na een
stroomonderbreking de klok opnieuw ingesteld te worden.
5
Gebruik van het alarm
In stand-by kan u voor de twee alarmen kiezen voor een zoemer of voor radio.
3
NL
Wekken met zoemer of met radio
1.
Voor het instellen van de alarmtijd, zie onder ‘Instellen van tijd en
alarmtijd’.
2.
Instellen of uitschakelen van het (radio of zoemer) alarm onder ALARM
1. Druk verschillende malen op de AL1 (3) toets totdat de gewenste
modus op het scherm verschijnt. Iedere keer dat u op AL1 (3) drukt
wijzigt de indicatie als volgt:
3.
Instellen of uitschakelen van het (radio of zoemer) alarm onder ALARM
2. Druk verschillende malen op de AL2 (4) toets totdat de gewenste
modus op het scherm verschijnt. Iedere keer dat u op AL2 (4) drukt
wijzigt de indicatie als volgt:
4.
Als de alarmtijd bereikt is zal de zoemer of de radio in werking treden,
tenzij het alarm uitgeschakeld is.
Opmerking: het volume van de zoemer kan niet ingesteld worden. Bij
radioalarm wordt het laatst gebruikte volume, frequentieband en zender
gebruikt. Tijdens het radioalarm kan het volume ingesteld worden met
VOLUME (3) of VOLUME (4). Om de zender te kiezen, zie onder
‘Radiobediening’.
De alarmtijd controleren
In stand-by modus, hou gedurende 2 seconden toets AL1 (3) voor ALARM 1
of toets AL2 (4) voor ALARM 2 ingedrukt. De alarmtijd knippert op het display.
Druk opnieuw op AL1 (3) (voor ALARM 1) of AL2 (4) (voor ALARM 2) om
terug naar de klokweergave te gaan.
4
NL
Snooze functie
Wanneer het alarm afgaat, druk op de SNOOZE (10) toets om het alarm
tijdelijk te onderbreken. De AL1/2 zoemer indicatie (15)/(17) of de AL1/2
radio indicatie (16)/(18) knipperen en het alarm zal opnieuw na 9 minuten
afgaan. Om het alarm te stoppen, druk eenmaal op POWER (1). De
alarmindicatie knippert niet meer en het alarm zal de volgende dag op
dezelfde tijd opnieuw afgaan.
6
Radiobediening
Naar de radio luisteren
1.
Druk op de POWER (1) toets om de radio in te schakelen. De huidige
radiofrequentie verschijnt op het display.
De radio staat standaard ingesteld voor FM op
87.5 MHz en voor AM op 522 kHz, ofwel op de
laatst beluisterde zender.
2.
Druk op de BAND (11) toets om de frequentieband te kiezen.
3.
Automatische afstemming. Hou gedurende 2 seconden TUNING (6)
of TUNING (7) ingedrukt totdat de frequentie naar boven of onder
gaat. De tuner stopt bij de eerst gevonden zender. Herhaal deze
operatie totdat de gewenste zender gevonden is.
4.
Handmatig fijnafstemmen. Druk herhaaldelijk TUNING (6) of TUNING
(7) ingedrukt om de frequentie per stap bij te regelen.
Volumeregeling
Gebruik VOLUME (3) of VOLUME (4) om het volume te regelen.
Om een optimale ontvangst te bekomen
FM: trek de FM draadantenne maximaal uit.
AM: draai het toestel totdat een maximale ontvangst bekomen wordt.
Memoriseren van de voorkeuzezenders
U kan elke frequentieband (FM en AM) 10 zenders vastleggen.
5
NL
1.
2.
3.
Stem af op de gewenste zender.
Hou de SET (9) toets ingedrukt totdat het
programmanummer knippert. Druk opnieuw op
SET (9) om de zender vast te leggen.
Herhaal deze stappen voor andere zenders.
Oproepen van vastgelegde zenders
In radiomodus, druk verschillende malen op MEM (12) totdat het nummer
waaronder de gewenste zender ligt, bereikt is.
7
Sleep Timer
U kan de sleep timer gebruiken om de radio na een bepaalde tijd (maximum
90 minuten) automatisch te laten uitschakelen.
1.
2.
3.
4.
5.
8
Druk op de SLEEP (8) toets en ‘90’
wordt aangeduid.
Druk verschillende keren op SLEEP
(8) om de tijd in te stellen: 90, 80,… Iedere keer dat u op deze toets
drukt wordt de tijd met 10 minuten vermindert totdat er OFF verschijnt.
De radio schakelt automatisch uit als de ingestelde tijd bereikt is.
Om de resterende tijd te controleren, druk eenmaal op SLEEP (8).
Om de sleep functie te annuleren en de radio uit te schakelen, druk op
POWER (1).
Zorg en onderhoud
Reinig de behuizing met een zacht doekje, licht doordrenkt met water of een
detergent. Gebruik geen solventen zoals alcohol, benzine of thinner, want die
kunnen de behuizing beschadigen. Trek het netsnoer uit het stopcontact
alvorens het toestel te reinigen
.
9
1.
Verwittigingen
Probeer niet om het toestel uiteen te halen en te veranderen. Dit kan
aanleiding geven tot elektrische schokken. Interne controle, wijzigingen
of herstellingen mogen alleen door gekwalificeerd personeel uitgevoerd
6
NL
2.
3.
4.
5.
6.
7.
8.
9.
worden.
Hou tenminste 5 cm vrije ruimte rond het toestel om een goede ventilatie
te garanderen. Plaats het toestel niet in een boekenkast of een rek
zonder voldoende ventilatie. Zorg ervoor dat de ventilatieopeningen van
het toestel niet geblokkeerd worden door voorwerpen zoals een krant,
een tafelkleed of een gordijn.
Plaats geen blote vlam, zoals die van een kaars, boven het toestel.
Stel het toestel niet bloot aan druppels of spatten en plaats geen met
vloeistof gevuld voorwerp, zoals een vaas, boven het toestel.
Gebruik van een voeding of batterijen die verschillen van diegene die
aangeraden zijn, kan aanleiding geven tot oververhitting, slechte
werking, brand, elektrische schokken of andere ongelukken. Gebruik
alleen de aangewezen voeding.
Gebruik of bewaar het toestel niet in een vochtige of stoffige ruimte.
Gebruik het toestel in een gemiddeld klimaat.
Er bestaat ontploffingsgevaar als de batterij verkeerd is aangesloten.
Vervang de batterij door een gelijkaardig type. Batterijen mogen niet
blootgesteld worden aan extreme hitte zoals die van zonlicht, een vuur,
of dergelijke. Gooi de batterijen nooit in een vuur. Hou bij het
verwijderen van lege batterijen rekening met het milieu.
Als het netsnoer is aangesloten, is het apparaat klaar voor gebruik.
De label van het toestel bevindt zich op de onderzijde van het apparaat.
10 Voeding en frequentiebereik
Voeding
Back-up batterijen
Frequentiebereik
AC230V~50Hz
2 x 1.5 V AAA/LR03 of gelijkaardig (niet
meegeleverd)
AM 522-1620 kHz
FM 87.5-108 MHz
Wegens constante verbeteringen aan het product kunnen de design en de specificaties
gewijzigd worden zonder voorafgaande verwittiging.
7
Radio reveil PLL AM/FM
Modèle CR 612
AM: 522-1620 kHz
FM: 87.5-108 MHz
MANUEL D’UTILISATION
Lisez ce manuel d’utilisation avant d’utiliser l’appareil et gardez
le pour consultation ultérieure
FR
1
Boutons de commande
Appareil
1.
PUISSANCE
2.
Ecran montre LED
3.
VOLUME
/ AL1
4.
VOLUME
/ AL2
5.
ANTENNE FM
6.
TUNING / HR
7.
TUNING / MIN
8.
9.
10.
11.
12.
13.
SLEEP
REGLAGE
SNOOZE
BANDE RADIO
MEM (mémoire)
Compartiment à piles
17.
Indicateur son signal alarme
AL2
Indicateur radio alarme AL2
Ecran LED
14.
15.
16.
Indicateur PM (affichage des
heures en système AM/PM)
Indicateur son signal alarme
AL1
Indicateur radio alarme AL1
18.
1
FR
2
Mode back-up (mémoire pour réglage temps et
présélections)
Il est recommandé de placer des piles ‘back-up’ (non livrées) pour éviter que
le temps, le temps d’alarme et les présélections soient effacées après une
panne de courant secteur.
1.
2.
3.
3
Ouvrez le compartiment à piles (13) sur le fond de l’appareil.
Insérez 2 piles AAA/LR03 (ou équivalent) et tenez compte de la polarité
+/-.
Fermez le compartiment à piles (13).
Fonctions de base
Mode standby
Après connexion courant secteur, l’appareil se trouve en mode standby et
l’écran affiche 0 :00 pour la version avec montre 24 heures ou 12 :00 (AZM)
pour la version avec montre 12 heures. Voyez ‘Réglage du temps et de
l’alarme’ pour régler le temps. Poussez le bouton POWER (1) pour mettre
l’appareil/mode radio en fonction et repoussez le bouton pour le mettre en
mode standby.
En fonction/ mode radio
Poussez POWER (1) pour mettre l’appareil en fonction et la fréquence radio
apparaît pendant 5 secondes. Ensuite le temps actuel est affiché.
4
Réglage du temps et de l’alarme
Réglage du temps
En mode standby, enfoncez pendant 2 secondes le bouton SET (9) jusqu’au
moment où les indications heures et minutes clignotent.
1.
2.
Poussez le bouton HR (6) pour régler l’heure.
Poussez le bouton MIN (7) pour régler les minutes.
2
FR
3.
Poussez SET (9) pour confirmer le temps (l’indication de l’heure et des
minutes est fixe).
Réglage du temps d’alarme 1
1.
2.
3.
4.
En mode standby, enfoncez pendant 2 secondes le bouton AL1 (3)
jusqu’au moment où les indications heures et minutes clignotent.
Poussez le bouton HR (6) pour régler l’heure.
Poussez le bouton MIN (7) pour régler les minutes.
Poussez AL1 (3) pour confirmer le temps (l’indication de l’heure et des
minutes est fixe).
Réglage du temps d’alarme 2
1.
2.
3.
4.
En mode standby, enfoncez pendant 2 secondes le bouton AL2 (4)
jusqu’au moment où les indications heures et minutes clignotent.
Poussez le bouton HR (6) pour régler l’heure.
Poussez le bouton MIN (7) pour régler les minutes.
Poussez AL2 (4) pour confirmer le temps (l’indication de l’heure et des
minutes est fixe).
NOTEZ BIEN : quand vous utilisez l’appareil uniquement avec les piles
l’écran n’affiche rien et la montre ne reste exacte que pendant un temps très
limité. L’exactitude de la montre diminue avec la capacité des piles. Il est
important de remettre le courant secteur le plus rapidement possible. Quand il
n’y a pas des piles ‘back-up’ il faudra régler à nouveau le temps après une
panne de courant secteur.
5
Utilisation de l’alarme
En mode standby vous pouvez choisir pour les deux alarmes entre un signal
sonore ou le radio.
Réveil par signal sonore ou par radio
1.
Pour régler le temps d’alarme voyez ‘Réglage du temps et de l’alarme’.
3
FR
2.
Pour choisir le mode alarme (signal sonore ou radio) ou pour désactiver
l’alarme 1, poussez plusieurs fois le bouton AL1 (3) jusqu’au moment où
le mode désiré apparaît sur l’écran. Chaque fois que vous poussez le
bouton AL1 (3) l’indication change comme suite :
3.
Pour choisir le mode alarme (signal sonore ou radio) ou pour désactiver
l’alarme 2, poussez plusieurs fois le bouton AL2 (4) jusqu’au moment où
le mode désiré apparaît sur l’écran. Chaque fois que vous poussez le
bouton AL2 (4) l’indication change comme suite :
4.
Quand le temps d’alarme est atteint le signal sonore ou le radio se met
en marche, à moins que vous avez désactivé l’alarme.
Remarque : le volume du signal sonore ne peut pas être réglé. Les réglages
volume, la gamme de fréquence et l’émetteur en cas d’alarme avec radio sont
ceux du dernier émetteur écouté. Pendant l’alarme radio vous pouvez régler
le volume avec les boutons VOLUME (3)/ VOLUME (4). Pour
sélectionner le radio, voyez ‘Opération radio’.
Contrôler le temps d’alarme
En mode standby, poussez pendant 2 secondes le bouton AL1 (3) pour
l’alarme 1 ou le bouton AL2 (4) pour l’alarme 2 et le temps d’alarme
programmé clignote. Repoussez le bouton AL1 (3) (pour alarme 1) ou AL2 (4)
(pour alarme 2) pour revenir à l’affichage du temps actuel.
Fonction snooze
Pendant le fonctionnement de l’alarme poussez le bouton SNOOZE (10) pour
interrompre momentanément l’alarme. Les indications AL1/AL2 signal
4
FR
sonore (15)/(17) ou AL1/AL2 radio (16)/(18) clignotent et l’alarme se remet
en fonction après 9 minutes. Pour arrêter l’alarme poussez le bouton POWER
(1). L’indication alarme est fixe et l’alarme se remettra en fonction le jour
suivant à la même heure.
6
Opération radio
Ecouter le radio
1.
Poussez le bouton POWER (1) pour mettre le radio en fonction. La
fréquence radio apparaît sur l’écran.
Le réglage standard en mode FM est 87.5 MHz et
522 kHz en mode AM, ou la fréquence du dernier
émetteur écouté.
2.
Poussez BAND (11) pour sélectionner la bande de fréquences.
3.
Poussez pendant 2 secondes le bouton TUNING (6) ou TUNING (7)
jusqu’au moment où la fréquence augmente ou diminue. Relâchez le
bouton. Le radio cherche et s’arrête au premier émetteur trouvé.
Répétez jusqu’au moment où l’émetteur désiré est trouvé.
4.
Réglage fin manuel. Poussez plusieurs fois le bouton TUNING (6) ou
TUNING (7) pour régler la fréquence en étapes.
Réglage du volume
Utilisez les boutons VOLUME (3) et VOLUME (4) pour régler le volume.
Réception optimale
FM : retirez au maximum l’antenne FM.
AM : tournez l’appareil pour obtenir une réception optimale.
Mémoriser les émetteurs
Vous pouvez mémoriser jusqu’à 10 émetteurs dans chaque gamme (AM et
FM).
1.
Cherchez l’émetteur voulu.
2.
Poussez pendant 2 secondes le bouton SET (9) et
le numéro de présélection clignote. Repoussez le
bouton SET (9) pour mémoriser l’émetteur.
5
3.
FR
Répétez les points pour mémoriser d’autres émetteurs.
Rappeler les émetteurs
En mode radio, poussez plusieurs fois le bouton MEM (12) pour sélectionner
le numéro sous lequel l’émetteur a été mémorisé.
7
SLEEP TIMER
Vous pouvez utiliser le Sleep Timer pour mettre automatiquement le radio
hors fonction après un certain temps (jusqu’à 90 minutes).
1.
2.
3.
4.
5.
8
Poussez le bouton SLEEP (8) et ‘90’ est affiché sur
l’écran.
Poussez plusieurs fois le bouton SLEEP (8) pour
régler la durée : 90, 80, … Chaque fois que vous
poussez ce bouton le temps est réduit de 10 minutes
jusqu’à OFF.
Le radio se met automatiquement hors fonction quand le temps
programmé est écoulé.
Pour contrôler le temps restant, poussez une fois le bouton SLEEP (8).
Pour annuler la fonction sleep et pour arrêter la radio, poussez le bouton
POWER (1).
Soin et entretien
Nettoyez l’appareil avec un chiffon doux légèrement humidifié avec de l’eau
ou un détergent doux. Ne pas utiliser des solvants tels que alcool, essence ou
thinner, car ceci peut abimer le boîtier. Déconnectez le courant secteur avant
de nettoyer l’appareil.
9
1.
Avertissements
N’essayez pas de démonter l’appareil ou de changer des pièces. Ceci
peut résulter dans des chocs électriques. Le démontage de l’appareil,
de remplacement des pièces et la réparation ne peuvent être effectués
que par du personnel qualifié.
6
FR
2.
3.
4.
5.
6.
7.
8.
9.
Assurez une espace vide de 5 cm autour de l’appareil pour garantir une
bonne ventilation. Ne placez pas l’appareil dans des armoires fermées
sans ventilation. Assurez que les ouvertures de ventilation ne soient pas
bloqués par des objets tels qu’un journal, une nappe, un rideau.
Ne pas placer des flemmes ouvertes, comme une bougie, au-dessus de
l’appareil.
Ne pas exposer l’appareil à des goutes et ne placez pas des objets
remplis d’une liquide, comme une vase, au-dessus de l’appareil.
L’utilisation d’alimentations ou des piles non recommandées pour cet
appareil peut causer une surchauffe, un mal fonctionnement, un feu, un
choc électrique ou autres inconvénients. Utilisez uniquement
l’alimentation recommandée.
Ne gardez pas l’appareil dans un endroit humide ou avec beaucoup de
poussière. Utilisez l’appareil dans un climat modéré.
Il existe le danger d’explosion quand la pile n’est pas bien insérée.
Remplacez la pile par un type équivalent. Ne pas exposer les piles à du
chaleur excessif comme la lumière du soleil, un feu,… Ne jamais jeter
les piles dans un feu. Pensez à l’environnement quand vous vous
débarrassez des piles vides.
L’appareil est prêt à fonctionner quand le câble courant secteur est
connecté à la prise courant secteur.
Le label de l’appareil se trouve sur le fond de l’appareil.
10 Alimentation et gamme de fréquences
Alimentation
Piles ‘back-up’
Gamme de fréquences
AC230V~50Hz
2 x 1.5 V format AAA/LR03 ou équivalent (non
livrées)
AM 522-1620 kHz
FM 87.5-108 MHz
Pour des raisons d’améliorations le design et les spécifications peuvent être modifiés sans
préavis.
7
AM/FM PLL Radio Alarm Clock
Model CR 612
AM: 522-1620 kHz
FM: 87.5-108 MHz
INSTRUCTION MANUAL
Please read these instructions before use and retain for future
reference
EN
1
Unit
1.
2.
3.
4.
5.
6.
7.
Location of Controls
POWER
LED Digital Clock Display
VOLUME
/ AL1
VOLUME
/ AL2
FM ANTENNA
TUNING / HR
TUNING / MIN
8.
9.
10.
11.
12.
13.
SLEEP
SET
SNOOZE
BAND
MEM (Memory)
Battery Door
LED Display
14.
15.
16.
PM indicator (for 12 hour time
display version)
AL1 buzzer indicator
AL1 radio indicator
17.
18.
1
AL2 buzzer indicator
AL2 radio indicator
EN
2
Back-up Mode (Memory Backup for Time Settings and
Preset Stations)
It is advisable to fit back-up batteries (not supplied) to the unit to prevent loss
of the clock time (keep operating), alarm time and preset stations settings
during a power failure.
1
2
3
3
Slide off the Battery Door (13) from the underside of the unit.
Insert 2 x AAA size/LR03 (or equivalent) batteries with correct polarity
+/Refit the Battery Door (13).
Basic Operation
Standby Mode
After connecting the power supply, the unit is in standby mode and the
display will blink 0:00 (clock time) for 24 hour time display version or 12:00
(AM) for 12 hour time display version. Please refer to “Clock and Alarm Time
Setting” to set the time. Press POWER (1) button to turn on the unit to power
on / radio mode or press it again to go back to the standby mode.
Power On / Radio Mode
Press POWER (1) button to switch on the unit, the current radio frequency
appears on the display for 5 seconds, after which the current time indication
returns to the display.
4
Clock and Alarm Time Setting
Clock Time Setting
In standby mode, press and hold SET (9) button for 2 seconds until the hour
and minute digits blink,
1.
2.
Press HR (6) button to set the hours.
Press MIN (7) button to set the minutes.
2
EN
3.
Press SET (9) button again to confirm the clock time setting (hour
and minute digits will become solid when finished)
Alarm 1 Time Setting
1.
In standby mode, press and hold AL1 (3) button for 2 seconds until
the hour and minute digits blink.
2.
Press HR (6) button to set the hours.
3.
Press MIN (7) button to set the minutes.
4.
Press AL1 (3) button again to confirm the alarm 1 time setting
(current time indication returns to the display when finished).
Alarm 2 Time Setting
1.
In standby mode, press and hold AL2 (4) button for 2 seconds until
the hour and minute digits blink.
2.
Press HR (6) button to set the hours.
3.
Press MIN (7) button to set the minutes.
4.
Press AL2 (4) button again to confirm the alarm 2 time setting (current
time indication returns to the display when finished).
PLEASE NOTE: When operating from batteries only (during back-up mode),
the display will be off and clock will only remain accurate for a short period of
time. The clock accuracy will decrease due to the voltage drop of the
back-up batteries. It is important that the mains supply is restored as soon
as possible. If no backup battery is installed or the power failure is prolonged,
you will need to set the clock again.
5
Alarm Operation
You can set the radio or buzzer alarms at both preset alarm times in standby
mode :
Wake up by Buzzer or Radio
1. To set or adjust the alarm time, follow the steps in “Clock and Alarm
Time Setting”.
2. To set alarm mode (radio or buzzer) or disable the alarm function for
ALARM 1, Press AL1 (3) repeatedly until the desired alarm mode
appears on the display. Each time you press AL1 (3), the alarm indication
changes as follows :
3
EN
3.
To set alarm mode (radio or buzzer) or disable the alarm function for
ALARM 2, Press AL2 (4) repeatedly until the desired alarm mode
appears on the display. Each time you press AL2 (4), the alarm indication
changes as follows :
4.
When the alarm time is reached, the radio or buzzer will sound unless the
alarm function is disabled.
Note:
While volume of buzzer alarm is fixed and cannot be adjusted, the volume,
band and frequency of radio alarm are preset as last tuned. When the radio
alarm sounds, you can also adjust the listening level by VOLUME
(3) /
(4) buttons. To select the station, refer to “Radio Operation”.
Review the Alarm Time
In standby mode, press and hold AL1 (3) button for ALARM 1 or AL2 (4)
button for ALARM 2 for 2 seconds, then the alarm time setting will blink in
the display. Press AL1 (3) (for ALARM 1) or AL2 (4) (for ALARM 2) again
to return to the clock time display.
Snooze Function
When the alarm is sounding, press SNOOZE (10) button to stop the alarm
temporarily. The “AL1/AL2 buzzer indicator (15)/(17) or AL1/AL2 radio
indicator (16)/(18)”will keep blinking while the snooze function is in
operation, and the alarm will sound again after 9 minutes. To stop the
alarm, press POWER (1) button once. The alarm indicator will become
solid and the alarm will function at the same time the next day.
4
EN
6
Radio Operation
Listen to the Radio
1. Press POWER (1) button to turn on the radio. The current radio
frequency appears on the display.
The radio is default to FM mode at frequency 87.5
(MHz), and at 522 kHz for AM mode, or the
frequency of last station listened will be displayed.
2. Press BAND (11) button to select the band.
3. Automatic tuning - Press and hold TUNING
(6) button or TUNING
(7) button for 2 seconds until the frequency displayed move up or down.
Release the button. The tuner will scan and stop for the first strong
station. Repeat until the desired station is reached.
4. Manual fine-tuning - Press TUNING
(6) button or TUNING
(7)
button repeatedly to adjust the frequency by each step.
Volume Control
Press the VOLUME
level.
(3) or VOLUME
(4) button to adjust the volume
Achieve Optimum Reception
FM : Extend the FM wire antenna fully to increase reception sensitivity.
AM : Rotate the unit horizontally to the position in which reception is clearest.
Program Preset Radio Stations
You can store up to 10 preset stations each for FM and AM band.
1.
2.
3.
Tune in the station you want to preset.
Press and hold SET (9) button for 2 seconds until
program number blink. Press the SET (9) button
again to store the station.
Repeat these steps to store additional stations.
Recall Preset Radio Station
In radio mode, press the MEM (12) button repeatedly to the program number
of which the desired station is stored.
5
EN
7
Sleep Timer
You can use the sleep timer function to turn off the radio automatically after a
preset duration (up to 90 minutes).
1.
2.
3.
4.
5.
8
Press SLEEP (8) button, and “90” is
displayed.
Press SLEEP (8) button repeatedly to select the duration: 90, 80….
Each time the button is pressed, the duration is reduced by 10 minutes,
until “OFF” is displayed.
The radio will turn off automatically after the selected preset duration
has elapsed.
To check the remaining playing time, press SLEEP (8) button once.
To cancel the sleep function and turn off the radio, press POWER (1)
button.
Care and Maintenance
Clean the cabinet with a soft cloth moistened with water or mild detergent. Do
not use solvents such as alcohol, benzene or thinner, as they may damage
the cabinet finish. Make sure to disconnect the mains lead from the supply
before cleaning.
9
1.
2.
3.
4.
Caution
Do not attempt to disassemble or alter any part of the equipment that is
not expressly described in this guide. Disassembly or alteration may
result in high-voltage electrical shock. Internal inspections, alterations
and repairs should be conducted by qualified service personnel only.
Ensure minimum distances of 5cm around the apparatus for sufficient
ventilation. Do not place the product in closed bookcases or racks
without proper ventilation. Ensure that the ventilation is not impeded by
covering the ventilation openings with items, such as newspapers,
table-cloths, curtains, etc.
No naked flame sources, such as lighted candles, should be placed on
the apparatus.
It shall not be exposed to dripping or splashing and that no objects filled
with liquids, such as vases, shall be placed on the apparatus.
6
5.
6.
7.
8.
9.
EN
Use of power sources, or batteries not expressly recommended for this
equipment may lead to overheating, malfunction of the equipment, fire,
electrical shock or other hazards. Use only the recommended power
source.
Do not use or store the equipment in humid or dusty area. Attention
should be drawn to the use of apparatus in tropical and/ or moderate
climates.
Danger of explosion if battery is incorrectly replaced. Replace only with
the same or equivalent type. Batteries shall not be exposed to excessive
heat such as sunshine, fire or the like. Never throw batteries in fire!
Attention should be drawn to the environmental aspects of battery
disposal.
Where the mains plug or an appliance coupler is used as the disconnect
device, the disconnect device shall remain readily operable.
Marking plate is located at bottom enclosure of the apparatus.
10 Power Supply and Frequency Range
Power Source
Back-up Batteries
Frequency Range
AC230V~50 Hz
2 x 1.5V “AAA” size / LR03 batteries or
equivalent (not supplied)
AM 522 – 1620 kHz
FM 87.5 – 108 MHz
Due to continuous product development, design and specifications are subject to change
without notice.
7