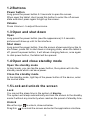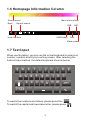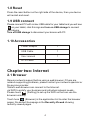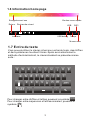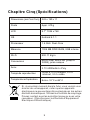
1
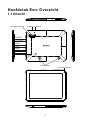
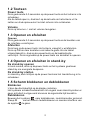
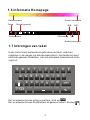
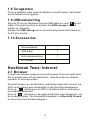
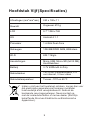
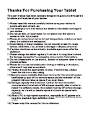
TAB9701
Dank u voor het aankopen van deze tablet
Deze gebruiksaanwijzing is speciaal gemaakt om u doorheen de
functies en eigenschappen van uw toestel te leiden.
1) Lees deze gebruiksaanwijzing aandachtig om het toestel op een
veilige en correcte wijze te kunnen gebruiken.
2) De omschrijvingen in deze gebruiksaanwijzing zijn gebaseerd op
de standaard instellingen van het toestel.
3) Gebruik het toestel niet naast water. Plaats geen voorwerpen,
gevuld met een vloeistof, boven het apparaat.
4) Plaats het toestel niet op een plaats met een hoge temperatuur,
waar veel vocht of stof is. Het toestel is niet waterdicht.
5) Zorg ervoor dat het toestel niet valt of ergens tegen botst. Schud
het scherm niet op een brutale wijze want dit kan leiden tot schade
en een niet goed werkend beeld.
6) Als het toestel automatisch uitschakelt, schakel het dan opnieuw
in.
7) Laad de accu van de tablet regelmatig op als het toestel gedurende
lange tijd niet gebruikt wordt om schade te vermijden door overdreven
verbruik van de accu.
8) Haal het toestel niet uit elkaar en gebruik geen alcohol, thinner of
benzine om het oppervlak van het toestel te reinigen.
9) Gebruik het toestel niet terwijl u rijdt of op straat loopt, want dat kan
ongelukken veroorzaken.
10) Kies het geschikte volume. Verlaag het volume of stop het
luisteren in geval van oorsuizingen.
11) Het Android systeem zelf neemt een deel van de
geheugencapaciteit in en het gebruik van een programma neemt
ook geheugencapaciteit in.
12) Het Android systeem neemt enkele honderden MB aan capaciteit
in. Ook als er software geïnstalleerd wordt, heeft het systeem
geheugen nodig. Er is dus een verschil tussen de theoretisch
beschikbare en de werkelijke geheugencapaciteit.
13) Als de CPU op hoge snelheid werkt, bijvoorbeeld bij 3D spelletjes
of langdurige video weergave in hoge definitie, kan het zijn dat de
behuizing warm wordt.
14) Bewaar deze gebruiksaanwijzing voor latere referentie.
Hoofdstuk Een (overzicht)
Inhoud
1.1
1.2
1.3
1.4
1.5
1.6
1.7
1.8
1.9
1.10
Uitzicht
Toetsen
Openen en afsluiten
Openen en afsluiten in stand-by
Het scherm blokkeren en deblokkeren
Informatie homepage
Inbrengen van tekst
Terugzetten
USB aansluiting
Accessoires
1
2
2
2
2
3
3
4
4
4
Hoofdstuk Twee (Internet)
2.1
Browser
4
Hoofdstuk Drie (Applicaties)
3.1
3.2
Explore
Downloads
5
5
Hoofdstuk Vier (Systeeminstellingen)
4.1
4.2
4.3
4.4
4.5
4.6
Instellingen draadloos netwerk
Geluidsinstellingen
Scherminstellingen
Applicatie-instellingen
Instellen van datum en tijd
Instellingen van taal en input
6
6
7
7
8
8
Hoofdstuk Vijf (Specificaties)
9
Hoofdstuk Een: Overzicht
1.1Uitzicht
Achterste camera
Volume+ Volume-
TF KAART
T
F
POWER
USB
HOST
DC IN
Oortelefoon
Microfoon
USB
HDMI
TAB9701
Luidspreker
Voorste camera
1
1.2 Toetsen
Power toets
Druk gedurende 2-3 seconden op de power toets om het scherm in te
schakelen.
Als de tablet open is, druk kort op deze toets om het scherm uit te
zetten en druk opnieuw kort om het scherm in te schakelen.
Volume
Druk op Volume +/- om het volume te regelen.
1.3 Openen en afsluiten
Openen
Druk gedurende 2-3 seconden op de power toets en de beelden van
de interface verschijnen.
Afsluiten
Druk lang op de power toets. Het scherm vraagt of u wil afsluiten.
Druk op OK om naar de status van laden te gaan. Als de tablet
uitgeschakeld is, druk op de power toets en de laadindicatie
verschijnt. Druk nogmaals op de power toets om de tablet te openen.
1.4 Openen en afsluiten in stand-by
De stand-by openen
In boot modus, druk op de power toets en het systeem gaat naar
stand-by om energie te besparen.
De stand-by sluiten
In stand-by, druk lichtjes op de power toets om het toestel terug in te
schakelen.
1.5 Scherm blokkeren en deblokkeren
Blokkeren
U kan de uitschakeltijd op de display instellen.
Het systeem schakelt automatisch uit en gaat naar stand-by indien er
geen activiteit is uitgevoerd alvorens de ingestelde tijd bereikt is.
Deblokkeren
Beweeg het symbool
naar deblokkeren, zoals hieronder getoond.
Sleep dit
om het scherm te deblokkeren en naar de interface van
de applicatie te gaan.
2
1.6 Informatie Homepage
Snelle menutoets
Geluidopname
Terug
Recent gezocht
USB
WIFI
USB debug Tijd
Gastinterface
Batterijvermogen
1.7 Inbrengen van tekst
U kan het virtueel toetsenbord gebruiken om tekst, cijfers en
symbolen in te voegen via het aanraakscherm. Na de Adroid input
methode gekozen te hebben, ziet het standaard toetsenbord er als
volgt uit:
q w
a
e
s
r
d
t
f
y
g h
u
i
o
k
l
j
p
z x c v b n m
?123
,
.
Om te wisselen tussen cijfers en letters, druk op ?123
Om te wisselen tussen hoofdletters en gewone letters, druk op
3
1.8 Terugzetten
Druk op de Reset toets op de rechterkant van het toestel. Het toestel
wordt herstart en teruggezet.
1.9 USB aansluiting
Sluit de PC op het tablet aan met een USB-kabel en u ziet
op het
tablet. Klik op dit symbool en schakel het USB storage in om uw
toestel te verbinden.
Schakel het USB storage uit om de verbinding tussen het toestel en
de PC af te sluiten.
1.10 Accessoires
Stroomadapter
1
USB kabel
1
Gebruiksaanwijzing
1
OTG kabel
1
Hoofdstuk Twee: Internet
2.1 Browser
U heeft een netwerk nodig om een web browser te kunnen gebruiken.
Als er problemen met het netwerk zijn, consulteer dan uw netwerk
operator of service provider.
De web browser van de tablet kan verbinding maken met Internet via
WiFi om te voldoen aan uw zakelijke of persoonlijke netwerkeisen.
Druk op
(Setting) om de WiFi in te stellen zodat u de browser
normaal kan gebruiken.
Druk op
(Browser) in de applicatielijst om naar de pagina's van
de browser te gaan. De standaard homepage is de Recently Viewed
en toont de recent bekeken pagina's
4
De browser ondersteunt de volgende eigenschappen.
Druk op de URL inputzone om het toetsenbord op te roepen en voeg
dan het URL in.
Klik op
om dit als een bookmark te bewaren.
Druk op
om de voorkeur website op te roepen.
Druk op
om op het Internet te zoeken.
Druk op
om een nieuwe browser toe te voegen.
Druk op
om de browser af te sluiten.
Hoofdstuk Drie: Applicaties
3.1 Explorer
Druk op
(File manager) in de applicatielijst. Het ondersteunt
files opgeslagen op de SD kaart, het intern geheugen en USB.
Druk op
om de lijst van de files in het interne geheugen weer te geven.
Druk op
om de lijst van de files op de TF kaart weer te geven.
Druk op
om de lijst van de files op USB weer te geven.
Om te kopiëren/knippen/deleten, druk op
en gebruik de aanraaktoetsen.
, kies de gewenste file
3.2 Downloads
Druk op
in de applicatielijst. U kan de gedownload inhoud
bekijken.
Klik op de download file om te stoppen of de inhoud van de download
te verwijderen.
5
Hoofdstuk Vier: Systeeminstellingen
Klik op
(Settings) om naar de interface voor instellingen te gaan.
4.1 Instelling draadloos netwerk
Dit bevat het instellen van het draadloos en het netwerk.
De draadloze netwerk instellingen openen LAN schakelaars en het
systeem scant automatisch het draadloos netwerk en toont de lokale
draadloze netwerken op het scherm.
Als er achter een netwerk het symbool
voorkomt, betekent dit dat
het netwerk over een encryptie beschikt en dat er een paswoord nodig
is om verbinding te maken.
Dit symbool
betekent dat het netwerk geen paswoord nodig
heeft en direct gebruikt kan worden.
U kan een netwerk uit de lijst kiezen door er op te klikken. U kan ook
kiezen voor 'advanced'; klik dan op 'aangesloten op netwerk', u kan
ook met de hand een lokaal netwerk toevoegen.
Opmerking betreffende netwerk: druk op de toets en het toont de open
netwerken.
Certificaat van het lokaal draadloos netwerk: het laden en het
management van het lokaal netwerk.
4.2 Geluidsinstelling
In de geluidsinstelling kan u meerdere gewenste instellingen doen.
Druk op de volumetoets om het geluidvolume, het volume van
media/verwittigingen en de alarmklok in te stellen.
6
4.3 Scherminstellingen
Dit bevat: Helderheid, Wallpaper instellingen, Automatische
draaiing, Slaaptijd en Formaat letters.
Helderheid
U kan de helderheid naar eigen wens instellen.
Wallpaper instellingen
Hiermee kan u de wallpaper en dynamische wallpaper instellen. U kan
kiezen uit een galerij.
Slaaptijd
Het scherm wordt automatisch geblokkeerd als binnen een bepaalde
tijd geen operaties uitgevoerd worden.
Formaat letters
U kan de grootte van de letters naar wens instellen. U kan kiezen
tussen: klein, gewoon, groot, zeer groot.
4.4 Instellingen applicaties
Met deze instelling kan u de lopende diensten en de toegangsrechten
beheren, evenals de ontwikkeling (alleen voor ontwikkelaars).
Applicatiebeheer
Met deze instelling is het gemakkelijk om bepaalde geïnstalleerde
applicaties te beheren of te verwijderen.
Ga naar de applicatielijst, klik op according to name sort om
alfabetisch te rangschikken; klik op het all menu om de lopende
programma's te scannen of programma's die door derde
softwareontwikkelaars geleverd worden.
Klik op de applicatie, u kan de relevante informatie over de applicatie
lezen om de cache, programma's, de standaardwaarde en de
geforceerde stopfunctie, enz te wissen.
Lopende diensten
Met deze instelling kan u lopende programma's stopzetten of instellen.
Toegangsbeheer
Geeft de toelating of het verbod om een applicatie te beheren en
toegang te hebben tot de inhoud.
7
4.5 Datum- en tijdinstelling
Met deze interface kan u de tijd en de serie-opties van het systeem
instellen.
Tijdinstelling
U kan kiezen voor automatische instelling vanuit het netwerk, de
tijdzone kiezen, en een specifieke datum en tijd weergave instellen.
4.6 Taal in input instellingen
Hier kan u de gewenste taal instellen.
Inputmethode
U kan hier de gewenste inputmethode kiezen en woorden aan het
woordenboek toevoegen of verwijderen.
Android toetsenbord
U kan kiezen voor automatisch hoofdletters bij het openen of sluiten.
8
Hoofdstuk Vijf (Specificaties)
Afmetingen (mm*mm*mm)
243 x 190 x 11
Gewicht
Ongeveer 610 g
LCD
9.7” 1024 x 768
OS
Android 4.1.1
Processor
1.6 GHz Dual-Core
Geheugen
1024 MB DDR3 RAM, 8GB intern
Wi-Fi
802.11b/g/n
Aansluitingen
Micro-USB, Micro-SD (tot 32 GB),
Hoofdtelefoon
Batterij
3.7V 6000mAh Li-Poly
Gebruiksduur
Tot 15 uur in muziekmodus, 2.5
uur internet, 3.5 uur video
Gebruikstemperatuur
Tussen -10°C en 45°C
Indien u zich van het toestel wil ontdoen, zorg er dan voor
dat elektrische apparaten niet tezamen met ander
huishoudelijk afval verwijderd wordt. Gebruik de
bestaande recyclagesystemen. Neem contact op
met de locale autoriteiten of met uw dealer (Richtlijn
betreffende Afval van Elektrische en Elektronische
Apparatuur).
9
the cover will have some
of hot.
Chapter One(overview)
1.1
1.2
1.3
1.4
1.5
1.6
1.7
1.8
1.9
1.10
Appearance
Buttons
Open and shut down
Open and close standby mode
Lock and unlock the screen
Homepage information column
Text input
Reset
USB Connect
Accessories
1
2
2
2
2
3
3
4
4
4
Catalog
Chapter Two (Internet)
2.1
Browser
4
Chapter Three (Applications)
3.1
3.2
EXplorer
Downloads
5
5
Chapter Four (System setting)
4.1
4.2
4.3
4.4
4.5
4.6
Wireless networks setting
Sound setting
Display setting
Application setting
Date & Time setting
Language and input setting
6
6
7
7
8
8
Chapter Five (Specification)
9
Chapter One Overview
1.1 Appearance
Volume+ Volume-
Back Camera
TF CARD
T
F
POWER
USB
HOST
DC IN
Earphone
MIC
USB
HDMI
TAB9701
Speaker
Front Camera
1
1.2 Buttons
Power button
Long press the power button 2-3 seconds to open the screen
When open the tablet, short press this button to enter the off-screen
state and short press again to light up the screen.
Volume
Press Volume+/- to adjust the volume.
1.3 Open and shut down
Open
Long press the power button (see the appearance) 2-3 seconds,
pictures will show up until to the interface.
Shut down
Long press the power button, then the screen shows would you like to
shut down, press OK to shut down in charging state, when the tablet is
off, press the power button, it will shows charging feature, once again
to click power button, the tablet will be opened.
1.4 Open and close standby mode
Open the standby mode
In boot mode, you can tap the power button, the system will into the
standby mode which can save power.
Close the standby mode
In the standby mode, light tap of the power button of the device, enter
the normal state.
1.5 Lock and unlock the screen
Lock
You can set the sleep time in the system of display.
The system will sleep automatically and lock the screen to the standby
mode if without any inactivity when reaches the preset of standby time.
Unlock
Move the sign
to unlock, show as below.
Drag this
to unlock the screen and enter the application interface.
2
1.6 Homepage Information Column
Menu shortcut key
Sound record
Back
Recent search
USB
USB Debug
Host interface
WIFI
Time
Batter power
1.7 Text Input
When use the tablet, you can use the virtual keyboard to enter text,
number, symbols directly by touching screen. After selecting the
Android input method, the default keyboard show as below:
q w
a
e
s
r
d
t
f
y
g h
u
i
o
k
l
j
p
z x c v b n m
?123
,
.
To switch the numbers and letters, please press this ?123
To switch the capital and lowercase letter, please press
3
1.8 Reset
Press the reset button on the right side of the device, then you device
will restart and reset.
1.9 USB connect
Please connect PC with in-box USB cable for your tablet and you will see
on your tablet, click this sign and turn on USB storage to connect
your device.
Turn off USB storage to disconnect your device with PC.
1.10 Accessories
Power Adapter
1
USB Cable
1
User manuaI
1
OTG Cable
1
Chapter two: Internet
2.1 Browser
Require network support before using a web browser, if there are
network supporting problems, please contact your network operator or
the service provider.
Tablet's web browser can connect to the Internet.
via WIFI to satisfy your business and individual network needs .
Please touch
(Setting) to set up the WIFI so that can use the
browser normally.
Touch here
(Browser) in the application list to enter the browser
pages; the default homepage is the Recently Viewed showing
recently viewed pages.
4
Browser supports the following features.
Enter the URL-touch the input area to get the soft keyboard, then text
the UPL.
Bookmark searchclick this
to add into the bookmark
Touch this
to read the favorite website that collected
Touch this
to search the internet
Touch this
to add new browser
Touch this
to close the browser
Chapter three: Application
3.1 Explorer
Touch here
(File manager) in the application list, it supports the
files mutual copy in this two places SD Card, internal memory and
USB.
Touch
Touch
Touch
to list the files of Internal memory
to list the files of TF card
to list the files of USB disk
To Copy/Cut/Delete, touch
through the tip button.
, choose the file you want, then do it
3.2 Downloads
Click here
in the application list; you can preview the downloading
or done document contents.
Click download file to stop or delete the download contents
5
Chapter Four: System setting
Click here
(Setting) to enter the system setting interface.
4.1 Wireless networks setting
This setting module includes: the wireless and network Settings
The wireless local area network Settings
Open wireless LAN switches, the system will scan available wireless
network automatically and display the wireless local area network in
the list
Among them, if the local area networks have the sign
behind it, it
represents the network has been encryption, it needs to enter the
password to connection.
The sign
represents the networks do not need a passwordm can
be connected directly
You can choose the network from the list you want m click it to connect
directly, also you can click the advanced, then click connected to
network; you can also select add wireless local area network to add by
hand
Network notice: open the switch, it will notice if there any opne
networks
The wireless local area network certificate: the wireless local area
network loading and management
4.2 Sound setting
In Sound setting, you can choose mute switch which can get more
detailed settings if you need. Press volume button to set up proper
volume you need, including media volume/ notice volume and the
volume of alarm colck.
6
4.3 Display setting
Display settings contains: Brightness, Wallpapers Settings,
Automatic rotating Settings, Dormancy time and Font size.
Brightness
The user can adjust brightness manually to get the lightness you want.
Wallpaper Settings
In the wallpaper setting, you can set up the wall paper and dynamic
wallpaper; the wallpaper can be chosen from gallery.
Dormancy time
When the screens in light state a period of time, it will automatically
lock to save the power if without any operations.
Font size
You can set up the font size according to individual's favorite, there
were respectively: small, ordinary, big, huge.
4.4 Application setting
In the application setting, you can manage the running services and
access rights management and development but only for developer.
Application management
In this setting, it is easy to manage and delete some applications that
have been installed.
First, get into the application list, click the according to name sort
buttons to order the alphabet and number; click the all menu to scan
the running program or programs that provide by a third party software
developers.
Click on an application, you can see the application's relevant
information to clear
The cache, unload programs, clear the default value or forced to stop
operation, etc
Running services
In this setting, you can end and set up some programs that are running
Access management
In this setting, by using the opening or prohibition to manage the
applications to access content permissions.
7
4.5 Date & Time setting
In this setting interface, you can set up your system time and series
options.
Time setting
You can use automatic time from the network, to choose the time zone,
to set specific date and time and display format in time setting.
4.6 Language and input Setting
In this setting interface, you can choose the language you want
Input method
In here the input methods can be set by users, you can add the words
in the dictionary or to delete.
Android keyboard
You can set up automatic capital function of opening or closing.
8
Chapter Five (Specification)
Dimension(mm*mm*mm)
243×190×11
Weight
Approx 610g
LCD
9.7 "1024 × 768
OS
Android 4.1.1
Processor
1.6G Hz Dual-Core
1024MB DDR3 RAM, 8GB internal
Memory
WI-FI
802.11b/g/n
Connections
Micro-USB, Micro-SD (up to
32GB), Headphone Jack
Battery
3.7V 6000mAh Li-Poly
Service time
Up to 15h music mode, 2.5h
internet, 3.5h video
Operating temperature
Between -10
et 45
If at any time in the future you should need to dispose of
this product please note that waste electrical products
should not be disposed of with household waste.Please
recycle where facilities exist.Check with your Local
Authority or retailer for recycling advice.(Waste
Electrical and Electronic equipment Directive)
9
Merci d'avoir acheté votre tablette
Ce manuel d'utilisation a été spécialement écrit pour vous guider
dans les fonctions et les possibilités de votre appareil.
1) Lisez attentivement ce manuel d'utilisation pour assurer une
utilisation sauve et correcte.
2) Les descriptions dans ce manuel sont basées sur les réglages
standard de l'appareil.
3) N'utilisez pas l'appareil à côté d'eau. Ne placez pas des objets
remplis d'une liquide au-dessus de l'appareil.
4) Ne pas utiliser l'appareil dans les endroits très chaudes, humides
ou poussiéreux. La tablette n'est pas étanche.
5) Evitez que l'appareil tombe et évitez des collisions. Ne pas
secouer l'écran car ceci peut provoquer des endommagements et un
mal fonctionnement.
6) Quand le système se met automatiquement hors fonction,
remettez-le en fonction.
7) Chargez régulièrement l'accu quand vous n'utilisez pas l'appareil
pendant un certain temps pour éviter une consommation excessive
de l'accu.
8) Ne pas désassembler l'appareil et ne pas utiliser l'alcool, diluant
ou essence pour nettoyer la surface.
9) Ne pas utiliser l'appareil quand vous conduisez une voiture ou
quand vous vous promenez. Ceci peut causer des accidents.
10) Utilisez un volume sonore raisonnable. Diminuer le volume ou
arrêtez l'écoute en cas d'un bourdonnement d'oreilles.
11) Le système android lui-même utilise une partie de la capacité de
mémoire ainsi que les programmes quand vous les ouvrez.
12) Le système android prend quelques centaines de MB de la
mémoire. L'installation des logiciels prend également de la
mémoire. Tenez compte d'une différence entre la capacité
théorique et réelle.
13) Quand le processeur (CPU) se trouve en fonction rapide, surtout
avec des jeux 3D ou la reproduction vidéo haute définition de
longue durée, il se peut que le boïtier devienne chaud.
14) Gardez le manuel d'utilisation pour consultation ultérieure.
Chapitre Un (Général)
Sommaire
1.1
1.2
1.3
1.4
1.5
1.6
1.7
1.8
1.9
1.10
Description
Boutons
Mettre en et hors fonction
Mettre en fonction et en standby
Bloquer et débloquer l'écran
Information home page
Ecrire du texte
Reset
Connexion USB
Accessoires
1
2
2
2
2
3
3
4
4
4
Chapitre Deux (Internet)
2.1
Browser
4
Chapitre Trois (Applications)
3.1
3.2
Explore
Downloads
5
5
Chapitre Quatre (Réglages système)
4.1
4.2
4.3
4.4
4.5
4.6
Réglage
Réglage
Réglage
Réglage
Réglage
Réglage
réseau sans fil
son
écran
applications
date et temps
langue et entrée (input)
6
6
7
7
8
8
Chapitre Cinq (Spécifications)
9
Chapitre Un : Général
1.1 Description
Caméra arrière
Volume+ Volume-
CARTE TF
T
F
PUISSANCE
USB
HOST
ENTREE DC
Casque d'écoute
Microphone
USB
HDMI
TAB9701
Haut-parleur
Caméra avant
1
1.2 Boutons
Bouton puissance
Poussez le bouton Power pendant 2-3 secondes pour ouvrir l'écran.
Quand l'appareil est en fonction, poussez ce bouton brièvement pour
mettre l'écran hors fonction et repoussez le bouton pour remettre
l'écran en fonction.
Volume
Utilisez les boutons Volume+/- pour régler le volume.
1.3 Mettre en et hors fonction
En fonction
Poussez le bouton Power pendant 2-3 secondes et les images
apparaissent pour l'interface.
Hors fonction
Poussez longtemps sur le bouton Power. L'écran affiche que vous
voulez mettre l'appareil hors fonction ; poussez sur OK. Quand
l'appareil est en train de charger l'accu, poussez le bouton Power pour
voir l'état de chargement, repoussez le bouton Power pour mettre la
tablette en fonction.
1.4 Mettre en fonction et en standby
Entrer dans le mode standby
Poussez le bouton Power et le système se met en standby, diminuant
la consommation.
Sortir du mode standby
Poussez le bouton Power pour remettre l'appareil en fonction normale.
1.5 Bloquer et débloquer l'écran
Bloquer
Vous pouvez régler le temps d'arrêt automatique de l'écran. L'écran
se met automatiquem ent en standby quand il n'y a pas eu des activités
avant l'écoulement du temps.
Débloquer
Bougez le symbole
Glissez le symbole
pour débloquer, comme montré ci-dessous.
pour débloquer l'écran et revenir à l'interface.
2
1.6 Information home page
Bouton menu rapide
Enregistrement son
Retour
Recherche récent
USB
USB debug
Interface
WIFI
Temps
Niveau accu
1.7 Ecrire du texte
Vous pouvez utiliser le clavier virtuel pour entrer du texte, des chiffres
et des symboles en touchant l'écran. Après avoir sélectionné le
méthode d'entrée Android, le clavier standard se présente comme
suite :
q w
a
e
s
r
d
t
f
y
g h
u
i
o
k
l
j
p
z x c v b n m
?123
,
.
Pour changer entre chiffres et lettres, poussez le symbole ?123
Pour changer entre majuscules et lettres normales, poussez le
symbole
3
1.8 Reset
Poussez le bouton Reset sur le côté droit de l'appareil pour remettre
les valeurs standards et remettre l'appareil en fonction.
1.9 Connexion USB
Connectez le PC par câble USB à votre tablette et vous voyez
la tablette. Poussez ce symbole et turn on USN storage pour
connecter votre appareil.
Turn off USB storage pour déconnecter votre appareil du PC.
sur
1.10 Accessoires
Adaptateur courant secteur
1
Câble USB
1
Manuel d'utilisation
1
Câble OTG
1
Chapitre Deux : Internet
2.1 Browser
Il faut un réseau pour pouvoir utiliser un browser. Si vous avez des
problèmes avec le réseau, contactez votre opérateur de réseau ou
votre provider.
Le browser réalise la connexion avec l'internet par WiFi pour satisfaire
vos besoins individuels ou professionnels.
Poussez
(Setting) pour régler le WiFi pour utiliser le browser de
façon normale.
Poussez
(Browser) dans la liste d'applications pour entrer dans
les pages du browser. La page standard est Recently Viewed : les
pages récemment regardées.
4
Le browser supporte les possibilités suivantes.
Allez vers la zone d'entrée URL pour afficher le clavier et entrez le URL.
Poussez
pour créer un 'bookmark'.
Poussez
pour obtenir le site web préféré
Poussez
pour chercher sur l'internet
Poussez
pour additionner un nouveau browser
Poussez
pour fermer le browser
Chapitre Trois : Applications
3.1 Explorer
Poussez
(File Manager) dans la liste des applications et vous
trouvez les documents sur la carte SD, la mémoire interne et le USB.
Poussez
pour voir les documents dans la mémoire interne
Poussez
pour voir les documents sur la carte TF
Poussez
pour voir les documents sur USB
Pour copier/couper/annuler, poussez
que vous voulez et utilisez les boutons.
, choisissez le document
3.2 Downloads
Poussez
dans la liste d'applications ; vous pouvez regarder le
download ou le contenu des documents.
Poussez download file pour arrêter ou annuler le contenu du
download.
5
Chapitre Quatre : Réglage système
Poussez
système.
(Setting) pour entrer dans l'interface du réglage
4.1 Réglage réseau sans fil
Ce module comprend : le réglage réseau sans fil et le réglage réseau
sans fil local.
Le système recherche automatiquement le réseau sans fil et affiche le
réseau sans fil local dans la liste.
Si les réseaux locaux ont le symbole
derrière leur nom, ceci veut
dire que le réseau possède une code et qu'il faut un mot de passe
pour connecter.
Le symbole
indique que le réseau n'a pas besoin de mot de passe
et peut être choisi directement.
Vous pouvez choisir le réseau que vous voulez directement dans la
liste. Vous pouvez aussi choisir 'advanced' et ajouter un réseau sans
fil local manuellement.
Remarque réseau: poussez le bouton et il affiche les réseaux ouverts.
Certificat du réseau sans fil local : le contrôle du réseau sans fil local.
4.2 Réglage son
Vous pouvez choisir le bouton mute pour effectuer des réglages plus
précis.
Poussez le bouton volume pour régler le volume sonore, le volume
média/avertissements et le volume d'alarme.
6
4.3 Réglages écran
Ceci contient : Luminosité, Réglages images de fond, Réglages de
rotation, temps sleep et format caractères
Luminosité
Réglez la luminosité comme vous voulez.
Images de fond
Vous pouvez choisir l'image de fond et l'image de fond dynamique.
Choisissez dans la galerie.
Temps sleep
L'écran se bloque automatiquement quand il n'y a pas eu des
opérations pendant un certain temps.
Format caractères
Vous pouvez régler le format des caractères : petit, normal, grand et
très grand.
4.4 Réglages applications
Dans ce menu vous pouvez contrôler les services actuels, les droits
d'accès et le développement (uniquement pour développeurs).
Contrôle applications
Ceci permet de contrôler et d'annuler les applications qui ont été
installées.
Allez vers la liste des applications et marquez according to name
sort pour obtenir un affichage alphabétique. Poussez all pour
chercher les programmes ou les programmes livrées par des
développeurs de logiciels.
Poussez sur l'application pour en trouver l'information à affacer.
Cache, effacer programmes, effacer la valeur standard, opération
arrêt, etc.
Services actuels
Ici vous pouvez arrêter et régler les programmes actuels.
Contrôle d'accès
Pour contrôler les applications et avoir permis d'accès au contenu.
7
4.5 Réglage date et temps
Vous pouvez régler le temps de votre système et les options série.
Réglage temps
Vous pouvez prendre le temps du réseau, choisir une zone de temps,
ou régler un certain temps et date et le format d'affichage.
4.6 Réglage langue et entrée (input)
Vous pouvez choisir la langue que vous voulez.
Méthode input
Vous pouvez ajouter ou annuler les mots dans le dictionnaire.
Clavier Android
Vous pouvez choisir pour les majuscules à la mise en fonction ou hors
fonction.
8
Chapitre Cinq (Spécifications)
Dimensions (mm*mm*mm)
243 x 190 x 11
Poids
Appr. 610 g
LCD
9.7'' 1024 x 768
OS
Android 4.1.1
Processeur
1.6 GHz Dual-Core
Mémoire
1024 MB DDR3 RAM, 8GB interne
Wi-Fi
802.11 b/g/n
Connexions
Micro-USB, Micro-SD (jusqu'à
32GB), prise casque
Accu
3.7V 6000mAh Li-Poly
Temps de reproduction
Jusqu'à 15 h. musique, 2.5 h.
internet, 3.5 h. vidéo
Température d'opération
Entre -10°C et 45°C
Si, à un certain moment dans le futur, vous voulez vous
écarter de votre appareil, notez que les appareils
électriques ne peuvent pas être enlevés avec les autres
déchets domestiques. Utilisez les facilités de recyclage.
Prenez contact avec les autorités locaux ou avec votre
revendeur. (Directive pour les Dechets d'Equipement
Electrique et Electronique).
9