1
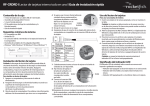
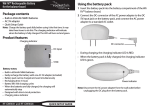
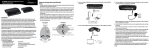
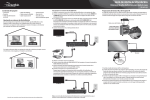
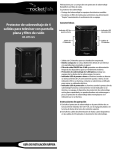
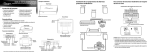
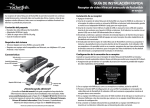
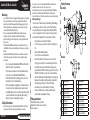
•
Warnings:
•
•
•
•
Do not operate the GameCube/Wii Wireless Controller
within nine inches of a pacemaker.
If you have a pacemaker or other implanted medical
device, do not use the GameCube/Wii Wireless
Controller without first consulting your doctor or the
manufacturer of your medical device.
Follow all regulations regarding use of wireless devices
in locations such as hospitals, airports, and on board
aircraft. Operation in those locations may interfere with
or cause malfunctions of equipment, with resulting
injuries to persons or damage to property.
Safety information:
•
Do not disassemble any of the GameCube/Wii Wireless Controller
components. Refer all servicing to qualified personnel only.
RF-GGC001
QUICK SETUP GUIDE
Package contents
Wii/GameCube Wireless Controller
Wii/GameCube Wireless Receiver Module
Quick Setup Guide
Y
A
O
•
Controller
CR
•
Battery warnings:
Incorrect use of batteries may result in battery fluid leakage,
overheating, or explosion. There is a risk of fire if batteries
are replaced by an incorrect type. Released battery fluid is
corrosive and may be toxic. It can cause skin and eye burns
and is harmful if swallowed. To reduce the risk of injury:
•
Keep batteries out of reach of children.
•
Do not heat, open, puncture, or dispose of batteries in
fire.
•
Only use AAA alkaline batteries.
•
Do not mix new and old batteries.
•
Remove the batteries if they are worn out or before
storing your controller for an extended period of time.
•
If a battery leaks, remove all batteries, taking care to
keep the leaked fluid from touching your skin or clothes.
If fluid from the battery comes into contact with skin,
flush skin with water immediately. Before inserting new
batteries, thoroughly clean the battery compartment
with a damp paper towel, or follow the battery
manufacturer’s recommendations for cleanup.
•
Dispose of batteries in accordance with local and
national disposal regulations (if any).
Product features
MA
•
Some medical studies have suggested that long periods of repetitive
motion may be linked to certain types of physical discomfort or
injuries. You should take frequent breaks during game play. If you
feel aching, numbness, or tingling in your arms, wrists, or hands,
consult a qualified health professional.
Do not use the GameCube/Wii Wireless Controller if you have
respiratory, heart, or other physical ailments that limit your
physical activity. If you have any doubts, consult a qualified health
professional.
The GameCube/Wii Wireless Controller is not intended for use by
small children. It may contain small pieces that may pose a choking
hazard.
The GameCube/Wii Wireless Controller can emit radio waves that
can affect the operation of nearby electronics, including cardiac
pacemakers.
Do not place or store the GameCube/Wii Wireless Controller in a
humid area and do not expose it to water or rain.
Read all instructions before operating the GameCube/Wii Wireless
Controller. Use the GameCube/Wii Wireless Controller only as
instructed. Failure to follow these instructions may void the warranty.
ST
AR
T
•
GameCube/Wii Wireless Controller
X
B
POWER
C
Receiver
POW
ER
CON
NEC
T
#
1
2
3
4
5
6
7
8
Description
L button
Control stick
Start button
Macro indicator
R button
Z button
Y button
X button
RX
#
9
10
11
12
13
14
15
16
Description
A button
B button
C stick
Macro button
Power button
Power indicator
RX indicator
Connect button
Installing batteries
1 Push the two battery compartment covers down to remove
them.
receiver is inserted correctly, the power light turns on and the
RX light flashes.
2 Insert the end of a paperclip into the tiny hole on the back side of
the controller and push. Do not release.
3 Release the Connect button on the receiver.
4 Remove the paperclip from the controller.
Programming a macro
2 Insert one AAA battery into each battery compartment. Make
sure that the + and – symbols on the batteries match the +
and – symbols in the compartments.
Or,
For GameCube: Insert the receiver into the controller socket
on the front of the console. See the instruction booklet for
the game you are playing to find out which socket(s) you
need to plug the receiver(s) into. When the receiver is inserted
correctly, the power light turns on and the RX light flashes.
You can program the Z button to perform a series of moves.
1 Press the MACRO button. The indicator on the controller lights
red.
2 Press the Z button.
3 Press the X, Y, A, or B buttons to create the combination of
moves that you want (maximum 16 moves), then press the
MACRO button again to save the macro. (If you make 16
moves, the macro is saved automatically, so you do not need
to press the MACRO button again). The indicator turns off.
4 To run the macro, press the Z button.
5 To erase the macro, press the MACRO button, the Z button,
then the MACRO button again.
Legal notices
FCC/regulatory notices
AAA
AAA
Changes or modifications not expressly approved by the party responsible
for compliance with the FCC Rules could void the user’s authority to
operate this equipment.
90-day limited warranty
3 Replace the covers.
Connecting your controller to your game console
1 For Wii: Open the door on top of the Wii console, then insert
the receiver into the controller socket. See the instruction
booklet for the game you are playing to find out which
socket(s) you need to plug the receiver(s) into. When the
2 Press the POWER button to turn on the controller. The
controller will pair with the receiver automatically. When
pairing completes, the RX indicator stops flashing and lights
solid.
Note: If you want to use more than one controller, you should pair the
controllers one at a time.
Note: If the controller does not automatically connect, follow these
pairing steps in this order:
1 Press and hold the Connect button on the receiver. Do not release.
Visit www.rocketfishproducts.com for details
GameCube and Wii are trademarks of Nintendo of America, Inc.
© 2009 Best Buy Enterprise Services, Inc. All rights reserved. All rights
reserved. ROCKETFISH is a trademark of Best Buy Enterprise Services, Inc.
Registered in some countries. All other products and brand names are
trademarks of their respective owners.
ENGLISH 09-0477