Transcript
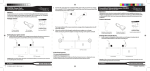
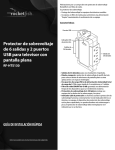
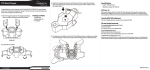
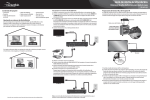
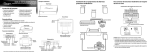
Nintendo® DSi™ Starter Kit
Welcome
Congratulations on your purchase of another high-quality Rocketfish Gaming
product. This starter kit can make your gaming more trouble-free and fun, and
it can help your Nintendo® DSi™ game console last longer, too! All Rocketfish
Gaming products are designed for years of trouble-free performance.
Package contents
DC car adapter (1)
Stylus lanyards (2)
Screen shields (2)
Camera lens shield (2)
Stylus (2)
Earbud headphones (1 set)
Clear play-thru case (1)
USB cable (1)
Quick Setup Guide (1)
Using the USB car charger
1 Connect the DC car adapter to your Nintendo
DSi using the included USB cable. Make sure
that both plugs are facing the correct direction
before you insert them into the connectors, or
you may damage the connector’s pins.
Using the earbuds
Applying the screen and camera shields
Your new stylus, with an attached
lanyard, is perfect for replacing the
original stylus, if it gets lost or damaged.
The lanyard makes it easy to remove
and hold onto the stylus.
To attach a lanyard to a stylus:
1 Feed one end of the lanyard
through the lanyard hole in the
stylus.
2 Feed the other end of the lanyard
through the lanyard loop that was
fed through the hole, then pull to tighten.
Shields provide a tough, durable, transparent surface, while keeping the LCD
screens and camera lens clean and unscratched.
1 Clean the screens before installing
the screen shields.
2 Remove the adhesive backing from
the screen shield and carefully
attach it to the screen.
3 Use any straight , rounded edge to
smooth bubbles out of the shield
from one side to the other.
4 Carefully attach the camera lens
shield to the camera lenses on the
interior and exterior of the DSi.
Installing the clear play-thru case
The play-thru case’s cover helps
to protect your console from dirt,
scratches, and damage from drops.
It also allows complete access to all
controls, the touch screen, and the
stylus.
• Carefully slide your game console
into the case.
Caution: Make sure that the plug is facing the correct
direction before you connect it to your console, or you
may damage the connector’s pins.
RF-GDS013
2 Insert the DC car adapter into a
standard 12V DC car cigarette lighter
or accessory socket. Make sure that
the plug is fully inserted into the socket.
The charge indicator LED on your
console turns orange while recharging,
then turns off when fully charged.
3 When your console is fully charged,
unplug the car charger and disconnect
it from your game console. Make sure
that you pull on the charger housing,
not the power cord itself.
QUICK SETUP GUIDE
With the earbud headphones, you can
more easily hear game sounds, without
disturbing others.
• Insert the earbud’s plug into the
headphone connector on your
console.
Warning: Make sure that the volume is turned
down before connecting the earbuds.
Otherwise, you may damage your hearing.
Using your stylus and lanyard
90-day limited warranty
Visit www.rocketfishproducts.com.
© 2009 Best Buy Enterprise Services, Inc.
All rights reserved. ROCKETFISH is a trademark of Best Buy Enterprise Services, Inc.
Registered in some countries. All other products and brand names are trademarks of their
respective owners.
ENGLISH 09-0118