1
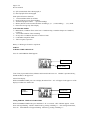
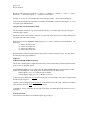
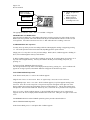
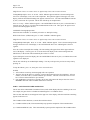
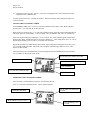
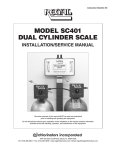
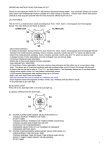
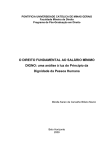
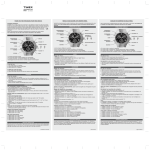
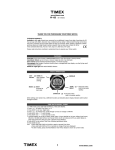
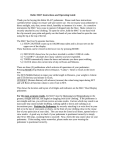
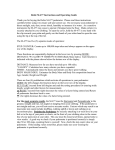
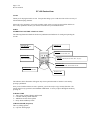
Page 1 of 8
Rev 02 05/04/05
SC-606 Instructions
SC-606
Thank you for buying the Robic SC-606. Your purchase brings you a world class timer with a vast array of
advanced timekeeping functions.
Please take a few moments to review this operating guide, so that you may become familiar with the SC606’s many capabilities and how you can best access them for your maximum benefit.
PART I
PUSHBUTTON and INDICATOR LOCATION
The following illustration details the location of pushbuttons and indicators for setting and operating the
SC-606.
Pushbutton “B”
LAP •SPLIT/RESET
Pushbutton “A”
START/STOP
Indicators:
UP, DOWN, AVG, MAX, SET
Pushbutton “D”
AVG/MAXIMUM
Alarm Time Display
Indicators:
CHRONO, LAP/SPL, RUN, STOP, RCL, ♠, (((•)))
Pushbutton “C”
ADVANCE/RELEASE, Alarm/Chime On/Off
Pushbutton “F”
MEMORY RECALL/SET
Pushbutton “E”
MODE/NEXT
The indicators in this illustration will appear only when a particular mode or function is activated by
pressing a pushbutton.
Once you are familiar with the SC-606’s operation, you will be ready to enjoy its many functions. The
starting point for any operation is the NORMAL TIME mode. You may sequence through the modes by
pressing “E”.
NORMAL TIME
¾ Time of Day in Hours, Minutes and Seconds
¾ Calendar with Day, Month and Date
¾ AM/PM or 24 Hour Time Options
¾ Daily Alarm and Hourly Chime
CHRONOGRAPH (Stopwatch)
Three (3) Timing Options
(1) Lap Time Chronograph
Page 2 of 8
Rev 02 05/04/05
(2) Split (accumulated) Time Chronograph, or
(3) Dual Lap/Split Time Chronograph
Each option offers these functions:
¾ 1/100 Second Resolution to 24 Hours
¾ Recall of the previous 30 Time Readings
¾ Automatic Lap/Split Counter . . . up to 999 Readings
¾ Memory Recall Can be Presented in Either Ascending (1,2,3. . .) or Descending ( . . . 3,2,1) Order
¾ Fastest and Average Lap Time Display
COUNTDOWN TIMER
¾ Multi-Mode, Countdown Timer select from: Countdown Stop, Countdown Repeat or Countdown,
Count-Up
¾ 1/10 second resolution of time remaining
¾ Set any time to countdown from one second to 16 hours
¾ Loud audible completion alarm
¾ Time-Out (pause) operation
Battery: Lithium type CR-2025 or equivalent
PART II
NORMAL TIME OPERATION
Press “E” until NORMAL TIME appears.
Calendar
Time of Day
Time of Day is presented in Hours, Minutes and Seconds in the lower row. Calendar is presented in Day,
Month and Date, in the upper row.
Alarm Time Display
While in NORMAL TIME, press “D” to display the Alarm Time. “AL” will appear in the upper row of the
display to indicate the Alarm Time.
Alarm
Indicator
Alarm Time
Time of day
Setting NORMAL TIME and ALARM TIME
While in NORMAL TIME mode, press and hold “F” for 2-3 seconds. “SET” indicator appears. Alarm
hours will begin flashing. Advance Alarm Hours by pressing or holding “C”. After setting Alarm Hours,
Press “E”. Alarm Minutes will appear flashing. Advance by pressing or holding “C”.
Page 3 of 8
Rev 02 05/04/05
Repeat the setting process for Seconds >>>> Hours >>>> Minutes >>>> Month >>>> Date >>>> Day of
the Week >>>> 12/24 Hour Option >>>> and back to Alarm Hours.
Pressing “F” at any time, will automatically exit the setting procedure. “SET” indicator disappears.
Time of Day and Alarm Time will both be presented in the AM/PM or 24 Hour format chosen. “A” or “P”
will appear in the AM/PM format.
Using the Daily Alarm and Hourly Chime
The Alarm can be armed (set to go off) to sound once per day. The Alarm symbol ((((•)))) will appear
when the alarm is armed.
The Hourly Chime can be armed to sound one (1) beep at the top of each hour. The Chime indicator (♠ )
will appear when the chime is armed.
While your SC-606 is in NORMAL TIME mode, press “C” to arm, or disarm your alarm and chime. The
sequence is:
(1) Alarm ON, Chime OFF
(2) Chime ON, Alarm OFF
(3) Alarm ON, Chime ON
(4) Alarm OFF, Chime OFF
When armed, the alarm will sound when the Alarm Time coincides with Time of Day. You may silence
the alarm by pressing any pushbutton.
PART III
CHRONOGRAPH MODE (Stopwatch)
The SC-606’s chronograph is a digital stopwatch with 1/100 second resolution, which will present timing
in any of three (3) different options.
From NORMAL TIME, press “E” once to enter the CHRONOGRAPH mode. Chrono indicator “CHR”
and all zeros should appear. If the display does not show all zeros, reset the chrono by:
If RUN appears, press “A” to STOP and “B” to RESET.
If STOP appears, simply press “B” to RESET to all zeros.
“LAP” Chrono will display the Interval of time from your previous readings. Each time a reading is taken,
the timer begins from zero.
“SPLIT” Chrono will display the Accumulation of time from the start of the event. Each time a reading is
taken, the timer shows the Total amount of time accrued.
“LAP/SPLIT” Chrono will display the Lap Time in the upper row and the Split Time in the lower row of
the display.
General Operation
Select from the LAP, SPLIT or LAP/SPLIT options by pressing “C”.
Page 4 of 8
Rev 02 05/04/05
Memory Recall
“UP” or “DOWN”
¾
¾
LAP Counter
¾
Chrono in Split Time
mode
Chrono stopped in
RESET position
Memory Recall in
ascending order “UP”
CHRONO Indicator
SPLIT Indicator
The appropriate indicator “LAP”, “SPL” or “LAP/SPL” will appear.
MEMORY RECALL DIRECTION
Select between ascending (up) or descending (dn) memory recall by pressing “D” while Chrono is in the
RESET (all zeros) position. The recall direction can only be selected while the Chrono is in the reset (all
zeros) position. You cannot select between “UP” or “DN” while the time is running, or not reset.
30 MEMORY RECALL Operation
You may access up to the previous 30 readings while the Chronograph is running or stopped by pressing
“F”. The recall operation will ascend or descend, depending upon the option selected.
Simply press “F” at any time to review previous readings. Recall (“RCL”) indicator appears. Holding “F”
down, will scroll through the memory recall function.
If “RUN” indicator appears, you may take a reading by pressing “B” or stop the chrono by pressing “A” at
any time while using the memory. You may also return to the last previous reading at any time, by
pressing “C”.
Average Lap Time, Maximum (fastest) Lap Time
The Average and Fastest Lap Times can be displayed at any time by pressing “D”. “AVG” indicator will
appear for Average Lap Time, and “MAX” indicator will appear for the Fastest Lap Time.
LAP CHRONOGRAPH Operation
In the Chrono mode, Press “C” until “LAP” indicator appears.
Single Events: Press “A” once to start. Press “A” again to stop. Press “B” to reset to all zeros.
Timing Multiple Laps: Press “A” to start. “RUN” indicator appears, Lap Time appears running in the
lower row. Press “B” to take a Lap Time. The previous Lap Time will appear in the upper row of the
display and the current Lap Time will build up from zero in the bottom row. The SC-606 will take up to
999 lap times. The LAP COUNTER will increase by one (1) each time “B” is pressed to take a Lap Time.
Press “A” to stop. “STOP” indicator appears. LAP COUNTER will increase by one (1) when timer is
stopped. Press “B” once to display total accumulated time of the event. Then press “B” again to reset to all
zeros.
For MEMORY RECALL and AVG/MAX operations, please proceed as described above.
SPLIT CHRONOGRAPH Operation
In the Chrono Mode, press “C” until Split “SPL” indicator appears.
Page 5 of 8
Rev 02 05/04/05
Single Events: Press “A” to start. Press “A” again to stop. Press “B” to reset to all zeros.
Timing Multiple Splits: Press “A” to start. “RUN” indicator appears and time is shown running in the
lower row of the display. Press “B” to take a Split time. The Split time appears in the upper row of the
display, while the accumulated running time appears in the lower row. The LAP COUNTER will increase
by one (1) each time “B” is pressed. The SC-606 will take up to 999 Split times.
Press “A” to stop. “STOP” indicator appears. LAP COUNTER will increase by one (1) when the timer is
stopped. Press “B” once, to view the total accumulated time of the event. Then, press “B” again to reset
your SC-606 Chronograph to all zeros.
LAP/SPLIT Chronograph Operation
Please note that “LAP/SPL” is commonly referred to as “dual split” timing.
While in the Chrono (CHR) mode, press “C” until “LAP/SPL” indicator appears.
Single Events: Press “A” to start. Press “A” again to stop. Press “B” to reset to all zeros.
Timing Multiple Dual Splits: Press “A” to start. “RUN” indicator appears. Time is shown running in both
the upper and lower rows of the display. LAP COUNTER will show “001” indicating this is the first
segment.
Press “B” to take a Dual Split time reading. The time reading will appear frozen in the upper and lower
rows of the display. You may press “E” to release the frozen display to the current running LAP and
SPLIT times, or the SC-606 will automatically do so after 15 second.
Upon releasing the frozen time display, the LAP COUNTER will increase by one (1) to indicate the second
segment is now displayed.
The SC-606 will take up to 999 Dual Split readings. You may recall up to the previous 30 at any time by
pressing “F”.
To stop the Chrono, press “A”, then, press “B” to reset to all zeros.
NOTES:
¾ After 24 hours or 999 laps, the chronograph will cease operation.
¾ The time value in the upper row will have 1/100 second resolution for the first 60 minutes. After 60
minutes, it will have one (1) second resolution up to 24 hours. The time value in the lower row will
have 1/100 second resolution for up to 24 hours.
¾ If no pushbutton is pressed for 15 seconds, the SC-606 will return to the last previous time value if
MEMORY RECALL and AVG/MAX functions are activated.
PART V COUNTDOWN TIMER OPERATION
The SC-606 offers a Multi-Mode Countdown Timer (CDT) which displays the time remaining in an event.
For example, the game clock at a football or basketball game is a Countdown Timer.
The reset time and mode is set and appears in the upper row of the display, while the actual time remaining
appears in the lower row.
The Countdown Timer has three (3) modes from which to choose:
(1) Countdown STOP (CdS) Timer automatically stops upon the completion of the countdown time.
(2) Countdown REPEAT (Cdr) Timer automatically repeats upon the completion of the countdown time.
Page 6 of 8
Rev 02 05/04/05
(1) Countdown Count-up (CdC) Acts as a “Count Up” chronograph with 1/10 second resolution upon
completion of the countdown time.
You may preset times from 1 second up to 24 hours. The time remaining will be displayed within 1/10
second resolution.
SETTING THE COUNTDOWN TIMER
From NORMAL TIME, press “E” twice to enter the Countdown Timer mode. If the “RUN” indicator
appears, press “A” to stop and “B” to reset the timer.
While in the reset position, press “C” to select the countdown mode. The mode will be indicated in the left
side of the upper row of the display. “CdS” for STOP, “Cdr” for REPEAT, and “CdC” for COUNT UP.
After selecting the mode, press and hold “F” for 2-3 seconds. The “SET” indicator appears and the hour
digits begin to flash. Advance the hours by pressing or holding “C”. After setting hours, press “E” tens of
minutes begin flashing. Press or hold “C” to advance tens of minutes.
Repeat this procedure for setting minutes and seconds. Upon completion of setting the preset time, press
“F” to exit the setting procedure. The preset time will appear in both the upper and lower rows of the
display as shown below.
Please note the SC-606 will automatically exit the setting procedure if no pushbuttons are pressed within
two (2) minutes of entering the “SET” mode.
Pre-Set time of 15 minutes 00 seconds
Countdown STOP Mode
“STOP” Indicator. Timer is stopped
1/10 second digit
Tens and Units of Minutes digits
Seconds Digits
OPERATING THE COUNTDOWN TIMER
After the mode is selected and the preset time value has been entered:
Press “A” to start the Countdown Timer. “RUN” indicator appears.
Countdown STOP Mode
Pre-Set Time of 15 minutes 00
seconds
“RUN” Indicator. Timer is active
Time remaining is 47.9
seconds
Page 7 of 8
Rev 02 05/04/05
“Time Out”. You may stop and restart the CDT by pressing “A”. While stopped, the “STOP” indicator
will appear. You may restart the timer by pressing “A” or reset to the original preset time by pressing “B”.
Upon completion of the Countdown time, a beep tone will sound to indicate the end of the time. The beep
tone will sound for 20 seconds if the preset time value is greater that one (1) minute. If the preset time is
less than one (1) minute, then four (4) beeps will signal the completion of the time.
NOTES:
(1) You may mode into other timer functions at any time by pressing “E”.
(2) The preset time can be reset to a new value, any time, the CDT is stopped (“STOP” indicator appears).
(3) In the “CDC” mode, the time counting up will be displayed in 1/10 second resolution. To stop the
count-up timer, press “A”. Then, press “B” to reset to all zeros.
LIMITED WARRANTY
OUR BASIC POLICY
Marshall-Browning International Corporation (MBI Corp.) warrants to the original owner, this quartz
digital liquid display timepiece (excluding battery, lens, band, or strap) for the period of one year from the
original purchase date. This limited warranty is given by MBI Corp. and not by the dealer from whom the
timepiece was purchased.
THE WARRANTY PROCESS - WHAT IS COVERED BY THE WARRANTY
If the timepiece develops a manufacturing defect within the one-year limited warranty period, it will be
either repaired or replaced (at MBI Corp.'s option) with a timepiece of equal or greater value, providing the
original owner submits the following:
1. Proof of purchase, i.e. a validated store receipt showing date of purchase.
2. A check or money order (no cash, please) in the amount of $6.50 to cover the cost of
shipping and handling.
WHAT IS NOT COVERED BY THE WARRANTY
A. MBI Corp. will not repair defects or damages caused by or showing evidence of:
1. Improper or unauthorized service.
2. Misuse, tampering, abuse, or mistreatment of the timepiece.
3. Damage to the case or visible cracking of the lens.
4. Moisture damage, if the product is a non-water-resistant timepiece.
B.
If we find that the battery is the cause of the defect, MBI Corp. reserves the right to charge you
($6.50) for a new replacement.
MBI Corp. is not liable for incidental or consequential damages. Some states do not allow the exclusion or
limitation of incidental or consequential damages, so the above limitation may not apply to you.
YOUR RIGHTS UNDER IMPLIED WARRANTIES AND STATE LAW.
MBI Corp. limits the duration of any warranty implied by state law, including the implied warranty of
merchantability, to one year from the date of original purchase. Some states do not allow limitations on
how long an implied warranty lasts, so the above limitation may not apply to you. This warranty gives you
specific legal rights, and you may also have other rights which vary from state to state.
CARING FOR YOUR TIMEPIECE
Proper care of your timer will provide many years of enjoyment. We recommend that: 1. The battery be
replaced at once when it becomes depleted. Please ask your local retailer to replace the battery for you
using a CR2025 (Lithium) or equivalent. 2. The lens be replaced immediately if it becomes damaged, as
contamination from dust, moisture, and other foreign substances will damage the module. 3. If the
timepiece is not marked "water-resistant," avoid immersing or exposing it to water, steam, or other forms of
moisture.
WHEN YOU REQUIRE SERVICE
If your timepiece ever requires factory servicing, you can send it directly to:
Page 8 of 8
Rev 02 05/04/05
MBI Corp., 115 Hurley Road, Oxford, CT 06478
We strongly recommend that when sending it through the mail, you send the product insured, return receipt
requested, so that if a problem in shipping arises, you can trace it through the originating post office. You
will be billed for all services performed deemed out of warranty; and since we reserve the right to substitute
with a replacement product of equal or greater value, NEVER include a personal item, such as a
watchband, with the repair request.
Robic offers a complete line of the world's finest timers and stopwatches for all your needs. Please call at
(203) 264-2702 for a free catalog.