1
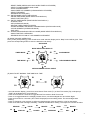
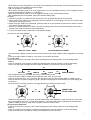
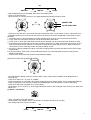
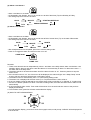
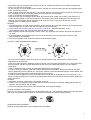
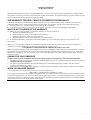
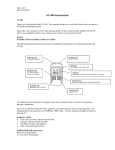
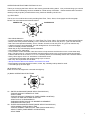
OPERATING INSTRUCTIONS FOR Robic SC-577
Thank you for buying the Robic SC-577 300 memory personal training watch. Your purchase brings you a world
class watch with timekeeping functions suitable for a wide variety of activities. Please read a these instructions
carefully to fully acquaint yourself with the many functions offered by the SC-577.
(A) FEATURES
The SC-577 is a multi-function watch providing Dual Time, Timer, Alarm, Chronograph and Chronograph
Recall. The main features are listed as follows:
CHIME ICON
ALARM ICON
S4
S1
S3
S2
S5
- Direct Mode Selection.
- 6 modes of operation: Normal Time (T1), Dual Time (T2), Timer, Alarm, Chronograph and Chronograph Recall.
- Normal Time mode presents weekday, hours, minutes, seconds, month, day and “T1” (year can also be set).
- Dual Time mode presents weekday, hours, minutes, seconds, month, day and “T2” (year can also be set).
- 2 display formats of time selectable, one with enlarged hour and minute digits.
- 12/24-hour display formats selectable.
- Month-day or day-month display formats selectable.
- Auto calendar from 1990-2049.
- 2 Count Down Timers selectable. One timer works in loop structure and the other one is a count down stop
timer. The timers are of 1-second resolution and with working range up to 23 hours 59 minutes 59 seconds.
- 6 alarms that can be set to refer to T1 or T2. 2 are daily alarms, 2 are weekday alarms and 2 are date alarms.
- Hourly chime signal, chime “on” with button confirmation sound.
- 1/100-second chronograph with working range up to 24 hours.
- Both “Lap” and “Split” time can be taken.
- 300 lap memories that can be stored in a maximum for recall.
- Each segment stores the segment number, month, day, weekday and lap data for recall.
- 3 seconds light up EL back light.
(B) EL BACK LIGHT
Press S4 for EL back light with 3 seconds auto light up.
(C) BASIC OPERATION OF BUTTONS
S4
S1
S3
S2
S5
S1: - ENTER ALARM MODE (MODE SELECTION DISPLAY)
- TOGGLE DISPLAY FORMATS OF TIME
- START TIMER
- TOGGLE DISPLAY FORMATS OF TIMER (TIMER COUNTING)
- TOGGLE ALARM AND CHIME ON OR OFF
- START/LAP OF CHRONOGRAPH
- FORWARD SELECTION OF LAP NUMBER IN SEGMENT
- FORWARD SETTING (SET)
S2: - ENTER CHRONOGRAPH MODE (MODE SELECTION DISPLAY)
- VIEW NORMAL TIME OR DUAL TIME
- TOGGLE NORMAL TIME OR DUAL TIME (PRESS AND HOLD)
- SELECT TIMER (TIMER RESET OR RELOADED)
- STOP TIMER
1
- RESET TIMER (PRESS AND HOLD WHEN TIMER IS STOPPED)
- SELECT ALARM NUMBER AND CHIME
- STOP CHRONOGRAPH
- SHOW FREE LAP NUMBER (CHRONOGRAPH STOPPED)
- SELECT SEGMENT
- REVERSE SETTING (SET)
S3: - ENTER MODE SELECTION DISPLAY
- ENTER TIME MODE (MODE SELECTION DISPLAY)
- SELECT SETTING (SET)
S4: - ENTER TIMER MODE (MODE SELECTION DISPLAY)
- EL BACK LIGHT
- SET (PRESS AND HOLD)
- RELOAD TIMER (TIMER STOPPED)
- STORE SEGMENT AND RESET CHRONOGRAPH (PRESS AND HOLD)
- CLEAR SEGMENT (PRESS AND HOLD)
- EXIT (SET)
S5: - ENTER CHRONOGRAPH RECALL MODE (MODE SELECTION DISPLAY)
- SHOW TIME FOR 3 SECONDS
- REVERSE SELECTION OF LAP NUMBER IN SEGMENT
(D) MODE CHANGE OPERATION
At any mode (except setting), press S3 will enter mode selection display and a “Beep” sound will be given. Then
press the corresponding button to enter the desired mode directly.
ANY MODE
S3
MODE SELECTION DISPLAY
TIMER MODE
TIME MODE
S4
S3
S4
S1
S3
S2
S1
S2
ALARM MODE
CHRONOGRAPH MODE
S5
S5
CHRONOGRAPH RECALL MODE
(E) HOW TO SET NORMAL TIME AND DUAL TIME
S4
S1
S1
S3
S2
S5
- At mode selection display, press S3 to enter Normal Time mode (T1) or Dual Time mode (T2), mode prompt
“TIME” will be displayed for 2 seconds first.
- Press and hold S2 for 2 seconds to toggle Normal Time mode or Dual Time mode.
- Press S1 to toggle between the 2 display formats of time, one with enlarged hour and minute digits.
- Press and hold S4 for 3 seconds (“SET HOLD” displayed) to enter setting mode. The second digits start
flashing.
- Press S1 (forward) or S2 (reverse) to adjust the flashing digits. Press and hold S1 or S2 for fast setting.
- Press S3 to select the next digits, weekday, 12/24HR or M-D/D-M for setting. The sequence is shown as follow:
SECOND
S3
S3
M-D/D-M
HOUR
S3
S3
12/24HR
MINUTE
S3
S3
WEEKDAY
YEAR
S3
S3
DAY
MONTH
S3
2
- When setting seconds, pressing S1 or S2 while the second digits count between 30 to 59 will reset the second
digits to 00 and 1 will be added to the minute digits.
- Year can be set from 1990 to 2049.
- When setting 12/24HR, press S1 or S2 to toggle 12-hour or 24-hour display formats. If 24-hour display format is
selected, there will be no AM flag “A” or PM flag “P”.
- When setting M-D/D-M, press S1 or S2 to toggle month-day or day-month display formats.
- After all adjustments are completed, press S4 to exit the setting mode.
Remarks:
1. Normal Time mode (T1) and Dual Time mode (T2) count up individually with the same second.
2. When Normal Time mode (T1) is displayed, press and hold S2 for not exceeding 2 seconds can view the dual
time without changing the mode.
3. When Dual Time mode (T2) is displayed, press and hold S2 for not exceeding 2 seconds can view the normal
time without changing the mode.
4. If there is no button operation for about 2 minutes in setting mode, the watch will automatically return back to
Normal Time mode or Dual Time mode respectively.
5. To exit Time mode, press S3 will enter mode selection display.
(F) HOW TO USE THE TIMERS
S4
S1
S4
S1
S3
S2
S3
S2
S5
S5
TMR1 OF “LOOP” TIMER
COUNT DOWN STOP TIMER
- At mode selection display, press S4 to enter Timer mode, mode prompt “TIMER” will be displayed for 2 seconds
first.
- Press S2 to select TMR1 to TMR5 of “Loop” timer or count down stop timer.
(1) “Loop” timer
- Press and hold S4 for 3 seconds (“SET HOLD” displayed) to enter setting mode. The second digits start
flashing.
- Press S1 (forward) or S2 (reverse) to adjust the flashing digits. Press and hold S1 or S2 for fast setting.
- Press S3 to select the next digits or timer number for setting. The sequence is shown as follow:
S3
SECOND
S3
MINUTE
S3
HOUR
S3
TIMER NUMBER
- After all adjustments are completed, press S4 to exit the setting mode.
- Press S2 to select TMR1 to TMR5 as the beginning of the count down process.
- Press S1 to start the timer. The count down process will run through all set timers (TMR1 to TMR5) in loop
structure and when it pass the beginning again, repetition number (shown at the bottom row of the display) will
increase by 1.
- When the timer is counting, press S1 can toggle between the display formats of timer.
S1
PRESET TIME
COUNT DOWN TIME
- Press S2 to stop the timer, or the timer will stop automatically when repetition number reaches 30. Then press
S4 to reload preset timer time, or press and hold S2 for 2 seconds (“RST HOLD” displayed) to reset all timers
(TMR1 to TMR5) to zeros. In both cases, repetition number is reset to zeros.
(2) Count down stop timer
- Press and hold S4 for 3 seconds (“SET HOLD” displayed) to enter setting mode. The second digits start
flashing.
- Press S1 (forward) or S2 (reverse) to adjust the flashing digits. Press and hold S1 or S2 for fast setting.
- Press S3 to select the next digits for setting. The sequence is shown as follow:
3
S3
SECOND
S3
MINUTE
S3
HOUR
- After all adjustments are completed, press S4 to exit setting mode.
- Press S1 to start the timer.
- When the timer is counting, press S1 can toggle between the display formats of timer.
S1
PRESET TIME
COUNT DOWN TIME
- Press S2 to stop the timer, or the timer will stop automatically when it counts down to zero. Then press S4 to
reload preset timer time or press and hold S2 for 2 seconds (“RST HOLD” displayed) to reset timer to zeros.
Remarks:
1. The timers are of 1-second resolution and with working range up to 23 hours 59 minutes 59 seconds.
2. “Loop” timer and count down stop timer cannot be used at the same time.
3. “Loop” timer or count down stop timer function can be selected only when the timers are reloaded or reset.
4. If preset timer time is less than 30 seconds, the watch will give out 1 “Beep” when timer counts down to zero.
And if preset timer time is equal to or more than 30 seconds, the watch will give out 10 “Beep” when timer
counts down to zero. Press any button can stop the “Beep” sound.
5. If there is no button operation for about 2 minutes in setting mode, the watch will return back to Timer mode
automatically.
6. If S5 is pressed in Timer mode, Time mode will be shown for 3 seconds and then return to the previous
display automatically.
7. To exit Timer mode, press S3 will enter mode selection display.
(G) HOW TO USE THE ALARM AND CHIME
S4
S1
S3
S2
S5
- At mode selection display, press S1 to enter Alarm mode, mode prompt “ALARM” will be displayed for 2
Seconds first.
- Press S2 to select “AL1” to “AL6” or “CHIME”.
- Press and hold S4 for 3 seconds (“SET HOLD” displayed) to enter setting mode. The hour digits start flashing.
- Press S1 (forward) or S2 (reverse) to adjust the flashing digits. Press and hold S1 or S2 for fast setting.
- Press S3 to select the next digits or T1/T2 for setting.
- When setting T1/T2, press S1 or S2 to toggle setting the alarm to refer to Normal Time mode (T1) or Dual Time
Mode (T2).
(1) Alarm 1 and alarm 2
- Alarm 1 and alarm 2 are daily alarms.
- As illustrated in the diagram, alarm 1 will sound at 7:30 AM of normal time (T1) daily.
- The setting sequence is shown as follow:
S3
HOUR
S3
MINUTE
S3
T1/T2
4
(2) Alarm 3 and alarm 4
- Alarm 3 and alarm 4 are weekday alarms.
- As illustrated in the diagram, alarm 3 will sound at 7:30 AM of dual time (T2) from Monday to Friday.
- The setting sequence is shown as follow:
S3
S3
HOUR
MINUTE
STARTING WEEKDAY
S3
T1/T2
S3
ENDING WEEKDAY
S3
(3) Alarm 5 and alarm 6
- Alarm 5 and alarm 6 are date alarms.
- As illustrated in the diagram, alarm 5 will sound at 8:30 PM of normal time (T1) on the 25th of December.
- The setting sequence is shown as follow:
S3
S3
MONTH
HOUR
MINUTE
S3
S3
S3
T1/T2
DAY
- After all adjustments are completed, press S4 to exit the setting mode.
- Press S1 to toggle the alarm and chime function on or off.
CHIME ICON
CHIME “ON”
Remarks:
1. There are 6 alarms that work independently. Alarm 1 and alarm 2 are daily alarms, alarm 3 and alarm 4 are
weekday alarms, alarm 5 and alarm 6 are date alarms. If month and day of alarm 5 or alarm 6 are set to “--”,
the alarm will act as daily alarm.
2. The alarm sounds for 20 seconds at alarm time if the alarm function is “on”. Press any button to stop the
alarm sound.
3. If the chime function is “on”, the chime icon will be displayed, the watch will give out a “Beep, Beep” sound
at every full hour and there will be button confirmation sound.
4. The alarm function is automatically set to “on” when exiting setting mode.
5. The alarm icon is displayed at the time mode (T1 or T2) that the alarm is set to refer to.
6. If 24-hour display format is selected for time mode, there will be no AM flag “A” or PM flag “P” for alarm time.
7. If there is no button operation for about 2 minutes in setting mode, the watch will return back to Alarm mode
automatically.
8. If S5 is pressed in Alarm mode, Time mode will be shown for 3 seconds and then return to the previous
display automatically.
9. To exit Alarm mode, press S3 will enter mode selection display.
(H) HOW TO USE CHRONOGRAPH
S4
S1
S3
S2
S5
- At mode selection display, press S2 to enter Chronograph mode, mode prompt “CHRON” will be displayed for
2 seconds first.
5
- Lap number, lap time and split time are shown at the top, middle and bottom row of the display respectively.
- Press S1 to start the chronograph.
- For the first hour, the chronograph shows minutes, seconds and 1/100-seconds, then the chronograph shows
hours, minutes and seconds.
- Press S1 again to take lap and split times. Lap number, lap time and split time will be shown for 5 seconds and
then the display will show current lap number and running times of chronograph.
- Press S1 to take the next lap and split times.
- Press S2 to stop the chronograph (at this stage, press S2 will show “FREE” lap number). Then press S1 to
re-start the chronograph, or press and hold S4 for 3 seconds (“RST HOLD” displayed) to end and store the
segment. The chronograph will be reset back to all zeros and “L001” is shown at the top row, and the
chronograph is now ready for next segment.
Remarks:
1. The chronograph is of 1/100-second resolution for the first hour and 1-second resolution for the rest and with
working range up to 24 hours, then the chronograph stop automatically.
2. There are 300 lap memories that can be stored in a maximum. Beyond these limits, “FULL”
will be displayed at the top row and further data will not be stored.
3. Each segment can store the segment number, month, day, weekday, lap numbers, lap times and split times
for recall.
4. If S5 is pressed in Chronograph mode, Time mode will be shown for 3 seconds and then return to the
previous display automatically.
5. To exit Chronograph mode, press S3 will enter mode selection display.
(I) HOW TO USE CHRONOGRAPH RECALL
S4
S1
S3
S2
1 second auto
S5
- At mode selection display, press S5 to enter Chronograph Recall mode, mode prompt “CH-RC” will be
displayed for 2 seconds first.
- Press S2 to select segment. Weekday, segment number, month and day will be shown for 1 second first, and
then lap number, lap time and split time will be shown at the top, middle and bottom row of the display
respectively.
- Press S1 (forward) or S5 (reverse) to retrieve the data stored in the segment.
- In order to clear one segment, press S2 to select the segment to be cleared, then press and hold S4 (“CLR
HOLD” displayed) until “CLR HOLD ALL” are shown; release S4 and the selected segment will be cleared. And
all segments stored beyond the cleared segment will move up by 1.
- In order to clear all segments stored, press and hold S4 (“CLR HOLD” displayed) until “CLR HOLD ALL” are
shown; continue holding S4 for another 2 seconds and all segments stored will be cleared. And the display will
show “NO DATA”.
Remarks:
1. Segments cannot be cleared if the chronograph is running.
2. If there is only one segment stored, press and hold S4 for 4 seconds (“CLR HOLD” displayed) will clear the
segment; and “NO DATA” will be shown.
3. To exit Chronograph Recall mode, press S3 will enter mode selection display.
(J) HOW TO RESET THE WATCH
Press S1, S2, S3 and S4 simultaneously, all segments will be “off”, then release the buttons can reset the watch.
After reset, test patterns will be shown for a few seconds and then the display will be as follow:
OR
(K) BATTERY REPLACEMENT
Replace the exhausted battery with a CR2032 cell or equivalent.
6
LIMITED WARRANTY
OUR BASIC POLICY
Marshall –Browning International Corporation (MBI Corp.) warrants to the original owner, this timepiece (excluding battery,
less, band or strap) for the period of one year from the original purchase date. This limited warranty is given by MBI Corp. and
not by the dealer from whom the timepiece was purchased.
______________________________________________________________________
THE WARRANTY PROCESS – WHAT IS COVERED BY THE WARRANTY
If the timepiece develops a manufacturing defect within the one year limited warranty period, it will be either repaired or
replaced (at MBI Corp.’s option) with a timepiece of equal value, providing the original owner submits the following:
1. Proof of purchase, i.e. a validated store receipt showing date of purchase.
2. A check or money order (no cash, please) in the amount of $7.50 to cover the cost of shipping and handling
WHAT IS NOT COVERED BY THE WARRANTY
A. MBI Corp. will not repair defects of damages caused by or showing evidence of:
1. Improper or unauthorized service.
2. Misuse, tampering, abuse or mistreatment of the timepiece.
3. Damage to the case or viable cracking of the lens.
4. Moisture damage, if the product is a non-water-resistant timepiece.
B. If we find that the battery is the cause of the defect, MBI Corp. reserves the right to charge your ($7.50) for a new
replacement.
MBI Corp. is not liable for incidental or consequential damages. Some states do not allow the exclusion or limitation of
incidental or consequential damages, so the above limitation may not apply to you.
YOUR RIGHTS UNDER IMPLIED WARRANTIES AND STATE LAW.
MBI Corp. limits the duration of any warrant implied by state law, including the implied warrant of merchantability, to one year
from the date of original purchase. Some states do not allow limitations on how long an implied warranty lasts, so the above
limitation my not apply to you. This warranty gives you specific legal rights, and you may also have other rights which vary
from state to state.
CARING FOR YOUR TIMEPIECE
Proper care of your timepiece will provide many years of enjoyment. We recommend that:
1
2.
3.
The battery be replaced at once when it becomes depleted. Please ask your local retailer to replace the battery for you using
CR2032 (Lithium) or equivalent.
The lens be replaced immediately if it becomes damaged, as contamination from dust, moisture, and other foreign
substances will damage the module.
If the timepiece is not marked “water-resistant,” avoid immersing or exposing it to water, steam, or other forms of moisture.
WHEN YOU REQUIRE SERVICE
If your timepiece ever requires factory servicing, you can send it directly to:
MBI CORP, 115 HURLEY RD, OXFORD, CT 06478
We strongly recommend that when sending it through the mail, you send the product insured, return receipt requested, so that if
a problem in shipping arises, you can trace it through the originating post office. You will be billed for all services deemed out
of warranty; and since we reserve the right to substitute with a replacement product of equal or greater value, NEVER include a
personal item, such as a watchband, with the repair request.
Robic…Timers & pedometers for champions at every level!
7