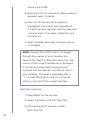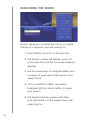
1
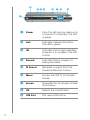
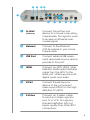
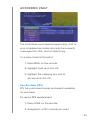
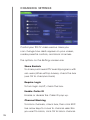
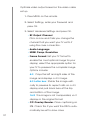
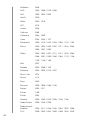
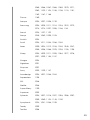
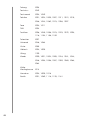
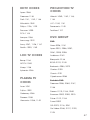
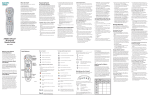
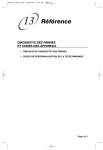
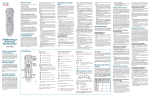
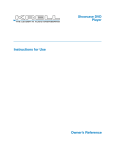
TDSTV
®
USER GUIDE
Broadband. Digital TV. Phone.
615-773-9033
www.tdstv.com
Welcome to TDS TV !
®
We’re happy to have you as a customer.
Now you can enjoy hundreds of the best television
and audio channels, all broadcast in 100% digital
format. That means better picture and sound
quality for your viewing and listening enjoyment.
We’re Committed to You.
TDS is committed to customer satisfaction.
So, if you ever encounter issues or have questions
about TDS TV, please call 615-773-9033. A TDS
representative will gladly provide the personal
assistance you need—and deserve!
We’re Here For You.
And remember, TDS is more than a TV provider—
we’re a Broadband and phone company too. So,
for all your communications needs, turn to TDS.
We’ll provide you with reliable services at
affordable rates!
Thanks again for choosing TDS. We really
appreciate your business.
Table of Contents
Introduction........................................................ 1
How It Works
Set-Top Box...................................................... 2
Remote Control............................................... 5
System Features............................................. 10
On-Screen Guide.......................................... 10
Settings.......................................................... 10
Using TDS TV
Turning the System On................................... 11
Selecting an Operating Mode....................... 11
Security Measures.......................................... 11
On-Screen Menu........................................... 12
On-Screen Guide.......................................... 13
Selecting Channels....................................... 15
Setting Parental Controls................................ 16
Accessing Vault............................................. 20
Changing Settings......................................... 25
Favorites........................................................ 28
Searching the Guide..................................... 31
System Password and PIN
Changing System Password.......................... 32
Changing/Disabling PIN................................. 33
Troubleshooting Guide................................... .35
Emergency Alert System.................................. 38
Universal Remote Control Codes.................. .39
Introduction
With TDS TV entertainment is made easy!
Now you’ll enjoy:
• 100% digital channels
• Superior picture and sound quality
• Universal Remote Control–one remote
controls your TV, DVD player, VCR, and
Home Theater System
• On-screen Interactive Program Guide (IPG)
for customized viewing and program
scheduling
• Parental controls–take the worry out of
what’s on TV
1
How It Works
TDS TV receives digital signals and transmits
them through a set-top box (STB). Use the Universal
Remote Control (included) to access and
manage your system’s services.
Set-Top Box
There are two set-top box models available, the
Scientific Atlanta 330 and the Scientific Atlanta
430. Both models can be enabled to receive HD
channels, while the Scientific Atlanta 430 features
a Digital Video Recorder (DVR).
The following details are provided for informational
purposes only. Do not change or alter any of the
equipment installed by TDS.
At times, TDS may need the MAC1 address for
your set-top box. This will allow us to provide new
services remotely, without sending a technician
to your home. The 12-character MAC1 address is
printed on the label on the bottom of the STB.
2
5
234
6 7 8
9
1
3
1
PowerTurns the set-top box device on
or places it in standby. The LED
is green.
2
LinkIndicates network link status.
The LED is green.
3
HDIndicates that a high-definition
program is in progress. The LED
is blue.
4
RecordIndicates that a program is
being recorded.
5
IR SensorReceives a signal from the
Universal Remote Control.
6
MenuAccess the TDS TV On-Screen
Guide.
7
ArrowsNavigate the On-Screen Guide
and menus.
8
OK
Selects the current item.
9
USB Port
Not used at this time.
2 3 45
1
6
7
8
9
( )
1
To Wall Connect the set-top box
(Video In)
device to in-house coax wiring,
if applicable. This signal is used
to receive an Ethernet-overcoaxial signal.
2
NetworkConnect to the Ethernet
(CAT-5) network in your home,
if applicable.
3
USB PortConnect external USB equipment approved by your service
provider to this port.
4
HDMIConnect an HDTV HDMI™ (High
Definition Multimedia Interface)
cable from the HDTV to the
HDMI port. HDMI supports both
digital audio and video.
5
PrPbYConnect the set-top box
device to the component
video input (PrPbY) on the high
definition TV (HDTV).
6
S-VideoConnect an S-Video cable
to send an S-Video signal to
your TV or VCR. This signal is
standard definition (SD) but
higher quality than other SDTV
connections.
4
7
Video OutConnect to either a VCR or
connect to another set of
inputs (composite) on you
HDTV or SDTV.
8
Audio Out Connect RCA-type cables
(L/R)
to Audio Out to send analog
audio signals (left and right) to
a TV with stereo inputs or to a
stereo amplifier.
9
OpticalConnect an optical cable to
send a digital audio signal to
a surround-sound receiver or
other digital audio device.
(
To TV Connect to TV. This is a chan(Video Out)
nel 3/4 output. You must set
the channel on your TV to the
correct channel (either channel 3 or 4).
)
PowerConnect the DC output of the
AC power adapter (provided)
to deliver power to the set-top
box.
Remote Control
TDS TV includes a Universal Remote Control, which
is programmed to work with your TDS TV set-top
box. Use the remote to turn power on/off,
navigate through channels, and move within
screens. Selections are confirmed by pressing OK.
The STB receives signals from the remote. So be
sure to point the remote at the STB.
5
Programming Your Universal Remote
The Universal Remote Control can be programmed
to operate other devices such as your TV, DVD,
Home Theater System, or VCR.
1. Refer to the code tables at the end of
this guide (pg. 38) for the codes needed
to program your remote.
2. Turn on the device that you want to
assign to a mode key.
3. Press and hold the appropriate mode
key (TV, DVD, or AUX) on the remote,
then press and hold the OK key.
4. Release both keys and the mode keys
will flash twice.
5. Enter the first 4-digit setup code for device
using the number keys (0-9) on the remote.
The mode key will flash three times to
indicate that the code entry was accepted.
* When an invalid code is entered, the
selected mode key will display a long
flash to indicate that you have not
entered the code correctly.
* If the remote times-out before you
complete the code setup, you will
need to start over. This is indicated
by one long flash of the red LED.
6
6. Point the remote at the device, and press
POWER to test the device.
7. Did the device power off?
* If yes, write down the code that
worked in this guide. You may
need it again if the device code is
accidentally erased.
* If no, repeat this procedure from step
3 using a different setup code.
Common uses for remote keys are noted in the
step-by-step procedures throughout this guide.
7
3 4
2
1
5
6
7
Ç
Ç
8
9
(
)
Ç
_
Ç
Ç
1
STB
Controls set-top box
2
TV
Controls TV
3
DVD
Controls DVD player
4
AUXControls auxiliary components
(e.g., stereo receiver, VCR, etc.)
5DVR/DVD/VCR
Controls
Controls playback
6
MenuDisplays menu of services
or options
7
LIVE TV
8
Arrows/OKNavigates menus and guides/
Returns to viewing live TV
8
selects current item
9
INFODisplays program details
(
GuideDisplays channel
listings/favorites
)Channel
ButtonsChanges channels, up
or down
_
JUMPReturns to the last channel
viewed
Ç
Number
ButtonsEnters a channel number, text,
PIN, or password
Ç
MUTE
Turns sound off/on
ÇVolume
Ç
Buttons
Changes volume, up or down
EXIT
Returns to previous feature
ÇDVR
RecordingsAccesses recorded
programming
9
System Features
Use the on-screen Menu to access system features
like Digital TV, Guide, Movies, Music, and Settings.
On-Screen Guide
The TDS TV On-Screen Guide provides the most
up-to-date program information in an easy-to-use,
intuitive format. Use visual cues on the Guide to
view, browse, and search program listings, as well
as purchase pay-per-view (PPV) programs.
You can access up to one week of programming
information with the On-Screen Guide. The
“picture in guide” function allows you to scan
the guide while watching a program.
Settings
Change your system Personal Identification
Number (PIN), manage Favorites, maintain
Parental Controls, and adjust System Settings
in one location. You can alter and use the
Purchase and System PINs as necessary.
10
Using TDS TV
Turning the System On
• On the remote, press TV, then Power (the TDS TV
system will begin loading)
Selecting an operating mode
You must ensure that your TDS TV Universal Remote
Control is in the correct operating mode:
• To control your TDS TV set-top box, press the
STB button on the remote control
• To control your TV, press the TV button
• To control your VCR or DVD player press
the AUX button
Security Measures
To ensure you have control over your TDS TV
11
account, TDS provides you with:
• A 4-digit numeric password that is used to
access various settings
• A numeric personal identification number
(PIN) used to make purchases
On-Screen Menu
Navigate TDS TV using the on-screen Menu,
which displays a list of main features available on
the system.
1. Press MENU on the remote.
2. Use the arrow keys and press OK to choose
a Menu option. The system jumps to the
selected feature.
12
On-Screen Guide
Access detailed program information, locate your
favorite shows, and more.
Understanding Color Coding
The Guide is color-coded to let you easily
differentiate the type of programs available.
Colors include:
DescriptionBoxChannel
Movie
PurpleGreen (Non-PPV)
Red (PPV)
Regular Blue
Programming
13
Green (Non-PPV)
Red (PPV)
Viewing Program Information
1. Press GUIDE to access the program list
• Use the navigational arrow keys to browse
programs. The Guide advances in 30
minute increments, displaying future
programming. A highlight appears around
a selected channel.
• Pressing the SKIP button advances the
program listing 12 hours. The BACK button
returns you to current date and time.
• Use CH +/- to preview channels in the
upper right corner from the Guide.
2. Highlight a program.
3. Press OK to change to the channel or press
INFO to display program information. Press
INFO again to clear information and return
to the Guide.
4. Use the arrow keys and press OK to browse
other channels in the Guide.
Accessing Audio Channels
TDS TV offers a variety of audio channels to
TDS TV Expanded Plus customers. The On-Screen
Guide displays basic program information for
an individual audio selection as channels are
changed. The system also displays title, track,
and artist information. To access audio channels:
14
1. Press GUIDE and use one of the following
methods to view/select a music channel:
• Press CH +/-.
• Use the numeric keypad to type audio
channel number.
Selecting Channels
NOTE: If the remote does not function
properly, ensure it is accurately programmed
for compatibility with your brand of television.
To view a channel or change channels, use one
of the following methods:
• Enter the channel number (e.g. 04 or 812)
and press ENTER using the numeric
keypad on the remote.
• Press CH +/-.
• Press GUIDE and use the navigation arrows
to browse listings.
• Press JUMP to return to previous channel.
Program information (channel, network, title, airtime, duration, and description) appears briefly
as channels change. This information appears
depending on system settings.
15
Setting Parental Controls
TDS TV includes advanced parental control
features that enable you to restrict the types of
programming that can be viewed. These controls
can be set for your entire account or you can
create additional TDS TV accounts, each with their
own set of controls. For example, you can create
accounts for your children that have more
restrictions. These additional accounts are known
as sub accounts.
Setting Parental Controls for the Main Account
1. Press Menu on the remote control.
2. Select Settings and press OK on the remote.
3. Enter your password and press OK on
the remote.
4. The Settings screen will appear.
16
5. Select the Parental Controls checkbox and
press OK to enable parental controls.
6. Select Edit next to Parental Controls. It will
prompt you to save changes. Select Yes
and press OK on the remote.
7. Click each category and use the arrows to
scroll through options. Press OK to to save
each setting.
• Movie Rating
• TV Rating
• Unlock Timeout
• Block Unrated
• Show Blocked Program Info
• Content Ratings
S Sexual Situations
D Suggestive Dialogue
V Violence
L Language
F Fantasy Violence
When finished, select Submit and press OK
to save and exit.
Setting Up Sub Accounts
The main user can create and maintain sub
accounts from the Settings menu. User IDs,
passwords, and parental control settings can be
configured for each sub account.
17
1. Press Menu on the remote control.
2. Select Settings and press OK on the remote.
3. Enter your password and press OK on the
remote.
4. The Settings screen will appear.
5. Check the Require Login box to enable
user accounts.
6. Select the Users tab at the top of the screen
and press OK on the remote. It will prompt
you to save changes. Select Yes and press
OK on the remote.
7. Select Add and press the OK button to
add a new user.
8. Select the login field and press OK to bring
up the onscreen keyboard. Enter the new
user name and click Done when finished.
9. Enter the user’s password in both the New
Password and Confirm Password fields.
10. Enter an allowance if the user is allowed
to purchase pay-per-view items.
11. Enter the PIN for the main account.
12. Check the Enable Caller ID box if the new
user should see Caller ID pop-up messages.
18
13. Select Continue and press the OK button.
14. Continue by setting the desired parental
controls.
15. Select Submit and press OK on the
remote when done. The new user account
is created!
16. To use the new sub account, go to
the Main Menu and select Sign Out.
17. At the sign-in screen, change the user
by highlighting the user field and clicking
OK. Use the up and down arrow keys to
change users. Press OK when done.
18. Enter the user’s password by highlighting
the password field and typing in the password. Click Sign In when you are finished.
NOTE: Parental controls must be enabled on
the main account for the feature to be active
on sub accounts.
19
Accessing Vault
The Vault stores purchased programming, a list of
your scheduled reminders and auto-tune events,
messages from TDS, and a Caller ID log.
To access stored information:
1. Press MENU on the remote.
2. Highlight Vault and click OK.
3. Highlight the category you wish to
access and click OK.
Pay-Per-View (PPV)
PPV lists purchased movies and events available
for purchase.
To rent a PPV movie/event
1. Press GUIDE on the remote.
2. Navigate to a PPV channel you want
20
to watch.
3. Press OK on the remote.
4. A box will appear that asks “What would you
like to do”. If you are within the allotted start
window (the first 10 minutes) you can select
Buy PPV. If you are late for the start of the
show, you can select Buy Next PPV.
5. After you select Buy PPV, a pop-up screen
with information (title, cost, start time) about
the event will appear. You’ll be asked to
enter your PIN. You may also check a box to
share the video on other set-top boxes on
your account.
6. Press OK after you enter PIN. Or, select the
on-screen button marked “Buy” and press
OK (cancel is also an option).
When you order a PPV event in advance, the
set-top box will either tune to the PPV channel
automatically at the correct time, or a pop-up
window will notify you of the PPV event. The
notification depends on the reminder and autotune options you have set up. To adjust, visit the
PPV events screen in the Vault menu.
Caller ID
Caller ID offers access to a log of all telephone
calls you have received. You can review and
21
delete individual entries.
1. In Vault, highlight Caller ID and press OK
on your remote. A list of your received
calls appears.
2. To delete, highlight the Caller, press OK.
Setting Reminders
Set Up
1. Select a program in the Guide. Highlight
the program listing and press OK.
2. Highlight Set Reminder and press OK.
You will then be returned to the Guide.
3. The program listing will show an icon next to
the program name.
4. If you chose:
Reminder–A few minutes before your
program comes on, a box will appear
on your screen, telling you that you have
a reminder. Press INFO to display the
reminder. Highlight the button showing the
program name. Press OK to tune to that
program or highlight Cancel and press OK
to ignore the reminder.
Autotune–Just before the program begins a
message will pop up, giving you the option
22
to tune in or cancel. You can choose either
option or just wait. The pop-up will go away
and the system will tune you to the correct
channel.
Canceling a Reminder
1. Select the program to cancel by
highlighting it. Then press OK.
2. Arrow up or down to Cancel Reminder.
Then press OK and you’ll be returned
to the Guide.
Messages
Messages may inform you of promotional offers,
upcoming pay per view events, and service
upgrades. Whenever you receive a new message from TDS, an alert will appear on your screen
informing you of the new message.
To read the message:
1. Press INFO on your remote to display
the message.
2. Highlight and press OK. A list of all available
messages appears.
3. To read the message, highlight and the full
message will be displayed in the Info Area.
23
To ignore the alert:
1. Press Exit to ignore the alert and view
the message.
2. Highlight Delete and press OK to remove
the entry, or Cancel if you want to keep it.
Video Features
(Not Currently Available to TDS TV customers.)
Video provides access to Video-On-Demand rentals that you’ve already purchased.
Pay-Per-Block
(Not Currently Available to TDS TV customers.)
All-day PPV movies that you’ve purchased are
located here.
Sports Packages
(Not Currently Available to TDS TV customers.)
Any special sports packages you purchase are
located here.
24
Changing Settings
Control your TDS TV video service. Here you
can change how alerts appear on your screen,
create parental controls, and block channels.
The options on the Settings screen are:
Share Rentals
To share purchased PPV events/programs with
sub users (other set-top boxes), check the box
(use OK to check/uncheck)
Require Login
To turn login on/off, check the box.
Enable Caller ID
Enable or disable the Caller ID pop up.
Channel Blocking
To block channels, check box, then click EDIT.
Use arrow keys to move to channel selection
you want to block, click OK to block channel.
25
Continue this process until you have selected
all channels that you want blocked. Click
UPDATE. On Preferences tab, click SUBMIT to
finalize changes.
PPV Action Field
Set a reminder when PPV is ready. Options are:
none, reminder, and auto-tune.
Program Alarm
Allows you to set the reminder time.
Caller ID Timeout Field
Use left/right arrows to select appropriate time
for displaying the Caller ID alert box: 5—50
seconds (in 5 second intervals).
Theme
You are not allowed to change this setting.
Hardware Settings
26
Optimize video output based on the video cable
set up.
1. Press MENU on the remote.
2. Select Settings, enter your Password and
press OK.
3. Select Hardware Settings and press OK.
• RF Output Channel
Click on box and it lets you change the
channel that you want your TV set to if
using the coax connection.
• Audio Language
• HDMI Comp. Resolution
• Frame Format–Set your TV format to
enable the most optimal image for your
display; select the appropriate option for
your TV to preserve the complete image.
Options include:
4:3 Crops the left and right sides of the
image and displays a 4:3 image.
4:3 Letter box Shrinks the image vertically to preserve its aspect ratio on a 4:3
display and puts black bars at the top
and bottom of the image.
16:9 The image is not manipulated, so it
displays in the original format.
• CC Overlay Render–Close captioning on
STB. Check this if you want the STB to automatically be set to show close
27
captioning on the screen.
• CC
Channel/Service Number–Please
leave as set up.
FAVORITES
Create, edit, and delete a list of your most
frequently viewed and favorite channels. Use the
default favorites lists (All or Subscribed) or create
your own (up to 5 unique lists.)
Set Up Favorites Lists
1. Press MENU on the remote.
(The Main menu displays.)
2. Select Favorites, press OK.
3. Select Create, press OK.
4. In highlighted name box, click OK button
to get keypad. You must press Clear All
on keypad before you begin entering the
name. When you have completed the
28
name click DONE.
5. Browse the list of channels to either select or
deselect each channel.
6. Press OK on the remote to add the
highlighted channel to your Favorites list.
A “heart” symbol appears next the selected
channel when it has been added to your
Favorites list.
7. Select Update and press OK when you’ve
completed.
NOTE: Pressing the GUIDE button will toggle
through the names of your favorites lists.
Next to the “heart” in the information bar, the
name of the current favorites list is displayed.
If a channel is selected by typing in the
channel number directly, and it’s not one of
your favorites, the heart is displayed with a
“---” to indicate that you are on a channel
which is not part of the current favorites.
Edit Your Favorites
1. Press MENU on the remote.
2. Select Favorites, click OK, then Edit.
3. Choose the list to rename or edit,
then click OK.
29
4. If you are changing the list name, you
must click OK while highlighted box is in the
name, then the on-screen keypad appears
to rename the list. When you have completed renaming the list, click on DONE.
5. Browse the list of channels to either select or
deselect each channel.
6. Select Update and click OK to complete
the changes and exit.
Deleting Favorites
1. Press MENU on the remote.
(The Main menu displays.)
2. Select Favorites, click OK.
3. Choose Delete.
4. Select the list to delete and select Yes.
The Delete Favorites screen is updated
and reflects the removed Favorite.
30
Searching the Guide
Search allows you to enter the name (or partial
name) of a program you are looking for.
1. Press SEARCH and OK on the remote.
2. The Search screen will display, press OK
on the remote and the on-screen keypad
displays.
3. Use the arrow keys to navigate letters and
numbers to spell search term/word, and
select Done.
4. Click on SEARCH GUIDE, and select
Extended (EPG) or Quick (QPG) to begin
your search.
5. The Search feature queries both titles
and descriptions of the keyword you are
searching for.
31
SYSTEM PASSWORD & PIN
Changing System Password
Create and modify your Password for System
Settings.
1. Press MENU on the remote.
2. Select Settings, press OK, enter your
Password and press OK.
3. Use right arrow key to go to users tab and
press OK.
4. Default selection is Main Account on the
User Tab.
5. Select Edit and press OK.
6. Enter your old password using the remote.
7. Enter your new password using the remote,
and re-enter to confirm.
32
8. Enter your PIN.
9. Select Submit and press OK to complete
the Password modification and return to the
Menu. A confirmation message appears;
after a few seconds, the system returns to
the Menu.
Changing or Disabling the PIN
Change or disable the PIN for purchases.
1. Press MENU on the remote.
2. Select Settings, press OK, enter your
Password and press OK.
3. Use right arrow key to go to users tab
and press OK.
4. Default selection is Main Account on the
User Tab.
5. Select Edit and press OK.
6. Enter your old PIN, then your new PIN,
and re-enter to confirm.
7. If you want the PIN enabled, make sure the
Enable PIN box is checked. If you want the
PIN disabled, make sure to deselect the
Enable PIN box.
8. Select Submit and press OK to complete
33
the PIN modification and return to the Menu. A
confirmation message will appear. After a few
seconds, the system returns to the Menu.
34
TROUBLESHOOTING GUIDE
No Picture (e.g., snowy or black screen)
• Turn the TV off and back on.
• Verify the input is correct on your TV. If you are
using coaxial cable, make sure your TV is tuned
to channel 3.
• Verify all cables are securely connected to the
back of the set-top box and the television.
• Check the power source to your TV and the settop box.
• Unplug the power source to the set-top box
for 30 seconds. Then, plug it back in and wait
about 5 minutes for the set-top box to reboot.
(Note: Allow 10–15 minutes for a DVR set-top box
to reboot.)
Some Channels Appear to be Missing
• Make sure you are viewing ALL channels (not
FAVORITES) by pressing the GUIDE button on the
remote.
• Check settings for Parental Controls or Channel
Blocking.
• Verify the channel is included in the programming package you have subscribed to by calling TDS at 1-866-44-TDSTV.
HD Channels Are Missing
• Refer to your TV Manual to ensure all cables are
connected properly.
35
• Verify the HD channels are provisioned for your
account by calling TDS at 1-866-44-TDSTV.
No Sound
• Verify that the volume is turned up.
• Verify that the TV is not on MUTE.
• Turn the TV off and turn back on.
• Verify that the audio cables are connected
properly, and to the proper input on the TV.
• If your set-top box is connected through a
device (e.g., surround sound, stereo, VCR) make
sure the device is turned on and is set to the
correct input.
• Unplug the power source to the set-top box
for 30 seconds. Then, plug it back in and wait
about 5 minutes for the set-top box to reboot.
Poor Sound Quality
• Verify that the audio cables are connected
properly.
• If the problem is voice sync and your set-top
box is connected via HDMI cables, unplug the
power source to the set-top box. If the problem
still persists, consider switching to component
video and stereo audio cables instead of HDMI.
Remote Control Not Working
• Press the STB button on the remote to make
sure the correct device has been selected.
• Check batteries to see if they need to be
replaced.
• Verify that the set-top box, TV, and audio device
36
(e.g., surround sound, stereo, etc.) have power.
• If the problem is with control of a television or
stereo (not the set-top box), try reprogramming
the remote with the code list provided.
• Try using the remote on a different set-top box.
If it works on a different TV, you should go back
to the first set-top box and cycle the power by
unplugging the power cable on the back of
the set-top box. Wait 30 seconds and plug it
back in.
DVR Events Have Disappeared
• The recordings that are oldest and not
“protected” will be deleted if you run out of
storage space.
• They may have inadvertently been deleted.
Review Delete History to access a list of deleted
recordings.
37
Emergency
Alert System (EAS)
Your set-top box may be interrupted for
Emergency Alert System (EAS) updates when
watching regular TV channels, PPV, or Guide
mode. The system will automatically change to
the EAS alert channel when an EAS event occurs.
The DTV guide is disabled during an EAS event.
38
Universal Remote Control
Codes
The Universal Remote Control that controls your
TDS TV set-top box can be programmed to
operate other devices such as your TV, DVD
player, Home Theatre System, or VCR. Use the
codes listed below to program your remote
control to work with the additional devices.
TV/DVD Combo Codes
Brand
TV
DVD
Apex
1163
2095
Broksonic 1114
2053
RCA
1115, 1162
2063, 2099
Sansui
1122
2071
Sylvania
1150
2092
Toshiba
1116
2054
TV/VCR Combo Codes
Brand
TV
VCR
Broksonic
1121
3081
GE
1164
3090
Quasar
1165, 1166
3091, 3092
RCA
1167, 1168
3093, 3094
Samsung
1161
3089
Sylvania
1145
3095
Toshiba
1006
3096
Zenith
1118
3097
39
TV/DVD/VCR Combo Codes
Brand
TV
DVD VCR
Panasonic
1123, 1152
2075, 2076
3087, 3086
RCA
1151
2077
3106
Sharp
1153
2086
3100
Sylvania
1027, 1124
2064, 2078
3105, 3088
Toshiba
1154, 1158
2093, 2094
3099, 3098
DVD/VCR Combo Codes
Brand
DVD
VCR
Broksonic
2072 3082
Daewoo
2062
3076
Emerson
2073
3083
Go Video
2046, 2127, 2129
3066, 3110, 3109
Hitachi
2126
3117
JVC 2047, 2097
3067, 3118
Panasonic 2066
3078
Philips
2051
3071
Polaroid 2007
3111
RCA 2048
3068
Samsung
2049, 2074, 2085
3069, 3084, 3101
Sanyo
2050
3070
Sony 2065, 2067
3104, 3085
Toshiba
2080, 2084
3103, 3102
Zenith
2052, 2128
3072, 3119
TV Group
40
Brand
TV
Abex 1098
Admiral
1001, 1099
Advent
1005, 1053, 1110, 1113
Adventura
1100
Aiko
1015
Aiwa
1034
Akai
1002
Alleron 1044
Amtron 1036
Anam National1003, 1036
AOC 1004, 1005
Apex
1111, 1119, 1163
Audiovox
1036
Belcor 1004
Bell & Howell
1001, 1045
Benq 1042
Bradford 1036
Broksonic 1114, 1121
Brokwood 1004
Candle
1004, 1007, 1100
Celebrity 1002
Citizen 1004, 1007, 1015, 1036, 1073, 1097, 1100
Colortyme 1004
Concerto 1004, 1036
Craig 1036
Crosley 1000, 1053
Crown 1036, 1053
Curtis Mathes 1000, 1004, 1014, 1045, 1073, 1097
CXC 1036
Daewoo 1004, 1005, 1013, 1015, 1016, 1097, 1106
Daytron 1004, 1097
41
Dimensia 1000
Dumont 1160
Dynatech 1004
Electroband 1002
Electrohome 1002, 1003, 1004, 1018, 1021
Emerson 1004, 1011, 1013, 1025, 1028, 1031, 1033,
1036, 1044, 1045, 1080, 1097, 1101, 1102,
1107
Envision 1004
Fisher 1043, 1045, 1047, 1103
Fujitsu 1044, 1029
Funai 1036, 1044
Futuretec 1036
Gateway
1038
GE 1000, 1003, 1004, 1008, 1021, 1048, 1049,
1063, 1068, 1094, 1144, 1164
Gibralter 1160
Goldstar 1004, 1005, 1011, 1018, 1050, 1090, 1091,
1097, 1098
Grunpy 1036, 1044
Hallmark 1004
Harvard 1036
Hisense 1112
Hitachi 1004, 1011, 1012, 1051, 1052, 1084, 1085,
1086, 1087, 1102
42
IMA 1036
Infinity 1053
Janeil 1100
JBL 1053
JCB 1002
JC Penney1000, 1004, 1005, 1007, 1012, 1021, 1048,
1049, 1058, 1063, 1068, 1072, 1073, 1075,
1097, 1098
Jensen 1004
JVC 1011, 1012, 1026, 1049, 1052, 1054, 1055,
1080, 1092, 1117, 1131
Kawasho 1002, 1004
Kenwood 1004, 1018
Kloss
Novabeam
1036, 1056, 1057, 1100
KTV
1036, 1097, 1101
LG 1005
Loewe
1053
Logik 1001
Luxman 1004
LXI 1000, 1004, 1045, 1053, 1058, 1068, 1075
Magnavox1004, 1007, 1018, 1053, 1056, 1057, 1059,
1060, 1083, 1110, 1147
Majestic 1001
Marantz 1004, 1051, 1053
Megatron 1004, 1051
Memorex 1001, 1004, 1005, 1022, 1045
MGA 1004, 1005, 1018, 1021, 1047, 1061, 1062
Midland 1049, 1068, 1097, 1098, 1160
Minutz 1048
Mitsubishi 1004, 1005, 1018, 1021, 1047, 1061, 1062,
1081
Montgomery
Ward
1001
Motorola 1003, 1099
MTC 1004, 1005, 1073
43
Multitech 1036
NAD 1004, 1058, 1075, 1085
NEC 1003, 1004, 1005
Net-Tv 1040
Nikko 1004, 1015
NTC 1015
Onwa 1036
Optimus 1085
Optonica 1064, 1099
Orion 1023, 1033, 1107
Panasonic 1003, 1010, 1049, 1053, 1096, 1123, 1152
Philco 1003, 1004, 1005, 1007, 1011, 1018, 1053,
1056, 1057, 1059
Philips 1003, 1004, 1007, 1011, 1017, 1018, 1053,
1056, 1057, 1059, 1060, 1063, 1110, 1126,
1129, 1148, 1155
Pilot 1097
Pioneer 1004, 1085, 1102
Portland 1004, 1005, 1015, 1097
Price Club 1073
Prima 1113
Prism 1049
Proscan 1000, 1008, 1068, 1108
Proton 1004, 1011
Pulsar 1160
Pulser 1004
Quasar 1003, 1039, 1049, 1096, 1165, 1166
Radio Shack 1000, 1045, 1098
Radio Shack/
Realistic
1004, 1011, 1036, 1045, 1064, 1097, 1098
RCA 1000, 1003, 1004, 1005, 1008, 1018, 1049,
44
1065, 1066, 1067, 1068, 1069, 1070, 1071,
1082, 1102, 1104, 1106, 1108, 1115, 1151,
1162, 1167, 1168
Runco 1160
Sampo 1004, 1097, 1098, 1120
Samsung 1004, 1005, 1011, 1014, 1018, 1019, 1072,
1073, 1074, 1097, 1098, 1156, 1161
Sansui 1023, 1107, 1122
Sanyo 1045, 1062, 1095, 1103
Scotch 1004
Scott 1004, 1011, 1033, 1036, 1044
Sears 1000, 1004, 1012, 1018, 1044, 1045, 1047,
1055, 1058, 1068, 1075, 1076, 1103, 1105
Sharp 1004, 1009, 1011, 1025, 1064, 1077, 1078,
1097, 1099, 1153, 1157
Shogun 1004
Signature 1001
Simpson 1007
Sony 1002, 1109, 1137
Soundesign 1004, 1007, 1036, 1044
Squareview 1105
SSS 1036
Starlite
1036
Supre-Macy 1100
Supreme 1002
Sylvania 1004, 1007, 1018, 1027, 1053, 1056, 1057,
1059, 1060, 1124, 1145, 1150
Symphonic 1024, 1031, 1036, 1105
Tandy 1099
Tashiko 1058
45
Tatung
1003
Technics 1049
Techwood 1004, 1049
Teknika 1001, 1004, 1005, 1007, 1011, 1012, 1015,
1036, 1044, 1060, 1073, 1096, 1097
Tera
1004, 1011
TMK
1004
Toshiba 1006, 1045, 1058, 1073, 1075, 1079, 1093,
1116, 1154, 1158, 1159
Totevision 1097
Universal 1048, 1063
Victor 1055
Vidtech
1004, 1005
Viking
1100
Wards1000, 1001, 1004, 1005, 1018, 1031, 1044,
1048, 1053, 1056, 1057, 1059, 1060, 1063,
1064
White
Westinghouse 1013
46
Yamaha
1004, 1005, 1018
Zenith 1001, 1089, 1118, 1125, 1161
HDTV Codes
Apex–1088
Projection TV
Codes
Daewoo–1135
Hitachi–1030, 1132, 1133,
Dell–1141, 1142, 1146
1134
Mitsubishi–1032
JVC–1130, 1131
Philips–1126, 1129
Panasonic–1140
Proscan–1000
Toshiba–1127
RCA–1143
Sampo–1038
DVD Group
Samsung–1019
DVD
Sony–1037, 1128, 1137
Aiwa–2026, 2131
Zenith–1020, 1139
Apex–2001, 2056, 2057,
2061, 2095, 2098
LCD TV Codes
Audiovox–2132
Benq–1136
Blaupunkt–2136
NET-TV–1040
BOSE–2122, 2130
Sharp–1138
Broksonic–2053, 2072
Sylvania–1046
Clarion–2100
Classic–2101
Plasma TV
Codes
Acer–1041
Fujitsu–1029
Gateway–1038
Pioneer–1035
Viewsonic–1038, 1149
Cyberhome–2083
Portable DVD
Daewoo–2058, 2062, 2137,
2138
Denon–2110, 2133, 2040
Emerson–2002, 2059, 2073
Fisher–2112, 2134
Funai–2002
GE–2079, 2118, 2041
Go Video–2046, 2127, 2129,
2124
47
48
Network DVD
Polaroid–2007
GPX–2114
Proscan–2010, 2118, 2144
Harmon Kardon–2125
Qwestar–2009
Hitachi–2000, 2027, 2126
RCA–2010, 2048, 2063,
Irradio–2149
2077, 2099, 2107, 2118
JVC–2017, 2028, 2047, 2090,
RCA–2055
2096, 2097, 2115
Portable DVD
Kenwood–2142, 2148
Sampo–2119
Konka–2029, 2030
Samsung–2012, 2049, 2074,
Koss–2060
2085, 2102
Lasonic–2081
Sansui–2071
Magnavox–2002, 2018,
Sanyo–2034, 2050, 2120
2033, 2089
Sharp–2013, 2015, 2044,
Marantz–2143
2086, 2082
Memorex–2003
Sherwood–2121
Mintek–2004
Sony–2014, 2020, 2022,
Mitsubishi–2019, 2123, 2145,
2065, 2067, 2068, 2069,
2147
2070, 2087, 2103, 2108,
NAD–2059, 2139
2113
Nakamichi–2116
Sylvania–2002, 2064, 2078,
Nexxtech–2140
2092
Norcent–2005, 2117
Techwood–2141
Onkyo–2006
Toshiba–2023, 2025, 2037,
Oritron–2009
2038, 2040, 2041, 2054,
Panasonic–2031, 2066,
2080, 2084, 2088, 2093,
2075, 2076, 2104, 2105,
2094
2106, 2111
Toshiba–2135
Philips–2018, 2032, 2033,
Venturer–2011
2045, 2051, 2091, 2109
Yamaha–2106, 2146
Pioneer–2008, 2021
Zenith–2039, 2052, 2128
AUX Group
Amplifier Codes
Aiwa–6003, 6020
Carver–6002
Optimus–6008
Panasonic–6001
Pioneer–6004, 6009, 6010,
6023, 6036
Proton–6035
Citizen–6026
Quasar–6001
Denon–6014
RCA–6025
Fisher–6002
Sharp–6029, 6030, 6031,
GE–6028
Goldstar–6016, 6021
Harman Kardon–6013
Hitachi–6034
JVC–6018, 6024
Kenwood–6015, 6022
Maganvox–6035
Marantz–6000
Nakamichi–6012
NEC–6033
6032
Sherwood–6011
Sony–6020
Teac–6019
Technic–6001
Technics–6001
Toshiba–6027
Victor–6024
Yamaha–6007
Onkyo–6005, 6006, 6017
Home Theater in a Box (HTIB)
BrandAudio
DVD
Bose
4000
2130
JBL 4001
2043
JVC 4002
2035
Koss 4003
2060
Onkyo
4004
2024
Panasonic 4005
2104
Philips 4006
2036
Pioneer 4007 2016
49
RCA 4008
Sony 4009, 4010
Venturer
4011
Receiver/Tuner
Codes
Aiwa–5000, 5001, 5002,
5004, 5005, 5006
50
2042
2113, 2108
2011
Wards–5000, 5021
Yamaha–5003, 5014, 5015,
5021
Bose–5007
VCR Codes
Carver–5000
Admiral–3001
Denon–5008
Adventura–3021
Harman Kardon–5000, 5009
Aiwa–3021
JBL–5009
Akai–3003, 3055, 3058
JVC–5010
Audio Dynamics–3005, 3006
Kenwood–5011, 5012, 5013
Bell & Howell–3007
Linn–5000
Broksonic–3081, 3082
Maganvox–5000
Candle–3011, 3013, 3014
Marantz–5000
Canon–3016
Onkyo–5018
Carver–3036
Panasonic–5019, 5020
Citizen–3011, 3013, 3014
Philips–5000
Colortyme–3005
Pioneer–5021, 5022
Curtis Mathes–3000, 3005,
RCA–5024, 5025, 5026
3014
Sansui–5000
Daewoo–3011, 3013, 3021,
Sherwood–5027
3076
Sony–5017, 5023, 5028,
DBX–3005, 3006
5029, 5030, 5031, 5032,
Dimensia–3000
5033
Dynatech–3021
Technics–5016, 5019, 5020
Electrohome–3023
Emerson–3003, 3011, 3021,
MGA–3023, 3038
3023, 3038, 3083
Minolta–3052
Fisher–3007, 3029, 3030
Mitsubishi–3023, 3038, 3039,
Fuji–3058
3060, 3108
Funai–3002, 3021
Montgomery Ward–3001
Garrard–3021
Motorola–3001
GE–3000, 3059, 3090
Multitech–3021
Go Video–3066, 3073, 3109,
NEC–3005, 3006, 3007,
3110
3014, 3055, 3060
Goldstar–3005, 3014
Optimus–3001
Gradiente–3021
Optonica–3047
Harley Davidson–3021
Orion–3004
Harman Kardon–3005
Panasonic–3053, 3062,
Headquarter–3007
3063, 3077, 3078, 3079,
Hitachi–3052, 3055, 3059,
3086, 3087, 3107
3117
Pentax–3052, 3059
JC Penney–3005, 3006,
Pentex Research–3014
3007, 3030, 3036, 3052
Philco–3036, 3037
Jensen–3055
Philips–3036, 3047, 3061,
JVC–3005, 3006, 3007, 3014,
3071
3055, 3060, 3067, 3118
Pioneer–3006, 3060
Kenwood–3005, 3006, 3007,
Polaroid–3111
3014, 3055, 3060
Portland–3013
Lloyd’s–3021
Proscan–3000
Magnavox–3036, 3037,
Pulsar–3051
3051, 3061
Quarter–3007
Marantz–3005, 3006, 3007,
Quartz–3007
3014, 3036
Quasar–3062, 3091, 3092
Memorex–3001, 3004, 3007,
Radio Shack–3001, 3047
3021, 3051
Radio Shack/Realistic–3007,
51
3021, 3023, 3029, 3047
Tandy–3007
RCA–3000, 3003, 3040,
Tatung–3055
3041, 3042, 3052, 3059,
Teac–3021, 3042, 3055
3062, 3068, 3075, 3093,
Technics–3053
3094, 3106
Teknika–3021, 3050
Realistic–3001, 3007, 3011,
Tivo–3074
3021, 3023, 3029, 3047
Toshiba–3011, 3029, 3030,
Ricoh–3064
3038, 3096, 3098, 3099,
Runco–3051
3102, 3103
Samsung–3011, 3069, 3084,
Vector Research–3005, 3006,
3089, 3101
3011
Sanky–3001, 3051
Victor–3006
Sansui–3004, 3006, 3055,
Video Concepts–3005, 3006,
3060
3011
Sanyo–3007, 3070
Wards–3001, 3011, 3021,
Scott–3011, 3038
3023, 3047, 3052
Sears–3007, 3029, 3030,
White Westinghouse–3002
3052,
XR-1000–3021
Sharp–3001, 3013, 3023,
Yamaha–3005, 3006, 3007,
3047, 3080, 3100
3014, 3055
Shintom–3048, 3058
Zenith–3048, 3051, 3058,
Signature–3001
3064, 3072, 3097, 3119
Singer–3064
Sony–3048, 3049, 3058,
3085, 3104
STS–3052
Sylvania–3021, 3036, 3037,
3038, 3061, 3088, 3095,
3105
Symphonic–3002, 3021
52
Broadband. Digital TV. Phone.
615-773-9033
www.tdstv.com
61493b/2-08/4533