1
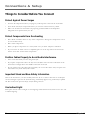
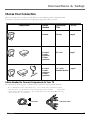
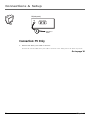
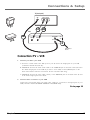
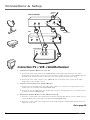
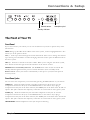
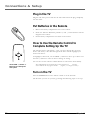
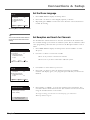
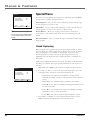
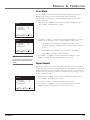
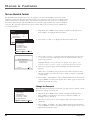
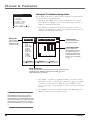
Television
User’s Guide
Changing Entertainment. Again.
Please read this manual before
operating this product for the
first time.
TOCOM 1577577A
Models: MR14400 & MR20400
Important Information
WARNING
To reduce the risk of fire or
electric shock, do not expose
this TV to rain or moisture.
WARNING
RISK OF ELECTRIC SHOCK
DO NOT OPEN
To reduce the risk of electric shock, do not remove
cover (or back). No user serviceable parts inside.
Refer servicing to qualified service personnel.
This symbol indicates
important instructions
accompanying the product.
This symbol indicates
"dangerous voltage" inside
the product that presents a
risk of electric shock or
personal injury.
Caution: To prevent electric shock, insert plug firmly into
outlet.
Power Consumption:
~
110V
60 Hz A.C.
55 W (model MR14400)
68 W (model MR20400)
If fixed (non-moving) images are left on the screen for long periods,
they may be permanently imprinted on the picture tube. Such
images include network logos, phone numbers, and video games.
This damage is not covered by your warranty. Extended viewing of
channels displaying these images should be avoided.
Cable TV Installer: This reminder is provided to call your attention to
Article 820-40 of the National Electrical Code which provides guidelines for
proper grounding and, in particular, specifies that the cable ground shall be
connected to the grounding system of the building as close to the point of
cable entry as practical.
Table of Contents
Chapter 1: Connections & Setup
Things to Consider Before You Connect ......................................................................... 4
Choose Your Connection .................................................................................................. 5
Cables Needed to Connect Components to Your TV ............................................... 5
Connection: TV Only .................................................................................................. 6
Connection: TV + VCR ................................................................................................ 7
Connection: TV + VCR + Satellite Receiver ............................................................... 8
The Front of Your TV ........................................................................................................ 9
Plug Batteries in the Remote ......................................................................................... 10
How to Use the Remote Control to Complete Setting Up the TV .............................. 10
Set the Menu Language .......................................................................................... 11
Set Reception and Search for Channels .................................................................. 11
Add or Delete Channels ........................................................................................... 12
Change the Input ..................................................................................................... 12
The Buttons on the Remote Control ............................................................................. 13
Chapter 2: Menus & Features
Menus and Control Panels ............................................................................................. 16
Video Menu ..................................................................................................................... 16
Adjust a Video Setting ............................................................................................. 17
Return Video Settings to Factory Preset ................................................................. 17
Time Menu ...................................................................................................................... 18
Set the Clock ............................................................................................................. 18
Set a Wake-Up Time ................................................................................................. 18
Set an Off Time ......................................................................................................... 19
Set the Sleep Timer .................................................................................................. 19
Special Menu ................................................................................................................... 20
Closed Captioning .................................................................................................... 20
CC on Mute ............................................................................................................... 21
Power Restore .......................................................................................................... 21
Turn on Parental Control ......................................................................................... 22
Setting TV Guidelines and Movie Ratings .............................................................. 23
Block the External Source Signal ................................................................................... 26
Chapter 3: Reference
Troubleshooting .............................................................................................................. 27
Care and Cleaning .......................................................................................................... 28
Index ................................................................................................................................ 29
1
This page left blank intentionally
Chapter 1
Connections & Setup
Chapter Overview:
•
Things to Consider Before You Connect
•
Choose Your Connection
•
The Front of Your TV
•
Put Batteries in the Remote
•
How to Use the Remote Control to Complete the
Setup
•
Buttons on the Remote Control
NOTE: Illustrations are for representation only. Your product and onscreen displays might differ.
Changing Entertainment. Again.
3
Connections & Setup
Things to Consider Before You Connect
Protect Against Power Surges
•
Connect all components before you plug any of their power cords into the wall outlet.
•
Turn off the TV and/or component before you connect or disconnect any cables.
•
Make sure all antennas and cables are properly grounded. Refer to the Important
Safeguards sheet packed with your TV.
Protect Components from Overheating
•
Don’t block ventilation holes on any of the components. Arrange the components so that
air can circulate freely.
•
Don’t stack components.
•
When you place components in a stand, make sure you allow adequate ventilation.
•
If you connect an audio receiver or amplifier, place it on the top shelf so the heated air
from it won’t flow around other components.
Position Cables Properly to Avoid Audio Interference
•
Insert each cable firmly into the designated jack.
•
If you place components above the TV, route all cables down the side of the back of the
TV instead of straight down the middle of the back of the TV.
•
If your antenna uses 300-ohm twin lead cables, do not coil the cables. Also, keep the twin
lead cables away from audio/video cables.
Important Stand and Base Safety Information
Choose the location for your TV carefully. Place the TV on a stand or base that is of adequate
size and strength to prevent the TV from being accidentally tipped over, pushed off, or pulled
off. This could cause personal injury and/or damage the TV.
Use Indirect Light
Don’t place the TV where sunlight or room lighting will be directed toward the screen. Use soft
or indirect lighting.
4
Chapter 1
Connections & Setup
Choose Your Connection
There are several ways to connect your TV. Please use the following chart to determine which
connection is best for you. Proceed to the appropriate page and connect your TV.
Components
Cables
Needed
Connection
Title
Go to...
1 Coaxial
TV Only
page 6
2 Coaxial
1 Audio
(optional)
1 Video
(optional)
TV + VCR
page 7
4 Coaxial
1 Audio
(optional)
1 Video
(optional)
TV + VCR +
Satellite Receiver
page 8
TV
TV
TV
VCR
VCR
lite
tel
a
S
Cables Needed to Connect Components to Your TV
You will need the following types of cables for the connections represented in this book.
Notes: Audio/V ideo cables (A/V cables for shor t) are usually sold as a bundled set, but the
connection pictur es in this book show each cable separately for better visibility
. Use the White
cable for audio connections and the Y ellow cable for video connections. Let the Red cable hang
-- this cable is for ster eo connections.
Coaxial cable
Chapter 1
Audio/Video cables
5
Connections & Setup
TV (back panel)
VIDEO IN AUDIO IN
ANT
TV
1
From Cable or
Antenna
Connection: TV Only
1. Connect the TV to your cable or antenna
Connect the coaxial cable from your cable or antenna to the ANT. jack on the back of your TV.
Go to page 10
6
Chapter 1
Connections & Setup
TV (back panel)
ANT
TV
1C
VIDEO IN AUDIO IN
1B
VCR
1A
IN FROM ANT
VIDEO
AUDIO
VCR
CH3
CH4
OUT TO TV
2
From Cable or
Antenna
Connection: TV + VCR
1. Connect your TV to your VCR
A. Connect a coaxial cable to the ANT. jack on your TV and to the Output Jack on your VCR
(sometimes labeled OUT TO TV).
B. OPTIONAL: Connect the white audio cable to the AUDIO IN jack on the back of the TV and to
the Audio Output Jack on the VCR. If you have a stereo VCR, use the L/MONO jack on the
back of the VCR to make this connection. Let the red audio cable hang.
C. OPTIONAL: Connect the video cable (yellow) to the VIDEO IN jack on the back of the TV and
to the Video Output Jack on the VCR.
2. Connect cable or antenna to your VCR
Connect the coaxial cable from your cable outlet, cable box, or antenna to the Input Jack on your
VCR (sometimes labeled IN FROM ANTENNA or IN FROM ANT).
Go to page 10
Chapter 1
7
Connections & Setup
From Cable or
Antenna
SATELLITE RECEIVER
2A
IN FROM ANT
OUT TO TV
VIDEO
e
llit
e
t
Sa
VCR
AUDIO
CH3
CH4
SATELLITE
IN
1B
Satellite Signal
IN FROM ANT
VIDEO
2B
3A
AUDIO
CH3
CH4
OUT TO TV
VCR
1A
TV (back panel)
ANT
VIDEO IN AUDIO IN
3B
TV
Connection: TV + VCR + Satellite Receiver
1. Connect your Satellite Receiver to your TV
A. Connect the white audio cable to the AUDIO IN jack on the back of the TV and to the Audio
Output Jack on the satellite receiver. If you have a stereo satellite receiver, use the L/MONO jack on
the back of the satellite receiver to make this connection. Let the red audio cable hang.
B. Connect the video cable (yellow) to the VIDEO IN jack on the back of the TV and to the Video
Output Jack on the satellite receiver.
2. Connect coaxial cables to the Satellite Receiver
A. Connect the coaxial cable from your cable outlet, cable box, or antenna to the Input Jack on your
satellite receiver (sometimes labeled IN FROM ANT).
B. Connect the coaxial cable from your satellite dish antenna to the Input Jack on your satellite receiver
(sometimes labeled SATELLITE IN).
3. Connect the Satellite Receiver to the VCR and to the TV
A. Connect a coaxial cable to the Output Jack (sometimes labeled OUT TO TV) on the satellite receiver
and to the Input Jack on the VCR (sometimes labeled IN FROM ANT).
B. Connect a coaxial cable to the Output Jack on the VCR (sometimes labeled OUT TO TV) and to the
ANT. jack on the TV.
Go to page 10
8
Chapter 1
Connections & Setup
Remote sensor
Headphone jack
Standby indicator
The Front of Your TV
Front Panel
If you cannot locate your remote you can use the buttons of your TV to operate many of the
TV’s features.
MENU Brings up the Main menu. When in the menu system, it selects highlighted items. Also
returns you to the previous menu.
CH ^/v Scans up or down through the current channel list. Press once to change the channel
up or down; press and hold to continue changing channels. Used to point to different items in
the menu system.
VOL +/– Increases or decreases the TV’s volume. When you’re using the TV’s menu system,
these buttons act like the right or left arrow buttons on the remote control.
POWER button and Standby indicator The POWER button turns the TV on and off. The
standby indicator lights when the power is turned off and the TV is in standby mode.
Remote sensor Point your remote control directly at this spot on your TV’s front panel to
control your TV.
Front Panel Jacks
You can access the component you connected by pressing the INPUT button on your remote.
VIDEO (in) Attach the Video Out jack of another component to this jack. To view the
component connected to this jack, use the INPUT button on the remote. If you plug a
component into this jack on the front of the TV, the VIDEO jack on the back of the TV will not
operate. This jack is ideal for the temporary connection of a camcorder or video game system.
AUDIO (in) Attach the Audio Out jack of another component to this jack. To view the
component connected to this jack, use the INPUT button on the remote. If you plug a
component into this jack on the front of the TV, the AUDIO jack on the back of the TV will not
operate. This jack is ideal for the temporary connection of a camcorder or video game system.
HEADPHONES Attach headphones to this jack for private listening.
Chapter 1
9
Connections & Setup
Plug in the TV
Plug the end of the power cord into the wall outlet. Insert the plug completely
into the outlet.
Put Batteries in the Remote
1.
Remove the battery compartment cover on the remote.
2.
Insert new batteries. Match the polarities (+ and -) on the batteries with the
diagram on the remote.
3.
Put the battery compartment cover back on the remote.
How to Use the Remote Control to
Complete Setting Up the TV
CHAN
VOL
VOL
The technical term is “Navigation” – how you move through the on-screen
menus. The theory is the same throughout the menu screens: highlight your
choice and select it.
CHAN
MENU
To highlight a menu item, use the CHAN ^/v buttons to move up or down. Use
the VOL +/- buttons to select an item or change its setting.
You can also use the remote’s number buttons to select menu items directly.
Use the CHAN ^/v and VOL +/buttons to move through the
menu system.
Note: Highlighted means that the menu item stands out fr
om other
menu items on the list (appears darker , brighter , or a dif fer ent color).
Turn on the TV
Press the POWER button on the remote control or on the TV itself.
The first time you turn on your TV go through the following steps to set it up.
10
Chapter 1
Connections & Setup
Set the Menu Language
Set-Up
1
2
3
4
5
Language:
English
Reception:
Air
Memorize Channels
Add/Delete Channels
Input:
TV
Select
Adjust
1.
Press MENU twice to display the Set-Up menu.
2.
Press VOL > or VOL < to select English, Spanish, or French.
3.
Repeatedly press MENU to remove the menu from the screen and return to
normal TV viewing.
Next
The Set Up Menu with English selected
Tip:
You can also use the number buttons
on the remote to select menu items
directly.
Set-Up
1
2
3
4
5
Language:
English
Reception:
Air
Memorize Channels
Add/Delete Channels
Input:
TV
Set Reception and Search for Channels
Use the Memorize Channels feature to have the TV search for all channels that
are viewable through your antenna or cable-TV system. This is sometimes called
“auto programming.” Note that first you must set the Reception feature to Air or
Cable.
1.
Press MENU twice to display the Set-Up menu and use CHAN v to select
Reception.
2.
Use VOL > or VOL < to select Air or Cable.
Select Air if you have connected an antenna.
Select Cable if you have connected a cable-TV system.
Select
Adjust
Next
Set-Up
1
2
3
4
5
Language:
English
Reception:
Air
Memorize Channels
Add/Delete Channels
Input:
TV
Select
Adjust
3.
Use CHAN v to select Memorize Channels.
4.
Press VOL > or VOL < to have the TV begin searching for available
channels. The display gives you a progress report and tells you when it has
finished.
5.
Press CHAN ^ or CHAN v to access the channels in the channel list. You
can add or delete channels from the list. The channels can also be accessed
using the number buttons on the remote.
Next
Memorize Channels
Air 11
Memorizing all air channels
Please, stand by.
Note: If you change your location or cable company, you will need to
Memorize Channels again.
Press MENU to cancel and
return to Set-Up menu.
Chapter 1
11
Connections & Setup
Add or Delete Channels
Set-Up
1
2
3
4
5
1.
Select the channel you want to add or delete using the number buttons on
the remote.
2.
Press MENU twice to display the Set-Up menu and use CHAN v to select
Add/Delete Channels.
3.
Press VOL > or VOL < to select the Add/Delete Channels feature.
4.
Use the VOL < or VOL > to add or delete the channel from the channel list.
5.
If you want to add or delete another channel, use CHAN ^ or CHAN v to
select it.
6.
Press MENU to remove the menu and return to normal TV viewing.
Language:
English
Reception:
Air
Memorize Channels
Add/Delete Channels
Input:
TV
Select
Adjust
Next
Add/Delete Channels
Air 11
This channel is not in memory.
Press VOL
to add.
Press CH for other channels.
Press MENU to return
to Set-Up menu.
Tip:
You can also use the number buttons
on the remote to select menu items
directly.
Set-Up
1
2
3
4
5
Language:
English
Reception:
Air
Memorize Channels
Add/Delete Channels
Input:
TV
Select
Adjust
1.
Display the Set-Up menu and use CHAN v to select Input.
2.
Use VOL < or VOL > to select TV or Line.
Select TV if you want to see the signal from the antenna or cable-TV.
Select Line if you want to see the signal from a component connected to
the AUDIO/VIDEO jacks on the TV.
3.
Language:
English
Reception:
Air
Memorize Channels
Add/Delete Channels
Input:
Line
Select
12
Use the Input feature to select the signal you want to view. Normally, your TV
displays the signal coming from antenna or cable-TV system. To see the signal
from a component connected to the AUDIO/VIDEO jacks of the TV, change the
Input feature to Line.
Next
Set-Up
1
2
3
4
5
Change the Input
Adjust
Next
When the Input feature is set to Line, you will see the signal from a
component connected to the front AUDIO/VIDEO jacks.
Note: if you want to see the signal fr om a component connected to the
back AUDIO/VIDEO jacks, disconnect the component fr
om the fr ont
jacks.
4.
Press MENU to remove the menu and return to normal TV viewing.
Chapter 1
Connections & Setup
The Buttons on the Remote Control
DISPLAY
POWER
POWER
Brings up available channel information.
Turns the TV on and off.
DISPLAY
MUTE Turns off the TV’s sound. Press again to restore the sound.
PREV CH
MUTE
VOL - or VOL + Decreases or increases the TV’s volume. Also used as left and
right arrows in the menu system.
CHAN
VOL
VOL
CHAN ^ or CHAN v Scans up or down through the current channel list. Press
once to change channels; press and hold to continue changing channels. Also
used as up and down arrows in the menu system.
CHAN
CLEAR
RESET
MENU
1
2
3
4
5
6
7
8
9
CLEAR Removes any menu or display from the screen and returns you to TV
viewing. Also cancels the SKIP timer.
MENU Brings up the Main menu. When in the menu system, selects
highlighted items or returns you to the previous menu.
RESET
0
INPUT
PREV CH Returns you to the previous channel.
SKIP
Returns all picture quality controls to their original settings.
(0-9) Number Buttons Enters channel numbers directly though the remote
control. To enter a three-digit channel, press and hold the first digit, then add
the second two. You can also use the number buttons in the menu system to
select items directly.
INPUT
Press to toggle through available input sources (CH3, CH4, etc.).
SKIP (Commercial Skip) Press once before changing channels. The TV will
wait 30 seconds before returning you to the original channel. Press again to add
more time. Press CLEAR to cancel the SKIP timer.
Chapter 1
13
This page left blank intentionally
Chapter 2
Menus & Features
Chapter Overview:
•
Menus and Control Panels
•
Adjusting Video Settings
•
Setting the Clock
•
Setting the On/Off and Sleep Timers
•
Closed Captioning
•
Power Restore
•
Parental Controls and Rating Limits
NOTE: Illustrations are for representation only. Your product and onscreen displays might differ.
Changing Entertainment. Again.
15
15
Menus & Features
Menus and Control Panels
Video
1
2
3
4
5
6
Settings:
Custom
Contrast:
Brightness
Sharpness
Color
Set-Up
Tint
1 Language:
Select
Adjust
NextEnglish
2 Reception:
Air
3 Memorize Channels
4 Add/Delete Channels
5 Input:
TV
Using the buttons on both the remote and front panel enable you to access
and make changes to the menus and control panels.
The following pages detail how to use the Video, Time, and Special menus
and controls to customize the functions of your TV. The Set-Up menu
features were described and explained under Set-Up Menu.
Press MENU to toggle through the menus. Press once to display the Video
menu, twice to display the Set-Up menu, three times to display the Time
menu, four times to display the Special menu, and five times to remove the
menu and return to TV viewing.
Time
Select1
Adjust
Set Clock:
2 Wake-Up time:
3 Off time:
4 SleepSpecial
Timer:
Select
1
2
3
4
__:
Next
__
__:__
__:__
0 min
Closed Caption:
CC on Mute:
Adjust
Power
Restore:Next
Parental Control
C1
Off
Off
•
With the menu displayed, point to the feature with CHAN ^ or CHAN v
and then select and/or adjust the feature with VOL < and VOL >.
•
You can also use the number buttons to access menu items directly.
Exiting a menu
Select
Adjust
Settings:
Contrast:
Brightness
Sharpness
Color
Tint
Select
There are two ways to exit a menu:
•
Press MENU repeatedly. The on-screen menus are cleared from the
screen and you return to TV viewing.
•
Wait ten seconds and the menus are automatically cleared from the
screen.
Video Menu
Video
1
2
3
4
5
6
Exit
Preset
You can access the Video menu features by pressing MENU on the remote.
Basic Video Controls Displays the five slider controls for adjusting the
way the picture looks and lets you reset the video to the factory settings.
Adjust
Next
Settings: Preset and Custom Lets you reset your custom video settings
to the factory presets.
Contrast Adjusts the difference between the light and dark areas of the
picture.
Brightness Adjusts the brightness of the picture.
Sharpness Adjusts the crispness of edges in the picture.
Color Adjusts the richness of the color.
Tint Adjusts the balance between the red and green levels.
16
Chapter 2
Menus & Features
Adjust a Video Setting
Video
1
2
3
4
5
6
Settings:
Contrast:
Brightness
Sharpness
Color
Tint
Select
1.
Press MENU on the remote to display the Video menu and use
CHAN v to highlight Contrast.
2.
Use VOL > or VOL < to select Contrast and display the Contrast
adjustment slider.
Preset
Adjust
Next
• Press VOL > to increase the Contrast.
• Press VOL < to decrease the Contrast.
Note: When the slider appears on the screen, use VOL > or VOL < to
adjust it or use CHAN ^ or CHAN v to display another Video
adjustment slider.
Contrast
Tip:
3.
Press CHAN ^ or CHAN v to display another Video adjustment slider
and use VOL > or VOL < to adjust it.
4.
Press MENU to return to the Video menu or wait ten seconds for the
slider to disappear from the TV screen. The TV will remember your
settings.
You can also use the number buttons
on the remote to select menu items
directly.
Return Video Settings to Factory Preset
Video
1
2
3
4
5
6
Settings:
Contrast:
Brightness
Sharpness
Color
Tint
Select
Custom
Adjust
Settings:
Contrast:
Brightness
Sharpness
Color
Tint
Select
Chapter 2
Preset
Adjust
1.
Press MENU on the remote to display the Video menu.
2.
Use VOL > or VOL < to select Preset.
3.
To return to your custom settings, press VOL > or VOL < again.
Next
Video
1
2
3
4
5
6
You can return the Video settings to the factory preset ones. Your custom
settings will remain in memory.
Next
17
Menus & Features
Time
1
2
3
4
Set Clock:
Wake-Up time:
Off time:
Sleep Timer:
Select
__:__
__:__
__:__
0 min
Adjust
Next
Time Menu
You can display the Time menu by repeatedly pressing MENU on the
remote. You must set the current time (including AM or PM) to use the
Wake-Up time or Off time feature.
Set Clock Lets you enter the current time including AM or PM.
Wake-Up Time Lets you enter a time including AM or PM to have the TV
turn itself on.
Tip:
You can also use the number buttons
on the remote to select menu items
directly.
Set Clock:
Wake-Up time:
Off time:
Sleep Timer:
Select
Sleep Timer Displays a control panel that lets you select the amount of
time you want to give the TV before it shuts itself off.
Set the Clock
Time
1
2
3
4
Off Time Lets you enter a specific time including AM or PM to have the
TV automatically shut itself off.
Adjust
12 : 00 AM
__:__
__:__
0 min
Next
1.
Repeatedly press MENU on the remote to display the Time menu.
2.
Press VOL > or VOL < to enter the current time including AM or PM.
3.
Press and hold VOL > or VOL < to quickly enter the current time
including AM or PM.
4.
Use CHAN ^ or CHAN v to select another time function or repeatedly
press MENU to remove the Time menu from the TV screen.
Set a Wake-Up Time
You must set the current time including AM or PM to use the Wake-Up time
feature. If you do not press one of the CHAN or VOL buttons within 15
minutes after the TV turns on with the Wake-Up timer, the TV will
automatically turn off.
Time
1
2
3
4
Set Clock:
Wake-Up time:
Off time:
Sleep Timer:
Select
Adjust
12 : 00 AM
__:__
__:__
Repeatedly press MENU on the remote to display the Time menu. Press
CHAN v to highlight Wake-Up time.
2.
Press VOL > or VOL < to enter the time including AM or PM that you
want the TV to turn itself on.
3.
Press and hold VOL > or VOL < to quickly enter the Wake-Up time
including AM or PM.
4.
Use CHAN ^ or CHAN v to select another time function or repeatedly
press MENU to remove the Time menu from the TV screen.
0 min
Next
Tip:
Press one of the CHAN or VOL buttons
within 15 minutes after the TV turns
on with the Wake-Up timer or the TV
will automatically turn off.
18
1.
To Cancel Wake-Up Time
1. Display the Time menu, select Wake-up Time and press and hold
VOL > or VOL < until – – : – – appears.
Chapter 2
Menus & Features
Set an Off Time
You must set the current time including AM or PM to use the Off time
feature.
1.
Repeatedly press MENU on the remote to display the Time menu. Press
CHAN v to highlight Off time.
2.
Press VOL > or VOL < to enter the time including AM or PM that you
want the TV to turn itself off.
3.
Press and hold VOL > or VOL < to quickly enter the Off time including
AM or PM.
4.
Use CHAN ^ or CHAN v to select another time function or repeatedly
press MENU to remove the Time menu from the TV screen.
Time
1
2
3
4
Set Clock:
Wake-Up time:
Off time:
Sleep Timer:
Select
Adjust
12 : 00 AM
06 : 30 AM
__:__
0 min
Next
Tip:
You can also use the number buttons
on the remote to select menu items
directly.
To Cancel the Off Time
1. Display the Time menu, select Off Time and press and hold VOL > or
VOL < until – – : – – appears.
Set the Sleep Timer
Time
1
2
3
4
Set Clock:
Wake-Up time:
Off time:
Sleep Timer:
Select
Adjust
Set Clock:
Wake-Up time:
Off time:
Sleep Timer:
Select
Adjust
Repeatedly press MENU on the remote to display the Time menu. Press
CHAN v to highlight Sleep Timer.
2.
Press VOL > or VOL < to enter the amount of time (15, 30, 45, 60, 90,
or 120 minutes) that you want the TV to play before it turns itself on.
3.
Use CHAN ^ or CHAN v to select another time function or press MENU
to remove the Time menu from the TV screen.
12 : 00 AM
06 : 30 AM
11 : 30 PM
0 min
Next
Time
1
2
3
4
1.
12 : 00 AM
06 : 30 AM
11 : 30 PM
60 min
Next
To Cancel the Sleep Timer
1. Either turn off the TV or set the Sleep Timer display on the Time menu
to – – : – –.
Chapter 2
19
Menus & Features
Special Menu
Special
1
2
3
4
Closed Caption:
CC on Mute:
Power Restore:
Parental Control
Select
Adjust
C1
Off
Off
You can access the Special menu features by repeatedly pressing MENU
on the remote to display the Special menu.
Exit
Closed Caption Lets you turn closed captioning on and select the type
of closed caption you want to view.
CC on Mute Lets you turn closed captioning on and select the type of
closed caption you want to view when you mute the TV.
Tip:
You can also use the number buttons
on the remote to select menu items
directly.
Power Restore Allows you to plug your TV into an outlet that is
controlled by a wall switch and turn the TV on and off using the wall
switch.
Parental Control Lets you control the types of material watched using
rating systems.
Closed Captioning
Many programs are encoded with closed captioning information, which
lets you display the audio portion of a program as text on the TV screen.
Closed captioning is not available on all channels at all times. Only
specific programs encoded with closed captioning information are
applicable. The TV offers four types of Closed Captions, including two
text modes.
Caption types follow the action on-screen by providing words that follow
the dialog or narration. Text types provide information, such as news or
weather.
Special
1
2
3
4
Closed Caption:
CC on Mute:
Power Restore:
Parental Control
Select
Adjust
C1
Off
Off
1.
Repeatedly press MENU on the remote to display the Special menu.
2.
Use VOL > or VOL < to select the type of Closed Caption you want
to display on the TV screen or turn Closed Caption off.
• Select C1 to view Captions (if available) providing words
following the dialog, narration, and side effects of the action on
screen.
Exit
• Select C2 to view a different type of Caption (if available).
• Select T1 to view Text (if available) providing information, such
as news or weather.
• Select T2 to view another type of Text (if available) providing
information, such as news or weather.
• Select Off to turn off any Closed Caption (Caption or Text).
3.
20
Use CHAN ^ or CHAN v to select another Special feature or press
MENU to remove the Special menu from the TV screen.
Chapter 2
Menus & Features
CC on Mute
You can display a Closed Caption feature automatically when you press
MUTE on the remote to mute the sound. The Closed Caption is
automatically turned off when you press MUTE again to return to the
normal sound level.
Special
1
2
3
4
Closed Caption:
CC on Mute:
Power Restore:
Parental Control
Select
Adjust
Closed Caption:
CC on Mute:
Power Restore:
Parental Control
Select
Adjust
Repeatedly press MENU on the remote to display the Special menu.
Press CHAN v to highlight CC on Mute.
2.
Use VOL > or VOL < to select the type of Closed Caption you want to
display on the TV screen when you press MUTE on the remote.
C1
Off
Off
Exit
Special
1
2
3
4
1.
C1
C1
Off
• Select C1 to view Captions (if available) providing words
following the dialog, narration, and side effects of the on-screen
action.
• Select C2 to view a different type of Caption (if available).
Exit
• Select Off to turn off any Closed Caption.
3.
Tip:
You can also use the number buttons
on the remote to select menu items
directly.
Use CHAN ^ or CHAN v to select another Special feature or press
MENU to remove the Special menu from the TV screen.
Power Restore
This feature allows you to use a switchable wall outlet to turn your TV on
or off. Just plug your TV in a wall outlet that is controlled by a wall switch.
Set the Power Restore feature to ON in the menu., When you use the wall
switch to turn on your TV, it will turn on and return to the settings it was in
before you turned it off.
Special
1
2
3
4
Closed Caption:
OC on Mute:
Power Restore:
Parental Control
Select
Chapter 2
Adjust
C1
Off
On
1.
Repeatedly press MENU on the remote to display the Special menu.
Press CHAN v to highlight Power Restore.
2.
Use VOL > or VOL < to turn Power Restore On or Off.
3.
Use CHAN ^ or CHAN v to select another Special feature or press
MENU to remove the Special menu from the TV screen.
Exit
21
Menus & Features
Turn on Parental Control
The Parental Control feature allows you to program your TV so that children cannot see certain
programs or channels. The first four choices in the Parental Controls menu involve software inside
your TV (referred to as V-chip). These four software functions may not work on your TV because
the features depend upon special additions to the broadcast signal, which may not be available in
your area. The parental control feature comes turned “Off,” so if you choose not to implement it,
you can just ignore it.
1.
Repeatedly press MENU on the remote to display the Special menu.
Press CHAN v to highlight Parental Control.
2.
Press VOL > or VOL < to display the Parental Control menu.
3.
Press VOL > or VOL < to turn the Parental Lock feature On. The Enter
a new Password screen will appear. Use the number buttons (0-9) to
enter your password.
Special
1
2
3
4
Closed Caption:
CC on Mute:
Power Restore:
Parental Control
Off
Off
Off
Parental Control
Select
1
2
3
4
5
6
Adjust Lock: Exit
Parental
Off
TV Guidelines
Movie Ratings
No Rating: Unblock
Ext. Source: Unblock
Change Password
Select
Adjust
Prev.
Enter a new Password
----
IMPORTANT: Be sure to remember the password you enter or you
will not be able to review or change your Parental Control selections.
0-9: Adjust
Prev.
4.
Enter your password again when the Repeat the Password screen
appears.
5.
Make sure to remember your password. You will be required to enter
the password the next time you want to check or change any Parental
control setting.
6.
Press CHAN ^ and CHAN v to select a different Parental Control feature
or press MENU to return to the Special menu. Press again to remove the
Special menu from the screen.
Change the Password
If the Parental control has been activated, you will need to enter the current
password to change the password.
Parental Control
1
2
3
4
5
6
Parental Lock: On
TV Guidelines
Movie Ratings
No Rating: Unblock
Ext. Source: Unblock
Change Password
Select
22
Adjust
Prev.
1.
Repeatedly press MENU on the remote to display the Special menu.
Press CHAN v to highlight Parental Control and press CHAN v to
highlight Change Password.
2.
The Enter a New Password screen appears. Enter and repeat your new
password.
3.
Press CHAN ^ or CHAN v to select a different Parental Control feature
or press MENU to return to the Special menu. Press again to remove the
Special menu from the screen.
Chapter 2
Menus & Features
Setting TV Guidelines and Movie Ratings
The first four choices in the Parental Controls menu involve software inside your TV (dubbed VChip) which allows you to block TV programs and movies based on violence, sex, or other
content you may believe children should not view. In other words, it lets you program your TV so
it will not display certain programs. Once you block programs, you or other adults are not limited
to only parent-approved programs; you can unblock programs by entering a password.
NOTE: These four software functions may not work on your TV because the features depend
upon special additions to the broadcast signal, which may not be available in your area.
The parental control feature comes turned “Off,” so if you choose not to implement it, you
can just ignore it.
When Parental Control is turned On, the software reads a code that most broadcasters send with
programs. That code tells the software the program’s age-based rating (TV-MA, TV-14, etc.) and
content themes (Violence (V), Adult Language (L), etc.). If you have blocked the rating and/or
content themes that the program contains, you will receive the message, “This rating is blocked.”
when you turn to that particular channel. Broadcasters are not required to provide content themes,
so programs received with no content themes will only be blocked if you block their age-based
rating. You can also block out programs that have been given a rating of “Not Rated,” and
programs that are considered “unrated” because no code has been sent by the broadcaster.
The TV age-based ratings and content themes you can block are listed in the table below.
Age-Based
Rating
Description and Content Themes for Age-Based Ratings
TV-MA
Mature Audience Only. Specifically designed to be viewed by adults and may be unsuitable for children under 17. It
contains one or more of the following content themes: crude indecent language (L), explicit sexual activity (S), or
graphic violence (V).
TV-14
Parents Strongly Cautioned. Contains some material that many parents would find unsuitable for children under 14.
Parents are strongly urged to exercise greater care in monitoring this program and are cautioned against letting children
under the age of 14 watch unattended. This program contains one or more of the following content themes: intensely
suggestive dialogue (D), strong coarse language (L), intense sexual situations (S), or intense violence (V).
TV-PG
Parental Guidance Suggested. Contains material that parents may find unsuitable for younger children. Many parents
may want to watch it with their younger children. The program contains one or more of the following content themes:
some suggestive dialogue (D), infrequent coarse language (L), some sexual situations (S), or moderate
violence (V).
TV-G
General Audience. Most parents would find this program suitable for all ages. It contains little or no sexual dialogue
(D), no strong language (L), or sexual situations (S), and little or no violence (V).
TV-Y7
Directed to Children 7 years and older. Designed for children ages 7 and above. It may be more appropriate for
children who have acquired the developmental skills needed to distinguish between make-believe and reality. Themes
and elements in this program may include mild fantasy violence (FV) or comedic violence, or may frighten children
under the age of 7.
TV-Y
All Children. Themes and elements in this program are designed for a young audience, including children from ages 26. It is not expected to frighten younger children.
Chapter 2
23
Menus & Features
Setting the TV Guidelines Ratings Limits
Parental Control
1
2
3
4
5
6
The TV Rating Limit lets you decide what TV programs can and cannot be
viewed. To set TV programming limits:
Parental Lock: Off
TV Guidelines
Movie Ratings
No Rating: Unblock
Ext. Source: Unblock
Change Password
Select
Rating Field
Lets you select
from a list of agebased ratings you
can block or view.
Adjust
1.
Repeatedly press MENU on the remote to display the Special menu.
Press CHAN v to highlight Parental Control. Press VOL > or VOL < to
display the Parental Control menu.
2.
Press CHAN v to highlight TV Guidelines. Press VOL > or VOL < to
display the TV Rating screen. Below is an example of where items are
located within the Rating Limit screen.
Prev.
Rating All FV
TVMATV14TVPGTVGTVY7TVSelect
D L S V
[
: Block]
Adjust
Prev.
Content Themes
Lists the content themes
you can block or view.
Content Status Fields
Lets you select which
content themes to view for
the selected rating, and
whether the status of the
content theme is currently
blocked ( ) or not blocked
(no ).
Rating Settings Area
Lets you see the current block/unblocked state of age-based ratings and
associated content. The Blocked settings are checked ( ) and the
Unblock settings are not checked.
Tip:
3.
Press CHAN ^ or CHAN v to highlight the Rating you want to change.
Press VOL > or VOL < to block ( ) or unblock (no ) the rating. When
you select a channel that has a rating, the rating will appear on the
screen. “This rating is blocked” appears on the screen when it has been
blocked.
4.
Press MENU to return to the Parental Control menu. Repeatedly press
MENU to remove the menus from the screen.
These software functions may not work on
your TV because the features depend upon
special additions to the broadcast signal, which
may not be available in your area. The parental
control feature comes turned “Off,” so if you
choose not to implement it, you can just ignore
it.
24
Chapter 2
Menus & Features
Setting the Movie Ratings Limits
You set movie rating limits by blocking movies rated above a specified
level. If you only want your child to watch movies that have a PG rating
and lower (in other words, movies rated PG and G), then you could
automatically block out all other movies with higher ratings.
1.
Parental Control
1
2
3
4
5
6
Parental Lock: On
TV Guidelines
Movie Ratings
No Rating: Unblock
Ext. Source: Unblock
Change Password
Select
Adjust
Prev.
2.
X
NC-17
R
PG-13
PG
G
NR
Select
3.
[
: Block]
Adjust
Prev.
These software functions may not work on
your TV because the features depend upon
special additions to the broadcast signal, which
may not be available in your area. The parental
control feature comes turned “Off,” so if you
choose not to implement it, you can just ignore
it.
Parental Lock: On
TV Guidelines
Movie Ratings
No Rating: Unblock
Ext. Source: Unblock
Change Password
Select
Adjust
Press CHAN ^ or CHAN v to highlight the lowest Rating you want to
block. Press VOL > or VOL < to block the rating and all of the ratings
above the one you block. A check ( ) appears next to the ratings you
have blocked.
Press MENU to return to the Parental Control menu. Repeatedly press
MENU to remove the menus from the screen.
Setting the No Rating Feature
This option lets you decide if you want programs that the TV recognizes
as “unrated” to be viewed. Note that “unrated” TV programs may include
news, sports, political, religious, local and weather programs, emergency
bulletins, public announcements, and programs without ratings.
1.
Parental Control
Press VOL > or VOL < to display the Movie Rating screen.
When you select a movie that has a rating, the rating will appear on the
screen. “This rating is blocked” appears on the screen when it has been
blocked.
4.
Tip:
1
2
3
4
5
6
Repeatedly press MENU on the remote to display the Special menu.
Press CHAN v to highlight Parental Control. Press VOL > or VOL <
to display the Parental Control menu. Press CHAN v to highlight
Movie Rating.
2.
Repeatedly press MENU on the remote to display the Special menu.
Press CHAN v to highlight Parental Control. Press VOL > or VOL <
to display the Parental Control menu. Press CH v to highlight No
Rating.
Press VOL > or VOL < to toggle between Unblock and Block.
• Select Unblocked so all unrated programs are available.
Prev.
• Select Blocked so no unrated programs are available.
3.
Chapter 2
Press CHAN ^ or CHAN v to select a different Parental Control
feature or press MENU to return to the Special menu. Press again to
remove the Special menu from the screen.
25
Menus & Features
Block the External Source Signal
This option lets you decide if you want to block the signal from the
component connected to the AUDIO/VIDEO jacks.
1.
Parental Control
1
2
3
4
5
6
Parental Lock: On
TV Guidelines
Movie Ratings
No Rating: Unblock
Ext. Source: Unblock
Change Password
Select
Adjust
2.
Repeatedly press MENU on the remote to display the Special menu.
Press CHAN v to highlight Parental Control. Press VOL > or VOL <
to display the Parental Control menu. Press CHAN v to highlight Ext.
Source.
Press VOL > or VOL < to toggle between Unblock and Block.
• Select Unblocked so the signal from an external source is
available.
Prev.
• Select Blocked so the signal from an external source is
blocked.
3.
26
Press CHAN ^ or CHAN v to select a different Parental Control
feature or press MENU to return to the Special menu. Press again to
remove the Special menu from the screen.
Chapter 2
Reference
Troubleshooting
Troubles sometimes are caused by simple “faults” that you can correct without the help of a service
technician. If you experience any difficulty with your TV, check a few basic remedies before calling
your service technician.
TV will not turn on
•
Check to make sure it is plugged in.
•
Check the wall receptacle (or extension cord) to make sure it is “live” by plugging in something else.
•
Maybe batteries in remote are weak, dead, or installed incorrectly. Try replacing batteries.
•
Maybe remote control is not aimed at remote sensor.
•
Try unplugging set for two minutes and then plug it back in and turn it on again.
Problems with remote
•
Maybe something is between the remote and the remote sensor.
•
Maybe the remote is not aimed directly at the TV.
•
Maybe batteries in remote are weak, dead, or installed incorrectly. Try replacing batteries.
•
Remove batteries and hold number 1 for at least 60 seconds to drain the microprocessor inside the remote.
Release number 1 and replace the batteries.
Turns off while playing
•
Off Time feature or Sleep Timer in the Time Menu may have been set.
•
If TV turns on with Wake-Up feature in Time menu, you must press a CHAN or VOL button within 15
minutes or the TV will automatically turn off.
•
Electronic protection circuit may have been activated because of a power surge. Wait 30 seconds and then
turn on again. If this happens frequently, the voltage in your house may be abnormally high or low.
•
Unplug. Wait two minutes. Plug in again.
Blank screen
•
Maybe the component connected to the input jacks is not turned on.
•
Try another channel.
Menus appear in other language
•
Different language may have been selected in Set-Up menu.
Wake-Up Time or Off Time do not operate
•
Make sure correct time is set in the Set Clock feature of the Time menu.
Some TV Channels, Movies, or Signal from External Source Cannot Be Seen
•
Parental control may be turned on for Some TV shows or Movies.
•
TV shows or Movies with No Rating may be blocked with No Rating feature in Parental Control menu.
•
External source may be blocked with Ext. Source feature in Parental Control menu.
Chapter 3
27
Reference
Can’t select certain channel
•
Channel may be blocked or not approved in the Parental Controls menu.
•
If using a VCR, check to make sure the TV/VCR button on the VCR is in the correct “mode.”
•
Maybe the Reception: Cable/Air setting is set to the wrong position. Check the Reception: Cable/Air setting
in the Set-Up menu.
No picture, no sound but TV is on
•
Maybe a vacant channel is tuned.
•
If watching VCR (connected only through antenna input), make sure TV is tuned to channel 3 or 4—the
same as CH3/4 switch on VCR. Also check to make sure the TV/VCR button on the VCR is in the correct
“mode.”
•
Maybe the Reception: Cable/Air setting is set to the wrong position. Check the Reception: Cable/Air setting
in the Set-Up menu.
Sound okay, picture poor
•
Check antenna connections.
•
Try adjusting sharpness function to improve weak signals.
Black box appears on the screen
•
Captioning may be turned on and set to a mode that is not available. Check the CC feature in the Special
menu.
Care and Cleaning
CAUTION: Turn OFF your TV before cleaning.
You can clean the TV as required, using a soft lint-free cloth. Be sure to occasionally dust the
ventilation slots in the cabinet to help assure adequate ventilation.
The TV’s screen may be cleaned with a soft, lint-free cloth as well. Take care not to scratch
or mar the screen. If necessary, you may use a cloth dampened with warm water.
Never use strong cleaning agents, such as ammonia-based cleaners, or abrasive powder.
These types of cleaners will damage the TV.
While cleaning do not spray liquid directly on the screen, or allow liquid to run down the screen and
inside the TV. Also, avoid placing drinks or vases with water on top of the TV. This could increase
the risk of fire or shock hazard or damage to the TV.
Caution: If fixed (non-moving) images are left on the screen for long periods, they may be
permanently imprinted on the picture tube. Such images include network logos, phone numbers,
and video games. This damage is not covered by your warranty. Extended viewing of channels
displaying these images should be avoided.
28
Chapter 3
Index
A
F
S
Advanced connections 8
Age-based ratings 23
Fixed images 28
Front panel
buttons 9
jacks 9
INPUT 13
Input sources 13
Satellite receiver, connecting 8
Set a wake-up time 18
Set an off time 19
Set the clock 18
Set the sleep timer 19
Setting TV guidelines 23
Sleep timer, set 19
Solving problems 27
Special menu 20
M
T
Main menu 13
MENU 13
MENU button 16
Menus
changing 16
exiting 16
Movie ratings 23
limits 25
MUTE 13
Mute, closed caption 21
Time menu 18
Time, set 18
Tint 16
Troubleshooting 27
TV, connecting 6
TV guidelines rating limits 24
B
Basic
connections 6, 7
Batteries for the remote 10, 13
C
CABLE/ANTENNA jack 6, 7
Cables
audio/video 5
coaxial 5
Care and cleaning 28
CC on mute 21
CHAN 13
Channel list 11, 13
Channel numbers 13
CLEAR 13
Closed captioning 20
Coaxial cable 5
Connections
multiple 8
TV + VCR 7
TV only 6
Content themes 23
Control panels 16
Current channel list 13
I
N
No rating feature 25
Number buttons 13
O
Off time, set 19
E
P
Entering channel numbers 13
External source signal, block 26
Parental control 22
Parental lock feature 22
Password 22
Password, change 22
PREV CH button 13
Previous channel 13
Problem solving 27
V
V-Chip 23
age-based ratings 23
content themes 23
VCR, connecting 7
VIDEO IN jack 7, 8
Video menu 16
Video setting, adjust 17
W
Wake-up time, set 18
R
Rating limits 22
Remote, batteries 10
Remote buttons 13
RESET 13
Chapter 3
29
Please do not send any products to the Indianapolis address listed in this manual or on the carton. This will only add delays in
service for your product.
Importer (for Mexico only):
Comercializadora Thomson de México, S.A. de C.V.
Sierra Candela No. 111, Piso 11
Col. Lomas de Chapultepec
Del. Miguel Hidalgo
México D.F. C.P. 11000
R.F.C. CTM-980723 KS5
Exporter:
Thomson multimedia Inc.
10330 North Meridian Street
Indianapolis, IN 46290
©2001 Thomson multimedia Inc.
Trademark(s)® Registered
Marca(s) Registrada(s)
Printed in Mexico
TOCOM 1577577A