1
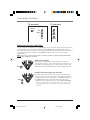
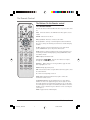
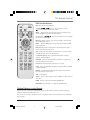
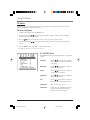
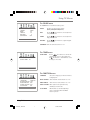
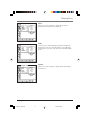
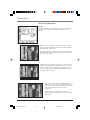
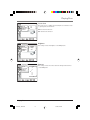
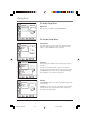
TV/DVD
User's Guide
Changing Entertainment. Again.
1627195C_cover
1
7/15/04, 4:38 PM
Important Information
CAUTION
This symbol indicates that this product incorporates double
insulation between hazardous mains voltage and user accessible
parts. When servicing use only identical replacement parts.
RISK OF ELECTRIC SHOCK DO
NOT OPEN
Caution: To reduce the risk of electric shock, do not remove cover (or back). No user serviceable parts inside.
Refer servicing to qualified service personnel.
This symbol indicates important
instructions accompanying the
product.
This symbol indicates "dangerous voltage" inside the
product that presents a risk of electric shock or personal
injury.
Notes:
This DVD player is designed and manufactured to respond to the Region Management Information. If the
Region number of a DVD disc does not correspond to the Region number of this DVD player, this DVD player
cannot play the disc. The Region number for this DVD player is Region No 1.
This device is protected by U.S. patent numbers 4,631,603 and 4,577,216 and 4,819,098 and other
intellectual property rights. The use of Macrovision’s copy protection technology in the device must be
authorized by Macrovision and is intended for home and other limited pay-per-view uses only, unless
otherwise authorized in writing by Macrovision. Reverse engineering or disassembly is prohibited.
Refer to the identification/rating label located on the back
panel of your product for its proper operating voltage.
WARNING
To reduce the risk of fire or electric shock, do not
expose this product to rain or moisture.
The apparatus shall not be exposed to dripping
or splashing and that no objects filled with
liquids, such as vases, shall be placed on the
apparatus.
CAUTION
THIS PRODUCT UTILIZES A LASER. USE OF
CONTROLS OR ADJUSTMENTS OR
PERFORMANCE OF PROCEDURES OTHER THAN
THOSE SPECIFIED HEREIN MAY RESULT IN
HAZARDOUS RADIATION EXPOSURE. DO NOT
OPEN COVERS AND DO NOT REPAIR YOURSELF.
REFER SERVICING TO QUALIFIED PERSONNEL.
FCC Regulations state that unauthorized changes or
modifications to this equipment may void the user’s
authority to operate it.
Caution: Using video games or any external accessory
with fixed images for extended periods of time can
cause them to be permanently imprinted on the picture
tube (or projection TV picture tubes). ALSO, some
network/program logos, phone numbers, etc. may cause
similar damage. This damage is not covered by your
warranty.
Cable TV Installer: This reminder is provided to call your
attention to Article 820-40 of the National Electrical Code
(Section 54 of the Canadian Electrical Code, Part 1) which
provides guidelines for proper grounding and, in particular,
specifies that the cable ground shall be connected to the
grounding system of the building as close to the point of
cable entry as practical.
Product Registration
Please fill out the product registration card (packed separately) and return it
immediately. For U.S. customers: Your RCA Consumer Electronics product
may also be registered at www.rca.com/productregistration. Registering this
product allows us to contact you if needed.
CLASS 1
LASER
PRODUCT
Product Information
Keep your sales receipt to obtain warranty parts and service and for proof of purchase. Attach it here and record
the serial and model numbers. These numbers are located on the product.
Model No. ____________________ Serial No. __________________Purchase Date: ____________________
Dealer/Address/Phone: ______________________________________________________________________
1627195C_cover
2
7/15/04, 4:38 PM
Table of Contents
Explanation of Jacks and Cables ........ 2
DVD Menu Navigation ....................... 16
Video Jacks and Cables ....................................... 2
Audio Jacks and Cables ....................................... 2
Setup Menus ....................................... 16
Top Panel Controls ............................... 3
The Buttons On the Remote control .. 4
TV Function Buttons ............................................ 4
DVD Function Buttons ......................................... 5
Putting Batteries in the Remote ......... 5
TV Menus .............................................. 6
TV Menu Navigation ............................................ 6
The PICTURE menu ............................................... 6
The SOUND menu ................................................. 7
The TIMER menu ................................................... 7
The FUNCTION menu ........................................... 7
The PARENTAL CONTROL menu
and V-CHIP ..................................... 8
Blocking TV Ratings .......................................... 10
Blocking Specific Content Themes ................ 11
V-Chip Movie Rating Limit ............................. 12
Parental Guide On (Activate V-Chip) ........... 13
Child Lock ............................................................ 13
Change Password ............................................... 13
DVD Basics ..........................................14
Regional Coding ................................................. 14
Using Different Menus ..................................... 14
Types of Discs Your DVD Will Play ................ 14
Search Options ................................... 15
Picture Scan ........................................................ 15
Skip ........................................................................ 15
Playback Options ................................ 15
Chapter Advance................................................ 15
Repeat ................................................................... 15
Zoom ..................................................................... 15
DVD Menu System ............................. 16
The Language Setup Menu ............................. 16
OSD ........................................................................ 16
Menu ..................................................................... 17
Audio ..................................................................... 17
Subtitle ................................................................. 17
The Screen Setup Menu .................... 18
TV Type .................................................................. 18
Screen Saver........................................................ 19
Brightness ............................................................ 19
Contrast ................................................................ 19
The Audio Setup Menu ...................... 20
(not available on model 13R400TD)
The Custom Setup Menu ................... 20
Parental Ctrl ........................................................ 20
Password .............................................................. 20
Defaults ................................................................ 20
Playing Audio CDs .............................. 21
Scan Disc .............................................................. 21
Track Advance or Reverse ................................ 21
Pause ..................................................................... 21
Playing mp3 Discs .............................. 21
Playing Picture CDs ............................ 22
Playing CD-ROM files (JPEG
or mp3) ......................................... 22
Troubleshooting .................................. 23
Recommendations and information
concerning discs ........................... 26
Additional Information ...................... 27
Maintenance of Cabinet .................................. 27
Formation of Condensation ............................ 27
Limited Warranty ............................... 28
Table of Contents
1627195C_13R400TD
1
1
7/15/04, 4:38 PM
Connections and Setup
TV (back panel)
TV (side panel)
ANTEN NA IN
VIDEO
VIDEO
L (MONO)
AU DIO
R
INPUT
HEADPHONE
Explanation of Jacks and Cables
You can connect other components to your TV/DVD player such as a VCD, video camera or audio receiver. There
are several ways to connect your other components to your TV/DVD player depending upon the cables you
have and the jacks that are on the back of the components. Different jacks and cables provide a different level
of performance. The jacks on the back of your TV/DVD Player and the cables used to connect them are
explained below.
Note: If you do not connect a cable, antenna, or another component to your TV, the TV will automatically
shut off after 15 minutes to save power.
VIDEO Jacks and Cables
The basic Video jack (usually color-coded yellow) is also referred to as
composite video. Composite video is better than the video quality you get
from an RF coaxial cable (the type used to plug the cable feed into a TV).
Usually the video cable is bundled with the audio cables (white and red).
VIDEO
AUDIO L (left) and R (right) Jacks and Cables
L (MONO)
These jacks send the audio from other components to the TV. The audio
jacks and cables are often color-coded (red for right audio, and white for
left audio). You must connect audio cables to the AUDIO L and R jacks on
the TV/DVD Player and the corresponding Audio Input Jacks on the
component no matter which Video jack you connect (VID1, DVD, FRONT).
R
Note: If your component has only one input for audio (mono), connect it to the
left (white L/Mono) audio jack on the TV and don’t connect the right audio part
of the cable.
2
1627195C_13R400TD
Connections and Setup
2
7/15/04, 4:38 PM
Connections and Setup
Top Panel Controls
If you cannot locate your remote, you can use the top panel buttons of your TV to operate many of the TV/
DVD’s features.
INPUT Toggles the Video Input Channels from TV, VID1, DVD, FRONT.
VOL- Decreases the volume. In the menu system, acts like the left arrow button on the remote control and
adjusts menu controls.
VOL+ Increases the volume. In the menu system, acts like the right arrow button on the remote control and
adjusts menu controls.
CH- Scans down through the current channel list. In the menu system, acts like the down arrow button on
the remote control and adjusts menu controls.
CH+ Scans up through the channel list. In the menu system, acts like the up arrow button on the remote
control and adjusts menu controls.
POWER Turns the TV/DVD on and off.
Play/Pause
Stop
Plays/pauses disc playback.
Stops disc playback.
Open/Close Opens and closes the disc tray.
Connections and Setup
1627195C_13R400TD
3
3
7/15/04, 4:38 PM
The Remote Control
The Buttons On the Remote control
ON OFF
DVD
TV Function Buttons
VCR
TV
TV Puts the remote in TV mode. When the TV is off, press to turn on the
TV.
Mute Lowers the volume to the minimum level. Press again to restore
volume.
CH
VOL
MUTE
GO BACK
ON•OFF Turns the TV on and off.
VOL (+/-) buttons Decreases or increases the volume.
CLEAR
MENU
CH (+/-) buttons Scans up or down through the current channel list.
Press once to change the channel; press and hold to continue changing
channels.
OK
SKIP
PRESETS
Go Back Returns to the previous channel. If you are in the menu
system, GO BACK takes you to the previous menu screen.
INFO
CC
GUIDE
1
2
3
4
5
6
7
8
INPUT
0
9
FORWARD
STOP
PAUSE
AGAIN
ZOOM
OPEN CLOSE
SPEED
SEARCH
RECORD
MENU Displays the Picture menu.
ANTENNA
PLAY
REVERSE
CLEAR Removes a menu or display from the screen and returns you to
TV viewing. For menus with digit inputs, pressing CLEAR will clear the
last number entered.
Arrow buttons ( / / / ) Press the arrow buttons to navigate
through the on-screen menu system.
OK button When a menu is on screen, press OK to toggle the item
that is highlighted on or off.
PRESETS Brings up picture presets.
SKIP Press the button twice to begin channel scan. Press again to select
the current channel.
CC Turns closed captioning on and off.
INFO Displays channel information. Press again to remove the
information from the screen.
0-9 (Number buttons) Use the number buttons to enter channel
numbers. To enter a two-digit channel, press the two digits. To enter a
three-digit channel, press and hold the first digit for two seconds until
two dashes appear to the right of the number, then add the second two.
Example: to tune a channel 123, press and hold 1 for two seconds, press
2, then press 3.
INPUT Toggles between available inputs.
4
1627195C_13R400TD
The Remote Control
4
7/15/04, 4:38 PM
The Remote Control
DVD Function Buttons
DVD Puts the remote in DVD mode.
ON OFF
DVD
VCR
CH+/CH- ( ,
)
advances to the next chapter or track.
reverses to the preceding chapter or track.
TV
MENU
Displays menus and other options that are available on the
current disc (if the disc contains this information).
CH
VOL
MUTE
GO BACK
Arrow buttons ( / / / ) Press the arrow buttons to move through
the on-screen menu system.
CLEAR
OK button When a menu is on the screen, press OK to select the item
that is highlighted on or off.
MENU
OK
GUIDE
When the DVD player is not playing a disc, displays the DVD
player setup menu.
SKIP
PRESETS
INFO Displays the title, chapter and time information. Press again to
remove information from the screen.
INFO
CC
GUIDE
1
2
3
4
5
6
7
8
9
INPUT
0
FORWARD
STOP
PAUSE
AGAIN
ZOOM
OPEN CLOSE
SPEED
SEARCH
RECORD
0-9 (Number buttons) Use to input information such as chapter
numbers, and track numbers.
ANTENNA
PLAY
REVERSE
SKIP Advances the title, chapter, or time counter to a specific location
on a DVD. See page 15 for more information.
FORWARD Searches forward through a disc while it is in play mode.
Press repeatedly to increase speed.
PLAY Begins disc play (and closes disc tray if it is open).
PAUSE Pauses disc play. When disc play is paused, press PLAY or PAUSE
to resume playback.
REVERSE Searches backward through a disc while it is in play mode.
Press repeatedly to increase speed.
STOP Stops disc play.
AGAIN
Press to repeat a chapter or title on DVDs, or a track or disc for
audio CDs.
ZOOM Zooms in on the picture when playing DVD discs.
OPEN/CLOSE Press this button to open/close the DVD drawer.
Putting Batteries in the Remote
Remove the cover of the battery compartment. Insert two AAA batteries, with the polarities as indicated,
inside the compartment. Replace the cover.
Note: If you are not going to use the remote for a long period of time, remove the batteries to avoid damage
due to leakage.
The Remote Control
1627195C_13R400TD
5
5
7/15/04, 4:38 PM
Using TV Menus
TV Menus
TV Menus let you control picture quality and features available for TV viewing. There is a different menu
system for DVD features, described on page 16.
TV Menu Navigation
1. To bring up the TV menu, press the MENU button.
2. Use the arrow buttons ( / ) on the remote (or the VOL +/- buttons on the top of TV) to highlight a
submenu icon at the top of the menu.
3. Press the
/
buttons on the remote (or CH +/- on the top of TV) to select the option.
4. Use the arrow buttons (
setting.
/
) on the remote (or the VOL +/- buttons on the top of TV) to change the
5. Press the MENU button on the remote to exit the menu system.
Note: Make sure that the remote control is in the TV mode.
The PICTURE Menu
The PICTURE menu allows you make adjustments to your picture
settings.
PICTURE
CONTRAST
BRIGHTNESS
COLOR
SHARPNESS
TINT
COMBFILTER
COLOR TEMP
1
18
50
50
0
ON
NORMAL
CONTRAST
Use the / arrow buttons to adjust the
contrast between the light and dark areas
of the picture.
BRIGHTNESS
Use the / arrow buttons to adjust the
brightness of the picture.
COLOR
Use the / arrow buttons to adjust the
color intensity or saturation.
SHARPNESS
Use the / arrow buttons to adjust the
sharpness of the picture.
TINT
Use the / arrow buttons to adjust the
balance between the red and green levels.
COMBFILTER
Turns the comb filter on or off.
COLOR TEMP
Provides three color adjustments: Cold for
more blue in the picture, Normal, and
Warm for more red in the picture.
6
1627195C_13R400TD
Using TV Menus
6
7/15/04, 4:38 PM
Using TV Menus
The SOUND menu
The SOUND menu offers different audio options.
SOUND
PRESET
BASS
TREBLE
BALANCE
SURROUND
USER
50
50
0
OFF
PRESET
Provides four preset audio settings
(USER /SPEECH/THEATER/MUSIC).
BASS
Use the / arrow buttons to decease/increase
low-pitched sound.
TREBLE
Use the / arrow buttons to decease/increase
high-pitched sound.
BALANCE
Use the / arrow buttons to adjust left/right
speaker balance.
SURROUND Turns the surround sound on or off.
The TIMER menu
SLEEP TIMER
TIMER
SLEEP TIMER
20
Use the / arrow buttons to turn the TV
automatically off after a given time. Press
the arrow button to add 10 minutes to the
clock (up to two hours).
The FUNCTION menu
LANGUAGE
FUNCTION
LANGUAGE
BLACK STRETCH
NOISE REDUCE
CLOSE CAPTION
CC ON MUTE
ENGLISH
OFF
OFF
CC1
ON
Selects the language you want the menus to
be displayed in.
BLACK STRETCH Turns the black stretch function on or off.
NOISE REDUCE
Turns the noise reduce function on or off .
CLOSE CAPTION Offers eight closed captioned modes,
including four text modes.
CC ON MUTE
When turned on, automatically brings
up close captioning when the MUTE
button is pressed.
Using TV Menus
1627195C_13R400TD
7
7
7/15/04, 4:38 PM
Using TV Menus
The TUNING menu
TUNING
SOURCE
CHANNEL
DELETE CH
FINE TUNE
AUTO SEARCH
AIR
18
NO
SOURCE
Selects AIR or CABLE. Select AIR to receive
a broadcast signal. Select CABLE to receive
a CATV signal.
CHANNEL
buttons on the remote ( or
Use the /
the VOL +/- button on the top of the TV)
to scroll through the channels available via
your antenna. You can enter the channel
number directly using the number buttons.
DELETE CH
Select YES to skip the channel above.
Select NO to go to the channel above.
FINE TUNE
Fine tunes a channel for best reception.
AUTO SEARCH
Starts channel search and stores the
channels automatically.
`
The PARENTAL CONTROL menu and V-CHIP
The Parental Controls menu allows you to program your TV/DVD so that children cannot see certain programs
and channels.
The Parental Controls menu involve software inside your TV/DVD (V-Chip) which allows you to “block” TV
programs and movies based on violence, sex, or other content you think children should not view. It lets you
program your TV so it will not display certain programs. You can “unblock” programs by entering a password.
When Parental Controls is turned ON the software reads a code that most broadcasters send with programs.
That code tells the software the program’s age-based rating (TV-MA, TV-14, etc.) and content themes (Violence
(V), Adult Language (L), etc.).
Broadcasters are not required to provide content themes, so programs received with no content themes will
only be blocked if you block their age-based rating. You can also block out programs that have been given a
rating of “Not Rated,” and programs that are considered “unrated” because no code has been sent by the
broadcaster.
The TV age-based ratings are listed in the table on the following page.
PASSWORD
You need a password to enter the PARENTAL CONTROL menu. The initial password is 5898.
The first time you use this menu you should change the password.
When you enter the correct password, the PARENTAL GUIDE menu is displayed.
PARENTAL GUIDE Select “OFF” to turn V-CHIP off. Select “ON” to activate V-CHIP.
TV RATING
Select to display the TV Rating submenu.
The TV ratings and content themes you can block are listed on pages 10 and 11.
8
1627195C_13R400TD
Using TV Menus
8
7/15/04, 4:38 PM
Using TV Menus
Rating
Description and Content Themes for Age-Based Ratings
TV-MA
Mature Audience Only. Specifically designed to be viewed by adults; may be unsuitable for
children under 17. Contains one or more of the following content themes: crude indecent
language (L), explicit sexual activity (S), or graphic violence (V).
TV-14
Parents Strongly Cautioned. Contains some material that parents would find unsuitable for
children under 14. Parents are strongly urged to exercise greater care in monitoring this
program and are cautioned against letting children under the age of 14 watch unattended.
This program contains one or more of the following content themes: intensely suggestive
dialogue (D), strong coarse language (L), intense sexual situations (S), or intense violence
(V).
TV-PG
Parental Guidance Suggested. Contains material that parents may find unsuitable for younger
children. Parents may want to watch it with their younger children. The program contains one
or more of the following content themes: some suggestive dialogue (D), infrequent coarse
language (L), some sexual situations (S), or moderate violence (V) .
TV-G
General Audience. Most parents would find this program suitable for all ages. Contains little
or no sexual dialogue (D), no strong language (L) little or no sexual situations (S), or
violence (V).
TV-Y7
Designed for children ages 7 and above. May be more appropriate for children who have
acquired the developmental skills needed to distinguish between make-believe and reality.
Themes and elements in this program may include mild fantasy violence (FV) or comedic
violence, or may frighten children under the age of 7.
TV-Y
All Children. Themes and elements in this program are designed for a young audience,
including children from ages 2-6. It is not expected to frighten younger children.
Using TV Menus
1627195C_13R400TD
9
9
7/15/04, 4:38 PM
Using TV Menus
The TV Rating Limit Screen Rating Screen
Rating Status Field
Lets you select whether the status of the age-based rating limit to the
left is Unblock or Block.
Content Themes
Lists the content
themes you can block
or unblock.
Rating Field
Lets you select from a
list of age-based
ratings you can block
or unblock.
TV RATING
RATING
FV D L S
TV-Y
>U
TV-Y7
U U
TV-G
U
TV-PG
U
U U U
U
U U U
TV-14
TV-MA
U
U U
V
U
U
U
Content Status Fields
Lets you select which
content themes to view for
the selected rating, and
whether the status of the
content theme is currently
Unblock (U) or Block (B).
Rating Settings Area
Lets you see the current block/view state of age-based ratings and associated
content.
Blocking TV Ratings
You can automatically block all program ratings above a specified TV rating level. To block channels with
higher ratings:
1. Press MENU on the remote control (the Main menu appears).
2. Press the
button until the Parental Control icon is highlighted.
3. Press the button on the remote (or CH- button on the top of TV) until the bottom PASSWORD is
highlighted, then press the button to access the password entry.
10
1627195C_13R400TD
Using TV Menus
10
7/15/04, 4:38 PM
Using TV Menus
4. Enter your password using the numbers buttons on the
remote (the PARENTAL GUIDE menu appears).
5. Press the
press the
PASSWORD
PASSWORD
button until TV RATING is highlighted, then
button (the TV RATING screen appears).
6. Use the button to select the rating, then press
the button to change the status of a TV program rating
or content theme from U (Unblock) to B (Block).
7. Press the OK button to return the PARENTAL CONTROLS
menu.
8. Make sure PARENTAL GUIDE is on. Press the button to
highlight PARENTAL GUIDE OFF, then press the button to
turn it on. It must be on for rating limits to take effect.
The following sections give you more details about how to
change the status of TV program limits.
Note: If you forget your password, you can reset it. Enter 5898 as the
password and then change it to a new one.
Blocking Specific Content Themes
Content Themes
D
Sexually Explicit Dialogue
L
Adult Language
S
Sexual Situations
V
Violence
FV
Fantasy Violence
You can block programs based on their content. (Content is
represented by the FV, D, L, S, and V on your screen.) When you
block a content theme for a particular rating, you automatically
block that content theme for higher rated programs as well.
To block program content:
1. Determine the content themes you want to block.
2. Press and hold the button until the content theme you
want to change is highlighted.
3. Press the button to change its status to B (Block).
4. Press OK to return to the previous menu.
Notes: Broadcasters are not required to provide content themes or
age-based ratings.
You must remember to activate Parental Controls for rating limits to
take effect.
Using TV Menus
1627195C_13R400TD
11
11
7/15/04, 4:38 PM
Using TV Menus
V-Chip Movie Rating Limit
Set movie rating limits by blocking movies rated above a
specified level.
MPAA RATING
G
PG
PG-13
R
NC-17
X
To access the MPAA RATING (Movie Rating Limit) menu:
B
B
B
B
B
B
1. Press MENU on the remote control (the Main menu appears).
2. Press the button until the Parental Control icon is
highlighted.
3. Press the button until the bottom PASSWORD is
highlighted, then press the button to access the
password entry.
4. Enter your password using the numbers buttons on the
remote (the PARENTAL GUIDE menu appears).
5. Press the
press the
button until MPAA RATING is highlighted, then
button (the MPAA RATING screen appears).
6. Use the button to select the rating, then press the
button to change the status of a TV program rating or
content theme from U (Unblock) to B (Block).
7. Make sure PARENTAL GUIDE is on. Press the GO BACK button
to return the PARENTAL CONTROLS menu.
8. Press the button to highlight PARENTAL GUIDE OFF, then
press the button to turn it on. It must be on for rating
limits to take effect.
Note: If you forget your password, you can reset it. Enter 5898 as the
password and then change it to a new one.
You must remember to activate Parental Controls for rating limits to
take effect.
12
1627195C_13R400TD
Using TV Menus
12
7/15/04, 4:38 PM
Using TV Menus
Parental Guide On (Activate V-Chip)
Selecting this option lets you activate and deactivate parental control settings.
1. Press MENU on the remote control (the Main menu appears).
2. Press the
button until the Parental Control icon is highlighted.
3. Press the
button until the bottom PASSWORD is highlighted.
4. Enter your password using the numbers buttons on the remote (the PARENTAL GUIDE menu appears).
5. Press the button to highlight PARENTAL GUIDE OFF, then press the
for rating limits to take effect.
button to turn it on. It must be on
If you do not activate V-Chip, none of the settings for V-Chip will take effect.
If you forget your password, you can reset it. Enter 5898 as the password and then change it to a new one.
Child Lock
Selecting this option lets you lock (disable) or unlock (enable) the TV’s front panel. The remote still tunes to
any channel. When using this as a Parental Control method, remove access to any remote that is capable of
operating the television.
1. Press MENU on the remote control (the Main menu appears).
2. Press the
button until the Parental Control icon is highlighted.
3. Press the
button until the bottom PASSWORD is highlighted.
4. Enter your password using the numbers buttons on the remote (the PARENTAL GUIDE menu appears).
5. Press the
button to highlight CHILD LOCK, then press the
button to turn it on.
Change Password
Selecting this option lets you simply create a new password at any time. Once you enter a new password from
CHANGE PASSWORD in the PARENTAL CONTROL menu, it is the password you use until you change it again.
1. Press MENU on the remote control (the Main menu appears).
2. Press the
button until the Parental Control icon is highlighted.
3. Press the
button until the bottom PASSWORD is highlighted.
4. Enter your password using the numbers buttons on the remote (the PARENTAL GUIDE menu appears).
5. Press the
button to highlight CHANGE PASSWORD, then press the
button to select it.
6. Press the button to highlight NEW PASSWORD, and use the number buttons on the remote to enter the
new password. Enter it again in the confirm field to confirm the new password.
Using TV Menus
1627195C_13R400TD
13
13
7/15/04, 4:38 PM
Playing Discs
DVD Basics
Regional Coding
The DVD player and the discs are coded by region. These regional codes must match in order for the disc to
play. This unit’s code is region 1. Discs with other regional codes can’t be played in this unit.
Using Different Menus
Each disc is programmed with different features. There are two separate menu systems that you can use to access
DVD features: the disc’s menu and the TV/DVD’s DVD menu (separate from the TV’s menu system). Remember that
a feature only works if the disc was programmed with that feature. For example, if you choose subtitles, the
subtitles only appear if the disc was created with subtitles. The DVD menu system is explained on page 16.
•
The Disc menu – The disc menu is part of each disc and is separate from the DVD’s menu system. The
contents of each disc’s menu vary according to how the disc was created and what features are included.
Sometimes a disc’s menu appears automatically when you insert the disc, or you can access it by pressing
the MENU button.
Types of Discs Your DVD Will Play
•
DVD discs – Contain video.
•
Audio discs – Contain musical or sound content only (such as CD, CD-R, CD-RW).
•
mp3 discs – Contain audio files (for example, a CD-R with downloaded mp3 files).
•
Picture CDs, JPEG files.
Before you load a disc, make sure that it is compatible with the player. Note that the following discs CANNOT
be used with this player:
• Laserdisc
•
CD-I, CD-ROM, DVD-ROM
•
MiniDisc
•
CD-G discs play audio only, not graphics
To Load and Play a Disc
1. Press the DVD button on the remote to make sure the unit is in the DVD mode.
2. Press the open/close button on the remote to open the disc tray. Place a disc gently into the tray with the
disc’s label facing up (double-sided discs have content on both sides, so you can place either side up).
3. Press the OPEN/CLOSE button again to close the disc tray.
The player reads the disc’s table of contents, and then one of following happens depending on how the disc
was programmed:
•
No disc menu appears, a screen saver is displayed.
•
The disc menu appears.
•
The disc menu appears on the screen when you press PLAY/PAUSE.
•
The disc starts playing automatically.
If no picture or screen saver is displayed, press the DVD button to put the player in DVD mode.
14
1627195C_13R400TD
Playing Discs
14
7/15/04, 4:38 PM
Playing Discs
Search Options
To search a disc, you can use the FORWARD button or the REVERSE button.
You can also use the following search features with some discs:
Picture Scan
When you’re playing a disc, each time you press FORWARD or REVERSE, your DVD Player scans the disc faster
until you reach the fastest scan speed. To resume normal playback, press PLAY.
Skip
While a DVD is playing, press SKIP to advance to a title or chapter. Use the left or right arrow button to select
the title or chapter. Use the up or down arrow button to advance to the next title or chapter. Press OK once
you have selected the title or chapter.
Pressing SKIP again brings up the time counter field to allow you to go to a specific location on the DVD. Use
the number buttons to enter the time and press OK.
Note: This feature may not be available on all discs.
Playback options
With some discs you can access playback features directly from the remote control.
Chapter Advance
While a disc is playing, you can skip forward or backward a chapter or track at a time by pressing the CH+ and/
or CH- buttons.
Repeat
For DVD discs, press the AGAIN button on the remote to repeat a chapter. Press once more to repeat a title.
Press three times to cancel repeat.
For audio CDs, press the AGAIN button on the remote to repeat a track. Press AGAIN twice to repeat the entire
disc and three times to cancel repeat.
Zoom
1. While you’re playing a disc, press ZOOM (the player zooms in on the image). Each time you press ZOOM,
the picture is magnified even more (until you get to the maximum zoom level).
2. To see other parts of the picture when you’ve zoomed in on the image, try pressing the
buttons to go in corresponding directions.
Playing Discs
1627195C_13R400TD
/ / /
15
15
7/15/04, 4:38 PM
Playing Discs
DVD Menu System
The DVD player menu system lets you set up features for your DVD player. There is a different menu system
that controls TV features (see page 6). The DVD setup menu is accessed when the DVD player is stopped.
DVD Menu Navigation
1. Press STOP twice to stop playback. Make sure that the remote is in the DVD mode.
2. Press the GUIDE button on the remote. The SETUP MENU is displayed.
3. Press the /
submenu.
button to highlight an item, then press the OK button to select it and move to the
4. Use the /
OK button.
button to highlight an option and press the
/
button to select the option and press the
5. To exit the menu, press the GUIDE button again.
Setup Menus
Menus are used to setup TV screen format for DVD viewing and DVD other functions.
The Language Setup Menu
OSD (on-screen display)
Language Setup
OSD
Menu
Audio
Subtitle
This setting controls the language used to display text in TV and
DVD system menus.
English
French
German
Italian
Spanish
16
1627195C_13R400TD
Playing Discs
16
7/15/04, 4:38 PM
Playing Discs
Menu
Language Setup
OSD
Menu
Audio
Subtitle
Allows you to select a language to display the disc menu in
(provided the disc menu has those languages).
English
Chinese
Japanese
French
German
Audio
Language Setup
OSD
Menu
Audio
Subtitle
Some discs are recorded with multiple language tracks (different
languages). You can select a default language so discs will play in
the language of your choice, if the disc was recorded with multiple
tracks.
English
Chinese
Japanese
French
German
Subtitle
Language Setup
OSD
Menu
Audio
Subtitle
Allows you to select a language to display subtitles in (if subtitles
are turned on).
English
Chinese
Japanese
French
German
Playing Discs
1627195C_13R400TD
17
17
7/15/04, 4:39 PM
Playing Discs
The Screen Setup menu
TV Type
TV TYPE controls the aspect ratio (height to width) of the picture on
the screen. See the below for a description of different screen
formats.
4:3 PS – Choose this setting if you want the movie to fill the
entire screen. This might mean that parts of the picture (the left
and right edges) won’t be seen.
Most discs produced in a widescreen format can’t be cropped in
this fashion. This means the black bars will appear at the top and
the bottom of the screen.
4:3 PS
4:3 LB – Choose this setting if you want to see movies in their
original aspect ratio (height-to-width ratio). You’ll see the entire
frame of the movie, but it will take up a smaller portion of the
screen vertically. The movie might appear with black bars at the
top and bottom of the screen.
4:3 LB
16:9 – Choose this setting if your TV/DVD player is
connected to a widescreen TV. If you choose this setting
and you don’t have a widescreen TV, the images on the
screen may appear distorted due to vertical
compression.
If you play a disc recorded in 4 x 3 format on a
widescreen TV, the left and right side of the screen will
appear black.
16:9
18
1627195C_13R400TD
Playing Discs
18
7/15/04, 4:39 PM
Playing Discs
Screen Saver
Screen Setup
Type TV
Screen Saver
Brightness
Contrast
The screen saver is a graphic that randomly moves around the screen
to guard against screen burn-in.
On
Off
ON: Screen Saver turned on.
OFF: Screen Saver turned off.
Brightness
Screen Setup
Type TV
Screen Saver
Brightness
Contrast
This setting controls the brightness of the DVD picture.
Normal
Bright
Soft
Contrast
Screen Setup
Type TV
Screen Saver
Brightness
Contrast
This setting controls the contrast between the light and dark areas
of the DVD picture.
-3
-2
-1
0
+1
+2
+3
Playing Discs
1627195C_13R400TD
19
19
7/15/04, 4:39 PM
Playing Discs
The Audio Setup Menu
Audio Setup
Digital Out
SPDIF /PCM
SPDIF /RAW
Off
Digital Out
This feature is not available on the 13R400TD model.
The Custom Setup Menu
Parental Ctrl
Custom Setup
Parental Ctrl
Password
Default
In the United States, categories range from 1G (very restrictive
content) to adult categories. If the level set here is below the
rating of a disc the DVD will request a password.
4 : PG13
5
6: R
7 : NC17
8
Password
Custom Setup
The default password is 8888. You may change the password at
any time.
Parental Ctrl
Password
Default
You must enter a valid password to gain access to Parental
controls. If you forget your password you can reset it by setting
the TV/DVD player back to the factory settings (default menu),
but you will have to reset all your setup options.
Old:
X _ _ _
New: _ _ _ _
Verify: _ _ _ _
Defaults
Custom Setup
Parental Ctrl
Password
Default
Select DEFAULTS option if you want to return ALL settings to the
factory defaults.
Lecture
CAUTION: If you choose to reset to the default settings, Parental
controls must be reset along with all the other selections you
have made in the Setup menus.
20
1627195C_13R400TD
Playing Discs
20
7/15/04, 4:39 PM
Playing Discs
Playing Audio CDs
Your DVD player has many of the same features as an audio CD player. This section explains how to play audio
CDs in your TV/DVD player.
Scan Disc
You can scan through the disc when you’re playing it by doing the following:
1. Press the REVERSE or FORWARD button on the remote.
2. Press the button again to scan at a faster speed.
3. Press the PLAY button at any time to resume normal playback.
Track Advance or Reverse
1. Press the
or
button (CH+/CH-) on the remote when you’re playing a disc.
2. Each time you press the button, the CD advances (or reverses) one track.
Pause
1. Press the PAUSE button when a disc is playing to pause the disc.
2. Press the PLAY button to resume normal playback.
Playing mp3 Discs
When an mp3 disc is inserted in the player, the Disc Nav screen appears automatically. You can change folders
and songs through Disc Nav. The player plays the songs in the order they were burned onto the disc.
1. Insert the mp3 disc. The folder selection screen appears.
2. Use the arrow buttons to select the folder you want to play and press the OK button.
3. Use the arrow buttons to select the files (or tracks) you want to play and press the OK button. Then
selected files (or tracks) play.
4. Press the STOP button to stop playback.
Tip: When you play an audio CD or mp3 disc, you can also use number buttons to select tracks, files, and folders.
Playing Discs
1627195C_13R400TD
21
21
7/15/04, 4:39 PM
Playing Discs
Playing Picture CDs
Insert a picture CD into the disc tray. The pictures on the CD are played in a slide show.
1. To stop on a certain picture, press PAUSE.
2. Press the arrow keys to rotate the picture.
Playing CD-ROM files (JPEG or mp3)
When a CD-ROM with JPEG or mp3 files is inserted, a File Manager window is displayed. The DVD player
automatically begins playback of the files on the disc. Use the arrow buttons to navigate through the folders
and select files for playback.
•
When displaying JPEG files, press fast forward repeatedly to change the speed of the slide show.
•
When a JPEG is displayed, use the arrow keys to rotate the picture.
Note: This feature may not be available on all discs.
22
1627195C_13R400TD
Playing Discs
22
7/15/04, 4:39 PM
Playing Discs
Troubleshooting
Most problems you encounter with your TV/DVD can be corrected by consulting the following
troubleshooting list.
TV Problems
TV won’t turn on
•
Press the TV button.
•
Make sure the TV is plugged in.
•
Check the wall receptacle (or extension cord) to make sure it is “live” by plugging in something else.
•
Something might be wrong with your remote control. Press the POWER button on the top of the TV. If the
TV turns on, check the remote control solutions on page 24.
Buttons don’t work
•
If you’re using the remote control, press the TV button first to make sure the remote is in TV mode.
•
Unplug the TV for two minutes and then plug it back in. Turn the TV on and try again.
TV turns off unexpectedly
•
Sleep timer might have been activated.
•
Electronic protection circuit may have been activated because of a power surge. Wait 30 seconds and then
turn on again. If this happens frequently, the voltage in your house may be abnormally high or low.
•
Unplug TV. Wait five minutes. Plug it in again.
Blank screen
•
Try another channel.
No sound, picture okay
•
Maybe the sound is muted. Try pressing the volume up button to restore sound.
Can’t select certain channel
•
Channel may be blocked or not approved through the V-Chip.
No picture, no sound but TV is on
•
Maybe the signal type is set wrong. Go to page 8 for detailed instructions.
•
The channel might be blank — change channels.
Sound okay, picture poor
•
Check antenna connections. Make sure all of the cables are firmly connected to the jacks.
•
Try adjusting sharpness function to improve weak signals.
Black box appears on the screen
•
Closed caption might be on.
Playing Discs
1627195C_13R400TD
23
23
7/15/04, 4:39 PM
Other Information
The Remote Control Doesn’t Work
•
Something might be between the remote and the remote sensor on the component. Make sure there is a
clear path.
•
Maybe the remote isn’t aimed directly at the component (DVD, TV, VCR) that you’re trying to operate.
•
Maybe batteries in remote are weak, dead, or installed incorrectly. Put new batteries in the remote. (Note,
if you remove the batteries, you may have to reprogram the remote to operate other components.)
•
You might need to reset the remote: remove batteries and press the number 1 button for at least 60
seconds. Release the 1 button, replace the batteries, and (if necessary) program the remote again.
Problems with V-Chip/Parental Controls
The rating limits don’t work
•
You must activate the settings.
I don’t remember my password and I want to unlock the TV
•
If you forget your password you can reset it. Enter 5898 as the password and then change it to a new one.
DVD Problems
Can’t advance through a movie
•
You can’t advance through the opening credits and warning information that appear at the beginning of
movies because the disc is programmed to prohibit that action.
The invalid icon appears on screen
•
The feature or action cannot be completed at this time for one of the following reasons:
•
The disc’s software restricts it.
•
The disc’s software doesn’t support that feature (e.g., angles).
•
The feature is not available at the moment.
•
You’ve requested a title or chapter number that is out of range.
The picture is distorted
•
The disc might be damaged. Try another disc.
•
If you’re using FORWARD or REVERSE buttons, it is normal for some distortion to appear while scanning.
24
1627195C_13R400TD
Other Information
24
7/15/04, 4:39 PM
Other Information
A screen saver appears on the TV
•
Your player is equipped with a screen saver that appears on the TV after your player has been idle for
several minutes. To make it disappear, press STOP or CLEAR on the remote.
Subtitle and/or audio language is not the one selected from the initial setting
•
If the subtitle and/or audio language does not exist on the disc, the initial settings will not be seen/heard.
The disc’s priority language is selected instead. Set the subtitle and/or audio language manually through
the player menu.
The menu is displayed in a foreign language
•
The OSD option is set to that language. Go to the LANGUAGE SETUP Menu and select the OSD option.
Select the language you prefer.
Play doesn’t begin
•
The rating of the title on the disc exceeds the rating limit set in the PARENTAL CTRL menu. Unlock the
player and/or change the rating limit in those menus.
No forward or reverse scan
•
Some discs have sections that prohibit rapid scanning, or title and chapter skip.
•
If you’re trying to skip through the warning information and credits at the beginning of a movie, you
won’t be able to. This part of the movie is often programmed to prohibit skipping through it.
Picture is too tall and thin
•
Change the TV TYPE (aspect ratio). Go to page18 for more information.
Picture is too short and wide
•
Change the aspect ratio with the TV TYPE option. Go to page 18 for more information.
Disc won’t eject
•
When you put a disc into the player, the player might take up to 15 seconds to read the disc. You won’t be
able to eject the disc during this time. Wait 15 seconds and try again.
Other Information
1627195C_13R400TD
25
25
7/15/04, 4:39 PM
Other Information
Recommendations and information concerning discs
CD-R and CD-RW discs
This player can play most CD-R and CD-RW discs. However, depending on the recorder of the discs of your
personal computer, the type of disc and recording method used, some discs might not play, or the performance
might not meet the expected standard of quality. When playing a CD-R disc, it is completely normal for the
unit to take up to 20 seconds to recognize the disc before it plays. If the disc is not recognized after a period
of 20 seconds, remove the disc, and then insert it again. If after several trials, the disc cannot be recognized,
make sure you have followed the recommendations below or try another type of disc.
•
Whatever the actual recording capacity of a disc, do not fill it to maximum capacity.
•
Use CD-R discs rather than CD-RW (re-recordable CDs), as replay of CD-RWs may sometimes not work
properly.
•
Use a reliable and good quality recording software.
•
Before recording on a disc, close all applications on you personal computer in order to optimize the quality
and reliability of recordings on the disc.
CD-R and CD-RW discs with mp3 format “Sound” files
In the case of discs that include mp3 files, follow not only the general recommendations for CD-R and CD-RW
discs, but also the following specific recommendations:
•
The format of your mp3 files should be ISO 9660 or JOLIET. These files are compatible with DOS and
Windows applications as well as with Mac OS.
•
Your mp3 files must have a name no longer than 12 characters as well as the suffix “.mp3”. They must be
recorded in the form: title.mp3. Ensure that you do not leave spaces or use special characters such as ( . , / ,
\ , = ,+) in the name.
•
Do not attempt to record protected mp3 files. Such files are coded and protected.
•
Use a decompression transfer rate of at least 128 kb/sec (kilobytes/second) when recording mp3 files.
Sound quality with mp3 files basically depends on the rate of compression/ decompression you choose.
Getting audio CD quality sound requires an analog/digital sampling rate, that is conversion to mp3 format,
of at least 128 kb/sec and up to 160 kb/sec.
However, choosing higher rates, like 192 kb/sec or more, only rarely give even better sound quality.
Conversely, files with sampling rates below 128 kb/sec will not be played properly.
Important: The above recommendations cannot be taken as a guarantee that the DVD player will play mp3
recordings, or as an assurance of sound quality. You should note that certain technologies and methods for
mp3 file recording on CD-Rs prevent optimal playback of these files on your DVD player (that is degraded
sound quality and even, in some cases, inability of the player to read the file or files).
Information updated in December 2002
26
1627195C_13R400TD
Other Information
26
7/15/04, 4:39 PM
Other Information
Additional Information
Maintenance of Cabinet
For safety reasons, when cleaning the cabinet be sure to disconnect the AC power cord from the AC outlet.
• Do not use benzene, thinner, or other solvents for cleaning.
• Wipe the cabinet with a soft cloth.
Formation of Condensation
•
Due to sharp changes in temperature and humidity, condensation may form if warm air comes in contact
with any cold parts inside the player.
•
When condensation forms inside the player, the player may not operate correctly. If this occurs, leave the
player at room temperature until the inside of the player becomes dry and operational.
•
If condensation forms on a disc, wipe the disc with a soft, dry cloth by moving the cloth from the center
hole toward the outer edge.
Handling Discs
•
•
•
Don’t touch the disc’s data surfaces. Hold by the edges or by one edge and the hole in the center.
Don’t affix labels or adhesive tape to label surfaces. Don’t scratch or damage the label.
Do not use damaged (cracked or warped) discs.
Cleaning Discs
•
Dirty discs can cause reduced video and audio performance. Always keep discs clean by wiping them gently
with a soft cloth from the inner edge toward the outer perimeter.
•
If a disc becomes dirty, wet a soft cloth in water, wring it out well. Wipe the dirt away gently, and remove
any water drops with a dry cloth.
•
Do not use record-cleaning sprays or anti-static agents on discs. Also, never clean the discs with benzene,
thinner, or other volatile solvents which may cause damage to the disc surface.
Handling Cautions
•
Before connecting other components to this player, be sure to turn all components off.
•
Don’t move the player while a disc is being played. The disc may get scratched or broken, and the player’s
internal parts may be damaged.
•
Don’t put any container filled with liquid or any small metal objects on the player.
•
Be careful not to put your hand into the disc tray.
•
Don’t place anything other than a disc in the disc tray.
•
Exterior influences such as lightning and static electricity can affect normal operation of this player. If this
occurs, turn the player off and on again with the ON•OFF button, or disconnect and then reconnect the
AC power cord to the AC power outlet. The player will operate normally.
•
Be sure to remove the disc and turn off the player after use.
Other Information
1627195C_13R400TD
27
27
7/15/04, 4:39 PM
Other Information
RCA TV/DVD Combination Limited Warranty
What your warranty covers:
• Defects in material or workmanship.
For how long after your purchase:
• 90 days from date of purchase for labor charges.
•
One year from date of purchase for parts.
•
Two years from date of purchase for picture tube.
The warranty period for rental units begins with the first rental or 45 days from date of shipment to the rental
firm whichever comes first.
What we will do:
• Pay an Authorized RCA Television Service Center the labor charges to repair your unit.
•
Pay an Authorized RCA Television Service Center for the new or, at our option, rebuilt replacement parts
and picture tube required to repair your unit.
How you get service:
• For screen sizes of 26” and smaller: Take your RCA unit to any Authorized RCA Television Service Center
and pickup when repairs are complete.
•
For screen sizes larger than 26”: Request home or pick up, repair and return service from any Authorized
RCA Television Service Center, provided that your unit is located within the geographic territory covered by
an Authorized RCA Television Service Center. If not, you must take your TV/DVD to the Service Center
location at your own expense, or pay for the cost the Service Center may charge to transport your unit to
and from your home.
•
To identify your nearest Authorized RCA Service Center, ask your dealer, look in the Yellow Pages, visit
www.rca.com, or call 1-800-336-1900.
•
Proof of purchase in the form of a bill of sale or receipted invoice which is evidence that the product is
within the warranty period must be presented to obtain warranty service. For rental firms, proof of first
rental is also required.
What your warranty does not cover:
• Customer instruction. (Your Owner’s Manual describes how to install, adjust, and operate your product.
Any additional information should be obtained from your dealer.)
•
Installation and related adjustments.
•
Signal reception problems not caused by your TV/DVD.
•
Damage from misuse or neglect.
•
Batteries.
•
Images burnt onto the screen.
•
A TV/DVD that has been modified or incorporated into other products or is used for institutional or other
commercial purposes.
•
A unit purchased or serviced outside the U.S.A.
•
Acts of nature, such as but not limited to lightning damage.
28
1627195C_13R400TD
Other Information
28
7/15/04, 4:39 PM
Other Information
Product Registration:
• Please complete the online Product Registration on www.rca.com or complete and mail the
Product Registration Card packed with your unit. It will make it easier to contact you should it
ever be necessary. The return of the card is not required for warranty coverage.Limitation of
Warranty:
•
•
THE WARRANTY STATED ABOVE IS THE ONLY WARRANTY APPLICABLE
TO THIS PRODUCT. ALL OTHER WARRANTIES, EXPRESS OR IMPLIED
(INCLUDING ALL IMPLIED WARRANTIES OF MERCHANTABILITY OR
FITNESS FOR A PARTICULAR PURPOSE) ARE HEREBY DISCLAIMED. NO
VERBAL OR WRITTEN INFORMATION GIVEN BY TTE TECHNOLOGY, INC.,
ITS AGENTS OR EMPLOYEES SHALL CREATE A GUARANTY OR IN ANY
WAY INCREASE THE SCOPE OF THIS WARRANTY.
REPAIR OR REPLACEMENT AS PROVIDED UNDER THIS WARRANTY IS
THE EXCLUSIVE REMEDY OF THE CONSUMER. TTE TECHNOLOGY, INC.
SHALL NOT BE LIABLE FOR INCIDENTAL OR CONSEQUENTIAL DAMAGES
RESULTING FROM THE USE OF THIS PRODUCT OR ARISING OUT OF ANY
BREACH OF ANY EXPRESS OR IMPLIED WARRANTY ON THIS PRODUCT.
THIS DISCLAIMER OF WARRANTIES AND LIMITED WARRANTY ARE
GOVERNED BY THE LAWS OF THE STATE OF INDIANA. EXCEPT TO THE
EXTENT PROHIBITED BY APPLICABLE LAW, ANY IMPLIED WARRANTY OF
MERCHANTABILITY OR FITNESS FOR A PARTICULAR PURPOSE ON THIS
PRODUCT IS LIMITED TO THE APPLICABLE WARRANTY PERIOD SET
FORTH ABOVE.
How state law relates to this warranty:
• Some states do not allow the exclusion nor limitation of incidental or consequential damages, or
limitations on how long an implied warranty lasts, so the above limitations or exclusions may not
apply to you.
•
This warranty gives you specific legal rights, and you also may have other rights that vary from
state to state.
If you purchased your product outside the United States:
•
This warranty does not apply. Contact your dealer for warranty information.
Service calls which do not involve defective materials or workmanship are not covered by this
warranty. Costs of such service calls are the sole responsibility of the purchaser.
Other Information
1627195C_13R400TD
29
29
7/15/04, 4:39 PM
Visit the RCA web site at www.rca.com
Please do not send any products to the Indianapolis address listed in this
manual or on the carton. This will only add delays in service for your
product.
TTE Technology, Inc.
10330 North Meridian Street
Indianapolis, IN 46290
©2004 TTE Technology, Inc.
Trademark(s)® Registered
Marca(s) Registrada(s)
Printed in China
TOCOM 1627195C
1627195C_13R400TD
30
7/15/04, 4:39 PM