1
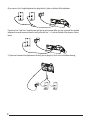
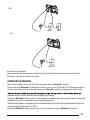
User’s Guide
25216
®
Equipment Approval Information
Your telephone equipment is approved for connection to the Public Switched Telephone Network and is in compliance with parts 15 and 68, FCC Rules and Regulations and the Technical Requirements for Telephone Terminal
Equipment published by ACTA.
1 Notification to the Local Telephone Company
On the bottom of this equipment is a label indicating, among other information, the US number and Ringer
Equivalence Number (REN) for the equipment.You must, upon request, provide this information to your telephone company.
The REN is useful in determining the number of devices you may connect to your telephone line and still have all
of these devices ring when your telephone number is called. In most (but not all) areas, the sum of the RENs of
all devices connected to one line should not exceed 5. To be certain of the number of devices you may connect
to your line as determined by the REN, you should contact your local telephone company.
A plug and jack used to connect this equipment to the premises wiring and telephone network must comply
with the applicable FCCPart 68 rules and requirements adopted by the ACTA. A compliant telephone cord and
modular plug is provided with this product. It is designed to be connected to a compatible modular jack that is
also compliant. See installation instructions for details.
Notes
• This equipment may not be used on coin service provided by the telephone company.
• Party lines are subject to state tariffs, and therefore, you may not be able to use your own tele
phone equipment if you are on a party line. Check with your local telephone company.
• Notice must be given to the telephone company upon permanent disconnection of your telephone from your line.
• If your home has specially wired alarm equipment connected to the telephone line, ensure the installation of this product does not disable your alarm equipment. If you have questions about what will disable alarm equipment, consult your telephone company or a qualified installer.
US Number is located on the cabinet bottom
REN number is located on the cabinet bottom
2 Rights of the Telephone Company
Should your equipment cause trouble on your line that may harm the telephone network, the telephone company shall, where practicable, notify you that temporary discontinuance of service may be required. Where prior
notice is not practicable and the circumstances warrant such action, the telephone company may temporarily
discontinue service immediately. In case of such temporary discontinuance, the telephone company must: (1)
promptly notify you of such temporary discontinuance; (2) afford you the opportunity to correct the situation;
and (3) inform you of your right to bring a complaint to the Commission pursuant to procedures set forth in
Subpart E of Part 68, FCC Rules and Regulations.
2
The telephone company may make changes in its communications facilities, equipment, operations or procedures where such action is required in the operation of its business and not inconsistent with FCC Rules and
telephone company must give you adequate notice, in writing, to allow you to maintain uninterrupted service.
Notice:
techniques applicables d’Industrie Canada.The Ringer Equivalence Number is an indication of the maximum number of devices
allowed to be connected to a telephone interface. The termination on an interface may consist of any combination of devices
sonnerie (IES) sert à indiquer le nombre maximal de terminaux qui peuvent être raccordés à uneinterface téléphonique. La
terminaison d’une interface peut consister en une combinaison quelconque de dispositifs, à la seule condition que la somme
d’indices d’équivalence de la sonnerie de tous les dispositifs n’excède pas 5.
Interference Information
This device complies with Part 15 of the FCC Rules. Operation is subject to the following two conditions: (1) This
device may not cause harmful interference; and (2) This device must accept any interference received, including
interference that may cause undesired operation.
This equipment has been tested and found to comply with the limits for a Class B digital device, pursuant to Part
15 of the FCC Rules. These limits are designed to provide reasonable protection against harmful interference in a
residential installation.
This equipment generates, uses and can radiate radio frequency and, if not installed and used in accordance
with the instructions, may cause harmful interference to radio communications. However, there is no guarantee
that interference will not occur in a particular installation.
If this equipment does cause harmful interference to radio or television reception that can be determined by
following measures.
• Reorient or relocate the receiving antenna (that is, the antenna for radio or television that is “receiving” the interference).
• Reorient or relocate and increase the separation between the telecommunications equipment and receiving antenna
the receiving antenna is connected.
If these measures do not eliminate the interference, please consult your dealer or an experienced radio/television technician for additional suggestions. Also, the Federal Communications Commission has prepared a
helpful booklet, “How to Identify and Resolve Radio/TV Interference Problems.” This booklet is available from
when ordering copies.
could void the user’s authority to operate the equipment.
Licensing
Licensed under US Patent 6,427,009.
Hearing Aid Compatibility
3
This telephone system meets FCC standards for Hearing Aid Compatibility.
Table of Contents
Equipment Approval Information
Interference Information
Licensing
Hearing Aid Compatibility
Introduction
Parts Checklist
Telephone Jack Requirements
Important Installation Guidelines
Phone Layout
Installing the Phone
Programming the Phone
- Standby Screen
- Programming Functions
2
3
3
3
5
5
6
6
7
8
11
11
11
- Phone Settings
11
- Date/Time
11
- Set Date/Time
11
- Set Format
12
- Time Format
12
- Date Format
12
- Dial Mode
12
- Area Code
12
- 2nd Call Alert
13
- Display Setting
13
- Language
13
- Contrast
13
- Backlight
13
- Sound Settings
14
- Ring Tones
14
- Ring Volume
14
- Key Tone
14
- Voice Mail
14
- Call VM
15
- Settings
15
- Bluetooth Settings
15
- Add New Device
15
- Bluetooth Mode
16
- Priority Device
16
- Delete Device
16
- Device Name
16
16
- Restore Setting
17
Telephone Operation
- Making Calls with the Corded Handset 17
17
- Making Calls in Speakerphone Mode
- Making Calls with the Optional
Wired Headset
17
17
- Making Cellular Calls
17
- Pre-Dialing
18
- Answering a Call
18
- Receiving a Cellular call
- Switching Between the Speakerphone,
Handset, and Headset Mode
- Mute
- Do Not Disturb
- Flash
- Inserting a Pause in the Dialing
Sequence
- Redial
- Reviewing the Redial Numbers
- Storing a Redial Record in Directory
- Speakerphone, Handset and
Headset Volume
- Hold
- Conference Calls
- Conference Calls using your
Bluetooth Cellular Phone
- Bluetooth Operation
- Transfer cellular call to cell
Caller ID (CID)
- Receiving and Storing CID Records
- Reviewing CID Records
- Saving a CID Record to the Phone
Directory
- Deleting a CID Record
- Deleting All Call Records
- Dialing Back
- Call Waiting Caller ID
Directory and One-Touch Memory
- Adding Directory Entries
- Storing a Record in the One-Touch
Memory Buttons
- Reviewing Directory Records
- Editing a Name or Number Stored in
the One-Touch/Memory Log
- Reviewing Record in One-Touch Memory
- Editing a Directory Record
- Deleting a Directory Record
- Deleting All Directory Records
- Dialing a Directory Record
- Dialing a One-Touch/Memory Record
- Display Messages
Backup Battery Operation
Troubleshooting Guide
General Product Care
Warranty Assistance
Limited Warranty
Bluetooth
18
18
18
19
19
19
19
19
20
20
20
20
20
21
21
21
21
21
21
22
22
22
23
23
23
24
24
24
25
25
25
25
25
26
26
27
27
27
28
28
30
4
Introduction
CAUTION: When using telephone equipment, there are basic safety instructions that should always
be followed. Refer to the IMPORTANT SAFETY INSTRUCTIONS provided with this product and save
them for future reference.
Parts Checklist
Make sure your package includes the following items:
Ce l
Coiled Handset
Cord
Corded
Handset
AC power
adaptor
(for base)
5
Short Line Cord
Telephone
2- Line cords
Telephone Jack Requirements
To use this phone, you will need a RJ11C (for a single line) or a RJ14C (for two lines) type modular phone jack,
which might look like the one pictured here, installed in your home or office. If you find don’t have either
modular jack, call your local phone company to find out how to get one installed.
Wall plate
Modular
telephone line
jack
Important Installation Guidelines
• Avoid sources of noise and heat, such as motors, fluorescent lighting, microwave ovens, heating appliances and direct sunlight.
• Avoid areas of excessive dust, moisture and low temperature.
• Never install telephone wiring during a lightning storm
• Never install telephone jacks in wet locations unless the jack is specifically designed for
wet locations.
• Never touch non-insulated telephone wires or terminals, unless the telephone line has been disconnected at the network interface.
• Use caution when installing or modifying telephone lines.
6
Phone Layout
Display
3 Soft Keys
Volume +/Prev Key
Message
Waiting
Next Key
One-Touch
Memory Log
Directory, Caller ID
Delete, Bluetooth®
DND, Exit
Redial, Flash
Cell
Tone
7
Headset, Hold,
Mute
Pause
Line1,
Line 2
Speakerphone
Installing the Phone
The phone has the ability to connect to two landlines and a Bluetooth® cellular telephone. The landlines may
be connected by a single two-line cable or two single-line cables. Please see page 15 for instructions on how to
connect your RCA 25216 to your Bluetooth® cellular phone.
1. Choose an area near an electrical outlet and a telephone wall jack (RJ11C), and place your corded telephone
on a level surface, such as a desktop or tabletop, or you may mount it on the wall.
2. Install 5 AAA-size alkaline batteries (not included) for back up power in the event of a power failure.
• Insert a flat-head screwdriver or similar object into the battery door latch and gently pry upward to
release the battery door from the base.
• Insert the batteries inside the battery compartment as shown on the diagram.
• Snap the battery compartment door back into place.
NOTE: If the low battery icon appears in the display, you need to replace the batteries. It is important that you replace them as soon as possible to maintain unit operation when electrical power is
IMPORTANT: If you are not going to use the telephone for more than 30 days, remove the batteries
because they can leak and damage the unit.
3. Plug the power supply cord into the power jack on the back of the base and the other end into an electrical
outlet.
CAUTION: To reduce risk of personal injury, fire, or damage use only the T-2757 (base)
power adaptor listed in the user’s guide. This power adaptor is intended to be correctly
orientated in a vertical or floor mount position.
4. Connect the telephone line cords:
If you have 2 single-line wall jacks installed in your home or office, you can use adaptors/couplers (not
included) to combine the 2 single telephone lines into 1 dual lines. The adaptor/coupler may look similar to the
one pictured here and can be purchased from your local telephone products retailer.
8
Or, you can use the 2 single telephone lines plug into the 2 jacks on the back of the telephone.
Line 2
Line 1
If you have Line 1 and Line 2 wired into one wall jack in your home or office, you can use one of the supplied
telephone line cords to connect from the wall jack to the Line 1 + 2 jack on the back of the phone as shown
below.
Line 1 + 2
5. If you want to mount the telephone on the wall, you can plug the 2 lines such as the below drawing;
Line 2
9
Line 1
-OR-
Line 2
Line 1
-OR-
Line 1 & 2
6. Connect the handset cord:
Connect one end of the coiled handset cord to the jack on the side of the base and the other end into the jack in
the handset, and place the handset in the cradle.
IMPORTANT INFORMATION
Refer to your cell phone user's manual for more information about its Bluetooth® function.
Make sure that your Bluetooth® enabled cellular phone is near (less than 10') your RCA 25216 telephone in order to
maintain a clear and consistent connection between your Bluetooth® cell phone, telephone base and cell tower.
telephone base to a location where the cellular signal may be stronger.
Charge your Bluetooth®cell phone while it is connected to the telephone base because your cell phone's battery will
discharge faster while it is connected wirelessly to the telephone base.
Monitor your cell phone's usage because airtime is deducted from your cellular plan for the duration of cellular calls,
even while placing them on your RCA 25216.
Refer to the Bluetooth® settings section (page 15) to learn how to set up your Bluetooth® connection.
10
Programming the Phone
Standby Screen
The phone displays the current date, time and the Soft keys.
NOTE: The Soft keys will change according to the status of the unit.
menu “Phone Setting- Date /Time” to set the clock. If you subscribe to Caller ID services from your
telephone service provider, your clock will be set automatically each time you receive a phone call.
However, you will need to set the year by going to the Date/Time option in the Phone Settings Menu.
Programming Functions
The system uses a menu structure to give you access to all of the built-in features. You may program the following items in main menu: Phone Settings, Display Setting.Sound settings,Voice Mail, Bluetooth Settings and
Restore setting.
NOTE: During programming, you may press the BACK Soft key (left) at any time to exit the submenu and return to the main menu, or press exit key to exit programming and return to the
standby screen.
NOTE: If no key is pressed for 30 seconds, the base will automatically exit programming
and return to the standby screen.
SELECT
SELECT
12:00AM 01/01/10)
5. Press SAVE Soft Key.
6.
SAVE.
11
SELECT
Set Format
SELECT
SELECT
Set Format
SELECT
SELECT
Dial Mode
From the Phone Settings Menu:
1. Use the VOL (- or +) button to scroll to Dial Mode.
2. Press the SELECT Soft key.
3. Use the VOL (- or +) button to scroll to select either Line 1 or Line 2.
4. Press the SELECT Soft key to select.
5. Use the VOL (- or +) button to scroll to select either Tone or Pulse.
Note: the default setting is Tone.
Area Code
From the Phone Settings Menu:
1. Use the VOL (- or +) button to scroll to Area Code.
2. Press the SELECT Soft key.
3. Use the dial-pad to enter your area code.
4. Press the SAVE
Note: the Area code default setting is empty.
2
2nd Call Alert
From the Phone Settings Menu:
1. Use the VOL (- or +) button to scroll to 2nd Call Alert.
2. Press the SELECT Soft key.
3. Use the VOL (- or +) button to scroll to select either On or
4. Press the SELECT Soft key to select.
Note: the default setting is On.
SELECT
SELECT
SELECT
Note: The default setting is English.
SELECT
SELECT
Note: The default setting is Level 3.
SELECT
(- or +) button to scroll to either Always On or Automatics.
SELECT
Note: The default setting is Automatics.
1. Make sure your phone is OFF (not in Talk mode).
2. Press the MENU Soft key to go to the main menu.
3. Use the VOL (- or +) button to scroll to Sound Settings
4. Press the SELECT
Ring Volume
SELECT
SELECT
SELECT
Note: The line 1 default ring tone is melody 1 and the line 2 default is melody 2.
Ring Volume
From the Sound Settings Menu:
1.Press the VOL(- or +)button to scroll to the Ring Volume.
2.Press SELECT Soft key.
3.Use the VOL (- or +) button to scroll to select either Line 1 or Line 2.
4.Press the SELECT Soft key to select.
5.Use the VOL (- or +) button to scroll to your selection.
Note:The default setting is VOL 3.
Key Tone
From the Sound Settings Menu:
1. Use the VOL (- or +) button to scroll to Key Tone.
2. Press the SELECT Soft key.
3. Use the VOL
4. Press the SELECT Soft key to select.
Note: the default setting is On.
Voice Mail
line in order for this feature to operate.
14
1. Make sure your phone is in idle mode. (not in Talk mode)
2. Press the MENU Soft key (left) to go to the main menu.
3. Press VOL (- or +) button to scroll to Voice Mail.
4. Press SELECT
Call VM
Settings
Call VM
From the Voice Mail Menu:
1. Press VOL (- or +) button to scroll to Call VM.
2. Press SELECT Soft key
3. Use the VOL (- or +) button to toggle between Line 1 and Line 2 and press SELECT soft key to select.
4. The phone will dial your voicemail access number. You may proceed to access your voicemail per your service
provider’s instructions.
SELECT
Delete button to backspace and
delete numbers, if necessary.
SELECT
Bluetooth® Settings
To use a Bluetooth
Bluetooth® cellular
d
phone with your RCA 25216.
NOTE: This unit supports a maximum of 8 Bluetooth® cell phones. However, only 2 can be connected to
your 25216 at the same time.
To use your Bluetooth® cell phone with this system, you must ensure that Bluetooth® is activated on your cellular
phone and that it is "Discoverable." Activate Bluetooth® on your device and then pair the device to the base.
NOTE: Your Bluetooth® cell phone device should be within 2 feet to 10 feet from the base. If the device is too
close it may create undesired noise. If device is too far it will not pair.
1. Make sure your base is in idle mode.
2. Press the Menu Soft key to enter the main menu.
3. Use the VOL (- or +) button to scroll to BLUETOOTH SETTINGS.
4. Press the SELECT Soft key to enter the sub-menu. There are 5 programmable menus: Add New Device, Bluetooth
Mode, Priority Device, Delete Device and Device Name.
Add New Device
Note:
not the quick Connect/Bluetooth® button.
From the Bluetooth Settings Menu:
1. Use the VOL (- or +) button to scroll to ADD NEW DEVICE.
2. Press the SELECT Soft key. The base will display “ADD NEW DEVICE Searching…”, and then it will display a list of
all Bluetooth® devices within range. Select your Bluetooth® cell phone and press Select soft key.
3. Your cell phone will ask you for a PIN or password. Use the number keys on your cell phone to enter the default
PIN 0000. When the device is paired successfully, device information will be saved to the base and can be displayed
by pressing the Bluetooth® button.
Note:Once you have paired a device with the telephone base, the pairing information is stored in the
telephone base. If the paired device becomes disconnected, the RCA 25216 will automatically search
and attempt to re-connect to the Bluetooth cellular phone. If the connection does not resume in one
minute, you will need to re-connect to that device manually.
Bluetooth Mode
From the Bluetooth Settings Menu:
1. Use the VOL (- or +) button to scroll to BLUETOOTH MODE.
2. Press the SELECT Soft key.
3. Use the VOL
4. Press the SELECT Soft key to select.
Note: the default setting is On.
Priority Device
From the Bluetooth Settings Menu:
1. Use the VOL (- or +) button to scroll to PRIORITY DEVICE.
2. Press the SELECT Soft key, the unit shows the paired device name list;
3. Use the VOL (- or +) button to scroll to the direct device name, press SELECT Soft key to select.
Note: The device selected under the Priority Device menu will be the device that is automatically
selected by your 25216 phone.
Delete Device
From the Bluetooth Settings Menu:
1. Use the VOL (- or +) button to scroll to DELETE DEVICE.
2. Press the SELECT Soft key, the unit shows the paired device name list;
3. Use the VOL (- or +) button to scroll to the direct device name, press DEL Soft key to delete.
Device Name
From the Bluetooth Settings Menu:
1. Use the VOL (- or +) button to scroll to DEVICE NAME.
2. Press the SELECT Soft key.
3. Use the dial-pad to enter your device name.
4 Press SAVE
Restore Setting
1. Make sure your phone is OFF (not in Talk mode).
2. Press the MENU Soft key to go to the main menu.
3. Use the VOL (- or +) button to scroll to Restore Setting.
4. Press the SELECT Soft key.
5. Display will read Restore?
Warning: Pressing YES will return phone to its default state. This will reset date/time and all
menu settings to default.
YES
6
Initializing
7
16
Telephone Operation
Making Calls with the Corded Handset
1. Pick up the handset. The unit will automatically select an available land line. If both land lines are available, Line 1
Bluetooth®
ell
button. -ORPress the Line 1, Line 2 or Cell button and then pick up the corded handset to select the desired line.
2. Wait for a dial tone, and then dial a phone number using the dial-pad, the directory or a one-touch speed dial.
Making Calls in Speakerphone Mode
1. Press the speaker button. The unit will automatically select an available land line. If both land lines are available,
-ORPress the Line 1, Line 2 or Cell button to select the desired line, and the speakerphone will engage automatically.
2. Wait for a dial tone, and then dial a phone number using dial-pad, the directory or a one-touch speed dial.
Making Calls with the Optional Wired Headset
1. Plug the headset into the Headset jack on the side of the unit.
3. Press the headset button on the phone.
5. Wait for a dial tone, and then dial the phone number using the dial-pad, the directory or a one-touch speed
dial. -ORPress the Line 1, Line 2 or Cell button and then press the headset button to select the desired line.
NOTE: If the headset is not connected (or if not completely inserted into headset jack), an error tone is
heard when the Headset button is pressed.
NOTE: Headset performance may vary widely depending on the quality of the headset.
Making Cellular Calls
1. In standby mode, dial the desired number, press Cell button. - OR Use the VOL (- or +) button to select the desired record in record review mode, then press the Cell button. - OR Press the corresponding speed dialing number button, then press Cell (SKR) button.
Note: The device selected under the Priority Device menu will be the device that is automatically
selected by your 25216 phone.
Note: If the user needs to dial using an alternate (non-priority) cell phone that has previously been paired,
press the Bluetooth button to view the paired devices, scroll to the desired device, then press the Dial soft
key to make the call.
2 . Pick up the corded handset to switch to receiver mode.
3. Place the corded handset in the base cradle when finished.
Pre-Dialing
1. With the phone idle, manually enter the telephone number.
2. Press the Speaker button or line1 or line 2 button to take a line, or pick up the corded handset (on the base
cradle) and then the telephone number will be dialed out.
NOTE: The maximum pre-dialing number length is 32 digits, if the number is over 32 digits, the
phone will emit an error tone.
17
Answering a Call
1. Pick up the corded handset to answer the call in Handset mode, -OR2. Press the speaker button to answer the call in speakerphone mode, -OR3. Press the corresponding line button to answer the call in speakerphone mode, -OR4. Press the headset button to answer the call in headset mode.
Speaker button (in speakerphone mode) or Headset button (in headset mode) to end the call.
NOTE: Adjust the volume by pressing the vol (- or +) button during a call.
Receiving a Cellular Call
ell
similar to lines 1 and 2. To answer the call:
1. Pick up the handset from the base cradle. - OR Press the Speaker button on the base. - OR Press the Cell button on the base. -ORPress the Headset button on the base. (if a wired headset is connected to the base)
Switching Between the Speakerphone, Handset, and Headset Mode
To switch to the speakerphone, press Speaker button. The speakerphone indicator will illuminate. Place the
handset back into the cradle.
T
switch to the headset, press the Headset button to enable the headset. The headset indicator will illuminate.
Mute
you, but you can still hear them.
1. Press Mute button to activate the mute feature.
NOTE: When using the mute feature on the base, the indicator will illuminate when the mute is
activated.
2. Press the Mute button again to de-activate.
Do Not Disturb
This feature is set at individual telephones to disable (silence) an incoming ring signal. When there is an
incoming call , the status indicators will function, but the phone will not ring.
1. When the unit is idle, press the DND button.
2. Use the VOL (- or +) button to select the duration. You may choose from 15 minutes, 30 minutes, 45 minutes,
1 hour, or 2 hours and increase the duration by 1-hour intervals up to 24 hours.
3. Press the SELECT
lowed by the length of time in hours and minutes that the ringer will be disabled. Additionally, the DND
5. To cancel, press DND button again.
18
Flash
If you subscribe to Call Waiting service from your telephone service provider and you receive an incoming call on
while a call is currently active on the same line, you will hear an audible tone to indicate another call is waiting.
Also, Caller ID information (if available) for the waiting call will be displayed.
1. To connect to the waiting call, press the Flash button on your phone. This will place the origian call on hold
and connect you to the new incoming call.
2.To switch between the two calls, press the Flash button.
Inserting a Pause in the Dialing Sequence
Press and hold the # button for 2 seconds to insert a delay in dialing sequence when a pause is needed to wait for a
dial tone (for example, after you dial 9 for an outside line, or to wait for a computer access tone.) Each pause counts
as one digit in the dialing sequence, and is shown as “P” in the display.
Redial
1. Press the Speaker button (speakerphone mode), or press the headset button (headset mode), or pick up the
corded handset from the base.
-ORPress a Line button to select a line.
3. Press the Redial button. The redial number list is shown.
4. Use the VOL (- or +) button to select the number. Press the DIAL Soft key to dial out the number.
NOTE: If the number you dialed is longer than 32 digits, only the first 32 digits will be saved in
the redial list .
Reviewing the Redial Numbers
Your phone records up to three previously dialed phone numbers.
1. When the phone is idle, press the Redial button.
2. Use the VOL (- or +) button to view previously dialed numbers.
3. While the preferred number is displayed, press the Speaker, Headset, a Line button, or pick up the corded
handset to dial the phone number.
and the number will be dialed accordingly.
Storing a Redial Record in Directory
1. Make sure your phone is in idle mode. (not in Talk mode)
2. Press the Redial button, then use the VOL (- or +) button to scroll to the desired redial number.
3. Press the SAVE Soft key.
4. The screen displays Enter Name. Input a name by pressing the keypad.
19
SAVE
6. You can edit the telephone number by using the Delete button and number keys.
7.Press SAVE Soft key to enter the VIP Tone Melody selection.
8.User VOL(- or +)button to scroll to the desired ring tone melody and press SELECT Soft key to complete.
NOTE:If an incoming call number matches this record,the VIP Tone Melody will ring
3. Press either the LINE 1 or LINE 2 or BT soft key
Conference Calls using your Bluetooth® Cellular Phone
This feature allows you to easily conference together a cellular call with a landline call.
1. While on a Bluetooth® cellular phone call, press the Hold button;
2. Press Line 1 or Line 2 to make another call;
3. Press the “CONF” soft key to enter 3-way conference mode. - OR 4. While on a land line call, press the Hold button;
5. Press the Cell button to make a cellular call;
6. Press the “CONF” soft key to enter 3-way conference mode.
20
Bluetooth® Operation
When the unit is in idle mode(not on an active call), press the Bluetooth® button.
The menu will display a list of Bluetooth® devices (up to eight ) that are paired to
the RCA 25216.
Transfer cellular call to cell
MY DEVICE
BACK
DIAL
DISC
This feature allows you temporarily cancel Bluetooth®capabilites and transfer the active cell call from the base back to
your cell phone. The base will then return to standby mode.
NOTE: Check your cell phone instruction manual regarding capabilities before attempting transfer.
OR Press the base Bluetooth button to transfer cellular call to cell phone.
Caller ID (CID)
IMPORTANT: In order to use this unit’s Caller ID features, you must subscribe to Caller ID services from
your telephone service provider. To know who is calling while you are currently on an active call on the
same line, you must subscribe to Call Waiting Caller ID Service.
When the unit receives an incoming call with CID information, the Caller ID information will be displayed on the
LCD of the unit.
Receiving and Storing CID Records
This unit receives and displays information transmitted by your local phone company. This information can include the phone number, date and time; or the name, phone number, date and time. The unit can store up to 99
records for later review. When the memory is full, a new call automatically replaces the oldest call in memory.
NEW appears in the display for calls received that have not been reviewed. The line number for the call received
is also displayed.
By pressing the DND button during the incoming call ringing mode, the unit will stop ringing .The unit will not
ring in the subsequent ring cycles, but the Line LED
Reviewing CID Records
Press Caller ID button, and then use the VOL (- or +) button to scroll through the call records.
When reviewing the CID records, the record number is also shown to the right of the time along with the
FORMAT and STORE Soft keys.
Saving a CID Record to the Phone Directory
1. While viewing a Caller ID record, press the STORE Soft key.
2. The name shows in the display. You can edit it. After editing, press the SAVE Soft key.
3.The number shows in the display. You can edit it. After editing, press the SAVE Soft key to enter
the VIP Tone Melody selection.
4.User VOL(- or +)button to scroll to the desired ring tone melody and press SELECT Soft key to complete.
NOTE:If an incoming call number natches this record,the VIP Tone Melody will ring
NOTE: If you want to change the format of the CID number to 7, 10 or 11 digits and save it in the
Soft key. See the “Dialing Back” section for more information on formatting a number.
21
Deleting a CID Record
Press the Delete button to delete the record shown in the display. The screen displays DELETE?. Press the OK
will display
Empty.
Deleting All Call Records
This feature allows you to clear all CID records at once.
1. While viewing a CID record, press and hold the Delete button. The screen displays Delete All?
2. Press OK
Dialing Back
When reviewing CID records, you can dial back the numbers showing on the display by pressing the headset
button, or the Speaker button or the Line 1 or Line 2 or Cell button as well as by picking up the corded handset.
If You Programmed Your Local Area Code
1. Use the Caller ID button to display the number you want to dial.
2. If you see a number with 7 digits (i.e. 555-1234), then the call was received from within your area code.
However, this does not guarantee the call is a local call. If you see a number with 11 digits (i.e.1-234-5551234), then the call received was not from your area code.
3. To adjust the phone number format, use the FORMAT Soft key. For instance, a 7-digit local number sometimes cannot be dialed because it requires a 10-digit or 11-digit format. Use the FORMAT Soft key to scroll
through 7, 10 and 11-digit number
Number of digits
Explanation
Example
7-digits:
7-digit telephone number
(i.e. 555-5555)
10-digits:
3-digit area code
+7-digit telephone number
(i.e. 425-555-5555)
11-digits:
Long distance code 1
+3-digit area code
+7-digit telephone number
(i.e. 1-425-555-5555)
4. To dial the displayed number, select a Line or press the Speaker or Headset button or pick up the handset
from the base.
22
SAVE
6. Press the SAVE Soft key to enter VIP tone melody selection.
NOTE: If an incoming call number matches this record the VIP Tone Melody will ring.
7. Use VOL (- or +) button to scroll to the selection and press SELECT Soft key to complete.
NOTE: Press the Delete button will delete the last number or character during editing.
23
SAVE
24
3. Press SAVE Soft key to proceed to number change. You may now change the number, if desired.
4. Press SAVE Soft key to proceed to VIP Tone Melody selection. You may use VOL (- or +)
key to scroll to the selection you desired.
NOTE: If an incoming call number matches this record the VIP Tone Melody will ring.
5. Press SELECT Soft key to complete.
OK
OK
25
4. Press the Speaker, Line 1, Line 2 or Cell button or
While in idle mode:
1. Make sure your phone is in idle mode. (Not in Talk mode)
2. Press the One-Touch/Memory Log button to select the desired record.
3. Press the speaker, line 1/2 button or Line1/Line2 Soft key or pick up the handset on the base.
The number dials automatically.
26
Backup Battery Operation
If the power cord is not plugged into the unit, and the battery is available, the unit enters Battery Operation
Mode. In this mode, the base is fully functional.
Troubleshooting Guide
Telephone Solutions
No dial tone
• Check or repeat installation steps.
• Make sure the base power cord is connected to a working electrical outlet. Make sure the telephone line cord is
connected to the base and the wall jack.
• Connect another phone to the same jack. If it doesn’t work, the problem might be your wiring or your local
service.
Dial tone is ok, but can’t dial out
• Make sure the type of phone service you are subscribed to is TONE or PULSE.
Memory dialing doesn’t work
• Did you follow the proper dialing sequence?
Date/Time setting is restored to default setting
• May be cause by a power failure. Set Date/Time again.
Caller ID Solutions
No Display
• Make sure the unit is connected to a non-switched electrical outlet. Disconnect the power adapter from the
base and reconnect it.
No Caller ID
• You must be subscribed to the standard Name/Number Caller ID service from your local telephone company to
receive CID information.
General Product Care
• To keep your unit working and looking good, follow these guidelines:
• Avoid dropping the handset, as well as other rough treatment to the phone.
• Clean the phone with a soft cloth.
• Never use strong cleaning agents, paint thinner, abrasive powder, alcohol, or other chemical products to clean
• Retain the original packaging in case you need to ship the phone at a later date.
27
Warranty Assistance
If trouble is experienced with this equipment, for warranty information, please contact customer service at
1-800-511-3180. If the equipment is causing harm to the telephone network, the telephone company may
require that you disconnect the equipment until the problem is resolved.
user’s authority to operate this product. For instructions on how to obtain a replacement unit, refer to the
warranty included in this guide or call customer service at 1-800-511-3180.
Or refer inquiries to:
Beaverton, OR 97005
Attach your sales receipt to this booklet for future reference or jot down the date this product was purchased as
a gift. This information will be valuable if service should be required during the warranty period.
Purchase Date _________________________________________________________
Name of Store _________________________________________________________
Limited Warranty
What your warranty covers:
• Defects in materials or workmanship
For how long after your purchase:
• Two years, from date of purchase.
What we will do:
•Provide you with a replacement unit. The exchange unit is under warranty for the remainder of the original
product’s warranty period.
How you get service:
• Properly pack your unit. Include any cables, etc., that were originally provided with the product. We recommend using the original carton and packing materials.
• Proof of purchase in the form of a bill of sale or receipted invoice which is evidence that the product is within
the warranty period, must be presented to obtain warranty service.
• Print our name and address and a description of the defect. Send via standard UPS or its equivalent to:
501 North Lincoln
Siloam Springs, AR 72761
28
• A new unit will be shipped to you freight prepaid.
What your warranty does not cover:
• Customer instruction. (Your Instruction Book provides information regarding operating instructions and user
controls. Any additional information should be obtained from your dealer.)
• Installation and setup service adjustments.
• Batteries.
• Damage from misuse or neglect.
• Products purchase or serviced outside the USA.
• Acts of nature, such as, but not limited to lightning damage.
Product Registration:
• Please register your product on-line at www.rca4business.com. You may also complete and mail the product
Registration Card, if one was received with your unit. Product Registration will make it easier to contact you
should it ever be necessary. Registration is not required for warranty coverage.
Limitation of Warranty:
• THE WARRANTY STATED ABOVE IS THE ONLY WARRANTY APPLICABLE TO THIS PRODUCT. ALL OTHER
WARRANTIES, EXPRESSED OR IMPLIED (INCLUDING ALL IMPLIED WARRANTIES OF MERCHANTIBILITY
OR FITNESS FOR A PARTICULAR PURPOSE) ARE HEREBY DISCLAIMED. NO VERBAL OR WRITTEN INFORMATION GIVEN BY TELEFIELD NA INC., ITS AGENTS, OR EMPLOYEES SHALL CREATE A GUARANTY OR IN
ANY WAY INCREASE THE SCOPE OF THIS WARRANTY.
• REPAIR OR REPLACEMENT AS PROVIDED UNDER THIS WARRANTY IS THE EXCLUSIVE REMEDY OF THE
CONSUMER. TELEFIELD NA INC. SHALL NOT BE LIABLE FOR INCIDENTAL OR CONSEQUENTIAL DAMAGES
RESULTING FROM THE USE OF THIS PRODUCT. THIS DISCLAIMER OF WARRANTIES AND LIMITED WARRANTY ARE GOVERNED BY THE LAWS OF THE STATE OF OREGON. EXCEPT TO THE EXTENT PROHIBITIED
BY LAW, ANY IMPLIED WARRANTY OF MERCHANTIBILITY OR FITNESS FOR A PARTICULAR PURPOSE ON
THIS PRODUCT IS LIMITED TO THE APPLICABLE WARRANTY PERIOD SET FORTH ABOVE.
29
How state law relates to this warranty:
• Some states do not allow the exclusion nor limitation of incidental or consequential damages, or limitations on
how long an implied warranty lasts so the above limitations or exclusions may not apply to you.
If you purchased your product outside the USA:
• This warranty does not apply. Contact your dealer for warranty information.
The Bluetooth® word mark and logos are owned by the Bluetooth® SIG, In c. and any use of such
their respective owners.
Beaverton, OR 97005
Visit the RCA website: www.rca4business.com
RCA is a trademark of RCA Trademark Management S.A., used under license.
is under license. Other trademarks and trade names are those of their respective owners.
©2010. All rights reserved.
Model 25216
T0009065 (Rev00)
10-06
Printed in China
25216 Spanish Instruction Book available at www.rca4business.com
30


![E1-ClipTip Electronic Pipette User Manual [FR]](http://vs1.manualzilla.com/store/data/006380814_1-b1fc4359e05804daa196410d2874b449-150x150.png)