1
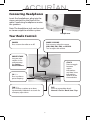
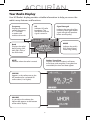
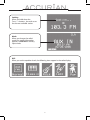
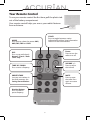
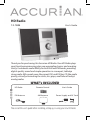
HD Radio
12-1686
User’s Guide
Thank you for purchasing this Accurian HD Radio. Your HD Radio plays
your favorite programming, plus new, expanding choices and amazing
clarity. It enhances audio fidelity for both AM and FM bands, providing
digital-quality sound and simple operation in a compact, tabletop
stereo radio. AM sounds more like current FM, and FM has CD-like audio
quality, virtually eliminating the static, hiss, pops, and fades of today’s
analog radios.
WHAT’s INCLUDED
HD Radio
FM Antenna
Remote Control
User’s Guide
AM Antenna
Power Supply and AC Cord
Please read this user’s guide before installing, setting up, or using your new HD Radio.
Content
How HD Radio works ........................................................... 3
Quick Start ........................................................................... 4
Connecting Your Radio ................................................................ 4
Cable Radio Signals....................................................................... 4
Connecting Headphones............................................................ 5
Your Radio Controls ...................................................................... 5
Your Radio Display ........................................................................ 6
Your Remote Control .................................................................... 8
Replacing the Remote Control Battery .................................. 9
Storing Your Remote Control .................................................... 9
The Basics ........................................................................... 10
Setting the Clock..........................................................................10
Saving Preset Stations................................................................10
Beyond the Basics .............................................................. 11
Multicast Channels ......................................................................11
System Delay .................................................................................11
FAQ...................................................................................... 12
Important Safety Instructions .......................................... 13
RF Emissions Information ................................................. 14
Limited 90-day Warranty .................................................. 14
2
How HD Radio works
HD Radio produces a smooth, natural response and room-filling sound that
belies its compact size. HD Radio stations can broadcast data (artist and song
information, weather, traffic, and more) and multiple channels at their same,
familiar position on the radio dial.
1. The digital signal is compressed using HD Radio compression
technology.
2. Stations bundle both analog and digital audio signals, and the
combined analog and digital signals are transmitted. The signal will be
compatible with both HD Radio receivers and analog radios.
HD Radio receivers are designed to reduce static, hiss, pops, and fades by sorting
through reflected signals and multi-path distortion. Multi-path distorition is the
most common form of interference, and occurs when part of a signal bounces
off an object and arrives at the receiver at a different time than the main signal.
To learn more about HD Radio technology and to find HD Radio Stations, visit
www.hdradio.com.
3
Quick Start
Connecting Your Radio
To avoid interference, keep the power supply away from the radio while in use.
FM ANT
Connect FM antenna. Use the “T”
shaped antenna in
more remote areas.
AUX IN
Connect auxiliary devices with
headphone output. To listen to
auxiliary devices, select AUX mode.
AM Antenna
Press down the two
spring terminals,
connect the AM
antenna wires, and
position the antenna
for the best reception.
DC IN
Plug the power supply into the
DC IN port, plug the AC cord into
the power supply, and then plug
the AC plug into the wall outlet.
Cable Radio Signals
The Radio’s FM antenna connector is a standard F-connector and will accept
cable FM feeds from most cable systems that provide FM programming. To
connect your radio to the FM signal from some cable TV providers, contact your
cable TV provider for assistance.
The installation must include a splitter that filters the signal to prevent any
re-emission of the RF spectrum through the radio, so only the FM band, not
the cable TV signal, is transmitted to the Radio. HD signals are not currently
rebroadcast via cable providers.
4
Connecting Headphones
Insert the headphones plug into the
stereo minijack on the front of the
radio. Connecting headphones mutes
the speakers.
Note: The headphone jack can be used
as stereo output to another system.
Headphones
Your Radio Controls
POWER
Press to turn the radio on or off.
MODE / VOLUME
Press once to .select the source:
AM1, AM2, FM1, FM2, andAUX IN.
Turn to adjust the volume
PRESET STORE
Lets you save
stations in the
radio memory.
See Saving
Preset Stations.
CLOCK
Press to toggle
between
station
information
and date / time
information.
Hold to set the
time and date.
CH - / +
Press to select a
preset freqency.
TUN - / +
Press to tune a station up or down
incrementally. Hold down to search for
a freqency up or down.
DSP
Press to set equalizer levels:
Normal / Classic / Rock /Jazz / Pop
5
Your Radio Display
Your HD Radio’s display provides valuable information to help you access the
radio’s many features and functions.
Frequency
Displays the current
station’s frequency.
A “-1” indicates
a station with
multicast channels.
HD
Indicates HD radio
broadcasts. The
icon blinks until the
signal is tuned in.
Signal Strength
Indicates the strength of the
incoming radio signal. Better
signal strength will produce
better sound quality.
MODE
Band
Displays the radio’s
band setting: AM1,
AM2, FM1, FM2, or
the AUX mode.
Indicates the radio’s
DSP (Digital Signal
Processing) setting
Station / Song Data
Displays the current station’s call letters,
artist name, and song title. If song data are
unavailable, the time and date appear.
MUTE
Indicates when the radio is muted.
LINKING
Appears as the radio accesses the
HD broadcast for a selected HD
radio station (-2 or higher).
VOLUME
As you adjust the volume, the
Volume bar appears at the bottom
of the radio’s display.
6
Seeking
When you hold down the
Tune - / + buttons, the radio scans
for the next available station.
Mode
When you change the radio’s
mode, the station information
appears, or AUX IN for auxiliary
input mode.
DSP
When you set the equalizer levels, the following icons appear in the radio display:
7
Your Remote Control
To use your remote control the first time, pull the plastic tab
out of the battery compartment.
Your remote control helps you access your radio’s features
from a distance.
CLOCK
Press to toggle between station
information and date / time information.
Hold to set the time and date.
MODE
Press once to select the source: AM1,
AM2, FM1, FM2 and AUX.
Power
Press to turn the
radio on or off.
DSP
Press to set audio levels:
Normal / Classic / Rock
/Jazz / Pop
VOLUME + / Press to adjust
the volume.
TUNE UP / DOWN
Press to tune a freqency.
MUTE
Press to mute
the radio. Press
again to restore
volume.
PRESET STORE
Lets you save stations in
the radio memory. See
Saving Preset Stations.
Number Buttons
Press to select a
preset freqency.
8
Replacing the Remote Control Battery
To replace the battery, use your thumb to push the battery compartment
locking tab to the right and pull the compartment open. Insert the battery with
the positive side (+) up and carefully close the compartment until it clicks. See
the diagram on the remote for more information.
Storing Your Remote Control
To store your remote control, slide it under the available tabs on the back of
your radio.
9
The Basics
Setting the Clock
To set your radio’s clock, complete the following steps:
1. Turn on your radio.
2. Press and hold the CLOCK
button until the time display
appears with the hour blinking.
3. Use the TUN - / + buttons to set
the hour and press the CLOCK
button. The minutes value starts
blinking.
4. Repeat step 3 for the minutes, AM/PM, date, month, and year. After you
set the year, the radio display returns to normal with the updated date
and time information.
Saving Preset Stations
To save a frequency in your radio’s memory, complete the
following steps:
1. Press MODE to select the band (AM1, AM2, FM1,
FM2) .
2. Select the frequency.
3. Press PRESET STORE.
4. Use the CH- /+ buttons on the radio or use the
number buttons on the remote control to select
a preset station number.
5. Press PRESET STORE. to save the preset station. If
you don’t press PRESET STORE again within a few
seconds, the radio returns to normal mode without
saving the frequency in memory.
Preset station
number
Currently saved
frequency
Note: Your radio provides six preset positions for each band (AM1, AM2, FM1,
10
and FM2) for a total of 24.
Beyond the Basics
Multicast Channels
In addition to digital sound quality, HD Radio broadcasters can offer multiple
programming channels simultaneously using their existing frequency on the
radio dial. These additional channels can offer expanded news, talk, and music
formats.
When your radio tunes in the HD channel, if a number appears on the right
side of the station frequency (for example: 89.3-1), this indicates the existence
of multicast services. Use the TUNE - / + to select a multicast channel for the
frequency.
System Delay
Digital systems inherently produce an audio delay. To overcome this delay,
HD Radio uses a station’s analog signal to enable fast tuning of an AM or
FM station. After approximately 5 seconds, the audio from the analog signal
changes to digital HD Radio. If the radio station has implemented the HD Radio
broadcast correctly, the blend is smooth. However, if the station has not, you will
experience a skip in content of up to 5 seconds for a -2 or higher channel.
This is not an issue with your HD Radio. This is an HD Radio broadcaster’s
implementation issue, which should be corrected by the station over time.
Today’s analog is only present on the main channel. Should you tune directly to
a station’s multicast channel, the HD Radio Tabletop will delay playing audio or
content for up to 5 seconds. This is normal operation.
11
FAQ
Why does my audio quality change after a few seconds on some HD Radio
stations and on some other stations skip when I first tune in?
HD Radio stations blend analog signals to digital HD Radio. The blend is typically
smooth, but in some cases, the audio quality can take a few seconds to reach
enhanced digital levels. This is not an issue with your HD Radio. This is an HD
Radio broadcaster’s implementation issue, which the station should correct over
time.
What can I do if I my audio is unclear or I don’t hear any audio?
If your radio audio is unclear or you don’t hear any audio, you may be
experiencing one of the following conditions:
• Is the radio muted? If so, unmute the radio or turn up the volume.
• Is the radio in AUX mode? If so, your auxiliary device may not be sending
audio signals or may not be correctly connected.
• Is anything plugged into the headphone jack? If so, unplug it.
• Check all connections, including power and antenna.
• Is the signal too weak? If so, tune to a stronger station or reposition your
radio and/or antenna.
• If you are using an antenna other than the one supplied, make sure the
antenna supports FM reception. If the antenna uses an FM trap, make
sure the FM trap is off.
Note: If you are using an amplified antenna with adjustable gain, turn down
the gain all the way and adjust slowly upward.
12
Important Safety Instructions
1.
2.
3.
4.
5.
6.
7.
8.
9.
10.
11.
12.
13.
14.
15.
16.
Read these instructions.
Keep these instructions.
Heed all warnings.
Follow all instructions.
Do not use this apparatus near water.
Clean only with dry cloth.
Do not block any ventilation openings. Install in accordance with the
manufacturer’s instructions.
Do not install near any heat sources such as radiators, heat registers,
stoves, or other apparatus (including amplifiers) that produce heat.
Do not defeat the safety purpose of the polarized or grounding-type
plug. A polarized plug has two blades with one wider than the other. A
grounding-type plug has two blades and a third grounding prong. The
wide blade or the third prong is provided for your safety. If the provided
plug does not fit into your outlet, consult an electrician for replacement
of the obsolete outlet.
Protect the power cord from being walked on or pinched particularly at
plugs, convenience receptacles, and the point where they exit from the
apparatus.
Only use attachments/accessories specified by the manufacturer.
Unplug this apparatus during lightning storms or when unused for long
periods of time.
Refer all servicing to qualified service personnel. Servicing is required
when the apparatus has been damaged in any way, such as the powersupply cord or plug is damaged, liquid has been spilled or objects have
fallen into the apparatus, the apparatus has been exposed to rain or
moisture, does not operate normally, or has been dropped.
Maintain a minimum distance of 2” (50mm) around the front, rear, and
sides of the apparatus for sufficient ventilation. The ventilation should
not be impeded by covering the ventilation openings or placing on or
around the apparatus items such as newspapers, table cloths, curtains,
etc.
No open flame sources, such as lit candles, should be placed on the
apparatus.
The apparatus should not be exposed to dripping or splashing. No
objects filled with liquids, such as vases, should be placed on the
apparatus.
13
RF EMISSIONS INFORMATION
This equipment has been tested and found to comply with the limits for a Class B digital
device, pursuant to Part 15 of the FCC Rules. These limits are designed to provide reasonable
protection against harmful interference in a residential installation. This equipment generates,
uses, and can radiate radio frequency energy and, if not installed and used in accordance with
the instructions, may cause harmful interference to radio communications. However, there is
no guarantee that interference will not occur in a particular installation. If this equipment does
cause harmful interference to radio or television reception, which can be determined by turning
the equipment off and on, the user is encouraged to try to correct the interference by one or
more of the following measures:
• Reorient or relocate the receiving antenna.
• Increase the separation between the equipment.
• Connect the equipment to an outlet on a circuit different from the device.
Consult your local RadioShack or an experienced radio/TV technician for help.
If you cannot eliminate the interference, the FCC requires that you stop using your radio.
WARNING: Changes or modifications not expressly approved by RadioShack may cause
interference and void the user’s authority to operate the equipment.
This device complies with Part 15 of the FCC Rules. Operation is subject to the following two
conditions: (1) This device may not cause harmful interference, and (2) This device must accept
any interference received, including interference that may cause undesired operation.
This Class B digital apparatus complies with Canadian ICES-003.
Cet appareil numérique de la classe B est conforme à la norme NMB-003 du Canada.
LIMITED 90-DAY WARRANTY
This product is warranted by RadioShack against manufacturing defects in material and workmanship under
normal use for ninety (90) days from the date of purchase from RadioShack company-owned stores and
authorized RadioShack franchisees and dealers. For complete warranty details and exclusions, check with your
local RadioShack store.
RadioShack Customer Relations
300 RadioShack Circle, Fort Worth, TX 76102
04/04
Actual product may vary from images contained in this document.
©2006. RadioShack, Inc. All rights reserved. Accurian is a trademark
used by RadioShack. HD Radio is a registered trademark of iBiquity
Digital Corporation.
12-1686
07A06
Printed in China