1
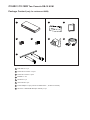
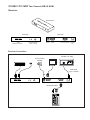
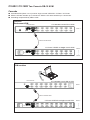
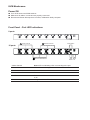
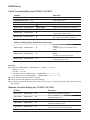
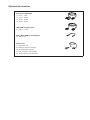
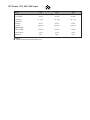
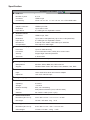
www.rackmountsolutions.net
1-866-207-6631
[email protected]
2 Console DB-15 KVM User Manual
CV-802 / CV-1602
CV-802 / CV-1602 Two Console DB-15 KVM
Installation
screw A: M3.2 x 4.5 mm
A
B
iew
rV
be
Cy
screw B: M4 x 10 mm
■
Install each bracket using screws provided shown in Figure 1.
■
Fix the KVM into the rack
Figure 1. Installing the bracket to the KVM.
iew
rV
be
Cy
Figure 2. Fixing the KVM into the rack.
* Hardware for fixing the mounting bracket
to the rack is not provided
CV-802 / CV-1602 Two Console DB-15 KVM
Package Content (only for rackmount KVM)
1
5
6
Remote I/O
al
User Manu
Local Compute
r
VGA
9VDC
500mA
Cat.5 Remo
te Conso
le
Keyboard
Mouse
Remote
2
3
Local
Console
Select
7
4
1 KVM switch x 1 pc
2 Screw M3.2 x 4.5mm x 4 pcs
3 Screw M4 x 10mm x 8 pcs
4 Bracket x 1 set
5 Receiver x 1 pc
6 User manual x 1 pc
7 Power adapter x 2 pcs (12V DC for KVM switch ; 9V DC for receiver)
8 CB-6 2-in-1 USB KVM cable (for receiver) x 1 pc
8
CV-802 / CV-1602 Two Console DB-15 KVM
Connection
CV-802
Local Console
Remote
console
Power
Input
Cascade
CV-1602
Connection
Rackmount KVM
Receiver
Remote I/O
Local Computer
VGA
9VDC
500mA
Cat.5 Remote
Console
Keyboard
Mouse
Remote
Console
Select
Local
CD-6
KVM cable
Cat5 cable
(up to 1,000 ft)
Connection
KVM modules
Receiver
Remote I/O
Local Computer
VGA
9VDC
500mA
Cat.5 Remote
Console
Keyboard
Mouse
Remote
Local
Console
Select
back
Cat5 cable
(up to 1,000 ft)
CD-6
KVM cable
CV-802 / CV-1602 Two Console DB-15 KVM
Receiver
Receiver Box
Front View
USB
Keyboard Mouse
Rear View
Console Console
LEDs Select
9VDC
VGA
Local Computer
Remote
I/O
Receiver Connection
CV-802 / CV-1602
9V DC Power
Adapter
Monitor
Cat5 cable
(up to 1,000 ft)
CB-6 KVM cable
CV-802 / CV-1602 Two Console DB-15 KVM
Cascade
■ Cascaded KVM ( Bank 2 to 8 ) must be single console USB KVM - CV-S801 / CV-S1601
■ With the CV-802 cascade up to 120 servers. With the CV-1602 cascade up to 128 servers.
■ Cascading multiple KVM by CBC-6 cable
Cascade
Rackmount KVM
CV-1602 two console DB-15 KVM
Local Console
Bank 1
Cascade
CBC-6 cascade cable
CV-S1601 USB DB-15 single console KVM
Bank 2
Bank 8
Cascade
KVM modules
back
Local Console
CV-1602 two console DB-15 KVM
Bank 1
Cascade
CBC-6 cascade cable
CV-S1601 USB DB-15 single console KVM
Bank 2
Bank 8
KVM Membranes
Power ON
■ Turn off all servers and KVM switches
■ Make sure all cables / connectors are properly connected
■ Recommend Power ON sequence is monitor, KVM switch finally computer
Front Panel - Port LED Indications
8 ports
Online Channel
Selected Channel
Bank Button
16 ports
Channel Select Button
Shift Bank
Button No.
Online Channel
Green LED on indicating a PC is connecting to the port
Selected Channel
RED LED on indicating a selected channel
Bank Button
Select the bank from1 to 8
Channel Select Button
Press to select channel from 1 to 8
Shift Button
Press & hold follow with a channel button to select channel from 9
to 16
Bank No.
7-Segment BANK LED indication
Password
Password for CV-802 / CV-1602
The password is disabled by default (i.e. There is no password required when you power on the KVM switch
for the first time)
■ Enable password
1. Press the KVM hotkey Scroll Lock + Scroll Lock + U
2. Logout the KVM by pressing the hotkey Scroll Lock + Scroll Lock + P
3. In SUPERVISOR level, enter “00000000” eight zeros in user name & password field
(Do not use “0” on number pad)
4. In USER level, press Space bar + Enter in user name & password field
Remark: Automatic logout after 10 minutes of inactivity
■
Set your own user name & password
1. Login the KVM in SUPERVISOR level by pressing “00000000” eight zeros in user name & password
field
2. Call KVM OSD menu by pressing the KVM hotkey Scroll Lock + Scroll Lock + Space Bar
3. Press F1 to the MAIN MENU
4. Select “USER SECURITY”
5. Set password in SUPERVISOR & USER level
a. In the left-top row “S” (SUPERVISOR), press Enter to set your own user name & password
b. In the row 1 to 8 (USER), press Enter to set your own user name & password
6. Press Enter to save the setting or press Esc to cancel the editing without any change
Remark: a. Blank has underscore. SPACE does not have underscore.
b. Press any alphanumeric key to move to next input item. SPACE is treated as a valid
character
■
Change your password
1. Login the KVM in SUPERVISOR level by pressing your own user name & password
2. Call KVM OSD menu by pressing the KVM hotkey Scroll Lock + Scroll Lock + Space Bar
3. Press F1 to the MAIN MENU
4. Select “USER SECURITY”
5. Change password in SUPERVISOR & USER level
a. In the left-top row “S” (SUPERVISOR), press Enter to change your user name & password
b. In the row 1 to 8 (USER), press Enter to change your user name & password
6. Press Enter to save the setting or press Esc to cancel the editing without any change
Remark: a. Blank has underscore. SPACE does not have underscore.
b. Press any alphanumeric key to move to next input item. SPACE is treated as a valid
character
■
■
Disable your password
1. Press the KVM hotkey Scroll Lock + Scroll Lock + U
2. Logout the KVM by pressing the KVM hotkey Scroll Lock + Scroll
3. You don’t need user name & password to access the KVM OSD menu
Forget your password
Please contact your supplier for further support
Remark:
■ You must press the KVM hotkey within 2 seconds
■ A beep sound will be heard for successful entering KVM hotkey
Lock + P
KVM OSD
OSD Menu
OSD operation
next to the system name
The PC is powered on
next to the system name
The PC is selected
F1
Access F1 MAIN MENU
F2
Logout the OSD menu
F3
Previous menu
Esc
Cancel / Quit
Enter
Complete / Switch to selected port
Switch to previous or next port
PgUp/PgDn
Switch to previous bank or next bank
1/2/3/4
Display port 01 ~ 08 / 09 ~ 16 / 17 ~ 24 / 25 ~ 32
Remark: Display port 17 ~ 32 for 32 port model only
F1 Main Menu
01 LANGUAGE
OSD language change
02 PORT NAME EDIT
Define port name
03 PORT SEARCH
Quick searching by port name
04 USER SECURITY
Change password
05 ACCESS LIST
Define user access authority
06 HOTKEY
Change hotkey
07 TIME SETTINGS
Modify scan display time interval
08 OSD MOUSE
Modify OSD mouse speed
KVM Hotkey
Local Console Hotkey for CV-802 / CV-1602
Hotkey
Function
Scroll Lock + Scroll Lock + Space Bar
Calling OSD menu
Right-button mouse + Esc
Calling OSD menu
Scroll Lock + Scroll Lock +
Switch to previous port
Scroll Lock + Scroll Lock +
Switch to next port
Scroll Lock + Scroll Lock +
PgUp / PgDn
Switch to previous bank or next bank
Scroll Lock + Scroll Lock +
Bank no. + Port no.
Switch to specific port
Scroll Lock + Scroll Lock +
B
Turn the buzzer ON and OFF
* Default the buzzer is ON
Scroll Lock + Scroll Lock +
P
Logout the KVM if password security is
ON. Show up the status windows
Advance hotkeys (for Supervisor login only)
Scroll Lock + Scroll Lock +
S
Activate auto-scan mode for connected
servers
*Press any key to exit the auto-scan
mode
Scroll Lock + Scroll Lock +
R
Reset all the KVM settings to factory
default
*Except User Security settings
Scroll Lock + Scroll Lock +
U
Disable and enable password security
*Default security is OFF
Remarks:
■ Example of “Scroll Lock + Scroll Lock + Bank no. + Port no.”
- Bank No. : 1 to 8
- Port No. : 01 to 16
- e.g. Bank 1 Port 4 : Scroll Lock + Scroll Lock + 1 + 0 + 4
- e.g. Bank 2 Port 16 : Scroll Lock + Scroll Lock + 2 + 1 + 6
■ You must press the hotkey within 2 seconds
■ A beep sound will be heard for successful entering
■ The numeric keypad is not supported, while in OSD screen, the arrow keys, PgUp, PgDn, and Enter keys
are supports
Remote Console Hotkey for CV-802 / CV-1602
Hotkey
Function
Caps Lock + Caps Lock +
F1
Show up the Help OSD windows
Caps Lock + Caps Lock +
F2
Select Hotkey
*Default is Caps Lock
Caps Lock + Caps Lock +
C
Toggle switch between remote & local port
Caps Lock + Caps Lock +
Q
Turn thr buzzer ON & OFF
*Default the buzzer is ON
Caps Lock + Caps Lock +
S
Activate auto-scan mode for remote & local port
*The scan time interval is 5 seconds
Caps Lock + Caps Lock +
A
Auto-adjust the video signal
Optional Accessories
1. PS/2 3-in-1 KVM cable
1.1 CD-6
6 feet
1.2 CD-10 10 feet
1.3 CD-15 15 feet
1.4 CD-33 33 feet
2. USB KVM cascade cable
2.1 CBC-6
6 feet
3. SUN / iMAC USB to PS/2 adapter
3.1 SUN-31 kit
5. Power cord
4.1 IEC power cord
4.2 NEMA 5-15 power cord (US)
4.3 BS 1363 power cord (UK)
4.4 CEE 7/4 power cord (German)
4.5 AS 3112 power cord (Australia)
DC Power 12V, 24V, 48V Input
Model
12V
24V
48V
Input voltage:
12-Volt
24-Volt
48-Volt
Input range:
9 ~ 18V
18 ~ 36V
36 ~ 75V
- No load
50 mA
50 mA
50 mA
- Full load
4950 mA
2450 mA
1220 mA
Output voltage:
12-Volt
12-Volt
12-Volt
Output current:
4.16A
4.16A
4.16A
Ef?ciency
84%
85%
85%
Input rating
Input current
Output rating
Remarks:
■ Package does not include power cord
Specification
CV-802 / CV-1602
▀
▀
▀
▀
KVM Port
Number of ports:
8 or 16
Connector:
HDDB 15-pin
Connectivity:
CD-6 / 10 / 15 / 33
6' / 10' / 15' / 33' 3-in-1 PS/2 KVM cable
Local Console
Graphic connector:
HDDB15-pin VGA
Resolution:
Up to 1920 x 1440
Input device:
2 x USB type A for keyboard & mouse
Remote Console
Connector:
HDDB 15-pin, VGA
Resolution:
Up to 1600 x 1200 (500 feet), Up to 1024 x 768 (1000 feet)
Input device:
2 x USB type A for keyboard & mouse
Remote I/O:
RJ45 via Cat5 / Cat5e / Cat6 cable up to 1000 feet
Compensation:
Auto adjust for cable length
On Screen Display
Port name:
Up to 10 characters long
Port select:
Front membrane button, Hotkey & On screen menu
Security:
Support eight character password
Auto scan:
5~99 seconds
▀
Expansion:
Up to 128 servers by 8-level cascade
▀
Compatibility
▀
Multi-platform:
Mix PCs, SUNs, IBMs, HPs, DELLs Server
Support:
Windows Vista / 2003 / XP / 2000, Linux, Netware, Unix, DOS
Power
Input:
100 or 240V AC at 50 or 60 Hz via AC adapter
Option DC:
12V / 24V / 48V DC input
▀
Regulatory Approval:
FCC, CE
▀
Environmental
▀
▀
Operating:
0 to 50°C
Storage:
-5 to 60°C
Relative humidity:
90%, non-condensing
Shock:
50G peak acceleration (11ms, half-sine wave)
Vibration:
58~100Hz / 0.98G (11ms / cycle)
Product Information
Dimension (W x D x H):
443 x 180 x 44 mm / 17.3 x 7.1 x 1.73 inch
Net weight:
CV-802 / CV-1602 : 4 kg / 9 lb
Packing Information
Dimension (W x D x H):
510 x 400 x 77 mm / 20.1 x 15.7 x 3 inch
Gross weight:
CV-802 / CV-1602 : 4.5 kg / 10 lb
FAQ
General
1.
How do the KVM switches allow the user to switch ports?
There are two ways to switch ports. One is the membrane buttons on the front and the other way is
with Hot-key commands.
2.
What operating systems do the KVMs support?
The KVMs support multi-platform support allows you to control Windows-based computers, Sun Solaris systems, Linux, or even Macs by a single KVM switch. The KVM switches support multi-platform
operating systems including but not limited to DOS, Windows 95/98/ME/NT/2000/XP, Linux, Solaris
and Mac OS.
3.
Do I have to power down the KVMs to add a new server ?
The KVMs are hot-pluggable and allows servers or devices to be added or removed without powering down the switch, but components of connected devices, such as the servers, may not be hotpluggable. We suggest that turn off power to all devices before connecting them.
4.
Why I can’t login with default password on KVM switch
The default username and password for the KVM switch is eight zeros - “00000000”. Please check
i.
The “Num lock” is not turned on. (for notebook type keyboard)
ii.
The numeric (number) keys on the number pad are not accepted by KVM, only the main
number keys.
5.
Can I disable the KVM password ?
Yes, for Cat5 KVM, USB KVM, two console PS/2 KVM & IP PS/2 KVM, user can disable/ enable the
KVM password by hotkey.
No, for PS/2 KVM, user can’t disable the KVM password.
6.
What do I do if I forget the password?
If the user change the default password and lose the password, pls contact the supplier for further
support.
7.
How many levels of KVM cascade are supported?
8 levels are supported.
8.
Can I cascade the different types KVM switches together ?
No, only same type KVM can cascade together. (e.g. PS/2 to PS/2, USB to USB,..)
9.
Why am I getting ghosting images or shadowing?
i.
Check that all video cables are inserted properly.
ii.
Check whether the KVM supports the resolution and refresh-rate on your servers.
iii.
Check whether the graphics card you are using supports the resolution and refreshrate on
your server or not.
iv.
Connect the monitor directly into the servers you are having trouble with to see if problem
still appears.
FAQ
10.
The server VGA resolution does not match the resolution of monitor ?
The KVM supports DDC function which will dynamically detect and the DDC data.
The problem may come from the power on sequence.
For KVM switch
The recommended power on sequence is - monitor, KVM switch and then servers.
For remote console box
It supports DDC function but does not support hot-plug, the recommend power on se
quence is – monitor, remote console box and then servers.
Two console KVM
What is the resolution support on remote console ?
The remote console can support up to 1,000 feet at 1024 x 768, and up to 500 feet at 1600 x 1200.
Why am I getting ghosting images or shadowing on remote console ?
Press “Scroll lock + Scroll lock + A” on the keyboard connected to remote console box to force autoadjusting the video signal to optimize.
Troubleshooting
1.
There is no LED display on KVM membrane switch
i.
Make sure the power adapter plugged into the KVM Switch, if the LED’s still off, perform soft
reset to KVM switch.
ii.
Power cycle KVM switch.
2.
I can power on the KVM, but I am not getting any picture at all, how can I solve this?
Switching to another port and checking if this port has the same problem
a.
If you switch to another port, please check the screen resolution is the same.
b.
Check the OSD menu is available on the hot keys “Scroll lock + Scroll lock + space bar”.
If the problems persist, please make sure the cables are inserted properly and the boot up
sequence is followed.
3.
The screen is on but the keyboard and mouse don’t work
i.
Check the server by using a different keyboard and mouse.
ii.
For PS/2 servers
The keyboard and mouse are not hot pluggable.
iii.
For USB servers
Unplug and plug allowing a few seconds for the bus emulation process to complete.
iv
Do not press any keys on the keyboard whilst the server is booting up. This can cause a
keyboard error or cause the keyboard not to detect the KVM switch.
v.
Try a different keyboard, but use only 101/102/104-key keyboard
vi.
Avoid moving the mouse whilst switching the KVM ports.
4.
There is no LED display on the Cat5 dongle
The LED on the Cat5 dongle will flash when plugged into the USB or USB server. The light will then
become steady when the KVM switch has connected. If the LED light is on and not flashing when
plugged into server, please unplug the USB or PS/2 and try again. Or try another good Cat5 dongle
to verify if problem still appears. If the problem persists, please contact your supplier.