1
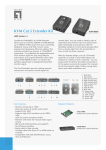
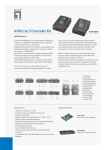
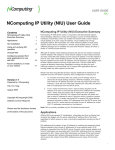
freeView X10P
1-Port Cat5 Extender
USER’S MANUAL
P/N: KEX-150P
Rev. 1.0
freeView Pro X10P User Manual
Copyright and Trademark Information
This document contains proprietary information that is protected by copyright. All rights
reserved. No part of this document may be photocopied, reproduced, or translated into another
language without express prior to written consent of Freedom9 Inc.
© Copyright 2006, freeView and the freedom9 company logo are trademarks or registered
trademarks of freedom9 inc. All rights reserved. Windows is a trademark or registered
trademark of Microsoft Corporation. Other trademarks or registered trademarks are the property
of their respective holders.
TABLE OF CONTENTS
1
GENERAL INFORMATION.................................................................................................................. 2
1.1
1.2
1.3
1.4
2
INSTALLATION.................................................................................................................................... 4
2.1
2.2
2.3
2.4
3
CONFIGURING THE TRANSMITTER.................................................................................................... 4
CONNECTING THE DEVICES ............................................................................................................ 4
CONNECTING TO AN ANALOG KVM.................................................................................................. 5
SWITCHING BETWEEN COMPUTERS ................................................................................................ 5
TROUBLESHOOTING......................................................................................................................... 6
3.1
4
OVERVIEW ..................................................................................................................................... 2
SAFETY INSTRUCTIONS................................................................................................................... 2
PACKAGE CONTENTS...................................................................................................................... 2
PRODUCT SPECIFICATIONS ............................................................................................................. 3
TROUBLESHOOTING ....................................................................................................................... 6
CERTIFICATIONS................................................................................................................................ 7
1
freeView Pro X10P User Manual
1 General Information
1.1
Overview
The freeView X10P is designed to allow users to access a computer from up to 500 feet (236
meters) away. By allowing keyboard, mouse, and video signals to travel over standard
Category 5 Ethernet cable, the transmitter and receiver pair facilitates secure remote access
without installing additional cables.
The freeView X10P is ideal for accessing servers located in server rooms that are difficult to
work in or inaccessible due to environmental conditions, security concerns, or space limitations.
Alternatively, multiple freeView X10P units can also be used to control computers in different
locations (e.g. board room, demonstration room, server room) from a single location.
Additionally, the freeView X10P can be connected to an existing analog KVM (keyboard-videomouse) installation to provide remote access to all of the servers connected to the KVM.
With both a local and a remote port on the unit, the freeView X10P allows a user to control both
a local computer at their desk, along with a remote computer, with a simple hotkey command to
switch between the two. The freeView X10P works with Category 5 Shielded Twisted Pair
(STP), Unshielded Twisted Pair (UTP), Category 5e, 6, and 7 cables.
1.2
Safety Instructions
If one of the following situations arises, the equipment should be checked by service personnel.
•
The power adapter is damaged.
•
Liquid has leaked into the equipment.
•
The equipment has been exposed to excessive moisture.
•
The equipment does not work properly and you can not get it to work after reading this
manual.
•
The equipment has been dropped and damaged.
•
The equipment shows obvious signs of damage.
1.3
Package Contents
The complete freeView X10P package consists of:
•
•
•
•
•
freeView X10P Transmitter
freeView X10P Receiver
3-in-1 PS/2 KVM cable
Power Adapter
User Manual
Ensure that the unit was not damaged during shipping. If you encounter a problem, please
contact your dealer.
Read this manual thoroughly, and follow the installation and operation procedures carefully to
prevent any damage to the product and/or any of the devices connected to it.
1.4
Product Specifications
Keyboard Port
Mouse Port
VGA Port
Network Port
LED
Power Adapter
Weight
Size (L x W x H)
Certification
freeView X10P Receiver
2 x Mini-din 6 pin (PS/2) Female
2 x Mini-din 6 pin (PS/2) Female
2 x HDDB 15-pin
1 x RJ-45
PC1, PC2
DC 9V, 500 mA
5.3 oz (150g)
4.6 x 3.1 x 1.6 in
(117 x 80 x 39.5 mm)
CE, FCC
3
freeView X10P Transmitter
2 x Mini-din 6 pin (PS/2) Female
2 x Mini-din 6 pin (PS/2) Female
2 x HDDB 15-pin
1 x RJ-45
Power, Data
N/A
4.7 oz (134g)
4.4 x 3.0 x 1.4 in
(111.5 x 75 x 35.5 mm)
CE, FCC
freeView Pro X10P User Manual
2 Installation
2.1
Configuring the Transmitter
Determine how far away the Transmitter will be located from the Receiver. If the distance is less
than 300 ft (91 m), set both DIP switches on the Transmitter to the OFF position. If the distance
is 300 ft (91 m) or more, set both DIP switches on the Transmitter to the ON position.
2.2
Connecting the Devices
1. Turn off all computers and peripherals before connecting them to the freeView Pro X10P.
2. Connect one end of the KVM cable included in the box to the VGA and PS/2 ports on the
computer.
3. Connect the other end of the KVM cable to the PS/2 and VGA ports labeled PC Port on the
Transmitter.
4. A local console can be installed by connecting a PS/2 keyboard, mouse, and monitor to the
Console ports on the Transmitter (see Figure 2-2).
5. Connect the Transmitter to the Receiver by using a straight-through category 5, 5e, 6, or 7
cable.
6. Connect a PS/2 keyboard, mouse, and monitor to the Console ports on the Receiver to be
able to control the remote computer.
7. If you are connecting the Receiver to a local computer, connect one end of a KVM cable (not
included) to the PS/2 and VGA ports labeled PC Port on the Receiver, and the other end of
the KVM cable to the PS/2 and VGA ports on the local computer (see Figure 2-2).
8. Connect the power adapter to the Receiver and plug the adapter into an outlet.
9. Power on the computer and peripherals.
10. Adjust the video quality using the Video Tuning Dial on the Receiver to sharpen the picture.
Note: The RJ-45 ports on the freeView X10P are not standard Ethernet ports. Do not connect
the freeView X10P to a network device such as a switch or a hub, otherwise the device will not
work.
Figure 2-1: Basic Setup
Figure 2-2: Advanced Setup with Remote Console and Local Computer
2.3
Connecting to an Analog KVM
The freeView X10P can also be connected to an analog KVM (or stack of analog KVMs) to
control multiple computers remotely (Figure 2-3). To connect the Transmitter to a KVM, follow
the steps outlined in section 2.2, but instead of connecting the KVM cable to the PS/2 and VGA
ports of the computer in step 2, connect the KVM cable to the PS/2 and VGA ports labeled
Console on the KVM switch (label may differ depending on the KVM).
Figure 2-3: Connecting to a KVM
2.4
Switching Between Computers
If you are using both a local computer and the remote computer, you can use a hotkey to toggle
between the local computer and the remote computer. To initiate a hotkey sequence, press the
Scroll Lock key twice within 2 seconds. A beep will sound indicating that the hotkey sequence
has been entered. The commands are listed below:
Scroll
Lock
+
Scroll
Lock
+
C
=
Toggle Between
computers
Scroll
Lock
+
Scroll
Lock
+
Q
=
Turn Confirmation Beep On/Off
5
Local
and
Remote
freeView Pro X10P User Manual
3 Troubleshooting
3.1
Troubleshooting
Problem: The Power LED on the Receiver does not turn on.
Resolution:
• Check that the power adapter is connected securely to the unit.
• Check that the power outlet is supplying power.
Problem: The monitor does not display any video.
Resolution:
• Check that the monitor is securely connected to the Receiver.
• Check that the KVM cable is securely connected to the Transmitter and the Computer.
• Ensure that the Cat5 cable is attached securely to the Receiver and Transmitter.
• Ensure that the KVM cable is attached when the computer is booting up.
• Ensure that the power adapter is connected to the Receiver.
• Ensure that the monitor is receiving power and is on.
Problem: The video displayed is blurry.
Resolution:
• Check that the monitor is securely connected to the Receiver.
• Check that the KVM cable is securely connected to the Transmitter and the Computer.
• Use the Video Tuning Dial to adjust the video quality.
• Lower the resolution on the remote computer. Maximum recommended resolution is 1280 x
1024, though overall quality depends on the quality of the Cat5 cable.
Problem: The computer displays a “Keyboard or Mouse Not Found” error message.
Resolution:
• Check that the KVM cable is securely connected to the Transmitter and the Computer.
• Check that the keyboard is connected securely to the Receiver.
4 Certifications
FCC
This equipment has been tested and found to comply with Part 15 of the FCC Rules. Operation
is subject to the following two conditions:
(1) This device may not cause harmful interference
(2) This device must accept any interference received. Including interference that may cause
undesired operation.
CE – Certificate
This equipment is in compliance with the requirements of the following regulations: EN 55 022:
CLASS B
7