Transcript
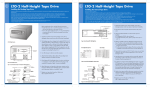
GETTING STARTED
T A P E STOR
To install your new TapeStor Travan 20GB tape drive,
follow the simple steps listed below. For detailed
installation instructions and trouble-shooting tips,
see the online manual on the Tape Resource CD.
®
Before installing the drive, check to make sure
your TapeStor 20GB box contains the
following items:
EASY INSTALLATION SHEET
•
Mounting brackets to adapt the drive to a
5.25-inch drive bay.
•
Mounting screws
•
A Certance Tape Resource CD (contains the
Online Installation Manual and much more)
•
This Easy Installation Sheet
Items you may need for installation:
IMPORTANT PRECAUTIONS
•
Internal ATAPI Tape Drive (20-Gbyte capacity)
• CD with Yosemite TapeWare backup software
ATAPI 20GB TAPE DRIVE
•
•
You will need flat-bladed and Phillips screwdrivers to complete the installation. In addition,
To protect your computer and drive from static electricity, install the drive in an
uncarpeted area and ground yourself frequently on a grounded metal object (such
as the frame of your computer) before opening the antistatic bag or touching any
components within your computer.
• If your computer has only a single IDE port, you will need to purchase and install an ATAPI host adapter to
provide a secondary IDE port for the tape drive.
• If no drives are presently attached to your secondary IDE port, you will probably need to purchase a 40-pin IDE
interface cable for your tape drive.
Step 1: Install the backup software
Turn off your computer and any peripheral devices before installing the drive.
We recommend that you install your backup software before you install the tape drive. For more information, see
the instructions that came with the backup software.
Note: For detailed tape drive installation instructions, operating instructions and troubleshooting tips, see the online
TapeStor 20GB manual on the Certance Tape Resource CD. The CD will startup automatically on most Windows
systems (if it doesn’t autostart, run setup.bat from the CD). From the introductory screen, click on “Installing
Your Drive.” Linux users can find the manual in the /pdfs directory of the CD under the appropriate language.
2
Note: Drive is shown upside down
Before continuing to the next step, shut down your computer, turn off the power, and remove the cover.
STEP 2
Master
Step 2: Configure the drive (optional)
Slave
(default)
If your tape drive will be on the same cable with an existing ATAPI device (such as a CD-ROM), you do not have to
change the default jumper setting (tape drive is a “slave”). Make sure that the existing ATAPI device is the “Master.”
Cable
select
If your tape drive will be the only device on your secondary IDE port, you need to configure your tape drive as a
“Master.” Turn the drive over and move the master/slave jumper to the “Master” position, as shown at left.
Step 3: Mount the drive
a) If you are mounting the tape drive in a 3.5-inch drive bay, skip to step 3b below. If you are mounting the drive in
a 5.25-inch drive bay, attach mounting brackets to each side of the drive, as shown at far left.
3a
b) Slide the drive into an unused drive bay until the bezel is flush with the front of the computer. Secure the drive
using four mounting screws. Do not overtighten the screws.
3b
STEP 3
Step 4: Connect the IDE cable
Attach your tape drive to the secondary IDE port.
3.5-inch
drive bay
5.25-inch
drive bay
Note. Do not attach your tape drive to any cable that is already connected to a hard drive, a floppy drive or a sound card.
If no drives or cables are attached to your secondary IDE port, you may need to purchase a new 40-pin IDE cable
to run from the secondary IDE port to your tape drive. Attach the new IDE cable to the secondary port and to the
tape drive as shown in the illustration 4a.
If you already have a CD-ROM or other device attached to your secondary IDE port, attach the tape drive to the
middle connector on the IDE cable, as shown in illustration 4b.
Primary
IDE port
Pin 1 (typical)
Step 5: Connect the power cable
Connect a 4-pin power cable to the back of the tape drive. If all the power cables in your computer are being
used by other devices, you can purchase a Y-shaped power-cable from your computer dealer.
CD M
RO
Secondary
IDE port
PE
TA
Primary
IDE port
r
te rd
pu a
m rbo
Co the
o
M
Note. When attaching cables, Make sure that pin 1 on the drive is connected with pin 1 on the IDE connector. Pin 1 on
the tape drive is located next to the 4-pin power cable. Pin 1 on the IDE cable is indicated by a stripe on the edge
of the cable.
d
ar
H ive
r
D
r
te rd
pu a
m rbo
o
e
C th
o
M
4b
d
ar
H ive
r
D
STEP 4
4a
Step 6: Complete the installation
a) Check all cables, including those of adjacent devices, to make sure that none have loosened during the
installation. Make sure that all cables are routed so that they will not bind or become crimped when you
replace the cover of your computer.
Secondary
IDE port
PE
TA
Stripe
on
cable
Pin 1 (typical)
b) Reinstall your computer cover.
c) Do a test backup to make sure that your tape drive and software are working properly.
STEP 5
5
©2003
Certance LLC. All rights reserved. Part number 10010845-001. Certance, the Certance logo and TapeStor are registered trademarks of
Certance LLC. Other product names are registered trademarks or trademarks of their owners. Certance reserves the right to change, without notice,
product offerings or specifications. No part of this publication may be reproduced in any form without written permission from Certance LLC.