1
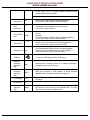
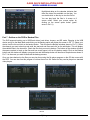
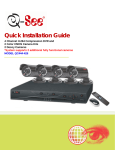
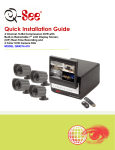
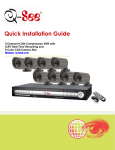
Quick Installation Guide 4 Channel H.264 Compression DVR and 4 Color CCD Camera Kits MODEL QC444-403 Q-SEE QUICK INSTALLATION GUIDE MODEL NUMBER QC444-403 PART 1 - PACKAGE CONTENTS: QC444 DVR Power Supply & 4 -Way Splitter For Cameras User’s Manual 4 - Color CCD Cameras with Stands 2 – QSDS14273 (6mm) 2 – QSDS14273W (3.6mm) Power Supply For DVR Ethernet Cable Software CD 1|Page Pre-Installed Hard Drive Camera Cables (2 Included) USB 2.0 Mouse Software CD BNC (M) – RCA (F) Adapter Remote Control Q-SEE QUICK INSTALLATION GUIDE MODEL NUMBER QC444-403 PART 2 - DVR CAMERA AND POWER CONNECTIONS Please note that it is STRONGLY recommended to use a surge protector that is UL-1449 rated. Look for a clamping voltage of 330 or lower, a Joule rating of at least 400 and a response time of 10 nanoseconds or less. Q-SEE QUICK INSTALLATION GUIDE MODEL NUMBER QC444-403 Part 3 – DVR Controls: Front Panel Please refer to the following chart for front panel button information: Name Icon Power button, press and hold this button for three seconds to boot up or shut down DVR. Power button Shift Up/1 Down/4 Function Shift In textbox, click this button to switch between numbers, letters (Small/Capitalized), and symbols. Activate current control, modify setup, and then move up and down. 、 Increase/decrease numbers. In text mode, input number 1/4 (letters G/H/I) Shift current activated control, Left/2 Right/3 ESC ESC In playback, click these buttons to control playback bar. In text mode, input number 2 (letters A/B/C) /3(letters D/E/F) Go to previous menu, or cancel current operation. In playback, click it to restore real-time monitor mode. Confirm current operation Enter ENTER Go to default button Go to menu Record REC Manually stop/start recording, working with direction keys or numeral keys to select the recording channel. Slow play/8 Multiple slow play speeds or normal playback. In text mode, input number 8 (letters T/U/V). Assistant One-window monitoring mode, click this button to display assistant function: image color. Backspace function: in numeral control or text control, press and hold it for 1.5 seconds to delete the previous character before the cursor. In motion detection setup, working with Fn and direction keys to realize setup. Fn 3|Page Q-SEE QUICK INSTALLATION GUIDE MODEL NUMBER QC444-403 In text mode, click it to switch between numbers, letters (small/capitalized) and symbols. Realize other special functions. Fast play/7 Various fast forward speeds and normal playback. In text mode, input number 7 (letters P/Q/R/S). Play previous/0 Reverse/Pau se/6 In playback mode, playback the previous video In text mode, input number 0. Play Next/9 Play/Pause /5 USB port In normal playback or pause mode, click this button to reverse playback In reverse playback, click this button to pause playback. In text mode, input number 6 (letters M/N/O) In playback mode, playback the next video In menu setup, go to down ward of the dropdown list. In text mode, input number 9 (letters W/X/Y/Z) In normal playback click this button to pause playback In pause mode, click this button to resume playback. In text mode, input number 5 (letters J/K/L). To connect USB storage device, USB mouse. Network abnormal indication light Net Network error occurred or there is no network connection, the light becomes red to alert you. HDD abnormal indication light HDD HDD error occurred or HDD capacity is below specified threshold value, the light becomes red to alert you. Record light 1-16 IR Receiver IR Alarm indication light Alarm System is recording or not. It comes on when system is recording. Receives the signal from the remote control. Here you can view if there is external alarm input or not. The light comes on when there is an external alarm. The light turns off when the external alarm stops. 4|Page Q-SEE QUICK INSTALLATION GUIDE MODEL NUMBER QC444-403 Part 4 – Accessing the DVR menus After the system boots up it will go into multiple window mode. Click Enter or left click with the mouse anywhere on the screen and you will bring up the login interface (shown as Pic 4.1) and enter the admin password which is admin by default under the admin login. This will bring up the Main Menu screen in Pic 4.2. There are 6 icons; Search, Info, Setting, Advanced, Backup and Shutdown. Use the Search option to find and playback files from the hard drive. Go to the Info option for hard drive info, system log, version information, and online users. The Setting option is used to access General settings where you set system time, Language, hard drive overwrite, file size, and video display format, the Encode option where you set compression, frame rate, bit rate, audio, and sub stream, Schedule setup, RS232 setup, Network setup, Alarm setup, motion detection setup, PTZ setup, Display setup, and Load Default setup. The Advanced option is used for hard drive management, alarm output, manual recording, account setup, auto maintenance, and TV output adjustment. The Backup icon is used to backup files from the hard drive, and the Shutdown option is used to safely shutdown the system. Pic 4.1 Pic 4.2 Part 5 – Setting up DVR to record There are 3 modes for recording Manual Recording Scheduled Recording Motion Recording. 1. Manual Recording: You can get to the Manual Record menu by right clicking on the screen with the mouse or by going to the Main Menu and selecting Manual Record. This will take you to the screen in Pic 5.1. You can click the All option on the manual line to start recording on all channels, or you can select the cameras that you want to record in manual mode. To stop recording you can select the all option on the stop line, or select individual cameras as shown in Pic 5.2. Pic 5.1 PIC 5.2 5|Page Q-SEE QUICK INSTALLATION GUIDE MODEL NUMBER QC444-403 2. Scheduled Recording: To record on a schedule you would go to the Main Menu, Manual Record and select the cameras on the Schedule line instead of the Manual line in the Manual Record screen shown in Pic 5.1, then go to the Main Menu, click on Settings, and select Schedule. This will bring up the screen shown in Pic 5.3. You can set up a schedule for all channels or different times for different cameras. You can also set up the same schedule for all days, or set up different schedules for different days. You can also setup a mixed schedule where you have some cameras recording all of time during certain times and on motion or alarm detection during others. Pic 5.4 shows a mixed schedule were some the cameras are set to record all the time between 8 and 10am, record on motion detection between 12am and 8am and 12pm to 8pm and then on external alarm from 10am to 12pm and 8pm to 12am. The time line on the bottom of the screen shows how the day is broken up by the recording methods. Pic 5.3 Pic 5.4 3. Motion Detection Recording: There are 3 steps to setting up the DVR to record on motion. The first is to go to the Main Menu, Advanced, Manual Record option which will display the screen shown in Pic 5.5. You can select the All option on the Schedule line to record on all cameras or you can select the cameras that you want to schedule motion recording on. Next you would go to the Main Menu, Setting, Schedule option to setup the schedule for when you want the cameras to record on motion. This is shown in Pic 5.6 where Channel one is scheduled to record 24 hours on Wednesday. Set the schedule for all cameras on all days that you want them to record on motion. Pic 5.5 Pic 5.6 6|Page Q-SEE QUICK INSTALLATION GUIDE MODEL NUMBER QC444-403 After setting up the schedule go to Main Menu, Setting, Detect and this will display the screen shown in Pic 5.7. Under Event Type select Motion Detect, Select your Channel, or All, and select the enable option to enable the camera for motion detection. Next under Region click the Select button to set up the area of the camera display that you want to be sensitive to motion. This will display the screen in Pic 5.8. The green box is the current location of the cursor. The red area is the sensitive area and the black area is not sensitive to motion. Click the Fn button on the remote control to adjust the sensitivity of your mouse as you move the cursor. After you have finished the setup click the Enter button on the remote control to exit. Next set your sensitivity level from 1 to 6 (6 being the most sensitive), then click the Save button on the Detect screen to save the setting. Pic 5.7 Pic 5.8 Part 6 - Playing Back Files Click the Search option in the Main Menu to display the screen shown in Pic 6.1. The table to the right shows the functions of the buttons on the screen. 1. Play 2. Reverse 3. Stop 4. Slow Play 5. Fast Forward 6. Previous Frame 7. Next Frame 8. Volume 9. Previous File 10. Next Channel 11. Next File 12. Previous Channel 13. Search 14. Backup Pic 6.1 Clicking on the icon (blue arrow in Pic 6.1) will open a schedule window shown in Pic 6.2 7|Page Q-SEE QUICK INSTALLATION GUIDE MODEL NUMBER QC444-403 Highlighted dates on the calendar indicates that there are video files available on that day. You can double click on the day to view the file list. You can play back the files in 4 screen or 8 screen mode. Select your screen option by clicking on the screen option button (green arrow in Pic 6.1) Pic 6.2 Part 7 - Setting up the DVR to Backup Files The DVR supports backing up to USB flash drives, hard drives, burners, and SD cards. Plugging in the USB device and go to the Main Menu and clicking on the Backup option will display the screen in Pic 7.1. Select your device from the list and click on the backup button. This will open the Backup windows shown in Pic 7.2. Select the channel you want to back up and enter the start and end times and click on the add button. This will display the available files in the lower box. Check the files that you want to backup. The bottom of the window will show the space required to back up the files and how much space is left on the backup media. Click on the Backup button and the window will display a progress bar and the Backup button will become a Stop button as shown in Pic 7.3 in the event you wish to terminate the backup process. Once you have backed up the files you can play them using the file player program on the CD that comes with the DVR. You can also use this program to convert them into AVI format so they can be played on standard video players. Pic 7.1 Pic 7.2 Pic 7.3 8|Page Q-SEE QUICK INSTALLATION GUIDE MODEL NUMBER QC444-403 Questions or Comments? Contact Us: Mailing Address: Customer Service: DPS, Inc. 8015 E. Crystal Dr. Anaheim, CA 92807 Phone: 877-998-3440 x 538 Email: [email protected] Live Chat from our Website Website: Tech Support: http://www.q-see.com Fax: 714-998-3509 Phone: 877-998-3440 x 539 Email: [email protected] Live Chat from our Website REVISED 8/30/2010 9|Page