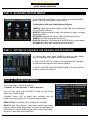
1
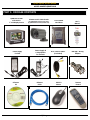
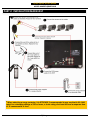
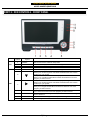
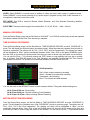
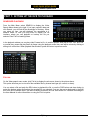
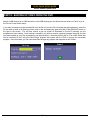
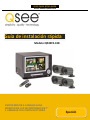
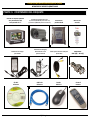
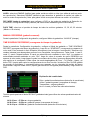
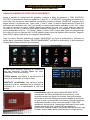
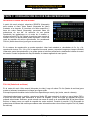
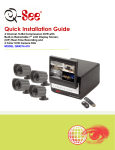
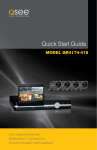
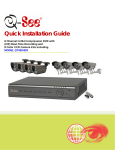
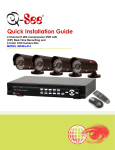
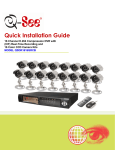
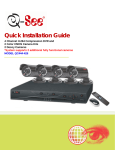
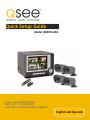
Quick Setup Guide Model QR4074-418 4 CH. H.264 NETWORK DVR BUILT-IN 7” LCD MONITOR 4 COLOR CCD NIGHT VISION CAMERAS English and Spanish Q-SEE QUICK SETUP GUIDE . MODEL NUMBER QR4074-418 PART 1: PACKAGE CONTENTS QR4074 4 CH DVR with Built-in 7” LCD Display Screen Power Supply For DVR Software CD 4 Cameras with 3-Axis Stands (2) QSDS0612D Cameras (6mm Lens) (2) QSDS3612D Cameras (3.6mm Lens) Power Supply & 4 -Way Splitter For Cameras Ethernet Cable 1|Page Pre-Installed Hard Drive 60 Ft. Camera Cables (4 Included) USB 2.0 Mouse User’s Manual BNC (M) – RCA (F) Adapter Remote Control Q-SEE QUICK SETUP GUIDE . MODEL NUMBER QR4074-418 PART 2: INSTALLATION MADE EASY * When selecting a surge protector, it is STRONGLY recommended to use one that is UL-1449 rated, for a clamping voltage of 330 or lower, a Joule rating of at least 400 and a response time of 10 nanoseconds or less. 2|Page Q-SEE QUICK SETUP GUIDE . MODEL NUMBER QR4074-418 PART 3: DVR CONTROLS - FRONT PANEL Device LCD Item Number Button Name / Symbol 1 POWER 2 3 4 5 MENU + MENU 6 DVR 7 8 ENTER 9 REC. 10 11 PWR IR Receiver Function On: The LCD screen is displayed in a basic activation status; Off: The LCD screen enters into sleep mode. Press once to display LCD main menu. Press again to exit LCD main menu. Increase and confirm setting value Decrease and confirm setting value Press once to display DVR main menu. Press again to exit DVR main menu. When pressed while the Main Menu is not displayed, the down arrow button allows you to scroll through the video feeds transmitted from each camera hooked up to your system. When pressed while the Main Menu is displayed, the down arrow button allows you to navigate the Main Menu Interface and select the icon of the program you wish to access. When pressed while the Main Menu is not displayed, the right arrow button allows you to scroll through the video feeds transmitted from each camera hooked up to your system. When pressed while the Main Menu is displayed, the right arrow button will allow you to navigate the Main Menu Interface and select the icon of the program you wish to access. When pressed while the Main Menu is displayed, the ENTER button will allow you to enter into the sub-menu of the program you wish to access. When the “Red” Indicator Light Flashes, it Means the Hard Drive is Being Read or Written to If the “Green” Indicator Light is on, the System is Getting Power. Receives Signal from Remote Control 3|Page Q-SEE QUICK SETUP GUIDE . MODEL NUMBER QR4074-418 PART 4: ACCESSING THE DVR MENUS Choose MENU by right clicking on the mouse or by pushing the MENU button on the DVR front panel or remote control. The Main Menu offers the following Setup Features: CAMERA: Setup name display, position, image view, and record quality of each channel (cameras). RECORD: Enable recording & audio, set resolution & quality, recording mode and file size. NETWORK: Setup Network access (Remote Internet Monitoring). SEARCH: Find files for playback and backup. DEVICES: Manage & Format hard drive and USB devices, setup alarms, PTZ cameras, mobile phone access and motion detection. SYSTEM: Setup time, date, password, and video mode. PART 5: SETTING UP CAMERAS FOR VIEWING AND RECORDING 1. From the Main menu, select CAMERA to setup the name display (up to 8 characters) and position of each channel (cameras). 2. Select COLOR SETUP to adjust the image brightness, saturation, contrast and hue settings for each channel (camera). 3. Select LIVE MODE and/or RECORING MODE to choose a preview mode for the channel (camera.) PART 6: TO START RECORDING This System offers 3 modes for recording: A. Manual B. Time Schedule C. Motion Detection From the main menu, select RECORD to enter into the Record Setup menu (shown at right). CHANNEL: Select “ON” to enable video recording from the respective camera. Select “OFF” to disable video recording. RESOLUTION: D1=704x480, HD1=704x240, CIF=352x240 QUALITY: Best, Good, Normal. Using higher resolution and quality settings results in better video quality, but takes up more space on the hard drive. Choosing lower settings result in lower video quality, but takes up less space on the hard drive. 4|Page Q-SEE QUICK SETUP GUIDE . MODEL NUMBER QR4074-418 AUDIO: Select ENABLE to record sound in addition to video (will have audio output in playback mode). Select DISABLE, to turn sound recording off (no audio output in playback mode). Note: Audio cameras or a microphone is required to record the sound REC MODE: Sets DVR to record on Manual, Motion Detection, and Time Schedule Recording (detailed instructions below). PACK TIME: Choose the time length of all recorded files: 15, 30, 45, 60 min. (Max = 60 min) MANUAL RECORDING: From the Record Setup screen set the Rec Mode to “ALWAYS”. Your DVR will continuously record and separate files will be created with the Pack Time intervals you selected. TIME SCHEDULE RECORDING: From the Record Setup screen, set the Rec Mode to “TIME SCHEDULE RECORD” and click “SCHEDULE” in green. This will display the Schedule menu (see below image). Select the channels (cameras) that you wish to record on a schedule. The options are: All, CH-1, CH-2, CH-3, and CH-4 respectively. The channel you select will be highlighted in “Blue”, and the unselected channels will be “Grey. Click on the green GENERAL option box then click on the boxes for the days and times that you want to record using this option on the timeline. You can use the [From – To] pull-down menus and COPY button to copy settings from one day to another day, or all days. Your DVR will record on it’s Time Schedule, and separate files with the Pack Time Interval you selected. Click APPLY to activate your customized schedule, and then reboot the DVR. Grid Explanation: Red = Alarm (motion detection) recording Green = General (time schedule) recording Transparent = No recording Blue = The channel and date selected. You can also click on the DEFAULT button to use the system defaults. The system default settings are: Hr 01:00 am-07:59 am : No recording Hr 08:00 am-18:59 pm : General recording (Time Schedule) Hr 19:00 pm- 00:59 am : Alarm recording (Motion Detection) MOTION DETECTION RECORDING: From the Record Setup screen, set the Rec Mode to “TIME SCHEDULE RECORD” and click “SCHEDULE” in green. This will display the Schedule menu (See “SCHEDULE” picture on previous page). The options are: All, CH-1, CH-2, CH-3, and CH-4 respectively. The channel you select will be highlighted in “Blue”, and the unselected channels will be “Grey. Click on the red ALARM option box then click on the boxes for the days and times that you want to record using this option on the timeline. You can use the [From – To] pull-down menus 5|Page Q-SEE QUICK SETUP GUIDE . MODEL NUMBER QR4074-418 and COPY button to copy settings from one day to another day, or all days. Your DVR will record on Motion Detection. Click APPLY to activate your customized schedule. Next, go to the Devices option (“MAIN MENU” image below) and select the Motion Option (“DEVICE MANAGEMENT” image below), which will display the Motion Detect Box. The Motion detection Menu has three sections, including Channel Status, Sensitivity and Motion area. STATUS: This option allows you to enable motion detection on any channel. SENSITIVITY: This option allows you to set the sensitivity level of motion detection from 1 to 4, with 4 being the highest. Next, click on the MD AREA SETUP button, which will display the picture on the left. This option allows you to select the area you want to be sensitive to motion. The area in red is sensitive to motion. You can set this area by using the mouse or REV, FWD, and SEL keys on the front panel. Once you have set the area, right click with the mouse or push the ESC key to save the setting. After you have set all of the cameras, click on the Apply button to save the settings. 6|Page Q-SEE QUICK SETUP GUIDE . MODEL NUMBER QR4074-418 PART 7: SETTING UP THE DVR TO PLAYBACK SEARCHED PLAYBACK: From the Main Menu select SEARCH to display the Video Search Menu shown to the right. If you input a specific date and click Search, you will find all the recordings for that day. When you select an item, you will playback the recordings in 4 channel mode; or, click [File list] button to display File list interface, where you can playback or backup the file you selected. See File List heading below. In the playback window you can play video Forward at 2x, 4x, and 8x speeds, Slow play at 1/2x, 1/4x, and 1/8x, or normal play, pause and play frame by frame using the playback control bar, and adjust volume by clicking or sliding tune control bar. When playback has finished, system will return to previous menu. File List: On the Video search menu mode, click File list to display the sub-menu shown in the picture above. This option will allow you to view all of the available files by channel and type (all, normal, or alarm). You can select a file and push the SEL button to playback the file, or use the FWD button and down button to select the backup option and backup the recorded file you selected. You can also put a checkmark in the BAK box at the end of multiple files if you want to backup more than one file. See section 5.2.4 Search Recordings in the User Manual for more information on using the File List option. 7|Page Q-SEE QUICK SETUP GUIDE . MODEL NUMBER QR4074-418 PART 8: BACKING UP VIDEO FROM THE DVR Attach a USB flash drive or USB hard drive to the USB backup port and follow the instructions in Part 8 to go to the File List in the Search menu. If you want to backup a single recorded file from the file list, from the File List dialog box pictured above, select the file you wish to back up by placing a check mark in the accompanying green box and hit the [BACKUP] button on the right of the screen. You will then receive a pop up screen as illustrated in Picture 22 showing you the progression of your backup. Once backup is complete, you will then receive a pop up message informing you that you have backed up your files successfully (see picture below). Note that all files will be in an H264 format that can be converted to AVI using the Multi Player program that comes with the DVR or through the net-viewer program. Once converted, you can view these files through any program that supports an AVI format. 8|Page Q-SEE QUICK SETUP GUIDE . MODEL NUMBER QR4074-418 Questions or Comments? Contact Us: MAILING ADDRESS CUSTOMER SERVICE Q-See Products Digital Peripheral Solutions, Inc. 8015 E. Crystal Dr. Anaheim, CA 92807 Phone: 877-998-3440 x 538 Email: [email protected] Live Chat on the homepage www.Q-See.com WEBSITE TECH SUPPORT http://www.q-see.com Phone: 877-998-3440 x 539 Email: [email protected] Live Chat on the homepage www.Q-See.com FAX 714-998-3509 Make sure you register your Q-See product. Visit www.q-see.com, click “support”, then “online registration form”. Complete the product registration form to receive warranty/technical support benefits, and to be notified of product updates and free downloadable firmware updates to your DVR. REVISED 8/26/2010 9|Page Q-SEE QUICK SETUP GUIDE . MODEL NUMBER QR4074-418 Guía de instalación rápida Modelo QR4074-418 DVR DE RED DE 4 CANALES H.264 MONITOR DE LCD INCORPORADO DE 7” 4 CÁMARAS CON VISIÓN NOCTURNA 10 | P a g e Spanish GUÍA DE INSTALACIÓN RÁPIDA DE Q-SEE . NÚMERO DE MODELO QR4074-418 PARTE 1: CONTENIDO DEL PAQUETE DVR de 4 canales QR4074 con pantalla de LCD incorporada de 7” Suministro de energía para el DVR CD del software 4 cámaras con bases de 3 ejes (2) Cámaras QSDS0612D (Lentes de 6 mm) (2) Cámaras QSDS0612D (Lentes de 3.66 mm) Suministro de energía y bifurcador de 4 vías para las cámaras Cable de Ethernet 1|Página Disco duro preinstalado Cables para la cámara de 60 pies (4 incluidos Ratón USB 2.0 Manual del usuario Adaptador BNC (M) – RCA (F) Control remoto GUÍA DE INSTALACIÓN RÁPIDA DE Q-SEE . NÚMERO DE MODELO QR4074-418 PARTE 2: INSTALACIÓN FÁCIL * Para la selección de un protector contra sobretensiones, se recomienda ENÉRGICAMENTE el uso de uno con clasificación UL-1449, para un voltaje pasante de 330 o inferior, una clasificación julio de por lo menos 400 y un tiempo de respuesta de 10 nanosegundos o menos. 2|Página GUÍA DE INSTALACIÓN RÁPIDA DE Q-SEE . NÚMERO DE MODELO QR4074-418 PARTE 3: CONTROLES DEL DVR – PANEL FRONTAL Dispositivo LCD N.º de partida Nombre del botón / Símbolo 1 POWER 2 MENU 3 4 + - 5 MENU 6 DVR 7 8 ENTER 9 REC. 10 PWR 11 Receptor de IR Función Encendido: la pantalla de LCD se muestra en un estado de activación básica; Apagado: la pantalla de LCD pasa a modo de espera. Presione una vez para mostrar el menú principal del LCD. Presione otra vez para salir del menú principal del LCD. Aumentar y confirmar el valor de configuración Disminuir y confirmar el valor de configuración Presione una vez para mostrar el menú principal del DVR. Presione otra vez para salir del menú principal del DVR. Si presiona el botón de la flecha descendente cuando no aparece el Menú principal, este le permite desplazarse a través de las señales de video transmitidas de cada cámara conectada al sistema. Si presiona el botón de la flecha descendente cuando aparece el Menú principal, este le permite navegar por el Interfaz del Menú principal y seleccionar el icono del programa al cual usted desea tener acceso. Si presiona el botón de la flecha hacia la derecha cuando no aparece el Menú principal, este le permite desplazarse a través de las señales de video transmitidas de cada cámara conectada al sistema. Si presiona el botón de la flecha hacia la derecha cuando aparece el Menú principal, este le permite navegar por el Interfaz del Menú principal y seleccionar el icono del programa al cual usted desea tener acceso. Si presiona el botón ENTER (ingresar) cuando no aparece el Menú principal, este le permite acceder al submenú del programa al cual usted desea tener acceso. Cuando la luz indicadora de color “rojo” parpadea, significa que el disco duro está siendo leído o escrito. Si la luz indicadora de color “verde” está encendida, el sistema está recibiendo alimentación de energía. Recibe la señal del control remoto. 3|Página GUÍA DE INSTALACIÓN RÁPIDA DE Q-SEE . NÚMERO DE MODELO QR4074-418 PARTE 4: ACCESO A LOS MENÚS DEL DVR Seleccione MENU presionando el botón derecho del ratón o presionando el botón MENU ubicado en el panel frontal del DVR o en el control remoto. El Menú principal ofrece las funciones de configuración que figuran a continuación: CAMERA (cámara): configuración del nombre mostrado, posición, visualización de imagen y la calidad de grabación de cada canal (cámaras). RECORD (grabar): habilitar grabación y audio, fijar la resolución y la calidad, modo de grabación y tamaño del archivo. NETWORK (red): configuración del acceso a la red (monitoreo remoto a través del Internet). SEARCH (búsqueda): encontrar archivos para reproducir y crear un respaldo. DEVICES (dispositivos): administrar y formatear el disco duro y los dispositivos de USB, configurar las alarmas, cámaras PTZ, acceso a teléfono móvil y detección de movimiento. SYSTEM (sistema): configuración de la hora, fecha, contraseña y modo de video. PARTE 5: CONFIGURACIÓN DE LAS CÁMARAS PARA VISUALIZACIÓN Y GRABACIÓN 1. Desde el menú Principal, seleccione CAMERA (cámara) para configurar el nombre de visualización (hasta 8 caracteres) y la posición de cada canal (cámaras). 2. Seleccione COLOR SETUP (configuración del color) para ajustar la configuración de la brillantez, saturación, contraste y tonalidad de la imagen de cada canal (cámara). 3. Seleccione LIVE MODE (modo en vivo) y/o RECORDING MODE (modo de grabación) para seleccionar un modo de presentación preliminar para cada canal (cámara). PARTE 6: PARA COMENZAR A GRABAR El sistema ofrece tres modos para grabar: A. Manual B. Cronograma de tiempo Detección de movimiento Desde el menú principal, seleccione RECORD (grabar) para ingresar al menú Record Setup (configuración de grabación) (mostrado a la derecha). CHANNEL (canal): seleccione “ON” (activado) para activar la grabación de video desde la respectiva cámara. Seleccione “OFF” (desactivado) para desactivar la grabación de video. RESOLUTION (resolución): D1=704x480, HD1=704x240, CIF=352x240 QUALITY (calidad): Best, Good, Normal (Excelente, Buena, Normal). La opción de configurar la resolución y la calidad al nivel más alto resulta en una mejor calidad de video, pero toma más espacio del disco duro. La selección de configuraciones más bajas, resultan en una calidad de video más baja, pero toma menos espacio del disco duro. 4|Página GUÍA DE INSTALACIÓN RÁPIDA DE Q-SEE . NÚMERO DE MODELO QR4074-418 AUDIO: seleccione ENABLE (habilitar) para grabar sonido en adición a video (con salida de audio en modo de reproducción). Seleccione DISABLE (desactivar) para desactivar la grabación de sonido (sin salida de audio en modo de reproducción). Nota: para grabar sonido se requiere cámaras con audio o un micrófono. REC MODE (modo de grabación): para configurar el DVR en los modos de grabación de Detección de movimiento, Cronograma de tiempo y Manual (las instrucciones detalladas figuran a continuación). PACK TIME: seleccione el período de tiempo de todos los archivos grabados: 15, 30, 45, 60 minutos (Máximo = 60 minutos). MANUAL RECORDING (grabación manual): Desde la pantalla de Configuración de grabación, configure el Modo de grabación a “ALWAYS” (siempre). TIME SCHEDULE RECORDING (cronograma de tiempo de grabación): Desde la pantalla de Configuración de grabación, configure el Modo de grabación a “TIME SCHEDULE RECORD” (cronograma de tiempo de grabación) y haga clic en “SCHEDULE” (cronograma) que aparece de color verde. Esto mostrará el menú Schedule (cronograma) (vea la imagen a continuación). Seleccione los canales (cámaras) que desea grabar conforme a un cronograma. Las opciones son: Todas, canal 1, canal 2, canal 3 y canal 4 respectivamente. El canal que seleccione será resaltado en color “Azul”, los canales no seleccionados estarán resaltados en color “Gris”. Haga clic sobre el recuadro de opción GENERAL que aparece de color verde y luego haga clic sobre los recuadros de los días y horas que desea grabar utilizando esta opción en el cronograma. Puede utilizar los menús desplegables de [From – To] (Desde - Hasta) y el botón COPY (copiar) para copiar las configuraciones de un día a otro día o a todos los días. Su DVR grabará de acuerdo al cronograma, y se crearán archivos por separado con los intervalos del período de tiempo seleccionado. Haga clic sobre APPLY (aplicar) para activar su cronograma personalizado y luego reinicie el DVR. Explicación del cuadriculado: Rojo = grabación mediante alarma (detección de movimiento). Verde = grabación general (cronograma de tiempo). Transparente = ninguna grabación Azul = el canal y la fecha han sido seleccionados. También puede presionar el botón DEFAULT (predeterminado) para utilizar los valores predeterminados del sistema. Hr 01:00 a.m. - 07:59 a.m.: ninguna grabación Hr 08:00 a.m. - 18:59 p.m.: grabación general (cronograma de tiempo) Hr 19:00 p.m. - 00:59 a.m.: grabación mediante alarma (detección de movimiento) 5|Page GUÍA DE INSTALACIÓN RÁPIDA DE Q-SEE . NÚMERO DE MODELO QR4074-418 GRABACIÓN MEDIANTE DETECCIÓN DE MOVIMIENTO Desde la pantalla de Configuración de grabación, configure el Modo de grabación a “TIME SCHEDULE RECORD” (cronograma de tiempo de grabación) y haga clic en “SCHEDULE” (cronograma) que aparece en color verde. Esto mostrará el menú Schedule (cronograma) (consulte la imagen “SCHEDULE” que figura en la página anterior). Las opciones son: Todas, canal 1, canal 2, canal 3 y canal 4 respectivamente. El canal que seleccione será resaltad en color “Azul”, los canales no seleccionados estarán resaltados en color “Gris”. Haga clic sobre el recuadro de opción ALARM (alarma) que aparece de color rojo y luego haga clic sobre los recuadros de los días y horas que desea grabar utilizando esta opción en el cronograma. Puede utilizar los menús desplegables de [From – To] (Desde - Hasta) y el botón COPY (copiar) para copiar las configuraciones de un día a otro día o a todos los días. Su DVR grabará cuando ocurra una detección de movimiento. Haga clic sobre APPLY (aplicar) para activar su cronograma personalizado. Vaya a la opción Devices (dispositivos) (imagen “MAIN MENU” que figura a continuación) y seleccione la opción Motion (movimiento) (imagen “DEVICE MANAGEMENT” que figura a continuación), lo cual mostrará la ventana Motion Detect (detección de movimiento). El menú Motion detection (detección de movimiento) tiene tres secciones, incluidas Estado del canal, Sensibilidad y Zona de movimiento. STATUS (estado): esta opción le permite activar la detección de movimiento en cualquier canal. SENSITIVITY (sensibilidad): esta opción le permite configurar el nivel de sensibilidad de la detección de movimiento de 1 a 4, 4 representando el nivel más sensible. A continuación, haga clic sobre el botón MD AREA SETUP (configuración de la zona de detección de movimiento), el cual mostrará la imagen que figura a la izquierda. Esta opción permite seleccionar la zona que usted desea que sea sensible al movimiento. La zona de color rojo es sensible al movimiento. Esta zona puede ser configurada utilizando el ratón o las teclas de REV, FWD y SEL ubicadas en el panel frontal. Cuando haya configurado la zona, pulse el botón derecho del ratón o la tecla ESC para guardar la configuración. Después de haber configurado todas las cámaras, haga clic sobre el botón Apply (aplicar) para guardar las configuraciones. 6|Page GUÍA DE INSTALACIÓN RÁPIDA DE Q-SEE . NÚMERO DE MODELO QR4074-418 PARTE 7: CONFIGURACIÓN DEL DVR PARA REPRODUCCIÓN REPRODUCCIONES ENCONTRADAS A partir del menú principal, seleccione SEARCH (búsqueda) para mostrar el menú Video Search (búsqueda de video) mostrado a la derecha. Si introduce una fecha específica y hace clic sobre Search (búsqueda), encontrará todas las grabaciones de ese día. La selección de una partida reproducirá las grabaciones en el modo de 4 canales; o, presione el botón [File list] (listado de archivos) para mostrar el interfaz File list, en donde usted puede reproducir o crear una copia de respaldo del archivo seleccionado. Ver encabezado File List (listado de archivos) que figura a continuación. En la ventana de reproducción se puede reproducir video hacia adelante a velocidades de 2x, 4x y 8x; reproducción lenta a 1/2x, 1/4x y 1/8x; o reproducción normal, pausar y reproducir imagen por imagen utilizando la barra de control de reproducción y se puede ajustar el volumen presionando o deslizando la barra de control de tonada. Cuando la reproducción haya finalizado, el sistema regresará al menú previo. File List (listado de archivos) En el modo del menú Video search (búsqueda de video), haga clic sobre File list (listado de archivos) para mostrar el submenú mostrado en la imagen que figura arriba. Esta opción permite visualizar todos los archivos disponibles por canal y tipo (todos, normal o alarma). Usted puede seleccionar un archivo y presionar el botón SEL para reproducir el archivo o usar el botón FWD y el botón de hacia abajo para seleccionar la opción de respaldo y crear una copia de respaldo del archivo grabado seleccionado. Asimismo, puede colocar una marca de cotejo en el encasillado BAK al final de múltiples archivos si desea crear una copia de respaldo de varios archivos. Consulte la sección 5.2.4 Búsqueda de grabaciones del Manual del usuario para obtener más información sobre cómo utilizar la opción File List (listado de archivos). 7|Page GUÍA DE INSTALACIÓN RÁPIDA DE Q-SEE . NÚMERO DE MODELO QR4074-418 PARTE 8: CREACIÓN DE UNA COPIA DE RESPALDO DEL VIDEO DESDE EL DVR Conecte una memoria USB o un disco duro USB al puerto de respaldo USB y siga las instrucciones de la Parte 8 para ir a File List (listado de archivos) en el menú Search (búsqueda). Si desea crear un copia de respaldo de un solo archivo grabado del listado de archivos, desde la ventana de diálogo File List (listado de archivos) que figura en la imagen de arriba, seleccione el archivo del cual usted desea crear una copia de respaldo colocando una marca de cotejo en el encasillado verde y presione el botón [BACKUP] (crear copia de respaldo) que aparece a la derecha de la pantalla. Después, aparecerá una pantalla emergente que le mostrará el progreso de su copia de respaldo, como figura en la Imagen presentada a continuación. En cuanto finalice la creación de la copia de respaldo, aparecerá un mensaje emergente informándole que la creación de la copia ha sido exitosa (consulte la imagen que figura a continuación). Observe que todos los archivos estarán en un formato H264, los cuales pueden ser convertidos a formato AVI usando el programa Multi Player incluido con el DVR o a través del programa Net-Viewer. Una vez los haya convertido, usted puede visualizar estos archivos mediante cualquier programa que respalde el formato AVI. 8|Page GUÍA DE INSTALACIÓN RÁPIDA DE Q-SEE . NÚMERO DE MODELO QR4074-418 ¿Preguntas o comentarios? Contáctenos: DIRECCIÓN POSTAL SERVICIO DE ATENCIÓN AL CLIENTE Q-See Products Digital Peripheral Solutions, Inc. 8015 E. Crystal Dr. Anaheim, CA 92807 Teléfono: 714-998-3440 x 538 Correo electrónico: [email protected] Chat en vivo en www.Q-See.com SITIO WEB SOPORTE TÉCNICO http://www.q-see.com Teléfono: 714-998-3440 x 539 Correo electrónico: [email protected] Chat en vivo en www.Q-See.com FAX 714-998-3509 ¡Recuerde inscribir su producto Q-See! Complete el formulario de inscripción del producto para recibir los beneficios de garantía y soporte técnico, y para que podamos notificarle las actualizaciones de firmware del producto y cualquier otra información importante relacionada con el producto adquirido. Puede completar y devolver el formulario incluido en la caja o puede llenar el formulario por internet en el sitio web que figura a continuación. Visite www.q-see.com Support Register your Product, y complete el Formulario de inscripción en línea. REVISADO 8/26/2010 9|Page