1
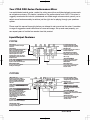
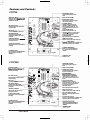
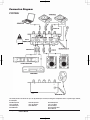
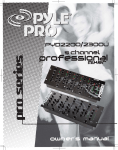
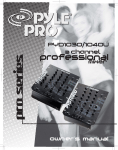
P�r:J72s/72eu • • •• ' .. . �� .� . ... ... . ' . . . ��. ��. .... . . ..... ...-.. ...-......-.. ...-. .. .. ..... ....... .............. . .......... .-.. . .. . . .. ... .. ... . . ... . .... .. ... . .. . . . . . .. . ... .. .. . .... .-.... .-.. ...-... . ., .. . � ..., .-. .. �...-�. . . . . . .. .. .. .. .. .- ..- ...- ..,.- .. - .. - .... .. .. .. ... .. .-....-....-.... -. . .. .. .. . • e . ._ ._ ._ .. ... ... .. . .. . . . . · . .. .. . . .. ... I· .. . . . . .... .-.... .. .... -..... . . . .. . . . .. . . .. � •.•.... .... .•.... • • • • • • -.. . .. . ..• . • • •.• • • • •• • • •• . . . . .. . . .. . . . . . . . . - . . . . . . . . . . . . . . . . . . . . . . . . . . . .. .. ...... .. •••• •••• •••• ••• •e ••••_••••e ••••-••• e. f • ..• ..• ..• ..• . ... . .. . � ..•..• ..••.....••.. •• �•. . �.• �.•. � .•. e •• e •• e •• •• . .. � . .. � ...: ... � . :. . . . . . .: . . .: . : . : . .: . .. : . . : . . • • •• • • . . . . , . .. . . . . •. .. • • • • . •. • • . .. . . . . •• - •• .....e.. � e.•e • e.e..•• . . e.-. •e • e.•e• _ .••e. � . �.. �.. �.. •.................... .• . •• _ ._ ��. ��. ��.:: . . . . . . . I· . .. .. . .. .. . . . .. . · . . . . . . . . . . . . .. .. .. .. . . . . . . , . _ . .. .. . . . . . . . . . · - . . .. . e - I • • • • • • . . . .. . . . . . . . . . . . . . .. . . . . . . . . . . . . . .. . . . . . . . . . . . . . . . ..... . . . .. ...... ......... . . . · . . . . . . . . . . .. . .. ... . .. . . � .. .. . . ...... .. .. . .. ...... ........... .. . . .. . . . . . . . . . . .. . . . . .. . . . . . . . .. . .. . . . . .....� . • IiI!' ... ... • .• �.�:.::.::.::.:" . !iI...IiI!' . •. . .... ... . .... . .. . . .. . ... . . . . . . . . . . . . . . ... . . . . . . . . . . . .. . . . .. ..... . .. . . . . . . . . . .. ' .. . . . . . .. . · • • · · • • • • • • • • • • • • • • • • • • • IMPORTANT SAFETY INSTRUCTIONS 1. Read Instructions - All the safety and operating instructions should be read before the appliance is operated, 2. Retain Instructions - The safety and operating instructions should be retained for future reference. 3. Heed Warnings - All warnings on the appliance and in the operating instructions should be adhered to. 4. Follow Instructions - All operating and use Instructions should be followed. 5. water and Moisture - The appliance should not be used near water -for example. near a bathtub, washbowl, kitchen sink, laundry tub, swimming pool, or a wet basement. 6. VenUlatlon - The appliance should be situated so that its location or position does not interfere with its proper ventilation. For example, the appliance should not be situated on a bed, sofa, rug, or similar surface that may block the ventilation openings: or placed in a built-in Installation, such as a bookcase or cabinet that may Impede the now of air through the ventilation openings. 7. Heat - The appliance should be situated away from heat sources such as radiators, heat registers, stoves, or other appliances Qncluding amplifiers) that produce heat. 8. Power Sources - The appliance should be connected to a power supply only of the type described In the operating instructions or as marked on the awliance. 9. Grounding or Polarization - Precaution should be taken to insure thai: the grounding or polarization means of an appliance is not defeated. 10. Power-Cord Protection - Power supply cords should be routed so that they are not like ly to be walked on or pinched by Items placed upon or against them, paying particular atlention to cords at plugs, convenience receptacles, and the point at which they exit from the appliance. 11. Cleaning - The appliance should be cleaned only as recommended by the manufacturer. 12. Power Unes - An outside antenna system should not be located in the vicinity of overhead power lines or other electric light or power circuits, or where It can fall Into such power lines or circuits. When Installing an outside antenna system. extreme care should be taken to keep from touching such power lines or circuits as contact with them might be fatal. 13. NonU1!18 Periods - The power cord of the appliance should be unplugged from the outlet when the appliance is to be left unused for a long period of time. 14. Object and Uquid Enby - Care should be taken 80 that objects do not fall and liquids are not spilled into the enclosure through openings. 15. Carta and Stands - tfthe appliance is used with a cart or stand, the cart or stand should be a type recommended by the manufacturer. An appliance and cart combination should be moved with care Quick stops, excessive force, and uneven surfaces causa the appliance and cart combination to overtum. . 16. Mounting - The appliance should be mounted only as recommended by the manufacturer. 17. Damage Requiring Service - The appliance should be serviced by qualified service personnel when: A. The power-supply cord or plug has been damaged. B. Objects have fallen into, or liquid has been spilled into the appliance enclosure. C. The appliance has been exposed to rain. D. The appliance has been dropped, or the enclosure damaged. E. The appliance does not appear to operate normally or exhibits a marked change in performance. 18. Servicing - The user should not attempt to service the appliance beyond that described in the user's operating instructions. All other servicing should be referred to qualified personnel. 19. Overloading - Do not overload wall outlets and extension cords as this can result in a risk of fire or electric shock. 20. Replacement Parts - When replacement parts are requirad. be sure the service technician has used replacement parts specified by the manufacturer or have the same characteristics as the original part. Unauthorized substitutions may result In fire, electric shock or other hazards. 21. Safety Check - Upon completion of any service or repairs to this appliance, ask the service technician to perform safety checks to determine that the appliance is in proper operating condition. WARNING: To rvduce !he n.k of firu or ehotlk huard. dg nol "= .. !: � : ... :: ...e: prod :! ::: .. :: == .. ::: . "' ==' � ' =-===o------i A�C-C-�D RISK OF ELECTRIC SHOCK Co��== =� D� ' 70 � ' �D � " � ' �c--�A C --1 CAUTlON: To rvduce ... .... of eleetrl G ehotlk, dg nol l8lTlllW OIMIr or beck. No IIBIIHIIIVIClllbla pIIIr111ll111da. Refer servicing IDqualllllld p1111W1111'11!11. 1 - Pyle Pro Mixer PYD7251728U Owner's Manual nw"""boIII l'U'-bMrl)Wbtho_S_"'o", A _ dIrQMIuI...,..lOIIhIn tho pradocl!l a_o.. thll rr/ghl t. '"arfIIoIont m.gnlUcl. b _ ......"'._0 _ D:J not ",*,'" pr<JCIuctII-. A lNI syriIoIlllnIIndoocIb hIDnn)"lO 1hII1� � _ mIII...n...... 1wInH:IIDnI ... nd_ hIM 1_.. �ng Ihllprodoot. Your PYLE PRO Series Performance Mixer is a sophisticated control center, perfect for mixing sound from multiple playback sources such as microphones tuners, CD players, tumtables or the audio outputs from a VCR. This mixer is ruggedly constructed for home or professional use. Wide range volume controls, permit you to adjust sound levels accurately to achieve just the right mix for playing through your speakers system. Please read this manual thoroughly before you attempt to set up and use the mixer. It contains a range of suggestions and instructions to insure safe usage. Set up and used properly, you can expect years of trouble-free service from this product. Input/Output Features PYD725 Power Switch Power orr the fF.1--tr---- Dual Purpose Sterec Iputs --------, For using a turntable wHh a magnetic cartridgeOR a high level input source. mixer betora making any connealions. Power Supply Ground Screw -------, Plug the included power supply of AC15V adaptor Into the mixer nrst while the power is switched off, than plug AC power supply Into a proper power outlet. This mixer is designed to work with the Included AC power supply only, using an incompatible power supply could result in damage to the mixer. Output Jacks To connect ground wire from turntable. to eliminate the ayatam hum. :f----- MICMicrophone connector Pannlla you to connect a balanced or unbalancecllow impedance microphone with 1/4� plug. --'----- ....1 _____________ plugged into PHON01JLINE1 and PHON02ILINE3. To connect mixer to a I'8C8Iver or ampliflBl' - use the cable with RCA plugs. Record Output Jacks -------' '----- connect most high-level audio sources, such as CD players,tape dack,tuner or VCR. PYD728U �ru USB IN/OllT Port -------------.,;�-___:';;i\ to connect the Laptop or desktop PCIMAC using high speed USB Power Switch Power Supply ' - ...1 I � @ , @ r ...··r- L:-r--'" - _. == Output Jacks To connect mixer to a receiver Dr amplifier - use the cable with RCA plugs. W � ! I � For using a turntable wHh a magnetic cartridgeOR a high level Input source. r- Ground Screw l @l@l @lilt � O ! : A -.Jr-j ..I@l@l, @ 1 " "'I aD �.i'll @l§ilj]lI!O·@§·I!Q·@§·I!QM7-----MICMicrophoneconnector _________ Plug the Included power supply or AC1 5V adaptor into t he mixer li m while the power Is ewttched off, then plug AC power supply into a properpower ouUet. This mixer is designed to work with the Included AC power supply only. ualng an incompatible power supply could result in damage to the mixer. Iffi\ i _ _______ """"' ..... m""" ...... meld.. any CO"""'ono. n r..;;;;,--....;c ; ;;,------- Dual Purpose Stereo Iputs _ W . @ .... � !!l.... 1 I POWER � • Allows you ::,':.":;':=!�.:: Stereo Une Inputs Let you To connect mixer to a tape deck for recording the mixed program. USB cable. Input Select Switches Set thaee swltchee baed on what Is @ , ground wire from turntable, to . hum. eI;m;"...'h.....m To connect _ U1'j=J· Penn" you to coo_ a balanced DO' unbalanced low Impedance microphone with 114- plug. -L-.. 1 -'-_______ __ '------ Input Select Switches Set these switches based on what is plugged Into PHON011LINE1, PHON02IUNE3 and LlNE4IUSB. Stereo Line Inputs Let you connect most high-level audio aourcea, such as CD players,tape deck,tuner or VCR. Record Output Jacks -------' To connect mixer to a tape deck for racording the mixed program. Pyle Pro Mixer PYD7251728U - 2 Owner's Manual Features and Controls: PYD725 ,----- Channel Gain Controls sou.... Let you adjust the gain or each Input Dual DisplayMeter -=�=:;;-::;;---�;:::;::: : :;::::;::::;::::;::::;:::::; ::: ;: ;::::: =!------l: ----F""�- Power on LED indicator I"V'U'Y .... .'" Channel Tone Controls Displays your choice of Master Input Left andRIght Levels, or Phones Output Level. tor CUE and PGM. MIC Tone Controls © O. -" ..... --------.+-0_· Pennit adjustment of the high and low of microphone algnal. Permit adjustment of the high, midrange and low of a selacted Input !lUI CueMode Selector audio that III 88nt to the headphones. Switch it to -MASTER" to hear the Program mix. Switch it to ''CH 1CH %' to hear Channels1 and 21n theCue channel. Selects the _ Cue CH1/CH2 Control MIC Level Control--------, Selects the audio that is sent to the Controls the volume of the microphone. headphones betweemCH1 and CH2. So you can ·preview" an input soures and adjust the volume prior to mixing it in. Lowen! the leval of Input ItOUI'C8II, MIC Taikover Switch ------, =="+-- Cue Level Control SeIa the listening level for the headphonee. pennltllng you to talkover' them using a microphone. �;-==::;;;--1-- Master Level Control ..�g���-=----�-- Crossfader Slope SWitch Input Source Selector Lela you easily aelad your choice of audio inputs for mixing. Channel Level Controls AdJusta the mixer's overall output volume level. .. Allows you to choose the slope of crossfader curve between the gradual and quick cl'OSSfades . ----- Allow ftngertlp control of all aound mixing and fading. CrossfaderMode SWitch c=c==;_----LJt- - Allows "CC �c-'=:c=: ,---"" you to the aeeignment of CH1 on the left andCH2 on the right of © Crossfader Control --------+- © crossfad er . Leta you quickly and smoothly switch and @ mix two playing input SOUrotlS,it is I replaceable. � CH 2 CH 1 I reverse HEADPHONEI 't' '-------�====�- Accepts HeadphoneJack 1/4plug. PYD728U � �� , ,----- Channel Gain Controls Let you adlua the gain of each Input eoun::e. Dual DisplayMeter -=�;:::;_::;;---r=======::::;� ::::=l : -------I---. r==,-- Power on LED indicator Displays your choice of Master Input Left .. , I E PRO" andRight Levels, or PhonesOutput -.. ..wu; Channel Tone Controls Levels torCUE and PGM. - \3tl o Permit adjuslmant of the high and low of microphone signal. -._. -� MIC Lovel Control--------, Controls the volume of the microphone. MIC Talkover Switch ------, level of Input IIOUrcee, permitting you to talkover them using a microphone. L.owars the o e» 0 "'��;"I'I'I- ·0- -iO_· � I .C)- p� _ k( R -� }J. MIC Tone Controls -------T-7'''==- HKIH _., - IIID ' _ L a��;:E=��� headphones betweemCH1 and CH2. So you "prevl8W� an Input eouraa and adjust the volume prior to mixing it in. ,--�=c..=��K. =0'-;--- Cue Level Control Sets the listening level for the headphones. ------�;;;; -,I�:-==:::::;;;;1-- Master Level Control Channel Level Controls -----�="=_----_': a "",;----�-- CH2 input Selector for USB Allows you to choose the USB connection to play atCH2. �=Tr==:;;�ii----"j_-- Crossfader Slope Switch -----;.--I@ ©J1lAnItDnInhlll© @ �' \3tl Leta you quickly and smoothly switch and mix two playing input soul'08S,it is ..._10. - Pyle Pro Mixer PYD7251728U Owner's Manuel Adjusta the mixer's overall output volume level. � Allow ftngertlp control of all eound mixing and fading. 3 Cue CH1/CH2 Control SeI_ ... aud;o'h.U.....'o ... can audio Inpub for mixing. Crossfader Control to helIrthe Program mix. Switch it to -CH 1CHZ'tohearChannels1 and2 In the Cue channel. '-"" w�_�_ ' '-"!:: I Leta you eaally seleel your choice of Input Source Selector Permit adjustment of the high, midrange and low of a selected input CH 1 CH I I Allows you to choose the alope of croellfader curve between the gradual and quick croafadu. HEADPHONES • Connection Diagram: PYD725 PHONOIN DCIN MASTER OUT LINE IN POWER AMPLIFIER CD BURNER HEADPHONE OUT This mixer permits connection of up to five (5) audio input sources,including one microphone. Such a system might include, for examples: One Microphone Two Turntables Two CD Players One Microphone Four CD Players One Microphone Two Turntables One CD Player One Cassette Deck Pyle Pro Mixer PYD7251728U Owner's Manual - 4 Connection Diagram: PYD728U PHONOIN DCIN MASTER OUT POWER AMPLIFIER CD BURNER @ HEADPHONE OUT This mixer permits connection of up to six (6) audio input sources,including one microphone. Such a system might include, for examples: One Microphone Two Turntables Two CD Players One USB Port 5 Pyle Pro Mixer PYD725/728U Owner's Manual - One Microphone Four CD Players One USB Port One Microphone Two Turntables One CD Player One Cassette Deck One USB Port USB OPERATION: The input selection at CH2 allows you to choose the USB connection to play at CH2. ON PC 1.Turn on the computer and PYD728U 2.Connect USB cable from port of mixer to your computer. 3.The window will recognize the mixer as a "USB AUDIO DEVICE" or "USB AUDIO CODEC" , and install any required system components. automatically. 4.0pen the START menu and go to CONTROL PANEL, click on the SOUND AND AUDIO DEVICES ICON, to change system audio preferences in Window. 5.Clip on the AUDIO tab, to access audio device settings. 6.Choose the USB AUDIO CODEC as a DEFAULT DEVICE. 7.Click on APPLY and you are ready to use the PYD728U with your PC. ON MAC 1.Turn on the computer and PYD728U 2.Connect USB cable from port of mixer to your computer. 3.0pen SYSTEM PREFERENCES under APPLE menu. 4.Choose the SOUND icon in SYSTEM PREFERENCES. 5.Choose the OUTPUT tab in the SOUND window. 6.Select USB AUDION CODEC under CHOOSE A DEVICE FOR SOUND OUTPUT. 7.Repeat the procedure for the INPUT tab and you are ready to use PYD728U with your MAC. ..... Please complete warranty card, detach and return ..... Place Stamp Here ® • PYLE PRO Audio, Inc. 1600 63rd Street Brooklyn, NY 11204 Pyle Pro Mixer PYD7251728U Owner's Manum - 6 Specifications PYD7251728U Input S ensitivityllmpedance Distortion MIG ..................................... 1.5 mVl600 Ohms Balanced Mic .................................. 0.50% Phono 1-2 ........................... 3.0mV/50K Ohms Phono .............................. 0.08% Une 1-4 .............................. 150 mVl27K Ohms Tone Control Output Level Master ................................. 1.5 V/1OK Ohms Record ................................. 300 mVl1OK Ohms Frequency Response Line .................................. 0.05% .... 20Hz - 20kHz +1- 3 dB SIN Ratio (at 1 kHz) Treble .......... .................... 10kHz; +10/-20dB Mid ................................. 1 KHz; +10/-20dB Bass ................................ 100Hz; +10/-20dB Talkover Attenuation.. -16dB Power Source ........... . AG 15V, 500mA Mic ...................................... 55 dB/1 .5mV input Phono .................................. 65 dB/3.0mV input Une ...................................... 70 dB/150.0mV input Dimensions, inches (mm) WxHxD ......................... 9.29 x 2.75 x 10.70 (236 x 70 x 272) Weight, Ibs (kg) ....... .. 4.85 ( 2.2 ) Specifications are typical; individual units might vary. Specifications are subject to change and improvement without notice. Limited Warranty All PYLE PRO products are carefully constructed and tested before shipment. Units purchased In the USA are warranted to be free of defects In material and workmanship for one (1) year from the date of purchase. This warranty Is limited to the original retail purchaser of the mixer. Should the unit fail due to factory defects in material or workmanship. your unit will be repaired or replaced at the sole discretion of PYLE. To obtain warranty service, you must first call our Consumer Return Hotline at (718) 236-6948 to obtain a Return Authorization Number. This R.A. # must appear on the outside of your package and on all paperwork relating to your return. When returning the unit to us for warranty service, It must be carefully packed and shipped, prepaid, to: R.A.#: =-=--'--=-_. PYLE PRO Serv1ce Center 1600 63rd Street Brooklyn, NY 11204 You must also include the following items with your return: A copy of your sales receipt or other proof of purchase A brief letter, indicating the problem you are experiendng with the pnxIuct • Include in your letter your retum address, daytime phone number and R.A. number • Also include II. check or money order for $20.00 fill" retum shipping, handling and insurance, or provide your Visa/N£. number with expiration date. • • Our obligation under this warranty is limited to the repair or replacement of the defective unit when It Is returned to us prepaid. This warranty will be considered void If the unit was tampered with, Improperly serviced or subject to misuse, neglect or accidental damage. ..... Please complete warranty card, detach and return ..... Thank you for purchasing this PYLE product. To activate your warranty, please mail this card warranty registration card within 10 days. Name PYLE PRO MIXERS Address City, State ZIP Model No. Serial # (If available) Date of Purchase Purchased at: o Music Products Store o Catalog Merchandiser o Sound Contractor /Installer OMail Order o Other _________ _ www.pyleaudio.com 7- Pyle Pro Mixer PYD7251728U Owner's Manum