1
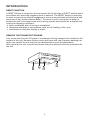
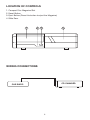
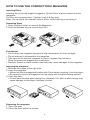
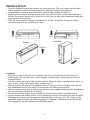
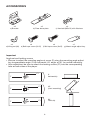
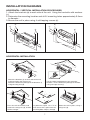
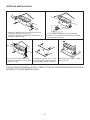
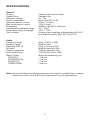
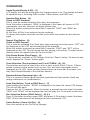
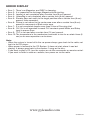
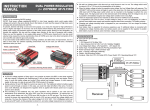
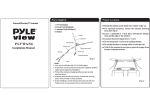
PLCHD6
6 - DISC CD CHANGER
INSTRUCTION MANUAL
IMPORTANT NOTICE
This Compact Disc Changer/Player has been tested and found to comply with the
limits for a class B digital device in accordance with the specifications in Subpart J
of part 15 of FCC Rules. This equipment generates and uses radio frequency energy,
and it must be installed and used properly in accordance with the manufacturer's
instructions.
CAUTION
This product is designed for 12 Volt DC Negative ground systems only. Your vehicle
is compatible with this equipment if the negative (–) terminal of the battery is connected
to the vehicle's body/chassis.
USE OF CONTROLS OR ADJUSTMENTS OF PERFORMANCE OR PROCEDURES
OTHER THAN THOSE SPECIFIED MAY RESULT IN HAZARDOUS RADIATION
EXPOSURE DO NOT REMOVE THE CHANGER/PLAYER COVER. THERE ARE NO
USER SERVICEABLE PARTS INSIDE. REFER TO QUALIFIED SERVICE PERSONNEL
ONLY.
SAFETY PRECAUTIONS
Disc
* Only use compact Discs which have this mark:
* Do not use cracked, bent or scratched Discs.
* If Disc becomes dirty, gently wipe the surface with a soft line-free cloth.
* Do not use sprays or cleaners designed for records.
* Do not expose the Disc to direct sunlight. Excessive heat will warp the Disc.
* Do not leave a Disc unprotected. Always store it in its case right away from sunlight.
Compact Discs may not always be recorded at the same volume level or with the
same quality. This may result in different volume levels between Disc and radio.
ENVIRONMENTAL CONDITIONS
The unit may not function properly if exposed to extreme temperatures. To assure
normal operation keep vehicle's interior temperature within normal range.
In cold environmental conditions. Water mist/moisture may form on the optical lens
when the vehicle interior heater is turned ON. Allow moisture to evaporate before use.
If a parked vehicle has been exposed to direct sunlight, cool down interior before use.
Always keep the magazine door closed.
Do not expose your unit to extreme levels of humidity or dusty environments.
In the interest of safety while driving, set the volume control level so that sounds
outside the vehicle can still be heard.
Playing a Disc while driving on a very bumpy road may result in skips, but this will not
scratch the Disc or damage the player.
1
INTRODUCTION
RESET FUNCTION
A RESET button is located on the front panel (to the left side of EJECT button) and is
accessible only when the magazine door is opened. The RESET button is recessed
in order to prevent accidental engagement, and can be activated with the tip of ballpoint pen or any similar pointed object. The reset circuitry is provided in order to
protect the unit's microprocessor and tracking system and should be activated only
under the following conditions:
a. Initial installation after all wiring is completed;
b. Abnormal operation is encountered such as not loading a Disc; and
c. Indication on controller display is erratic.
REMOVE THE TRANSPORT SCREWS
Four screw that lock the CD player's mechanism during transport are located on the
bottom of the unit. Remove these screws and keep with your literature package for
future use should the unit need to be transported for service/maintenance.
After removal, be sure to seal these holes using the adhesive stickers provided with
the unit.
2
LOCATION OF CONTROLS
1. Compact Disc Magazine Slot
2. Reset Button
3. Eject Button (Press this button to eject the Magazine)
4. Slide Door
1
2 3
4
WIRING CONNECTIONS
CD CHANGER
CAR RADIO
3
HOW TO USE THE COMPACT DISC MAGAZINE
Inserting Discs
Inserting Discs into the supplied magazine. Up to 6 Discs may be inserted into the
magazine.
The Disc are numbered from 1 (bottom tray) to 6 (top tray).
Note: Do not touch the recorded side of a Disc while inserting or removing it.
Removing Discs
1. Press the Eject button to remove the Magazine.
2. Push the Release keys to remove the Discs.
Precautions
• Do not leave the magazine exposed to high temperature or direct sunlight.
• Do not attempt to disassemble the magazine.
• Take care not to drop the magazine or knock it against hard surfaces.
Store the pulled-out magazine in a safe place.
• Benzine, thinner, or other volatile chemicals may cause damages to the magazine.
Inserting the magazine
1. Slide the door open to the right side.
2. Insert the magazine.
• Make sure that the magazine toadied with Discs before inserting it into the player.
• Be careful to insert the magazine into the player with the label tacking upward.
3. Close the door
• Do not leave the door open during Disc playback. Dirt ,dust or other foreign may
cause damage to the player if allowed to enter.
Removing the magazine
1. Open the door.
2. Press the Eject button to remove.
4
INSTALLATION
• Use the supplied parts and mount the unit securely. The use of parts other than
these supplied (specified) may loosen or damage internal components.
• If installation presents any difficulties, consult your dealer for advice.
• Before drilling a hole into the wall or floor the vehicle trunk, check that nothing is
behind the panel. Never drill a hole in the fuel tank or any other important that may
be attached to the trunk.
• Take off the negative terminal connector (–) of the car battery to prevent short
circuits while you are installing the unit.
TOP
TOP
Improper
Proper
FRONT
FRONT
Location
• Be sure to mount the unit in a location that will not interfere with the driver or
passengers. Be certain there is not danger of passengers being injured case of
sudden stops.
• Do not mount the player near heater outlets, where it might be affected by heat; or
near doors, where rainwater might splash onto it.
• Do not mount the player in a location that will receive direct sunlight, such as on
the dashboard or the rear shell. Excess heat will damage the player.
• When mounting the player make sure no wires are trapped between the player and
the surrounding metalwork or fittings.
• Do not mount the player on the spare lire board or any other unstable place.
• Do not mount the player where it will impede access to the spare tire, jack or tools.
• Although the player can be mounted horizontally, vertically or at 45°, keep to the
tolerable angles shown on following page. In addition, choose a place where the
CD magazine can be loaded and unloaded easily.
5
ACCESSORIES
x2
a) Bracket
x4
d) Wing nut (06)
x2
b) Floor base plate
x4
e) Self tape screw (5x15)
x4
c) Hex bolt (M5x12) with Washers
x4
x1
f) Self tape screw (3x15) g) Mount angle adjust key
Important
Angle set and locking screws
• Be sure to adjust the mounting angle set screw (F) using the mounting angle adjust
key to appropriate angle: Of for horizontal. 45° angle. or 90° for vertical mounting.
• After adjustment be sure to attach the locking screws (F1) into the corresponding
hole on both sides of the player.
F1
0°
horizontally
F
F1
45°
(slant mounting)
F
F
90°
vertically
F1
6
o
45
INSTALLATION DIAGRAMS
HORIZONTAL / VERTICAL INSTALLATION PROCEDURES
1. Attach the brackets (a) to each side of the unit. Using the hex bolts with washers
(c).
2. Determine the mounting location and drill 4 mounting holes approximately 3.5mm
in diameter .
3. Secure the unit in place using 4 self-tapping screws (e).
e)
e)
c)
c)
e)
e)
a)
a)
ø3.5mm
ø3.5mm
a)
a)
c)
c)
HORIZONTAL INSTALLATION
c)
e)
a)
d)
b)
a)
b)
c)
Attach the brackets (a) to each side of the unit
using hex bolts with washers (c).
Attach the floor base plate (b) to the brackets a)
using the wing nuts (d)
Lift the carpet and determine the mounting
location. Fix the floor base plate (b) to the floor
using self-tape screw (f).
d)
d)
d)
Press the unit to the floor, and
remove the wing nuts (d), and lift
off the changer
d)
Lay down the carpet. Cut 1 “X” on
each area of the carpet where the
mounting bolts will pass through
7
Mount the unit in place, using 4
wing nuts (d)
VERTICAL INSTALLATION
c)
e)
a)
b)
d)
a)
b)
c)
Attach the brackets (a) to each side of the unit
using hex bolts with washers (c).
Attach the floor base plate (b) to the brackets a)
using the wing nuts (d)
Lift the carpet and determine the mounting
location. Fix the floor base plate (b) to the floor
using self-tape screw (f).
d)
d)
d)
Press the unit to the floor, and
remove the wing nuts (d), and lift
off the changer
d)
Lay down the carpet. Cut 1 “X” on
each area of the carpet where the
mounting bolts will pass through
Mount the unit in place, using 4
wing nuts (d)
FOR AN ANGLED INSTALLATION, TURN TO THE 45° POSITION AND ATTACH LOCK
SCREW (F1) IN THE MIDDLE HOLE.
8
SPECIFICATIONS
General
System
Usable Discs
Operation voltage
Power consumption
Operating electric current
Max. peak electric current
Dimensions
Operational temperature range
Temperature range of storage
Test condition
Audio
Frequency range
Dynamic range
Distortion (THO N)
S/N ratio
Channel separation
Audio output level
Wow & Flutter
SCRATCH
INTERRUPTION
BLACK DOT
FINGER PRINT
Compact Disc audio system
Compact Disc
10 - 15V
6W or less (DC 14.4V)
400mA 14.4Volt
1.2A 14.4Volt
284(W) x 186.5(O) x 74(H) mm
5°F - 158°F
-22°F - 176°F
Ordinary room condition of temperature 68°±5.4°F
and relative humidity 65% (DC 14.4±0.2V)
20Hz - 20KHz (±1dB)
90dB or more
0.1% or less (at 1KHz)
90dB or more (at 1KHz)
70dB or more (at 1KHz)
1.25V±0.05V (1KHz, 0dB)
Below the measuring unit
< 0.8 mm
< 0.8 mm
< 0.8 mm
< ø65 µm
Note: Unit specifications and design parameters are subject to modification or change
without prior notice due to technical improvements by the manufacturer.
9
OPERATION
Liquid Crystal Display (LCD) - (1)
LCD display will only be active when the changer power is on. This display indicates
all operation key's, including DISC number. Track number, and DISC icon.
Random Play Button - (2)
(Track or DISC Random)
This is used for random selection Disc play, and sequence.
Once this button is pressed. "RDM" is displayed in the Upper left corner of LCD
commander, and disc selection will begin random play.
When this button is pressed for more than 2 seconds, "DISC" and "RDM" are
displayed.
At this time, all Disc's are selected to play randomly.
To release the random selection function, push either the random or disc buttons
again.
Repeat Play Button - (3)
(Track or DISC Repeat)
This is used for repeating Disc/Track play. Upon pressing this button once. "APT" will
be displayed on the LCD, and the playing will be repeated.
When this button is pressed for more than 2 seconds. "DISC" and "RPT" will be
displayed on the LCD. This will repeat the disc playing in its entirely. To stop function,
depress either the repeat button or the disc button.
Play/Pause Button (Play/Pause) - (4)
To pause all play functions of CD Changer. Push the "Pause" button. To return to play
mode, depress the "Pause" button again.
Track Selection (Track up/down) and Track FF/REW - (5), (10)
These button are used to search for a disc or track quickly. Press T-Up or T-Down
button to search to the desired track or disc. Disc and track information will be
displayed on the LCD. Upon pressing these buttons for more than 2 seconds, you
may Fast Forward/Rewind in the direction desired.
Random Sensor Receiving Light - (6)
This is to receive infrared signal from card-type Remote Commander. (Avoid any
foreign substances or contamination.)
Scan Play Button ( Track or DISC Scan ) - (7)
Upon pressing this button. "SCAN" is displayed in the lower left corner LCD display.
The unit will play each.
Track on disc for 10 seconds. When this button is pressed for more than 2 seconds.
"DISC" and "SCAN" will be displayed and unit will play first 10 seconds of each disc.
Disc Selection Button ( DISC Select ) - (8),(11)
Press D-Up button to select upper DISC, and press D-Dn button to select the lower
DISC. All disc functions will be displayed on the commander LCD.
Power Button ( Power On/Off ) - (9)
Press this button to turn On/Off the changer.
10
ERROR DISPLAY
• Error 1:
• Error 2:
• Error 3:
• Error 4:
• Error 5:
There's no Magazine, and DISC is clamping.
It is impossible to discharge Magazine while ejecting.
Loading is not completed after a certain time (8 sec) passed.
Unloading is not completed after a certain time (8 sec) passed.
Elevator does not reach to the target position after a certain time (8 sec)
passed. Hole separated.
• Error 6: Pickup is not moved to the center area even after a certain time (8 sec)
passed in movement of Sled center area.
• Error 7: It is not completed despite more than 3 time of Focusing trial.
• Error 8: CLV On is not operated to reach CLV constant speed Mode, and Subq
input is proven Error.
• Error 9: TOC is not read after a certain time (15 sec) passed.
• Error 10: The temperature in the mechanism continues to rise for a certain times (5
sec) so no more operation can be done.
Note:
- When the system is turned off in the car power always goes back to the radio, not
back to the CD player.
- When power is restored to the CD System. It does not start where it was last
playing. It always goes back to the number 1 song on the disc.
- If you want to play a CD, turn the system on via the commander or remote control.
If you want to listen to radio or cassette, turn power on via the radio.
www.pyleaudio.com
88-D0020-26