1
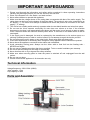
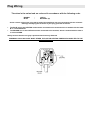
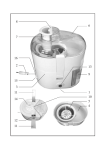
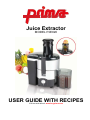
Juice Extractor
MODEL PJE020
USER GUIDE WITH RECIPES
Visit our web site at: www.buyprima.com
IMPORTANT SAFEGUARDS
1. Please read through the information and safety advice contained in these operating instructions
carefully and thoroughly before you use the Juicer for the first time.
2. Place Juice Extractor on a flat, stable, cool work surface.
3. Never allow children to operate this appliance.
4. Make sure that the voltage shown on the rating plate corresponds with that of the mains supply. The
rating plate can be found on the bottom of the motor block. The product is only to be connected to an
AC supply (~). The motor must always be switched off before the product is connected to the main
supply. ( ‘0’ setting).
5. This Juicer has a safety switch and only operates when the two black handles are locked into place.
6. Do not use the Juice extractor continually for more than one minute at a time. If the machine
becomes too hot then it will automatically shut down until the motor is cool enough to start up again.
Once it has shut down the machine normally takes about 15 minutes to cool down before it can be
used again.
7. If the supply cord is damaged, its must be replaced by the manufacturer or its service agent or a
similarly qualified person in order to avoid a hazard. Do not attempt to repair the device yourself.
8. Do not immerse the unit in water or any other liquid. Simply wipe with soft damp cloth.
9. Close adult supervision is necessary when using this or any appliance where children are present.
10. Never leave the appliance connected to the mains and unattended.
11. Avoid contacting moving parts. Always use the Juicer stick to feed fruit into the feeding tube –
NEVER use fingers.
12. Do not use any attachments other than those supplied. To do so would invalidate your warranty.
13. Do not let the cord hang over the edge or counter top.
14. Never interfere with or try to bypass the safety switches.
15. Make sure when removing parts to clean the power is switched off and unplugged from the wall
socket.
16. Do not use out doors.
17. Please note that this appliance is for domestic use only.
Technical Information
Voltage/frequency: 230V~50Hz (600W)
Juice capacity: 1 litre
Pulp capacity: 2 litres
Parts and Assembly
IMPORTANT
THE JUICE EXTRACTOR IS EQUIPPED WITH A SAFETY INTERLOCK SWITCH. THIS IS FITTED TO PREVENT
THE MOTOR FROM BEING ACTIVATED WHILE THE MACHINE IS DISASSEMBLED. THE MOTOR WILL NOT
RUN UNLESS THE REMOVABLE TRANSPARENT COVER IS ON SECURELY AND LOCKED INTO PLACE
WITH THE SAFETY LOCKING HANDLES.
ASSEMBLY
Before first use it is a good idea to familiarise yourself with the assembly/disassembly of the
unit.
ASSEMBLY
1. The appliance should be unplugged from the mains before assembly or disassembly.
2. Place the pulp container under the nozzle on the left of the machine. Place the juice
container under the nozzle on the right of the machine.
3. Attach the residue container onto the main body and clip the filter net into place.
4. Attach the top transparent cover and close and place the juicer stick in the food chute.
5. Make sure the housing unit is locked with the safety lockers in place by hooking them
onto the top cover and pushing them downwards until they clip in place.
6. The juicer will not work for safety reasons if the safety lockers are not locked in place
correctly.
DISASSEMBLY
1. Remove the juicer stick and the pulp and juice containers.
2. To remove the upper body pull both safety lockers outwards from the bottom. Release
and lift off the top cover.
3. Lift the filter net off by gently pulling upwards.
4. Lift of the Residue container.
SETTINGS
There are 2 settings 1 and 2
Setting 1 is low speed and is usually best for soft fruits such as plums and peaches (Please
remove the stone before trying to juice!)
Setting 2 is faster and is usually best for harder fruits such as apples and carrots.
PLEASE NOTE: There is a temperature safety device installed in the machine. If the machine
becomes too warm the machine will automatically shut down until the motor has cooled to the
correct temperature. (This usually takes about 15 minutes). To prevent this from happening
please do not use the machine continually for more than one minute at a time.
Juicing
1.
2.
3.
4.
5.
Assemble the machine as described above.
Connect to mains supply.
Remove the Juicer Stick (it simply lifts out).
Ensure the juicer and pulp containers are in place.
Start the machine using the power switch and turning it to position 1 for slow and position
2 for fast.
6. Slowly add the fruit/vegetable pieces via the food chute using the Juicer Stick to feed the
fruit down the chute. Please remember to remove any large stones in fruit or any peel
that you would not normally eat.
7. The juicer is efficient but do not to over load the machine by feeding too much through at
once.
8. Once the juice container is full you can empty the juice into another container and then
resume juicing.
9. Once the Pulp container is full, switch of the juicer at the mains supply and disassemble
as described above. Empty the sediment from the sediment container and re-assemble
as described above. Switch on the mains supply, you can now continue juicing.
10. Notes: The amount of juice produced depends upon the type of fruit/vegetable used and
how ripe it is. Only put through things that you would normally eat, for example; Kiwi fruit
should be peeled first. Never put sharp objects down the food chute.
Please note that bananas are not suitable for juice extractors due to the way the fruit is
structured.
Cleaning
When cleaning this product please observe the following precautions:
•
•
Always ensure the unit is switched off & unplugged from the mains
Disassemble as described in the disassembly instructions.
All parts except the Main Body (9) can be washed with warm soapy water, rinsed and dried
thoroughly.
To clean the Main Body (9) wipe with a soft damp cloth. DO NOT IMMERSE IN WATER OR
PLACE IN THE DISHWASHER. THE MAIN BODY CONTAINS THE ELECTRICAL
COMPONENTS.
Useful Tips
1. Gently feed the fruit through the fruit shoot one by one. DO not try and over cram food into the
juicer.
2. If you are processing solid ingredients, cut them into small pieces (2-3cm) first.
Recipes
Easy Drinks – simply put the ingredients through the juicer in the stated order and enjoy!
Carrot, Apple and Ginger
6 carrots
Slice of root ginger
2 apples
Apple and Pears
2 apples
2 pears
Apple and Grapes
2 apples
l large bunch grapes
Waldorf
3 apples
1 celery stick
Apple and Strawberry
2 apples
100g strawberries
Strawberry Punch
2 large oranges
100g strawberries
100ml cranberry juice
Ice
1. Put the strawberries and oranges through the juicer.
2. Mix in the cranberry juice and add ice.
Orange and Blueberry Punch
2 large oranges
100g blueberries
Ice
1. Juice together in the given order.
1
carrot
Pineapple
and Apple Cocktail
1
apple
½ pineapple
1. Juice together in the given order
Pineapple Cocktail
½ pineapple
2 apples
1. Juice together in the given order.
Pink Cocktail
½ pineapple
100ml cranberries
½ lemon
1. Juice together the pineapple and cranberries
2. Serve and add a squeeze of lemon juice to taste
Sweet Potato and Grapefruit
2 pears
2 pink grapefruit
1 sweet potato
1. Juice together in the given order
Apple, Pear and Lime
2 apples
2 pears
½ lime
1. Juice together the apples and pears.
2. Serve and add a squeeze of lime juice to taste
Rich Tomato Cocktail
6 tomatoes
1 beetroot
1 slice lemon
1. Juice together the tomatoes and beetroot
2. Serve and add a squeeze of lemon juice to taste
Spicy Tomato
4 ripe tomatoes
1 celery stick
1
½apple
red pepper
1 slice onion
1 clove garlic
5ml Worcestershire sauce
1 pinch ground black pepper
Hot chilli sauce (use as desired)
1. Juice together the tomatoes, red pepper, celery stick, apple, onion and garlic.
2. Mix together and add the Worcestershire sauce, pepper and chilli sauce.
Vege Cocktail
1 beetroot
1 sweet potato
2 apples
1 lemon
1 tomato
1 slice onion
1 garlic clove
250ml apple juice
1. Juice together the beetroot, sweet potato, apples, tomato, onion and garlic clove.
2. Mix together and add the apple juice and lemon juice.
PLEASE NOTE: All these recipes are only guidelines, please feel free to experiment.
There are many good recipe books available from most bookshops on Juice extractors and recipes for
them.
Plug Wiring
The wires in the mains lead are coloured in accordance with the following code:
BROWN
BLUE
-
LIVE (L)
NEUTRAL (N)
As the colours of the wires in the mains lead of this appliance may not correspond with the coloured
markings identifying the terminals in your plug, proceed as follows:
•
•
The BLUE wire is the NEUTRAL and must be connected to the terminal which is marked with the letter
N or coloured BLACK
The BROWN wire is the LIVE and must be connected to the terminal, which is marked with the letter L
or coloured RED.
Always ensure that the cord grip is positioned and securely fastened.
WARNING: ON NO ACCOUNT MUST EITHER THE LIVE OR NEUTRAL WIRES BE CONNECTED TO THE
EARTH TERMINAL
~~~~~ Warranty ~~~~~
This product is guaranteed for 12 months from the date of purchase when the appliance is used solely for
domestic purposes. For commercial use the product is guaranteed for 90 days from the date of purchase.
The guarantee is valid against mechanical or electrical defects if the product is used in accordance with the
instructions and provided that it is not connected to an unsuitable electricity supply or dismantled, interfered with or
damaged in any way.
IMPORTANT, PLEASE RETAIN THIS WARRANTY
Please ask your retailer to either stamp this warranty or simply attach your store receipt. Keep this warranty
somewhere safe. DO NOT SEND TO PRIMA.
This guarantee in no way affects your rights under statutory law.
IF THE PRODUCT MALFUNCTIONS DURING ITS WARRANTY PERIOD IT MUST BE RETURNED TO THE
RETAILER FROM WHOM IT WAS PURCHASED FOR REPLACEMENT. IF YOU BOUGHT THIS PRODUCT
VIA MAIL ORDER, PLEASE KEEP ALL THE DOCUMENTATION THAT CAME WHEN THE UNIT WAS
DELIVERED.
NAME___________________________________________________________________________________
ADDRESS________________________________________________________________________________
_________________________________________________________________________________________
PURCHASED FROM________________________________________________________________________
DATE OF PURCHASE ________________________________MODEL_______________________________
© Copyright 2006 Nu-World UK Ltd. All rights reserved.
Nu-World UK Ltd, Prima House, 15 (2D) Springfield Commercial Centre, Bagley Lane, Leeds. LS28 5LY. UK