1
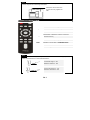
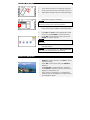
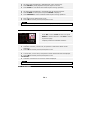
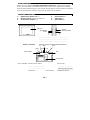
Introduction
Thank you for purchasing Prestigio Digital Photo Frame 107, a digital photo display
device. You have made an excellent choice and we hope you will enjoy all of its exciting
features. Please read through the user manual carefully before using the product, and follow
all of the procedures in manual to fully enjoy all features of the product.
Package Content
1.
Digital Photo Frame 107 X 1
4.
Device Stand X 1
2.
Remote Control (battery included) X 1
5.
USB Cable X 1
3.
DC 5V Power Adapter X 1
6.
Quick Guide X 1
Product Overviews
LCD Panel
USB Port
Mini USB Port
Memory Card Slot
DC Jack
LCD Panel
Displays picture/video
USB Port
Connects to external flash drive
Mini USB Port
Connects to PC
DC Jack
Connects to power adapter
Memory Card Slot
Receives memory card for data transmission
Up
Power
Right
Down
Enter
Left
Power Indicator
ESC
Device Stand
Power Indicator Displays power status
Power Button
RIGHT Button
ENTER Button
Scrolls right
Turns backlight ON/OFF
UP Button
Scrolls up
ESC Button
DOWN Button
Scrolls down
Cancels selection or
returns to previous menu
LEFT Button
Scrolls left
Device Stand
Upholds the device
EN-1
Confirms selection
NOTE
The device is capable of being wall mounted with screws (not included). Please refer
to below diagram for mounting illustration.
Mount the device onto the
screws securely applied on
wall.
:
Remote Control View
Power
Preview
ESC
i
ENTER
Menu
Date
DEL
Rotate
Turns backlight ON/OFF
Views all thumbnail images in Picture Mode
Cancels selection/Returns to previous menu
Displays file information
Activates slide show function
Displays current time in Calendar Mode
Copies files in between memory card and
internal memory
Directional buttons
Confirms selection/Start playback
Returns to main menu
Displays current date in Calendar Mode
Deletes current file
Rotates images in Picture Mode
Ratio
Cycles through different image display modes
Slide
Time
Copy
SWXT
NOTE
For better performance, please operate the remote control within appropriate
angles and distances as recommended below:
Horizontal Angle ≤ 45°
Effective Distance: 3M
5M
Horizontal Angle ≤ 15°
Effective Distance: 5M
EN-2
Getting Started
1.
Insert Device Stand into corresponding position.
2.
Revolve the stand counter-clockwise to secure it.
3.
Adjust Stand and place device on desired location.
4.
Insert memory card or USB flash drive with files
desired for browsing if necessary.
NOTE
Please make sure that memory card(s) is inserted
properly according to its inserting direction.
5.
Connect device to DC 5V Power Adapter and
insert power plug on adapter to electrical socket.
6.
Press Power to turn on device.
7.
Press ESC and ST to select appropriate media
8.
Press WX to select desired function and press
source and press ENTER to confirm selection.
ENTER to confirm selection.
NOTE
Only available media source will be highlighted and
selectable.
9.
Press MENU to return to main menu anytime
during operation.
NOTE
The device will automatically enter Slide Show Mode
if no action is performed for a few seconds.
PHOTO Function
1.
Press WX to select PHOTO function and press
ENTER to confirm selection. Press ESC to return
to previous page.
2.
Press WX to select photo and press ENTER to
3.
Press ROTATE to rotate photo 90° clockwise.
4.
Press RATIO to transform photo in sequence of
5.
Upon entering, the photo(s) of corresponding
display it.
Original Æ Expanded Æ full.
media source will be displayed. 3 display modes
are available as below:
EN-3
Slide Show Mode:
z
All photos will be displayed in alphabetically order continuously.
z
Press ENTER to pause playback and press again to resume.
z
Press SLIDE to enter Slide Show Mode anytime during operation.
Thumbnail Mode:
z
All photos will be displayed in thumbnail sizes for preview purpose.
z
Press SWXT to select photo and press ENTER to display it.
z
Press PREVIEW to enter Thumbnail Mode anytime during operation.
Browsing Mode:
z
One photo will be displayed at a time.
z
Press WX to browse previous/next photo in line.
NOTE
Please refer to Setup Function section to change photo display mode.
Clock Function
1.
Press WX to select CLOCK function and press
ENTER to confirm selection. Press ESC to return
to previous page.
2.
3 display modes are available as below:
Monthly Calendar Mode:
z
Calendar of month, current time, and photos in Slide Show Mode will be
displayed.
z
Press WX to browse previous/next photo in line.
Calendar Mode:
z
Current date, current time, and photos in Slide Show Mode will be displayed.
z
Press WX to browse previous/next photo in line.
Clock Mode:
z
Calendar of month and current time will be displayed.
NOTE
Please refer to Setup Function section to change calendar display mode.
File Function
EN-4
Press WX to select FILE function and press
1.
ENTER to confirm selection. Press ESC to return
to previous page.
Press ST to select photo. Press COPY to copy
2.
photo from external media source to internal
memory. Press T to highlight YES and press
ENTER to confirm action.
Press ST to select photo. Press DEL to delete
3.
photo in media source. Press T to highlight YES
and press ENTER to confirm action.
4.
NOTE
COPY function is only available when executed from external media source to
internal memory.
NOTE
Please exit to main menu, select desired media source, and enter file function to
copy/delete photo in a different directory.
Setup Function
1.
Press WX to select SETUP function and press ENTER to confirm selection. Press
2.
Press ST to select option, press WX to adjust values and press ENTER to confirm
3.
3 setup options are available as below:
ESC to return to previous page.
selection. Press ESC to return to previous page.
System Setup:
Brightness
1~100 (Default value set at 50)
Backlight
1~6 (Default value set at 6)
Contrast
1~100 (Default value set at 50)
Saturation
1~100 (Default value set at 50)
Hue
1~100 (Default value set at 50)
Gamma
z
GAMMA-1: Approaching color sharpness
z
GAMMA-2: Approaching true color
English (Default), Russian, Polish, Serbian, Czech,
Language
Bulgarian, Croatian, Romanian, Latvian, Slovenian,
Slovak, Estonian
Auto-Power On
Enable auto-power on/off function and adjusts
Auto-Power Off
corresponding time values
Auto-Power
Frequency
Reset
Adjust frequency of auto-power on/off function in
sequence of Once Æ Everyday Æ Mon. to Fri. Æ
Weekend
Restore settings to factory default values
EN-5
Photo Setup:
Display Mode
Display Ratio
Adjust photo display mode of Slide Show /
Thumbnail / Browse
Adjust photo display ratio of Crop to Fill / Full
Screen / Fit to Screen
Adjust time duration of Slide Show Mode in sequence
Slide Show Duration
of 5 Sec. Æ 10 Sec. Æ 15 Sec. Æ 30 Sec. Æ 1 Min. Æ
5 Min. Æ 15 Min. Æ 1 Hour Æ 1 Day
Adjust Slide Show Mode transition effect including
Slide Show Effect
Rect / Spiral / Cross / Grid / Random lines / Blinds
/ Erase / Partition / Snake / Random / None
Slide Show Repeat
Clock Display
Enable/disable Slide Show Mode repeat function
Enable/disable Slide Show time display
Calendar Setup:
Display Mode
Date
Adjust clock display mode of Monthly Calendar /
Calendar / Clock
Adjust day/month/year value of calendar display
Clock Mode
Toggle between 12-hour/24-hour time format
Clock Time
Adjust minute/hour value of clock display
Card Reader Function
1.
2.
Connect the device to PC with USB cable provided.
After automatic driver installation, insert memory cards into appropriate slots on the
device.
3.
Files can be copied, moved, and deleted exactly as other card reader functions.
4.
Reboot the device when prompted.
5.
To safely remove the device from PC, click on
in Windows Notification Area.
Select corresponding device (Stop USB Mass Storage Device Drive (E:)) to stop
operation.
6.
Follow the on screen instructions to complete device removal.
EN-6
Technical Specifications
Display Screen
7” TFT LCD
File Format
*.jpg ,*.bmp
Expansion Slot
SD/MMC/MS/xD Cards (up to 8GB capacity supported)
Internal Memory
128MB NAND Flash
USB Interface
High Speed USB2.0
OSD Languages
English, Russian, Polish, Serbian, Czech, Bulgarian,
Croatian, Romanian, Latvian, Slovenian, Slovak, Estonian
Compatible OS
Windows 2000 / Windows XP / Windows VISTA
Weight
528 ± 5g
Dimensions (L X W X H)
209mm X 141mm X 24.5mm
Power Source
Input: AC 100V-240V
Output: DC 5V, 2A
Technical Support and Warranty Information
Please refer to www.prestigio.com for technical support and included warranty card for
warranty information.
Disclaimer
We make every effort to ensure that the information and procedures in this user manual are
accurate and complete. No liability can and will be accepted for any erros or omissions.
Prestigio reserves the right to make any changes without further notice to any products
herein.
EN-7