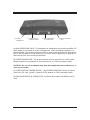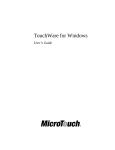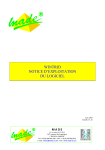
1
Port, Inc.
Portable
PC Card CDROM Drive
NW24XCD
Quick Installation Guide
Copyright © 1998, Port. All rights reserved.
This document may not, in whole or part, be copied, photocopied, reproduced, translated
or reduced to any electronic medium or machine-readable form without prior consent, in
writing, from Port.
In no event will Port be liable for direct, special, incidental or consequential damages
arising out of the use or inability to use this product or documentation even if advised of
the possibility of such damages. In particular the manufacturer shall not have liability for
any hardware, software or data stored or used with the product including any costs of
repairing, replacing or recovering such hardware, software or data. Product names mentioned in this user guide are trademarks of their respective companies.
*All specifications are subject to change without notice.
MS-DOS, Windows 3.1, Windows 95, Windows 98, and Windows NT are trademarks of
Microsoft Corporation, all right reserved. All other trademarks belong to their respective
owners.
Introduction
Congratulations on your purchase of the NW24XCD Portable 24X CD-ROM drive. We
hope you enjoy our product for its great features, performance and value. This user
guide is designed to help you get your new CD-ROM drive installed and running in the
shortest amount of time. It should also help you to become familiar with all the various
features and controls of the unit.
Port CANNOT be held liable if you damage your computer due to misuse or mishandling
of equipment.
Please take the time to read the installation guide and inspect the contents.
If anything is missing or damaged call your supplier or local distributor.
System Requirements
-
PC or AT compatible system
386, 486, Pentium, or higher processor
DOS, Windows 3.1x, Windows 95, Windows 98, or Windows NT
Type II PC Card slot
Contents List
Make sure you have the following items in your NW24XCD package:
- Portable 24X CD-ROM Unit
- PC Card cable
- Driver diskette
- User's Manual
- Warranty Card
1 - Part Names and Functions
B) POWER LED
D) MANUAL
EJECT BUTTON
C) BUSY LED
A) LOADING TRAY
E) EJECT BUTTON
A) LOADING TRAY - Opens and closes to allow loading of CD Discs.
B) POWER LED - This LED will glow RED when the drive is powered on and CD-Rom
accessed.
C) BUSY LED - This LED will glow GREEN when the CD-ROM is accessed.
D) MANUAL EJECT BUTTON - In the case of no power or other conditions where the
user is unable to open the loading tray, a paper clip may be inserted into the hole which
will open the tray sufficiently to remove the CD disc.
E) EJECT BUTTON - Opens and closes the loading tray.
Note : The front panel controls and indicators may vary from model to model.
B) POWER
CONNECTOR
C) POWER OPTION
JUMPER SWITCH
D) MINI-CENTRONICS
36 CONNECTOR
A) MINI HEADPHONE
JACK
A) MINI HEADPHONE JACK - This standard mini headphone jack provides amplified CD
audio output for connection to a pair of headphones, a pair of amplified speakers, or a
stereo amplifier. You can also connect a stereo to stereo cable from the mini head phone
jack on the CD-ROM to a LINE-IN jack on your sound card (if applicable) for playing CD
audio directly from your sound card speakers.
B) POWER CONNECTOR - The power connector may be connected to a 5Volt power
adapter available for purchase from the manufacturer or a PS/2 (mouseport) cable.
CAUTION - Do not use an adapter other than that supplied by the manufacturer, or
refer to your vendor.
C) POWER OPTION JUMPER SWITCH - (See POWER SOURCES section 2) Selects
Power from PC Card (default ), optional AC/DC adapter or PS/2( mouseport) cable.
D) MINI-CENTRONICS 36 CONNECTOR - Interfaces the portable CD-ROM to the PC
Card.
2 - Power Sources
There are two power source options available on this version of NW24XCD:
1. PC CARD slot (default). The drive is powered from the computer through the PC Card
slot and can be supplemented by an optional PS/2 power cable if required for notebooks
with insufficient power from the PC Card socket.
2. Optional external AC/DC Power Adapter. This option is only for notebooks with
insufficient power from the PC Card socket. If the CDROM is not recognised, or keeps
resetting, or the tray latch is not released when you press the button on the front panel,
your computer may not supply enough power to the NW24XCD. In this case, contact
your vendor to order an AC/DC adapter to power your NW24XCD. The AC/DC adapter
must deliver 5V DC +/-5%, 1Amp.
POWER SWITCH SETTING
By looking at the back of the drive unit (with it facing you), locate the power option
2-position jumper on the back of the drive. Make sure that this is in the correct position
before inserting the PC Card into the computer:
Jumper Position
Towards the right (default)
Jumper function
Power will be supplied from the PC Card
Towards the right
Power will be supplied from the PC Card and can
be supplemented via an optional PS/2 power cable
attached to the notebook mouse port
Towards the left
Power will be supplied by the optional AC Power
Adapter or from the PS/2 power cable; no power
will come from the PC Card Slot of the notebook.
.
Note: on some models, the 2-position jumper is replaced by a mechanical switch.
3 - Hardware Setup
1. Make sure that the Power Option Jumper is towards the right (without optional
AC/DC adapter) (see Power Sources Section).
2. Ensure that the supplied PC Card and cable are correctly connected to the NW24XCD
via the mini-centronics 36 connector at the rear of the drive. Insert the PC Card into the
relevant PC Card slot on the computer.
Note: The Eject button on the CD-ROM drive unit will not function until the Software
installation is completed in the following sections; the tray can always be unlatched
manually by inserting a paperclip sized object inside the hole in the front panel.
4 - Windows 95/98 Software Installation
4.1 - Install Windows 95 Default Driver
Windows 95's card services should automatically configure the NW24XCD upon insertion
of the PC Card. When the PC Card is first plugged into one of the PC Card sockets, the
Installation Wizard will pop up a window informing you that a new piece of hardware has
just been found and request to select a driver for the new hardware from the following
options :
.
.
.
.
Windows default driver,
Driver from disk provided by hardware manufacturer,
Do not install a driver,
Select from a list of alternate drivers.
Select the option, 'Windows default driver' and follow the instructions given by the
Installation Wizard. The hard drive should be recognised after rebooting.
There should be now two new entries in the list of devices displayed by the Device
Manager, one under the heading 'CDROM' which shows the model of CDROM laser drive
(e.g. TEAC CDROM xxxx) and another entry under 'Hard Drives' with the name of the
device driver 'Standard ESDI/IDE driver'. In most cases, there will be two such entries,
one for the internal IDE hard drive and a second for the NW24XCD drive (the same driver is used for the internal hard drives and the NW24XCD).
4.2 - Install Windows 98 Default Driver
Windows 98's card services should automatically configure the NW24XCD upon insertion
of the PC Card. When the PC Card is first plugged into one of the PC Card sockets, the
Installation Wizard will pop up a window informing you that a new piece of hardware has
just been found and request to select a driver for the new hardware.
Just follow the instructions on the screen to install the default hard disk driver 'Standard
IDE/ESDI Hard Disk Controller'.
Click on 'Next' and select 'Search for the best driver for your device (recommended)'.
Then, click on 'Next' twice to finish installing the default driver.
No installation diskette is needed.
There should be now two new entries in the list of devices displayed by the Device
Manager, one under the heading 'CDROM' which shows the model of CDROM laser drive
(e.g. TEAC CDROM xxxx) and another entry under 'Hard Drives' with the name of the
device driver 'Standard ESDI/IDE driver'. In most cases, there will be two such entries,
one for the internal IDE hard drive and a second for the NW24XCD drive (the same driver is used for the internal hard drives and the NW24XCD).
5 - DOS and Windows NT Software Installation
5.1 Install Windows NT Ver 4.0
The computer must be turned off before inserting or removing the NW24XCD under
WIndows NT.
1) Boot to Windows NT
2) Go to Start/Settings/Control Panel
3) Open SCSI Adapters
4) Click on the Drivers tab
5) Click on Add. On the next screen, click on Have Disk
6) Insert the NW24XCD Driver Diskette and direct the prompt to the “A:\WINNT” directory
and click OK
7) The system will prompt you again for the directory. Enter the same directory,
“A:\WINNT” and click OK.
8) The system will prompt you to reboot once the driver installation is complete.
5.2 Install DOS
Drivers are also available for DOS. Please download the driver from our web site
'www.port.com/support/files.htm.
Note : Removing the PC Card
Make sure the NW24XCD is idle. From the 'Control Panel', open 'PC Card' and 'STOP'
the NW24XCD PC Card. Remove the PC Card only when prompted to do so.
6 - Troubleshooting
After connecting the CD-ROM drive to my computer the loading tray will not open
when I press the EJECT button.
- On many computers the parallel port device is not reset or initialized until the
Operating System is loaded. If the system has not been started, disconnect the
parallel cable from the rear of the CD-ROM drive.
During installation or after the drivers were loaded the computer hangs up.
- Most likely there are other device drivers already loaded into the computer such
as Network Card drivers, SCSI drivers, Sound Card drivers or other Parallel Port
Device drivers which are interfering with the drivers. Please perform a system
check of the status of all installed devices through the Control Panel and System
Configuration Screens. Sometimes driver conflicts can be resolved very easily by
fine tuning the drivers settings.
The CD-ROM drive is not recognized after software installation.
- Verify step by step that you have followed the instructions in this manual concerning Hardware and Software installation.
- Verify the installation and the configuration of the PC Card software supplied with
the computer.
There is not enough power to power the CD-ROM unit.
- There is an optional PS/2 power cable or AC power adapter available for use with
your notebook computer to supply additional power to the CD-ROM drive. Some
notebooks do not supply enough power through the PC Card slot to power the
drive unit. Contact customer service for the optional PS/2 power cable or AC
Adapter and refer to the section 2-Power Sources.
Need to use my notebook computer Recovery CD but can’t get access to the CDROM.
- In the instance of Hard Disk Drive replacement due to failures, Recovery CDs
used to restore your original OEM Software image to your notebook HDD can be
used with the NW24XCD. However, if your HDD is not bootable to DOS, you will
need to contact Port Technical Support for additional information or for certain systems to request a Diskette so that you can then access your CD-ROM and utilize
the recovery CD. If your system is bootable to DOS, you will need to make sure
your Notebook’s card and socket services are installed and loaded then follow the
DOS installation procedures to install the CD-ROM DOS driver.
7 - Technical Support
For additional assistance with your PORT Accessories, please contact our
Technical Support group at :
Technical Support :
Telephone : (503) 684-3147, Mon Frid 8am-8pm EST
Email :
[email protected]
WWW :
http://www.port.com
Headquarters :
Port, Inc
66 Fort Point Street
Norwalk, CT 06855
USA
8 - Specifications
DRIVE TYPE : ATAPI CD-ROM 24X MAX
INTERFACE : PC card 2.1 Type II or Type III
OPERATING SYSTEM DRIVERS : DOS, Windows 95, Windows 98 & Windows NT
CD FORMATS SUPPORTED : ISO 9660, High Sierra, Multi-Sessions Photo CD, CDROM mode 1 & 2 CD-XA, CD-I, Video CD, CD Digital Audio & MPC-3
LED DISPLAYS : Power & Busy indicators
PERFORMANCE : Max Transfer Rate up to 3600 kB/s (24X)
Average Access Time 190 msec
POWER SOURCES : Powered directly through the PC Card slot using patented micro
power management system < 600mA peak from 5V PCMCIA
Optional AC adapter (5V, 1A, 110-220V auto-switching) or PS/2.
DIMENSIONS : 4 X 6 X 0.7 inches (14 X 13 X 2 cm)
WEIGHT : 400 g
Warranty
Warranty Limitations
The limited warranty period should appear on your warranty card. If not contact your
retailer for any information about the limited warranty.
The warranty does not apply to:
- Damaged front panel and loading tray
- The damages or problems resulting from misuse, abuse, accident,
alteration or incorrect electrical current or voltage.
- Any product without warranty or serial number label, or shipped without it's
warranty card
FCC Compliance
This equipment has been tested and found to comply with the limits for a Class B digital
device, pursuant to Part 15 of the FCC Rules. These limits are designed to provide reasonable protection against harmful interference when the equipment is operated in a residential installation. This equipment generates, uses, and can radiate radio frequency
energy and if not installed and used in accordance with the instruction manual may cause
harmful interference to radio communications. However, there is no guarantee that interference will not occur in a particular installation. If this equipment does cause interference
to radio or television reception, which can be determined by turning the equipment off
and on, try to correct the interference by one or more of the following measures:
• Relocate the receiving antenna.
• Increase the separation between the equipment and the receiver.
• Connect the equipment into an outlet of a circuit different from that to which the receiver
is connected.
• Consult the dealer or an experienced radio/TV technician for help.
CAUTION: Any changes or modifications not expressly approved by the grantee of this
device could void the user's authority to operate the equipment.
FCC Part 15
Operation is subject to the following two conditions:
(1) This device may not cause harmful interference.
(2) This device must accept any interference received including interference that may
cause undesired operation.
Warning
Safety :
Never attempt to disassemble, adjust or repair the CD-ROM drive as exposure to laser
light or other safety hazards may result.
This is a Class 1 Laser Product. This product complies with all applicable safety standards, DHHS Rules 21 CFR Chapter 1, Subchapter. The laser beam generated is totally
enclosed during all modes of normal operation, and no hazardous laser light is emitted
from the drive.
www.port.com