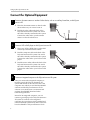
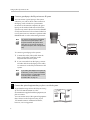
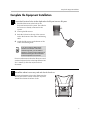
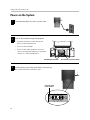
1
Setting Up the Polycom
Instructor RP
Version 1.0
November 2005 Edition
1725-22886-001/A
Polycom Instructor RP Version 1.0
VideoVoiceDataWeb
Connect. Any Way You Want.
Trademark Information
Polycom® and the Polycom logo design are registered trademarks of Polycom, Inc. Polycom Instructor™ RP,
PowerCam™, and VSX™ are trademarks of Polycom, Inc. in the United States and various other countries.
All other brand and product names are trademarks or registered trademarks of their respective companies.
Patent Information
The accompanying product is protected by one or more U.S. and foreign patents and/or pending patent applications
held by Polycom, Inc.
Disclaimer
This software is provided 'as is' with no explicit or implied warranties in respect of its properties, including, but not limited
to, correctness and fitness for purpose.
Copyright Information
© 2005 Polycom, Inc. All rights reserved.
Polycom Inc.
4750 Willow Road
Pleasanton, CA 94588-2708
USA
No part of this document may be reproduced or transmitted in any form or by any means, electronic or mechanical, for
any purpose, without the express written permission of Polycom, Inc. Under the law, reproducing includes translating
into another language or format.
As between the parties, Polycom, Inc. retains title to, and ownership of, all proprietary rights with respect to the software
contained within its products. The software is protected by United States copyright laws and international treaty
provision. Therefore, you must treat the software like any other copyrighted material (e.g. a book or sound recording).
Every effort has been made to ensure that the information in this manual is accurate. Polycom, Inc. is not responsible
for printing or clerical errors. Information in this document is subject to change without notice.
Portions of the VSX software are copyright © 2001 by Dr. Brian Gladman. The following terms and
disclaimer apply only to Dr. Gladman's AES encryption implementation:
Copyright © 2001, Dr. Brian Gladman <[email protected]>, Worcester, UK. All rights reserved.
License Terms
The free distribution and use of this software in both source and binary form is allowed (with or without
changes) provided that:
1.
distributions of this source code include the above copyright notice, this list of conditions and the
following disclaimer;
2.
distributions in binary form include the above copyright notice, this list of conditions and the following
disclaimer in the documentation and/or other associated materials;
3.
the copyright holder's name is not used to endorse products built using this software without specific
written permission.
About this Guide
Now that you’ve received your Polycom Instructor™ RP, you’ll probably
want to set it up and start enjoying its functionality as soon as possible. This
document, Setting Up the Polycom Instructor RP, explains how to unpack the
system, connect the equipment, calibrate it, and perform all the steps you need
to be ready to make calls and share data.
Because the Polycom Instructor RP contains components from a number of
different manufacturers, you may have to refer to other documents during the
set-up process. You can use this Setting Up the Polycom Instructor RP document
like a roadmap: it will tell you the steps you need to take and tell you where to
look for additional information, if necessary.
Most of the other documents that you’ll have to refer to are included with your
Polycom Instructor RP, either as printed documents or available through the
CDs that come with the system. These documents include:
•
Polycom® Using the Polycom Instructor RP
•
Polycom Setting Up the VSX™ 8000 System
•
Polycom Administrator’s Guide for the VSX Series
•
Polycom Getting Started Guide for the VSX Series
•
Polycom Setting up the PowerCam™ Plus
•
SMART™ Rear Projection SMART Board™ 3000i Installation Guide
•
SMART Unpacking the Rear Projection SMART Board Interactive Whiteboard
•
SMART SMART Board Software User’s Guide
•
NEC® Quick Setup Guide
•
NEC Portable Projector Important Information manual
•
Sejin Electron Inc. User’s Manual for Windows® 95/98 Freeboard™
Many of the Polycom documents are also available at
www.polycom.com/videodocumentation.
For support or service, please contact your Polycom distributor or go to
Polycom Support at www.polycom.com/support.
iii
Setting Up the Polycom Instructor RP
iv
Contents
Unpack and Position the System . . . . . . . . . . . . . . . . . . . . . . . . . 1–2
Prepare to Install the Equipment . . . . . . . . . . . . . . . . . . . . . . . . . 1–3
Connect the Standard Equipment . . . . . . . . . . . . . . . . . . . . . . . . 1–5
Connect the Optional Equipment . . . . . . . . . . . . . . . . . . . . . . . . 1–6
Complete the Equipment Installation . . . . . . . . . . . . . . . . . . . . . . 1–9
Power on the System . . . . . . . . . . . . . . . . . . . . . . . . . . . . . . . . 1–10
Check the Screens and Run the Wizard . . . . . . . . . . . . . . . . . . 1–11
Calibrate the Annotation Box . . . . . . . . . . . . . . . . . . . . . . . . . . 1–12
Install the Software and Complete the Calibration . . . . . . . . . . . 1–15
Configure and Use the System . . . . . . . . . . . . . . . . . . . . . . . . . 1–16
Troubleshooting . . . . . . . . . . . . . . . . . . . . . . . . . . . . . . . . . . . 1–17
v
Setting Up the Polycom Instructor RP
vi
Setting Up the Polycom Instructor RP
The Polycom Instructor RP combines the power
of a Polycom VSX 8000 video conferencing
system with the capabilities of a SMART Board
interactive whiteboard.
With a Polycom Instructor RP, you can make and
receive video calls and share content, such as
show slide presentations, just like you would in a
typical video conference. But with the added
SMART Board functionality, you can also
annotate that video or content. For example, you
can jot down notes on a document you’re sharing
with the far site, draw on the video from your
VCR, or highlight changes on a file from your
computer.
For your convenience, Polycom Instructor RP
also enables you to touch the screen to make
selections from the VSX 8000 user interface.
1
Setting Up the Polycom Instructor RP
Unpack and Position the System
1
Work with another person to unpack the Polycom Instructor RP system.
To perform this step, follow the instructions in
Unpacking the Rear Projection SMART Board
Interactive Whiteboard that is attached to the
outside of the crate.
Caution
Be sure the wheels are unlocked
before you try to move the system.
Be careful when you move the
system. Quick stops, excessive
force, and movement over uneven
surfaces can overturn the system.
2
2
Work with another person to roll the Polycom Instructor RP off the pallet and move it to the room where
you will be using it.
•
Position the system so that it does not face
toward a window or other source of bright
light.
•
Leave space in front of the system so that you
can open the doors.
•
Leave space behind the system so that you
can work.
•
Set up the system in an area with as little
dust, humidity, and smoke as possible.
•
Lock the wheels when the system is in the
desired place.
Prepare to Install the Equipment
Prepare to Install the Equipment
1
Open the front doors of the cabinet and remove the accessory boxes and the video conferencing shelf.
You should find these accessory boxes:
Accessory Box
Contents
Documentation You May Need During Setup
Polycom Instructor
RP/VSX 8000
accessory box
Accessories for the
Polycom Instructor RP
system and the VSX 8000
video conferencing system,
including the Polycom
remote control, the Polycom
Instructor Tools CD, and the
VSX Series Documentation
Library CD
• Using the Polycom Instructor RP
• Setting Up the VSX 8000 System
• Polycom Instructor RP User’s Guide (available as a
link on the Polycom Instructor Documentation CD)
• Administrator’s Guide for the VSX Series and
Getting Started Guide for the VSX Series (available
as links on the VSX Series Documentation Library
CD)
Note: You must have an Internet connection to access
the documents on the Polycom documentation CDs.
2
Display accessory
box
Accessories for the SMART
Board, including the pens
and eraser, and the SMART
software CD
• SMART Board Software User’s Guide
Projector
accessory box
Accessories for the
projector, including the lens
cap
• NEC® Quick Setup Guide
Keyboard box
Wireless keyboard
Sejin Electron Inc. User’s Manual for Windows® 95/98
Freeboard™
Microphone box
Microphone
Setting Up the VSX 8000 System
• Rear Projection SMART Board 3000i Installation
Guide
• NEC Portable Projector Important Information
manual
Remove the shipping strap that secures the small mirror.
The buckle of the shipping strap is located on the
underside of the projector mounting plate.
Shipping
strap
3
Setting Up the Polycom Instructor RP
3
Remove the rear access panel from the cabinet.
For more information, refer to the “Removing the
Rear Access Panel” section of the Rear Projection
SMART Board 3000i Installation Guide.
Note
4
4
The Rear Projection SMART Board 3000i
Installation Guide is produced by SMART
Technologies Inc. Although the
information contained in this document
was accurate at the time of publication,
some procedures or illustrations may
have changed slightly since its inclusion
in the Polycom Instructor RP
documentation set.
Install the video conferencing shelf if you want to place the camera on it.
•
If you do not need this shelf for your camera
or for any other device, skip this step.
•
To install the shelf, follow the instructions in
the “Installing the Optional
Videoconferencing Shelf” section of the Rear
Projection SMART Board 3000i Installation
Guide.
•
Typically, you attach the video conferencing
shelf to the right side of the Polycom
Instructor RP system when facing it from the
front. However, you can attach it to the left
side if you choose.
•
The shelf mounting arm has three positions.
Choose the height that best suits your
installation.
•
Do not confuse the video conferencing shelf
with the laptop shelf. The laptop shelf is an
optional item and is smaller than the video
conferencing shelf.
Connect the Standard Equipment
Connect the Standard Equipment
1
Connect the PowerCam Plus to the Polycom Instructor RP.
1. Place the PowerCam Plus on the video
conferencing shelf.
2. Connect one end of the PowerCam Plus
cable to the VSX 8000 system as described in
the Polycom Setting Up the VSX 8000 System
document. The VSX 8000 system is located
above the annotation box in the Polycom
Instructor RP cabinet.
3. Connect the other end of the PowerCam Plus
cable to the PowerCam Plus as described in
the Polycom Setting Up the PowerCam Plus
document.
Note
2
Do not power on the PowerCam Plus or
any of the standard equipment until you
are ready to power on the complete
system as described in Power on the
System on page 10.
Connect the Polycom microphone to the Polycom Instructor RP.
1. Place the microphone on a table or other flat
surface.
The microphone performs best if you place it
correctly. For information about microphone
placement, refer to the Polycom
Administrator’s Guide for the VSX Series.
2. Find the microphone cable in the back of the
Polycom Instructor RP system. One end of
the cable is already connected to the system.
Connect the other end to the microphone.
You can connect up to three daisy-chained
Polycom microphones to the system. If you
choose to connect more than one microphone,
you will need to order the appropriate cables. To
obtain the lengths and part numbers for these
cables, refer to the Polycom Administrator’s Guide
for the VSX Series.
5
Setting Up the Polycom Instructor RP
Connect the Optional Equipment
1
Connect a document camera or another S-video device, such as an auxiliary PowerCam, to the Polycom
Instructor RP.
1. Place the document camera or other S-video
device wherever you want to locate it.
2. Find the S-video cable in the back of the
Polycom Instructor RP system. One end of
the cable is already connected to the system.
Connect the other end to your document
camera or other S-video device.
2
Connect a VCR or DVD player to the Polycom Instructor RP.
1. Place your VCR or DVD player on the shelf
in the Polycom Instructor RP cabinet.
2. Find the composite cable in the back of the
Polycom Instructor RP system. One end of
the cable is already connected to the system.
Connect the other end to your VCR or DVD
player.
3. Find the stereo audio cable in the back of the
Polycom Instructor RP system. One end of
the cable is already connected to the system.
Connect the other end to your VCR or DVD
player.
3
Connect an integrated computer to the Polycom Instructor RP system.
Once you connect the integrated computer, it
becomes part of the Polycom Instructor RP
system and should not be removed. This is the
computer onto which you will load the SMART
software and the Polycom Instructor Tools
software. You can then use it to annotate and
perform other SMART Board and video
conferencing functions.
Instead of an integrated computer, you can
connect a guest laptop to the Polycom Instructor
RP system. In contrast to the integrated
computer, the guest laptop can be attached and
removed from the system at any time. It does not
have the SMART or Polycom Instructor Tools
6
VCR/DVD
Connect the Optional Equipment
software loaded on it. You can use it to show
content (such as a slide presentation), but you
cannot use it to annotate or perform other
SMART Board and video conferencing functions.
Note
You cannot connect both an integrated
computer and a guest laptop to the
Polycom Instructor RP at the same time.
If you want to connect a guest laptop,
skip this step and go to step 5.
To connect an integrated computer to the system:
1. Find the tie-wrapped bundle of cables in the
back of the Polycom Instructor RP system.
One end of this cable bundle is already
connected to the system.
2. Connect the video cable to the monitor video
connector on the computer.
3. If you want audio from the computer,
connect the audio cable to the audio out
connector on the computer.
A
4. Connect the serial cable to an available serial
connector on the computer.
5. If you have a separate printer for the
computer, connect the printer cable to the
25-pin parallel port (printer connector) on
the computer.
6. Connect the network cable to the network
card on the computer.
7. Find the mouse and keyboard cable bundle
in the back of the Polycom Instructor RP
system. One end of this cable bundle is
already connected to the system.
8. Connect the mouse cable to the mouse port
on the computer.
9. Connect the keyboard cable to the keyboard
port on the computer.
10. Connect the power cord to the power
connector on the computer.
Note
If you add an integrated computer to the
system at a later time, you may need to
recalibrate the touch screen. For
information on how to do this, refer to
Calibrate the Annotation Box on page 12.
7
Setting Up the Polycom Instructor RP
4
Connect a guest laptop to the Polycom Instructor RP system.
You can connect a guest laptop to the system
whenever you want to show others content on
the laptop, such as slides for a presentation.
In contrast to the internal computer, the guest
laptop can be attached and removed from the
system at any time. It does not have the SMART
or Polycom Instructor Tools software loaded on
it. You cannot use it to annotate or perform other
SMART Board or video conferencing functions.
Note
You cannot connect both an integrated
computer and a guest laptop to the
Polycom Instructor RP system at the
same time. If you want to connect an
integrated computer, refer to the previous
step.
To connect a guest laptop to the system:
1. Connect the video (VGA) cable from the
laptop to the video connector on the
Polycom Instructor RP system.
2. If you want audio from the laptop, connect
an audio cable from the laptop to the audio
out connector on the Polycom Instructor RP
system.
Note
5
If you add a guest laptop to the system at
a later time, you may need to recalibrate
the touch screen. For information on how
to do this, refer to Calibrate the
Annotation Box on page 12.
Connect other optional equipment that you plan to use with the system.
To perform this step, refer to the Polycom Setting
Up the VSX 8000 document or to the
documentation supplied with the equipment you
plan to connect.
You can connect most of the optional equipment
that is shown on the Polycom Setting Up the
VSX 8000 document. Additional monitors,
however, are not supported.
8
http://
www.polycom.com
Complete the Equipment Installation
Complete the Equipment Installation
1
Connect the IR receiver for the wireless keyboard to the Polycom Instructor RP system.
1. Find the IR receiver in the back of the
Polycom Instructor RP system. The cable for
the receiver is already connected to the
system.
2. Unwrap the IR receiver.
3. Stick the Velcro® to the top of the receiver
and to the bottom of the video conferencing
shelf.
4. Attach the IR receiver to the bottom of the
video conferencing shelf.
Note
If you do not want to attach the IR
receiver to the bottom of the video
conferencing shelf, you can attach it
elsewhere. Just be sure that there are no
obstacles blocking the IR transmission
from the keyboard to the receiver.
For more information about the IR receiver and
wireless keyboard, refer to the Sejin Electron Inc.
User’s Manual for Windows 95/98 Freeboard
document.
2
Reinstall the cabinet’s rear access panel and close the front doors.
For more information, refer to the “Removing the
Rear Access Panel” section of the Rear Projection
SMART Board 3000i Installation Guide.
9
Setting Up the Polycom Instructor RP
Power on the System
1
Connect the external power cord to a power outlet.
2
Power on the standard and optional equipment.
•
Open the front doors of the cabinet and
power on the annotation box.
•
Power on the VSX 8000.
•
Power on any other equipment you have,
such as an integrated computer, a document
camera, or a VCR or DVD player.
VSX 8000 power button
3
Press the green projector lamp power button on the pen tray.
The system takes about a minute to start.
Projector lamp
power button
10
Annotation box power button
Check the Screens and Run the Wizard
Check the Screens and Run the Wizard
1
Make sure the Welcome screen image is centered properly on the screen.
If you need to adjust the projected image, follow
the instructions in the “Adjusting the Projected
Image” section of the Rear Projection SMART
Board 3000i Installation Guide.
The adjustments that you make at this point are
coarse adjustments; you will be able to make fine
adjustments later.
2
Make sure the Welcome screen image is in focus.
If you need to adjust the projector focus, follow
the instructions in the “The NEC VT670
Projector” section of the Rear Projection SMART
Board 3000i Installation Guide.
3
Complete the VSX setup wizard.
•
Use the Polycom remote control to complete
the wizard. For information about using the
remote control, refer to the Polycom Getting
Started Guide for VSX Series Systems.
•
Touch control is not enabled at this stage of
the setup; however, you will be able to use
touch control for most of the system
configuration and customization.
•
For information about the VSX system, refer
to the Polycom Administrator’s Guide for the
VSX Series.
11
Setting Up the Polycom Instructor RP
4
Make fine adjustments to the projector, if needed.
To perform this step:
1. Select full-screen video by pressing
Near on the Polycom remote control.
2. Make the fine adjustments to the projector
by following the instructions the “Adjusting
the Projected Image” section of the Rear
Projection SMART Board 3000i Installation
Guide.
Calibrate the Annotation Box
1
Calibrate the touch screen for Camera 2.
Camera 2 is typically the document camera.
However, even if you do not have a document
camera connected to your system, you must still
calibrate the touch screen for Camera 2. (You
must calibrate each available camera and video
source because the system stores separate
calibration data for each.)
CALIBRATE TOUCH SCREEN
TOUCH UPPER LEFT TARGET
To calibrate the touch screen for Camera 2:
1. On the Polycom remote control, press
Camera and select 2.
CALIBRATE TOUCH SCREEN
2. Pick up a pen from the SMART tray.
3. Press the
Keyboard button on the
SMART tray to bring up the calibration
screen.
TOUCH LOWER RIGHT TARGET
4. Use the pen to touch the center of the
crosshair on the upper left of the screen.
If the PIP appears on the screen, use the
remote control to turn it off because it can
hide the crosshairs.
5. Use the pen to touch the center of the
crosshair on the lower right of the screen.
6. Use the pen to touch the center of the
crosshair on the upper right of the screen.
7. Draw on the screen to check that the
calibration worked correctly.
12
CALIBRATE TOUCH SCREEN
TOUCH UPPER RIGHT TARGET
Calibrate the Annotation Box
2
Calibrate the touch screen for Camera 3.
Camera 3 is typically the VCR or DVD player.
However, even if you do not have a VCR or DVD
player connected to your system, you must still
calibrate the touch screen for Camera 3. (You
must calibrate each available camera and video
source because the system stores separate
calibration data for each.)
CALIBRATE TOUCH SCREEN
TOUCH UPPER LEFT TARGET
To calibrate the touch screen for Camera 3:
1. On the Polycom remote control, press
Camera and select 3.
CALIBRATE TOUCH SCREEN
2. Pick up a pen from the SMART tray.
3. Press the
Keyboard button on the
SMART tray to access the calibration screen.
TOUCH LOWER RIGHT TARGET
4. Use the pen to touch the center of the
crosshair on the upper left of the screen.
If the PIP appears on the screen, use the
remote control to turn it off because it can
hide the crosshairs.
5. Use the pen to touch the center of the
crosshair on the lower right of the screen.
CALIBRATE TOUCH SCREEN
TOUCH UPPER RIGHT TARGET
6. Use the pen to touch the center of the
crosshair on the upper right of the screen.
7. Draw on the screen to check that the
calibration worked correctly.
3
Calibrate the touch screen for Camera 4.
Camera 4 is typically the integrated computer.
However, even if you do not have an integrated
computer, you must still calibrate the touch
screen for Camera 4 because it will be used for the
annotation box whiteboard instead. (You must
calibrate each available camera and video source
because the system stores separate calibration
data for each.)
Note
If you add a PC or laptop after you have
already performed this step, or you
switch to a different PC or laptop, you
may need to perform this step again to
recalibrate the touch screen.
13
Setting Up the Polycom Instructor RP
To calibrate the touch screen for Camera 4:
1. On the Polycom remote control, press
Camera and select 4.
— If you have an integrated PC or a guest
laptop, you will see the video from the PC
or laptop as well as the whiteboard icon in
the upper right corner of the screen.
— If you do not have an integrated PC or a
guest laptop, you will see a blank
whiteboard except for the whiteboard
icon in the upper right corner of the
screen.
CALIBRATE TOUCH SCREEN
TOUCH UPPER LEFT TARGET
CALIBRATE TOUCH SCREEN
2. Pick up a pen from the SMART tray.
3. Press the
Keyboard button on the
SMART tray to bring up the calibration
screen.
TOUCH LOWER RIGHT TARGET
4. Use the pen to touch the center of the
crosshair on the upper left of the screen.
If the PIP appears on the screen, use the
remote control to turn it off because it can
hide the crosshairs.
5. Use the pen to touch the center of the
crosshair on the lower right of the screen.
6. Use the pen to touch the center of the
crosshair on the upper right of the screen.
7. Draw on the screen to check that the
calibration worked correctly.
8. Do one of the following:
— If you have an integrated PC or a guest
laptop, you will see a blank whiteboard
except for the whiteboard icon in the
upper right corner of the screen. Click the
whiteboard icon and then continue by
repeating steps 2 through 7.
— If you do not have an integrated PC or a
guest laptop, continue with the Install the
Software and Complete the Calibration
section on page 15.
14
CALIBRATE TOUCH SCREEN
TOUCH UPPER RIGHT TARGET
Install the Software and Complete the Calibration
Install the Software and Complete the Calibration
1
If you have an integrated computer connected to your Polycom Instructor RP system, install the Polycom
Instructor Tools software on it.
If you do not have an integrated computer, skip
this step.
The Polycom Instructor Tools software is on the
Polycom CD. You simply need to insert the CD
into the integrated computer and then follow the
Setup Wizard.
2
Install the SMART Board software.
The SMART Board software is on the SMART
CD. You simply need to insert the CD into the
integrated computer and then follow the Setup
Wizard.
3
SMART
Calibrate the touch screen for the SMART interactive whiteboard.
To calibrate the touch screen for the SMART
interactive whiteboard:
1. Press the SMART Board button on the
SMART tray.
2. Select Orient.
3. Follow the on-screen instructions, making
sure you press your finger squarely on each
crosshair.
For more information, refer to the “Orienting
the Interactive Whiteboard” section of the
Rear Projection SMART Board 3000i Installation
Guide.
SMART Board button
4. Press or draw on the screen with your finger
to check that the calibration worked
correctly.
15
Setting Up the Polycom Instructor RP
Configure and Use the System
1
Configure the VSX 8000 video conferencing system.
To perform this step, follow the instructions in
the Polycom Administrator’s Guide for the VSX
Series.
2
Use the Polycom Instructor RP system.
•
For quick tips on common video
conferencing and data sharing tasks, refer to
Using the Polycom Instructor RP.
User’s Guide
AdministratorS'UIDE
•
For instructions on administrator and
advanced user tasks for the Polycom
Instructor RP, refer to the Administrator’s
Guide for the Polycom Instructor RP.
•
For instructions on using the Polycom
VSX 8000 video conferencing system, refer to
the Getting Started Guide for the VSX Series.
•
16
For instructions on using the annotation tools
and saving your work, refer to the SMART
Board Software User’s Guide.
FORTHE0OLYCOM)NSTRUCTOR20
SMART
.OVEMBER%DITION
"
6ERSION
6IDEO6OICE$ATA7EB
#ONNECT!NY7AY9OU7ANT
Troubleshooting
Troubleshooting
The Polycom Administrator’s Guide for the VSX
Series contains troubleshooting information that
can help you identify and correct issues
associated with the VSX 8000 and the accessories
connected to it.
The Rear Projection SMART Board 3000i
Installation Guide contains troubleshooting
information that can help you identify and
correct issues associated with the display and its
annotation capabilities.
Installation Guide
SMART
The table below lists other issues that can occur
with the Polycom Instructor RP system.
If the system...
It often means...
Correct it this way...
Does not respond to touch
control.
The touch screen is not calibrated
for the camera or video source in
use.
Calibrate the touch screen.
Screen is blank.
The system is in standby.
Touch the screen. If that does not
activate the system, press the green
projector lamp power button on the
pen tray.
Annotation color is different
from the color of the pen.
The pens were not placed in the
tray that matches their color (the
color of the annotation is the color of
the tray, not the color of the pen).
Place the pen in the tray that
matches its color.
Annotations appear bigger
than what you draw or write
on the screen, they appear in
the wrong place, they do not
appear at all, or they appear
erratically.
The camera or video source is not
calibrated correctly. If the touch
screen is out of calibration for the
camera or video source in use,
annotations may appear several
times bigger than what you draw or
write on the screen or they may
appear in the wrong place, and
touch control may be disabled or
erratic. If this occurs, you must
recalibrate the touch screen.
Calibrate the cameras and video
sources again according to the
steps in the Calibrate the Annotation
Box section on page 12.
17
Setting Up the Polycom Instructor RP
If the system...
It often means...
Correct it this way...
Screen is blue.
At least one of the video outputs
from the annotation box is not
connected to the appropriate video
input on the VSX 8000 system.
Ensure that all the video outputs
from the annotation box are
connected to the VSX 8000 system:
• Annotation box VGA output to
VSX 8000 VGA input
• Annotation box Y/C (S-Video)
output to VSX 8000 Camera 2
input
• Annotation box composite video
output to VSX 8000 VCR/DVD
video input, using a composite to
S-Video adapter
18