1
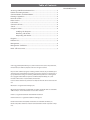
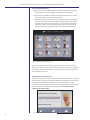
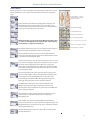
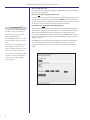
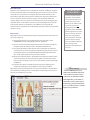
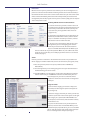
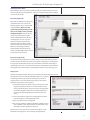
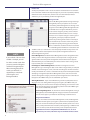
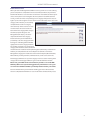
DxRCl
i
ni
c
i
an
TM
I
NSTRUCTOR MANUAL
STUDENTUSER MANUAL ✔
TECHNI
CALAPPENDI
X
Table of Contents
Accessing a DxR Clinician Patient Case............................................................................2
Patient’s Presenting Situation..............................................................................................2
Common Buttons and Exam Buttons...............................................................................3
Entering a Hypothesis............................................................................................................4
Interview Section..................................................................................................................... 5
Exam Section.............................................................................................................................5
Lab Section.................................................................................................................................6
Common Lab Tests..................................................................................................................6
Search...........................................................................................................................................6
Categories & Lists.....................................................................................................................6
Justifying Lab Requests.......................................................................................7
Reviewing Lab Results.........................................................................................7
Interpreting Lab Results......................................................................................7
Diagnosis....................................................................................................................................7
Problem List...............................................................................................................................8
Management............................................................................................................................8
Management Confidence....................................................................................................8
Initial Self Assessment...........................................................................................................9
© 2015 DxR Development Group, Inc.,1840 Innovation Drive Suite 112, Carbondale,
Illinois 62903, for software, template and icons. All rights reserved.
No part of this software program, including artwork and text, may be utilized, reproduced, stored, or transmitted in any form by any means, electronic or mechanical, or
by any information storage or retrieval system, without permission in writing from
the copyright holder. Address inquiries to DxR Development Group, Inc., 1840
Innovation Drive Suite 112, Carbondale, Illinois 62903.
Licensee of the software has permission to duplicate manuals for the licensee’s own
use.
Macintosh is a registered mark of Apple, Inc.
Microsoft, Internet Explorer, and Windows are either registered marks or trademarks
of Microsoft, Inc. in the United States and/or other countries.
Firefox is a registered trademark of the Mozilla Foundation
Chrome browser is a registered trademark of Google, Inc.
Portable Document Format (PDF) and Acrobat are trademarks of Adobe, Inc.
Brands and product references noted are the trademarks of their respective companies.
Mv4.0DxRCUser2015
Accessing a Patient Case and Presenting Situation
Accessing a DxR Patient Case
1. Make sure you have the Web site location and the name of the case you have
been assigned to work on. Navigate to that location in your browser.
2. Find the case on the Web site address provided by your instructor or in DxR’s
waiting room. Click on the case file [See Figure 1].
3. Enter your name and assigned password in the spaces provided. Click Enter. If
there has been a log-in error, a warning message will appear. Check to make
sure your name and ID are entered exactly as your instructor requires. Once
your name and ID are properly entered, click Start. (If this isn’t the first time
you’ve accessed this case, follow the steps above and click Continue Case.)
Figure 1: DxR’s Waiting Room with patient files.
As you enter a DxR Clinician case, keep in mind, instructors and case authors can
design cases and criteria as they wish. The following instructions take into account all
case options available to the instructor. Your instructor may have chosen some or all
of those options for this case.
The Patient’s Presenting Situation
This window introduces you to the patient and the patient’s stated reason for seeking
medical attention [See Figure 2]. Read the information carefully, then click one of the
three buttons under “What would you like to do next?” Your choices are: the
Interview button for asking the patient questions; the Exam button for conducting a
physical exam; or the Lab button for ordering lab tests. You can access these
sections in any order you like.
Figure 2: DxR Clinician’s Presenting Situation Screen
2
Common Buttons & Exam Buttons
Common Buttons
Before you start your clinical investigation, review the buttons common to all screens
within a DxR Clinician case as well as the exam buttons shown on the right of this
page.
Body View Buttons - Select the
view that shows the body part
you want to examine.
These six buttons (Interview, Exam, Lab, Hypothesis, Diagnosis, and
Management) appear at the top of most screens and allow you to
access the major portions of the DxR case. Click one of those buttons
to go to the corresponding section of the case.
View/ Hammer/ Flashlight
Feel/ Pin/ Ophthalmoscope
Motion/ Cotton ball/ Otoscope
Percussion/ Tuning fork/ Blade
Management Note: You can enter Interim Management Items after
you enter an active hypothesis up until you enter a final diagnosis
and treatment. See page 8 for instructions.
The Interpret button allows you to see a list of the questions, exams, or
lab tests that you selected which require an interpretation.
Stethoscope/ Sphygmomanometer/ Thermometer
Position sense/ Stopwatch/ Speculum
Vital Signs/ More Tests & Exams
The Consult button allows you to see a list of the items (questions,
exam, lab, or management) that have been interpreted and which have
a consultant text associated with them.
Click the Notes button to see your notes, to add to your notes, or to see
a list of all the investigation items you’ve selected so far. You can add to
your notes either by typing text into the field, or by copying and
pasting text into the Notes field (click SAVE). If you click View Printable
on the Notes window, only your notes will print out (it will not include
your investigation items).
The Learning button allows you to make note of any learning issues
you would like to further study or investigate after completing a DxR
case. Categories include Anatomy, Behavioral and Social Science,
Biochemistry, Clinical Medicine, Microbiology, Pharmacology, and
Physiology. Type your entries into the appropriate text box.
The SOAP button allows you to enter notes for Subjective Data,
Objective Data, Assessment Data, and Plan. Type the text in the
appropriate box and click SAVE. You may be forced to enter SOAP data
prior to entering a diagnosis.
If the Problem List button appears, you will be prompted to type in,
prioritize, and save a patient problem list prior to entering a
Management plan.
When the Web Links button is displayed, Web-based information
sources are available to assist you as you work through the patient case.
Click Web Links, then click the link text to open a new browser window
displaying the information.
Click the HELP button to access online help. Help is available in both
text and video format.
3
Working Through a DxR Patient Case
Entering a Hypothesis List
You may be asked to supply a list of diagnostic hypotheses before you are allowed to
proceed in your investigation.
If you are not ready to supply a hypothesis list
You will be advised to go to the Interview section (using the Interview button). In the
Interview section, you may ask the patient questions ONLY from the Present Illness
category prior to entering a hypothesis list. This is the only section of the case you will
be able to access prior to entering at least one diagnostic hypothesis.
If you believe you can provide an initial hypothesis list
Interim Management
You may enter Interim Management at any
point after you enter your first hypothesis
until the time when you enter your final
diagnosis and final treatment.
Click the Management button to access this
option, then follow the instructions listed on
page 8.
To discontinue an interim management item,
click the Management button, select the
Type the patient problem in the text box marked “Concise statement of the patient’s
major problem.” Then type each “new hypothesis” in the window provided and click
ADD to place the hypothesis in your list [see Figure 3]. You may prioritize your
hypotheses by highlighting the item and using the UP and DOWN buttons to move
the item in the list. Highlight a hypothesis and click DELETE if you want to remove an
item from your list.
Click DONE when you are finished entering diagnostic hypotheses. The Hypothesis
screen may appear after each section of the DxR case. You may also access the
Hypothesis screen from any section of the case by clicking the DDX (Hypothesis)
button.
category of treatment you want to discontinue and select Discontinue from the list of
choices. Type in the management order that
you want to discontinue. In the Medications
category, choose Miscellaneous and then
choose discontinue.
Figure 3: Diagnostic Hypothesis screen.
4
Interview and Exam Sections
Interview Section
Questions in the Interview section are divided into more than 20 different categories
listed on the left side of your screen. Depending on your instructor’s choice, you may
not be able to access questions in categories other than the HPI Summary or the
Present Illness until after you’ve entered or reviewed your diagnostic hypothesis(es).
To pose a question, select the interview category. A list of questions within that
category appears. Select your question and the hypothesis you are investigating (see
note). Click ASK to see the patient’s response to your inquiry. Repeat this process for
each interview question you would like to pose. When you are done with the
Interview section, click the button corresponding to the portion of the case you would
next like to access.
Exam Section
Most physical exams are defined by the body part being examined and the exam tool
you use. [See Figure 4.]
1) Select the hypothesis you are investigating for each exam item, or select
SCANNING if you aren’t investigating a particular hypothesis.
2) Select an exam tool from the body tool buttons. The name of the selected tool
will appear below the patient picture in the field labeled Exam Tool.
ASSOCIAT I N G
HYPOTHE S E S
You may be asked to select a
hypothesis associated with
each of the interview, exam,
and lab items you include
before you can add that item
to your list. If you are not
investigating a particular
hypothesis, select SCANNING
from the hypothesis list at the
top of each screen. To select
more than one hypothesis
associated with an interview
question, exam, or lab test,
press the command (Ctrl) key
while clicking on the
hypotheses you would like to
associate.
3) Select the body view that shows the body part you would like to examine. As
you move your cursor over the patient picture, the body part that your cursor is
touching will appear in the field labeled Body Part below the patient picture.
Click on the specific body part that you want to examine.
4) Review the results that appear in the window to the right of the patient picture.
Some results may be text only, some may be graphics, and still others may be
heart or breath sounds for you to listen to. Such sounds are best heard through
headphones.
5) A question may appear just below the patient response, prompting you to
interpret the result. Type your interpretation into the space provided.
Repeat the process described above for each exam you would like to conduct. When
you are finished conducting exams, click the button corresponding to the section of
the case you would like to access next.
Efficiency Warning
You will see a warning when you are
within 3 of the total number of questions,
exams or lab tests deemed necessary to
complete this case efficiently. You will be
warned again when you are within 1 of
that number. You may continue requests
in that category, beyond the limits, but if
you do so you will not be able to reach the
highest level of performance.
Figure 4: Exam screen.
5
Lab Section
Lab Section
On the Lab screen you may order lab tests to further your clinical investigation of a
patient case. You have three methods of ordering lab tests. Each is described and pictured below. You will also be able to see the results of the labs you order. Some results
will be available immediately, while others will be Delayed until you enter the final
management phase of the program. You may also be asked to justify your lab requests
and/or interpret lab results.
Ordering with the Common Lab Test buttons
1. Look for the lab test you want to order in the list of
32 common labs [see Figure 5, upper] displayed on your
screen when you enter the lab section. (You may also
access this list by clicking Common Tests in the lab
categories list.)
2. (optional) To get information (a test description, normal values, what Abnormal Indicates, and the relative
cost) on a Common Lab before you order it, click Test
Info and then click the name of the test.
Figure 5: Common Labs buttons and the Search function for labs.
3. To select a lab in the Common Tests list, first select
the hypothesis you are investigating, then click the
name of your chosen lab test. The selected test will
appear in the field labeled Proposed Lab Orders. If you
want to order all labs in your Proposed Lab Orders list, click Submit Labs. If the
results of your chosen lab(s) are not delayed, you will be able to access the lab
results (see page 7).
Search
If the lab you want to order isn’t in the Common Lab tests list and you don’t know
which category it would be listed under, use the search function [see Figure 5, lower].
1. Enter a key word or phrase in the space provided and click SEARCH (or
Return/Enter).
2. Select the hypothesis you are investigating, then select your desired lab test in
the field showing your search results.
3. Click TEST INFO (for a test description, normal values, what Abnormal Indicates,
and the relative cost), or click ORDER to order the test immediately. The test
name will appear in your Lab List and results will be
available for review unless the lab results are designated
as Delayed.
Categories & Lists
If you know what category your lab test is likely to be
listed under, use the Categories option to find your lab
test [see Figure 6].
1. Select the category most likely to contain your lab test.
2. Find the specific test in the list that appears to the right
of the category list. (optional) Click TEST INFO to see a
test description, normal values, what Abnormal Indicates,
and the relative cost.
Figure 6: Selecting lab tests from the categories and lists.
6
3. To place the selected lab test in your Proposed Lab
Orders list, select the test and click Order. When you are
satisfied with your proposed lab list, you can click Submit
Labs to order the lab tests and review results of lab tests
that are not designated as Delayed (see Page 7).
Lab Results & Entering a Diagnosis
Justifying Lab Test Orders
After ordering a lab test, you may be asked to justify your request before you can see
the test results. Type in your justification and then click Enter. You will then be allowed
to access the lab results.
Reviewing Lab Results
When you are satisfied with your lab list,
click Submit Labs. In the Lab List window that appears, select a lab and then
click View Results. (Note: Some lab
results may be delayed until you indicate you are ready to enter your final
management plan.) Some results will
consist only of text that you should
review carefully. Other lab results may
include graphics, such as x-rays [see
Figure 7] or other pictures that you
should also review carefully. You may
choose to make notes on what you see.
Make note of anything you think is
important. While reviewing your lab
results, click TEST INFO to see the normal
values/responses for that test.
Interpreting Lab Results
Figure 7: Reviewing Lab results.
You may be asked to interpret the lab results after you access them. You may need to
use the scroll bar next to the lab results to see if there’s a request for an interpretation.
If so, type your interpretation into the space provided and click Enter. Depending on
the settings for this case, a consultant’s report may be available. When you are finished
ordering lab tests, click the button corresponding to another section of the DxR case.
Diagnosis Dx
Click the Dx (Diagnosis) button when you are ready to make a final diagnosis. You may
be prompted to enter or complete your SOAP notes prior to entering
a final diagnosis. Once you enter your final diagnosis, you will no
longer be able to access the patient history, exam, or lab sections.
Follow the steps below [see also Figure 8].
1. In the text field at the top of the screen, you will see your list of
diagnostic hypotheses. Select one or more that most closely
match your final diagnosis. To select more than one hypothesis
as your final diagnosis, hold down the command (Ctrl) key as
you select the desired hypotheses from your list, then click
Select.
2. In the second text box, expand on your hypotheses to phrase
your final diagnosis is pathophysiologic terms.
3. Type in a justification for your diagnosis.
4. Are you very confident, confident, somewhat confident, and not
at all confident in your diagnosis? Click the radio button corresponding to the most appropriate response.
Click Cancel to cancel your entries and close the Diagnosis screen.
Click Enter Final Diagnosis to save and enter your diagnosis(es).
Figure 8: Entering a final Diagnosis.
7
Patient Management
Problem List
You may be prompted to enter a list of all issues that should be taken into consideration in the holistic healthcare of the patient. Type in your list of all pertinent problems,
numbered in order of importance, and then click Save. This information will be
available to you as you develop your final management plan.
Management Rx
Figure 9: Ordering Medication as an Interim Management.
N OT E
If you ordered a lab test that is
marked as Delayed, you will
be able to review results after
you enter your final diagnosis
and final management plan.
After reviewing delayed lab
results, you will have a n
opportunity to reevaluate
your Diagnosis and
Management Plan.
Click the Rx (Management) button to begin ordering a
management plan for your patient. You can choose
from ordering Interim Management or entering a Final
Diagnosis and Final Management. Management items
are divided into ten categories. But before you have
access to those categories, you may also be asked to
select whether treatment should occur on an outpatient basis or in a hospital setting. For certain types of
management, you may be prompted to provide
specifics of your management orders. For example, if
you select follow-up and order a return visit, you will
be prompted to specify, meaning you should explain
when or under what conditions the return visit should
be scheduled. Type the information in the text box and
click OK to enter it, or click Cancel to close the Specify window. You may also be challenged with content-related questions about specific management selections or
about management in general.
Interim Management. Click Order Interim Management to order management items
before you enter a final diagnosis. Click the icon that represents a category of management items. Select the specific management choice from the list that appears.
Click Order when you are satisfied with your entries. Click the return arrow (go back)
to proceed with your case investigation.
Final Diagnosis and Final Management. Click Enter Final Diagnosis and Final
Management to go to the Diagnosis (Dx) screen shown on Page 7. After you complete
all fields on the Final Diagnosis screen, click Enter Final Diagnosis. You will next either
review your Problem List or select a treatment mode (In-patient or Out-patient) before
developing a management plan. On the Management screen, click the icon for the
desired a management category. Select the specific management choice from the list
that appears. Click Order when you are satisfied with your entries.
Ordering Medications. If you choose Medications, you will be prompted to select a
drug type and a class of drug within that type [see Figure 9]. Click Order when you
have made your selections. A box will appear prompting you to enter the name
of the drug, the dosage, the route of delivery and the interval. Click Order again
when you are satisfied with your entries.
Discontinuing Management. To discontinue a selected management choice, go
to Management, select the Management category and select Discontinue from
the list of choices. Type in your orders for discontinuing a treatment choice.
Management Confidence
When you click Evaluate on the Patient Management screen, the Management
Confidence window appears. [see Figure 10]. Answer the four questions posed
about your concerns for follow-up for this patient, whether you’ve seen or read
about a patient problem like this one before, and designating a confidence level
in your care of this patient. Click Done when you’ve completed all questions.
Figure 10: Entering a management confidence level
8
Congratulations! You have completed the DxR Clinician case. To see an
assessment of your entries, follow the steps under Initial Self-Assessment.
Initial Self Assessment
Initial Self-Assessment
When you leave the Management Confidence screen, you will see a screen advising
you the computer has completed its initial assessment (evaluation) of your entries.
Click Review Results to access the Index screen for the Initial Self-Assessment of your
choices in the patient case investigation. At the top of the Initial Self-Assessment
screen, you will see names corresponding to each category of the patient case [see
Figure 11]. The same categories are also listed in the window below. A star next to the
category name indicates you successfully
completed that task. Click a category
name at the top of the screen to see criteria items and/or discussion text of the
items within that category. Most category
windows (except for Diagnosis and
Management) will display a list of the
required items within that category.
Criteria items that you included will be
preceded by a star. The category windows
for Diagnosis and Management will differ
slightly from the other category windows.
Figure 11: The Initial Self-Assessment screen showing detail of the Consider category.
For example, instead of a list, the Diagnosis
category will include discussion text of what
should have been included in the Required Diagnosis, followed by a statement on
whether you completed the task successfully. The assessment screen for the
Management category will include the criteria items for Required, Recommended,
Related History and Physical Exam, and Related Labs, as well as discussion text.
Click Category Definition on any of the category screens to see the meaning of the
category title. Click Category Definition again to hide the definition window.
Please note, your initial self assessment doesn’t provide a score on the DxR
Clinician patient case. If you are being graded on performance in a case, your
score won’t be available until after your faculty member reviews your entries.
Close the window when you are finished reviewing your initial self-assessment.
You have completed the DxR Clinician case and the Initial Self Assessment process.
9
10
[email protected]
Technical Requirements
Browser Requirements
Javascript must be enabled. Also make sure your browser preferences are set
to allow the page to specify the colors and fonts. The following browsers are
compatible with this program.
Firefox® latest version + past 2 versions
Google Chrome™ latest version + past 2 versions
Safari® latest version + past 2 versions
Microsoft® Internet Explorer latest version + past 2 versions
Screen Size and Monitor Resolution
DxR Clinician requires a minimum monitor resolution of 1024 x 768 pixels. If
your monitor is not set for 1024 x 768 pixels or higher resolution, portions of
your screen may be cut off and a warning message may appear when you try
to log in to the case.
Your monitor must also be set display at least 16 bit color (thousands of
colors). If your monitor is not set to display 16 bit or higher color, images and
movies may appear distorted, pixilated, or washed out on your screen.
Sound
Your computer must have a sound card installed. Heart and breath sounds
will sound best when heard through headphones.
11
[email protected]
Tech support: 1-800-453-8040
12
13
[email protected]
Working Through a Case: Quick Reference
1. STARTING
a. Follow the URL or Link provided by your instructor to the desired case. You will access the patient case either directly by clicking the DxR
Clinician opening screen, or through a waiting room.
b. Enter your assigned name and password. After name/password are verified, click Start.
c. Review the information on the patient's Presenting Situation. Answer the question “What would you like to do next?” Click Interview,
Physical Exam or Lab to begin your investigation.
2. INTERVIEW PATIENT
a. Click Interview
. Initially you may be able to see only the Present Illness category questions or to review a summary of the
History of the Present Illness (HPI). Select any questions appropriate for that category as directed below (2c).
b. Follow the on-screen instructions to enter a Diagnostic Hypothesis and access other categories.
1. After you enter your Diagnostic Hypothesis, you will need to select the hypothesis you are investigating from your list at the top of the
screen before you can ask a question. If you aren't investigating a particular hypothesis, select Scanning.
2. To associate a question with more than one Hypothesis, hold down the CTRL (Command) key while clicking the appropriate
hypotheses.
3. To associate multiple questions with the same hypothesis, hold down ALT (Option) while highlighting the questions.
c. Click the category for the question you want to ask. Questions are listed in the box in the upper half of your screen. Highlight the
question and click Ask. The response appears in the box below.
d. To find a question among the various categories, click Search at the end of the category list and enter a keyword or phrase in the box that
appears.
3. STATEMENT OF PROBLEM AND DIFFERENTIAL DIAGNOSIS
a. At some point in your investigation of the patient case, you will be asked to frame the patient's problem and form a list of diagnostic
hypotheses in order of importance. When you have completed your initial list, click DONE to return to the patient. If you would like to gather
more data from the patient before entering this information, close the DDx window. Depending on your instructor's preferences, you may
not be able to investigate areas other than the Present Illness without entering your hypotheses.
b. If you would like to change or rearrange your list of diagnostic hypotheses, click the Hypothesis (DDx)
button.
1. To edit your statement of the patient’s main problem, type changes in the text field at the top of the message box.
2. To add a diagnostic hypothesis, type it in the middle text box, then click ADD.
3. To delete a diagnostic hypothesis, select it and click DELETE.
4. To change the order of the diagnostic hypotheses, select the one you want to move and click UP or DOWN. It will move one position in
the list.
5. When finished, click DONE.
4. Perform A Physical Exam (When you first enter the Exam screen, you will see a description of the patient’s appearance.)
a. Click EXAM
button. If you are prompted with the Hypothesis Screen, make any changes you wish and click Done when you are
satisfied with your entries.
b. Specify the diagnostic hypothesis you are investigating.
c. Select the appropriate tool, then click the body part you want to examine.
d. Click the button for the Body View you wish to examine (i.e., head, chest, abdomen). The name of the tool and the body part that your cursor is positioned to select will be displayed above the patient picture. Click Other Exams to access Observations, Maneuvers, or Mental Status
exams. Click Vital Signs to see a list of the patient's vital signs.
e. Some exams will yield audio, graphic, or text data that you must interpret before you can enter a diagnosis. (Heart sounds are soft, you
may need to use headphones to hear the clearly. ) Enter your interpretation in the text field provided, then click Enter. Click the CONSULTANT
button to view any available information from a professional consultant.
5. Order Laboratory Tests Depending on your instructor’s choices, you will be able to order labs either individually or as a group.
a. Click the LAB
button. If you are prompted with the Hypothesis screen, edit as you wish and click Done.
b. Each time before selecting a lab test, specify the diagnostic hypothesis you are investigating.
NOTE: Some lab tests results are delayed. If you select a lab test with delayed lab results, your order can be submitted with a group of lab
tests, but you won’t be able to see its results until after you enter the Final Management phase of the case and click the Continue arrow. If
you need to change your diagnosis and treatment after viewing delayed lab results, you will have that opportunity.
c. To get additional information about a lab test before ordering, click the TEST INFO button, then select the test. To search the database for a
specific test, enter the test name or related keyword, and click the SEARCH button. Search results appear in list form. Select a lab from the
search results to order it immediately or to place it in your Proposed Lab Orders list.
d. To order a test from the group of 32 common tests click the name of the desired test.
e. To order tests not listed in the common group, select a category of tests, then select the test from the list of available tests for that
category.
f. When ordering lab tests as a group, make sure you are satisfied with the selections in your Proposed Lab Orders list, then click
Submit to order those lab tests. Once your orders have been submitted, click a specific lab test and click View Results.
g. View and interpret all available consultant information as described above (4e).
Tech support: 1-800-453-8040
DxR Clinician
6. Enter DIAGNOSIS
Click the DIAGNOSIS
button. (You may be prompted to enter/complete your SOAP notes before entering your final Dx.) On
the Diagnosis window, click the diagnostic hypothesis that most closely matches your final diagnosis and click SELECT. In the next text
field, edit this hypothesis to express your final diagnosis in pathophysiologic terms. Justify your diagnosis and select your confidence
level. When you are satisfied, click ENTER FINAL DIAGNOSIS, then click CONTINUE. After you commit to a final diagnosis, the
investigation phase of the case is complete.
7. MANAGEMENT AND PROBLEM LIST
You may be prompted to type in, prioritize, and save a patient problem list. Select where treatment should take place (in hospital or
outpatient). Select the aspects of management you wish to prescribe by clicking the specific buttons and detailing the treatment you
desire. After you have entered your final management plan, results for delayed labs will be available for review. When finished, click
EVALUATE to have your performance evaluated. Answer the Management Confidence questions and click Done.
Quick Tips
8. INITIAL SELF-ASSESSMENT
The initial self-assessment provides information about your investigation of the case. Click one of the categories at the top. A star next
to the category indicates you completed the task successfully. On each screen, items you requested during your workup of the patient
are marked with a star. Click an item to review the patient results.
NOTES
You may use two methods to record text to your personal NOTES.
a. To record data while interviewing a patient, conducting a physical exam or ordering lab tests, select the text you want, copy it to
the computer's clipboard, open the Notes window, and paste in the text. You may also type directly into the field provided on the
Notes window. You must click the Save button in the Notes screen to preserve your changes.
b. To print your notes, click the VIEW PRINTABLE button on your Notes window. When the new browser window appears, click Print
on the browser’s button bar.
c. At the top of the Notes window, you can see and review a list of all the investigation items you’ve selected for this case. (Please keep in
mind, this list is NOT printable.)
LEARNING ISSUES
SOAP NOTES
and Learning Resources If you wish to make note of learning issues encountered
within the program or make SOAP notes, click the appropriate button. You must click the Save button to preserve your changes.
Learning Resources accesses a list of Web links.
EFFICIENCY WARNING: You will see a warning when you are within 3 of the total number of questions, exams or lab tests deemed necessary
to complete this case efficiently. You will be warned again when you are within 1 of that number. You may continue collecting patient data
after the warning, but if you do, you will not be able to reach the highest level of performance.
Case Investigation
Interview
Examination Tools
Physical Exam
Laboratory
Hypothesis (DDx)
Body View Buttons - Select the
view that shows the body part
you want to examine.
Interpretation
Notes
Motion/ Cotton ball/ Otoscope
Learning Issues
SOAP Notes
Problem List
Online Help
Web Links
Diet
Procedure
View/ Hammer/ Flashlight
Consultant
Nursing Care
Activity
Diagnosis
Patient Management
Patient Management
Feel/ Pin/ Ophthalmoscope
Percussion/ Tuning fork/ Blade
Stethoscope/ Sphygmomanometer/ Thermometer
Position sense/ Stopwatch/ Speculum
Vital Signs/ More Tests & Exams
HINT:
To measure temperature sensation on various
parts of the body, such as the foot, ankle, hand,
etc., use the tuning fork. This measures response
to a cold tuning fork.
[email protected]
Collaboration
Medications
Education
Counseling
Community Resources
Follow-up
Evaluate Performance
DxRCl
i
ni
c
i
an
Formor
ei
nf
or
mat
i
onort
oor
derpat
i
entcases,
pl
easecal
lDxRDevel
opmentGr
oup
t
ol
l
f
r
eeat8665991140
www.
dxr
gr
oup.
com
DxRDe
v
e
l
opme
ntGr
oup,I
nc
.
Educ
at
i
onalSol
ut
i
onst
hr
oughComput
e
rT
e
c
hnol
ogy