1
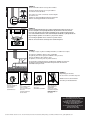
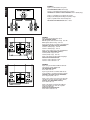
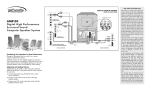
Owner’s
Manual
LSi SERIES
LSi 25
Floorstanding Loudspeaker
IMPORTANT SAFETY INSTRUCTIONS
READ BEFORE OPERATING EQUIPMENT
1. Read these instructions.
2. Keep these instructions.
3. Heed all warnings.
4. Follow all instructions.
5. Do not use this apparatus near water.
6. Clean only with dry cloth.
7. Do not block any ventilation openings. Install in accordance with the
manufacturer’s instructions.
8. Do not install near any heat sources such as radiators, heat registers,
stoves, or other apparatus (inlcuding amplifiers) that produce heat.
9. Do not defeat the safety purpose of the polarized or grounding-type plug.
A polarized plug has two blades, one wider than the other. A grounding
type plug has two blades and a third grounding prong. The wide blade or
the third prong are provided for your safety. If the provided plug does not
fit into your outlet, consult an electrician for replacement
of the obsolete outlet.
10. Protect the power cord from being walked on or pinched particularly
at plugs, convenience receptacles, and the point where they exit from
the apparatus.
11. Only use attachments/accessories specified by the manufacturer.
12. Use only with the cart, stand, tripod, bracket, or table specified by the
manufacturer, or sold with the apparatus. When a cart is used, use
caution when moving the cart/apparatus combination to avoid injury
from tip-over.
13. Unplug this apparatus during lightning storms or when unused for
long periods of time.
14. Refer all servicing to qualified service personnel. Servicing is required
when the apparatus has been damaged in any way, such as power-supply
cord or plug is damaged, liquid has been spilled or objects have fallen
into the apparatus, the apparatus has been exposed to rain or moisture,
does not operate normally, or has been dropped.
15. WARNING: To reduce the risk of fire or electric shock, this apparatus
should not be exposed to rain or moisture and objects filled with liquids,
such as vases, should not be placed on this apparatus.
16. To completely disconnect this equipment, disconnect
the power supply cord plug from the wall outlet receptacle.
17. The main plug of the power supply cord shall remain readily operable.
Contact Polk Audio Customer Ser vice 1-800-377-7655 (Outside US: 410-358-3600) Monday-Friday, 9:00 AM-6:00 PM Eastern Time, [email protected]
LSi SERIES FROM POLK AUDIO
The LSi Series from Polk Audio is the ultimate expression of the performance principles that have made Polk Audio a world leader in
loudspeaker technology. The LSi Series features patented Polk Audio technologies reengineered for the new millennium. From
reformulated Dynamic Balance cones, to ring radiator tweeters, the LSi Series is for serious listening. Advancements in sound
technology, including SACD and DVD Audio, come to life with higher accuracy and resolution, more dynamic response and superb
focus; the LSi Series delivers three-dimensional imaging and remarkable reproduction of even the finest details. Hear what you’ve
been missing: the Polk Audio LSi Series.
TECHNOLOGY FEATURES OF YOUR NEW LSi LOUDSPEAKERS
• Dynamic Balance® drivers for wide response and low distortion.
• Power Port™ venting technology for more powerful bass and lower distortion.
• Acoustic Resonance Control™ (ARC) ports for more accurate midrange response.
• Cascade Tapered Driver Array for more lifelike imaging.
PLACEMENT RECOMMENDATIONS
FOR LSi SERIES FLOORSTANDING LOUDSPEAKERS
One LSi Floorstanding speaker is the “left” channel speaker, and the other is the “right” channel
speaker. The serial number label identifies which speaker is which [figure 1]. The “left” speaker
should be placed on the left side of the room as you face the front of the room. To get the most
realistic stereo image and lifelike sound, place the speakers so that an equilateral triangle is
created between the speakers and your favorite listening position [figure 2]. Your LSi Series
Loudspeakers are magnetically shielded for safe placement near your TV or video monitor. If you
notice video distortion or discoloration, immediately move the speakers away from the TV and call
Polk Audio Customer Service Monday – Friday, 9:00 AM – 6:00 PM Eastern Time, (800) 377-7655
(USA and Canada) or email [email protected]. If your room arrangement forces you to place
the speakers farther apart than the distance from which you are listening, angle the speakers
toward the middle in order to support a more solid center image. Rubber feet and adjustable
carpet spikes are included to provide stability on any type of floor. To install them, lay the speaker
carefully on its side and screw in the spikes as far as they will go into the threaded inserts in the
base of the speaker. For wood or tile floors, slip a rubber foot over each spike. For carpeted floors,
use bare spikes [figure 3]. You will achieve optimum performance when the speaker is level and
stable in all directions.
CONNECTION OPTIONS FOR LSi SERIES FLOORSTANDING LOUDSPEAKERS
Follow the hookup directions included with your receiver. Strip 1/2 inch (12.7mm) of insulation
from each of the two conductors of the speaker wire to expose the bare metal and twist each of
the individual conductors into single unfrayed strands. Note that one of the terminals on the rear
of each speaker is red (+) and the other is black (-). Make certain that you connect the wire from
the red (+) terminal of your amplifier or receiver to the red (+) terminal on your speaker and the
wire from the black (-) terminal of your amplifier or receiver to the black (-) terminal on your
speaker. Most wire has some indicator (such as color-coding, ribbing or writing) on one of the two
conductors to help you maintain consistency.
To connect wire to the binding post [figure 4], unscrew the hex nut and insert the bare wire into
the hole near the base of the binding post. Do not insert the insulated part of the wire into the hole
as this will not give you a good connection. Twist the hex nut back down the binding post until it
firmly meets the wire. Do not over tighten.
f o r m o r e i n f o r m a t i o n v i s i t o u r w e b s i t e a t w w w. p o l k a u d i o . c o m
FIGURE 1
FIGURE 1
Consult serial number label for correct speaker orientation.
Consulte la etiqueta del número de serie para establecer
la orientación correcta del altavoz.
Pour orienter vos enceintes correctement, consultez l’étiquette
du numéro de série.
Angaben zur ordnungsgemäßen Ausrichtung der Lautsprecher
finden Sie auf dem Typenschild mit der Seriennummer.
LEFT
LEFT
FIGURE 2
Left Speaker
Right Speaker
FIGURE 2
Create an equilateral triangle between the speakers and the listening position. Face tweeters “in.”
LSi Series Loudspeakers are magnetically shielded for safe placement near TV or video monitors.
If you notice video distortion or discoloration, immediately move the speakers away from the video
source and call Polk Audio Customer Service 800.377.7655 (US and Canada) or [email protected].
Haga un triángulo equilátero con los altavoces y la posición de audición.
Créez un triangle équilatéral entre les enceintes et la position d’écoute.
Bilden Sie ein Dreieck zwischen den Lautsprechern und Ihrer Hörposition.
FIGURE 3
FIGURE 3
For stability on carpet, use spikes. For stability on hard floors, use rubber feet over spikes.
Use púas para estabilizar los altavoces sobre una alfombra.
Use patas de goma sobre las púas para estabilizarlos sobre pisos duros.
Pour plus de stabilité sur tapis, utilisez les picots.
Sur planchers, recouvrez les picots des pieds de caoutchouc.
Die Verwendung von Befestigungsstutzen gewährleistet die Stabilität der Lautsprecher
bei Platzierung auf Teppichböden. Auf hartem Untergrund sollten die Stutzen mit
Gummifüßen überzogen werden.
FIGURE 4
FIGURE 4
Using binding post connections.
Uso de conexiones con tornillos de presión.
Utilisation des bornes de branchement.
Verwendung von Anschlussklemmen.
Loosen hex nut
Desenrosque parcialmente
la tuerca hexagonal
Desserrer l’écrou
Sechskantmutter lösen
Insert speaker wire through
hole
Inserte el alambre para la
bocina en el orificio
Insérer le fil du haut-parleur
dans le trou
Lautsprecher-Draht durch
das Loch schieben
Tighten hex nut
Enrosque la tuerca de nuevo
Serrer l’écrou
Sechskantmutter festschrauben
Do not insert insulated
section of speaker wire
No inserte alambre con
material aislante
Ne pas insérer la partie
isolée du fil du haut-parleur
Isolation des LautsprecherDrahtes nicht in das
Loch schieben
To use Banana Plugs (US only):
Unscrew the binding post lug nuts completely
to expose the binding post plugs
(plastic plugs inserted into the binding posts).
Carefully pry out the binding post plugs
to expose banana plug holes.
Screw the lug nuts back on the binding posts
and insert banana plugs.
(This is for US owners only.)
Contact Polk Audio Customer Ser vice 1-800-377-7655 (Outside US: 410-358-3600) Monday-Friday, 9:00 AM-6:00 PM Eastern Time, [email protected]
To Use Banana Plugs (US Only): Unscrew the binding post lug nuts completely to expose the
binding post plugs (plastic plugs inserted into the binding posts). Carefully pry out the binding post
plugs to expose banana plug holes. Screw the lug nuts back on the binding posts and insert banana
plugs. (This is for US owners only.)
[figure 5] is recommended for most systems. Make sure the flat metal
jumper strips are tightly secured to both sets of binding posts.
HOOK UP OPTION 1
[figure 6] is recommended for use with a receivers or preamp/processors
with L & R preamp outputs. For this connection, remove the flat metal jumper strips. Connect
the top set of binding posts to the speaker outputs of your amp or receiver, If your pre-amp,
processor, amplifier or receiver has a spare set of front left and right pre-outputs, connect
them to the subwoofer inputs on the back of the speakers. If your electronics has a single set
of pre-outputs and they are being used to deliver signal to an amplifier, use “Y” cables.
HOOK UP OPTION 2
HOOK UP OPTION 3 [figure 7] is recommended for systems with receivers or preamp/processors with unfiltered subwoofer (LFE) outputs only. (To find out if your subwoofer output jack
is unfiltered, please see your receiver/preamp/processor’s owner’s manual.) For this connection,
remove the flat metal jumper strips. Connect the line level inputs on the back of the loudspeaker
to the subwoofer output(s) of your pre-amp, processor, amplifier or receiver. If you only have one
subwoofer output jack, run a cable to the subwoofer line level input of one speaker and another
cable from the line level output of that speaker to the line level input of the other speaker.
If you are not sure about the nature of your subwoofer output jack, use either hookup option 1
or hookup option 2.
INPUTS
The “LINE LEVEL IN” jack [figure 8] is a low-level input designed to be connected to an
unfiltered pre-amp or subwoofer output on your receiver or processor. Signals fed to this input
will pass through the variable Low Pass Crossover (Frequency control) built into the LSi25’s
subwoofer amplifier. This is the input to use when using Hook Up Option 2. The “LFE IN” jack
bypasses the Low Pass Crossover. Use this input only if you are using Hook Up Option 3 with
a sub-out jack that has a Low Pass Crossover. See your receiver or preamp/processor owner’s
manual to find out whether or not your Subwoofer Output jack is filtered.
FOR MANUAL UPDATES, VISIT
http://www.polkaudio.com/home/library/manuals.php
FOR MORE DETAILED BOOKUP AND PLACEMENT INFORMATION, VISIT
http://www.polkaudio.com/home/faqad/
FOR RECOMMENDED ACCESSORIES (INCLUDING SPEAKER STANDS, BRACKETS AND
EXCLUSIVE POLK AUDIO LOGOWEAR), VISIT OUR WEBSTORE:
http://shop.polkaudio.com/
f o r m o r e i n f o r m a t i o n v i s i t o u r w e b s i t e a t w w w. p o l k a u d i o . c o m
FIGURE 5
FIGURE 5
Option 1, recommended for most systems.
BASS MANAGEMENT SETTINGS: Front = Large
Opción 1, recomendada para la mayoría de los sistemas.
PARÁMETROS DE CONTROL DE BAJAS FRECUENCIAS: Front = Grande (Large)
Option 1, recommandée pour la plupart des systèmes.
Réglages: (Bass Management Settings) Front (avant) = Large
Option 1, empfohlen für die meisten Lautsprecher.
EINSTELLUNG DER TIEFENTONLAGEN: Vorne = Groß
FIGURE 6
FIGURE 6
Option 2, for systems with preamp outputs.
BASS MANAGEMENT SETTINGS:
With NO separate subwoofer: Front = Large Sub = No
WITH separate sub: Front = Large Sub = Yes
HIGH LEVEL
INPUT
HIGH LEVEL
INPUT
Opción 2, para sistemas con salidas de preamplificador.
PARÁMETROS DE CONTROL DE BAJAS FRECUENCIAS:
2a: Front = Grande (Large) Sub = No
2b: Front = Grande (Large) Sub = Sí
SUB OUT
SEPARATE SUB
(OPTIONAL)
Option 2, pour systèmes avec sorties préamplificateur.
RÉGLAGES: (BASS MANAGEMENT SETTINGS)
2a: Front (avant) = Large Sub = No
2b: Front (avant) = Large Sub = Yes
Option 2, für Systeme mit Vorverstärker-Ausgängen.
EINSTELLUNG DER TIEFENTONLAGEN:
2a: Vorne = Groß Subwoofer = Keine
2b: Vorne = Groß Subwoofer = Ja
FIGURE 7
FIGURE 7
Option 3, for systems with both unfiltered subwoofer
outputs and no separate dedicated sub.
BASS MANAGEMENT SETTINGS:
Front = Small Sub = Yes
HIGH LEVEL
INPUT
HIGH LEVEL
INPUT
Opción 3, para sistemas con ambas salidas de subwoofer sin filtrar y sin subwoofer dedicado separado.
PARÁMETROS DE CONTROL DE BAJAS FRECUENCIAS:
Front = Pequeño (Small) Sub = Sí
Option 3, pour systèmes avec deux sorties subwoofer
sans filtre et sans sortie subwoofer dédiée distincte.
RÉGLAGES: (BASS MANAGEMENT SETTINGS):
Front = Small Sub = Yes
Option 3, für Systeme sowohl mit nicht gefilterten
Subwoofer-Ausgängen als auch ohne separaten
(dedizierten) Subwoofer.
EINSTELLUNG DER TIEFENTONLAGEN:
Vorne = Klein Subwoofer = Ja
AC POWER
This LSi powered loudspeaker has a built-in power amplifier and must be plugged into a standard
household AC power source in order to operate properly.
The power switch on the rear amp plate [figure 8] has three positions, “Off,” “On” and
“Auto,”and a small LED light. The LED will glow green at all times that the powered loudspeaker
is plugged in (even if the speaker is set to “Off”). We meant it that way.
In the “Auto” position, the amplifier will automatically turn on as soon as the speaker senses a
signal coming from your pre-amp, integrated amp or receiver. It will automatically turn off several
minutes after signals cease to be sent by your pre-amp, integrated amp or receiver. The LED will
glow green at all times.
In the “On” position, the power amplifier will operate until the switch is set to “Off,” or until the
AC cord is disconnected from a power source. The LED will glow green at all times.
SUBWOOFER VOLUME CONTROL
Subwoofer level is adjusted via the VOLUME knob located on the amp plate [figure 8]. Adjust
the volume by ear using a wide variety of CD or video sources. Adjust for deep powerful bass
without “boominess.”
FREQUENCY ADJUSTMENT
The FREQUENCY knob adjusts the frequency range over which the subwoofer operates. This
control [figure 8] only affects signals that are sent through the “LINE LEVEL IN” jack and the
“SPEAKER LEVEL INPUT.” It has no effect on signals fed into the “LFE IN” jack. After setting
subwoofer level, you may want to experiment with this frequency setting. Turning the knob
clockwise from the “FACTORY SETTING” will add more “warmth” to the bass and lower mid-range,
possibly at the expense of bass “tightness.” Turning the knob “down” from the recommended
setting will make the bass and lower mid-range sound “thinner.”
FIGURE 8
TAKING CARE OF YOUR
LSi SERIES FLOORSTANDING LOUDSPEAKERS
The side panels of your new LSi Loudspeakers are finished in natural wood veneer. Clean these
panels periodically with a soft cloth and furniture polish to remove dust and fingerprints. Avoid
harsh detergents and cleaning fluids [figure 9]. Clean and dust the Gloss Black lacquer area
with a damp cloth only. Do not use furniture polish on the Gloss Black lacquer. Carefully vacuum
the grilles to remove dust.
FIGURE 9
FIGURE 9
Clean wood panels with furniture polish and a soft cloth.
Do not use furniture polish on black gloss lacquer.
Clean black gloss lacquer with a damp cloth.
Cuidado del acabado de madera natural.
Entretien de la finition en bois véritable.
Pflege der Holzappretur.
f o r m o r e i n f o r m a t i o n v i s i t o u r w e b s i t e a t w w w. p o l k a u d i o . c o m
LIMITED FIVE YEAR WARRANTY
Polk Audio, Inc., warrants to the original retail purchaser only. This warranty will terminate automatically prior to its stated expiration if the original retail purchaser sells or transfers
the Product to any other party.
Polk Audio, Inc., warrants, to the original retail purchaser only, that the LOUDSPEAKER(S), PASSIVE CROSSOVER COMPONENT(S) and ENCLOSURE on this Polk Audio Loudspeaker
Product will be free from defects in material and workmanship for a period of five (5) years from the date of original retail purchase from a Polk Audio Authorized Dealer.
Furthermore, Polk Audio, Inc., warrants, to the original retail purchaser only, that any AMPLIFIER OR OTHER ELECTRONIC COMPONENT that may be included in this Polk Audio Loudspeaker Product will be free from defects in material and workmanship for a period of three (3) years from the date of original retail purchase from a Polk Audio Authorized Dealer.
To allow Polk Audio to offer the best possible warranty service, please register your new product online at: www.polkaudio.com/registration or call Polk customer service 800-377-7655
in the USA and Canada (outside the USA: 410-358-3600) within ten (10) days of the date of original purchase. Be sure to keep your original purchase receipt.
Defective Products must be shipped, together with proof of purchase, prepaid insured to the Polk Audio Authorized Dealer from whom you purchased the Product, or to the Factory at 2550
Britannia Boulevard, Suite D, San Diego, California 92154. Products must be shipped in the original shipping container or its equivalent; in any case the risk of loss or damage in transit
is to be borne by you. If upon examination at the Factory or Polk Audio Authorized Dealer it is determined that the unit was defective in materials or workmanship at any time during this
Warranty period, Polk Audio or the Polk Audio Authorized Dealer will, at its option, repair or replace this Product at no additional charge, except as set forth below. All replaced parts and
Products become the property of Polk Audio. Products replaced or repaired under this warranty will be returned to you, within a reasonable time, freight prepaid.
This warranty does not include service or parts to repair damage caused by accident, disaster, misuse, abuse, negligence, inadequate packing or shipping procedures, commercial use, voltage inputs in excess of the rated maximum of the unit, cosmetic appearance of cabinetry not directly attributable to defect in materials or workmanship, or service, repair, or modification
of the Product which has not been authorized or approved by Polk Audio. This warranty shall terminate if the Serial number on the Product has been removed, tampered with or defaced.
This warranty is in lieu of all other expressed Warranties. If this Product is defective in materials or workmanship as warranted above, your sole remedy shall be repair or replacement as
provided above. In no event will Polk Audio, Inc. be liable to you for any incidental or consequential damages arising out of the use or inability to use the Product, even if Polk Audio, Inc. or
a Polk Audio Authorized Dealer has been advised of the possibility of such damages, or for any claim by any other party. Some states do not allow the exclusion or limitation of consequential
damages, so the above limitation and exclusion may not apply to you.
All implied warranties on this Product are limited to the duration of this expressed Warranty. Some states do not allow limitation on how long an implied Warranty lasts, so the above
limitations may not apply to you. This Warranty gives you specific legal rights, and you also may have other rights which vary from state to state.
This Warranty applies only to Products purchased in Canada, the United States of America, its possessions, and U.S. and NATO armed forces exchanges and audio clubs.
The Warranty terms and conditions applicable to Products purchased in other countries are available from the Polk Audio Authorized Distributors in such countries.
SPECIFICATIONS
DRIVER COMPLEMENT:
2 - 51⁄4"(13.3cm) drivers
1"(2.5cm) tweeter
10"(25.4cm) subwoofer
OVERALL FREQUENCY RESPONSE:
20Hz-27kHz
-3dB LIMITS:
30Hz-26kHz
POLK AUDIO HISTORY—A PASSION FOR SOUND
Polk Audio was founded in Baltimore in 1972 by Johns Hopkins University graduates Matthew
Polk and George Klopfer. Today, Polk Audio is a leading international manufacturer of high quality
home and automotive loudspeakers. Polk products emphasize superior sound and build quality,
and feature many patented and award-winning innovations. Polk Audio has built a reputation as
“The Speaker Specialists.” Polk products are sold throughout the USA, Canada and in over 50
countries around the world. Polk Audio’s mission has always been to build high quality, great
sounding speakers at affordable prices. For the people of Polk Audio, building speakers is not
just a job; it’s a passion.
RECOMMENDED AMPLIFICATION:
20-300 watts/channel
EFFICIENCY (1M,1W):
88dB
IMPEDANCE:
Nominal 4 Ohms
SUBWOOFER POWER OUTPUT (DYNAMIC):
300 watts
SUBWOOFER POWER OUTPUT (RMS):
150 watts
CROSSOVER FREQUENCY:
80Hz, 800Hz, 2.4k
CROSSOVER SLOPE:
Driver: 2rd Order HP, 2nd Order LP, cascaded
Tweeter: 3rd Order HP
ENCLOSURE TYPE:
Vented-Power Part
DIMENSIONS:
491⁄2"H(with feet) x 85⁄8"W x 17"D
(125.7cmH x 21.9cmW x 43.2cmD)
481⁄2"H(without feet) x 85⁄8"W x 151⁄2"D
(123.2cmH x 21.9cmW x 39.4cmD)
GREATEST OVERALL DEPTH, GRILLE TO HEAT SINK:
17" (43.2cm)
BASE DIMENSIONS:
95⁄8"W x 163⁄8"D
(24.4cmW x 41.6cmD)
SHIPPING WEIGHT:
104lbs (47.1kg)
POLK AUDIO, INC. • 5601 METRO DRIVE, BALTIMORE, MD 21215 USA
800.377.7655 • FAX: 410.764.5266 • WWW.POLKAUDIO.COM
RM0325-3