1
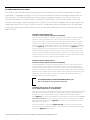
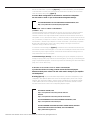
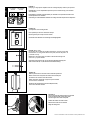
LSi FX
Surround FX Loudspeaker
Owner’s
Manual
LSi SERIES
LSi C
Center Channel Loudspeaker
LSi SERIES FROM POLK AUDIO
The LSi Series from Polk Audio is the ultimate expression of the performance principles that have made Polk Audio a
world leader in loudspeaker technology. The LSi Series features patented Polk Audio technologies reengineered for the
new millennium. From reformulated Dynamic Balance cones, to ring radiator tweeters, the LSi Series is for serious
listening. Advancements in sound technology, including SACD and DVD Audio, come to life with higher accuracy and
resolution, more dynamic response and superb focus. LSi Series Center Channel Loudspeakers deliver three-dimensional
imaging and superb off-axis clarity. LSi Series Surround FX Loudspeakers perfectly complement your LSi home theater
system, offering both Bipole and Dipole options to suit your placement needs. Hear what you’ve been missing: the Polk
Audio LSi Series.
PLACEMENT RECOMMENDATIONS
FOR THE LSi SERIES CENTER CHANNEL LOUDSPEAKER
The LSi Series Center Channel Loudspeaker incorporates the most effective magnetic shielding
available so it can be placed safely on or near your TV or video monitor. If you notice video
distortion or discoloration, immediately move the speaker away from the TV and call Polk Audio
Customer Service 800-377-7655 (US or Canada) or [email protected]. The most popular
placement for a center channel speaker is on top of your TV, anchoring the dialogue and effects to
the screen [figure 1]. An alternate placement is on a shelf below your TV [figure 1]. If you are
using a front projection TV system, place the center channel speaker on a small stand or table
immediately below the bottom of the projection screen, or at ear level behind the screen if your
screen is acoustically transparent. Consult the owner’s manual for your screen. Adhesive rubber
feet are included with your LSi C Center Channel Loudspeaker and may be attached to the bottom
of the speaker to protect your furniture and keep the speaker in place.
PROCESSOR MODE CONFIGURATION
FOR THE LSi SERIES CENTER CHANNEL LOUDSPEAKER
The “bass management” or “speaker configuration” menus of most surround receivers offer the
choice of “normal” or “wide” modes for center channel operation. In discrete channel digital
processors these modes are referred to as “small” and “large.” Normal (small) mode filters bass
frequencies from the center channel speaker and sends them instead to the front left & right main
speakers or to the subwoofer output (LFE) jack. Wide (large) mode sends an unfiltered, full range
signal to the center channel speaker. Use the Small (normal) mode for optimum center (and
surround) channel performance and reliability.
FOR MORE INFORMATION ON BASS MANAGEMENT SETTINGS, VISIT
http://www.polkaudio.com/home/faqad/advice/processor.html
PLACEMENT AND BI-POLE/DI-POLE OPERATION
OF LSi SERIES SURROUND FX LOUDSPEAKERS
The LSi Series Surround FX Loudspeakers were designed to provide the ultimate diffuse sound field
experience in your home theater system. One LSi FX speaker is the “left” channel speaker, and
the other is the “right” channel speaker. The serial number label identifies which speaker is
which [figure 2]. The “left” surround speaker should be placed on the left side of the room as you
face the front of the room. The type of surround processor you use will influence your placement
and bi-pole/di-pole switching choices [figure 2]. Experiment to find the right balance of sound
quality and room integration:
Direct surround effects—bi-pole mode [figure 3a & 3b]: If you plan on placing the speakers
more than one foot (30cm) behind the primary listening position we recommend using the “bipole”
switch setting [figure 2] and placement.
Contact Polk Audio Customer Service 1-800-377-7655 (Outside US: 410-358-3600), [email protected]
FIGURE 1
FIGURE 1
Most popular placement, above the TV screen. LSi Series Center Speakers are magnetically shielded for safe
placement near TV or video monitors. If you notice video distortion or discoloration, immediately move the
speakers away from the video source and call Polk Audio Customer Service 800.377.7655 (US and Canada)
or [email protected].
La ubicación más común es encima de la pantalla del televisor. Los altavoces centrales de la serie
LSi tienen blindaje magnético para poder ubicarlos con seguridad cerca de monitores de televisión
o de video. Si nota que hay distorsión o descoloración de la imagen, aleje inmediatamente los
altavoces de la fuente de video y comuníquese con el servicio al cliente de Polk Audio.
OR
Disposition la plus courante, au-dessus de l’écran. Les enceintes de la série LSi sont blindées
magnétiquement et peuvent être disposées à proximité d’une télé ou d’un moniteur vidéo.
Si vous percevez de la distorsion ou de la décoloration vidéo, éloignez immédiatement les
enceintes de l’écran et communiquez avec le service à la clientèle de Polk.
Häufigste Platzierung – über dem Fernsehbildschirm. LSi-Mittenlautsprecher sind für eine Platzierung in
der Nähe von Fernsehgeräten oder Videomonitoren magnetisch abgeschirmt. Wenn Sie eine Verzerrung
oder Verfärbung des Videobildes bemerken, sind die Lautsprecher umgehend von der Videoquelle zu
entfernen. Setzen Sie sich in diesem Fall mit dem Kundendienst von Polk Audio in Verbindung.
FIGURE 2
FIGURE 2
Consult serial number label for correct FX speaker orientation.
Note location of Bipole/Dipole switch.
Consulte la etiqueta con el número de serie para orientar
correctamente el altavoz.
LEFT
Pour orienter vos enceintes f/x correctement, consultez l’étiquette
du numéro de série (et non celle de l’interrupteur Bipole/Dipole).
Angaben zur ordnungsgemäßen Ausrichtung der Lautsprecher
finden Sie auf dem Typenschild mit der Seriennummer.
LEFT
FIGURE 3
[a]
[b]
Left
Right
FIGURES 3a & b
Direct surround effects using BI-POLE mode.
Set Surrounds as “small” in your receiver’s Bass Management settings.
Efectos de sonido surround directo con modalidad BI-POLE.
Asigne la clasificación “pequeño” a los altavoces surround
en los parámetros de control de bajas frecuencias de su receptor.
Pour des effets ambiophoniques directionnels, choisissez le mode
BI-POLE. Réglez le contrôle “surround” de votre récepteur à “small”.
Direkte Surround-Effekte im BIPOL-Modus. Stellen Sie die SurroundWerte der Tiefen auf Ihrem Empfänger auf ”klein“ ein.
f o r m o r e i n f o r m a t i o n v i s i t o u r w e b s i t e a t w w w. p o l k a u d i o . c o m
Diffuse surround effects—di-pole mode [figure 4]: For a more diffuse effect, place the speakers
on the side walls in line with your listening position and at least 2 feet away from the rear wall.
Select the “dipole” switch setting [figure 2].
Processor Mode Configuration for the LSi Series Surround FX Loudspeaker:
Set Surrounds to “Small” in your receiver’s Bass Management settings.
FOR MORE INFORMATION ON CHOOSING BIPOLE OR DIPOLE SETTINGS, VISIT
http://www.polkaudio.com/home/faqad/faq/bipole.html
CONNECTING YOUR LSi SERIES LOUDSPEAKERS
[FIGURES 5 & 6]
Follow the hookup directions included with your receiver. Strip 1/2 inch (12.7mm) of insulation
from each of the two conductors of the wire to expose the bare metal and twist each of the
individual conductors into single unfrayed strands. Note that one of the terminals on the rear of
each speaker is red (+) and the other is black (-). Make certain that you connect the wire from the
red (+) terminal of your amplifier or receiver to the red (+) terminal on your speaker and the wire
from the black (-) terminal of your amplifier or receiver to the black (-) terminal on your speaker.
Most wire has some indicator (such as color-coding, ribbing or writing) on one of the two
conductors to help you maintain consistency.
To connect wire to the binding post [figure 7], unscrew the hex nut and insert the bare wire into
the hole near the base of the binding post. Do not insert the insulated part of the wire into the hole
as this will not give you a good connection. Twist the hex nut back down the binding post until it
firmly meets the wire. Do not over tighten.
To use Banana Plugs (US only): Unscrew the binding post lug nuts completely to expose the
binding post plugs (plastic plugs inserted into the binding posts). Carefully pry out the binding post
plugs to expose banana plug holes. Screw the lug nuts back on the binding posts and insert banana
plugs. (This is for US owners only.)
BI-WIRING OR BI-AMPING YOUR LSi SERIES LOUDSPEAKERS
If you decide to bi-wire or bi-amp, you must remove the flat metal jumpers
between terminal posts. Failure to do this could result in damage to your amplifier
and loudspeakers.
Bi-wiring [figure 8] can provide noticeable improvements in the overall transparency of your
loudspeakers. Run separate speaker wires to the low and high frequency drivers from a single
amplifier: after removing the jumpers, connect one set of speaker wires to the upper terminals
on each speaker and one set of (usually heavier gauge) wires to the lower terminals. Connect
the other ends of both wire sets to the corresponding amplifier outputs.
FOR MANUAL UPDATES, VISIT
http://www.polkaudio.com/home/products/center/lsic
AND/OR
http://www.polkaudio.com/home/products/surround/lsifx
FOR MORE DETAILED HOOK UP AND PLACEMENT INFORMATION, VISIT
http://www.polkaudio.com/home/faqad/
FOR RECOMMENDED ACCESSORIES (INCLUDING SPEAKER STANDS, BRACKETS
AND EXCLUSIVE POLK AUDIO LOGOWEAR), VISIT OUR WEBSTORE:
http://polkaudio.tranguard.com/
Contact Polk Audio Customer Service 1-800-377-7655 (Outside US: 410-358-3600), [email protected]
FIGURE 4
FIGURE 4
Diffuse surround effects using DI-POLE mode.
Set Surrounds as “small” in your receiver’s Bass Management settings.
Efectos de sonido surround difuso con modalidad DI-POLE. Asigne la clasificación “pequeño”
a los altavoces surround en los parámetros de control de bajas frecuencias de su receptor.
Pour des effets ambiophoniques diffus, choisissez le mode DI-POLE. Réglez le contrôle
“surround” de votre récepteur à “small”.
Surround-Effekte lassen sich im DIPOL-Modus verteilen. Stellen Sie die Surround-Werte
der Tiefen auf Ihrem Empfänger auf “klein“ ein.
FIGURE 5
FIGURE 5
Basic Center Channel Speaker hookup diagram.
Set Center Channel to “small” in your receiver’s
Bass Management settings.
Diagrama básico de conexión.
Diagramme de branchement rudimentaire.
Grundlegendes Anschlussdiagramm.
FIGURE 6
FIGURE 6
Basic Surround FX Speaker hookup diagram.
Set Surrounds to “small” in your receiver’s
Bass Management settings.
Diagrama básico de conexión.
Diagramme de branchement des enceintes
f/x ambiophoniques. Réglez le contrôle des canaux
ambiophoniques de votre récepteur à “small.”
Grundlegendes Anschlussdiagramm.
FIGURE 7
FIGURE 7
Using binding post connections.
Uso de conexiones con tornillos de presión.
Utilisation des bornes de branchement.
Verwendung von Anschlussklemmen.
Loosen hex nut
Desenrosque parcialmente
la tuerca hexagonal
Desserrer l’écrou
Sechskantmutter lösen
Tighten hex nut
Insert speaker wire
through hole
Enrosque la tuerca de nuevo
Inserte el alambre para
la bocina en el orificio
Serrer l’écrou
Insérer le fil du haut-parleur
dans le trou
Sechskantmutter festschrauben
Lautsprecher-Draht durch
das Loch schieben
Do not insert insulated
section of speaker wire
No inserte alambre con
material aislante
Ne pas insérer la partie
isolée du fil du haut-parleur
Isolation des LautsprecherDrahtes nicht in das Loch schieben
FIGURE 8
FIGURE 8
Bi-wiring, or using separate speaker wire connections
for high and low frequency sections.
To use Banana Plugs (US only):
Unscrew the binding post lug nuts completely
to expose the binding post plugs
(plastic plugs inserted into the binding posts).
Carefully pry out the binding post plugs
to expose banana plug holes.
Screw the lug nuts back on the binding posts
and insert banana plugs.
(This is for US owners only.)
Bicableado, o uso de conexiones de cables de altavoz
separadas para las secciones de alta y baja frecuencia.
Bi-câblage: l’utilisation de câbles distincts pour brancher les
composantes des hautes et des basses fréquences de vos enceintes.
Verwendung von unterschiedlichen Kabelverbindungen
für hohe und niedrige Frequenzen.
f o r m o r e i n f o r m a t i o n v i s i t o u r w e b s i t e a t w w w. p o l k a u d i o . c o m
Bi-amping [figure 9] allows you to use separate amplifiers for the high and low frequency
sections of your loudspeaker for greater dynamic range and lower distortion. After removing the
jumpers, connect the speaker wires from the high frequency amplifier outputs to the upper set of
terminal posts on each speaker. Follow the same procedure for connecting the low frequency
amplifier outputs to the lower set of terminals. Remember to maintain correct wiring polarity (+
to +, - to -) in all connections.
WALL MOUNTING THE LSi SERIES SURROUND FX LOUDSPEAKERS
The LSi Series Surround FX Loudspeakers feature built-in wall mounting brackets. Follow the
steps below to safely wall mount these speakers. Wall mounting requires basic skills in with tools
such as a drill and a screwdriver. If you are in doubt that you possess the necessary skills or
tools, consult your Polk Audio dealer, or a professional installer.
• Make sure the material on which you plan to mount the speakers (plaster, drywall, paneling,
stone, etc.) can support the weight of the speakers (LSi FX=approx 50lbs/22.5kg ea). Make
sure the locations you select do not conceal electrical wiring or plumbing.
• Prior to installation, hold the speaker in the chosen location to make sure it safely
clears obstacles such as ceiling, adjacent walls, corners, beams, lighting fixtures and
door/window frames.
• Using the keyhole slots in the bracket template (included), mark the installation location
of the four keyhole slots with a pencil [figure 10]. Orient the template so that the small
ends of the keyhole slots are facing “up.”
• If you are certain that there is a stud behind the wall surface, drive a #10 screw (not included)
through the wall and into the stud [figure 11a].
• If there is no stud behind the wall at the chosen location, install a #10 wall anchor (not
supplied) into the wall by following the wall-anchor-manufacturer’s instructions [figure 11b].
• For masonry walls, use a masonry drill bit and #10 masonry anchor and screw (not included).
• Tighten screws into stud or wall anchors, leaving screw heads protruding 1/16” (1.6mm).
• Make all wire attachments now. (See previous page.)
• Line up the keyhole slots on the back of the speakers so that the screw heads pass through
the large center hole of the slots.
• Let the speaker and slide straight down, allowing the screw head to slip behind the smaller
end of the keyhole slot [figure 12].
• Tug gently on the speaker to make certain that the screws and bracket are properly aligned
and that the wall anchors are secure.
• If the bracket is not held snug against the wall by the screw heads, remove the speaker
from the wall, drive the screws in a little further and then remount the speaker.
TAKING CARE OF YOUR LSi SERIES LOUDSPEAKERS
Your new LSi Series Loudspeakers are constructed of a rugged material that can be dusted or
cleaned with a damp cloth. Avoid harsh detergents and cleaning fluids, as they can permanently
damage your speakers’ finish [figure 13]. Vacuum the grilles to remove dust.
Contact Polk Audio Customer Service 1-800-377-7655 (Outside US: 410-358-3600), [email protected]
FIGURE 9
FIGURE 9
Bi-amping, or using separate amplifiers for the low and high frequency sections of your speakers.
LOW FREQUENCY
AMPLIFIER
HIGH FREQUENCY
AMPLIFIER
Biamplificación, o uso de amplificadores separados para las secciones de baja y alta frecuencia
de los altavoces.
Bi-amplification: l’utilisation d’amplis distincts pour alimenter les composantes des hautes et des
basses fréquences de vos enceintes.
Verwendung von unterschiedlichen Verstärkern für niedrige und hohe Frequenzen der Lautsprecher.
FIGURE 10
FIGURE 10
Use template to mark mounting location.
Use la plantilla para marcar la ubicación de montaje.
Utilisez le gabarit pour marquer le lieu de fixation.
FIGURE 11
Verwenden Sie die Schablone zur Markierung der Befestigungsstelle.
[a]
FIGURE 11a & 11b
Use #10 screw for wall stud, use #10 (M4.5) wall anchors + screw for no wall stud.
Use un tornillo n° 10 si hay parales internos en la pared, use anclas de pared n° 10
y un tornillo si no hay.
Utilisez des vis #10 pour fixation sur montant ou des chevilles d’ancrage #10
avec vis s’il n’y a pas de montant.
[b]
Verwenden Sie eine Schraube (Nr. 10) für Wände mit Holzstielverstärkung bzw.
Dübel und Schrauben (Nr. 10) für Wände ohne Holzstielverstärkung.
FIGURE 12
FIGURE 12
Slide the speaker down on the screw heads to catch the keyhole slots.
Deslice el altavoz hacia abajo sobre las cabezas de los tornillos para
que entren en las ranuras en forma de cerradura.
Glissez l’enceinte sur les têtes de vis jusqu’à ce que les encoches
en trou de serrure s’enclenchent.
Schieben Sie den Lautsprecher auf die Schraubköpfe herunter,
so dass sie in den Ritzen einrastet.
FIGURE 13
FIGURE 13
Clean wood panels with furniture polish and a soft cloth.
Do not use furniture polish on black gloss veneer.
Clean black gloss veneer with a damp cloth.
Cuidado del acabado de madera natural.
Entretien de la finition en bois véritable.
Pflege der Holzappretur.
f o r m o r e i n f o r m a t i o n v i s i t o u r w e b s i t e a t w w w. p o l k a u d i o . c o m
LIMITED FIVE YEAR WARRANTY
Polk Audio, Inc. warrants to the original purchaser only that this Polk Audio Loudspeaker Product (the “Product”) will be free from defects in materials and
workmanship for a period of five (5) years from the date of original retail purchase from a Polk Audio Authorized Dealer. However, this Warranty will automatically
terminate prior to the expiration of the five (5) years if the original retail purchaser sells or otherwise transfers the Product to any other party. The original retail
purchaser shall hereinafter be referred to as “you.” To allow Polk Audio to offer the best possible warranty service, please fill out the Product Registration Card(s)
and send it to the Factory, at the address provided on the Product Cards(s) within ten (10) days of the date of purchase.
Defective Products must be shipped, together with proof of purchase, prepaid insured to the Polk Audio Authorized Dealer from whom you purchased the Product,
or to the Factory at 2550 Britannia Boulevard, Suite D, San Diego, California 92154. Products must be shipped in the original shipping container or its equivalent;
in any case the risk of loss or damage in transit is to be borne by you. If upon examination at the Factory or Polk Audio Authorized Dealer it is determined that the
unit was defective in materials or workmanship at any time during this Warranty period, Polk Audio or the Polk Audio Authorized Dealer will, at its option, repair
or replace this Product at no additional charge, except as set forth below. All replaced parts and Products become the property of Polk Audio. Products replaced
or repaired under this warranty will be returned to you, within a reasonable time, freight prepaid.
This warranty does not include service or parts to repair damage caused by accident, disaster, misuse, abuse, negligence, inadequate packing or shipping procedures, commercial use, voltage inputs in excess of the rated maximum of the unit, cosmetic appearance of cabinetry not directly attributable to defect in materials
or workmanship, or service, repair, or modification of the Product which has not been authorized or approved by Polk Audio. This warranty shall terminate if the
Serial number on the Product has been removed, tampered with or defaced.
This warranty is in lieu of all other expressed Warranties. If this Product is defective in materials or workmanship as warranted above, your sole remedy shall
be repair or replacement as provided above. In no event will Polk Audio, Inc. be liable to you for any incidental or consequential damages arising out of the use
or inability to use the Product, even if Polk Audio, Inc. or a Polk Audio Authorized Dealer has been advised of the possibility of such damages, or for any claim
by any other party. Some states do not allow the exclusion or limitation of consequential damages, so the above limitation and exclusion may not apply to you.
All implied warranties on this Product are limited to the duration of this expressed Warranty. Some states do not allow limitation on how long an implied Warranty
lasts, so the above limitations may not apply to you. This Warranty gives you specific legal rights, and you also may have other rights which vary from state to state.
This Warranty applies only to Products purchased in the United States of America, its possessions, and U.S. and NATO armed forces exchanges and audio clubs.
The Warranty terms and conditions applicable to Products purchased in other countries are available from the Polk Audio Authorized Distributors in such countries.
POLK AUDIO HISTORY—
A PASSION FOR SOUND
SPECIFICATIONS
LSi C
LSi FX
DRIVER COMPLEMENT:
1
2 - 5 ⁄4"(13.3cm) drivers
1"(2.5cm) tweeter
OVERALL FREQUENCY RESPONSE:
1
2 - 5 ⁄4"(13.3cm) drivers
2 - 1"(2.5cm) tweeters
OVERALL FREQUENCY RESPONSE:
40Hz-27kHz
40Hz-27kHz
-3DB LIMITS:
-3DB LIMITS:
52Hz-26kHz
RECOMMENDED AMPLIFICATION:
20-200 watts/channel
EFFICIENCY (1M,1W):
88dB
IMPEDANCE:
Nominal 4 Ohms
CROSSOVER FREQUENCY:
2.4k, 200Hz
CROSSOVER SLOPE:
3rd Order HP, 2nd Order LP, cascaded
ENCLOSURE TYPE:
Ported
DIMENSIONS:
7"H x 213⁄4"W x 9"D
(17.8cmH x 55.2cmW x 22.8cmD)
SHIPPING WEIGHT:
20 lbs (9kg)
52Hz-26kHz
RECOMMENDED AMPLIFICATION:
20-200 watts/channel
EFFICIENCY (1M,1W):
88dB
IMPEDANCE:
Nominal 4 Ohms
CROSSOVER FREQUENCY:
2.4k, 200Hz
CROSSOVER SLOPE:
3rd Order HP, 2nd Order LP, cascaded
ENCLOSURE TYPE:
Ported
DIMENSIONS:
15"H x 131⁄4"W x 10"D
(38.1cmH x 33.7cmW x 25.4cmD)
SHIPPING WEIGHT:
50 lbs (22.5kg)
POLK AUDIO, INC. • 5601 METRO DRIVE, BALTIMORE, MD
WWW.POLKAUDIO.COM
RM0327-1
Polk Audio was founded in Baltimore in
1972 by Johns Hopkins University graduates
Matthew Polk and George Klopfer. Today, Polk
Audio is a leading international manufacturer
of high quality home, car and multimedia
loudspeakers. Polk products emphasize
superior sound and build quality, and feature
many patented and award-winning innovations.
Polk Audio has built a reputation as “The
Speaker Specialists.” Polk products are sold
throughout the USA, Canada and in over
50 countries around the world. Polk Audio’s
mission has always been to build high quality,
great sounding speakers at affordable prices.
For the people of Polk Audio, building speakers
is not just a job; it’s a passion.
DRIVER COMPLEMENT:
21215
USA
•
800.377.7655
•
FAX: 410.764.5266