1
DVD Player / Recorder
DVR-0900
Operation Manual
-1-
Table of Contents
Important Safety Instructions
About this manual
This player supports the following Media Formats
Important Note
Copyright Information
Regional Management Information
Features
Before you Switch On
Place in Position
Condensation
Handling Disk’s
Cleaning a Disk
Using the Remote Control
Elements of Operation
Front Panel
Display Panel
Rear Panel
Quick Setup Guide
The Remote Control Handset
Connections
Connecting to a TV
Analog Audio Connections
Digital Audio Connections
Satellite Connections
Cable Connections with Converter Box
Cable Connections without Converter Box
Connecting to Audio/Video Sources
Connecting to the TV Tuner
The DVR Setup Menu
Initial Configuration
Auto-Channel Scan
Setting the Clock
TV/Media Playback Display
Picture Mode Resolution
Video Output
Speaker Setup (Stereo Mode)
Speaker Setup (Multi-Channel Mode)
Audio Setup
Digital Out Setup
Dynamic Compression Setup
Dolby Prologic Setup
Starting the Recording Session
Recording Quality
Auto Chapter
Recording Functions
One Touch Recording
Quick Recording
My Record List
Disc Play Operations
Basic Disc Play Options
Formatting a Disc
Erasing a Disc
Finalizing a Disc
Renaming
Renaming/Deleting a Title
4
5
5
5
5
5
6
7
7
7
7
7
8
8
9
9-10
11-12
13
14
15
16
16
17
17
18
19
19
20
20
21
21
21
22
23
23
24
24
24
24
25
25
25-27
27
27
27
28
28
28
28
-2-
Disc Playback
Playing Back a Disc
Angle Mark
Language Selection
Pausing Playback
Fast Forward/Reverse Playback (×2 - ×8 Normal Speed)
Stop Playback
Using the Trick Modes
Slow Motion
Fast Forward/Fast Reverse
Slow Motion Step Frame-By-Frame
Repeat a Segment Between Points A and B
Zoom In/Out
Resuming Playback from the Same Location
Locating a specific Title or Chapter
Repeating a Chapter or Track
Zooming Function and Shift Point Function
CD Playback
MP3-CD Playback
Viewing JPEG Pictures
Previewing Contents
Zooming a JPEG
Panning Around a JPEG
Rotating a JPEG
Special Features
Helpful Hints
Technical Specifications
Frequently Asked Questions
Glossary
29
29
29
29
29
30
30
30
30
30
30
30
30
31
31
31
31
31
31
31
31
32
32
32
33
34
35-37
38-40
-3-
Important Safety Instructions
Thank you for purchasing this Polaroid DVD player/recorder. We strongly recommend that you carefully study
the Operation Manual before attempting to operate the recorder and that you note the listed precautions.
After you have finished reading these instructions, put them in a safe place for future reference.
y
y
y
y
y
y
y
y
y
y
y
y
y
y
y
y
y
y
Read these instructions. All the safety and operating instructions should be read before the equipment is
operated.
Keep these instructions. The safety and operating instructions should be retained for future reference.
Heed all warnings. All warnings on the equipment and in the operating instructions should be adhered to.
Follow all instructions. All operating and use instructions should be followed.
Do not use this unit near water including bathtub, sink, laundry tub, wet basement, or swimming pool.
Unplug this unit from the wall outlet before cleaning. Do not use liquid cleaners or aerosol cleaners. Use
a damp cloth on the exterior cabinet only.
Slots and openings in the cabinet back or bottom are provided for ventilation, to ensure reliable operation of
the unit, and to protect it from overheating. These openings must not be blocked or covered. Do not
place the unit on a bed, sofa, rug, or other similar surface. This unit should never be placed in a bookcase
or rack unless proper ventilation is provided.
Do not install near any heat sources such as radiators, heat registers, stoves or other apparatus (including
amplifiers) that produces heat.
This unit is equipped with a polarized plug. A polarized plug has two blades with one wider than the other. A
grounding type plug has two blades and a third grounding prong. The wide blade or the third prong is
provided for your safety. If the plug provided doesn’t fit in your outlet, consult an electrician for replacement
of the obsolete outlet. Removal of the polarized plug will diminish the plugs level of safety.
Protect the power cord from being walked on or pinched particularly at plugs, convenience receptacles, and
the point where they exit from the product.
Only use attachments/accessories specified by the manufacturer.
Use only with the cart, stand, tripod, bracket, or table specified by the manufacturer, or sold with the product.
When a cart is used, use caution when moving the cart/equipment combination to avoid injury from tip-over.
To protect your unit from a lightning storm, or when it is left unattended and unused for long periods of time,
unplug the product from the wall outlet and disconnect the antenna or cable system.
Do not overload wall outlets and extension cords, as this can result in a risk of fire or electric shock.
If an outside antenna or cable system is connected to the unit, be sure the antenna or cable system is
grounded to provide some protection against voltage surges and built-up static charges.
Refer all servicing to qualified service person. Servicing is required when the product has been damaged in
any way, such as power-supply cord or plug is damaged, liquid has been spilled or objects have fallen into
the product, exposed to rain or moisture, does not operate normally, or has been dropped.
Apparatus shouldn’t be exposed to dripping or splashing. Objects filled with liquids, such as vases, should
not be placed on the apparatus.
Do not use cracked, deformed, or repaired disks in the unit. These disks are easily broken and may cause
serious personal injury and product malfunction.
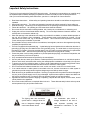
The lighting flash with arrowhead
symbol within a triangle alerts the
user to “dangerous voltage” which
could cause electric shock.
The exclamation point within a
triangle indicates to the user to
read important operating and
maintenance instructions in the
manual.
-4-
About this manual
The operation described here mainly refers to the use of the remote control handset (R/C).
Buttons with same or similar marking at the main unit have the same function like those of the R/C.
Safety Precautions
WARNING:
To reduce the risk of fire or shock hazard, do not expose this DVD player to rain or moisture.
To reduce risk of electrical shock, do not remove cover or back, no user serviceable parts inside.
CAUTION:
This product utilizes a laser. Use of controls or adjustments or performance of procedure other than those specified
herein may result in hazardous radiation exposure. Do not open cover to view it, do not repair it yourself. Refer
servicing to qualified personnel.
When this recorder is plugged to the wall outlet, do not place your eyes close to the opening or the disc tray and other
openings to look into the inside of this recorder.
This player supports the following Media Formats:
DVD-Video, CD-R, CD-RW, CD Audio, Photo CD, DVD+RW, DVD+R, MP3
Important Note:
This unit plays CD-R, CD-RW and MP3 disks, although CD-R and CD-RW media will not be indicated in
the display. Due to the variety of disk types, recording computers, operating systems and burning
software we cannot guarantee that every CD-R or CD-RW is playable.
The types of functions and operations that can be used for a particular disk vary depending on the features of that
disk. In some cases, these functions and operations may differ from the descriptions given in this Operation Manual.
In this event, follow the instructions given on the screen. This Operation Manual only covers basic disk operations.
Copyright Information:
Unauthorized copying, broadcasting, public performance, and lending of disks are prohibited. This product
incorporates copyright protection technology that is protected by method claims of certain U.S. patents and other
intellectual property rights owned by Macrovision Corporation and other rights owners. Use of this copyright
protection technology must be authorized by Macrovision Corporation, and is intended for home and other limited
viewing uses only unless otherwise authorized by Macrovision Corporation. Reverse engineering or disassembly is
prohibited.
Regional Management Information:
This DVD/CD player is designed and manufactured to respond to the region management
information that is recorded on a DVD disk. If the region code described on the DVD disk does
not correspond to the region code of this DVD/CD player, this DVD/CD player cannot play this disk.
The region code for this DVD player is “1”.
1
Please note for a better understanding of this manual that the program of a DVD may be divided into several “titles”
(e.g. main movie, material, interviews etc.). Each of these titles can be divided into “chapters”. The program of audio
CD’s is divided into “tracks”. Manufactured under license from Dolby Laboratories. “Dolby” and the double-D symbol
are trademarks of Dolby Laboratories.
-5-
Features
INTRODUCTION
Thank you for buying this Polaroid DVD Recorder.
We hope you enjoy this quality unit with its fantastic
features and easy playback/recording operation.
With it, you can watch DVDs, music disks, or watch
TV shows from external source devices. The most
outstanding feature that attracts you perhaps is that
you can record these shows to DVD+RW or DVD+R
disks in various ways, as you like.
GUIDE
The product provides customers a friendly GUIDE,
which is very useful for you to understand and enjoy
all functions the product provides:
Record Function
• Built-in TV tuner lets you record from TV,
audio, video onto DVD+R/RW.
• There are CVBS composite video, S-video
and RF Cable TV signal inputs.
NOTE: For best results, we recommend using the
4X DVD disks when recording.
Edit/Delete Function
• Disk delete and rename.
• Title deletion – Title is actually deleted with all
header information about it.
• Automatic chapter insertion (at 4 min, 10 min,
20 min , 30 min intervals or OFF)
• Modification of title name
Timer programming feature
The following timer programming features are
supported for both DVD+RW/R
Program recording of shows – Program the
unit to record an upcoming show by selecting
channel, date, start time, end time, and
quality of recording.
Manual Real time Clock set up
Back-to-back recording of shows – you can
select to record two shows that have an end
time of one show coinciding with the start
time of another show.
Let you enter a multi-digit codes used in TV Guide
show publication for fast and easy recording.
DVD Functions
High Resolution
Adopt an MPEG2 decoding format to achieve
horizontal resolution of more than 500 lines.
Superior sound
Built-in Dolby Digital decoder to output digital
audio signal to reproduce high quality sound
effects.
Special Function
Supports multi-angle and multi-language
playback for enjoying unique video features.
Video Output
Standard Video, S-Video and Component Video
output.
Audio Output
2CH and 5.1CH analog audio output, optical and
coaxial digital audio output can be connected to
any amplifiers.
Screen
Supports 4:3 and 16:9 aspect ratios.
Zoom Function
If desired, the picture can be enlarged to further
enhance your enjoyment.
All Playback Functions
Fast forward and rewind, slow playback, step
playback, repeat playback and program
playback.
Search By Time
Search for scenes by time; ideal for finding your
favorite scenes.
Last Memory Playback
Continue playing from the last point you stopped.
-6-
Before You Switch On
Place in Position
Choose a location with sufficient air circulation to
prevent overheating. Do not expose the unit to direct
sunlight or other heat sources.
The product must be positioned horizontally. Do not
put any heavy objects on the housing. Protect the
laser unit against dust and if necessary, use a
cleansing disk. Be sure to follow the operating
instructions.
Condensation
Condensation may cause the laser lens to
malfunction. For example: quickly bringing the unit
from a cold environment to a warm environment or
using the player in humid environments can cause
condensation.
¾ When moving the unit from a cold
environment to a warm environment, take the
disk out of the unit and wait for about an hour,
until the unit has warmed.
¾ Do not use this unit in high humidity
environments.
Handling Disk’s
Touching the shiny surface of disks can leave dirt, oils
or scratches. Always handle the disc from its label
side.
Putting stickers or adhesive labels on the disk can
lead to an imbalance in the disk and can cause a
malfunction.
Using the Remote Control
1. Open the battery compartment that
is found on the backside of the remote.
2. Insert four batteries (1.5 V, size AAA).
Make sure the polarity matches the
marks inside the compartment or the
remote will not work and could
be damaged.
3. Put the cover back on the remote and begin using.
The remote has a range of
approximately 20 feet and works best
when pointed directly at the DVD
player (at angles up to 60° from
the front of the player).
Obstructions between the player
and the remote (like people, pets,
or plants) will diminish the remote’s effectiveness.
A WORD ABOUT BATTERIES:
• Prevent damage to your remote
removing batteries prior to storage.
Do not expose disks to direct sunlight or other heat
sources.
Do not use any specially shaped discs.
Do not use significantly warped or cracked discs.
Do not drop or bend discs.
Do not write on discs using markers or ball-point
pens.
Do not place stickers or labels on discs.
Do not put two or more discs in the disc tray.
Please store the disks only in their casing.
Cleaning a Disk
Clean disks with a soft cloth. Do not use any type of
cleaning agent, liquid or solvent. Wipe from the inside
to the outer edge. Do not wipe in a circular direction.
by
• Batteries contain chemical substances.
Used batteries should be disposed of at a
household hazardous waste collection site.
• Never throw batteries into fire, as they
could explode.
• Do not attempt to recharge a battery unless
the
battery
specifically
is
marked
“rechargeable.
• Keep all batteries, used or new, out of the
reach of children.
-7-
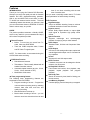
Elements of Operation - Front Panel
1.
2.
3.
4.
5.
6.
7.
8.
9.
10.
POWER button
Disk tray
SOURCE button
EJECT button
VIDEO input jack (Video 2)
L-AUDIO-R input jacks
Remote sensor
Display panel
STOP button
PLAY/PAUSE button
11. PREV/CH- button
12. NEXT/CH+ button
13. RECORD button
Press to turn on/off the power
Use to load disk
Press to shift between Video 1, Video 2, S-Video and ANT
Press to open/close the disc tray
Connection for a video output
Connections for audio output
Receives the signal from the remote control
Indicates the current status of the unit
Press to stop the playback
Press to begin playback of the inserted disk
During playback press to pause the playback
Press again to resume the playback
When playing a disc, press to go back to the preceding chapter;
when watching TV press for channel down
When playing a disc, press to advance to the next chapter; when
watching TV press for channel up
Press to activate the record function
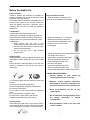
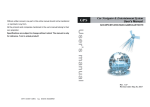
Display Panel
1.
2.
3.
4.
TV status indicator
Recording indicator
Playing/Pause status indicator
Repeat status indicator
5.
6.
7.
8.
Fast Forward/Rewind indicator
Disk type indicators
Track/Chapter indicator
Playing time indicator
-8-
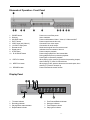
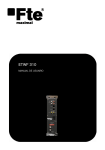
Rear Panel
1.
2.
3.
4.
5.
6.
7.
ANTENNA jack
VIDEO input jack (Video 1)
2CH Audio input jacks
5.1CH Audio output jacks
VIDEO output jack
TV TUNER jack
S-VIDEO input jack
8. S-VIDEO output jack
9. Component video output jacks
10. Optical Digital output jack
11. Coaxial Digital output jack
12. 2ch Audio output jacks
13. Power-supply cord
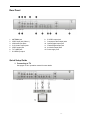
Quick Setup Guide
1. Connecting to TV
See pages 13-18 in operation manual for more details.
-9-
2. Initial Recorder Setup:
Press the SETUP button on your remote and toggle as follows:
Channel Setup
Auto CH Scan
Press the SETUP button on your remote 2 times to get back to main menu.
Press the WATCH TV button to watch TV or see #3 to watch a DVD movie
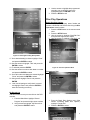
3. Watch a Movie - Insert a DVD movie disk. The DVD will automatically play bringing you to the
title menu.
NOTE: The DVD Recorder has its default channel list. This function allows you to watch TV without
going through the Auto CH Scan process. From the Setup Menu go to General setup option. Use
the Factory Default function to set the unit to factory default mode.
4. Record your favorite TV shows to DVD - Insert a DVD+RW or DVD+R disk, and press the
REC button on your remote control or on the unit while watching the TV show you wish to record.* It’s
that easy!
*Expect a few seconds delay when recording starts and a slight delay when recording ends.
When a blank disc or recordable disc is inserted for the first time it will take about 30 seconds to read it.
5. Copy video to DVD – Connect the Video/Audio OUT jacks on your VCR or camcorder to the
color coordinated INPUT jacks on the DVD Recorder. Insert a DVD+RW or DVD+R disk. Press the
SOURCE button on the remote to select a recording source, press the REC button when ready to
record.
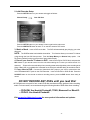
DO NOT RECORD ANY DVDs until you read this!
All DVD disks are not equal! In fact, certain DVD disk manufactures have perfected video recording
media. For best results, we recommend using the following brands of DVD disks when recording:
• DVD+RW: Use Hewlett Packard®, TDK®, Memorex® or Maxell®
• DVD+R: Use Hewlett Packard®
Visit www.polaroidelectronics.com for more product information and updates.
- 10 -
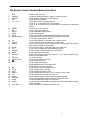
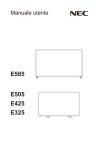
The Remote Control Handset Button Functions
1
2
3
4
5
REC
SOURCE
POWER
6
7
8
9
10
11
ENTER
12
13
14
PS
CLEAR
ANGLE
15
16
17
18
19
ZOOM
A-B
REPEAT
MUTE
WATCH TV
20
21
22
23
DISPLAY
OPEN/CLOSE
24
25
26
27
28
29
30
31
32
33
VOLUME +/-
SETUP
STOP
GOTO
Number buttons
TITLE
STEP
MENU
+10
SUB-T
RESUME
SLOW
AUDIO
Press to start recording.
Press to shift between Video 1, Video 2, S-Video and ANT.
Switch between stand-by and working status.
Press to search backward.
Arrow select. (OSD navigation buttons)
Press / to tune the effect of the reception.
Press to advance to the next channel or to go back to the preceding
channel.
Press to confirm the selection.
Press to view previously track.
Press to activate the setup menu.
Press to stop playback.
Allows you to select the desired disk starting time, track or title.
In Play DVD mode, select numbers by pressing these buttons.
In TV mode, press to select channel.
Press to shift between ‘Progressive’ and ‘Interlace’ mode.
Press to clear the incorrect input when you edit a disc.
During DVD playback, press to access various camera angles (if the DVD
disk contains multiple camera angles).
When a DVD is playing, press this button to activate zoom.
Press to mark a segment to repeat between A and B.
Press to repeat a chapter, track, title, or all content.
Press to mute the audio output.
During DVD playback, press the watch TV. In TV mode, press the Play
button to shift to DVD mode
‘On Screen Display’
Press to open/close the disk tray.
Press to search forward.
Press to begin the playback.
During playback press to pause disc play.
Press again to resume the playback.
Press to skip to the next chapter or menu.
Press to display titles of the disk.
Press to playback frame by frame.
Press to display the disk menu on the TV screen in Play mode.
Press to select track numbers more than 10.
When a DVD is playing, press to select a subtitle language.
During JPEG playback, press to choose the slideshow mode.
Press to activate slow forward or slow rewind.
Press to access various audio languages (if the DVD disk contains multiple
audio languages).
Press to increase or decrease the volume level.
- 11 -
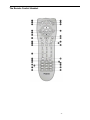
The Remote Control Handset
- 12 -
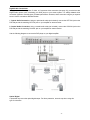
Connections
Connecting to a TV
Important Note:
- Not all cables shown below are included with this DVD player.
- Turning off the power to all equipments involved before making any connections will
protect your speakers from possible damage.
1. Connecting to a TV will give you an Analog Audio Connection:
Using the supplied audio cables, connect the AUDIO OUT jacks (LEFT/RIGHT) on the DVD Player with the
AUDIO IN jacks (LEFT/RIGHT) on your TV.
2. Choose your Video Connection (Analog, S-Video, or Component):
Good Analog Video Connection: Plug one end of the supplied video cable into the VIDEO OUT jack on
the DVD Player and the other end to the VIDEO IN jack on your TV.
Better
S-Video Connection: Plug a S-VIDEO cable into the S-VIDEO OUT jack on the DVD Player and the
other end to the S-VIDEO IN jack on your TV.
Best
Component Connection: Plug one end of the supplied video cable into the COMPONENT OUT jack
on the DVD Player and the other end to the VIDEO IN jack on your TV.
Important Note: The Video Connections described above are used in the various audio/video connections
described on pages 13-18 in this manual.
- 13 -
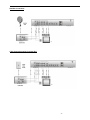
Analog Audio Connections
Using your choice of analog video, S-video, or Component video connection (see page 10), you also have the
option to connect your DVD player to your stereo system for incredible stereo sound. Use the audio connection
described below:
Standard Analog Audio Connections: Using the supplied audio cable, connect the AUDIO OUT jacks
(LEFT/RIGHT) on the DVD Player with the AUDIO IN (LEFT/RIGHT) jacks on your amplifier or stereo receiver.
Once this is complete, please turn to page 22 and follow the directions under speaker setup.
NOTE: Depending on the model of your TV, amplifier or stereo receiver, not all connections may be
available.
2 Channel
5.1 Channel
- 14 -
Digital Audio Connections
Using your choice of analog video, S-video, or Component video connection (see page 10), you also have two
Digital Audio options when connecting your DVD player to your stereo system. It is widely debated which
connection (Optical or Coaxial) gives you better performance. However, either connection will give you superior
sound. Use the connections described below:
1. Optical Audio Connection: Using an optical audio cable (not included), connect the OPTICAL jack on the
DVD Player with the matching OPTICAL jack on your amplifier or stereo receiver.
2. Coaxial Audio Connection: Using a coaxial audio cable (not included), connect the COAXIAL jack on the
DVD Player with the matching COAXIAL jack on your amplifier or stereo receiver.
Use the following diagram to connect the DVD player to your digital amplifier.
Optical Digital
A protective cap covers the optical digital output. For future protection, store the cap when using this
type of connection.
- 15 -
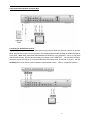
Satellite Connections
Cable Connections with Converter Box
- 16 -
Cable Connections without Converter Box
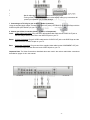
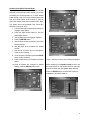
Connecting to Audio/Video Sources
This DVD player supports two-channel video input and two groups of audio input (one set of each is on the front
panel, the other set of each is on the rear panel). The diagram below illustrates hooking up another DVD player
to this DVD. Note: Most prerecorded videocassettes and DVDs are copy protected. If you try to copy them
with this DVD recorder, the recorder may display the message “COPY PROTECT”. You can easily connect a
camcorder to this DVD Player by using the audio/video connections found on the front of the unit. Use the
SOURCE button on the remote control handset to switch between Video 1, Video 2, S-Video and Antenna.
- 17 -
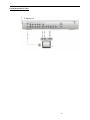
Connecting to the TV Tuner
TV Signal Input
- 18 -
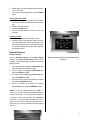
The DVR Setup Menu
Installation: The DVD-Recorder is equipped with a
TV tuner making it possible for you to watch TV or
record your favorite shows to DVD for later playback.
1. Connect your cable TV or antenna to the TUNER
input jack found on the back of the DVD player.
(See page 17)
2. Make the appropriate Audio/Video connections
(see pages 13-18).
3. Plug in your DVD-Recorder. Now you’re ready to
configure the DVD-Recorder.
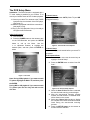
Initial Configuration
1. Turn on the TV.
2. Press the POWER button on the remote to turn
on the DVD-Recorder and press the SETUP
button to call up the Menu. Use the
(direction buttons) to highlight the
desired option, and then press the ENTER to
select.
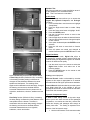
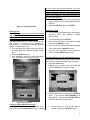
Channel Source
You can choose between CATV (Cable TV) and AIR
(Regular Antenna).
Figure 2. The Channel Source Options
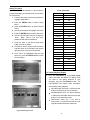
Channel Setup
You must setup your channels before you record TV
programs.
Auto-Channel Scan
1. From the main menu use the arrow keys to
highlight “Channel Setup”.
2. Press the ENTER button to select “Auto CH
Scan”.
Figure 1. The menu
Note: During DVD playback, if you want to watch
TV, please highlight the Watch TV, and then press
the ENTER.
During MP3 or CD playback, if you want to watch
TV, please open the disc tray and take out the
disc first.
Figure3. The Channel Setup Options
3. When the Auto CH Scan function is selected,
the auto-channel scanning process begins.
4. After the auto-channel scanning process
finishes, the total number of channels found
will be shown on the screen.
5. Select the Channel List function to display
the complete list of all the channels that were
found during the auto-channel scanning
process.
6. Press the SETUP button on the remote to
exit and save the selection.
- 19 -
Setting The Clock
In order for the DVD-Recorder to record using a
programmed setting, the internal clock must be set to
the correct time.
Clock Time Chart
AM/PM
24 HOUR
1:00 AM
1:00
1. From the main menu use the arrow buttons to
highlight “Setup Menu”
2:00 AM
2:00
3:00 AM
3:00
2. Press the ENTER button to select “Setup
Menu”
4:00 AM
4:00
5:00 AM
5:00
6:00 AM
6:00
7:00 AM
7:00
8:00 AM
8:00
9:00 AM
9:00
10:00 AM
10:00
11:00 AM
11:00
12:00 PM
12:00
1:00 PM
13:00
2:00 PM
14:00
3:00 PM
15:00
4:00 PM
16:00
5:00 PM
17:00
6:00 PM
18:00
7:00 PM
19:00
8:00 PM
20:00
9:00 PM
21:00
10:00 PM
22:00
11:00 PM
23:00
12:00 PM
24:00
3. Press the ENTER button to select “Record
Setup”
4. Use the arrow buttons to highlight “Set Clock”
5. Press the ENTER button to select “Set Clock”
6. Use the Up and Down arrows to change the
“Hour”. Note: This is a 24 hour clock;
please see the chart for assistance
7. Once the “Hour” is set use the right arrow
button to move to “Minute”
8. Continue to use the Up and Down arrows to
edit each field. Once the field is set use the
right arrow key to move to the next field
9. Once “Done” is highlighted using the right
arrow key, press the ENTER button to save
the new setting.
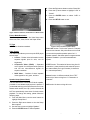
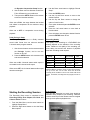
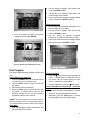
TV / Media Playback Display
1. From the Setup Menu go to the Video Setup
option and select the desired TV display mode
you want to use during playback of your
recording, using the TV Display function. The
DVD-Recorder can display video information
several ways during playback.
•
Normal/PS (pan-and-scan): Cuts the top and
bottom of the picture to fit your television.
•
Normal/Letterbox (LB): The picture displays
in wide screen with black bars at the top and
bottom of your television screen.
•
Wide-screen (Wide TV): If you have a
wide-screen TV, it shows the movie as it was
original intended without the black bars.
Figure 4. Setting The Clock
- 20 -
5. Press the Right arrow button to select “Down Mix”
6. Press the Up arrow button to highlight “Lt/Rt” or
“Stereo”.
7. Press the ENTER button to select “Lt/Rt” or
“Stereo”
8. Press the SETUP button to exit.
Figure 5. Select Letterbox, Pan-And-Scan or Wide-Screen
Picture Mode Resolution
This Picture Mode function in the Video Setup menu
offers Auto, Film, Video, Smart and Super Smart.
TV Type
NTSC is the American standard.
Video Output
The video output allows you to set up the DVD player
several ways.
•
S-video – Divides video information into two
separate signals (one for color, one for
brightness).
•
Component Video (YPbPr) – Separates
color signals from black-and-white portions
and into two color-difference signals for
superior resolution.
•
RGB Video – Consists of three separate
video signals for red, green, and blue.
Speaker Setup (Stereo Mode)
The DVD-Recorder is 6-channel DVD-Audio capable,
provided a home theater audio receiver is present. If
Figure 6. Basic TV-Stereo Speaker Setup
Down mix function: This function mixes 5.1 channels
down to two channels. Only when Down mix is off will
you see all the possible speaker options for 5.1
speaker systems. Set these options to agree with the
speakers installed in your home entertainment
system.
LT/RT function: This method of down mixing from 5.1
channel to 2 channel audio is well suited as input to
an external Dolby Pro Logic Decoder (2 channel to
5.1 channel expansion).
Stereo function: A different method (from LT/RT
down mix) of down mixing from 5.1 channels to 2
channels.
Off function: No down mixing will occur.
you are not hooking up the DVD-Recorder to a home
theater audio receiver, the 6 (5.1) audio channels will
NOT be automatically down-mixed for basic stereo
playback. To change this setting, please follow the
following steps.
1. From the Main Menu use the arrow buttons to
highlight “Setup Menu”
2. Press the Right arrow button to view the Setup
Menu options
3. Use the Down arrow to highlight “Speaker”
4. Press the ENTER button to select Speaker.
- -
21
Speaker Setup (Multi-Channel Mode)
This DVD-Recorder is 6-channel DVD-Audio capable
(requires a home theater audio receiver). If you are
connecting the DVD-Recorder to a home theater
audio receiver, refer to the owner’s manual that came
with your home theater audio receiver in order to
select the desired multi-channel audio mode. Note:
This option will not be available if the “Down Mix”
selection is not set to “OFF”.
1. From the Main Menu use the arrow buttons to
highlight “Setup Menu”
2. Press the Right arrow button to view the
Setup Menu options
3. Use the Down arrow to highlight “Speaker”
4. Press the ENTER button
5. Use the Up and Down arrows to move to the
desired function
6. Use the Right arrow to select the desired
function
7. Use the Up and Down arrow to change the
option of each function
8. Once an option is selected, press the ENTER
button to save selection.
9. Press the left arrow to move back to function
select
10. Once all options are changed to desired
setting, press the SETUP button to exit
Figure 7. Activating The Center, Rear and Subwoofer Speakers
While remaining in the Speaker Setup function, use
the arrow buttons on the remote control to select the
amount of center and rear speaker delay desired.
Press the ENTER button on the remote control to
establish the final delay distance.
- -
22
Speaker Test
On: Plays a single tone in step-wise fashion at each
of the speakers in the clockwise direction.
Off: Test-Tone feature is not enabled.
Audio Setup
The Audio Setup menu allows you to access the
Digital Out, Dynamic Compress, and ProLogic
functions.
1. From the Main Menu use the arrows to highlight
“Setup Menu”
2. Press the Right arrow button to select “Setup
Menu”
3. Press the Down arrow button to highlight “Audio”
4. Press the ENTER button
5. Use the Up and Down arrows to move to the
desired function
6. Use the Right arrow to select the desired function
7. Use the Up and Down arrow to change the option
of each function
8. Once option is selected press the ENTER to save
selection
9. Press the left arrow to move back to function
select
10. Once all options are saved and changed to
desired functions press the SETUP button to exit
Digital Out Setup
In DVD playback mode, Digital Out refers to
bypassing the recorder system’s internal DACS and
instead feeding the digital audio signal to an external
receiver for better sound quality.
1. Use the arrow keys on the remote to select the
Digital Out function, and select one of the
following options.
2. Press the SETUP button on the remote to exit
and save the selection.
Figure 8. Establishing Center and Rear Speaker Delays
Center Delay function (Default=0-5ms): Increasing
or decreasing the delay setting in milliseconds
changes the virtual distance between the center
speaker and the listener. The resulting effect,
together with modifications to the rear delay, changes
the listening environment to simulate different
acoustical characteristics found in places such as
nightclubs, auditoriums, churches, stadiums and the
like.
Rear Delay function (Default=0-15ms): Increasing
the delay setting increases the virtual distance of the
rear speaker from the listener. The effect, in
combination with the center delay setting, changes
the listening environment to simulate different
acoustical characteristics such as nightclub,
auditorium, church and the like.
Analog: normal playback.
External Decode: Audio not decoded by recorder
system so this output is appropriate for an external
decoder/receiver with higher performance standards.
Internal Decode: Audio decoded by recorder system
and digital signal fed to the outside of the box
perhaps to be fed into an external receiver with better
DACS then this recorder system.
Dynamic Compression Setup
A FULL to OFF sliding control for dynamic range
allows you to turn down the level of loud passages
(explosions, car crashes and the like), while at the
same time keeping soft passages loud enough to
clearly hear them. The setting is expressed as a
fraction of the full dynamic range.
1. Use the arrow buttons on the remote to select
- -
23
the Dynamic Compression Setup function
2. Use the Down arrow to slide the control from
Full to Off based on your preference
3. Then press the SETUP button on the remote
to exit and save the selection.
When set to FULL, the range between the loudest
and softest is compressed to the maximum during
playback.
When set to OFF no compression occurs during
playback.
3. Use the Down arrow button to highlight “Record
Setup”
4. Press the ENTER button
5. Use the Up and Down arrows to move to the
desired function
6. Use the Up and Down arrows to change the
option of each function
7. Once option is selected press the ENTER to save
selection
8. Press the Left arrow button to move back to
function select
9. Once all options are changed to desired function
press the SETUP button to exit
Dolby ProLogic Setup
The Dolby ProLogic feature is a Dolby surround
sound audio format that can enhance standard
2-channel stereo program material.
1. Use the arrow buttons on the remote to select
the ProLogic function, and to turn the
function on and off.
2. Press the SETUP button on the remote to exit
and save the selection
When set to ON, 2-channel stereo audio output is
converted into six channel audio output.
Recording Quality
The quality of the recording to a DVD+RW/R disc
directly depends on the selection of the recording
mode. Decide on the quality of the recording you
want, taking into account the amount of playback
time each recording mode requires.
recording
quality
recording pels
Bit rate
per second
Recording
Time
Best
720X480 MPEG2
8 Mbit/s
70min
High
720X480 MPEG2
6 Mbit/s
90min
Medium
544X480 MPEG2
4 Mbit/s
133min
Basic
352X480 MPEG2
2.2 Mbit/s
231min
When set to OFF, the 2-channel stereo audio output
remains unchanged.
Selecting Best, for example, means one 80-minute recording
can go on the disc. On the other hand, that 80-minute
recording will be excellent in terms of its overall audio-visual
quality. Remember, recording times vary slightly from disc to
disc.
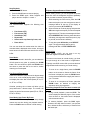
Starting the Recording Session
Auto Chapter
You can also determine how much time should be
allotted to every chapter of your recording, if desired.
Use the arrow keys on the remote control to navigate
through the chapters at playback time.
The Recording Setup menu is comprised of the
Recording Quality, Auto Chapter, Set Clock, and
Channel Select functions.
1. From the Main Menu use the arrow buttons to
highlight “Setup Menu”
2. Press the Right arrow button to view the Setup
Menu options
- -
24
Figure 9. Selecting Time Length For Each Chapter
1. From the Main Menu use the arrow buttons to
highlight “Setup Menu” and press the ENTER
button to select
2. Press the ENTER button to select “Record
Setup”
3. Use the arrows to highlight “Auto Chapter”
4. Press the ENTER button to select “Auto Chapter”
5. Use the Up and Down arrows to change the
setting
6. Once you have highlighted the setting you would
like press the ENTER button to save the setting
7. Press the SETUP to exit
Set Clock
The clock must be accurately set for timed recordings.
See page 20 for instructions.
5. When you are watching a source you would
like to record, press the REC button to start
recording. The message “RECORDING”
and a timer will be superimposed on the TV
screen.
6. Press the DISPLAY button to change the on
screen message.
7. During recording, press the
button to
pause the recording. The program playback
continues. Press the button again to resume
the recording.
8. Press the STOP button to end the recording
session. The message “CLOSING” will
appear on the screen, informing you the
recording session is ending. Wait a minute
or so for active disc title to return to your TV
screen.
Quick Recording
1. Once the disc is done loading press the
SETUP button to call up the main menu.
2. From the main menu use the arrows to
highlight “Record Program”
3. Press the Right Arrow button to select
“Record Program”
4. Use the Up and Down arrow buttons to
highlight “Quick Record” and press the
ENTER button to select “Quick Record”
Recording Functions
The DVD-Recorder offers three recording functions:
•
•
•
One Touch Recording allows you to record
TV programs as you watch them on your TV
screen.
Quick Record allows you to perform a
simplified unattended timer recording.
My Record List allows you to view all the
recordings that will be made onto the disk.
Note: Most prerecorded videocassettes and DVDs
are copy protected. If you try to copy them with the
DVD recorder, the Recorder display may show
“COPY PROTECT”.
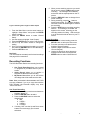
One Touch Recording
1. From the Main Menu use the arrow buttons to
highlight “Watch TV”
2. Press the ENTER button to select
3. Press the SOURCE button to select the
desired input
a. ANT
b. VIDEO 1
c. VIDEO 2
d. S-VIDEO
4. If viewing “ANT” use the Up and Down arrow
buttons to move through your channel
selections
- -
25
Figure 12. Selecting The Recording Day
Figure 10. Starting The Quick Recording
5. Use the arrows to highlight “Record Time” and
press the ENTER button to select “Record Time”
6. Use the Up and Down arrows to change the
“Hour”
NOTE: This is a 24 hour clock; please see the
chart on page 20 for assistance.
Figure 11. Selecting The Start and Stop Time
7. Once the “Hour” is set use the Right arrow key to
move to “Minute”
8. Continue to use the Up and Down arrows to edit
each field. Once the field is set use the Right
arrow key to move to the next field
9. Once “Done” is highlighted using the Right arrow
key press the ENTER button to go back to the
record menu
10. Using the arrows highlight “Frequency” and press
the ENTER button to select
11. Use the Up and Down arrows to change the “How
Often” field, once the field is set use the right
arrow key to move to “Continue” and press the
ENTER button. If “Once” was selected please
go to step “a” below. If “Repeat” was selected
go to “b” below.
a. Use the up and down arrows to change the
date in each field, once you have the correct
date use the right arrow button to move to the
next field. After all fields are correct please
highlight “Done” and press the ENTER
button.
b. Use the Right and Left arrows to move
between days and use the ENTER button to
select and deselect days. The check mark
means that you would like the unit to record
on that day. After all fields are correct
please highlight “Done” and press the
ENTER button.
12. Using the arrows highlight “Channel” and press
the ENTER button to select
13. Use the Up and Down arrows to select the
channel you would like to record from.
14. Use the Right arrow to highlight “Done” and press
ENTER to select
15. Use the arrows to highlight “Quality” and press
the ENTER to select
16. Use the Up and Down arrows to change quality to
desired setting, refer to table below
recording
quality
Best
720X480 MPEG2
bit rate
per second
8 Mbit/s
High
720X480 MPEG2
6 Mbit/s
90min
recording pels
recording
time
70min
Medium
544X480 MPEG2
4 Mbit/s
133min
Basic
352X480 MPEG2
2.2 Mbit/s
231min
Note: Recording times vary from disc to disc.
- -
26
3. Use the arrows to highlight the programmed
recording you would like to view once
highlighted press the ENTER to view
4. Press the SETUP to exit
Disc Play Operations
Basic Disc Play Options
The DVD-Recorder can format, erase, finalize and
rename a DVD+RW and DVD+R disc using the Disc
Operations menu functions.
1. Press the STOP button on the remote control
twice.
2. Press the SETUP button
3. Use the arrows to highlight “Play/Edit Disc”
and press the Right arrow to select
4. Use the arrows to highlight “Edit Disc” and
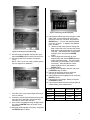
press the ENTER button to select
Figure 13. Selecting Recording Quality Mode
17. Once desired setting is chosen highlight “Done”
and press the ENTER to select
18. Use the arrows to highlight “Title” and press the
ENTER to select
19. To edit title press the ENTER
20. Use the arrows to move to each letter or number
and press the ENTER to select
21. Once all number and letters are entered highlight
Figure 14: The Disc Operation Menu
Formatting a Disc
This function is only available on DVD+RW discs.
“Done” and press the ENTER to select
22. Using arrows highlight “Done” and press the
ENTER
23. Look over all settings to verify that it is correct
and highlight “Done” and press the ENTER to
save this recording to memory.
My Record List
Use this function to see your record list on the DVD
recorder.
1. From the Main Menu highlight “Record
Program” and press the right arrow to select
2. Using the arrows highlight “My Record List”
and press the ENTER to select
1. From the Basic Disc Options menu (See
section Accessing Basic Disc Options”)
highlight “Format Disc”
2. Press the ENTER to select
- -
27
Figure 15: Formatting a Disc
Erasing a Disc
NOTE: ERASING ANY DISC IS AN IRREVERSIBLE
AND PERMANENT OPERATION! Be sure to back up
any and all titles or tracks you want to save onto
another disc before erasing the original disc!
The Erase Disc function is used to erase all data
from a disc. This function is only available on
DVD+RW discs. Once any disc is erased, whatever
was on it is permanently gone.
1. From the Basic Disc Option menu (See section
Accessing Basic Disc Options”) highlight “Erase
Disc”
2. Press the ENTER to select
3. You’ll be asked to confirm you want to erase the
disc. Select Yes, to proceed with erasing.
Once a DVD+R disc has been finalized, you cannot
either edit any of the titles on the disc, nor can you
add any new titles to the disc! The recorded DVD+R
disc is only available on other DVD player when the
disc has been finalized.
1. From the Basic Disc Options menu (see previous
page for directions on accessing Basic Disc Play
Options")
2. Select Finalize Disc then press ENTER
Renaming a Disc
1. From the Basic Disc Options menu (See section
Accessing Basic Disc Options”) highlight
“Rename Disc”
2. To edit disk title press the ENTER
3. Use the arrows to move to each letter or number
and press the ENTER to select
4. Once all number and letters are entered highlight
“Done” and press the ENTER to select
5. Once the “Disc Operations” menu appears on
screen press the SETUP button to exit
Renaming/Deleting a Title (DVD+RW Discs Only)
Accessing the Play/Edit Titles menu option from the
Menu lets you rename and delete titles as desired,
1. Press the TITLE button
2. Highlight title to change using the arrows and
press the DISPLAY on remote to select
3. Highlight desired option and press the ENTER to
select. If you choose TITLE RENAME go to
step A below. If you choose TITLE DELETE you
will be brought back to the title menu.
Figure 16. Erasing a Disc
Finalizing a Disc (DVD+R Discs Only)
When you want to finalize your recordings on a
DVD+R disc, use the Finalize Disc function. NOTE:
a. Use the arrows to move to each letter or
number and press the ENTER to select
- -
28
2. Use the arrows to highlight “DVD Control” and
press the ENTER to select
3. Use the arrows to highlight “Angle Mark” and
press the right arrow to select
4. Use the Up and Down arrows to highlight desired
choice and press the ENTER to select
Language Selection
1. From the Main Menu highlight “Setup Menu” and
press the Right arrow to select
2. Use the arrows to highlight “DVD Control” and
b. Once all number and letters are entered
highlight Done and press ENTER
press the ENTER to select
3. Use the arrows to highlight “Language
Preference” and press the right arrow to select
4. Use the Up and Down arrows to highlight desired
language and press the ENTER to select
Figure 17. Renaming and Deleting Disc Titles
Figure 18. Choosing Language Preference
Disc Playback
This section addresses basic playback for DVDs and
CDs.
Playing Back a Disc (DVD–CD)
1. Press the POWER button on the remote control
to turn the unit on from standby mode
2. Press the OP/CL button to open the DVD disk
tray loader
3. Place a DVD disk on the disk tray
4. Press the OP/CL button to close the DVD disk
tray loader. The player starts to play the first
selection recorded on the disc and continues
sequentially until the end is reached.
Pausing Playback
1. Press the
button any time during playback of
a disk. A “freeze frame” is created that stays on
the screen until you resume playing the disk.
Sound is muted during still playback.
2. To resume playback, press the
button again.
Fast Forward/Reverse Playback (x2 – x8 Normal
Speed)
1. Press or buttons during playback. After the
fifth press, normal speed playback resumes.
2. Alternately, press the PLAY button to resume
normal playback at any fast speed setting.
NOTE: In the event playback is not realized, check to
see if the parental controls are preventing playback.
Turn off the parental controls to realize disc playback
Angle Mark
1. From the Main Menu highlight “Setup Menu” and
press the Right arrow to select
- -
29
Stop Playback
1. Press the STOP button.
2. Press the PLAY button to resume playing.
3. Press the STOP again. When stopped, this
player returns to chapter 1 or track 1.
Using the Trick Modes
The DVD-Recorder supports the following trick
modes:
•
•
•
•
•
•
Fast forward (FF),
Fast reverse (FR),
Slow Motion (SF),
Repeat A-B,
Slow motion step frame-by-frame, and
Zoom In/Out
You can use these trick modes when live video or
recorded video is displayed on the screen, so long as
some amount of video has been stored in the circular
buffer.
Slow Motion
When video is stored in the buffer, you can select the
SLOW speed at any point by pressing the SLOW
button. You can continue to press the SLOW button
two times to parse the disk at 4x and 8x, before
returning to normal speed.
Fast Forward/Fast Reverse
Press the button to jump forward in discrete steps
of 2x, 4x, 6x, or 8x normal playing speed. The screen
will display the active fast forward speed (FF 2x, FF
4x, FF 6x, or FF8x).
Likewise, pressing the button will allow you to
jump backward in discrete steps. The screen will
display the active fast reverse speed (FR 2x, FR 4x,
FR 6x, or FR 8x).
Slow Motion Step Frame-By-Frame
Press the STEP button repeatedly to step through
frames one at a time during your playback session.
Press the PLAY button to resume normal viewing.
Repeat a Segment Between Points A and B
When viewing a DVD, you can designate two points
and then view the designated segment repeatedly
until you want to resume normal viewing.
1. While watching the DVD movie, press the A-B
button at the point you want a segment to start. A
message flashes at the top of the display to
confirm your action (A TO B SET A).
2. Allow the video to continue playing and press the
A-B button again at the point you want the repeat
segment to end. This time the message will flash:
A TO B REPEAT ON. Following these directions
will cause your segment to start from point A, play
to point B, and continue indefinitely.
3. To stop the repeat A-B mode, press REPEAT
again. The segment stops playing and a
message will flash: A TO B CANCELLED.
Zoom In/Out
When viewing a DVD, you can zoom in on any
particular segment or frame as desired.
To zoom out and return to normal viewing, you have
to cycle through all of the levels of magnification.
Typically, most DVD movies offer up to three levels of
magnification before returning to normal viewing.
1. To zoom in on a single frame, press the PAUSE
button on the remote to freeze the frame. Once
the frame is displayed, press the ZOOM button
on the remote as desired to magnify the frame on
your TV screen.
2. To zoom in on a sequence of frames, press the
ZOOM button as desired to magnify the
sequence during its progression.
Resuming Playback From The Same Location (all
discs)
1. During normal playback, press the STOP. The
screen displays a stationary logo or, if the screen
saver is set to on, the screen saver is displayed
after a timeout interval.
2. To resume playback, press the PLAY again.
However, this step does not work if you eject the
disc, reinsert the disc, and then try to resume from
the same spot.
- -
30
Locating A Specific Title Or Chapter Using The
MENU Button (DVD)
To play a specific chapter from a given title on a DVD
you can use the TITLE button to display a menu to
make your title and chapter selection.
The procedure described here is general in nature. If
the steps seem inappropriate for the DVD you are
attempting to play, disregard these instructions and
follow the instructions that appear on the screen.
1. During normal playback, press the TITLE button.
The screen displays the chapter menu of the
disc. The menu may not contain all the chapters
in the movie title. However, the disc creators
provide additional menus to navigate, which
cover all the chapters. Use the direction buttons
to navigate the menus.
2. Position the screen highlight over your selection
and press the PLAY. Alternately, you can press
the number of the desired chapter.
3. During playback, you can press the GOTO and
enter a chapter number. Press a number button
corresponding to the chapter number and press
the ENTER.
Repeating a Chapter Or Track (DVD–CD)
1. While playing a chapter, press the REPEAT. The
message CHAPTER REPEAT ON appears
2. To repeat the entire title, press the REPEAT
again. The message TITLE REPEAT ON
appears.
3. Press the REPEAT again to resume normal
playback. The message REPEAT OFF appears.
Zooming and Shift Point Function (DVD)
To zoom in x1.5, x2, or x3:
1. During normal or slow motion play, press the
ZOOM. The picture is magnified x1.5
2. To increase magnification press the ZOOM again
(x2) and again (x3)
3. Pressing the ZOOM again turns zoom off
4. While zoomed you can change the viewpoint by
pressing the direction buttons
CD Playback
The player will play all tracks for CD discs
continuously in default status. You can press buttons or number buttons to select a certain track.
MP3-CD Playback
When you have inserted a MP3 coded CD you see a
menu showing the folders on the CD. Use the
(direction buttons) to select the desired
folder, and then press the PLAY. Now the tracks
inside are displayed.
1. Press the direction button to open the folder.
Use these buttons to choose a song, then
start playback.
2. Press the STOP button to end the playback.
3. Press the REPEAT button to select various
repeat modes.
4. Press or to skip to the other song page.
Viewing JPEG Pictures
If you save JPEG pictures to a CD ROM you can view
them on a television monitor. The software that
created the JPEG picture CD creates a folder that
you can examine when you select Play Disc. There
are several ways of viewing the pictures.
Previewing Contents of a Folder
1. Open the disc tray, insert the JPEG disc and
close the tray
2. The disc contents are displayed (JPEGs may be
in a folder)
3. To preview a picture, use direction buttons to
move the highlight over a folder entry. The small
preview window reveals the contents of a clip
when the highlight is positioned over the clip title
4. To see a full screen view of the selected clip,
press the PLAY.
Depending on the way the Slideshow control is
conditioned; a slideshow may commence operation
as soon as you view the full screen presentation.
There are three slideshow modes: Sequential,
Random, and Manual. In Sequential mode, slides are
automatically presented in the order they appear in
the disc directory.
1. To cancel the slide show press the RESUME
(Slideshow) until the message NONE appears
2. To view a random slideshow press the RESUME
until the message RAND appears
To continue previewing clips press the STOP
Zooming a JPEG
You can enlarge a JPEG to see detail up close.
1. Position the highlight over a desired JPEG
2. Press the ZOOM button. The message ZOOM
ON appears
3. Press the button; the view enlarges to 150%.
- -
31
4. Pressing the button repeatedly steps through
150%, and 200%
5. To resume normal enlargement, press the ZOOM
again
Panning Around a JPEG
1. Follow usual procedure for playing a disc: Open
the disc tray, insert the JPEG disc and close the
tray
2. Select a JPEG for viewing
3. Press the ZOOM button
4. Use the direction buttons to pan up, down, left
and right.
Rotating a JPEG
1. Position the highlight over a desired JPEG.
2. Press the right or left direction button one time.
The displayed picture rotates 90 degrees to the
left or right depending upon the button pressed.
To continue rotating the picture, keep pressing
the direction button.
Special Features
Parental Controls
Use the Parental Control and Choose Rating
functions in the DVD Control Setup menu to block
playback of DVD disks that are not within the parental
settings chosen.
Figure 19. Invoking Parental Controls and password
protection
1. From the Main Menu highlight Setup Menu and
press the Right arrow button to select
2. Use the arrows to highlight DVD/Control and
press the ENTER to select
3. Use the arrows to highlight Parental Control and
press the ENTER to select
4. Use the arrows to move to each letter or number
and press the ENTER to select
5. Once all numbers and letters are entered
highlight Done and press the ENTER to select
NOTE: The factory default password is 3308. In
order to use a new password, the default password
must first be entered. A new password comprised of
a mixture of letters and numbers (ex. GB28MN0)
works best. If you decide to use passwords, keep a
written record of them! Keep the password list in a
safe place in your home, preferably something with a
lock on it.
- -
32
Helpful Hints
If you are having problems with your product, check this list of problems and possible solutions before
requesting service. You may be able to solve the problem yourself. If you need to call a customer service
representative, please know the model number and serial number of your product before you call. You can find
this information on the rear of the product. Also, please take a moment to identify the problem you are having,
and be prepared to explain this to the representative. If you believe the representative will need to help you with
operations, please stay near the product. Our representatives will be happy to assist you.
No Power
Press the ON/OFF switch on the front of the DVD Recorder to turn on the DVD Recorder.
Connect the supplied power cord securely to the AC power jack on the rear of the DVD-Recorder. Connect
the power cord firmly to an AC power outlet. Use only the supplied power cord.
Make sure the AC outlet has power by trying another appliance in the same outlet.
No Picture
Make sure the TV power is on.
Check the video cables. Make sure the cable(s) are fastened securely to the Recorder and the TV.
Set your TV to the correct Video In channel. These channels are usually near channel 00. Or, you may have
a button on the TV remote control that selects an Auxiliary or A/V IN channel. See your TV owner’s manual for
details. Or, change channels at the TV until you see the Recorder’s background picture on the TV screen. You
only need one video connection between the DVD Recorder and the TV.
Distorted Picture
Check the disc for fingerprints. Clean the disc with a soft cloth, wiping from the center to the edge in a straight
line.
Sometimes a small amount of picture distortion may appear. This is not a malfunction. The picture is
distorted; the picture is black and white during playback.
TVs have a color system standard, usually NTSC in the United States. If the disc’s color system is different
than your TV’s color system, the picture may be distorted or colorless.
The Recorder cannot record in color if the TV channel or source is not providing color. In some situations,
programs that are broadcast in black and white cannot be recorded.
Distorted Sound During Playback Through Your Stereo System
Do not connect any cables from the DVD-Recorder to the Stereo’s “PHONO IN” jack.
Do not connect a digital jack on the Recorder (DIGITAL AUDIO OUT - OPTICAL or COAX) to an analog jack
on the Stereo. (Analog audio jacks are usually labeled as such and are usually red and white.)
No Sound
Check the audio connections. Remember, you only need one audio connection. Make sure cables are
connected firmly to all equipment.
Select another channel, sound source, or Auxiliary station at your Stereo or TV. See your Stereo’s manual or
TV’s manual for details. Or, just continue selecting the different sound sources or modes on the Stereo or TV
until you hear sound from the disc that is in the DVD-Recorder.
Check your Analog output settings or Digital output settings. Make sure you choose the right setting; based
on what equipment you connected to the DVD Recorder.
Make sure your Analog output settings or Digital output settings match the capabilities of your Stereo Receiver
or TV.
- -
33
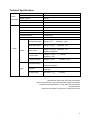
Technical Specifications
General
Specification
Operating voltage
AC 120~ /60Hz
Power consumption
≤45W
Weight (approx.)
9.92 lbs.
Dimensions
2.16” H x 17.06” W x 11.82” D
Operating Temperature
+2 ~+40
Color System
NTSC
Frequency Response
20Hz 20kHz ±2.5dB
Audio S/N Ratio
≥ 85dB (1kHz)
Audio Distortion + Noise
≤ -70dB (1kHz)
Channel Separation
≥ 70dB (1kHz)
Dynamic Range
≥ 80dB (1kHz)
Analog Audio Output
Voltage 2V±0.2
1.0
Digital Audio Output
Voltage 0.5Vp-p
Player
Output
Video Output
S-Video Output
Component Output
Composite Video In
Input
Impedance 10KΩ
Impedance 75Ω
Voltage 1Vp-p±0.2 Impedance 75Ω
Unbalanced Negative
Voltage Y 1Vp-p
C 0.286Vp-p
Impedance 75Ω
Voltage 0.7Vp-p
Out Level:1VP-P±0.2,
Impedance 75Ω
Load:75Ω
Unbalanced Negative
Out Level: Y: 1VP-P, C: 0.286VP-P
S-Video In
Load:75Ω
RF Signal Input
Out Level: Y: 1VP-P,
Load:75Ω
Manufactured under license from Dolby Laboratories.
“Dolby” and the double-D symbol are trademarks of Dolby Laboratories.
Confidential Unpublished Works. © 1992-1997 Dolby Laboratories.
All rights reserved.
Design and specifications are subject to change without notice.
- -
34
Frequently Asked Questions
1. How many shows can I record on a DVD?
a. The total number of shows that can be recorded onto a DVD disc directly depends on the selection
of the quality of the recording. See chart below: Keep in mind; disc recording times vary slightly
from DVD to DVD.
Recording
quality
Recording pels
Bit rate per
second
Recording
time
Best
720x480 MPEG2
8 Mbit/s
70 min
High
720x480 MPEG2
6 Mbit/s
90 min
Medium
544x480 MPEG2
4 Mbit/s
133 min
Basic
352x480 MPEG2
2.2 Mbit/s
231 min
2. The recorder is stopping and starting recording. What’s wrong?
a. If you receive a “Closing” message followed by a “Recording” message, it indicates the recorder has
run into a flaw on the disc. You’ll need to use a different disc to complete the recording. Always be
sure to use the highest quality discs. We recommend the following:
i. DVD+RW: Use Hewlett Packard®, TDK®, Memorex® or Maxell®
ii. DVD+R: Use Hewlett Packard®
3. How do I record video from my Camcorder onto a DVD?
a. Open drop down panel on the front left hand side of your Polaroid DVD player (under power button)
b. Plug in color coded composite cords
c. Turn on your camcorder and your Polaroid DVR
d. On the Polaroid DVD player remote control
i. Press the SETUP button
ii. Move the curser to the “Watch TV” option on the screen by using the arrow buttons on the
remote control.
iii. Press the ENTER button
iv. Press the SOURCE button on the remote control until you see Video 2 on your TV monitor
v. Press the PLAY button on your camcorder
vi. Press the REC button on the remote control
4. How do I edit a disc?
a. With the disc in the Polaroid DVR, press the STOP button on the remote control twice
b. Using the arrow keys on the remote move the curser to the “Play/Edit Disc” option
c. Press the ENTER button
d. Using the down arrow, select “Edit Disc”
e. Press the ENTER button
f. A menu with for options will appear
i. Format Disc
ii. Erase Disc
iii. Finalize Disc
iv. Rename Disc
g. Choose the Erase Disc option if you want to delete everything from the disk.
5. When searching for channels I don’t get anything. What’s wrong?
- -
35
a. The DVR 0800 tuner is not digital. If your system is either digital cable or satellite you’ll need to
control channels through the cable box or satellite, not the Polaroid DVR-0800.
6. The DVD I recorded won’t play on another DVD player.
a. First, check to verify you finalized the disc after recording. If you did and it still won’t play, it’s likely
a format problem. The DVR 0800 records in DVD+. Some DVD players are set up to read only
DVD- discs.
7. I want to add content to a DVD I already recorded something on. How do I do that without
overriding what I already recorded?
a. The DVR 0800 automatically starts a new title with each recording so you won’t override any content
already on the disc.
8. How do I override what I already recorded?
a. Erase the disc completely
i. With the disc in the DVD player Press the STOP button on the remote control twice
ii. Using the arrow keys on the remote move the curser to the “Play/Edit Disc” option
iii. Press the ENTER button
iv. Using the down arrow, select “Edit Disc”
v. Press the ENTER button
vi. A menu with for options will appear
1. Format Disc
2. Erase Disc
3. Finalize Disc
4. Rename Disc
vii. Choose the Erase Disc option if you want to delete everything from the disk.
b. Edit a title only
9. Is it possible to edit one specific title on a DVD disc?
a. Renaming or deleting an individual title on a DVD disc
i. With the disc in the DVD player Press the TITLE button on the remote control
ii. Using the arrow keys on the remote, highlight the title you wish to edit or delete
iii. Press the DISPLAY button on the remote
iv. A menu with for options will appear
1. Play title
2. Title rename
3. Title delete
4. Cancel
v. Using the arrows on your remote control, select the option you wish to employ
vi. Press the ENTER button
10. How do I hook up basic audio to my television
- -
36
Using the supplied audio cables, connect the AUDIO OUT jacks (LEFT/RIGHT) on the
unit with the AUDIO IN jacks (LEFT/RIGHT) on your Television set
a. Turn on the unit
b. Press the SETUP button
c. Press the Down arrow button three times to highlight “Setup Menu”
d. Press the Right arrow button once
e. Press the Down arrow button four times to highlight “Speaker”
f. Press the ENTER button
g. Press the Right arrow button once to select “Down Mix”
h. Press the Up arrow button twice to highlight “Lt/Rt”
i. Press the ENTER button to select “Lt/Rt”
j. Press the SETUP button to exit
11. The player isn’t playing.
The first thing to do is make sure that the disc cover is close and a disc is loaded. Other problems might
include the disc being loaded upside down or the disc is dirty or warped. Also check to see if the player’s
region code is the same region code of your DVD disc.
12. There’s no picture or sound…what’s wrong?
Check to see if your system connection is correct. Then check to see if your speakers have power. Other
problems might include the disc being loaded upside down or the disc is dirty or warped. Also check to see
if the DVD player’s region code is the same region code of your DVD disc. If that’s not it, make sure your
DVD player isn’t muted.
13. I can’t get a picture on the TV?
Make sure you check all connections, particularly the ones between your TV and the DVD player. If that’s
not the problem, check to see if your TV is turned on and is on the correct video setting. Also check to make
sure your TV and speakers work properly and that your TV is not muted. And make sure that the
progressive scan/interlace of the DVD player is set to match the display device. Press the PS button on the
remote control to shift between progressive scan and interlace mode.
14. OK, it’s playing but it keeps playing the same section over and over!
Is the DVD in A-B status? If it is, press the A-B button to cancel it. That should do the trick. Otherwise make
sure your disc is clean and not warped.
15. The picture moves up and down…
Check to make sure your signal system is correct.
16. High humidity has given my player some water condensation! What now?
It’s not the end of the world. Try taking out the disc and leave the player on for at least an hour. That should
dry things out enough for normal operation.
17. The remote control doesn’t seem to function.
Make sure you are pointing the remote directly at the remote sensor. The remote requires an unobstructed
line-of-sight “connection” to your DVD player to work properly. If that’s not the problem, make sure you have
new batteries in the remote and that the batteries are inserted correctly into the remote control.
18. Everything seems to work OK, but I’m not happy with the picture and sound performance…
Check your disc. Make sure it’s not dirty, warped or damaged. If you’re playing an MP3, make sure the files
were created with sufficient compression quality.
19. I’m getting a lot of static…what do I do now?
Optimal radio reception requires a correct antenna connection. Is yours connected correctly? Also make
sure your antenna fully extended and away from the system and other equipment. You can also try
unplugging your receiver to reset the player.
- -
37
Glossary
Artifacts:
An anomaly that occurs on a video image as a result of a problem in the film-to-video transfer. Often occurs
when trying to compress too much information on to the disc.
Aspect Ratio:
The width-to-height ratio of a television screen. Widescreen is 16:9, while the standard television aspect ratio is
expressed 4:3.
Audio Streams:
DVD has the ability to hold a maximum of eight audio streams on a single disc. Usually used for multiple
languages and/or the director’s commentary.
Camera Angles:
DVD can support up to nine different camera angles. Discs that include “angles” let you watch scenes from
different camera angles for a different prospective.
Chapters:
An easy way to organize what’s on your DVD. Just like in a book, DVDs are split into chapters for easy referral
and access.
Coaxial A/V Connection:
The traditional RF connection for a Video signal. All DVD Players will have a coaxial output for purposes of
hooking up to televisions without separate audio/video inputs.
Coaxial Connection:
A type of connection used for consumer digital audio, which uses an RCA jack. The coaxial cable is an
impedance-constant, two-conductor cable with either a stranded or solid core. For DVD digital audio, use a
coaxial cable that has an impedance of 75-ohms (with 75-ohm connectors).
Component Video:
Component video offers the highest video quality available on DVD. Component video is a 3-channel system
that is either RGB or color-difference. DVD component video is color-difference. Signals using color-difference
contain the color component of the picture minus the brightness component. Component video is often
regarded as being the next step beyond S-video that can be found on the majority of DVD players, the benefits
include improved color accuracy and less color bleeding.
Component Video Output:
3 RCA or BNC connectors for the transfer of Component Video signal to TV or projector.
Composite Video:
An analog signal that contains the combined signals for luminance (black and white) and chrominance (color)
components. This is the standard for broadcast TV, VHS and Laser disc.
All DVD players have this type of output. S-Video offers a better picture while Component video offers the best
picture quality.
Composite Output:
Traditional RF type signal. All DVD players have this type of output since not all TV's have S-video or
Component Video inputs.
Deleted Scenes:
Deleted Scenes are usually scenes that are removed from a program, for various reasons. Many times deleted
scenes are reinserted into the film and the film is then called a "director's cut" or an "extended cut".
Digital Comb Filter:
To produce highly accurate Chrominance and Luminance signal separation, the chrominance and luminance
signals are converted to a digital medium. This produces enhanced color purity and reduced dot craw.
- -
38
Digital Output:
The majority of all DVD players will have at least a coaxial or optical output for sending the Dolby Digital
bitstream to a Dolby Digital decoder. This decoder may be a stand-alone unit or built into a receiver.
Digital video:
A video signal represented by computer-readable binary numbers that describe colors and brightness levels.
Dolby Digital:
This proprietary technology is used to decode high-quality sounds from the DVD.
DVD:
Digital Versatile Disc, not Digital Video Disc.
Easter Eggs:
These are hidden features that many DVDs now contain and can usually be accessed via a hidden icon on a
menu.
Frame Rate:
Number of frames per second displayed in motion.
5.1:
The five indicates the number of sound channels available - in this case there would be front left and right, rear
left and right and centre. The number after the dot indicates sub-woofer support.
HDTV:
High Definition Television encompasses both analog and digital televisions that have a 16:9 aspect ratio and
approximately 5 times the resolution of standard TV (double vertical, double horizontal, wider aspect).
Horizontal Resolution:
The number of lines that run across the width of a TV. The bigger the number, the clearer the picture.
Standard VHS resolution - 220 horizontal lines
Laser disc - 425 horizontal lines
DVD - 480-500 horizontal lines
Layer:
All the information appearing on your screen is stored in layers. DVDs can be double sided (two layers).
Letterbox:
The use of upper and lower black mattes to keep films in their original aspect ratio.
Moire:
Circular lines that appear on television screens when they are filmed.
Optical Output:
In the case of DVD, this connection is used to connect the DVD digital output to a surround sound processor via
a TOSLINK cable to process DVD sound (Dolby Digital).
Parental Lock:
Allows users to block certain content
Pixel:
This is similar to PC monitors and measures the width by height of your display in pixels.
Progressive Scan:
A video scanning system that displays all lines of a frame in one pass as opposed to interlacing the lines
(alternating the lines, showing half of the picture each pass).
Regional Coding:
DVD players are hard-coded to accept DVDs that are only meant to be played within one of six designated
world regions. A Code 1 disc cannot be played in a Code 3 region for example. This technique was developed to
enable Hollywood companies to release movies at different times in different regions.
- -
39
The DVD regions are defined as:
Region 1 - United States of America, Canada
Region 2 - Europe, Greece, Turkey, Egypt, Arabia, Japan and South Africa
Region 3 - Korea, Thailand, Vietnam, Borneo and Indonesia
Region 4 - Australia and New Zealand, Mexico, the Caribbean, and South America
Region 5 - India, Africa, Russia and former USSR countries
Region 6 – People’s Republic of China
RGB:
Red, Green & Blue. A color model used in computer/monitor displays, in which different colors are specified
according to the combination of their red, green and blue components.
ROM:
Read Only Memory cannot be written to.
S-Video Output:
Unlike the RGB Component output, S-Video modulates the video signal in its separate parts -- chrominance
(color) and luminance (light and dark). This makes for a more precise, detailed picture than RF.
Surround Sound:
One of the most high-fidelity sound protocols available for the home user. Surround sound makes you feel like
you are in the middle of the picture. Also known as positional sound.
Y/C:
Another term for S-Video. The cable carries the luminance ("Y") and chrominance ("C") on separate channels.
- -
40