1
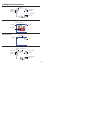
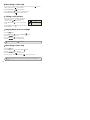
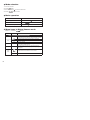
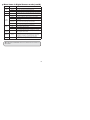
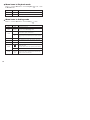
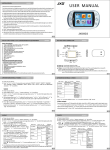
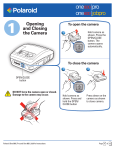
3.0 Megapixel Digital Video Camera
CAA-03040S
User’s Manual
20070110
Safety Notice:
1. Do not drop, puncture or disassemble the camera; otherwise the warranty will be voided.
2. Avoid all contact with water, and dry hands before using.
3. Do not expose the camera to high temperature or leave it in direct sunlight. Doing so may damage the
camera.
4. Use the camera with care. Avoid pressing hard on the camera body.
5. For your own safety, avoid using the camera when there is a storm or lightning.
6. Do not use batteries of different types. Doing so may lead to the potential for serious damage.
7. Remove the batteries during long periods between non-use, as a deteriorated battery may affect the
functionality of the camera.
8. Remove the battery if it shows signs of leaking or distortion.
9. Use only the accessories supplied by the manufacturer.
10. Keep the camera out of the reach of small children.
FCC Compliance Statement:
This device complies with Part 15 of the FCC Rules. Operation is subjected to the following two conditions:
(1) this device may not cause harmful interference, and (2) this device must accept any interference received,
including interference that may cause undesired operation.
This equipment has been tested and found to comply with limits for a Class B digital device, pursuant to Part
15 of the FCC rules. These limits are designed to provide reasonable protection against harmful interference
in residential installations. This equipment generates, uses, and can radiate radio frequency energy, and
if not installed and used in accordance with the instructions, may cause harmful interference to radio
communications.
However, there is no guarantee that interference will not occur in a particular installation. If this equipment
does cause interference to radio or television equipment reception, which can be determined by turning the
equipment off and on, the user is encouraged to try to correct the interference by one or more of the following
measures:
-Reorient or relocate the receiving antenna.
-Move the equipment away from the receiver.
-Plug the equipment into an outlet on a circuit different from that to which the receiver is connected.
-Consult the dealer or an experienced radio/television technician for additional suggestions.
You are cautioned that any change or modifications to the equipment not expressly approved by the party
responsible for compliance could void Your authority to operate such equipment.
*Environment:
Do not throw the appliance away with the normal household waste at the end of its life. Bring it to an official
collection point for recycling.
By doing this you will help to preserve the environment.
Loading the battery
Please use two AA batteries.
1. Slide open the battery compartment cover as indicated.
2. Load the batteries into the battery compartment with + and - ends correctly installed.
3. Replace the cover.
open
close
Inserting the SD/MMC card (optional)
1. Lift the SD card cover.
2. Insert the card in the direction of indication until it reaches the end of the slot.
3. When using a SD card, the built-in memory will become inaccessible.
4. To remove the SD card, gently push the card until it pops up.
The serial number of the file name (PICTxxxx) will be counted even after you delete
all your files on the SD card or insert a new one. If you want to restart the serial number,
please use the camcorder “Format” function to format the card.
3
Turning on the camcorder
Open the LCD panel.
OR
) for 3 seconds.
Press and hold down the Power button (
Turning off the camcorder
Close the LCD panel.
OR
Press and hold down the Power button (
Press the Power button (
) for 3 seconds.
) quickly will turn the video light on/off.
Setting Language
Power-on → Press the Mode button → Use the Zoom buttons (
(
) mode → Use the Zoom buttons (
Zoom buttons (
) to enter the Setting
) to select the Language (
) to select a suitable language and press the
ABC
) item → Use the
button to confirm.
Battery Life Indicator
Icon
Description
Full battery life
Moderate battery life
Low battery life
Empty battery life
Note: When your battery indicator reads “Low Battery Life” please replace the batteries.
4
Reading LCD indicators
Digital Camcorder mode:
Flash mode
Focus mode
Photo resolution
NightShot
1.1x
Zoom ratio
Smart Zoom
SD card inserted
Battery life
Number of pictures/files
Playback thumbnail mode:
Current/total recordings
Play mode
File type
Highlight box
Playback full mode:
Recording time
Play mode
Volume
Video REC mode:
Video light
mode
Recording time
Focus mode
Video resolution
NightShot
1.1x
Zoom ratio
Smart Zoom
SD card inserted
Battery life
Recording
5
Recording a video clip
1. Set the focus to an appropriate setting. Normally, you may set the focus to (
) only for close-ups.
filming conditions. Select (
2. Press the Record button (
3. Use the Zoom buttons (
4. Press the Record button (
) for most
) to start recording.
) to zoom in or zoom out the screen.
) again to stop recording.
Taking a still picture
1. Set the focus to an appropriate setting. Normally, you
may set the focus to (
) for most picture taking
conditions. Select (
) only for close-ups.
2. Use the Zoom buttons (
screen.
3. Press the Shutter button (
to take a still picture.
50cm ~
) to zoom in or zoom out the
30cm ~ 50cm
) on the top of the camera
Playing back your recordings
1. Press the
button.
2. Use the Zoom buttons (
3. Press the
4. Use the Zoom buttons (
5. Press the
) to select the Playback (
) mode.
button to enter.
) to shift between files.
button to review/play the file.
Press the Shutter button (
) to delete files.
Recording a voice clip
1. Press the
button.
2. Use the Zoom buttons (
3. Press the
) to select the Voice (
) mode.
button to confirm. (*)
4. Press the Record button (
) to start recording.
5. When you are done, press the Record button (
) again to stop recording.
When entering the Voice mode, the remaining recordable time will be displayed on
the LCD.
6
Connecting the camcorder to a TV
Connect your camcorder and TV via the accessory AV cable for real-time display. You can
display your video clips, still pictures, and audio recordings directly on your TV, sharing them
with your friends and family.
TV
AV-Mode
Video
Audio
TV
OUT
Earphone
1. Turn on your TV and switch the TV to the appropriate TV AV input mode.
TV systems are different for various countries. You may need to adjust the
TV-out setting, please refer to page 8 for more information. (Taiwan: NTSC;
America: NTSC; Europe: PAL; China: PAL)
2. Connect the audio and video ends of the AV cable to the TV.
3. Turn on the camcorder.
4. Connect the other end of the AV cable to your camcorder.
Connecting the camcorder to your PC
1. Turn on the camcorder.
2. Connect the camcorder to your computer by the USB cable.
The default is set to “Disk” mode. When connected to a PC, the camcorder will
automatically enter Disk (Removable disk) mode.
If you set the USB Mode to “Menu” mode, the following screen will appear.
Please select the desired connection mode.
If you would like to change the setting, please refer to page 9 for more
information.
7
Mode selection
1. Turn on the camcorder.
2. Press the
button.
3. Use the Zoom buttons (
4. Press the
) to select the desired item.
button to confirm.
Basic operation
How to...
Action
Move the highlight bar
Use the Zoom buttons (
Confirm an item
Press the
Exit menu/Go back to upper menu
Press the Mode/
) to move up or down.
button.
button (when in sub-menu).
Menu items in Digital Camera mode
Power-on → Press the
Item
Resolution
Selftimer
Option
On/Off
On
Off
Once the selftimer is turned on, the camcorder will have a ten
second delay before recording when the Shutter button is pressed.
The flash automatically fires when the lighting is insufficient.
The flash is forced to fire in every shot.
The flash is disabled.
* Two-in-One
On/Off
This setting allows you to combine two images taken individually
into one photo; a double exposure.
Histogram
On/Off
The real-time histogram displays the approximate luminance
distribution on the screen. You may adjust the exposure to gain
better picture.
* PhotoFrame
1 ~ 10
0
8
Description
Please refer to addendum for more information.
Auto
Flash
button.
This setting allows you to add customized frames to photos. 10
background frames are available on the LCD monitor.
The Photo-Frame function is disabled
Menu items in Digital Camera mode (cont’d)
Item
Video
Option
VGA
Description
Set the video resolution to VGA (640x480 pixels).
QVGA
Set the video resolution to QVGA (320x240 pixels).
Stabilizer
On/Off
Reduces blurry images in certain lighting conditions.
Smart Zoom
On/Off
This setting allows you to get a clearer image when using the zoom
buttons.
Auto
White
Balance
This setting is suitable for outdoor recording in sunny weather.
Cloudy
This setting is suitable for recording in cloudy weather or shady
environments.
Fluorescent
This setting is suitable for indoor recording with fluorescent lamp
lighting, or environments with high color temperature.
Tungsten
Normal
Effect
The camcorder automatically adjusts white balance.
Sunny
B&W
Classic
This setting is suitable for indoor recording with incandescent lamp
lighting, or environments with low color temperature.
Make recordings in natural color.
Make recordings in black and white.
Make recordings in sepia-toned color.
-2~+2
You may manually adjust the lightness or darkness of your image
by making changes to the exposure value; a positive makes it
lighter, a negative makes it darker.
NightShot
On/Off
This setting allows you to take a photograph with a dark
background. Since the shutter speed will slow down when taking
photographs in a dark place, we recommend using a tripod.
Video Light
On/Off
The setting allows you to add extra light when the lighting is
insufficient during recording video clips
Exposure
The Two-in-One and Photo-frame function will be disabled when the resolution is set
to 10M/12M.
9
Menu items in Playback mode
Power-on → Press the Mode button → Enter the Playback (
the Menu/OK button.
) mode → Press
Item
Option
Delete One
Yes/No
Delete current file.
Description
Delete All
Yes/No
Delete all pictures and video/audio files stored in the memory.
Menu items in Setting mode
Power-on → Press the Mode button → Enter the Setting (
Item
Option
Beep
On/Off
Flicker
50Hz/60Hz
Description
Enable beep sound on/off.
Set flicker frequency to 50Hz or 60Hz. For more information,
please refer to the “Flicker Settings” table.
NTSC
Set TV system compatibility to NTSC. This option is suitable for
America, Taiwan, Japan, and Korea areas.
PAL
Set TV system compatibility to PAL. This option is suitable for
Germany, England, Italy, Netherlands, China, Japan, and Hong
Kong.
TV-out
10
) mode.
Icon
On/Off
LCD Bright
0~4
Set LCD brightness. A greater value makes the LCD brighter;
while a smaller value makes the LCD dimmer.
Volume
0 ~ 10
Set the volume. (0: mute, 1-10 levels)
Format
Yes
Format the storage medium. Note that all files stored in the
medium will be gone.
The serial number of the file name (PICTxxxx) will be restarted.
No
Cancel action.
Auto Off
Off
1min/3min/
5min
Enable/disable OSD icons to display on the screen.
Set how long the camcorder will automatically shut down when
staying inactive. Setting to [Off] will make the camcorder stay
powered on until it runs out of power.
Menu items in Setting mode (cont’d)
Item
Option
Language
USB Mode
Description
Lets you select the language used for OSD.
Menu
When connected to a PC, the camcorder displays a menu for
you to choose a desired connection mode.
Camera
When connected to a PC, the camcorder automatically enters
Camera (PC camera) mode.
Disk
When connected to a PC, the camcorder automatically enters
Disk (removable disk) mode.
Start Movie
On/Off
Enable/disable the movie sequence when the camcorder is
powered on.
Default
On/Off
Restore factory defaults. Note that your current settings will be
overridden.
Flicker Settings
Country
England
Germany
France
Italy
Spain
Setting
50Hz
50Hz
50Hz
50Hz
50Hz
Russia
50Hz
Country
Portugal
America
Taiwan
China
Japan
Korea
Setting
50Hz
60Hz
60Hz
50Hz
50/60Hz
60Hz
Note: The flicker setting is based on the frequency standard of your local power supply.
11
Storage Capacity
VGA
QVGA
Audio (min.)
Maximum
SD/MMC card (128MB)
2
9
100
SD/MMC card (256MB)
5
18
200
SD/MMC card (512MB)
10
36
300
SD/MMC card (1GB)
20
72
400
Memory
Memory
Video (min.)
Still picture
5M
3M
1M
SD/MMC card (128MB)
200
350
800
SD/MMC card (256MB)
400
700
1600
SD/MMC card (512MB)
800
1400
3200
SD/MMC card (1GB)
1600
2800
6400
Note: The actual value of capacity may vary (up to ± 30%) depending on the
color saturation and complexity of your subject and surroundings.
“Polaroid” and “Polaroid and Pixel” are trademarks of Polaroid Corporation,
Waltham, MA, USA.
For service, support, and warranty information, visit www.polaroid.com.
12