1
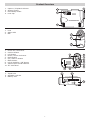
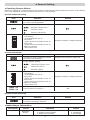
SPYPEN AIAS/ VIVA-DV1
User’s Manual
Product Overview
1.
2.
3.
4.
Capture / Playback Selector
Shutter button
Hand Strap holder
Lens Cap
4
1
2
3
1. Lens
2. Status LED
3. MIC
VIVA
DI
GI
T
AL
MERA
CA
1
F
3.
5
f= 8.5 m
m
2
3
1. Power On / Off button
2. Confirm button
3. Left button
4. Down / Zoom out button
5. Right button
6. Up / Zoom in button
7. Mode button
8. LCD & ICON On / Off button
9. Video output slot & USB slot
10. TFT LCD Panel
1
8
2
7
OK
6
5
VIDEO
OUT
4
3
10
1
1. Tripod hole
2. SD/MMC card slot
3. Battery door
9
2
TBA
3
2
Table of Contents
1 Getting Started....................................................................................................................... 4
• What can I do with my Camera? ............................................................................................ 4
• What can I do with my Digital Pictures?.................................................................................. 4
• What can I do with my Video clips ? ....................................................................................... 4
• Camera Package Contents .................................................................................................... 4
• Installing the batteries ......................................................................................................... 4
• Turning the Camera On and Off ............................................................................................ 5
2 Recording Video/Still Image/Audio ............................................................................................ 5
• Recording Video/Still Image/Audio ......................................................................................... 5
• Setting Picture Quality ......................................................................................................... 6
• Setting Self-timer ............................................................................................................... 6
• Using the SD (Secure Digital) Card or MMC Card ..................................................................... 6
3 Playback Video/Still Image/Audio .............................................................................................. 8
• Playback Video/Still Image using the camera LCD .................................................................... 8
• Playback Video/Still Image/Audio on TV.................................................................................. 9
• Play Slideshow .................................................................................................................. 10
• Protect the files................................................................................................................. 11
• Delete file ........................................................................................................................ 12
4 Camera Setting ....................................................................................................................
• Checking Camera Status ....................................................................................................
• Audio Beeper Information ...................................................................................................
• Turning the icon off and turn the LCD Off ..............................................................................
• Set White Balance .............................................................................................................
• Set Time ..........................................................................................................................
• Set Time Stamp (Still Image Only) ......................................................................................
• Set DPOF .........................................................................................................................
• Cancel DPOF .....................................................................................................................
• Set Anti-Flicker .................................................................................................................
13
13
13
14
14
14
15
15
16
16
5 Installing the Software onto a Computer ..................................................................................
• Install the software............................................................................................................
• Software included with your camera.....................................................................................
• Computer system requirements...........................................................................................
17
17
17
18
6 Transferring Pictures to Your Computer ....................................................................................
• Before you transfer pictures................................................................................................
• Connecting to your computer ..............................................................................................
• Transferring Picture(s), Audio Clip(s) and Movie Clip(s) From Camera to PC ...............................
• Transferring Picture(s), Audio Clip(s) and Video Clip(s) to MAC ................................................
• Capturing Live Video Using VideoImpression 1.6 (PC Only) .....................................................
18
18
18
18
18
19
7 Using the Camera as a Web Cam ............................................................................................. 20
• Setting up NetMeeting ........................................................................................................ 20
• Start NetMeeting ................................................................................................................ 20
8 Using the Camera as a PC Cam (PC only) ................................................................................. 20
• Setting to PC Camera......................................................................................................... 20
• Setting up PC Camera ........................................................................................................ 20
9 Using the Camera as a Mass Storage ....................................................................................... 21
• Setting Mass Storage to PC................................................................................................. 21
• Setting Mass Storage toMAC ............................................................................................... 21
10 How to Uninstall Digital Video Manager (PC) ............................................................................ 21
• How to Uninstall Digital Video Manager (PC).......................................................................... 21
11 Troubleshooting Problems ..................................................................................................... 22
• Troubleshooting ................................................................................................................ 22
12 Getting Help........................................................................................................................ 23
• Customer Support ............................................................................................................. 23
• ArcSoft Software Help ........................................................................................................ 23
13 Appendix ............................................................................................................................
• Technical Specifications ......................................................................................................
• Using your batteries ..........................................................................................................
• Tips, Your Safety & Maintenance..........................................................................................
• Regulatory Information ......................................................................................................
3
23
23
24
24
24
1 Getting Started
• What can I do with my Camera?
Capture
Enjoy point & shoot operation. Store pictures and video clips on the internal
memory or a SD/MMC Card.
Set Up
Select various camera settings.
Communicate
Use the camera as a web camera. (PC only)
• What can I do with my Digital Pictures?
View
View pictures on a computer using the Arcsoft®
Save
Save pictures to the computer memory by Mass Storage interface.
Communicate
Send the pictures over the Internet to family and friends.
Software supplied.
• What can I do with my Video clips ?
Playback
Playback video clips on a computer using the Arcsoft® Software supplied.
Save
Save video clips to the computer memory by Mass Storage interface.
Communicate
Send the video clips over the Internet to family and friends.
• Camera Package Contents
Lens Cap with
Strap
SPYPEN AIAS/
VIVA-DV1
Tripod
Pouch
Warranty Card
USB Cable
The CD-ROM includes
Digital Video Manager ( PC & Mac)
Microsoft® NetMeeting™(PC)
Adobe® Acrobat® Reader(PC & Mac)
User manual (PC & Mac).
AV Cable
• Installing the batteries
Hand Strap
1. Open the battery door at the bottom of the SPYPEN AIAS/ VIVA-DV1, follow the arrow direction.
2. Insert 2 x AA battery follow the polarity, showed in the battery compartment.
3. Close the battery door.
TBA
TBA
TBA
4
• Turning the Camera On and Off
For start with Capture Mode
1. Select the Capture/playback selector to Capture Mode
2. Pull left to open the LCD panel
3. Press and hold the Power On/Off button
until the LCD on
4. You will see “VIDEO” / ”STILL IMAGE” / ”AUDIO” / ”PC/MAC” on the
Display
For start with Playback Mode
1. Select the Capture/playback selector to playback Mode
2. Pull left to open the LCD panel
3. Press and hold the Power On/Off button
until the LCD on
4. You will see “VIDEO”/”STILL IMAGE”/”AUDIO” on the Display
To start capture or playback Video/Images, Please refer to Chapter 2 and Chapter 3.
2 Recording Video/Still Image/Audio
Note
Scene complexity affects a picture’s file size. For example, a picture of tree in autumn has a larger file size than a picture of blue sky at the same
resolution and quality setting. Therefore, the number of pictures and the length of the video clip you can store on the memory card and internal
memory may vary, and the image counter is for reference only. (i.e, may not deduce one by one)
• Recording Video/Still Image/Audio
Video
1. Select the Capture/playback selector to Capture Mode
2. Pull left to open the LCD panel
3. Press the Power On/Off button
until the LCD on
4. Press UP
and DOWN
button to select “VIDEO” on the LCD Display
5. Press OK Button
to confirm
6. Press UP
and DOWN
button to Zoom in and Zoom out
7. To start capture Video, press the shutter button fully down
8. Record time counter will show on the top right hand corner of the LCD
9. To stop capture Video, press the shutter button fully down again
Still image
1. Select the Capture/playback selector to Capture Mode
2. Pull left to open the LCD panel
3. Press the Power On/Off button
until the LCD on
4. Press UP
and DOWN
button to select “STILL IMAGE” on the LCD Display
5. Press OK Button
to confirm
6. Press UP
and DOWN
button to Zoom in and Zoom out
7. To start capture Still image, press the shutter button fully down to take a picture
Audio
1. Select the Capture/playback selector to Capture Mode
2. Pull left to open the LCD panel
3. Press the Power On/Off button
until the LCD on
4. Press UP
and DOWN
button to select “Audio” on the LCD Display
5. Press OK Button
to confirm
6. To start capture audio, press the shutter button fully down
7. Record time counter will show on the top right hand corner of the LCD
8. To stop capture audio, press the shutter button fully down again
Default----video
OK
MENU
Start A
5
• Setting Picture/Video clip Quality
1. Select the Capture/playback selector to Capture Mode
2. Pull left to open the LCD panel
3. Press the Power On/Off button
until the LCD on
4. Press UP
and DOWN
button to select “Video” or “Still Image” on the LCD Display
5. Press OK Button
to confirm
6. Press RIGHT button
7. Press UP
and DOWN
button and select “Quality”
8. Press RIGHT button
9. Press UP
and DOWN
button to set the Quality. ie Super Fine/Fine/Economy.
10. Press OK Button
to confirm Quality selected
11. Press LEFT button
to resume capture mode
Press
to pop out the menu.
Press
to return to the
Press
to select
previous screen.
item.
Main Menu
Default----video
Press
item.
to select
Press
to
OK
confirm the quality
and return to main
menu.
OK
MENU
Start A
Press Shutter down fully to
record; press shutter down
fully to stop.
• Setting Self-timer
Your Camera is designed with a self timer function which will allow you to take pictures with a 10 second
timer built in.
1. Select the Capture/playback selector to Capture Mode
2. Pull left to open the LCD panel
3. Press the Power On/Off button
until the LCD on
4. Press UP and DOWN button to select “VIDEO” or “STILL IMAGE” on the LCD Display
5. Press OK Button
to confirm
6. Press RIGHT button
7. Press UP
and DOWN
button and select “Timer”
8. Press RIGHT button
9. Press UP
and DOWN
button and select “ON” to activate self timer
10. Press
to confirm Self-timer activated
11. Press LEFT button
to resume capture mode
Press
to pop out the menu.
Press
to return to the
Press
to select
previous screen.
item.
Main Menu
Default----video
OK
Press
item.
to select
Press OK to select
the item and return
to main menu.
MENU
Start A
Press Shutter down fully
to record; press shutter
down fully to stop.
Remarks:
Press any button within the 10 second self-timer will disable the Self-timer function.
• Using the SD (Secure Digital) Card or MMC Card
Your camera comes with approximately 7MB of built-in flash memory for storing pictures/video clip/ audio.
You can expand memory using a commercially available SD Card/MMC Card. The camera senses whether a
memory card is inserted, and automatically saves pictures accordingly. Note that you can not save pictures
to built-in flash memory while a memory card is installed in the camera.
IMPORTANT!
• Make sure you turn off the camera before inserting or removing a memory card.
• Be sure to orient the card correctly when inserting it. Never try to force a memory card into the slot when you feel resistance.
• Though the camera also supports use of an MMC (MultiMediaCard) in place of an SD memory card, the data processing speed in the case of
an MMC is much slower than that for an SD memory card. Because of this , we recommend that you choose an SD memory card whenever
possible.
• SD memory cards have a write protect switch, which you can use to protect against accidental deletion of picture data. “Whenever you want
t orecord, format or delete item in the SD Card, you must disable write protection before any of above to action.”
6
Inserting the SD (Secure Digital) Card / MMC Card
Turn off the camera and open the SD card slot cover as illustrated. Insert the SD card/MMC Card, ensure the
card is inserted the correct position as illustrated, close the card door before using the camera.
TBA
TBA
TBA
Removing the SD (Secure Digital) Card/ MMC Card
To remove the SD card, turn off camera , open the SD card slot cover, gently use your finger to push the SD
card inwards and then release it for the SD card to bounce out of the SD card slot as illustrated.
TBA
TBA
TBA
IMPORTANT!
• Never insert any other object which is not SD Card or MMC Card into the camera’s card slot. Doing so creates the risk of damage to the camera
and card.
• Make sure that the terminals of the memory card is facing towards the front of the camera.
• Should water or any foreign object ever get into the card slot, immediately turn off the camera, remove the batteries or disconnect the AC
adaptor, and contact your dealer or nearest service provider.
• Never remove a card from the camera while the camera is powered on. Doing so can cause the picture record operation to fail, and even
damage the memory card.
Format the SD Card/MMC Card or the Internal Memory
Formatting a memory card will deletes all data already stored on it.
1. Select the Capture/playback selector to Capture Mode
2. Pull left to open the LCD panel
3. Press the Power On/Off button
until the LCD on
4. Press UP
and DOWN
button to select “VIDEO” or “STILL IMAGE” on the LCD Display
5. Press OK Button
to confirm
6. Press RIGHT button
7. Press UP
and DOWN
button and select “FORMAT”
8. Press RIGHT button
9. Press UP
and DOWN
button and select “YES” to format card(SD/MMC card) or format
memory(internal)
10. Press
to confirm Format
Press
to pop out the menu.
Press
to return to the
Press
to select item.
previous screen.
Main Menu
Default----video
Press
to select item.
YES
OK
It will return
to Main Menu
after formatting
card.
MENU
Start A
Press Shutter down
fully
to
record;
press shutter down
fully to stop.
Remarks:
When SD Card or MMC Card inserted, Internal Memory will be disable.
IMPORTANT!
• You can format a memory card on the camera or on a computer. However formatting a memory card on a computer takes much longer time.
• Note that data deleted by a format operation can not be recovered. Make sure you do not need any data currently stored on a memory card before
you format it.
• Formatting a memory card that contains pictures deletes all the pictures, even those that are protected.
Memory Card Precautions
1. Use only a SD memory card or a MultiMediaCard with this camera. Proper operation is not guaranteed
when any other type of card is used.
2. Electrostatic charge, electrical noise, and other phenomena can cause data to become corrupted or even
lost. Always make sure that you always back up important data on other media (MO disc, computer hard
disk, etc.).
3. If a memory card starts to behave abnormally, you can restore normal operation by reformatting it.
However, we recommend that you always take along more than one memory card whenever using the
camera far away from the home or office.
4. We recommend that you format a memory card before using it for the first time after purchasing it, or
whenever the card you are using seems to be the cause of abnormal pictures. Also format a memory
card if it was used in another digital camera or other device.
7
3 Playback Video/Still Image/Audio
Note:
There is no speaker built-in. Audio file or sound of Video clip cannot be playback by the camera.
• Playback Video/Still Image using the camera LCD
Playback Video on camera LCD
1. Select the Capture/playback selector to playback Mode
2. Pull left to open the LCD panel
3. Press the Power On/Off button
until the LCD on
4. Press UP
and DOWN
button to select “VIDEO” on the LCD Display
5. Press OK Button
to confirm
6. Press UP
and DOWN
button to select files you want to playback.
OR you can press the DISPLAY button
to show Thumbnails and use the four direction button to select
requested file.
7. Press
Button to confirm
8. The selected Video file shown in the LCD display
Press OK to play the VIDEO.
Press OK to stop.
Press
to view the files. Press
Default----video
item.
to select
VIDEO
OK
MENU
Start A
ERROR MESSAGE
Press
to show thumbnail.
Press
or OK to Start A
Playback still image on camera LCD
1. Select the Capture/playback selector to playback Mode
2. Pull left to open the LCD panel
3. Press the Power On/Off button
until the LCD on
4. Press UP
and DOWN
button to select “STILL IMAGE” on the LCD Display
5. Press OK Button
to confirm
6. Press UP
and DOWN
button to select files you want to playback.
OR you can press the DISPLAY button
to show Thumbnails and use the four direction button to select
requested file.
7. Press OK Button
to confirm
8. The selected image file shown in the LCD display.
Press
to view the files.
Default----video
Press
the files.
STILL
IMAGE
OK
MENU
Start A
to view
Start B
Start C
Press
to show
thumbnail or Full
screen.
ERROR MESSAGE
Press
or OK
to Start C
Remarks:
Since there is no built-in speak, audio playback can only be done by TV.
8
Press
item.
to select
• Playback Video/Still Image/Audio on TV
Playback Video on TV
1. Connect the SPYPEN AIAS/ VIVA-DV1 to the TV using the AV cable provided
2. Select the Capture/playback selector to playback Mode
3. Pull left to open the LCD panel
4. Press the Power On/Off button
until the LCD on
5. Press UP
and DOWN
button to select “VIDEO” on the LCD Display
6. Press OK Button
to confirm
7. Press UP
and DOWN
button to select files you want to playback. OR you can press the DISPLAY
button
to show Thumbnails and use the four direction button to select requested file.
8. Press OK Button
to confirm
9. The selected Video file shown in the TV
Note:
If the color of the TV screen is not correct, you have to adjust the “TV output” format.
10. Press
11. Press
12. Press
13. Press
14. Press
RIGHT button
UP
and DOWN
RIGHT button
UP
and DOWN
button to select “TV OUTPUT”
button to select NTSC/PAL
Press OK to play the VIDEO
Press OK to stop
Press
to view the files Press
Default----video
item.
to select
TV OUTPUT
VIDEO
OK
MENU
OK
Start B
Press
ERROR MESSAGE
It will return
view files
to show thumbnail.
Press
to
or OK to Start A
Playback Still image on TV
1. Connect the SPYPEN AIAS/ VIVA-DV1 to the TV using the AV cable provided
2. Select the Capture/playback selector to playback Mode
3. Pull left to open the LCD panel
4. Press the Power On/Off button
until the LCD on
5. Press UP
and DOWN
button to select “STILL IMAGE” on the LCD Display
6. Press OK Button
to confirm
7. Press UP
and DOWN
button to select files you want to playback. OR you can press the DISPLAY
button
to show Thumbnails and use the four direction button to select requested file.
8. Press OK Button
to confirm
9. The selected Image file shown in the TV
10. Press RIGHT button
11. Press UP
and DOWN
button to select “TV OUTPUT”
12. Press RIGHT button
13. Press UP
and DOWN
button to select “NTSC” or “PAL”
14. Press
Press
to view the files.
Press
to select
Press
the files.
Default----video
item.
STILL
IMAGE
OK
MENU
Start A
to view
Start B
Start C
Press
to show
thumbnail or Full
screen.
ERROR MESSAGE
Press
or OK
to Start C
9
TV OUTPUT
OK
It will return to view files
Playback Audio files on TV
1. Connect the SPYPEN AIAS/ VIVA-DV1 to the TV using the AV cable provided
2. Select the Capture/playback selector to playback Mode
3. Pull left to open the LCD panel
4. Press the Power On/Off button
until the LCD on
5. Press UP
and DOWN
button to select “AUDIO” on the LCD Display
6. Press OK Button
to confirm
7. Press UP
and DOWN
button to select files you want to playback.
OR you can press the DISPLAY button
to show Thumbnails and use the four direction button to select
requested file.
8. Press OK Button
to play the audio file
9. Press OK Button
to stop playing the file
Press OK to play the Audio.
Press OK to pause.
Press
to view the files.
Press
to view
the files.
Default----video
AUDIO
MENU
OK
Start B
Start A
Start B
ERROR MESSAGE
Press
to show
thumbnail.
Press
Start A
or OK to
• Play Slideshow
1.
2.
3.
4.
5.
6.
Select the Capture/playback selector to playback Mode
Pull left to open the LCD panel
Press the Power On/Off button
until the LCD on
Press UP
and DOWN
button to select “STILL IMAGE” on the LCD Display
Press OK Button
to confirm
Press UP
and DOWN
button to select files you want to playback.
OR you can press the DISPLAY button
to show Thumbnails and use the four direction button to select
requested file.
7. Press OK Button
to confirm
8. The selected image file shown in the LCD display
9. Press RIGHT button
10. Press UP
and DOWN
button to select “SLIDESHOW”
11. Press RIGHT button
12. Press UP
and DOWN
button to select ON
13. Press
14. The camera will Start to slideshow. It will stop by pressing
.
Press
to view the files.
Default----video
Press
the files.
Press
item.
to select
STILL
IMAGE
OK
MENU
Start A
to view
Start B
Start C
Press
to show
thumbnail or Full
screen.
ERROR MESSAGE
Press
or OK
to Start C
10
SLIDESHOW
ON
Start to Slideshow
( It will stop by
pressing OK )
• Protect the files
Remarks:
Lock function can only protect file from erasing. It can not protect the file if we format the memory card or the internal memory.
Lock one file
1. Select the Capture/playback selector to playback Mode
2. Pull left to open the LCD panel
3. Press the Power On/Off button
until the LCD on
4. Press UP
and DOWN
button to select “VIDEO/STILL IMAGE/AUDIO” on the LCD Display, depend on
what kind of files you want to protect
5. Press OK Button
to confirm
6. Press UP
and DOWN
button to select files you want to protect
7. Press RIGHT button
8. Press UP
and DOWN
button to select “LOCK”
9. Press RIGHT button
10. Press UP
and DOWN
button to select “THIS” to protect the selected file
11. Press OK button
to confirm protect selected file and return to previous screen. (It will UNLOCK THIS
file by pressing the OK button
again.)
12. A lock icon will so on the LCD, left of the picture no.
Press OK to play the VIDEO.
Press OK to stop.
Press
to view the files. Press
Default----video
item.
to select
LOCK
VIDEO
OK
MENU
THIS
Start A
Start B
Press
ERROR MESSAGE
Press OK to lock
this file and go to
next file. (It will
UNLOCK THIS file
by pressing
OK
again.)
to show thumbnail.
Press
or OK to Start A
Lock ALL files
1. Select the Capture/playback selector to playback Mode
2. Pull left to open the LCD panel
3. Press the Power On/Off button
until the LCD on
4. Press UP
and DOWN
button to select “VIDEO/STILL IMAGE/AUDIO” on the LCD Display, depend on
what kind of files you want to protect
5. Press OK Button
to confirm
6. Press UP
and DOWN
button to select files you want to protect
7. Press RIGHT button
8. Press UP
and DOWN
button to select “LOCK”
9. Press RIGHT button
10. Press UP
and DOWN
button to select “ALL” to protect all files
11. Press OK button
to confirm protect all files and return to previous screen. (It will UNLOCK ALL files
by pressing the OK button
again.)
12. A lock icon will so on the LCD, left of the picture no.
Press OK to play the VIDEO.
Press OK to stop.
Press
to view the files. Press
Default----video
item.
to select
LOCK
VIDEO
OK
MENU
Start B
ERROR MESSAGE
ALL
Start A
Press
to show thumbnail.
Press
or OK to Start A
11
Press OK to lock
all files and go to
next files. (It will
UNLOCK ALL files
by pressing
OK
again.)
• Delete files
To delete file inside the memory card or internal memory of SPYPEN AIAS/ VIVA-DV1.
Delete One file
1. Select the Capture/playback selector to playback Mode
2. Pull left to open the LCD panel
3. Press the Power On/Off button
until the LCD on
4. Press UP
and DOWN
button to select “VIDEO/STILL IMAGE/AUDIO” on the LCD Display, depend on
what kind of files you want to delete
5. Press OK Button
to confirm
6. Press UP
and DOWN
button to select files you want to delete
7. Press RIGHT button
8. Press UP
and DOWN
button to select “ERASE”
9. Press RIGHT button
10. Press UP
and DOWN
button to select “THIS” to delete the selected file
11. Press OK button
to confirm delete selected file and return to next file
Press OK to play the VIDEO.
Press OK to stop.
Press
to view the files. Press
Default----video
item.
to select
ERASE
VIDEO
OK
MENU
THIS
Start A
Start B
ERROR MESSAGE
Press
Press OK to erase
this file and go to
next file.
to show thumbnail.
Press
or OK to Start A
Delete ALL file
1. Select the Capture/playback selector to playback Mode
2. Pull left to open the LCD panel
3. Press the Power On/Off button
until the LCD on
4. Press UP
and DOWN
button to select “VIDEO/STILL IMAGE/AUDIO” on the LCD Display, depend on
what kind of files you want to delete
5. Press OK Button
to confirm
6. Press UP
and DOWN
button to select files you want to delete
7. Press RIGHT button
8. Press UP
and DOWN
button to select “ERASE”
9. Press RIGHT button
10. Press UP
and DOWN
button to select “ALL”
11. Press OK button
and then select YES for double confirm
12. Press
to process delete all files
Press OK to play the VIDEO.
Press OK to stop.
Press
to view the files. Press
Default----video
item.
to select
ERASE
VIDEO
OK
MENU
Start B
Start A
ALL
ERROR MESSAGE
Press
to show thumbnail.
Press
or OK to Start A
YES
Press OK to erase all files
and return to Start B.
12
4 Camera Setting
• Checking Camera Status
Switch the camera on, view the camera LCD screen to check which camera settings are active. If the feature
icon is not displayed, means that particular feature is not activated.
Preview-Video Recording
Icon
Function
Default
Counter, to show remaining space
for video recording MM:SS
Subject to the memory space left
Video Quality Setting
640x480 (Super Fine)
320x240 (Fine)
160x120 (Economy)
Show battery level:
-Full Battery
All segments are set on
-50% level
Frame and level indicator A are on
-25% level
Frame and level indicator A are on
-Battery is empty
Only frame is on
Subject to battery voltage detected
Preview-Still Image
Icon
Function
Default
Counter, to show remaining number
of pictures can be taken
Subject to the memory space left
Image Quality Setting
1280X1024 (Super Fine)
1280x1024 (Fine)
640x480 (Basic)
Show battery level:
-Full Battery
All segments are set on
-50% level
Frame and level indicator A are on
-25% level
Frame and level indicator A are on
-Battery is empty
Only frame is on
AMXX : XX
PMXX : XX
Subject to battery voltage detected
Time function is turned on
Off
Preview-Audio Recording
Icon
Function
Default
Counter, to show remaining space
for audio recording in MM:SS.
Subject to the memory space left
• Audio Beeper Information
Description
Beeper
Functions
Output
a. Confirmation of press / selection
b. Pressing wrong button
c. Battery-low warning
a. One Beep
b. Two Beeps
c. Four Beeps
Device
Electronic
Buzzer
13
• Turn the icon off and turn the LCD off
To turn the icon off, just simply press the DISPLAY button
once, press it again will turn off the LCD. To
turn on the display again, press DISPLAY button
one more time.
i.e. Press Display button
(Turn off ICON). Press Display button
(Turn off LCD display). Press Display
button
(Turn on ICON and LCD display)
• Setting White Balance
1. Select the Capture/playback selector to Capture Mode
2. Pull left to open the LCD panel
3. Press the Power On/Off button
until the LCD on
4. Press UP
and DOWN
button to select “VIDEO” or “STILL IMAGE” on the LCD Display
5. Press OK Button
to confirm
6. Press RIGHT button
7. Press UP
and DOWN
button and select “W.balance”
8. Press RIGHT button
9. Press UP
and DOWN
button to select the white balance setting you prefers
10. Press OK button
to confirm White Balance Setting selected and return to Main Menu
11. Press LEFT button
to resume Capture Mode
Press
to pop out the menu.
Press
to return to the
Press
to select
previous screen.
item.
Default----video
Main Menu
Press
item.
to select
OK
Press OK to select
the item and return
to main menu.
MENU
Start A
Press Shutter down fully to
record; press shutter down
fully to stop.
• Setting Time
1.
2.
3.
4.
5.
6.
7.
8.
9.
Select the Capture/playback selector to Capture Mode
Pull left to open the LCD panel
Press the Power On/Off button
until the LCD on
Press UP
and DOWN
button to select “VIDEO” or “STILL IMAGE” on the LCD Display
Press OK Button
to confirm
Press RIGHT button
Press UP
and DOWN
button and select “TIME”
Press RIGHT button
Press UP
and DOWN
button to adjust the number and press LEFT button
and RIGHT button
select next item
10. Press LEFT button
and RIGHT button
to select the field you want to adjust
11. Select “OK” and press OK button
to save the setting and return to main menu
12. Press LEFT button
to resume Capture Mode
Press
to pop out the menu.
Press
to return to the
previous screen.
Press
Default----video
item.
to select
Press
item.
to select
Press
to adjust the
number. Press
to next
OK
item. Select
“OK” and
press OK to select the item
and return to main menu.
MENU
Start A
Press Shutter down fully
to record; press shutter
down fully to stop.
Main Menu
14
to
• Set Time Stamp (Still Image only)
1. Select the Capture/playback selector to Capture Mode
2. Pull left to open the LCD panel
3. Press the Power On/Off button
until the LCD on
4. Press UP
and DOWN
button to select “STILL IMAGE” on the LCD Display
5. Press OK Button
to confirm
6. Press RIGHT button
7. Press UP
and DOWN
button and select “TIME STAMP”
8. Press RIGHT button
9. Press UP
and DOWN
button and select “ON” to activate Time Stamp
10. Press OK button
to confirm time stamp activated and return to main menu
11. Press LEFT button
to resume Capture Mode
Press
to pop out the menu.
Press
to return to the
previous screen.
Press
Default----video
item.
to select
Press
item.
to select
Press OK to select
the item and return
to main menu.
OK
MENU
Start A
Press Shutter down fully
to record; press shutter
down fully to stop.
Main Menu
• Set DPOF
NOTE:
• DPOF only available when SD Card or MMC Card is inserted.
• All DPOF files are protected. Users cannot delete them using the erase function.
1.
2.
3.
4.
5.
6.
Select the Capture/playback selector to playback Mode
Pull left to open the LCD panel
Press the Power On/Off button
until the LCD on
Press UP
and DOWN
button to select “STILL IMAGE” on the LCD Display
Press OK Button
to confirm
Press UP
and DOWN
button to select files you want to set DPOF.
OR you can press the DISPLAY button
to show Thumbnails and use the four direction button to select
requested file.
7. Press OK Button
to confirm
8. Press RIGHT button
9. Press UP
and DOWN
button to select “DPOF”
10. Press RIGHT button
11. Press UP
and DOWN
button to select “THIS” or “ALL”
12. Press
13. Press UP
and DOWN
button to select the number of copy you want
14. Press OK Button
to confirm DPOF format and reutn to main menu
Press
to view the files.
Default----video
Press
the files.
Press
item.
to select
DPOF
STILL
IMAGE
OK
MENU
Start A
to view
Start B
Start C
OK
ERROR MESSAGE
Press
to show
thumbnail or Full
screen.
OK
Return to view files.
Press
or OK
to Start C
15
• Cancel DPOF
1.
2.
3.
4.
5.
6.
Select the Capture/playback selector to playback Mode
Pull left to open the LCD panel
Press the Power On/Off button
until the LCD on
Press UP
and DOWN
button to select “STILL IMAGE” on the LCD Display
Press OK Button
to confirm
Press UP
and DOWN
button to select files you want to cancel DPOF.
OR you can press the DISPLAY button
to show Thumbnails and use the four direction button to select
requested file.
7. Press OK Button
to confirm
8. Press RIGHT button
9. Press UP
and DOWN
button to select “DPOF”
10. Press RIGHT button
11. Press UP
and DOWN
button to select “THIS” (If you want to cancel DPOF for all files, please select
“RESET” and then go to step 14.)
12. Press
13. Press UP
and DOWN
button to select the number of copy to “00”
14. Press OK Button
to confirm and reutn to main menu
• Set anti-Flicker
1. Select the Capture/playback selector to Capture Mode
2. Pull left to open the LCD panel
3. Press the Power On/Off button
until the LCD on
4. Press UP
and DOWN
button to select “VIDEO” or “STILL IMAGE” on the LCD Display
5. Press OK Button
to confirm
6. Press RIGHT button
7. Press UP
and DOWN
button and select “ANTI-FLICKER”
8. Press RIGHT button
9. Press UP
and DOWN
button to select the according frequency. ie. 50Hz/60Hz.
10. Press OK button
to confirm and return to main menu
11. Press LEFT button
to resume Capture Mode
Press
to pop out the menu.
Press
to return to the
previous layer.
Press
Default----video
item.
to select
OK
Press
item.
to select
Press OK to select
the item and return
to main menu.
MENU
Start A
Press Shutter down
fully
to
record;
press shutter down
fully to stop.
Main Menu
16
5 Installing the Software onto a Computer
• Install the software
PC
For Windows® Users:
IMPORTANT!
• MAKE SURE YOU INSTALL ALL THE SOFTWARE FROM THE CD SUPPLIED BEFORE YOU CONNECT YOUR CAMERA TO A COMPUTER AND
TRANSFER PICTURES FROM YOUR CAMERA TO THE COMPUTER.
• If the computer request you to insert the Windows set up CD during the software installation, place the windows CD into the
computer CD-ROM drive. The computer will install the necessary files from the CD automatically. After the installation is complete,
remove the Windows set up CD and store safely.
NOTE:
Microsoft® NetMeeting™ is already bundle with Windows® 2000 and XP OS. Users using Windows® 2000 or XP do not need to install this
software from the CD-Rom.
1. Before you begin, close all other software applications open on your
computer.
2. Insert the CD supplied into the computer CD-ROM Drive.
3. The CD User Interface Screen will automatically launch.
4. With the mouse, click on each software interface button in turn and follow
the on screen instructions.
Open & Close
NOTE:
If the setup screen doesn’t appear after loading the CD, then you can manually start it by double-clicking the
“My Computer” Icon on your desktop, then double-clicking the icon for the CD-ROM drive. When the CD-ROM
window opens, double-click the “INSTALL-E.EXE” icon.
For Macintosh® Users:
MAC
NOTE:
Digital Camera driver is no need for Macintosh. Therefore, Digital Camera Manager includes Arcsoft VideoImpression 1.6 only.
1.
2.
3.
4.
Before you begin, close all other software applications opened on your computer.
Insert the CD supplied into the computer CD-ROM Drive.
Double click the CD-ROM icon “Digital Video”.
Install the software included.
• Software included with your camera
The SPYPEN AIAS/ VIVA-DV1 software CD contains the following software:
Digital Video Manager
NOTE:
For PC, Digital Video Manager combines ArcSoft® VideoImpression 1.6 and Digital Camera Driver.
For MAC, Digital Video Manager includes ArcSoft® VideoImpression 1.6 only.
Easy to use, just plug the camera to a computer and use it as a removable disk. Use the Arcsoft
VideoImpression 1.6 software to create and edit new videos using existing video and images files – making
desktop video presentations for home, business, and the web.
ArcSoft VideoImpression™ 1.6 Movie Making Software
ArcSoft VideoImpression™ is an easy-to-use video and image editing software program. The program
enables users to create and edit new videos using existing video and image files - making desktop video
presentations for home, business, and the Web.
Microsoft® NetMeeting™ Web Cam software
NetMeeting™ provides the most complete conferencing solution for the Internet and corporate intranet.
Powerful features let you communicate with both audio and video, collaborate on virtually any Windowsbased application, exchange graphics on an electronic whiteboard, transfer files, use the text-based chat
program, and much more. Using your PC and the Internet, you can now hold face-to-face conversations
with friends and family around the world.
Adobe® Acrobat® Reader .PDF File Reading Software
Adobe® Acrobat® Reader lets you view and print Adobe Portable Document format (PDF) files on all major
computer platforms, as well as fill in and submit Adobe PDF forms online.
17
• Computer system requirements
For acceptable picture transfer and editing, we recommend the following minimum requirements:
For Windows® Users
For Macintosh® Users
PC
MAC
•
•
•
•
•
•
Mac® OS Version 9.2 or above
iMac / PowerMac G3 300MHz or higher
USB Port
64MB RAM (128MB recommended)
150MB Free disk space
Color monitor with high color (16-bit) graphic
capability or higher
• CD-ROM drive
• Standard mouse and keyboard
• Stereo speakers
• Compatible with Microsoft® Windows® 98SE, Me,
2000 or XP
• Pentium® II 333MHz or equivalent processor
• USB Port
• 64MB RAM (128MB recommended)
• 200MB free disk space
• Color monitor with high color (16-bit) graphic
capability or higher
• CD-ROM drive
• Standard mouse and keyboard
• Stereo speakers
6 Transferring Pictures To Your Computer
• Before you transfer pictures
IMPORTANT!
• Before you transfer your pictures make sure you have installed the software from the CD.
• On Windows 98SE, Mass Storage function needs to install the Digital Video Manager.
• Connecting to your computer
Connecting with the USB Cable.
OK
VIDEO
OUT
USB
• Transferring Picture(s), Audio Clip(s) and Movie Clip(s) From Camera to PC
1. Turn on the camera
2. Change to Capture
PC
mode if your camera is in Playback mode
3.
4.
5.
6.
Change to MASS STORAGE mode, by following the steps: PC/MAC -> PC-> MASS STORAGE
Connect the camera via the USB cable, the system will automatically recognize the Mass Storage drive.
PC will pump up the Mass Storage drive .
Please click the “Removable Disk” driver, you can get the photos and video clips that stored under
“DCIM” sub-folders.
7. You can either copy the “DCIM” or copy the specified photo files into the hard disk.
• Transferring Picture(s), Audio Clip(s) and Video Clip(s) to MAC
1. Turn on the camera
2. Change to Capture
MAC
mode if your camera is in Playback mode
3. Please change to MASS STORAGE mode, by following the steps: PC/MAC -> MAC->MASS STORAGE
4. Connect the camera with MAC via USB cable, the systems will automatically recognize the MASS STORAGE
drive
.
Note:
This Drive name will be varied from different version of MAC OS system.
5. Double-click the folder “untitled” to enter sub-folder “DCIM”.
6. You can copy the photo(s), audio clip(s) or video clip(s) that stored under “DCIM”
sub-folder.
18
• Capturing Live Video Using VideoImpression 1.6 (PC only)
IMPORTANT!
NetMeeting function or ArcSoft VideoImpression (live video) needs to install the Digital Video Manager.
1. Turn on the camera
2. Change to Capture
3.
4.
5.
6.
mode if your camera is in Playback mode
Please change to PC CAM mode, by following the steps: PC/MAC -> PC-> PC CAM
Run the “VideoImpression 1.6” and Click “New” to start
Click “Capture” to enter Capture Video mode.
User can get a “live” view from the screen.
Click this button to get a live view!
7. Make sure that “WWL 601 Camera” is selected in the pull down menu.
8. Click “Record” button to start recording video.
9. Click “Stop” button to stop recording.
10. User can play the video by clicking “Play” button.
Record button
Stop button
11. User can click “Save” button to save the video that already created.
12. Type the appropriate file name, path and then click “Save”.
13. Users can add the video clips into video templates by choosing “Yes”..
14. Enjoy your fun with SPYPEN AIAS/ VIVA-DV1 camera!
19
PC
7 Using the Camera as a Web Cam
• Setting up NetMeeting
NOTE:
Set the camera to Capture mode
Cam for more detail information.
and select PC Cam mode before starting NetMeeting™. Please refer to section 8 Using the Camera as a PC
1. Connect your SPYPEN AIAS/ VIVA-DV1 to the USB cable on one end.
2. Connect the USB cable to a USB port on your PC on the other end.
3. Put your SPYPEN AIAS/ VIVA-DV1 on top of your PC monitor or another flat surface.
4. Connect your microphone (not included) to your audio card’s external microphone connector.
• Start NetMeeting
NOTE:
For Windows XP / 2000 users who use NetMeeting for the first time , Go to Start -> Run ->type in “conf” ->click “OK” and then follow the onscreen set up instruction to set up NetMeeting.
1. Double click the “NetMeeting” icon on the desktop or select the “NetMeeting” icon from the Windows
Start Menu.
2. If you need further help on how to use Microsoft® NetMeeting™, select the “Help” under the menu bar
and choose the topic you need. You can also visit the website: http://www.microsoft.com/windows/
netmeeting.
VIVA
DI
GI
T
AL
MERA
CA
F
3.
5
f= 8.5 m
m
8 Using the Camera as a PC Cam (PC only)
IMPORTANT!
Before using the Web Cam function, make sure that your camera had been switched to PC Camera Mode. PC camera mode is not
supported by Apple Macintosh.
• Setting to PC Camera
1.
2.
3.
4.
5.
6.
7.
8.
Select the Capture/playback selector to Capture Mode
Pull left to open the LCD panel
Press the Power On/Off button
until the LCD on
Press UP
and DOWN
button to select “PC/MAC” on the LCD Display
Press OK Button
to confirm
Press UP
and DOWN
button and select “PC” to enter PC mode
Press UP
and DOWN
button to select “PC CAM” to the PC Camera on
Press
to confirm
PC-CAM
OK
MENU
OK
MENU
• Setting up PC Camera
1.
2.
3.
4.
Connect your camera to the USB Cable on one end.
Connect your USB Cable to USB Port on your PC on the other end.
Put your camera on the flat surface.
Open a PC Camera software then you can enjoy the conference.
20
Press OK to select
the item and return
to view.
9 Using the Camera as a Mass Storage
• Setting Mass Storage to PC
PC
Remarks:
1.
2.
3.
4.
5.
6.
7.
8.
The default setting of the camera is PC, Mass Storage.
Select the Capture/playback selector to Capture Mode
Pull left to open the LCD panel
Press the Power On/Off button
until the LCD on
Press UP
and DOWN
button to select “PC/MAC” on the LCD Display
Press OK Button
to confirm
Press UP
and DOWN
button and select “PC” to enter PC mode
Press UP
and DOWN
button to select “MASS STORAGE” to the Mass Storage on
Press
to confirm
PC-CAM
PC
OK
OK
Press OK to select
the item and return
to view.
MENU
MENU
• Setting Mass Storage to MAC
1.
2.
3.
4.
5.
6.
7.
MAC
Select the Capture/playback selector to Capture Mode
Pull left to open the LCD panel
Press the Power On/Off button
until the LCD on
Press UP
and DOWN
button to select “PC/MAC” on the LCD Display
Press OK Button
to confirm
Press UP
and DOWN
button and select “MAC” to enter MAC mode
Press
to confirm
PC-CAM
OK
MENU
PC
OK
MENU
Press OK to select
the item and return
to view.
10 How to Uninstall Digital Video Manager (PC)
• How to Uninstall Digital Video Manager (PC)
In order to completely uninstall Digital Video Manager, you need to uninstall digital camera driver and
ArcSoft VideoImpression 1.6 separately.
How to Uninstall Digital Camera Driver
PC
How to Uninstall ArcSoft VideoImpression 1.6
PC
1.
2.
3.
4.
5.
1.
2.
3.
4.
Click Window Start.
Go to Setting -> Control Panel
Double-click “Add or Remove Program”
Choose the “WWL 601 Camera” driver and Click “Change/Remove” to uninstall it.
Driver successfully uninstalled!!
Click Window Start.
Go to Setting -> Control Panel
Double-click “Add or Remove Program”
Choose the “ArcSoft Video Impression 1.6” and Click “Change/Remove” to uninstall it.
21
11 Troubleshooting Problems
• Troubleshooting
The troubleshooting guide is designed to help you. If problems continue, please call your local customer
support hot-line. See your registration card for hotline contact details.
Symptom
I receive an error message when I am
installing the Digital Video Manager.
Problem
Solution
Shut down all other applications and attempt to
reinstall the driver
Digital Video Manager does not load.
Check the USB controller in your BIOS if they are
activated. If these do not work, contact your national
Customer Support representative.
I cannot upload images to the PC.
Connection failure.
My SPYPEN AIAS/ VIVA-DV1 camera
can’t be recognized by the system.
Conflict with another
capture device.
camera
I press the shutter button and get no
response.
The SPYPEN AIAS/
processing the image.
VIVA-DV1
is
Wait for this process to complete and then take your
next image.
I get a blurred image when uploading my
images to my computer.
There may be a momentary delay between
pressing the shutter button and the actual
exposure.
Hold your SPYPEN AIAS/ VIVA-DV1 camera steady
until you hear a “beep” which indicates the exposure
is completed.
My SPYPEN AIAS/ VIVA-DV1 Camera
” and four beep
LCD displays show ”
sound will be heard.
This means there is insufficient power.
You need to replace the batteries.
My SPYPEN AIAS/ VIVA-DV1 Camera
hanged and all buttons do not work
Your camera may be affected by the
electrostatic discharge
Take out all the batteries and disconnect the camera
from the computer for 10 seconds. Re-insert the
batteries again.
I cannot upload files to the PC in Windows
98SE
On Windows 98SE, Mass Storage function
needs to install the Digital Video
Manager.
Please insert PLAWA CD and click Digital Video
Manager to install the driver.
There is no response in NetMeeting or
ArcSoft VideoImpression (live video) when
the camera is connected to the PC
NetMeeting
function
or
ArcSoft
VideoImpression (live video) needs to
install the Digital Video Manager
Please insert PLAWA CD and click Digital Video
Manager to install the driver.
REC mode is not selected in your SPYPEN
AIAS/ VIVA-DV1 Camera
Set the camera to REC mode before connecting to
your PC.
The auto installation file is switched to off.
Go to the computer desktop Right click on “My
Computer”.
Click
“Properties”.
Select
“Device
Manager”. Double click on “CD-Rom”, double click on
“CD-R” (Normally the manufacturer’s name). Click on
“ Setting . Ensure “Auto insert notification “ is ticked
and the “ disconnect “ is ticked. If you change the
settings the computer will ask you to restart your PC.
Click “ Yes “
The CD ROM is disconnected.
You can manually start it by going to the Windows
Desktop, double click “My Computer”, double click
your CD ROM icon and finally double click “INSTALLE.EXE” file.
I cannot upload the images from the
internal memory of the SPYPEN AIAS/
VIVA-DV1 camera to PC.
The SD Card/MMC Card is inserted inside
the SD Card/MMC Card slot.
The memory card with a higher priority than the
internal memory for image storage or image transfer
or delete.
I cannot switch on my SPYPEN AIAS/
VIVA-DV1 Camera after inserting a SD
Card/MMC Card .
The SD Card/MMC Card is not inserted
properly.
Make sure the SD Card/MMC Card is inserted all the
way in and close the slot door properly.
I press the shutter button and get no
response.
The SPYPEN AIAS/ VIVA-DV1 Camera is
processing the image.
Wait for this process to complete and then take your
next image.
The internal memory or SD Card/MMC
Card memory is full.
Delete some images in the internal memory of the
camera or SD Card/MMC Card
My CD installation wizard does not work.
Check all cables connections are secured.
driver
If you have another camera installed on your
computer, remove it and it’s driver completely from
your system to avoid conflicting with SPYPEN AIAS/
VIVA-DV1 or capture device.
Please also refer to the help files & User Guides that accompany the enclosed applications. For further
information and support, please visit our website: http://www.spypen.com & http://www.plawa-digital.com/
viva
22
12 Getting Help
• Customer Support
VIVA DV-1
plawa-feinwerktechnik GmbH & Co. KG
Bleichereistr. 18
73066 Uhingen - Germany
Helpline: +49 (7161) 93872-20 (English,
Deutsch)
Website: www.plawa-digital.com/viva
Email: [email protected]
SPYPEN AIAS
plawa-feinwerktechnik GmbH & Co. KG
Bleichereistr. 18
73066 Uhingen - Germany
Helpline: +49 (7161) 93872-0 (English, Deutsch)
Website: www.spypen.com
Email: [email protected]
• ArcSoft Software Help
For North America
ArcSoft HQ Support Center
(Fremont California, CA)
Tel: 1-800-762-8657
(toll free number)
Fax: 1-510-440-1270
E-mail: [email protected]
For South & Central America
Tel: 1-510-979+5520
Fax: 1-510-440-1270
E-mail:[email protected]
For China
ArcSoft China Support Center (Beijing)
Tel: 8610-6849-1368
Fax: 8610-6849-1367
E-mail: [email protected]
For Japan
ArcSoft Japan Support Center (Tokyo)
Tel: +81-03-3834-5256
Fax: +81-03-5816-4730
Web: http://www.mds2000.co.jp/arcsoft
E-mail: [email protected] and
[email protected]
For Oceania
ArcSoft Australian Support Center
(Baulkham Hills, New South Wales)
Tel: 61 (2) 9899-5888
Fax: 61 (2) 9899-5728
E-mail: [email protected]
For Europe/Middle East/
Africa & Rest of the World
ArcSoft Europe Support Center
(Ireland)
Tel: +353-(0) 61-702087
Fax: +353-(0) 61-702001
E-mail: [email protected]
Visit http://www.arcsoft.com for technical support and frequently asked questions (FAQ’s).
13 Appendix
• Technical Specifications
•
•
•
•
•
•
•
•
•
•
•
Sensor Size
Focus Range
Lens
Shutter Speed
Microphone
Display
Auto Power off
Digital Zoom
White balance
Exposure
I/O Port
• Memory
• Memory Priority
• Storable images
• Video
• Audio recording
• Battery
1/2” 1.3M pixel (1280 X 1024)
1.1m ~ Infinity
F 3.5 f=8.54mm (equivalent to 43mm of 35mm Camera)
1/4 ~ 1/1000 second, Auto control (electronic shutter)
Mono
1.7” TFT LCD Display
30 second
2X
Auto/sunlight/cloud/indoor selection
Auto
TV output
stereo minijack
Memory slot Secure Digital card slot
USB
Standard mini B type (v 2.0)
Internal
8MB NAND flash memory (approx. 7MB NAND flash for data
storage
External
Secure Digital card (compatibility test range :8~128MB)
1. External memory (SD card / MMC)
2. Internal memory, disable if SD memory card inserted.
(based on 8MB internal memory - Approximately 7MB Nand Flash for data
storage)
Super Fine resolution - Approximately 14 images at 1280 x 1024
Fine resolution - Approximately 34 images at 1280 x 1024
Economy resolution - Approximately 82 images at 640 x 480
(based on 128MB SD Card)
Super fine mode (8fps) - Approximately 7 minutes at 640 x 480
Fine mode (15fps) - Approximately 17 minutes at 320 x 240
Economy mode (15fps) - Approximately 56 minutes at 160 x 120
Approximately 10 minutes for internal memory of approximately 7MB Nand Flash
Type
Alkaline
Compatible with rechargeable NiMH
SIZE
AA
Quantity
2 pieces
23
• Power Management Normal Use
• Battery Life
30 seconds auto off.
Turn the camera into standby if no function is engaged over the time
length for Auto Off. This shall be applied to all modes this camera
has, except for PC mode
Low Battery When “empty battery” is turned on, camera must be disabled from
taking picture.
1.Approx. 60 minutes at video continuous recording and playback
mode
2.> 200 images (with LCD on) – using standard AA size fresh alkaline
batteries
• Using your batteries
IMPORTANT NOTE:
A fresh alkaline battery provides an output voltage of 1.5V whereas a rechargeable battery available in retail stores generally has a lower output
1.2V. In order to maximize the performance of your SPYPEN AIAS/ VIVA-DV1, we recommend that you do not use rechargeable batteries.
WARNINGS!
• Batteries should be replaced by an adult.
• Do not mix different types of batteries or new and used batteries.
• Use recommended or equivalent type of batteries only.
• Insert the batteries with the correct polarity.
• Remove exhausted batteries from the camera immediately.
• Do not short the supply terminals.
• Do not mix alkaline, standard (carbon-zinc), or rechargeable (nickel-cadmium) batteries.
• Do not dispose the batteries in fire.
• Remove batteries from the camera when not in use.
• Rechargeable batteries are not recommended.
These instructions should be retained for future reference.
• Tips, Your Safety & Maintenance
Your Camera should only be operated within the following environmental conditions;
• 41 - 104º Fahrenheit; 5 - 40º Celsius
• 20% - 85% relative humidity, non condensing
Battery life or image quality may be affected outside these conditions
•
•
•
•
•
Camera Cautions
NEVER immerse any part of the Camera or its accessories into any fluid or liquid.
ALWAYS disconnect the Camera from your PC or TV before cleaning it.
ALWAYS remove dust or stains with a soft cloth dampened with water or neutral detergent.
NEVER place hot items on the surface of the Camera.
NEVER attempt to open or disassemble Camera as this will affect any warranty claim.
• Regulatory Information
FCC Notice
This device complies with Part 15 of FCC Rules. Operation is subject to the following two conditions: (1)
This device may not cause harmful interference, and (2) This device must accept any interference received,
including interference that may cause undesired operation.
Warning: Changes or modifications to this unit not expressly approved by the party responsible for
compliance could void the user’s authority to operate the equipment.
NOTE: This equipment has been tested and found to comply with the limits for Class B digital device,
pursuant to Part 15 of the FCC Rules. These limits are designed to provide reasonable protection against
harmful interference in a residential installation. This equipment generates, uses and can radiate radio
frequency energy and, if not installed and used in accordance with the instructions, may cause harmful
interference to radio communications.
However, there is no guarantee that interference will not occur in a particular installation. If this equipment
does cause harmful interference to radio or television reception, which can be determined by turning the
equipment off and on, the user is encouraged to try to correct the interference by one or more of the
following measures:
• Reorient or relocate the receiving antenna.
• Increase the separation between the equipment and receiver.
• Connect the equipment into an outlet on a circuit different from that to which the receiver is needed.
• Consult the dealer or an experienced radio/TV technician for help.
Shielded cable must be used with this unit to ensure compliance with the Class B FCC limits.
Under the environment with electrostatic discharge, the product may malfunction and require user to reset
the product.
UK 1002
Part No.: OM837377 R1
Printed in China
© 2002 PLAWA
24