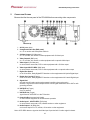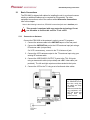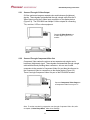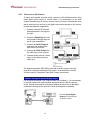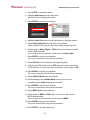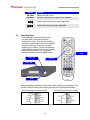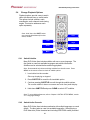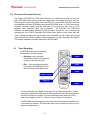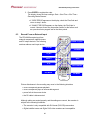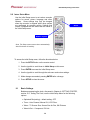
1
PRV-9000
DVD Recorder
Operating Instructions
Version 1.0
November 27, 2001
Pioneer Electronic Corporation
Pioneer Electronics (USA), Inc.
PRV-9000 Operating Instructions
This manual is copyrighted with all rights reserved. No part of this document may be reprinted, produced,
translated or utilized in any form or by any means now known or hereafter invented including, but not
limited to, any electronic, mechanical, photocopying and recording or information storage and retrieval
system means, without the express written permission from Pioneer New Media Technologies, Inc.
Every effort has been made to ensure that the information in this manual is accurate. Pioneer is not
responsible for printing or clerical errors.
Information in this document is subject to change without notice.
Copyright (c) – 2001/2002 Pioneer Electronics (USA), Inc.
Document Name: PRV-9000_OI
Printed in the United States of America.
Mention of third-party products is for informational purposes only and contributes neither an endorsement
nor a recommendation. Pioneer assumes no responsibility with regard to the performance or use of these
products.
No investigation has been made of common-law trademark rights in any word. Words that are known to
have current registrations are shown with an initial capital. Many, if not all, hardware and/or software
products referenced in this manual are identified by their trade names. Most, if not all, of these
designations are claimed a legally protected trademarks by the companies that make the product. It is not
Pioneer's intent to use any of these names generically and cautions the reader to investigate any claimed
trademark before using it for any purpose other than to refer to the product to which the trademark is
attached.
Equipment Copyright: This product incorporates copyright protection technology that is protected by
method claims of certain U.S. patents and other intellectual property rightws owned by Macrovision
Corporation and other rights owners. Use of this copyright protection technology must be authorized by
Macrovision Corporation, and is intended for home and other limited viewing uses only unless otherwise
authorized by Macrovision Corporation. Reverse engineering or disassembly is prohibited.
Audio and video recordings you make using this unit are for personal use only. You may not sell, lend or
rent your recordings.
Pioneer makes no warranty of any kind, expressed or implied, about the contents of this manual, the
merchantability of the product or the product's fitness for any particular purpose.
Every precaution has been taken in the preparation of this manual. Although we tried to thoroughly check
that all instructions and information in this manual are accurate and correct, Pioneer can not be and is not
responsible, in whole or in part, for any damage or loss to your data and/or equipment that results from
your use of this document or from any information contained herein including, but not limited to, any
errors, omissions or typos that may have resulted in an incorrect operation or installation.
- ii -
PRV-9000 Operating Instructions
FCC INFORMATION
The equipment described in this manual has been tested and found to comply with the limits for a Class B
digital device in accordance with the specifications in Part 15 of FCC rules. These specifications are
designed to provide reasonable protection against radio and television reception interference in a
residential installation. There is no guarantee that interference will not occur in a particular installation.
To determine if your unit is causing interference, turn the device OFF. If the unit is causing the
interference, try one or more of the following corrective measures:
•
•
•
•
verify the cables and connectors between components are shielded.
increase separation between the unit and components.
connect the changer into an outlet or circuit different from that which the components are
connected.
consult dealer or experienced radio/television technician for help.
The Federal Communications Commission offers a handbook that may help you with eliminating
interference. The handbook is titled Interference Handbook (stock number 004-000-00493-1) and may be
ordered from the U.S. Government Printing Office, Washington, D.C. 20402.
Warning: Any changes or modifications to this product that are not authorized by Pioneer could void the
FCC Certification and negate the user’s authority to operate the equipment.
DOC CLASS B COMPLIANCE
This digital apparatus does not exceed the Class B limits for radio noise emissions from digital apparatus
set out in the radio interference regulations of the Canadian Department of Communications.
SAFETY CAUTION
Care should always be taken when working with electronic devices. To protect you and your
system from damage or harm, it is important that you first read and then carefully follow the
instructions in this documentation. Take particular care to heed all warnings and cautions marked
on the unit and outlined in this document and the accompanying PRV-9000 Operating
Instructions. IGNORING ANY OR ALL INSTRUCTIONS AND WARNINGS MAY CAUSE INJURY TO
THE PERSON(S) OPERATING THE EQUIPMENT, DAMAGE TO THE PRODUCT OR BOTH.
IMPORTANT:
CAUTION
RISK OF ELECTRIC SHOCK
DO NOT OPEN
The lightening flash within an
equilateral triangle is intended to alert
the user to the presence of uninsulated “dangerous voltage” within
the product’s enclosure that may be of
sufficient magnitude to constitute a
risk of electric shock.
TO PREVENT THE RISK FO ELECTRIC
SHOCK, DO NOT REMOVE COVER (OR
BACK). NO USER-SERVICABLE
PARTS INSIDE. REFER SERVICING TO
QUALIFIED SERVICE PERSONNEL.
- iii -
The exclamation point within a
equilateral triangle is intended to alert
the user to the presence of important
operating and maintenance (servicing)
instructions in the literature
accompanying the equipment.
PRV-9000 Operating Instructions
Table of Contents
1
INTRODUCTION..................................................................................................................... 1
1.1 FEATURES ..........................................................................................................................1
1.1.1 Playback ................................................................................................................. 1
1.1.2 Recording................................................................................................................ 2
1.1.3 Video Input/Output .................................................................................................. 2
1.1.4 Editing ..................................................................................................................... 3
1.1.5 Compatibility ........................................................................................................... 3
1.2 BOX CONTENTS ..................................................................................................................3
1.2.1 Inserting Batteries in the Remote Control ............................................................... 4
1.2.2 Using the Remote Control....................................................................................... 4
1.3 MEDIA COMPATIBILITY .........................................................................................................5
1.3.1 DVD-Video Compatibility ........................................................................................ 6
1.3.2 Audio CD Compatibility ........................................................................................... 6
1.3.3 Video CD Compatibility ........................................................................................... 6
1.3.4 DVD Disc Box Information ...................................................................................... 7
1.3.5 DVD Region Codes................................................................................................. 8
1.4 RECORDING & EDITING LIMITATIONS ....................................................................................8
1.4.1 VR Mode ................................................................................................................. 8
1.4.2 Video Mode............................................................................................................. 9
1.4.3 Editing A DVD Recording........................................................................................ 9
1.4.4 On-Screen Icons ..................................................................................................... 9
2
CONNECTION OPTIONS..................................................................................................... 10
2.1 BASIC CONNECTIONS ........................................................................................................ 11
2.1.1 Connect to an Antenna ......................................................................................... 11
2.1.2 Connect to a TV for Disc Playback ....................................................................... 12
2.2 ALTERNATIVE CONNECTIONS (REAR PANEL).......................................................................12
2.2.1 Connect Through S-Video Output......................................................................... 13
2.2.2 Connect Through Component Video Out.............................................................. 13
2.2.3 Connect to an AV Receiver................................................................................... 14
2.2.4 Connect to Other A/V Sources – Satellite/Cable .................................................. 16
2.3 ALTERNATIVE CONNECTIONS (FRONT PANEL).....................................................................17
2.3.1 Connecting a VCR or an Analog Camcorder ........................................................ 18
2.3.2 Connecting a Digital Camcorder ........................................................................... 18
3
CONTROLS (REMOTE & PANEL) AND DISPLAYS ........................................................... 20
4
GETTING STARTED ............................................................................................................ 24
4.1 INITIAL SETUP ...................................................................................................................24
- iv -
PRV-9000 Operating Instructions
4.1.1
4.1.2
4.1.3
4.1.4
4.1.5
4.1.6
4.1.7
4.1.8
4.1.9
Set the Clock......................................................................................................... 24
Set the TV Aspect Ratio........................................................................................ 26
Set the Digital Audio Output.................................................................................. 27
Auto-Tune the Channels ....................................................................................... 29
Set Channels Manually & Channel Skipping ........................................................ 30
Assign Guide Channels for VCR Plus+ ................................................................ 31
Set the Remote to Control a TV............................................................................ 32
Additional Settings ................................................................................................ 33
Return to Default (Factory) Settings ..................................................................... 33
4.2 USING THE BUILT-IN TV TUNER ..........................................................................................34
4.2.1 Changing TV Channels......................................................................................... 34
4.2.2 Changing Audio Channels .................................................................................... 34
4.2.3 Displaying Program Titles & Channel Call Letters ................................................ 35
4.3 PLAYING DISCS .................................................................................................................36
4.3.1 Video (Mode) Playback Control ............................................................................ 37
4.3.2 VR (Mode) Playback Control ................................................................................ 37
4.3.3 CD and Video-CD Playback Control ..................................................................... 38
4.4 NAVIGATING DISCS ............................................................................................................38
4.4.1 DVD-Video Navigation .......................................................................................... 39
4.4.2 DVD-R/RW Navigation.......................................................................................... 39
4.4.3 CD and Video-CD Navigation ............................................................................... 40
4.4.4 DVD-Video Menu Navigation ................................................................................ 40
4.4.5 Video-CD Menu Navigation .................................................................................. 40
4.5 SCANNING DISCS ..............................................................................................................41
4.6 SLOW-MOTION PLAYBACK .................................................................................................42
4.7 FRAME ADVANCE/FRAME REVERSE PLAYBACK ...................................................................43
4.8 RECORDING OPTIONS .......................................................................................................44
4.8.1 VR Mode Recording.............................................................................................. 45
4.8.2 Video Mode Recording ......................................................................................... 46
4.8.3 TV Audio-Channel Recording ............................................................................... 47
4.8.4 Video Recording Restrictions................................................................................ 48
4.8.5 Content Protection for Recordable Media (CPRM)............................................... 48
4.8.6 Copyright Guideline .............................................................................................. 48
4.9 INITIALIZING A DISC ...........................................................................................................49
4.10 INITIALIZING RECORDING MODES .......................................................................................49
4.10.1 Initialize for VR Mode Recording .......................................................................... 50
4.10.2 Initialize for Video Mode Recording ...................................................................... 51
4.10.3 Setting the Recording Mode from the Front Panel................................................ 52
4.10.4 Adjusting the Audio Recording Level from the Front Panel .................................. 52
4.10.5 Recording from Broadcast Television ................................................................... 52
4.10.6 One Touch Recording........................................................................................... 54
-v-
PRV-9000 Operating Instructions
4.11 PLAYING A RECORDING ON A DVD PLAYER.........................................................................54
4.12 FINALIZE A DISC ................................................................................................................55
4.13 DISPLAY DISC INFORMATION ON-SCREEN ..........................................................................55
5.0 OTHER PLAYBACK FEATURES......................................................................................... 60
5.1 DISC SEARCHES ...............................................................................................................60
5.2 TIME & FRAME SEARCH GUIDELINES .................................................................................61
5.4 CHANGE PLAYBACK OPTIONS ............................................................................................62
5.4.1 Switch Subtitles..................................................................................................... 62
5.4.2 Switch Audio Channels ......................................................................................... 62
5.4.3 Switch Camera Angles.......................................................................................... 63
5.4.4 Set to Repeat Playback ........................................................................................ 64
5.5 CREATE A PROGRAM (PLAY) LIST.......................................................................................65
5.5.1 DVD Program List ................................................................................................. 65
5.5.2 CD Program List ................................................................................................... 67
6.0 RECORDING FUNCTIONS & OPTIONS ............................................................................. 70
6.1 TIMER RECORDING ...........................................................................................................70
6.1.1 Disc Timer Recording ........................................................................................... 72
6.1.2 Check Available Disc Space ................................................................................. 75
6.1.3 Check Timer Recording Details ............................................................................ 76
6.1.4 Edit Timer Recording Settings .............................................................................. 77
6.1.5 Extend a Timer Recording in Progress ................................................................. 77
6.1.6 Stop a Timer Recording in Progress..................................................................... 78
6.1.7 Cancel Timer Recording ....................................................................................... 78
6.2 VCR PLUS+ PROGRAMMING SYSTEM ...............................................................................79
6.2.1
VCR Plus+ Automatic Timer Recording ............................................................... 79
6.2.2
Program With VCR Plus+ When the Power is OFF ............................................. 81
6.3 RECORD FROM AN EXTERNAL INPUT ..................................................................................82
6.3.1 Record From an External Component .................................................................. 83
6.3.2 Record From A Digital Camcorder........................................................................ 84
6.3.3 Record From a Satellite Tuner.............................................................................. 85
6.3.4 Record From the DV Output Port.......................................................................... 86
6.4 RECORDER LOCK-OUT ......................................................................................................87
7.0 EDITING FUNCTIONS & OPTIONS..................................................................................... 88
7.1 GENERAL INFORMATION ....................................................................................................88
7.2 ADD CHAPTER MARKS ......................................................................................................89
7.3 EDIT WITH DISCNAVI.......................................................................................................89
7.3.1 Change the DISCNAVI Title Thumbnail................................................................ 90
7.3.2 Play A Chapter From DISCNAVI .......................................................................... 90
- vi -
PRV-9000 Operating Instructions
7.3.3
7.3.4
7.3.5
7.3.6
7.3.7
7.3.8
7.3.9
7.3.10
7.3.11
7.3.12
7.3.13
Create a Name For a Title .................................................................................... 91
Create a Playlist Title ............................................................................................ 91
Copy a Playlist Title .............................................................................................. 92
Move a Title/Chapter............................................................................................. 93
Combine Two Chapters In To a Single Chapter ................................................... 94
Erase a Title/Chapter ............................................................................................ 94
Add Part of a Title to a Playlist.............................................................................. 95
Erase a Part of a Title ........................................................................................... 96
Erase All Titles ...................................................................................................... 96
Protecting/Unprotecting an Original Title .............................................................. 97
Reverse an Edit .................................................................................................... 97
8.0 TITLE LIST MENU................................................................................................................ 99
8.1 ACCESS THE TITLE LIST MENU ..........................................................................................99
8.2 PLAY A TITLE FROM THE TITLE LIST MENU ..........................................................................99
8.3 NAME A TITLE FROM THE TITLE LIST MENU .......................................................................100
8.4 ERASE A TITLE FROM THE TITLE LIST MENU......................................................................101
9.0 INITIAL SETUP MENU ....................................................................................................... 102
9.1 BASIC SETTINGS .............................................................................................................102
9.1.1 Optimized Rec (default: OFF) ............................................................................. 103
9.1.2 Tuner Settings..................................................................................................... 103
9.1.3 Video Settings..................................................................................................... 103
9.1.4 Video In/Out Settings .......................................................................................... 104
9.1.5 Audio In Settings................................................................................................. 105
9.1.6 Audio Out Settings .............................................................................................. 106
9.1.7 Language Settings .............................................................................................. 108
9.2 ADVANCED SETTINGS ...................................................................................................... 110
9.2.1 Content Lock (a.k.a. Parental Lock).................................................................... 111
9.2.2 On Screen Display .............................................................................................. 112
9.2.3 Angle Indicator .................................................................................................... 112
9.2.4 Frame Search ..................................................................................................... 112
9.2.5 Navi Mark............................................................................................................ 113
9.2.6 Start Rec on DVD-R............................................................................................ 113
9.2.7 Chapter Interval .................................................................................................. 113
9.2.8 Remote Control Set ............................................................................................ 113
10 DISC SETUP MENU ........................................................................................................... 115
10.1 BASIC DISC SETUP.......................................................................................................... 115
10.1.1 Disc Timer Recording Function........................................................................... 116
10.1.2 Input Disc Name ................................................................................................. 116
10.1.3 Protect Disc......................................................................................................... 117
10.2 INITIALIZE DISC ............................................................................................................... 117
- vii -
PRV-9000 Operating Instructions
10.2.1 VR Format Disc................................................................................................... 117
10.2.2 Video Format Disc .............................................................................................. 117
10.3 FINALIZE DISC SETTINGS................................................................................................. 118
10.3.1 Finalize Disc........................................................................................................ 118
10.3.2 Undo Finalized Disc ............................................................................................ 118
10.4 VIDEO ADJUST MENU ...................................................................................................... 119
10.4.1 Set Picture Quality for Tuner and External Inputs............................................... 119
10.4.2 Create Personalized Settings ............................................................................. 120
10.4.3 Set Noise Reduction for Recording..................................................................... 121
10.4.4 Set Picture Quality for Disc Playback ................................................................. 122
11 ADDITIONAL INFORMATION ............................................................................................ 124
11.1 INSTALLATION & MOVING HINTS .......................................................................................124
11.2 ON-SCREEN MESSAGES..................................................................................................125
11.3 LANGUAGE CODE LIST ....................................................................................................126
11.4 DISC-HANDLING GUIDELINES ...........................................................................................128
11.5 SCREEN SIZES & DISC FORMATS .....................................................................................128
11.6 GENERAL MAINTENANCE ISSUES .....................................................................................129
11.6.1 Cleaning Pickup Lens ......................................................................................... 129
11.6.2 Clearing Condensation ....................................................................................... 130
11.7 GENERAL SPECIFICATIONS ..............................................................................................130
11.8 BRIEF GLOSSARY ............................................................................................................130
12 TROUBLESHOOTING........................................................................................................ 133
12.1 GENERAL ISSUES ............................................................................................................133
12.2 TIMER RECORDING ISSUES ..............................................................................................133
12.3 DV RECORDING ISSUES ..................................................................................................134
12.4 DV EDITING ISSUES ........................................................................................................135
12.5 FREQUENTLY ASKED QUESTIONS (FAQ) ..........................................................................135
- viii -
PRV-9000 Operating Instructions
1
INTRODUCTION
The Pioneer PRV-9000 Pro DVD-Video Recorder is a stand-alone set-top unit that can
make DVD-Video discs with the press of a single button and creates the disc in real time.
Anyone familiar with the operating of a VCR can easily operate the PRV-9000, making the
creation of compatible DVD-Video discs as quick and easy as recording videotape.
Recordings are made using either write-once DVD-R or re-recordable DVD-RW discs that
are compatible with most DVD-Video players and DVD-ROM drives.* In DVD-Video
mode, maximum program capacity is either one hour or two hours per disc, and up to 99
separate video segments (titles) can be recorded. The PRV-9000 Pro DVD-Video
Recorder can automatically generate a DVD title menu that can be used to access any
recorded title on a DVD-R compatible DVD-Video player similar to how movie titles are
used. Analog and digital A/V inputs allow easy connection to both legacy and current
video sources. The recorder outputs include component, Y/C and composite video signals.
The unit can also play DVD-Video discs (read-only), DVD-R and DVD-RW media, as well
as CD-Audio and Video CD discs(read-only), CD-R and CD-RW media.
*Note: DVD-R media is compatible with most DVD-Video players and DVD-ROM drives.
DVD-RW media is also compatible with many players and drives when using DVD-Video
mode. In either case, users should confirm playback compatibility with the target player
model or computer system prior to purchase.
1.1
Features
1.1.1
Playback
The following points summarize playback features.
Progressive Scan Compatible
Compared to standard interlaced video, progressive scan effectively
doubles the amount of video information fed to your television or
monitor. The result is a stable, flicker-free image.
Note: Check with the monitor manufacturer for Progressive Scan compatibility.
Cinema Surround Sound
Connect the PRV-9000 to a Dolby Digital-compatible amplifier/receiver
to enjoy full surround sound effects from DVD discs with Dolby Digital.
Search Functionality
Unlike video tape that needs to be wound to the correct place, you can
jump to the right part of the DVD disc. Search to a title, a chapter or to
a specific time on a disc.
Disc Navigator (VR mode)
Use the Discnavi (Disc Navigator) to find your way around and edit a
disc. This feature displays a still frame (picture) from each title, or an
image from a chapter within a title, as a visual reminder of that portion
of the disc contents.
1
PRV-9000 Operating Instructions
1.1.2
Recording
The following points summarize the recording functions.
Program up to 8 Timed Recordings
Program the PRV-9000 to record up to eight events, up to a month in
advance, using the VCR+Plus system. In addition to recording single
programs, you can specify daily or weekly recordings too.
One-Touch Recording
Use the one-touch recording feature to start a 30-minute recording
block immediately. The recording time is extended another 30-minutes
each time the one-touch button is pressed.
Disc Timer Recording (VR mode)
Instead of storing a timer program in the recorder’s memory, program a
disc for a timed recording. The timer is automatically set when the disc
is loaded. This is a great function for recording a regular weekly
program on a single disc.
Optimized Recording (VR mode)
Optimized recording adjusts the playback quality/recording time
automatically if a timer recording is too long for the available disc space.
High Quality 16-bit Linear PCM Audio
When using one of the high-quality settings in VR mode, the audio is
recorded in the uncompressed 16-bit Linear PCM format. This format
delivers clear audio to accompany the high picture quality.
Picture Quality Adjustments
During playback or recording, you can adjust various quality settings to
improve the picture. For example, to copy an old video tape to DVD,
optimize the picture quality before transferring it to disc.
Manual Level Recording (VR mode)
While the standard mode allows up to two hours of recording to a disc,
using the manual mode allows the picture quality to be adjusted down to
add recording time. There are a total of 32 recording rates with the
lowest picture quality giving up to 8 hours of recording time per disc.
Auto-Recording from Satellite Receiver or Other Set-Top Systems
Connecting a satellite receiver or a set-top box to the recorder’s Line
2/Auto Rec inputs provide automatic starts and stops synchronized to
the timer settings on the receiver or the set-top box.
1.1.3
Video Input/Output
The PRV-9000 has a built-in DV (Digital Video) input/output jack for directly
connecting a digital video camera to the unit. Simply transfer the footage to
the unit and edit your video. DVD content may also be transferred back to the
DV camera.
2
PRV-9000 Operating Instructions
1.1.4
Editing
The following points summarize the editing functions.
Safe, Non-Destructive Editing (VR mode)
When editing a DVD-RW disc, the original content on the disc is left
untouched. The edited version (Playlist content) points to your selected
areas on the original disc content.
Chapter Marking (VR mode)
Use the chapter marks that were automatically inserted during recording
for edits.
Add, Move and Delete Parts (VR mode)
Parts are segments that make up a title. Parts, or video scenes,
inserted into the Playlist, can be moved or deleted. The original content
is unaffected, just the segments on the playlist are affected.
1.1.5
Compatibility
DVD-Video is a new recording format agreed upon by the DVD Forum in the
year 2000. There may be some issues playing a recordable DVD (DVDR/RW) disc in some players. The following points provide general
compatibility information.
Play Video-format recordings on a DVD player (Video mode)
Discs formatted and recorded using the Video mode can be played back
compatible DVD players and drives.
Some older players may fail to play back the DVD-R/RW format.
DVD-Video playback may require additional software to function
properly.
Note: Some symptoms include an unreadable TOC (Table of Contents) from a disc,
video artifacts, playback freezes, audio and/or video dropouts. Pioneer suggests
addressing problems to the manufacturer of the playback device.
1.2
Box Contents
Thank you for buying the Pioneer PRV-9000 DVD recorder. Please check for the
following accessories included with your product.
Remote control
Power cord
AA/R6P dry-cell batteries (2)
Pioneer DVD-RW disc (blank media)
Stereo Audio cable (red/white)
Operating Instructions
Video cable (yellow)
Warranty card
RF Antenna cable
3
PRV-9000 Operating Instructions
1.2.1
Inserting Batteries in the Remote Control
Follow the directions to insert the provided batteries in to the remote control.
1. Open the battery compartment on the back of the remote control.
2. Insert two AA/R6P batteries in to the compartment following the
positive/negative indicators within the chamber.
3. Close the cover.
Installing the batteries incorrectly can result in damage to the batteries and
the remote control. Damaged batteries may leak or burst. Please observe
the following guidelines:
Avoid mixing new and old batteries - replace all batteries
simultaneously.
Use batteries of the same voltage.
Align batteries according to the charge symbols (+, -) shown within the
compartment.
Remove batteries from a disused remote control (idle for a month or
more).
Dispose of batteries according to the manufacturer’s recommendations.
1.2.2
Using the Remote Control
When using the remote control, follow these guidelines.
Avoid using a remote control if there is direct sunlight or strong
fluorescent light shining directly on the unit’s sensor.
Confirm that there are no obstacles between the remote control and the
sensor on the recorder.
Avoid using remotes for other equipment located close to the recorder.
Replace the batteries if there is a falling off of operating range.
Use the remote within the operating range/angle shown below (Fig 1-1).
30º
30º
7m
Figure 1-1: operating range for the remote control
4
PRV-9000 Operating Instructions
1.3
Media Compatibility
Differences between DVD-R and DVD-RW discs is that DVD-R is a record-once
medium for Video formatting only while DVD-RW is an erasable/re-recordable
medium for both the Video and VR formats. A DVD-RW disc may be erased and
reused approximately 1,000 or more times.
DVD-R discs work in many manufacturers’ DVD players and drives when the disc
is finalized. This finalizing process locks in the contents and adds information to
let other DVD devices recognize the disc as a DVD-Video disc. Check with the
product manufacturer for DVD-R compatibility.
Depending upon the recording method and the particular DVD player/drive,
playback of DVD-RW media is possible. Only DVD playback devices that are
specifically compatible with DVD-RW recognize this type of media. Look for the
RW-compatible logo on all playback devices.
Note: Damaged or dirty DVD-R/RW and CD-R/RW discs may fail to play back. Also,
dirt, smears or condensation on the player’s lens may also cause faulty playback.
A disc with one or more of the following logos is playable on the PRV-9000:
Note: The RW compatibility symbol (
) indicates that the device recognizes
material recorded on a DVD-RW VR-formatted disc.
The PRV-9000 records to DVD media only, CD-R and CD-RW can be read but
not written to. Other formats such as DVD-RAM, DVD-ROM, CD-ROM, SACD
and Photo CD are incompatible with this device.
Many functions depend upon the selected recording mode on the recorder and
the recording format on the disc. One or more of the following symbols appear
throughout this manual to help identify recording compatibility.
5
PRV-9000 Operating Instructions
Note: When a disc is created in a compatible format, the settings on the recording
application may still cause playback failures.
1.3.1
DVD-Video Compatibility
The compatible DVD-Video format supports the following functions:
Single-sided or double-sided discs
Single Layer or dual-layer discs
Dolby Digital, DTS, MPEG or Linear PCM digital audio
MPEG-2 digital audio
DVD-Video discs are divided into one or more titles. Each title may be
divided into smaller sequences called chapters (Fig 1-2).
Figure 1-2: Titles and Chapters
1.3.2
Audio CD Compatibility
The compatible Audio CD format supports the following functions:
12cm (5”) or 8cm (3”) discs
Linear PCM digital audio
CD-Audio, CD-R or CD-RW formats
(plays CD-R/RW discs recorded in CD Audio/Video CD format or with MP3 audio files)
Note: Audio CDs are divided into tracks rather than titles and chapters.
1.3.3
Video CD Compatibility
The compatible Video CD format supports the following functions:
12cm (5”) or 8cm (3”) discs
MPEG-1 digital audio
MPEG-1 digital video
Like Audio CDs, Video CDs are divided into tracks (Fig 1-3).
Figure 1-3: Video CD tracks
6
PRV-9000 Operating Instructions
1.3.4
DVD Disc Box Information
The following information can be found on the side of DVD media. If the
information is missing, contact the manufacturer of the disc (Fig 1-4).
1
2
3
4
5
Figure 1-4: Information available from the side of DVD media case, box or jacket
Reading from left to right:
1 – Audio Language and Audio Formats
DVD-Video discs may have up to eight soundtracks consisting of
languages and/or music. The first track on the list is the original
soundtrack.
Dolby Digital:
Dolby Digital is the most widespread DVD-Video audio format. These
soundtracks may be mono, stereo, or up to 5:1 channels (surround
sound) with the 1 referring to a special low-frequency effects channel.
DTS:
DTS is another 5:1 channel surround format used on some DVD-Video
discs, often in addition to Dolby Digital.
Linear PCM:
Linear PCM audio may be on some DVD-Video discs, usually with musicrelated materials. PCM is mono or stereo channels only.
2 – Subtitle Languages
DVD discs may have up to 32 subtitle streams however, subtitles are not
mandatory.
3 – Screen Aspect Ratio
Movies are filmed in a variety of screen formats. The box is marked with
the original format (example shows Cinemascope) and provides a
recommendation for best viewing (example shows 16:9, LetterBox).
4 – Region Code and TV Format
The world is divided in to six DVD regions with two additional region
codes; region 7-reserved and 8-international venues (airplanes, cruise
ships, etc.). For additional information on region codes, refer to the DVD
FAQ website - http://dvddemystified.com/dvdfaq.html#1.10
5 – DVD-Video logo
6 – Angle Mark ( )
Some DVD-Video discs provide scenes filmed simultaneously from two or
7
PRV-9000 Operating Instructions
more angles. Discs with multiple angles support switching between views
during playback.
1.3.5
DVD Region Codes
All DVD Video discs carry region mark on the case indicating the region(s) of
the world where the disc may be played. The PRV-9000 also has a region
code printed on the rear panel. The codes on the discs and this unit must
have a matching code in order to function. Discs marked with ALL play on
this device.
1.4
Recording & Editing Limitations
There are two recording modes on the PRV-9000, VR mode and Video mode.
When recording to DVD-R, set the unit to Video mode only. DVD-RW media
supports both Video and VR modes. Many functions are dependent upon the
recording method.
One or more of the following symbols appear throughout this manual to help
identify recording compatibility.
For more information, please refer to Chapter 4: GETTING STARTED, section
4.8 Recording Options.
1.4.1
VR Mode
The VR mode (Video Recording) is a subset of the Video mode. While Video
mode allows video viewing and minimal navigation, VR mode provides
advanced playback options and menu creation. When selecting the VR
mode, refer to these guidelines.
Two play modes: Standard Play (SP) or Manual (MN)
Multiple picture quality/recording time settings
– SP mode has two different settings available
– MN mode has 32 different settings available
Incompatible with DVD set-top players
Recordings may be extensively edited
8
PRV-9000 Operating Instructions
1.4.2
Video Mode
When selecting the Video mode, refer to these guidelines.
Two picture quality/recording time settings
Compatible with many DVD devices when the disc is finalized
Limited editing ability
1.4.3
Editing A DVD Recording
Traditionally, editing a VCR/VHS videotape requires two tape decks, one
deck to play back the original tape and a second unit to record the changes.
DVD recording allows you to make a Playlist of what to play and when to play
it, leaving the original material intact (Fig 1-5). The PRV-9000 recorder plays
back the disc according to your Playlist selections.
Figure 1-5: Original content > edited Playlist
Throughout this manual, the word, Original, refers to the actual content while
the word, Playlist, refers to the edited version.
1.4.4
On-Screen Icons
While using the PRV-9000 recorder, a <disc> icon or a <player> icon may
appear on-screen. The <disc> icon means that the disc blocks the requested
function and the <player> icon means the recorder blocks the function.
Disc blocks function:
Recorder/Player blocks function
9
PRV-9000 Operating Instructions
2
CONNECTION OPTIONS
Become familiar the rear panel of the PRV-9000 before connecting other components.
1 - AC IN (power inlet)
2 - Component Video Out (BNC ports)
to a TV or monitor with Component Video In
3 - S-Video Output 1 (S-Video port)
to a TV ,monitor, AV receiver or other equipment with S-Video Input
4 - Video Output 2 (BNC port)
to a TV ,monitor, AV receiver or other equipment with composite Video Input
5 - Video Input 1 (S-Video port)
to record from a camcorder, VCR or other equipment with a S-Video output
6 - Video Input 2/AUTO REC* (BNC port)
to record from a camcorder, VCR or other equipment with a composite video output
7 - Digital Out Optical
to an AV receiver, Dolby Digital/DTS decoder or other equipment with Optical Digital Input
8 - Digital Out Coaxial (RCA pin)
to an AV receiver, Dolby Digital/DTS decoder or other equipment with Coaxial Digital Input
9 - Signal Gnd
recorder may fail under certain environmental conditions (excessive noise)
terminal is a ground for when multiple devices cause signal interference but is NOT a safe
grounding terminal
10 - VHF/UHF In (F-type)
from TV antenna
11 - VHF/UHF Out (F-type)
signal from the VHF/UHF In to the TV/monitor
12 - Control In/Out (monaural mini jacks)
to other Pioneer equipment for unified remote operation
13 - Audio Input 1, 2/AUTO REC* (RCA pins)
to record from a camcorder, VCR, satellite receiver or other equipment
14 - Audio Output 1, 2 (RCA pins)
to the audio inputs of a TV, monitor, AV receiver or other equipment
Note: AUTO REC detects a signal at the Video Input 2 port but fails if a video signal is absent.
10
PRV-9000 Operating Instructions
2.1
Basic Connections
The PRV-9000 is shipped with cables for installing the unit in your home however
existing or additional cables may be required for full operation. For other
equipment connections, refer to the section entitled Alternative Connections
later in this chapter.
Note: In the following instructions, PRV-9000 connections/jacks are in boldface print.
This recorder is equipped with copy-protection technology. Do not
use AV cables to connect this unit to a TV via a VCR.
2.1.1
Connect to an Antenna
Connect the PRV-9000 to the antenna in order to record TV programs.
1. Connect the antenna cable to the VHF/UHF In port on the rear panel.
2. Connect the VHF/UHF Out port to the VCR’s antenna input jack using a
RF antenna cable (not provided).
If a VCR is unnecessary, connect to the TV’s Antenna In jack.
3. Connect the VCR’s antenna output to the TV’s antenna input using your
existing RF antenna cable.
4. Connect the VIDEO/AUDIO OUTPUT 2 ports to the TV’s AV inputs
using a stereo audio cable (not provided) and a BNC video cable (not
provided). The left and right outputs must be matched to the inputs.
5. Connect the VCR to the TV using a set of audio and video cables.
Before plugging in
the PRV-9000 for the
first time, verify that
all cables are firmly
connected.
Before disconnecting
any equipment, turn
OFF the power and
unplug from any
power sources.
11
PRV-9000 Operating Instructions
2.1.2
Connect to a TV for Disc Playback
Connect the PRV-9000 to your TV or monitor to watch DVD discs. Using the
following setup allows sound to play through the television speakers.
1. Connect Video Output 1 to the TV’s Video In jack using the provided
video cable.
2. Connect Audio Output 1 Left/Right to the TV’s Stereo Audio Inputs
using the provided stereo audio cable.
2.2
Alternative Connections (Rear Panel)
Alternative connections encompass video and audio sources. The following
diagrams are only setup suggestions for common types of products. Your
equipment and setup may differ.
Note: For high-quality playback, consider sending audio and video signals through an
AV receiver/amplifier.
Video – The PRV-9000 has standard (composite) S-Video and component
video outputs. The type of video effects the picture quality. S-Video delivers
a better picture then Composite Video while Component Video provides the
best picture. The variety of outputs provides flexibility for connecting a wide
range of products.
A/V Amplifier – To enjoy multi-channel surround sound, connect an AV
amplifier/ receiver using either digital optical output or coaxial output.
Connect through one of outputs, it is unnecessary to use both outputs
simultaneously to achieve surround sound. Pioneer recommends using
stereo analog as well as one of the digital connections through an AV receiver
for best disc playback compatibility.
Other AV Sources – The PRV-9000 has three audio/video input ports, two
sets on the rear panel and one set under a panel on the front of the unit.
These connection points currently support VCRs, satellite tuners and
camcorders.
12
PRV-9000 Operating Instructions
2.2.1
Connect Through S-Video Output
S-Video carries an image as separate color and luminance (brightness)
signals. These signals are transmitted through a single cable from the SVideo Output port to the S-Video Input connection on the display device
(Figure 2-4). The PRV-9000 has multiple S-Video outputs for connecting
TVs, monitors, VCRs or other equipment.
Connect S-Video Output to a
S-Video Input on your TV or
monitor.
2.2.2
Connect Through Component Video Out
Component Video carries the picture as two separate color singles and a
luminance (brightness) signal. These signals are transmitted through a single
cable with each end providing three connectors. Join one set of cable
connectors to the recorder’s Component Video Out port then the other set to
the Component Video In connections on the display device (Figure 2-5).
There is a single Component Video Out port on the PRV-9000 recorder.
Connect Component Video Output to
a Component Video Out on your TV.
Note: To set the recorder for progressive scan through Component Video Out, refer
to chapter 9, Initial Setup Menu, Video In/out Settings.
13
PRV-9000 Operating Instructions
2.2.3
Connect to an AV Receiver
To enjoy multi-channel surround sound, connect an AV amplifier/receiver using
either digital optical output or coaxial output. It is unnecessary to use both
outputs simultaneously to achieve surround sound. Pioneer recommends using
stereo analog as well as one of the digital connections through an AV receiver
for best disc playback compatibility.
1. Connect units with RF antenna
cables as shown in the figure to
the right.
2. Connect a Digital Out port from
the recorder to a digital input on
the AV receiver/amplifier.
3. Connect the Audio Output 2
(analog) to the analog audio
input on the AV receiver.
4. Connect the Video Output 2 to
the video input on the receiver.
5. Connect the AV receiver’s video
output to the display device’s
video input.
The diagram shows the PRV-9000 connected to the AV receiver using the
recorder’s Composite (standard) Video output. As an alternative, use the
S-Video output or Component Video (BNC) output connections.
Connect through the Optical Digital Output
For an optical connection, use a optical cable (not provided). ). It is unnecessary
to use both optical and coaxial outputs simultaneously to achieve surround
sound. Pioneer recommends using stereo analog as well as one of the digital
connections through an AV receiver for best disc playback compatibility.
Connect Optical Digital
Output to an optical input
on the AV receiver.
14
PRV-9000 Operating Instructions
Connect through the Coaxial Digital Output
For a coaxial connection, use a coaxial cable, similar to a video cable (not
provided). It is unnecessary to use both optical and coaxial outputs
simultaneously to achieve surround sound. Pioneer recommends using stereo
analog as well as one of the digital connections through an AV receiver for best
disc playback compatibility.
Connect Coaxial Digital
Output to an coaxial input on
the AV receiver.
Connect Analog Audio and Video
To send through an AV receiver/amplifier, Pioneer recommends using stereo
analog as well as a digital connection for best disc playback compatibility.
1. Connect Audio Output to the
analog audio inputs on the AV
receiver/amplifier.
2. Connect Video Output to the
analog video inputs on the AV
receiver/amplifier.*
* As an alternative, you may use S-Video Output or Component Video Output to use
an AV receiver/amplifier
Note: If using the Digital Out to record while watching another broadcast, there is a
slight delay in the playing TV channel.
This recorder is equipped with copy-protection technology. Do not
use AV cables to connect this unit to a TV via a VCR or other device.
15
PRV-9000 Operating Instructions
2.2.4
Connect to Other A/V Sources – Satellite/Cable
The PRV-9000 supports several AV products including VCRs, satellite tuners
and camcorders.
Connect to a VCR / Satellite Receiver:
1. Connect the VCR’s (or receiver)
Video Output to the Video Input.
S-Video In with an S-Video cable
(not provided) or Video In jack
with supplied cable
2. Connect the VCR’s audio outputs
to Audio IN L/R with a standard
stereo audio cable (not provided).
Connect to a Cable Box or Satellite Receiver:
If the cable box or satellite receiver provides less than five scrambled
channels, refer to the following diagram for assistance. For systems with six
or more scrambled channels, please refer to the following section.
1. Connect RF cables as shown with the
antenna/cable line connected to the
PRV-9000.
2. Connect the recorder’s Audio Output 2
to the TV’s audio input using a stereo
audio cable (not supplied).
3. Connect the recorder’s Video Output 2
to the TV’s video input using a BNC
cable (not supplied).
4. Connect audio/video outputs from the
cable box/satellite tuner to the
recorder’s INPUT 2/AUTO REC posts
using a stereo audio cable and a BNC
video cable, respectively.
(enables watching/recording scrambled
television broadcasts)
The diagram shows standard video connections. As an alternative, you can
use the S-Video or Component Video (BNC) connections if available.
The PRV-9000 provides a Cable TV Input for recording programs from cable.
Please refer to your cable box instructions for any additional configuration
information.
Note: For high-quality playback, send audio and video signals through an AV receiver.
16
PRV-9000 Operating Instructions
Alternate Method to Connect Cable or Satellite:
If the cable box or satellite receiver provides six or more scrambled channels,
refer to the following diagram for assistance.
1. Connect RF cables as shown with the
antenna/cable line connected to the
cable box/satellite tuner.
2. Connect the recorder’s Audio Output 2
to the TV’s audio input using a stereo
audio cable (not supplied).
3. Connect the recorder’s Video Output 2
to the TV’s video input using a BNC
cable (not supplied).
4. Connect audio/video outputs from the
cable box/satellite tuner to the
recorder’s INPUT 2/AUTO REC posts
using a stereo audio cable and a BNC
video cable, respectively.
(enables watching/recording multiplescrambled television broadcasts)
2.3
Alternative Connections (Front Panel)
Alternative connections encompass video and audio sources. The following
diagrams are only setup suggestions for common types of products. Your
equipment and setup may differ.
Become familiar the front ports (behind the lower left panel) before connecting
any components. Reading from left to right, the ports are as follows:
1 - DV IN/OUT – combined input/output jack
for digital camcorder access
2 - S-Video Input 3 (S-Video) – connect to
an S-Video output on an external device
3 - Video Input 3 (RCA pins) – connect to a
composite video output on another device
4 - Audio L/R Input 3 (RCA pins) – connect
to a stereo pair of audio outputs on
another device
Note: For high-quality playback, consider sending audio and video signals through an
AV receiver/amplifier.
17
PRV-9000 Operating Instructions
2.3.1
Connecting a VCR or an Analog Camcorder
1. Connect the VCR/camcorder’s Video
Output to a front Video Input.
Video Input 3 with a S-Video or
RCA-pin video cable (not provided)*
Video Input 1 with a S-Video cable
Video Input 2 (rear panel) with a
BNC video cable (not provided)
2. Connect the VCR/camcorder’s audio
outputs to the front DV IN/OUT port
with standard stereo audio cable (one
cable provided).
Video Out 1 with a S-Video cable
(not provided)
Video Out 2 with a standard BNC
video cable (not provided)
* As an alternative, you may use Component Video Output to connect (cable provided).
Note: If the input terminals are the other device are RCA, use a BNC/pin conversion
adapter to make connections.
2.3.2
Connecting a Digital Camcorder
Connect the front DV In/Out jack to
a DV digital camcorder or deck to
transfer DV tapes or DVD-R/RW
discs to DVD-R/RW.
(DV cable not provided)
IMPORTANT: The DV In/Out jack is for DV equipment only. This jack is incompatible
with computers, digital satellite tuners and D-VHS video decks.
Use a single DV (also known as i.Link) cable for audio and video signals to
connect compatible equipment to the PRV-9000. There are three elements to
remember when communicating through the DV In/Out jack:
Compatible with the DV-format (DVC-SD) sources
Controlling the PRV-9000 via the DV In/Out jack is unavailable
(including connecting multiple units, also known as daisy-chaining)
Switching the DV audio output may cause noise in the connected
device
18
PRV-9000 Operating Instructions
The following messages may appear on-screen when using the DV IN/OUT
port on the recorder’s front panel:
DV camcorder not connected
Check the cable connection from the camcorder to the jack. Reseat the
cable if necessary. Also verify that the camcorder is powered ON.
The power is switched off
Check the power on the camcorder and turn on if necessary.
Too many camcorders connected
The DV jack supports a single DV device at one time.
No cassette
Load a cassette in to the connected equipment.
Put into play or stop mode
The camcorder is either in camera/record mode or record-pause mode.
Playback stopped
Verify that the tape is running and that the camcorder is sending a
signal.
The DV camcorder does not operate
Check the camcorder for operation or power problems. Try switching
off the DVC link (detailed explanation in a later chapter).
If problems with audio or video occur, read through Chapter 10:
TROUBLESHOOTING for assistance.
Note: Some camcorders are incompatible with the remote control for the PRV-9000.
Operate the system manually if your camcorder is incompatible with the remote.
This recorder is equipped with copy-protection technology. Do not
use AV cables to connect this unit to a TV via a VCR or other device.
19
PRV-9000 Operating Instructions
3
CONTROLS (REMOTE & PANEL) AND DISPLAYS
Become familiar the front panel of the PRV-9000.
1 - STANDBY/ON
2 - FL DIMMER button
Press to change the display brightness
10 - AUTO REC indicator
Lights when the recorder has been set
for automatic recording
3 - FL OFF indicator
Lights when the display is turned OFF
(after pressing FL Dimmer)
11 - FUNCTION button
Toggles the SMART JOG operations
4 - DOLBY DIGITAL indicator
Lights when a Dolby Digital soundtrack
is playing
5 - DISCNAVI button
Press to display Discnavi menu (disc
navigator)
6 - Display
Refer to the following page for details
7 - OPEN/CLOSE button
Press to open/close the disc tray
12 - Smart Jog dial control
Turn to change the parameters selected
with the Function button
13 - REC button/indicator
Press to start recording
14 - PAUSE button
Press to pause playback or recording
15 - PLAY button
Press to start or restart playback
16 - STOP button
Press to halt playback or recording
8 - DVD indicator
Lights when a DVD disc is loaded
17 - Disc tray
9 - Timer indicator
Lights when the record timer is set and
the power is in Standby mode
18 - Front Panel Ports/Jacks
Analog and Digital input/output ports for
connecting a camcorder or other external
equipment
The
mark on this product indicates that the device is compatible with Video
Recording formatted (VR mode) DVD-RW discs. Also, DVD-RW discs recorded on this
recorder in VR mode should play on other systems bearing this mark.
20
PRV-9000 Operating Instructions
The PRV-9000 display provides settings information.
1 - Play/Record indicator
- Outer (white) ring denotes the playback speed and direction
- Inner (red) ring denotes elapsed playback/recording time
Note: When loading a VR mode disc, the RW indicator in the center lights up.
2 - DVD / CD / VCD / RW / R indicator
Reveals the loaded disc’s type
3- 23
Indicates the remote control mode
Note: If nothing is displayed then the mode is 1 (default)
4 - FINALIZE
Lights when a finalized disc is loaded
5 - RESERVED
Lights when a disc with a timer program is loaded
6 - LOCK
Lights when the content lock/parental control is active
7 - PLAYLIST
Lights when a VR mode disc is loaded (system must be in Playlist mode)
8 - Audio Level indicators
Monitors the audio level during playback and the audio input level during recording
9 - Status Bar
- MN – manual rate recording level
- TITLE – current title number playing from the DVD disc
- TRACK – current track number of the playing CD or Video CD
- CHP – current chapter number playing from the DVD disc
- ANGLE – lights when a multi-angle scene is available on the playing DVD disc
- TOTAL – displays the total playing time for the currently loaded disc
- REMAIN – displays the recording time available on the currently loaded disc
- SAP – lights when the selected broadcast provides Secondary Audio Program (SAP)
- STEREO – lights when the incoming TV audio signal is in stereo
- L R – indicates which channels are recorded/ played back when in Dual Mono mode
(see Chapter 9:INITIAL SETUP MENU section 9.1.5 Audio In Settings)
10 - CH
Channel indicator for the built-in television tuner
11 - Character Display
21
PRV-9000 Operating Instructions
Review the functions of the remote control included with the Pioneer PRV-9000. Additional
information regarding the remote control is available throughout this section of the manual.
6 - RETURN
steps back to the previous
menu/screen
7 - CM SKIP
moves 30 seconds forward
on the disc (length of a typical
broadcast commercial)
8 - PAUSE
Pauses playback or recording
9 - REC (record)
starts recording; press
repeatedly to set recording
time
10 - PREV & NEXT
track or chapter skip; displays
previous/next menu page
11 - REC MODE
switches record modes
between SP and MN for VR
format discs or between V1
and V2 for Video format discs
12 - PLUS CODE
press to enter a programming
number for timer recordings
13 - Number buttons
14 - PROGRAM/REPEAT/ AB/ANGLE/SHIFT
press Shift first to access
functions printed in green
refer to chapter 5 for details
1 - STANDBY/ON
2 - CHP MARK
inserts a chapter mark when
playing/recording a VR formatted DVDRW disc
3 - PLAYLIST
toggles between Original Content and
Playlist material
4 - ERASE
delete function for DISCNAVI or Title
List menu
5 - Jog Dial
controls scanning/slow motion speed
and direction
21 - ENTER / Joystick
use the joystick to navigate
on-screen menus / press
Enter to select the highlighted
option
22 - JOG MODE button/indicator
toggles Jog dial between
scanning and frame advance
23 - PLAY
starts playback
24 - STOP
halts playback/recording
25 - CHANNEL – / CHANNEL +
changes the channel for the
built-in TV tuner
26 - SEARCH MODE
allows disc searching by title,
chapter, track or time
27 - INPUT SELECT
changes the input select
when recording
28 - CLEAR C
clears the current setting
29 - _/_ _
Switch input from single digits
to double digits
30 - DISPLAY
reveals/changes on-screen
information
15 - TV Controls
to control the TV Input Select,
Channels, and Volume
31 - AUDIO
changes the audio channel or
language
16 - OPEN/CLOSE (tray)
32 - SUBTITLE
reveals/changes the subtitles
on multi-lingual DVD-Video
discs
17 - NAVI MARK
to select a thumbnail image
for the current title from within
the DISCNAVI menu
18 - SETUP
press to reveal the Setup
menu
19 - DISCNAVI
press to reveal the Discnavi
menu
20 - EDIT
to access the edit function
from within the Discnavi or
Title List menu
33 - MENU
reveals the disc menu on
DVD-video discs or displays
the Title List on Video format
DVD-RW discs
34 - TOP MENU
Reveals the disc ‘top’ menu
for DVD-Video discs or the
Title List on Video format
DVD-RW discs
Note: When working with the setup menu, lightly brush a fingertip across the ENTER key in the
direction you wish to scroll. This button doubles as the joystick.
22
PRV-9000 Operating Instructions
Using the On-Screen Displays:
Most settings and functions are available through on-screen menus and graphic links.
Scroll to or make a selection then press ENTER to activate that feature. Information about
a highlighted option displays at the bottom of the screen. In addition, under Help is a
summary of the on-screen navigation controls.
The setup procedures in the following section prepares the recorder for full operation and
assist you to become familiar with the on-screen functions.
23
PRV-9000 Operating Instructions
4
GETTING STARTED
Before plugging in the PRV-9000 for the first time, verify that all cables are properly and
firmly connected. Once all equipment is linked, following the steps below for standard
operation.
Powering ON the system:
1. Press STANDBY/ON on the remote control of from the recorder’s front panel.
To return the recorder to Standby, press the button again.
2. Turn ON the TV or monitor.
3. Set the video input for the recorder according to the directions below.
(may use the remote control to set the recorder)
4.1
Initial Setup
Most of the settings and functions are
accessed using on-screen displays.
These commands are navigated with
the joystick. The joystick is very
sensitive and only requires gentle
pressure in the required direction to
move the on-screen cursor.
SETUP
Use the joystick to highlight the
various menus and options then press
ENTER to select the highlighted item.
Information about the highlighted menu
or option is shown on the lower portion
of the screen.
ENTER / Joystick
STANDBY / ON
Note: A summary of navigation controls i
listed under the HELP information.
4.1.1
Set the Clock
The clock must be set before using the timed recording function. The PRV9000 has an automatic clock setup feature but supports manual clock setting
as well. The following commands are based on using the remote control.
1. Press SETUP to reveal the Setup menu.
24
PRV-9000 Operating Instructions
2. Select Initial Setup from the menu.
Use the joystick to highlight the option then press ENTER.
3. Confirm that Basic from the Initial Setup menu is highlighted.
Menu options appear to the right of the highlighted menu selection.
4. Select Clock Setting from the Basic Setup menu.
Use the joystick to move right, highlighting the Clock Setting option.
5. Highlight Auto from the Clock Setting submenu.
6. Press ENTER to select the function.
The following clock options are available from a pop-up screen. Move
the joystick to the left or right to change selections.
Channel to broadcast clock information
Time Zone selection
Daylight Savings Time (DST) observed
7. Set Clock Set CH to the channel number for PBS.
If leaving other settings to Auto causes the recorder to fail, manually,
move the joystick left/right to create a setting for the highlighted option.
Cable: turn ON the cable box and set to PBS
Digital Satellite Receiver: turn OFF the satellite receiver
8. Press ENTER after changing or confirm all settings.
The previous menu appears on screen.
9. Press SETUP to exit the Setup menu.
10. Press STANDBY/ON to change the recorder to the standby mode.
The AUTO CLOCK SET message appears in the display then changes
to the current time. If the clock fails to set, skip down to the next section
to manually set/change the clock.
11. Press STANDBY/ON again to power the recorder ON.
25
PRV-9000 Operating Instructions
12. Confirm that the clock displays the correct time and date.
Note: If the clock is incorrect, check the clock settings under step 5 above.
Manually Set Clock:
To manually set the clock, follow the steps below.
1. Press SETUP on the remote control.
2. Highlight Initial Setup from the main menu.
Use the joystick to move down the main menu.
3. Press ENTER to access the Initial Setup menu.
4. Confirm that Basic is highlighted on the Initial Setup menu.
Menu options appear to the right of the highlighted menu selection.
5. Select Clock Setting from the Basic Setup menu.
Use the joystick to move right, highlighting the Clock Setting option.
6. Highlight Manual from the Clock Setting submenu.
7. Press ENTER to confirm your selection.
8. Set the Time Zone and whether Daylight Savings Time is observed.
Move the joystick to the left or right to change settings.
9. Press ENTER to register your selections and proceed to the date/time
submenu.
10. Set the date (mm/dd/yyyy) and the time.
Move the joystick to the left or right to navigate the entry fields.
Use the joystick to the increase or decrease the numbers.
11. Press ENTER to store your selections.
The previous menu appears on screen.
12. Press SETUP to exit the Setup menu.
13. Press STANDBY/ON to change the recorder to the standby mode.
14. Press STANDBY/ON again to power the recorder ON.
4.1.2
Set the TV Aspect Ratio
A television has an aspect ratio of either 4:3 (standard) or 16:9 (widescreen).
If the TV’s aspect ratio is standard while the disc is widescreen (check the
disc jacket or disc label for the aspect ratio), choose between Letterbox or
Pan & Scan viewing.
Letterbox – shows full screen with black bars on the top and bottom
Pan & Scan – chops off the sides of the picture while following the
26
PRV-9000 Operating Instructions
primary screen action
To play DVD-Video discs on a standard television, follow the directions below.
1. Press SETUP to access the menu.
2. Highlight Initial Setup from the main menu.
Use the joystick to highlight the option.
3. Press ENTER to confirm your selection.
4. Highlight Video from the Initial Setup menu by using the joystick.
5. Select TV Screen Size from the Video menu by using the joystick.
Options appear to the right with the current setting marked (square).
Note: For more screen size and setting information, refer to Chapter 11:
ADDITIONAL INFORMATION, section 11.5 Screen Sizes & Disc Formats,
6. Choose the aspect ratio to match the setting of the TV or monitor.
4:3 Letterbox (Standard)
4:3 Pan & Scan (Standard)
16:9 Wide (Widescreen)
7. Press SETUP to exit the Setup menu.
8. Press STANDBY/ON to change the recorder to the standby mode.
9. Press STANDBY/ON again to power ON the recorder.
4.1.3
Set the Digital Audio Output
When operating the PRV-9000 with an AV amplifier/receiver for full surround
sound, set the recorder to output digital audio signals that match the receiver.
If you are unsure of the required signals, refer to the owner’s manual for the
AV amplifier/receiver.
27
PRV-9000 Operating Instructions
1. Press SETUP to access the menu.
2. Highlight Initial Setup from the main menu.
Use the joystick to highlight the option.
3. Press ENTER to confirm your selection.
4. Highlight Audio Out from the Initial Setup menu by using the joystick.
5. Select Dolby Digital Out from the Audio Out submenu.
Options appear to the right with the current setting marked (square).
6. Set the option to Dolby Digital – PCM unless your receiver has a builtin Dolby Digital decoder.
If your receiver has this decoder, set the option to Dolby Digital.
7. Press ENTER to confirm your selection.
The cursor moves back to the previous submenu.
8. Select DTS Out from the submenu by using the joystick.
9. Verify that the DTS option is set to OFF unless the receiver has a builtin DTS decoder. If your receiver has this decoder, set the option to ON.
10. Press ENTER to confirm your selection.
The cursor moves back to the previous submenu.
11. Select 96kHz PCM Out from the submenu.
12. Set the sampling rate to 96kHz-48kHz unless your receiver is
compatible with a 96kHz sampling rate for audio.
13. Press ENTER to confirm your selection.
The cursor moves back to the previous submenu.
14. Select MPEG Out from the submenu.
15. Set the option to MPEG – PCM unless your receiver has a built-in
MPEG audio decoder.
If your receiver has this decoder, set the option to MPEG.
16. Press ENTER to confirm your selection.
The cursor moves back to the previous submenu.
17. Press SETUP to exit the Setup menu.
28
PRV-9000 Operating Instructions
18. Press STANDBY/ON to change the recorder to the standby mode.
19. Press STANDBY/ON again to power the recorder ON.
4.1.4
Auto-Tune the Channels
The PRV-9000 has a built-in TV
tuner for recording programs off the
air. Use the Auto Channel Setting
feature to tune in to your available
television stations. Use the
Channel Skip feature to disable
unwanted channels. The maximum
number of settings stored in the
PRV-9000 is 192 channels.
SETUP
ENTER / Joystick
CHANNEL +/-
1. Press SETUP to access the menu.
2. Highlight Initial Setup from the main menu.
Use the joystick to highlight the option.
3. Press ENTER to confirm your selection.
4. Highlight Tuner from the Initial Setup menu by using the joystick.
5. Select Auto Channel Setting from the Tuner submenu.
6. Select Antenna or Cable to automatically begin scanning for stations.
To cancel the Channel Search at any time, press ENTER.
29
PRV-9000 Operating Instructions
Note: to fine-tune individual stations/channels, use the Manual CH Setting feature
discussed in the following section of this manual.
4.1.5
Set Channels Manually & Channel Skipping
The PRV-9000 has a built-in TV tuner for recording programs off the air. Use
the Auto Channel Setting feature to tune in to your available television
stations and the Channel Skip function to ignore channels without stations.
The maximum number of settings stored in the PRV-9000 is 192 channels.
1. Press SETUP to access the menu.
2. Highlight Initial Setup from the main menu by using the joystick.
3. Press ENTER to confirm your selection.
4. Highlight Tuner from the Initial Setup menu.
5. Select Manual CH Setting from the Tuner submenu.
6. Press ENTER to jump to the Next Screen option.
7. Press ENTER to go to the Manual Channel Setting screen.
8. Use the Channel +/- button to set the channels manually.
To add the displayed channel, change the Manual Tuning setting
to On then move down to Level to manually tune in the channel.
To bypass the displayed channel, change the Skip setting to On.
9. Press ENTER to return to the Initial Setup menu.
10. Press SETUP to exit the menu.
30
PRV-9000 Operating Instructions
4.1.6
Assign Guide Channels for VCR Plus+
The VCR Plus+ system uses guide channels to assign station channels with
specific VCR Plus+ codes.
1. Press SETUP to access the menu.
2. Highlight Initial Setup from the main menu by using the joystick.
3. Press ENTER to confirm your selection.
4. Highlight Tuner from the Initial Setup menu by using the joystick.
5. Choose VCR Plus+ CH Setting from the Tuner submenu.
6. Press ENTER to jump to the Next Screen option.
7. Press ENTER to go to the VCR Plus+ channel setting screen.
8. Assign channels to the guide channels as necessary.
Refer to a TV Guide or other program chart to choose channels.
Use the PREV/NEXT button to scroll through the 20 guide
channels.
9. Press ENTER to return to the Initial Setup menu.
10. Press SETUP to exit the menu.
31
PRV-9000 Operating Instructions
4.1.7
Set the Remote to Control a TV
Before using the remote control
supplied with the PRV-9000 to
directly control a television, you
must set the maker code. Follow
the directions below to program the
maker code in to the remote
control.
SETUP
STANDBY / ON
CLEAR - C
Number Pad
TV Controls
Program Functions
1. Hold down the CLEAR button while using the number buttons to input
the maker code for your television or monitor.
Use the first listed code for your television’s make.
Television Maker
GE
General
Goldstar
Grandiente
Hitachi
Magnavox
Mitsubishi
NEC
Panasonic
Philips
Pioneer
RCA
Sanyo
Sharp
Sony
Toshiba
Victor
Zenith
Maker Code
11, 28
33
10, 23
35
06, 24, 25, 31
12, 29
09
36
08, 22
07
00, 34
01, 15, 16, 17, 18
14, 21
02, 19, 27
04
05, 26, 30
13, 32
03, 20
Note: If the TV maker’s name is not shown on the chart, this remote is
incompatible with your television model.
32
PRV-9000 Operating Instructions
2. Press the TV button to check the remote’s compatibility/functionality.
If the code is correct, the television powers ON.
3. Manipulate television controls as needed.
Button
Function
TV
Press to turn television ON/OFF (standby)
INPUT SELECT
Press to change video input
TV VOLUME
Use to adjust the television volume
TV CHANNEL
Use to change TV channels
Note: If there are several codes for your brand of television set and the first code
fails, repeat the procedure with the next code until a code functions properly.
4.1.8
Additional Settings
Other settings available on the Initial Setup menu include the options below:
Audio input/output formats
Video input/output formats
DVD-Video language settings
Parental lock settings
Note: These settings are explained in later chapters.
The TV Control buttons on the remote (boxed area in the lower right corner of
the remote control) sends commands to the television or monitor. The
following chart provides a summary of each button’s function.
4.1.9
Remote Button
Function
TV <power>
Press to toggle the television ON and OFF.
INPUT SELECT
Press to change the video input
TV VOLUME +/-
Use to adjust the volume on the television.
TV CHANNEL +/-
Use to scroll through the active TV stations.
Return to Default (Factory) Settings
During certain situations, you may wish to return the recorder to the factory
(default) settings. An example is if a Content/Parental Lock password is
entered in error or if it is forgotten; resetting the recorder erases the current
password.
33
PRV-9000 Operating Instructions
Follow the directions below to restore default settings.
1. Power ON the recorder.
2. Remove any discs left in the tray.
3. Close the tray.
4. Hold down the STOP button on the recorder’s front panel.
5. Press the STANDBY/ON button (front panel).
6. Continue holding down the STOP button until the display on the front
panel clears.
The display shows only placeholders for the time.
7. Power ON the recorder and operate as normal.
All settings have returned to the default/factory settings.
4.2
Using the Built-in TV Tuner
4.2.1
Changing TV Channels
To change the channel when a disc is not playing, use the number pad or the
CHANNEL button on the remote or use the SMART JOG on the front panel.
Note: Channels programmed through the antenna are numbered 2 through 69 and
cable channels are numbered 2 through 125.
Remote Control – Number Pad: Input the channel then press ENTER.
Ex: Select Channel 4 – Press the digit 4 then press ENTER.
Select Channel 39 – Press the digit 3 then the digit 9. Press ENTER.
As an alternative method for two-digit numbers, press the _/_ _ button
followed by the two-digit channel number.
Remote Control – Channel button: Press the CHANNEL + or – button to
scroll through the channels.
Front Panel – Smart Jog: Press the FUNCTION button until CHANNEL?
appears in the display. Turn the Smart Jog wheel to change the channel.
4.2.2
Changing Audio Channels
Some TV programs are broadcast with both a main and a secondary audio
channel (SAP). Use the Audio button to change the audio playback track.
34
PRV-9000 Operating Instructions
When the Audio button is pressed, the current audio channel appears on the
display. Pressing Audio again changes the audio playback channel to another
setting. The three audio channels are as follows:
Stereo – dual output
Mono – single output
SAP – Second Audio Program
The following guidelines may solve unexpected sound issues.
Selecting SAP when the secondary signal is absent still provides the
primary sound to play.
If the sound quality is poor when set to Stereo, change to Mono.
When setting to Dual Mono while using an external input port allows
audio channel switching to just left, just right or both left and right.
4.2.3
Displaying Program Titles & Channel Call Letters
Some broadcast stations transmit the program title and channel call letters
with the production. To view this information, press the DISPLAY button.
Once the information is on-screen, pressing DISPLAY again causes the
displayed information to change.
35
PRV-9000 Operating Instructions
4.3
Playing Discs
This section explains controlling and
playing the following types of discs:
DVD (all types)
OPEN/CLOSE tray
Video CD
Audio CD
STANDBY / ON
PLAY
PAUSE
STOP
CM SKIP
Note: Throughout this manual, the
generic term DVD refers to
playback-only DVD-Video and DVDR/RW discs.
If the information
pertains to a single type of DVD disc
it is noted as such.
Program Functions
When attempting to play back a DVD disc, a
(function denied by the player)
or a
(function denied by the disc) symbol may appear on the screen.
The following steps are for standard playback operation:
1. Press STANDBY/ON to power up the recorder.
If playing a DVD or Video CD, also turn the TV/viewing device ON.
2. Verify that the display device is set to the correct video input if playing a
Video disc.
3. Press the OPEN/CLOSE button (on the remote control) to open the tray.
4. Load a disc in to the tray with the label facing up.
If loading a double-sided disc, place the side to be played first face down.
5. Press the Play button to begin playback.
Note: To remove a disc, press the Eject button before powering OFF the recorder.
To play a DTS audio CD, connect the recorder to a DTS-compatible amplifier/
receiver through the digital ports. Set the Audio setting to STEREO.
To eliminate excessive noise, avoid connecting through the analog outputs for
this equipment configuration.
36
PRV-9000 Operating Instructions
4.3.1
Video (Mode) Playback Control
The chart below reflects control options when playing back a DVD-Video disc
or a DVD-R/RW disc in Video mode.
Button
Function
Starts playback
If the display shows RESUME, playback starts from the
previous stopped location.
Pauses disc playback or resumes playback of a paused
disc
Stops playback
The display shows RESUME. Press a second time to
cancel playback.
Skips to the start of the current chapter then to previous
chapters
Skips to the next chapter
CM SKIP
4.3.2
(Commercial Skip) Each press skips forward 30-seconds
which is the approximate length of a commercial.
Use this button to skip up to a maximum of four minutes.
VR (Mode) Playback Control
The chart below reflects control options when playing back a DVD-RW disc in
the VR mode.
Button
Function
Starts playback
If the display shows RESUME, playback starts from the
previous stopped location.
Pauses disc playback or resumes playback of a paused
disc
Stops playback
The display shows RESUME. Press a second time to
cancel playback.
Skips to the beginning of the current chapter then to
previous chapters
Press and hold for two seconds to skip to the previous title
Skips to the next chapter
Press and hold for two seconds to skip to the next title
CM SKIP
(Commercial Skip) Each press skips forward 30-seconds
which is the approximate length of a commercial.
Use this button to skip up to a maximum of four minutes.
37
PRV-9000 Operating Instructions
4.3.3
CD and Video-CD Playback Control
The chart below reflects control options when playing back a CD disc.
Button
Function
Starts playback (Video-CD only)
If the display shows RESUME, playback starts from the
previous stopped location.
Pauses disc playback or resumes playback of a paused
disc
Stops playback (Video-CD only)
The display shows RESUME. Press a second time to
cancel playback.
Skips to the start of the current track then to previous
tracks
Skips to the next track
CM SKIP
4.4
(Commercial Skip) Each press skips forward 30-seconds
which is the approximate length of a commercial.
Use this button to skip up to a maximum of four minutes.
Navigating Discs
During playback, you can easily jump
to another title, chapter or track using
the number buttons on the remote
control or using the Smart Jog on the
front panel.
Joystick / ENTER
Number Pad
Smart Jog
CLEAR
FUNCTION
38
PRV-9000 Operating Instructions
To change title, chapter, or track from the front panel, follow the steps below.
1. Press the FUNCTION button on the front panel repeatedly until the
appropriate selection appears.
TITLE? (DVD)
CHAPTER? (DVD)
TRACK? (CD/Video CD)
2. Turn the Smart Jog dial on the front panel to select a title/chapter/track.
Once the Smart Jog dial is released, playback jumps to the specified
point on the disc and begins.
Note: During playback, use the numbers to jump to a different title, chapter or track. If
you make a mistake, use the CLEAR button to begin again.
4.4.1
DVD-Video Navigation
While a DVD-Video disc is playing,
use the number buttons to input a
chapter number within the current
title. After entering the number, press
the Enter button to play that chapter.
RETURN
Example:
Change to Chapter 6:
6 then ENTER
STOP
PREV / NEXT
Change to Chapter 24:
2 and 4 then ENTER
4.4.2
PLAY
Number Pad
DVD-R/RW Navigation
While a DVD-R or DVD-RW disc is playing, use the number buttons to input a
title or chapter number. No other buttons are required to select the title or
chapter.
Example:
Change to Title 2: 2 then ENTER
Change to Chapter 24: 2 then 4 then ENTER
39
PRV-9000 Operating Instructions
An alternate method of navigating a DVD-R/RW disc recorded in VR mode is
to use the disc navigator (DISCNAVI) button discussed later in this manual.
DVD-R/RW discs recorded in Video mode can be navigated using the Title
List menu discussed later in this manual.
4.4.3
CD and Video-CD Navigation
While a CD or Video-CD disc is playing, use the number buttons to input a
track number within the current title.
Example:
Change to Track 6: 6 then ENTER
Change to Track 24: 2 then 4 then ENTER
Note: To start playback again, press CLEAR.
4.4.4
DVD-Video Menu Navigation
Many DVD-Video discs provide menus to play to different sequences. Some
menus appear automatically while other menus must be requested. If a
menu fails to appear, press MENU or TOP MENU.
Button
TOP MENU
MENU
Reveals “top menu” of a DVD disc
Which menu displays varies with each disc.
Reveals a DVD disc menu
Varies with each disc and may be the same as TOP MENU
RETURN
Recalls the previously displayed menu
Joystick
Moves the cursor around the screen and calls submenus
ENTER
Numbers
4.4.5
Function
Selects the highlighted menu option
Chooses a numbered menu option (some discs only)
Press ENTER to activate the option
Video-CD Menu Navigation
Some Video-CD discs contain menus, called Playback Control (PBC) menus.
To view the PBC menu, press the RETURN button once. To begin playing a
disc without using the PBC menu, press PLAY rather than RETURN.
40
PRV-9000 Operating Instructions
Button
Function
RETURN
Displays the PBC menu
Numbers
Selects a numbered menu option when available
Displays the previous menu page if applicable
Displays the next menu page if applicable
4.5
Scanning Discs
During playback, use the Jog dial on the
remote control to fast-scan forward or
backward on a disc. Turn the dial clockwise
for forward scanning and counter-clockwise for
backward scanning. The scanning speed
displays on the screen. Sound is suppressed
during DVD and Video CD scans but is audible
when scanning an Audio CD. To resume
standard playback, press the PLAY button.
Smart Jog
Jog Dial
FUNCTION
PLAY
Normal playback may automatically resume when reaching a new chapter. Test
the disc for this function before playing the material in a professional setting.
DVD Scanning with remote control
CD Scanning with remote control
Note: SCAN 4 is only available on VR mode DVD-RW discs.
41
PLAY
PRV-9000 Operating Instructions
4.6
Slow-Motion Playback
After pausing playback of a DVD or Video-CD
disc, use the Jog dial to control the direction
and speed of slow-motion playback. The
direction and speed is shown on the display.
The picture quality is reduced during slow
motion viewing.
Jog Dial
PAUSE
JOG MODE
Slow Motion Speeds:
PLAY
Note: Video-CD only supports forward slow motion.
From the Remote Control:
To view a video segment or disc in slow motion, follow the directions below.
1. Begin playback of a disc.
2. Press the PAUSE button.
3. Turn the Jog dial to start slow-motion playback.
Forward motion – turn clockwise
Reverse motion – turn counter-clockwise
4. Verify the selected direction and speed is shown on the display.
5. Press PLAY to resume standard playback.
42
PRV-9000 Operating Instructions
From the Front Panel:
To use the buttons on the front of the recorder, follow the directions below.
1. Begin playback of a disc.
2. Press the FUNCTION button until STEP? appears on the display.
3. Turn the Jog dial to start slow-motion playback.
Forward motion – turn clockwise
Reverse motion – turn counter-clockwise
4. Refer to the on-screen display for scanning speed and adjust accordingly.
5. Press PLAY to resume standard playback.
Normal playback may automatically resume when reaching a new chapter. Test
the disc for this function before playing the material in a professional setting.
4.7
Frame Advance/Frame Reverse Playback
After pausing playback of a DVD or Video-CD disc, use the Jog dial to control the
frame-by-frame advance. Frame reverse is also possible on DVD media
however the picture quality may degrade.
From the Remote Control:
To view a video segment or disc frame-by-frame, follow the directions below.
1. Begin playing a disc.
2. Press the JOG MODE button.
The Jog mode indicator lights.
3. Turn the Jog dial to advance/reverse frame-by-frame.
* Forward frame – turn clockwise
* Reverse frame – turn counter-clockwise
4. Press PLAY to resume standard playback.
Note: Pressing the JOG MODE button again turns OFF the feature but playback
defaults to either forward or reverse scanning rather than normal play.
43
PRV-9000 Operating Instructions
From the Front Panel:
To use the buttons on the front of the recorder, follow the directions below.
1. Begin playing a disc.
2. Press the FUNCTION button until the STEP? appears on the display.
3. Turn the SMART JOG dial to advance or back up one frame at a time.
4. Press PLAY to resume normal playback.
Normal playback may automatically resume when reaching a new chapter. Test
the disc for this function before playing the material in a professional setting.
4.8
Recording Options
When preparing to record video, check the following guidelines before
proceeding.
CD-R and CD-RW blank discs are incompatible with this recorder.
Use DVD-R (General) and DVD-RW discs that are designated for video use.
Fingerprints, small scratches or other marks on a disc may affect playback
and/or recording performance.
Pioneer takes no responsibility for recording failures due to power
fluctuations, defective discs, or damage to the recorder.
The PRV-9000 can play three different types of DVD disc:
DVD-Video discs
DVD-RW discs
DVD-R discs
DVD-R discs are always Video format rather than VR format. This is the same
format as pre-recorded (Hollywood release) discs. Once your disc is recorded
and finalized, the disc may be played on a standard DVD player that recognizes
DVD-R media.
DVD-RW discs are either Video format or Video Recording (VR) format. The
PRV-9000’s default mode is Video. The recording mode is closely related to the
disc format. If the disc is VR format, the recorder must be in VR mode. If the
disc is Video format then the recorder must be set to Video mode.
Note: DVD-Video is unsupported as a recording option; however, DVD-Video discs are
playable on this recorder.
44
PRV-9000 Operating Instructions
Changing the format erases existing disc content.
Within the recording modes (fixed for the entire disc), are record settings for
determining picture quality and duration preferences. These settings are
alterable for each recording session as long as the mode remains the same.
Disc
DVD-R
Disc
Format
Recording
Mode
Record
Settings
Video
Video
V1 (high quality)
V2 (standard)
Playback
limited recording
limited editing
Video
Video
V1 (high quality)
V2 (standard)
Playback
limited recording
limited editing
VR
SP (standard)
MN (manual)
levels 1 to 32
Playback
Recording
Original/Playlist
editing
N/A
N/A
Playback only
DVD-RW
Video Recording
(default)
DVD-Video Video
4.8.1
Functions
VR Mode Recording
When recording in VR format, select the recording mode, SP (standard) or
MN (manual).
SP – fixed recording quality and recording time
total time maximum of 120 minutes
MN – trade off recording quality for additional recording time
recording levels range from Level 1 (360 minutes per disc)
to Level 32 (61 minutes per disc)
Default Level 9 (240 minutes/disc)
Note: SP is equivalent to MN Level 22.
45
PRV-9000 Operating Instructions
The table below lists maximum recording times for each MN level.
Level
1
2
3
4
5
6
7
8
9
10
11
12
13
14
15
16
Recording Time
360 minutes (longest time)
345 minutes
330 minutes
315 minutes
300 minutes
285 minutes *
270 minutes
255 minutes
240 minutes
230 minutes
220 minutes *
210 minutes
200 minutes
190 minutes
180 minutes
170 minutes *
Level
17
18
19
20
21
22
23
24
25
26
27
28
29
30
31
32
Recording Time
160 minutes
150 minutes
140 minutes
130 minutes
120 minutes (SP equivalent)
110 minutes
105 minutes
100 minutes
95 minutes
90 minutes
85 minutes
80 minutes
75 minutes
70 minutes
65 minutes
61 minutes (highest quality)
* indicates a possibly significant change in picture quality
The following situations may affect recording times:
The recording times are estimates only and may vary because of bitrate compression. Exact recording times also depend upon the
complexity of the original material.
When recording with poor broadcast reception or signal interference,
available recording time may be shorter then indicated in the previous
chart.
When recording still pictures or audio tracks only, available recording
time may be longer then indicated in the previous chart.
The displayed times, time used and time remaining, may fail to add up
to the total time available on the disc. This imbalance is because of
possible hidden titles within recorded segments.
Heavily edited discs may cause decreased recording time availability.
Levels 1 through 8 are unavailable when recording from the DV IN/OUT
port. The recording level automatically defaults to Level 9 when using
this port.
When recording at the highest quality (Level 32), the audio records as
uncompressed Linear PCM unless recording from the DV IN/OUT port.
All other audio recording levels are pre-set to 2-channel Dolby Digital.
4.8.2
Video Mode Recording
When recording in Video format, select a quality setting, V1 (high quality) or
V2 (standard).
46
PRV-9000 Operating Instructions
V1 – maximum recording time of 60 minutes per disc
similar quality to Level 32 in the VR mode
V2 – maximum recording time of 120 minutes per disc
similar recording time to the SP format in the VR mode
The following situations may affect recording times:
When recording with the V2 setting, minor artifacts may appear around
fast-moving objects.
Before recording to a DVD-RW Video format disc, set the recorder to
the Video mode.
Before recording in Video mode, set the Screen Size for Rec(ord)
option.
– 4:3: standard television screen size
– 16:9: widescreen/movie screen size
When recording to a DVD-R disc, continue recording until it is full or
finalize the disc at the end of the last recording session.
* Un-finalized DVD-R discs are incompatible with most existing players.
To increase the available recording time shown on the screen, erase the
last title recorded on the disc. This action recalculates time displays.
Recordings are created in 30-second blocks. If the STOP button is
pressed in the middle of a block, recording continues until the block is
complete.
To record to a DVD-R disc, press the REC(ord) button twice. The first
button press causes the PRV-9000 to enter record standby mode. The
second press begins the recording session.
Note: To set the unit to record after a single REC(ord) button press, refer to
Chapter 9: INITIAL SETUP MENU, section 9.2.6 Start Rec on DVD-R.
Unless a title is the final title recorded to a DVD-RW disc, selecting
Erase Title from the Title List menu merely hides the title.
4.8.3
TV Audio-Channel Recording
The PRV-9000 can record one-channel (mono) or two-channel (stereo) audio
from television broadcasts. This unit also supports the Secondary Audio
Program (SAP) audio channel.
In Video mode, (or in VR mode on the Manual Level 32 setting), you can
record either the main audio channel or the SAP audio.
If recording in VR mode but other than at Manual Level 32, the audio options
are to capture the main audio only or to record the main audio and SAP audio
47
PRV-9000 Operating Instructions
together as a single audio channel. During playback, the user is able to
switch between the main audio and SAP audio.
4.8.4
Video Recording Restrictions
The following information provides video recording limitations that coincide
with the DVD Forum specifications and other source providers’ guidelines.
The recorder is barred from duplicating copy-protected video. Copyprotected video includes DVD-Video discs and some satellite
broadcasts. If the PRV-9000 encounters copy-protected material during
a recording session, the recorder pauses or stops automatically and
shows an error message on the display screen.
Video coded to copy-only-once is recordable on to a DVD-RW disc in
the VR mode with CPRM security. Copyright information is covered in
the next section of this manual.
To display copy control information on screen when recording a TV
broadcast or a sequence through an external input, refer to the section
entitled Display Disc Information On-Screen.
4.8.5
Content Protection for Recordable Media (CPRM)
Content Protection for Recordable Media (CPRM) is a copy-protection
system that allows a broadcast program to be copied once. Any additional
attempt to copy the protected material fails.
The PRV-9000 is CPRM compatible. To create a copy of a protected
broadcast, record to a DVD-RW (formatted in VR mode) disc. The protected
material on this disc is blocked from being copied to any other discs or
devices.
To play back the copy on a different unit, the player or other device must also
be CPRM compatible.
4.8.6
Copyright Guideline
The PRV-9000 incorporates Macrovision Corporation and other rights owners
copyright protection technology to guard against illegal or unauthorized use.
Audio and video recordings using this recorder are for personal use only.
48
PRV-9000 Operating Instructions
4.9
Initializing a Disc
When recording to a DVD-R disc, set the mode to Video. For DVD-RW discs, the
default is VR mode but can be switched to Video mode. Change the mode from
the Disc Setup menu.
Note: Changing the mode on a DVD-RW disc erases all existing material from the disc.
The following directions refer to DVD-RW media but apply to DVD-R discs as
well when choosing Video in step 3.
1. Press SETUP to access the Setup menu.
2. Highlight Disc Setup to reveal the Disc Setup menu by using the joystick.
3. Press ENTER to confirm your selection.
4. Highlight Initialize from the Disc Setup menu by using the joystick.
5. Choose the appropriate mode from the submenu.
* Video mode
* VR mode (default)
6. Use the joystick to highlight Start from the submenu.
7. Press ENTER to begin initializing the disc.
The initialization process may take up to one minute to complete.
4.10
Initializing Recording Modes
The PRV-9000 and the recordable media
must have compatible formats. If the disc is
formatted to Video mode then the recorder
must be set to Video mode before beginning
a recording session. If the disc is a VR mode
DVD-RW then the recorder must be set to
VR mode.
SETUP
Joystick / ENTER
Disc Setup menu / Video mode option:
REC MODE
49
PRV-9000 Operating Instructions
4.10.1 Initialize for VR Mode Recording
When recording in VR mode (DVD-RW discs only), select either SP
(standard) or MN (manual) setting. The Settings screen also provides the
following information:
Total disc recording time
Data transfer time
Remaining recording time (based on the current settings)
Follow the directions below to initialize a DVD-RW disc in the VR format.
1. Load a DVD-RW disc formatted for VR mode recording.
If the disc is not already formatted, the recorder automatically prepares
the disc for VR recording.
2. Press REC MODE as often as needed to select your recording mode.
SP (standard)
MN (manual)
3. Set the recording rate level if MN is the preferred mode.
Use the joystick to increase or decrease the quality levels and the
PREV/NEXT buttons to jump to the previous/next pre-set level.
Ignore this step if selecting SP as the recording mode.
4. Preview the production for picture quality if necessary.
Additional instructions below
5. Press the ENTER button to save the selection and dismiss the menu.
Note: For additional information about VR mode, refer to earlier in this chapter 4.8.1
VR Mode Recording and to Chapter 1: INTRODUCTION, section 1.4.1 VR Mode.
A production preview option is available on the REC MODE submenus.
1. Select the PREVIEW menu button to activate an on-screen display of
how the material will appear after recording.
2. Adjust the picture quality and/or recording time as needed.
Refer to Chapter 7: EDITING FUNCTIONS & OPTIONS and Chapter
10: DISC SETUP MENU for additional information.
3. Press ENTER to accept the displayed settings.
Unless changes are sent to the recorder, the settings are automatically
saved after a few seconds and the menu disappears.
50
PRV-9000 Operating Instructions
4.10.2 Initialize for Video Mode Recording
When recording in Video mode (DVD-R or DVD-RW discs), select either V1
(high quality) or V2 (standard) setting. The V2 setting provides approximately
twice as much recording time. The Settings screen also provides the
following information:
Total disc recording time
Data transfer time
Remaining recording time available (based on the current settings)
Note: Reinitializing a DVD-RW disc causes all existing material on that disc to be
erased/lost.
To prepare for Video mode recording, follow the directions below.
1. Load a disc formatted for Video mode recording.
2. Press REC MODE to enter the submenu.
3. Use the joystick to highlight the appropriate mode.
V1 (high quality)
V2 (standard)
4. Preview the production for picture quality if necessary.
Additional instructions below
5. Press REC MODE again to set the mode and dismiss the menu.
A production preview option is available on this submenu.
1. Select the PREVIEW menu button to activate an on-screen display of
how the material will appear after recording.
2. Adjust the picture quality and/or recording time as needed.
Refer to Chapter 7: EDITING FUNCTIONS & OPTIONS and Chapter
10: DISC SETUP MENU for more information.
3. Press ENTER to accept the displayed settings.
Unless changes are sent to the recorder, the settings are automatically
saved after a few seconds and the menu disappears.
Note: For additional information about Video mode, refer and to an earlier section in
this chapter 4.8.2 Video Mode Recording and to Chapter 1: INTRODUCTION, section
1.4.2 Video Mode.
51
PRV-9000 Operating Instructions
4.10.3 Setting the Recording Mode from the Front Panel
Instructions in this manual are primarily for controlling the recorder through
the remote control. However, the steps below provide directions for using the
front panel to set the recording mode on the PRV-9000.
1. Press FUNCTION until REC MODE? appears in the window.
2. Turn the Smart Jog dial to scroll through recording mode options.
Video Mode: V1 (high quality) or V2 (standard)
VR Mode: SP (standard) or MN (manual)
Note: If selecting MN, press FUNCTION again and turn the SMART JOG dial
to select a rate level.
3. Wait 10 seconds for the unit to save the settings and dismiss the menu.
4.10.4 Adjusting the Audio Recording Level from the Front Panel
If the audio is too high or too low, check the audio level meter located on the
front of the recorder. The steps below explain how to adjust the audio from
the front panel.
1. Press FUNCTION until REC LEVEL? appears in the window.
2. Turn the Smart Jog dial to adjust the volume level.
3. Monitor the audio level meter on the front panel.
If the red bars at the end of the meter are lighting then the audio level is
too high.
4. Wait 10 seconds for the recorder to save the settings and dismiss the
menu.
4.10.5 Recording from Broadcast Television
TV recording begins automatically and continues to the end of the disc unless
recording is stopped. Follow the instructions below to record from a broadcast
program.
Note: When recording to VR mode at any quality level excluding MN 32, it is possible
to record both the main and the SAP audio streams. The sound can be switched
between the streams during disc playback. This function is unavailable in Video
mode and in VR mode – level 32.
Follow the instructions below to record a television broadcast.
1. Power ON the PRV-9000.
2. Confirm that the TV input is set to the recorder.
52
PRV-9000 Operating Instructions
3. Load a recordable disc on to the tray.
Unformatted discs require up to one minute to initialize.
4. Set the recording mode (if necessary).
Refer to the previous sections 4.10.1 Initialize for VR Mode Recording
and 4.10.2 Initialize for Video Mode Recording for more information.
5. Use the CHANNEL +/– buttons to scroll to the TV channel.
If the recorder is stopped, use number buttons to enter a channel.
6. Press AUDIO to choose an audio channel for recording
TV Broadcast
Selected Audio
Broadcast Audio
L ch
R ch
Mono
Stereo/Mono/SP
Mono
Mono
Mono
Stereo/SAP
L
R
Stereo
Mono
L+R
L+R
Stereo
Stereo/Mono
Mono
Mono
Mono
SAP
Mono †
SAP
SAP
Stereo
L
R
Stereo
Mono
L+R
Mono
Mono
SAP
SAP
Stereo
Mono + SAP
Stereo + SAP
SAP
L+R
†
Monitor Audio
†
When recording in VR mode/MN32 (high quality) or in Video mode, the SAP channel is
recorded on this channel.
7. Set the audio recording level (if necessary).
Refer to the previous section, 4.10.4 Adjusting the Audio Recording
Level, for more information.
8. Press REC to complete the process.
DVD-RW: recording begins immediately
DVD-R: wait for the on-screen display to refresh then press the REC
button again begin the recording session.
Note: The previous table charts different recording settings for different types of
broadcasts. The Monitor Audio column indicates what can be heard during the
recording session.
Pressing the PAUSE button stops the recording process and pressing a
second time resumes the recording session. When recording to a VR disc,
resuming the recording process creates a chapter mark at that point.
Recording continues until the STOP button is pressed or the disc is full. To
record to a fixed time length, refer to the next section 4.10.6 One Touch
Recording or refer to Chapter 6: RECORDING FUNCTIONS & OPTIONS,
section 6.1 Timer Recording.
53
PRV-9000 Operating Instructions
4.10.6 One Touch Recording
The following method is the simplest way to
record in 30-minute segments.
1. Load a recordable disc in to the unit.
Unformatted discs require up to one
minute to initialize.
SETUP
2. Select the appropriate settings
according to the instructions in the
previous section.
Joystick / ENTER
* Record mode
* Audio channel
* Audio Recording level
REC
3. Set the recording time.
Press REC to begin recording (or after
the second press to record to a DVDR disc). Pressing the REC button
again increases the recording time by
30 minutes. Each subsequent
continues to increase the recording
time in 30-minute increments. The
maximum recording time is six hours.
4. Confirm that the correct recording time
appears on the display.
DISPLAY
TOP MENU
MENU
Press STOP to discontinue recording at any time. Once recording has begun,
pressing REC again cancels the selected recording time without stopping the
current record session. When the timed recording is complete, the PRV-9000
automatically enters the Standby mode.
4.11
Playing a Recording on a DVD Player
Most DVD players can play back finalized discs recording in the Video mode. A
few players are able to play back DVD-RW media recorded in the VR mode as
well. If the player is capable of playing a DVD-RW disc, finalizing the recording is
usually unnecessary. For information about playback compatibilities, refer to the
operating instructions included with your DVD player.
54
PRV-9000 Operating Instructions
4.12
Finalize a Disc
Finalizing a disc seals the recording against adding additional segments or from
editing the existing material. Often, DVD devices require a disc to be finalized or
fixed before playing back the recorded sequences.
Finalizing a disc recorded in the Video mode automatically creates a menu for
navigating the material. To access this menu, press MENU or TOP MENU on the
remote control.
Once a Video-formatted disc is finalized, additions and editing are blocked. Discs
recorded in the VR mode allow additional recordings and edits by reversing the
finalization.
Follow the directions below to finalize a disc.
1. Load the disc to be finalized.
Playback must be stopped before proceeding.
2. Press SETUP to reveal the menu.
3. Highlight Disc Setup from the Setup menu.
4. Press ENTER to access the Disc Setup menu.
5. Use the joystick to select Finalize from the submenu.
6. Highlight Start to prepare for disc finalization.
7. Press ENTER to begin finalizing the disc.
If disc finalization takes more than four minutes to complete, an option to cancel
the procedure appears on the screen. Press ENTER to cancel the operation. At
four minutes before completion of a longer project, the option to cancel the
operation disappears.
Disc format and content determines the amount of time required to finalize a disc.
To finalize a Video-formatted disc requires up to 20 minutes while finalizing a VR
disc may take up to an hour. Factors influencing finalization time are as follows:
Disc type
Total duration of recorded material
Number of titles on the disc
Note: DVD-RW discs finalized on a different DVD recorder may be un-finalized. Load
the disc and choose Undo Finalize from the Finalize menu.
4.13
Display Disc Information On-Screen
To reveal information about the disc, follow the step below.
1. Load a disc in to the recorder.
55
PRV-9000 Operating Instructions
2. Press DISPLAY to reveal the primary disc data.
3. Continue pressing DISPLAY to cycle through the disc data.
Refer to the following pages for data details.
4. Hide the information by pressing DISPLAY repeatedly until reaching the
end of the on-screen data loop.
Example of DVD-Video/Video mode on DVD-R or DVD-RW media:
On-screen data while playing a disc:
On-screen data while a disc is stopped:
*1 – The ’#’ symbol refers to the video signal recording at 24 frames per second in progressive scans.
(see PureCinema within the glossary at the end of this manual)
56
PRV-9000 Operating Instructions
Example of VR mode on DVD-RW media:
On-screen data while playing a disc:
On-screen data while a disc is stopped:
*2 – The ’!’ mark denotes that the contents are scrambled with CPRM security technology.
Example of CD media:
On-screen data while playing a disc:
57
On-screen data while a disc is stopped:
PRV-9000 Operating Instructions
Example of Video-CD media:
On-screen data while playing a disc:
On-screen data while a disc is stopped:
Example of Recording to DVD-R or DVD-RW media:
Note: The on-screen data automatically disappears after 150 minutes.
58
PRV-9000 Operating Instructions
Additional information may appear on-screen under the following conditions:
Within the Recording or Stopped data screen, a One Time Rec or Can’t
Record message may appear. These messages occur when the TV program
is copy-controlled or contains copy-controlled information.
On the Recording display, the total recording time in parenthesis assumes the
disc is12cm/4.7GB and calculates the value per the recording settings.
The Stop on-screen data for Video-format media becomes the same as DVDVideo once the disc is finalized.
If Frame Search is ON, the frame number appears next to elapsed time when
the disc is paused.
Recording and playback times for TV recordings are approximately 0.1 %
shorter than the actual time. This disparity is due to the slightly different
frame rates between television broadcasts and DVD technology.
Note: Transfer frame rate lists the amount of video and audio information recorded on
the disc. However, this rate is not an indication of picture or audio quality.
59
PRV-9000 Operating Instructions
5.0 OTHER PLAYBACK FEATURES
In addition to the features detailed in the first chapter within this manual, the PRV-9000
provides advanced features for pro-sumer and professional users. This chapter reviews
functions and abilities beyond standard operation. Skip forward to Chapter 6 to begin
operating the recorder.
Note: When playing DVD discs, the player or the disc may disallow a particular function. If a
function is unsupported or disallowed, either a
(player) or a
(disc) appears on-screen.
5.1
Disc Searches
To locate a certain point or sequence on a
disc, use one of the Search options. A
disc can be playing or stopped during any
searches. The recorder jumps to the
specified area of the disc and begins
playback.
Joystick / ENTER
PLAY
SEARCH MODE
CLEAR
Number Pad
MENU*
* Depending upon the disc, searches
using the menu is possible. Press
MENU on the remote control to
check for this feature.
Follow the directions below to initiate a search.
1. Press the SEARCH MODE button to initiate a search.
2. Continue pressing SEARCH MODE to select an option.
Title (DVD only)
Chapter/Track
Time (DVD and Video CD only)
OFF
60
PRV-9000 Operating Instructions
3. Enter the title/chapter/track number or the time (H, MM, SS).
Numbers enter from the right to the left thus the first number entered
appears on the far right (SS) then is forced towards the left (H) field
with each number added.
Title: enter the number – Title 2 = 2
Chapter/Track: enter the number(s) – Chapter 12 = 1, 2
Time: enter the entire number including zeros when appropriate
– 45 minutes in to material = 4, 5, 0, 0
– 1 hour, 15 minutes, 20 seconds = 1, 1, 5, 2, 0
4. Press PLAY or ENTER to begin playback.
Note: If searching by frame, the recorder pauses on the specified frame and waits for a
PLAY or other command before continuing.
5.2
Time & Frame Search Guidelines
When issuing a time search, playback may begin slightly before or after the
indicated time. The PRV-9000 is programmed to jump to the closed full frame.
In DVD technology, this full frame is known as an I frame. The recorder checks
before and after the selected point on the disc for the closed I frame then jumps
to that frame.
To issue a time search to DVD-Video and Video-format media, the disc must be
playing. The recorder ignores the command if the disc is stopped.
If Frame Search is ON, add a frame number to the end of the time search. The
frame number needs to be between 0 and frame 24 for the U.S. standard NTSC
(30 frames/per second) video. For example, 22 minutes, 10 seconds and 5
frames is entered as 2, 2, 1, 0, 0, 5.
When using Frame Search with film material, the recorded rate is 24 frames/per
second. The difference between the NTSC video rate of 30/fps and film’s 24/fps
may cause an exact frame search to fail. Film’s playback rate causes framecount inaccuracies.
Note: If searching by frame, the recorder pauses on the specified frame and waits for a
PLAY or other command before continuing.
61
PRV-9000 Operating Instructions
5.4
Change Playback Options
Playback options provide a way to watch
video with altered views or sound tracks.
The options include subtitles, audio
soundtracks, audio channels and viewing
angles. This section addresses each
option separately.
Note: Hold down the SHIFT button
to access the (black-barred) function
button, ANGLE.
Clear
Shift
Angle
Audio
Subtitle
Menu
5.4.1
Switch Subtitles
Many DVD-Video discs include subtitles with one or more language. The
disc jacket or case lists available languages and subtitle information.
Subtitles can be selected before and during playback.
Note: Some material only allows switching subtitles from the disc menu. Press
MENU on the remote control to check for subtitle options.
1. Load a disc into the recorder.
Disc may be playing or stopped.
2. Press SUBTITLE to reveal the first available option.
3. Continue pressing SUBTITLE to scroll through the subtitle options.
The current subtitle is shown on-screen and in the front panel display.
4. Hold down SUBTITLE and press CLEAR to switch OFF subtitles.
Note: To set subtitle preferences, refer to Chapter 9: INITIAL SETUP MENU, section
9.1.7 Language Settings.
5.4.2
Switch Audio Channels
Many DVD-Video discs include soundtracks with multiple languages or sound
effects. The disc jacket or case lists available languages. When playing a
DVD-Video disc (Video formatted and including DVD-R/RW media) recorded
62
PRV-9000 Operating Instructions
with two or more soundtracks, the recorder supports switching between
soundtracks during playback.
Note: Some material only allows switching soundtracks from the disc menu. Press
MENU on the remote control to check for soundtrack options.
Some discs provide both Dolby Digital and DTS soundtracks. Selecting DTS
limits playback to digital audio output with analog audio unsupported. To
listen to a DTS soundtrack, connect a DTS decoder to one of the recorder’s
digital ports. For more information, refer to the Chapter 2: CONNECTIONS,
section 2.2.4 Connect to Other A/V Sources – Satellite/Cable.
1. Press AUDIO to view the current audio channel.
2. Continue pressing AUDIO to scroll through the options.
3. Release the AUDIO button to select the displayed option and hide the
options menu.
Note: Some discs cause the recorder to momentarily interrupt playback when
changing the audio language. Neither the disc nor the recorder is defective.
When playing a Dual Mono recording on a VR formatted disc in Dolby Digital,
the audio channel is locked at the current setting. Set Dolby Digital Out to
Dolby Digital
PCM or listen via the analog outputs to switch channels.
For additional information, return to Chapter 2: GETTING STARTED, section
4.1.3 Set the Digital Audio Output.
5.4.3
Switch Camera Angles
Some DVD Video discs feature scenes shot from more than a single view.
Refer to the disc jacket or sleeve for details. Discs marked with a
indicate
that one or more angles are available for one or more scenes.
Follow the directions below to change the angle when available.
1. Press SHIFT on the remote control.
2. Press ANGLE to change the camera view.
If the disc is paused when the buttons are pressed, playback starts again
from the new viewing angle. If the disc is set to repeat play when the buttons
are pressed then the repeat command is cancelled.
63
PRV-9000 Operating Instructions
5.4.4
Set to Repeat Playback
A PRV-9000 can play back all or portions of a disc as well as loop material.
The repeat options are as follows:
Repeat one or more chapters on a DVD
Repeat one or more titles on a DVD
Repeat tracks/chapters/titles from a program list
refer to the following section for program list creation
Play back disc contents (any DVD or CD media)
Repeat individual tracks on a CD
Repeat individual tracks on a Video-CD
Note: While playing a disc, pressing REPEAT (SHIFT + 8/REPEAT button) also adds
the command.
Follow the directions below to loop disc playback.
1. Press SHIFT on the remote control.
2. Press A-B once at the beginning of the section for loop playback.
3. Press A-B again at the end of the sequence to loop.
Playback immediately jumps back to the selected starting point and
plays the looped segment continuously.
4. Press CLEAR to return to normal playback.
Note: The beginning and ending points must be within the same title when looping
material on a DVD disc.
The REPEAT and LOOPING functions are unavailable on CD media or a
Video-CD disc if the recorder is playing from a program list/PBC mode. For
more information regarding Program Lists, refer to the following section.
To repeat a sequence once without using the REPEAT function, follow the
directions below.
1. Press SHIFT on the remote control.
2. Press A-B once at the beginning of the section for loop playback.
64
PRV-9000 Operating Instructions
3. Press PLAY at the end of the sequence to jump back to the beginning
of the section for loop playback.
The recorder repeats the segment but continues beyond the end of the
looped sequence.
5.5
Create a Program (Play) List
Build a Program List to play
tracks, chapters or titles in a
pre-programmed series.
To add a Program List, use
combinations of the following
buttons:
• Jog Dial
• Pause
• Play
• Stop
• Numbers
• Clear
• Shift
Jog Dial
ENTER / Joystick
Pause
Stop
Clear
Play
Number Pad
Shift
7 / PROGRAM
Note: Program Lists are unavailable for unfinalized VR formatted discs.
A Program List may contain up to 24 list entries. Each List entry can be a
track/chapter/title number or a pause.
5.5.1
DVD Program List
The Program Memory retains Program Lists for a maximum of 24 discs with
each List containing up to 24 entries. The supported DVD disc formats are as
follows:
DVD-ROM
DVD-R
DVD-RW – video format
DVD-RW – VR format (media must be finalized before playback)
Note: All standard commands such as track/chapter/title skipping and scanning
are available during List programming.
65
PRV-9000 Operating Instructions
The directions below provide step-by-step instructions to create a Program
List for a DVD-R or DVD-RW disc.
1. Load a disc in to the recorder.
The disc may be playing, paused or stopped. If the disc is playing, the
picture appears in the lower right corner of the screen.
2. Press the SHIFT button on the remote control.
3. Press PROGRAM (7 on the number pad) to access Program Play List.
4. Use the joystick to highlight Title or Chapter.
If selecting Chapter, use the joystick to
move up to enter the title number in the
appropriate box. press Enter to select
that title. All chapters for the Program List
entry must come from this title.
5. Use the joystick to move to the first Program List number field if the
cursor is not in the proper location.
6. Enter a title/chapter number for this program list.
title/chapter 8: press 8 on the number pad then press ENTER
title/chapter 16: press 1 and 6 then press ENTER
Note: To add a pause instead of a title or chapter, press the PAUSE button for
a Program List entry instead of entering a title/chapter number on that line.
7. Press ENTER after each number entered on a Program List entry field.
8. Continue adding numbers to complete the Program List.
9. Use the joystick to move the cursor down to Program Memory.
10. Select ON to activate the Program Memory and save the program list.
Each time this disc is loaded, the recorder automatically recalls the
Program List.
11. Press PLAY to begin Program List playback.
To play the List at a later time, press SHIFT, then PROGRAM.
66
PRV-9000 Operating Instructions
To view the Program List, press SHIFT then PROGRAM on the remote
control.
To add a pause between List entries, press the PAUSE button instead of a
number button then press ENTER to add the pause. If there is already a
number in that space, all entries after that point are forced down one step in
the List. Add pauses anywhere except as the first step or the last step in a
Program List. After a pause, press PLAY to resume/continue playback.
To delete an entry from the Program List, position the cursor over the entry
then press CLEAR. All following entries move up by one entry line. To delete
a Program List, stop the disc playback then press CLEAR. Unless the
Program List is stored in the recorder’s memory, the List is also erased when
the disc is removed or the recorder’s power is turned OFF (standby mode).
To insert a line within a Program List, position the cursor over the desired slot
and enter the title/chapter/track. Press ENTER to store the entry and to force
all following entries to drop down by one step.
To cancel a playing Program List without stopping the disc playback, press
CLEAR. The disc continues playing from the current sequence but the List
entries are ignored.
Occasionally during List playback, the start of a non-programmed chapter
briefly appears on screen. This is not a malfunction but a part of the process
to change from the end of one chapter to the next programmed chapter.
To add a currently playing title/chapter/track to the Program List, press SHIFT
then hold down the PROGRAM button for at least two seconds. If the
Program List is not already present, the recorder creates a new List with the
current sequence as the first entry. For DVDs, if the recorder last created a
Program List by title then the new List is also by title. If the disc has never
had a Program List then the recorder creates a Chapter Program List.
Note: All chapters in a Program List must be within the same title.
To delete a stored Program List for a DVD, access the program menu (press
SHIFT then PROGRAM) and change the Program Memory option to OFF.
A Program List may have up to 24 entries. The PRV-9000 stores up to 24
Program Lists in the recorder’s memory.
5.5.2
CD Program List
The Program Memory retains Program Lists for a maximum of 24 discs with
each List containing up to 24 entries. The directions below provide step-bystep instructions to create a Program List for a CD or Video-CD disc.
67
PRV-9000 Operating Instructions
1. Place a disc in the recorder.
The disc may be playing, paused or stopped. If the disc is playing, the
picture appears in the lower right corner of the screen.
2. Press SHIFT on the remote control.
3. Press PROGRAM (7 on the number pad).
4. Enter the track number for this Program List.
For track: press 8 on the number pad then press Enter
For track 16: press 1 and 6 then press Enter
5. Press ENTER after each complete track number.
6. Continue entering all sequences for this List.
7. Press PLAY to begin playback of the Program List tracks.
To play the List at a later time, press SHIFT, then PROGRAM to exit
the menu.
To view the Program List, press SHIFT then PROGRAM on the remote
control.
To add a pause between List entries, press the PAUSE button instead of a
number button then press ENTER to add the pause. If there is already a
number in that space, all entries after that point are forced down one step in
the List. Add pauses anywhere except as the first step or the last step in a
Program List. After a pause, press PLAY to continue playback.
To delete an entry from the Program List, position the cursor over the entry
then press CLEAR. All following entries move back by one step. To delete a
Program List stop the disc playback then press CLEAR. Unless the Program
List is stored in the recorder’s memory, the List is also erased when the disc
is removed or the recorder’s power is turned OFF (standby mode).
To insert an entry within a Program List, position the cursor over the desired
slot and enter the title/chapter/track. Press ENTER to store the entry and to
force all following entries to advance by one step.
To cancel a playing Program List without stopping the disc playback, press
CLEAR. The disc continues playing from the current sequence.
To add a currently playing title/chapter/track to the Program List, press SHIFT
then hold down the PROGRAM button for at least two seconds. If a Program
68
PRV-9000 Operating Instructions
List is present, then the recorder creates a new list with the current sequence
as the first entry.
To delete a stored Program List for a CD, access the program menu (press
SHIFT then PROGRAM) and change the Program Memory option to OFF.
A Program List may have up to 24 entries. The PRV-9000 stores up to 24
Program Lists in the recorder’s memory.
69
PRV-9000 Operating Instructions
6.0 RECORDING FUNCTIONS & OPTIONS
The Pioneer PRV-9000 Pro DVD-Video Recorder is a stand-alone set-top unit that can
make DVD-Video discs with the press of a single button and creates the disc in real time.
Recordings are made using either write-once DVD-R or re-recordable DVD-RW discs that
are compatible with most DVD-Video players and DVD-ROM drives. In DVD-Video mode,
maximum program capacity is either one hour or two hours per disc, and up to 99
separate video segments (titles) can be recorded. The PRV-9000 Pro DVD-Video
Recorder can automatically generate a DVD title menu that can be used to access any
recorded title on a DVD-R compatible DVD-Video player similar to how movie titles are
used. Analog and digital A/V inputs allow easy connection to both legacy and current
video sources. The recorder outputs include component, Y/C and composite video signals.
This chapter addresses recording features for the PRV-9000.
6.1
Timer Recording
The PRV-9000 provides the following
two methods for timer recording:
Standard – timer recording
information is stored in the recorder
for later recording to any disc
SETUP
Disc – timer recording information
is stored on the destination disc for
later recording to that specific disc
STOP
CLEAR
ENTER / Joystick
REC(ord)
AUDIO
Timer recordings have a higher priority than the Auto Rec(ord) function. A timer
recording command interrupts an Auto Rec session with Auto Rec resuming after
the timer recording is complete. For more information about Auto Rec refer to
later in this chapter, section 6.3.1 Record from an External Component.
The PRV-9000 recorder supports up to 8 timed recording sessions scheduled up
to one month in advance. The timer may also be set to record every day or every
week at a specified time.
70
PRV-9000 Operating Instructions
Approximately two minutes before a timer program begins, the recorder’s power
automatically switches ON. Pressing Standby/ON at this point stops the
recording session.
The instructions below apply to both Standard and Disc timer recording; however,
the example screen-shots are taken from a Standard timer recording session.
1. Load a recordable disc in to the recorder.
If loading an unformatted DVD-RW disc, it is automatically formatted as a
VR disc. This process requires approximately 40 seconds.
2. Press SETUP to display the Setup menu.
If disc timer recording is active, the first menu item is Disc Timer Rec.
Figure 6-1: Timer Recording Setup Menu
3. Confirm Timer Rec is highlighted on the menu or highlight Disc Timer Rec if
the disc timer option is active.
4. Press ENTER to call the menu.
Timer Recording program appears on screen with 8 available entry lines.
Figure 6-2: Up to 8 Timer Recording sessions
5. Begin entering information for the timer recording(s).
Move the joystick left/right to move the cursor left/right.
Move the joystick up/down to scroll through options within that line.
Press ENTER to retain the program line information.
Press CLEAR to erase the current entry.
6. Select a date up to one month in advance or choose a daily/weekly option.
7. Set the Recording Start time.
8. Set the Recording Stop time.
71
PRV-9000 Operating Instructions
9. Choose the channel (CH) to be recorded.
Channel 2 through 69
Channel 1 through 125 for antenna reception channels
Channel 1 through 125 for cable reception channels
From an external output
10. Set the recording mode.
VR disc format – SP – standard, recording equivalent to level 21
VR disc format – MN – manual, recording level 1 through 32
VR disc format/DV input – any setting other than MN 1 through MN 8
Video disc format – set to SP (V1 and V2 is unavailable) then press the
REC MODE button afterwards to se the recording mode
Pressing ENTER or moving the cursor back to the program number field
before inputting all information on that line, erases all fields.
11. Press ENTER to complete entry lines.
12. Press SETUP to exit the menu once all timer recordings are entered.
13. Switch the unit to Standby before timer recording is scheduled to begin.
The timer indicator on the recorder’s front panel lights when the unit is
switched to Standby. A blinking light indicates that the disc is un-recordable
or that no disc has been loaded.
Note: Timer recording fails if the recorder is left ON rather than in Standby.
Audio is recorded according to the settings on the TV or other display device
(Stereo, Mono or SAP). Select the audio using the Audio button before switching
the recorder to Standby.
If Optimize Disc is active (ON) during a timer recording, the PRV-9000 adjusts
the recording quality to fit as much of the sequence as possible on to the disc.
However, if the timer entry is still too long for the available disc space, the Time
Over message appears.
If a timer entry overlaps another entry, the message Duplicate, appears next to
the entry.
6.1.1
Disc Timer Recording
The Disc Timer feature allows up to eight recording entries to be saved to the
disc rather than to the recorder. This function is convenient for storing
consecutive weekly episodes on to a single DVD-RW disc (VR format).
72
PRV-9000 Operating Instructions
Because the Timer is stored on the disc, the recording program activates
automatically every time the disc is loaded in to the recorder. Follow the
directions below to prepare a disc for storing a timer recording program. If the
disc is already prepared for disc timer recording, skip to Program A Disc
Timer Recording in the instructions below.
Note: Before programming for disc timer, set the disc to VR format.
Prepare Media for Disc Timer Programming:
1. Load a recordable disc in to the recorder.
If loading an unformatted DVD-RW disc, it is automatically formatted as
a VR disc. This process requires approximately 40 seconds.
2. Press SETUP to display the Setup menu.
If disc timer recording is active, the first menu item is Disc Timer Rec.
3. Highlight Disc Setup from the Setup menu by using the joystick.
4. Confirm that Basic is highlighted.
5. Use the joystick to move to Disc Timer Rec on the Basic submenu.
6. Set Disc Timer Rec to ON.
Use the joystick to highlight ON then press ENTER.
Note: Ejecting the disc before programming at least one complete entry causes
the Disc Timer Rec option to revert automatically to OFF.
7. Press SETUP to exit the Disc Setup menu.
Program A Disc Timer Recording:
1. Load a recordable disc in to the recorder.
If loading an unformatted DVD-RW disc, it is automatically formatted as
a VR disc. This process requires approximately 40 seconds.
2. Press SETUP to display the Setup menu.
If disc timer recording is active, the first menu item is Disc Timer Rec.
3. Confirm that Disc Timer Rec is highlighted on the menu.
4. Press ENTER to access the Disc Timer Rec menu.
The Timer Recording program appears on screen with 8 entry lines
available.
5. Select an entry line by moving the joystick down/up.
6. Use the joystick to access an entry line.
73
PRV-9000 Operating Instructions
7. Begin entering information for the timer recording(s).
Move the joystick left/right to move the cursor left/right.
Move the joystick up/down to scroll through options within that line.
Press ENTER to retain the program information.
Press CLEAR to erase the current entry.
8. Select a date up to one month in advance or choose a daily or weekly
option.
9. Set the recording Start time.
10. Set the recording Stop time.
11. Choose the channel (CH) to be recorded.
Channel 2 through 69
Channel 1 through 125 for antenna reception channels
Channel 1 through 125 for cable reception channels
From an external output
12. Set the recording mode.
VR disc format – SP – standard, recording equivalent to level 21
VR disc format – MN – manual, recording level 1 through 32
VR disc format/DV input – any setting other than MN 1 through MN 8
Video disc format – set to SP (V1 and V2 is unavailable) then press
the REC MODE button afterwards to se the recording mode.
13. Press ENTER to save each entry line.
14. Activate the Confirm option to check required disc space if necessary.
See the following section for details.
15. Press SETUP to exit the menu once all disc timer sessions are entered.
16. Switch to Standby before timer recordings are scheduled to begin.
The timer indicator on the recorder’s front panel lights when the unit is
switched to Standby. A blinking light indicates that the disc is unrecordable or that no disc has been loaded.
Note: Timer recording fails if the recorder is left ON rather than in Standby.
Another option is to use the VCR Plus+ feature to program a timer recording.
For additional information on this feature, refer to Chapter 6: RECORDING
FUNCTIONS & OPTIONS, section 6.2 VCR Plus+ Program System.
74
PRV-9000 Operating Instructions
Use a Disc With a Disc Timer Program:
1. Load the disc with a disc timer program in to the unit.
RESERVED appears in the display panel while the Disc Timer Rec
option automatically switches to ON.
2. Switch the recorder to Standby.
Turn OFF a Disc Timer Program:
1. Press SETUP to display the Setup menu.
If disc timer recording is active, the first menu item is Disc Timer Rec.
2. Highlight Disc Setup from the Setup menu.
3. Set Disc Timer Rec to OFF (from the Basic menu).
4. Press SETUP to exit the Disc Setup menu.
Disc timer recordings become active when a disc with at least one disc timer
program is loaded in to the recorder. Disc timer programs also become
active when the Disc Timer Rec option is set to ON. When a disc timer
program activates, any standard timer recording setting are turned OFF.
Ejecting the disc or changing the Disc Timer Rec option to OFF activates the
standard timer program(s) when available. Loading an unformatted disc or a
disc without a disc timer program deactivates the option.
Note: Disc timer programming is unavailable on a protected disc. For more
information, refer to Chapter 7 EDITING FUNCTIONS & OPTIONS, section 7.4.12
Protecting/Unprotecting an Original Title.
6.1.2
Check Available Disc Space
To confirm that all timer entries will fit on to the loaded disc, follow the
directions below.
1. Load the disc with a disc timer program in to the unit.
RESERVED appears in the display panel while the Disc Timer Rec
option automatically switches to ON.
2. Press SETUP to access the Setup menu.
3. Confirm that Disc Timer Rec is highlighted on the menu.
4. Press ENTER to access the option.
5. Use the joystick to move up to Confirm.
75
PRV-9000 Operating Instructions
6. Press ENTER to calculate the disc space needed for the timer
recordings already present.
7. Verify that Rec OK appears next to each timer recording entry.
If the timer program is too long for the disc then Time Over appears
next to the entry. However, the timer entry records as much of the
program as possible until the disc is full.
8. Make adjustments as necessary.
9. Press ENTER to confirm adjusted lines.
10. Press SETUP to exit the Timer Program screen and return to the main
menu.
With a daily or weekly program, the Rec OK message appears next to the
last entry that can fit on the loaded disc (up to a maximum of one month in
advance).
If Optimize Disc is active (ON) during a timer recording, the PRV-9000
adjusts the recording quality to fit as much of the sequence as possible on to
the disc. However, if the timer entry is still too long for the available disc
space, the Time Over message appears.
6.1.3
Check Timer Recording Details
To verify that a timer program is ready to record, refer to the directions below.
1. Stop the recorder.
2. Press FUNCTION on the front panel of the recorder until PROGRAM 1
appears in the display.
If there are no timer programs, PROGRAM NON appears in the display.
3. Turn the Smart Jog on the front panel to display the timer information.
PROGRAM 1
DATE
8<WED>
START 11:15am
STOP
1:15pm
MODE SP
2CH
4. Wait ten seconds for the data to disappear, returning the recorder to
normal operation.
76
PRV-9000 Operating Instructions
6.1.4
Edit Timer Recording Settings
Refer to the following guidelines when editing a Timer program:
Previous timer recording program(s) may not be in progress
Disc tray can be empty or contain a disc
Return to the number field to lock in changes
Check available disc space after changes
To edit a timer recording setting, follow the directions below.
1. Power ON the recorder.
2. Press SETUP to reveal the Setup menu.
3. Select Timer Rec from the menu or select Disc Timer Rec if the disc
timer option is active.
The Timer Recording program appears on screen with 8 entry lines
available.
4. Make your changes to one or more line entries.
5. Press SETUP to exit the menu.
6. Set the recorder to Standby prior to the next timer recording selection.
6.1.5
Extend a Timer Recording in Progress
Follow the directions below to adjust the stopping point of a timer recording
session after the program begins recording.
1. Press and hold the REC button for approximately three seconds.
The timer program appears on screen.
2. Press REC to extend the recording session by 30 minutes.
3. Continue pressing REC to extend the recording session.
Each button-press equals an additional 30 minutes with a maximum
recording time up to six hours depending upon your media format and
the recording mode.
4. Wait three seconds while the recorder registers the changes and
automatically closes the menu.
77
PRV-9000 Operating Instructions
6.1.6
Stop a Timer Recording in Progress
To stop a timer program already in progress, follow the instructions below.
1. Press and hold the REC button for approximately three seconds.
When the indicator turns off, the program is cancelled but recording
continues.
2. Press Stop to end the recording session.
It may require as much as 30 seconds to stop the recording process.
Approximately two minutes before a timer program begins, the recorder’s
power automatically switches ON. Pressing Standby/ON during this period
stops the recording session but does not cancel the timer program.
6.1.7
Cancel Timer Recording
A Timer Program may be cancelled any time prior to the recording start time.
Follow the directions below to cancel a timer recording program.
1. Press SETUP to access the setup menu.
2. Select Timer Rec from the menu or select Disc Timer Rec if the disc
timer option is active.
The Timer Recording program appears on screen.
3. Move the cursor to highlight the timer program number to be deleted.
4. Press CLEAR to delete the timer program entry.
When the recorder is in Standby with the timer indicator lit, switching ON the
recorder keeps the timer program from recording the selection but does not
cancel the timer program.
Approximately two minutes before a timer program begins, the recorder’s
power automatically switches ON. Pressing Standby/ON at this point stops
the recording session but does not cancel the timer program. Press and hold
the REC button for three seconds to cancel the timer program.
To cancel a timer recording when the unit is locked, press and hold the STOP
button on the front panel for three seconds to unlock the recorder. Then, press
and hold the REC button for three seconds to cancel the timer program.
78
PRV-9000 Operating Instructions
6.2
VCR Plus+ Programming System
The VCR Plus+ system allows you to use
special codes included in most television
channel guides to record particular
broadcasts. These codes provide the
following information to the recorder:
Date of broadcast
SETUP
ENTER / Joystick
Broadcast Channel
Start time
REC MODE
PlusCode
End time
CLEAR
Number Pad
6.2.1
VCR Plus+ Automatic Timer Recording
VCR Plus+ makes programming timer
recordings very simple. Most television
guides publish VCR Plus+ system PlusCode
numbers with their program details. To make
a timer recording from broadcast signals,
input the code for that program. The date,
start/stop times, and channel settings are
automatically programmed. To complete the
timer recording settings, select a recording
mode, the quality level, and the recording
frequency.
SETUP
ENTER /
joystick
CLEAR
PlusCode
REC MODE
79
Number Pad
PRV-9000 Operating Instructions
The directions below include images of the on-screen displays for a Standard
recording however the instructions apply to both Standard and Disc timer
recording.
1. Load a recordable disc in to the recorder.
If loading an unformatted DVD-RW disc, it is automatically formatted as
a VR disc. This process requires approximately 40 seconds.
2. Press the PlusCode button to display the VCR Plus+ menu screen.
3. Enter the PlusCode programming code using the number pad.
To erase the last digit entered, press the CLEAR button.
To correct a PlusCode, Rec Mode, or Rec Times setting (after
pressing ENTER), press the RETURN button on the remote.
4. Press REC MODE to change the recording quality and adjust the times.
VR format discs – switch between SP and MN recording (MN
setting requires an additional choice of a quality level)
Video format discs – although V1 and V2 are unavailable, leave at
the SP setting then use REC MODE to select a quality level
5. Select the frequency option using the joystick (moving left/right).
Frequency options are Once, Daily, and Weekly.
6. Press ENTER to confirm the new settings.
Program details flash on the bottom of the screen then the menu
automatically closing after three seconds.
Note: If the guide channels still require set up, the recorder prompts you to
select the television channel broadcasting the program.
7. Select the channel if necessary by moving the joystick left/right.
Channel options scroll through the field.
8. Press ENTER to confirm the settings.
9. Switch the recorder in to Standby before the recording is due to start.
To check or change a program, follow the steps below:
1. Press SETUP to access the Setup menu.
2. Press ENTER to display the timer programming screen.
3. Review and adjust programs as needed.
4. Press SETUP to exit the menu.
5. Place the recorder in Standby mode prior to the program start time.
80
PRV-9000 Operating Instructions
To confirm that all timer entries will fit on the loaded disc, follow the steps
below.
1. Use the joystick to highlight Confirm on the Timer Program screen.
2. Press ENTER to calculate the disc space needed for the recordings.
3. Verify that Rec OK appears next to each timer recording entry.
If the timer program is too long for the disc then Time Over appears
next to the entry. However, the timer entry records as much of the
program as possible until the disc is full.
With a daily or weekly program, the Rec OK message appears next to the
last entry that can fit on the loaded disc (up to a maximum of one month in
advance).
If Optimize Disc is active (ON) during a timer recording, the PRV-9000
adjusts the recording quality to fit as much of the sequence as possible on to
the disc. However, if the timer entry is still too long for the available disc
space, the Time Over message appears.
6.2.2
Program With VCR Plus+ When the Power is OFF
The recorder can be in Standby mode when entering VCR Plus+ program
codes. The following guidelines apply to recording with VCR Plus+ codes.
Guide channels must be programmed in to the recorder before using a
VCR Plus+ codes.
The recording mode is locked when using VCR Plus+ program codes.
VCR Plus+ codes are valid with Once (single-session) recordings only.
Daily and Weekly timer recordings are unavailable with this feature.
To program in VCR Plus+ codes while the recorder is powered OFF (Standby
mode), follow the directions below.
1. Press the PLUSCODE button.
The front panel displays the current recording mode and prompts the
user to enter a code.
2. Input the number using the number pad on the remote control.
To erase the last digit entered, press CLEAR.
(becomes)
SP PlusCode#
81
SP
29324
PRV-9000 Operating Instructions
3. Press ENTER to register the code.
The display shows the timer settings: Date > Start Time > End Time >
Recording Mode/Channel
If CODE ERROR appears on the display, check the PlusCode and
return to step 1 above.
If CANNOT RECORD appears on the display, the PlusCode is
correct. However, there may be another reason for the failure such
as a previous timer program set for that time period.
6.3
Record From an External Input
The PRV-9000 accepts input from
external components, satellite tuners
and DV output devices. The following
sections address each input device.
ENTER / Joystick
PLAYLIST
JOG MODE
Jog Dial
RECord
STOP
PLAY
INPUT SELECT
REC MODE
TOP MENU
Picture disturbance in the recording may occur in the following situations
source component pauses playback
source component plays an unrecorded segment
power fails in the source device
the DV cable is disconnected
Although cables are seated properly and the settings are correct, the recorder is
subject to the following limitations:
The recorder is only compatible with DV-format (DVS-SD) camcorders.
Digital satellite tuners and Digital VHS video recorders are incompatible.
82
PRV-9000 Operating Instructions
The recorder allows one camcorder interaction at a time.
Controlling the recorder with equipment connected through the DV IN/OUT
port is unavailable. Controlling a second PRV-9000 connected to this port is
also not an option.
A few camcorders fail to accept commands sent through the DV IN/OUT port.
Some camcorders may ignore particular commands sent through this port.
Check with the camcorder’s manufacturer for support information.
The recorder outputs DVD video from the DV IN/OUT port; passing through
signals from the built-in TV tuner, CD, Video CD and other equipment is
unavailable.
Copy-protected or copy-once DVD signals are blocked from passing out
through the DV IN/OUT port.
Although digital camcorders may record as stereo 16-bit/48kHz or twin-stereo
tracks of 12-bit/32kHz, the recorder only records a single stereo track. Set DV
Input to Stereo1 or Stereo2.
Audio output from the DV IN/OUT port is limited to 16-bit.
Audio input through the DV IN/OUT port must be 32kHz or 48kHz rather than
44.1kHz.
6.3.1
Record From an External Component
Follow the directions below to record from an external component such as a
standard camcorder or a VCR. Skip to the next section to record from digital
camcorders.
1. Connect the external component to the recorder.
Refer to the chapter on Connections for port information.
2. Power up both devices.
3. Press INPUT SELECT repeatedly to scroll through input ports.
Input Port
On-Screen Display
Built-in Tuner
(Channel number)
INPUT 1
L1 (S-Video)
INPUT 2/AUTO REC
L2 (BNC)
INPUT 3 (front panel)
L3
DV IN/OUT
DV
4. Leave the selection highlighted.
83
PRV-9000 Operating Instructions
5. Begin recording.
When recording from DV In/Out, the recorder automatically pauses
recording if the signal is missing or interrupted. For example, the
recorder pauses during blank sections of a digital camcorder tape.
Check the Audio In settings for External Audio, Dual Mono Recording and DV
Input when recording any sequence. Often audio errors are traced to
incorrect Audio In settings rather than to a failure of the device.
Note: If the source material is copy-guarded, the recorder ignores the request.
6.3.2
Record From A Digital Camcorder
Before recording from a digital camcorder, set the audio input for the DV
IN/OUT. Use the recorder’s remote to control both devices.
Refer to the following information when recording from a digital camcorder:
source signal must be in the DVS-SD format
verify that your camcorder accepts commands from the recorder’s
remote
a PRV-9000 DVD recorder cannot control a second PRV-9000 (added
with a DV cable)
the recorder ignores commands sent remotely through a component
connected to the DV IN/OUT port
the recorder ignores commands to duplicate copy-protected material but
does play back the protected data
date and time information from a DV cassette is non-transferable
To record material from a digital camcorder, follow the directions below.
1. Connect the digital camcorder to the front panel DV IN/OUT port.
2. Verify that the camcorder is set to video transfer (VTR) mode.
3. Set recording features.
MN1 thought MN 8 is unavailable when recording from DV IN/OUT
Audio is 2ch Dolby Digital when recording from DV IN/OUT
4. Check the DV audio input settings.
Choose between Stereo1 (original audio) and Stereo2 (overdub)
Set the DV Input from the Initial Setup menu, sub-menu Audio In
Verify your settings for Audio In (External & Dual-Mono Recording)
84
PRV-9000 Operating Instructions
5. Press DISCNAVI (VR format discs) or TOP MENU (Video format discs).
The DISCNAVI or Title List screen appears.
6. Press PLAYLIST to toggle between Original and Playlist.
Set to Original for VR formatted discs.
7. Select DV Record from the menu.
Note: The DV Record is only available when the digital camcorder is in VTR
mode and has a tape loaded.
8. Scan through the camcorder tape to locate the necessary segment.
For best results, pause the playback before beginning to record.
If supported, use the recorder’s remote buttons (STOP, PLAY,
PAUSE and jog dial) to control the camcorder.
9. Press ENTER to begin recording.
Note: Pressing the DISCNAVI or RETURN buttons while recording does not exit the
DV Recording men screen.
If the signal to the recorder is interrupted, the recording pauses. Recording is
also paused if the recorder detects a copy-protected signal. Recording
continues when the copy-protected sequence ends.
To pause of stop the recording, select Rec Pause or Rec Stop from the
menu. The camcorder continues to play back the tape but the recorder
responds to the menu selection.
If the recording is re-started after stopping the camcorder, the recorder may
miss the first few seconds of the sequence. Use the PAUSE button on the
camcorder until the recorder is active so that the entire sequence is captured.
Recording begins automatically when the camcorder’s PAUSE button is
released.
When recording in Video mode, the final recorded frame may stay on-screen
a few seconds after pressing the Rec Stop.
6.3.3
Record From a Satellite Tuner
To connect a satellite tuner or other kind of set-top box to the PRV-9000, use
the recorder’s INPUT 2/AUTO REC (BNC) port. Recording can start and
stop automatically If the satellite tuner provides a timer recording option. For
devices without a built-in recording timer, add an external timer.
After programming an auto-start recording, the PRV-9000 begins recording as
soon as a signal from the tuner is detected. The recorder may lag a few
85
PRV-9000 Operating Instructions
seconds behind the actual time so adjust the timer program for this slippage.
When the signal ceases, the recorder stops recording.
Follow the directions below to record from a satellite tuner or other device.
1. Set the timer on the satellite tuner.
Refer to the device’s operating instructions for assistance.
2. Switch the satellite tuner’s power to OFF (or in to Standby).
3. Load a recordable disc in to the recorder.
4. Verify Audio In options are at the desired settings.
For more information, refer to Chapter 9:INITIAL SETTINGS MENU,
section 9.1.5 Audio In Settings.
5. Press REC MODE to set the recording mode.
Refer to Chapter 4: GETTING STARTED, section 4.10 Initializing
Recording Modes.
6. Press and hold FUNCTION on the recorder’s front panel for
approximately three seconds.
The recorder returns to Standby and the AUTO REC indicator lights.
The recorder turns ON then OFF in sync with the satellite tuner.
The auto-start function is unavailable in the following situations:
recorder is already recording a program
loaded disc is full or other than recordable media
loaded disc is protected
loaded disc already contains the maximum number of titles (99)
another timer recording program is already in progress
timer program supercedes a auto-start program
auto-start automatically launches after the timer program is complete
6.3.4
Record From the DV Output Port
To record from a non-copy-protected DVD disc to a camcorder, use the DV
IN/OUT port on the recorder’s front panel. Follow the directions below to
record from a disc to a camcorder.
1. Connect the camcorder to the DV IN/OUT port.
2. Load the source disc.
3. Scan to the segment to be recorded.
86
PRV-9000 Operating Instructions
4. Start recording on the camcorder.
Refer to the manufacturer’s operating instructions for assistance.
5. Press PLAY to begin disc playback.
6. Press STOP to halt disc playback.
7. Stop the camcorder.
6.4
Recorder Lock-Out
The command lock-out feature is operated from the front panel only. To lock out
commands from the remote control as well as from the front panel, follow the
directions below.
1. Switch the recorder in Standby.
2. Press and hold the STOP button on the front panel for three seconds.
When the recorder is locked, the Lock Indicator (on front panel) blinks
twice.
Note: If a command is sent when the recorder is locked, the indicator flashes twice
after each attempt to send a command.
3. Press and hold the STOP button on the front panel for an additional three
seconds to unlock the recorder.
To cancel a timer recording when the unit is locked, press and hold the STOP
button on the front panel for three seconds to unlock the recorder. Then, press
and hold the REC button for three seconds to cancel the timer program.
87
PRV-9000 Operating Instructions
7.0 EDITING FUNCTIONS & OPTIONS
The PRV-9000 provides editing options
for the original content or for content
copied (Playlist) to a VR formatted
DVD-RW disc. The following sections
provide instructions and general editing
feature information. Being as creating
titles and chapters is up to the DVD
author, the steps provide guidelines
and suggestions rather than specific
directions. Each disc supports a single
Playlist so add all possible content
before editing the Playlist.
CHP MARK
NAVI MARK
PLAYLIST
DISCNAVI button
DISCNAVI
ENTER / Joystick
PREV / NEXT
7.1
General Information
Edits made to Original content change the actual material on the source disc.
For example, erasing a title from the original content delete the material thus
freeing space on the disc for additional recordings.
When editing a Playlist, the material remains on the disc. For example, erasing a
title from the Playlist tells the recorder to skip that title during playback but the
material is still available for later edits.
DVD titles consist of one or more chapters. When a title is inserted in to a
Playlist, all the chapters within that title also appear on a Playlist.
A Part is a portion of the original material or Playlist content. Adding a part to the
Playlist creates a new title consisting of a section (i.e. part) from an original title.
Erasing a part removes that segment of a title from the original and/or Playlist
content.
An example of a professional use for showing a Playlist rather than the Original
content is within a shopper’s kiosk. If disc content includes upcoming product
specials and sales announcements, the data can be pulled in to the Playlist but
skipped after the information no longer applies. However, the data remains on
the disc as a record of the store’s activity.
88
PRV-9000 Operating Instructions
7.2
Add Chapter Marks
The PRV-9000 supports up to 999 chapter markers per disc for original or Playlist
content. Chapter marks, used primarily for search functions, can be placed
anywhere within original or Playlist content during recording or playback
sessions. When editing for chapter (or title) start and end points (frames), allows
for some frame deviation when erasing, adding and moving parts.
Note: For detailed information regarding I/P/B frames, refer to the DVD FAQ website
(http://dvddemystified.com/dvdfaq.html).
1. Play the title (Original or Playlist).
Press PLAYLIST to toggle between original and Playlist playback.
Note: Chapter markers can also be added during recording sessions.
2. Press CHP MARK at the point to start a new chapter.
A chapter mark icon (
) appears on-screen.
Note: During Playlist playback, there may be a momentary pause between edit points. This
is not a malfunction but part of the segment processing.
7.3
Edit With DISCNAVI
Use DISCNAVI (Disc Navigator) to build and edit a Playlist. DISCNAVI also
provides a way to record material from a digital camcorder, to play individual
titles, to erase titles and make other changes to Original content.
Note: To edit using DISCNAVI, the recorder must be stopped.
To move around the disc using DISCNAVI, follow the directions below.
1. Press DISCNAVI on the remote control to reveal the navigation menu.
Press DISPLAY to reveal more detailed title information for each title.
Use the PREV/NEXT buttons to scroll through the menu pages if there
are more than six titles on the disc.
Press DISCNAVI a second time to exit the menu.
2. Press PLAYLIST to switch between playback sources, Original or Playlist.
The tabs at the top of
the screen indicate
the source. The left
side of the screen
lists the DISCNAVI
functions.
89
PRV-9000 Operating Instructions
3. Choose Chapter to switch to the chapter view.
Use the joystick to highlight Chapter then press ENTER to open the submenu.
If necessary, press the RETURN button to access the DISNAVI menu on the
left side of the screen.
4. Select the title that contains the necessary chapters.
The main portion of the screen reveals thumbnails of the chapters within
the selected title.
5. Proceed to the following sections for editing functions using DiscNavi.
7.3.1
Change the DISCNAVI Title Thumbnail
In the DISCNAVI menu, each title and chapter is listed with a thumbnail
picture taken from the beginning of the title or chapter. If the title thumbnail is
ineffective to represent that segment, change the still picture to another
image from within the title. Only title thumbnails can be changed, this feature
is unavailable for chapter thumbnails.
Follow the directions below to change a title thumbnail.
1. Play the title (Original or Playlist content).
2. Press NAVI MARK to capture the current image as the new thumbnail.
The image represents the title in the DISCNAVI menu for original and
Playlist content.
3. Press DISCNAVI to return to the DiscNavi menu.
Note: To change the default image capture point, refer to Chapter 9: INITIAL SETUP
MENU, section 9.2.5 NAVI MARK.
7.3.2
Play A Chapter From DISCNAVI
Follow the steps below to play a chapter from within the DISCNAVI menu.
1. Press DISCNAVI to access the menu.
2. Press Playlist to change to the Playlist menu if necessary.
3. Use the joystick to scroll to Chapter.
If necessary, press the RETURN button to access the DISNAVI menu
on the left side of the screen.
4. Press ENTER to select the Chapter view.
5. Press ENTER to select the current title or enter a new title number.
If a title has been selected previously, skip this step.
6. Scroll to the appropriate chapter (or title).
7. Press PLAY to begin playback.
90
PRV-9000 Operating Instructions
7.3.3
Create a Name For a Title
Names (title labels) may be up to 64 characters consisting of letters, numbers
and a limited series of symbols. Title names may be associated with the
original source or to a Playlist. A predetermined name is assigned to the title,
however, pressing the ERASE button removes one character at a time. Some
systems reduce the character quantity to the standard alphabet and the digits
0 through 9.
Note: Discs formatted on a different recorder limit the character sets.
To create a name for a title, follow the steps below.
1. Press the DISCNAVI button to access the menu.
2. Press Playlist to change to the Playlist menu if necessary.
3. Use the joystick to scroll to Title Name.
If necessary, press the RETURN button to access the DISNAVI menu
on the left side of the screen.
4. Press ENTER to access the characters menu.
5. Press ERASE repeatedly to delete the existing ‘name’ (optional).
Press ERASE to remove each auto-assigned character.
6. Use the joystick to drop down from the name field to the characters.
Move left to select either Capitals or lowercase letters if necessary.
7. Highlight the first character for the title name.
8. Press ENTER to lock in the character.
The selection appears in the field above.
9. Continue selecting all characters for the title name.
Scroll down to the Delete button to remove the tentative name if
necessary. Press ENTER to confirm the deletion.
Scroll down to the SPACE button to add spacing between
characters. Press ENTER to confirm the space.
10. Scroll down to the SET button to lock in the title name.
11. Press ENTER to save the name and return to the DISCNAVI menu.
12. Press DISCNAVI to exit the menu.
7.3.4
Create a Playlist Title
Creating a new Playlist title copies the entire title from the original source to
the Playlist. The title appears in the Playlist with the original chapter markers.
However, Playlist chapter markers are unaffected if chapter markers are
91
PRV-9000 Operating Instructions
added to the original material after the Playlist is created. Playlists support
up to 99 titles.
Follow the direction below to add a title to the Playlist.
1. Press the DISCNAVI button to access the menu.
2. Press PLAYLIST to change to the Playlist menu if necessary.
3. Select Make Title from the DISCNAVI Playlist menu.
4. Scroll to the appropriate Playlist line if necessary.
If the Playlist is empty, make a title at the beginning of the Playlist.
If there are titles already on the Playlist, choose where to insert the title.
5. Highlight the Original title to add to the Playlist.
6. Press ENTER to select the title.
The added title appears in the Playlist.
For information about only adding parts of a title, refer to Chapter 7: EDITING
FUNCTIONS & OPTIONS, section 7.4.9 Add Part of a Title to a Playlist.
Note: During Playlist playback, there may be a momentary pause between edit
points. This is not a malfunction but part of the segment processing.
7.3.5
Copy a Playlist Title
Use the Copy Playlist Title function to paste a copy of the title to any line on
the Playlist.
1. Press the DISCNAVI button to access the menu.
2. Press PLAYLIST to change to the Playlist menu if necessary.
3. Use the joystick to access the menu on the left side of the screen.
4. Scroll down to Copy on the Playlist menu.
5. Press ENTER to initiate the command.
6. Use the joystick to highlight the title to be copied.
7. Press ENTER to confirm the title selection.
8. Scroll to the location for the copy of the title.
9. Press ENTER to copy the title and update the Playlist.
10. Press DISCNAVI to exit the menu.
92
PRV-9000 Operating Instructions
7.3.6
Move a Title/Chapter
The PRV-9000 supports moving chapters and titles within a Playlist. Follow
the steps below to move a title or to move a chapter within a title.
Move a Title:
1. Press the DISCNAVI button to access the menu.
2. Press Playlist to change to the Playlist menu if necessary.
3. Use the joystick to access the menu on the left side of the screen.
4. Scroll down to Move on the Playlist menu.
5. Press ENTER to initiate the move command.
6. Use the joystick to choose the title to be moved.
7. Press ENTER to confirm the title.
8. Use the joystick to select the new location for the title.
9. Press ENTER to confirm the move and to update the Playlist.
10. Press DISCNAVI to close the menu.
Move a Chapter:
1. Press the DISCNAVI button to access the menu.
2. Press Playlist to change to the Playlist menu if necessary
3. Use the joystick to access the menu on the left side of the screen.
4. Switch to the Chapter view.
5. Scroll down to Move on the Playlist menu.
6. Press ENTER to initiate the move command.
7. Use the joystick to choose the chapter to be moved.
8. Press ENTER to confirm the chapter.
9. Use the joystick to select the new location for the chapter.
The chapter may only be moved within that title.
10. Press ENTER to confirm the move and to update the Playlist.
11. Press DISCNAVI to close the menu.
93
PRV-9000 Operating Instructions
7.3.7
Combine Two Chapters In To a Single Chapter
The Combine function merges two adjacent chapters (Playlist or Original) in
to a single chapter. The two chapters must be in the same title. Chapters
created from erasing a segment or part between them cannot use this
function.
To combine to adjacent chapters, follow the directions below.
1. Press the DISCNAVI button to access the menu.
2. Press the PLAYLIST button to switch to the Playlist screen if needed.
3. Use the joystick to move to the menu on the left side of the screen.
4. Scroll to Chapter to display the chapter view.
5. Press ENTER to confirm the chapter view.
6. Select Combine from the menu.
7. Use the joystick to choose the dividing line between the two chapters.
8. Press ENTER to combine the chapters in to one chapter.
9. Press DISCNAVI to exit the menu.
Note: This function is unavailable if there is only one chapter in a title.
7.3.8
Erase a Title/Chapter
When a title or chapter is erased from the Playlist, the title/chapter is only
deleted from the Playlist rather than from the original content. Material erased
from the original content is lost.
Erasures of over one minute in duration (dependent upon recording levels)
increase the recording time available on the disc. Available recording time is
unaffected when segments removed are less than one minute in duration.
Erase a Title:
1. Press the DISCNAVI button to access the menu.
2. Press Playlist to change to the Playlist menu if necessary.
3. Select ERASE from the appropriate DISCNAVI menu.
Original or Playlist
4. Use the joystick to select the title to be erased.
5. Press ENTER to delete the title and reveal the updated title list.
94
PRV-9000 Operating Instructions
Erase a Chapter:
1. Press the DISCNAVI button to access the menu.
2. Press Playlist to change to the Playlist menu if necessary.
3. Use the joystick to switch to Chapter view.
4. Press ENTER to confirm Chapter view.
5. Select ERASE from the appropriate DISCNAVI menu.
Original or Playlist
6. Use the joystick to select the chapter to be erased.
7. Press ENTER to delete the chapter and reveal the updated title list.
7.3.9
Add Part of a Title to a Playlist
To define a portion of the Original title as a new title in the Playlist, follow the
directions below.
1. Press the DISCNAVI button to access the menu.
2. Press Playlist to change to the Playlist menu if necessary.
3. Select Add Part from the Playlist DISCNAVI menu.
4. Scroll to the appropriate Playlist line if necessary.
If the Playlist is empty, add the segment at the beginning of the Playlist.
If there are titles already on the Playlist, choose where to insert the title.
Note: The segment may be added as a chapter to an existing title.
5. Use the PLAY, PAUSE and CM SKIP buttons as well as the jog dial to
find the start point of the segment/part.
6. Press ENTER to mark the start point.
7. Use the PLAY, PAUSE and CM SKIP buttons as well as the jog dial to
define the end point of the segment/part.
8. Press ENTER to mark the end point.
Jump between the start and end points to fine-tune the selection if
necessary.
9. Select OK to save the additional part.
10. Press DISCNAVI to exit or press RETURN to reveal the Playlist screen.
95
PRV-9000 Operating Instructions
7.3.10 Erase a Part of a Title
Deleting a part of the Playlist erases nothing from the original material.
However, any portion of material deleted from the original source is lost from
both the original disc and the Playlist. Erasures of over one minute in duration
(dependent upon recording levels) increase the recording time available on
the disc. Available recording time is unaffected when parts removed are less
than one minute in duration.
To delete or erase a portion from the Original content or from a Playlist, follow
the directions below.
1. Press DISCNAVI to access the menu.
2. Press Playlist to change to the Playlist menu if necessary.
3. Select Erase Part from the menu.
4. Use the PLAY, PAUSE and CM SKIP buttons as well as the jog dial to
locate the start point of the segment/part to be removed.
5. Press ENTER to confirm the start point for the unnecessary segment.
6. Use the PLAY, PAUSE and CM SKIP buttons as well as the jog dial to
locate the end point of the segment/part to be removed.
7. Press ENTER to confirm the end point for the unnecessary segment.
Jump between the start and end points to fine-tune the selection if
necessary.
Note: When erasing content from the Original material, segments less than five
seconds in duration are unavailable for deletion.
8. Select Preview to verify the part to be removed before continuing.
The selected segment plays in the end point window. Previews begin
three seconds prior to the start point and stop three seconds after the
end point.
9. Select OK to erase the segment/part.
A chapter marker automatically replaces the erased segment/part.
10. Press DISCNAVI to exit or press RETURN to reveal the Playlist screen.
7.3.11 Erase All Titles
Deleting the unprotected titles from the Playlist erases nothing from the
original material. However, any portion of material deleted from the original
source is lost from both the original disc and the Playlist. For more
information on protecting titles, refer to the following section in this manual.
To delete all titles from the original content or from the Playlist, follow the
directions below.
96
PRV-9000 Operating Instructions
1. Press DISCNAVI to access the menu.
2. Press Playlist to change to the Playlist menu if necessary.
3. Select Erase All from the menu.
4. Press ENTER to confirm the removal of all unprotected titles.
7.3.12 Protecting/Unprotecting an Original Title
To protect the original content (title) from accidental edits or deletion, follow
the instructions below. To edit the material, unprotect the title.
1. Press DISCNAVI to access the menu.
If the menu is on the Playlist tab, press the Playlist button to access the
Original DISCNAVI menu.
2. Use the joystick to highlight Protect on the Original DISCNAVI menu.
3. Press ENTER to activate the protect function.
4. Use the joystick to highlight the title to protect (or unprotect).
5. Press ENTER to select the title.
A padlock icon appears (or disappears from) in the upper right corner of
the title thumbnail.
Figure 7-1: protected title (1) has a padlock icon in the upper right corner of the thumbnail.
6. Press the DISCNAVI button to exit the menu.
!
Changing the protection status locks previous edits thus UNDO is unavailable
immediately after the change. The UNDO command is also unavailable for
reversing a protection change.
7.3.13 Reverse an Edit
If an action is taken in error, to reverse the change or edit, use the Undo
command on the DISCNAVI menu. The number of Undo actions is limited to the
last three edits. It is unimportant whether the screen displays the Original or
Playlist menu when the Undo command is sent; Undo reverses the last edit.
97
PRV-9000 Operating Instructions
The following limitations apply to the PRV-9000’s Undo command.
Undo is unavailable for recordings
If the disc is ejected, Undo is unavailable
If the recorder is switched to Standby, Undo is unavailable
The protect/unprotect function ignores Undo commands
Undo is unavailable for finalized or initialized discs
Undo is unavailable after using the Preview function with the Record
Mode screen or the Rec NR setting
Note: Undo is available after exiting the DSICNAVI menu.
98
PRV-9000 Operating Instructions
8.0 TITLE LIST MENU
When working in Video format (DVD-R or DVD-RW
media), use the Title List menu to play, name, and
erase titles or to capture material from a camcorder
connected to the front panel DVD IN/OUT port.
However, once the disc is finalized, the Title List
menu limits the options to playing titles.
Jog Dial
PLAYLIST
STOP
MENU
TOP MENU
8.1
Access the Title List Menu
To access the Title List menu, follow the directions below.
1. Press TOP MENU or MENU to display the Title List.
If the disc is not finalized, the menu provides multiple functions.
If the disc is finalized, the menu provides a list of titles to play.
2. Use the joystick to move around the screen and highlight selections.
3. Press ENTER to activate the highlighted option.
4. Press TOP MENU or MENU again to exit the Title List.
Other controls for the Title List are shown at the bottom of the screen.
8.2
Play a Title from the Title List Menu
To play a title from this menu, follow the directions below.
1. Press TOP MENU or MENU to display the Title List.
If the disc is not finalized, the menu provides multiple functions.
If the disc is finalized, the menu provides a list of titles to play.
99
PRV-9000 Operating Instructions
2. Use the joystick to highlight a title.
3. Press ENTER to play the highlighted title.
8.3
Name a Title from the Title List Menu
To name a title in this menu, follow the directions below.
1. Press STOP if a disc is playing.
2. Press TOP MENU or MENU to display the Title List.
If the disc is not finalized, the menu provides multiple functions.
If the disc is finalized, the menu provides a list of titles to play.
3. Scroll to Title Name in the Title List menu.
4. Use the joystick to choose the title to be named.
5. Press ENTER to select the title and access the characters chart.
6. Press ERASE repeatedly to delete the existing ‘name’ (optional).
Press ERASE to remove each auto-assigned character.
7. Use the joystick to drop down from the name field to the characters.
Move left to select either Capitals or lowercase letters if necessary
8. Select the first character for the title name.
The selection appears in the field above Names may be up to 24
characters (letters and/or numbers) in length.
Note: Discs formatted on a different DVD recorder limits the character set.
9. Press ENTER to lock in the character.
10. Continue selecting all characters for the title name.
Scroll down to the Delete button to remove the tentative name if
necessary. Press ENTER to confirm the deletion.
Scroll down to the SPACE button to add spacing between characters.
Press ENTER to confirm the space.
11. Scroll down to the SET button to lock in the title name.
12. Press ENTER to save the name and return to the menu.
13. Press TOP MENU or MENU again to exit the Title List.
100
PRV-9000 Operating Instructions
8.4
Erase a Title from the Title List Menu
Before a disc is finalized, titles recorded on the disc may be erased. Follow the
directions below to erase a title from a recorded disc.
1. Press STOP if a disc is playing.
2. Press TOP MENU or MENU to display the Title List.
Press ERASE and skip to step 4 if there is only one title on the disc.
3. Scroll to Erase Title in the Title List menu.
4. Use the joystick to choose the title to be erased.
5. Press ENTER to erase the title and update the Title List.
6. Press TOP MENU or MENU again to exit the Title List.
101
PRV-9000 Operating Instructions
9.0 INITIAL SETUP MENU
Use the Initial Setup menu to set various recorder
options for sound, picture, language and other
features. Some settings may only be changed
when the recorder is stopped while other options
are unaffected by recorder activity. Settings that
require a stopped disc are shown with an outline in
the Initial Setup menu.
SETUP
ENTER / Joystick
Note: The Setup menu screen closes automatically
after 20 minutes of inactivity.
To access the Initial Setup menu, follow the directions below.
1. Press the SETUP button on the remote control.
2. Use the joystick to scroll down to Initial Setup on this menu.
3. Press ENTER to access the Initial Setup menu.
4. Use the joystick to scroll through the sub-menu and review settings.
5. Make changes as needed, pressing ENTER after a change.
6. Press SETUP to close the menu.
9.1
Basic Settings
Besides programming the clock, discussed in Chapter 4: GETTING STARTED,
section 4.1.1 Setting The Clock, use the Initial Setup Menu for the following
options.
Optimized Rec(ording) – default setting: OFF
Tuner – Auto Channel, Manual CH, VCR Plus+
Video – TV Screen Size, Screen Size for Rec, Still Pictures
Video In/Out – Component, DV Link
102
PRV-9000 Operating Instructions
Audio In – External Audio, Dual Mono Recording, DV Input, Tuner Level
Audio Output – Digital, Dolby Digital, DTS, 96kHz PCM, MPEG
Language – OSD, Audio, Subtitles, Auto-Language, DVD Menu, Other
9.1.1
Optimized Rec (default: OFF)
If a timer program launches but there is insufficient space on the disc (VR
format), the recording cuts off when the disc is filled. To avoid losing the end
of the recording, set Optimized Rec to ON. The recorder automatically
adjusts the recording quality levels to fit the entire session in to the available
disc space. This function is only available when recording in the VR mode.
You may notice a reduction in picture quality if the recorder must fit excessive
amounts of material in a limited space. If the setting is already at the lowest
available level (MN 1 on standard recording or MN 9 when using the DV
Input) but there is still insufficient space, the recording remains at the lowest
available setting and cuts off when the disc is full.
The Optimize Recording feature only compensates for one timer program.
9.1.2
Tuner Settings
Tuner settings refer to the following options:
Auto Channel – default: Antenna
Manual CH – default: n/a
VCR Plus+ CH – default: n/a
For details on the tuner settings, refer to the appropriate section within
Chapter 4: GETTING STARTED, earlier in this manual.
9.1.3
Video Settings
Video Setup provide settings for the following options:
TV Screen Size – default: 16:9 (Wide)
Screen Size for Rec – default: 4:3
Still Picture – default: Auto
TV Screen Size:
For wide-screen televisions and other display devices, leave the setting at the
default (16:9). When playing software recorded in conventional (4:3) format,
103
PRV-9000 Operating Instructions
the display device determines how the material is presented. For your
display device’s options, refer to the operating insturctions.
For conventional devices, choose between 4:3 Letterbox and 4:3 Pan &
Scan. In Letterbox format, the display shows black bars at the top and
bottom of the screen but none of the original content is hidden. Pan & Scan
follows the main action on the screen but the sides of the original is lost.
Screen Size for Rec:
When recording in Video mode, set the recording aspect ratio to suit the
material (16:9 Widescreen or 4:3 Pan & Scan). Set to Auto to record
broadcast programs. The recorder synchronizes the recording setting to the
initial broadcast setting.
Note: With the Auto setting, aspect ratios are locked from the recording starting point
till the end of that session.
Still Picture:
The recorder uses one of two processes when displaying a still frame (or
field) from a DVD disc. The default (Auto) setting automatically chooses the
best setting for each image.
Frame – produces a sharp image but may have some jitter
Field – produces a stable image with little jitter but not as sharp an
image as a frame
9.1.4
Video In/Out Settings
Video In/Out provides settings for the following options:
Component – default: Interfaced
DV Link – default: Auto
Component:
Use this setting only when connecting a display device using the recorder’s
component video port. If the display device supports progressive-scan
component video, set Progressive for the highest quality picture. Leave the
setting at Interface for all other devices.
On the Auto Progressive setting, 16:9 aspect ratios play with progressivescan turned ON, while 4:3 aspect ratios turn this scan method OFF.
!
Switching to Progressive when the display device does not support the function
causes the picture to fail. From the front panel, hold down the PAUSE button
and press FL DIMMER. This combination sets the recorder’s video output to the
104
PRV-9000 Operating Instructions
default setting (Interface).
Compatibility with progressive-scan devices:
Not all high-definition display devices support progressive-scan through this recorder. Artifacts
may appear in the picture. If problems occur when using 525 progressive-scanning, switch the
connection to the standard definition (Interface) output. If problems persist, please contact your
dealer or a Pioneer Authorized Service Center.
This recorder is compatible with the following Pioneer display devices:
- Plasma: PDP-502MX, PDP-505HD
- Projection: Pro-700HD, Pro 710HD, Pro-720HD, Pro-610HD, Pro-620HD,
Pro-510HD, Pro-520HD, SD-641HDS, SD-643HDS, SD-582HDS,
SD-533HDS, SD-532HDS
DV Link:
Leave the setting for the DV Link to the default (Auto) whenever possible.
However, if the audio and/or video signal from a digital camcorder (using the
DV IN/PUT port) is corrupted or failing, try setting the DVD Link setting to
OFF.
With this option set to OFF, some camcorders may still be incompatible with
the recorder when connecting with a DV cable.
9.1.5
Audio In Settings
Audio In provides settings for the following options:
External Audio – default: Stereo
Dual Mono Recording – default: L
DV Input – default: Stereo1
Tuner Audio Level – default: Standard
External Audio:
The default setting (Stereo) supports standard stereo external sources. If
each channel carries a separate soundtrack, change to Dual Mono. Refer to
the following section for information on the Dual Mono Recording setting.
Dual Mono Recording:
105
PRV-9000 Operating Instructions
When recording a dual-mono signal in Video or VR level MN32 (does not
apply if recording through the DV input) mode from an external source, record
either the L (left) or R (right) audio channel.
Using VR mode with the level set to something other than MN32 causes both
channels to record, thus supporting channel switching during playback.
DV Input:
If the camcorder uses 32kHz/12-bit sound when connected to the recorder’s
DV IN/OUT port on the front panel, this option must be set. The default
setting is Stereo1.
Some digital camcorders have two stereo tracks for audio, real-time sound
and overdubbing after shooting a scene. The Stereo1 setting selects the track
recorded while shooting. Stereo2 uses the overdubbed sound track.
Tuner Audio Level:
If the audio from the display device’s built-in tuner seems louder than the
volume during disc playback, adjust this setting to Minimum. However, the
default setting is the standard volume.
9.1.6
Audio Out Settings
Audio Out provides settings for the following options:
Digital – default: ON
Dolby Digital – default: Dolby Digital
DTS – default: OFF
96kHZ PCM – default: 96kHz to 48kHz
MPEG – default: MPEG to PCM
Audio DRC – default: OFF
Digital Out:
Unless there is a specific need for this feature to be turned OFF, leave the
setting to ON (default).
Note: Optical and coaxial outputs may only be switched as a set.
Dolby Digital Out:
106
PRV-9000 Operating Instructions
For detailed information on Dolby Digital output, please refer to Chapter 4:
GETTING STARTED, section 4.1.3 Setting the Digital Audio Output.
DTS Out:
There are four points to keep in mind when using DTS Out.
Noise is output when playing a DTS disc with a non-DTS-compatible
amplifier.
A DTS DVD-Video disc is missing analog audio output signals.
When playing a DTS audio CD, noise comes through the analog port
although the DTS Out is OFF.
To play a DTS audio CD, verify that Stereo is active. Use the AUDIO
button to adjust the setting if necessary.
96kHz PCM Out:
The default setting is 96kHz > 48kHz. For more information, refer to Chapter
4: GETTING STARTED, section 4.1.3 Setting the Digital Audio Output.
MPEG Out:
The default setting is MPEG > PCM. For information on this option, refer to
Chapter 4: GETTING STARTED, section 4.1.3 Setting the Digital Audio
Output.
Audio DRC:
When watching Dolby Digital DVDs at a low volume, lower level sounds may
drop out. This dropping also can affect low-level dialog. Switching ON Audio
DRC (Dynamic Range Control) can bring up the low sounds while controlling
the high peaks. The sound variations adjust to the recorded material.
The available settings have the following effects:
ON – balances dynamics
OFF – leaves original dynamics intact
Max – ‘squashes’ dynamics
Audio DRC is ineffective when listening to a disc through the digital output if
the Dolby Digital Out option is set to Dolby Digital. Adjust the dynamic range
from the AV amplifier/receiver to correct this situation.
107
PRV-9000 Operating Instructions
9.1.7
Language Settings
Language provides settings for the following options:
OSD – default: English
Subtitle – default: English
Auto – default: ON
DVD Menu – default: w/ Subtitle Language
Subtitle Display – default: ON
Subtitle Off – default: Selected Subtitle
Other – default: n/a
OSD Language:
The Open Software Description (OSD) format/language is a specification for
eXtensible Markup Language (XML) that provides a way to distribute
software on a disc. The PRV-9000 displays OSDs in English or French with
the default being English.
Audio Language:
If the selected language is on a disc, the recorder automatically plays the disc
in that language. The Auto Language option may affect this setting.
The PRV-9000 supports switching between languages any time during disc
playback. Use the AUDIO button to switch languages. Switching languages
during playback has no effect on the Audio Language setting.
For languages other than English (default) or French, select Other. The
Other setting is described later in this chapter.
Subtitle Language:
If the specified subtitle language is on the disc, the recorder automatically
plays the discs with that series of subtitles. The Auto Language option may
affect this setting.
The PRV-9000 supports switching between subtitle languages any time
during DVD disc playback. Use the SUBTITLE button to switch subtitle
languages. Switching languages during playback has no effect on the
Subtitle Language setting.
108
PRV-9000 Operating Instructions
For languages other than English (default) or French, select Other. The
Other setting is described later in this chapter.
Auto Language:
When set to ON (default), Auto Language plays the default language for the
DVD disc. For example, a French movie would play French dialog without
subtitles. If the Subtitle Language option is set to something other than the
default subtitle setting on the disc, the recorder displays any subtitles in the
selected subtitle language. Movies in a foreign tongue show subtitles in your
selected language.
To play discs only in your selected audio and subtitle language(s), turn the
Auto Language setting to OFF.
For Auto Language to function properly, the Audio Language and Subtitle
Language settings must be identical. Switching languages during playback is
supported but has no effect on these settings.
Note: Some discs fail to recognize the Auto Language function. Use the AUDIO and
SUBTITLE buttons to make language selections.
DVD Menu Language:
Some discs provide disc menus in multiple languages. Use the DVD Menu
Language option to set the language for the disc menus. The default setting
for this option locks the menu language to the Subtitle Language setting.
For languages other than English or French, select Other. The Other setting
is described later in this chapter.
Subtitle Display Language:
With the Subtitle Display Language turned ON, the recorder sets the display
according to the selections made in Subtitle Language and in Auto Language.
To hide subtitles, change this setting to OFF but review the following section
for special case situations.
The available settings have the following effects:
ON – subtitles shown in Subtitle/Auto Language settings
OFF – subtitles are hidden
Assist Subtitles – reveals any additional subtitles recorded on a disc
109
PRV-9000 Operating Instructions
Subtitle Off:
Although the Subtitle Display setting is switched to OFF, some discs still show
the subtitles. If the subtitles display, choose from the following options to
work with the situation.
With Audio – shown in audio Language setting
Selected Subtitle – shown according to Subtitle Language setting
Refer to disc content producer for alternatives
Other Languages:
To choose a language from the disc other than English or French, follow the
directions below.
1. Access the appropriate Initial Setup menu.
Refer to the beginning of this chapter for assistance if necessary.
2. Use the joystick to highlight Other from the language list.
This option appears under DVD Menu Language, Audio Language, and
Subtitle Language submenus.
3. Press ENTER to confirm your selection.
4. Scroll to the appropriate language or use the number pad to select the
number corresponding to that language.
For language options, refer to the Language Chart in Chapter 11.
5. Press ENTER to confirm the language selection and exit the menu.
9.2
Advanced Settings
The Initial Setup menu provides advanced setting in a submenu. The submenu
offers the following advanced setting:
Content Lock (a.k.a. Parental Lock) – default: Level 8
On Screen Display – default: ON
Angle Indicator – default: ON
Frame Search – default: OFF
Navi Mark – default: 0 seconds
Start Rec on DVD-R – default: Manual (press twice)
110
PRV-9000 Operating Instructions
Chapter Interval – default: 3 minutes
Remote Control Set – default: Recorder1
9.2.1
Content Lock (a.k.a. Parental Lock)
Some DVD Video discs provide a content or parental lock for mature viewing
material. Level 8 is the most permissible level with Level 1 being the most
restrictive.
If the recorder is set to a more restrictive level than the disc level, the
recorder asks for a password before playing the disc. There is no default
password. Refer to the next section to add a password.
Add/Change the Lock Level:
To change the Parental/Content Lock level, follow the directions below.
1. Access the Initial Setup menu.
Refer to the beginning of this chapter for assistance if necessary.
2. Confirm that Parental Lock is highlighted.
3. Press ENTER to confirm your selection or simply use the joystick to
move to the next submenu.
4. Use the joystick to highlight Level Change.
5. Press ENTER to confirm your selection or simply use the joystick to
move to the next submenu..
6. Use the number pad to input the numeric password if necessary,
pressing ENTER to confirm a number.
7. Use the joystick to lock or unlock levels.
8. Press ENTER to set the Parental/Content Lock level and return to
the previous menu.
Add a Password:
When changing the Parental Lock for the first time (or after resetting the
recorder), there is no password assigned. When prompted to enter the
password, use the numberpad to assign a 4-digit code. This code becomes
the registered password.
Some discs restrict only certain scenes. If the password is not entered, the
disc plays but skips over the questionable segments.
111
PRV-9000 Operating Instructions
If you forget the password, reset the recorder. Resetting the recorder erases
the current password and leaves the entry blank. Refer to Chapter 4:
GETTING STARTED, section 4.1.9 Return to Default Settings.
Change a Password:
To change the password, refer to the instructions below.
1. Access the Initial Setup menu.
Refer to the beginning of this chapter for assistance if necessary.
2. Highlight Advanced to reveal the submenu.
3. Use the joystick to highlight Parental Lock.
4. Continue using the joystick to highlight Password Change.
5. Press ENTER to confirm your selection.
6. Enter the current 4-digit password.
7. Press ENTER to confirm your entry.
8. Create a new 4-digit password.
9. Press Enter to register the new password.
9.2.2
On Screen Display
With the On-Screen display set to the default (ON), the recorder shows onscreen displays for Play, Stop, etc. To hide these displays, change this option
to OFF.
9.2.3
Angle Indicator
When playing a DVD Video disc with multiple angles, an icon appears onscreen when additional angles are present. To hide the on-screen indicator,
turn this feature OFF.
9.2.4
Frame Search
The frame number remains hidden when a DVD disc is paused and search
by frame number is unavailable. Turning this feature ON reveals the frame
number and supports a search by frame number. The default is set to OFF.
112
PRV-9000 Operating Instructions
9.2.5
Navi Mark
Within DISCNAVI, a thumbnail image of the content represents each title. The
default (0 seconds) setting captures the first recorded frame to create the
thumbnail. The standard capture point can be changed to a frame at 30
seconds or a frame at three minutes. If the recording session is shorter than
the capture point set with the Navi-Mark function, the capture defaults back to
0 seconds for this particular segment.
This option also determines where the program’s auto-name is taken from: at
one minute, three minutes or ten minutes. These settings correspond to the
thumbnail captures.
Thumbnail capture: 0 seconds – Auto-named at 1 minute
Thumbnail capture: 3 0 seconds – Auto-named at 3 minutes
Thumbnail capture: 3 minutes – Auto-named at 10 minutes
9.2.6
Start Rec on DVD-R
When recording to DVD-R media, press the RECORD button twice to begin
recording. Change the setting to Auto (press once) to record in the same
manner as with DVD-RW discs. Being as DVD-R media is write-once
technology, this feature allows you to verify that the proper type of media
(write-once or multi-write) is loaded for the current recording session.
Note: In the Auto (press once) setting, the recorder requires up to three seconds to
begin recording after the REC button is pressed.
9.2.7
Chapter Interval
When recording in Video mode, chapter marks are added every three
minutes (default setting). Available settings are as follows:
every 3 minutes (default)
every 5 minutes
every 10 minutes
No Separation (function turned OFF)
9.2.8
Remote Control Set
If multiple Pioneer DVD recorders are within the same room, set the Remote
Control Set function for the number of recorders. So that each remote control
corresponds to it’s own recorder, set each recorder/remote control pair to a
different ID.
113
PRV-9000 Operating Instructions
The PRV-9000 has three recorder IDs available, Recorder1, Recorder2 and
Recorder 3. When set to Recorder2 or Recorder3, the remote control mode
appears on the front panel.
Note: Setting the ID on the recorder locks out the remote control until the remote’s
ID is changed to match the recorder.
Follow the directions below to change the setting on the remote control.
1. Press and hold the RETURN button.
2. Press the number that corresponds to the recorder ID (1, 2 or 3).
3. Verify that the JOG MODE Indicator lights.
This indicator lights when the remote control ID is changed.
4. Confirm that the remote control number displayed on the front panel
matches the recorder ID.
Check this number if the remote fails to control the recorder.
If using a single recorder in a room, this function is unnecessary.
114
PRV-9000 Operating Instructions
10
DISC SETUP MENU
Use the Disc Setup menu to set various disc
options for disc format, disc lock and timer
recording programs. Some settings may only be
changed when the disc is stopped. Settings that
require a stopped disc are shown with an outline in
the Initial Setup menu.
SETUP
ENTER / Joystick
Note: The Setup menu screen closes automatically
after 20 minutes of inactivity.
To access the Disc Setup menu, follow the directions below.
1. Press the SETUP button on the remote control.
2. Use the joystick to scroll to Disc Setup.
3. Press ENTER to access the Disc Setup menu.
4. Use the joystick to scroll through the sub-menu and review settings.
5. Make changes as needed, pressing ENTER after a change.
6. Press SETUP again to close the menu.
10.1
Basic Disc Setup
The basic settings available under the Disc Setup menu including the following:
Disc Timer Recording – default: OFF
Input Disc Name – default: n/a
Protect Disc – default: OFF
115
PRV-9000 Operating Instructions
10.1.1 Disc Timer Recording Function
To enable disc timer recording on the loaded disc, set this function to ON. For
detailed information on using this feature, refer to Chapter 6, RECORDING
FUNCTIONS & OPTIONS, section 6.1.1 Disc Timer Recording.
10.1.2 Input Disc Name
Use the Input Disc Name function to assign a name to the disc. A disc name
appears when the disc is loaded and when displaying disc information.
Names (VR format – up to 64 characters, Video format – up to 24 characters)
may consist of letters, numbers and/or a limited series of symbols. Some
systems reduce the number of characters to the standard alphabet and to the
digits 0 through 9. Press the ERASE button to delete a character if
necessary.
Note: Discs formatted on a different recorder limit the character sets.
To create a name for a disc, follow the steps below.
1. Press the SETUP button to access the main menu.
2. Use the joystick to select Disc Setup.
3. Press ENTER to confirm the selection.
4. Use the joystick to highlight Input Disc Name.
5. Press ENTER to access the character menu.
6. Use the joystick to drop down from the name field to the characters.
Move left to select either Capitals or lowercase letters if necessary.
7. Select the first character for the disc name.
The selection appears in the field above.
8. Press ENTER to lock in the character.
9. Continue selecting all required characters.
Scroll down to the Delete button to remove the tentative name if
necessary. Press ENTER to confirm the deletion.
Scroll down to the SPACE button to add spacing between
characters. Press ENTER to confirm the space.
10. Scroll down to the SET button to lock in the name.
11. Press ENTER to save the name and return to the previous menu.
116
PRV-9000 Operating Instructions
10.1.3 Protect Disc
The Protect Disc function prevents a disc from accidental erasing, editing or
writing over an existing recording. To unlock a disc for edits, set to OFF.
!
10.2
A protected disc may STILL be initialized which erases any
existing content from the disc.
Initialize Disc
The Initialize settings available under Disc Setup include the following options:
VR Format – default: n/a (DVD-RW only)
Video Format – default: n/a (DVD-RW only)
10.2.1 VR Format Disc
Follow the directions below to initialize a VR-formatted disc.
1. Press the SETUP button to access the main menu.
2. Use the joystick to highlight Disc Setup.
3. Press ENTER to access the menu.
4. Use the joystick to highlight Initialize.
5. Select the VR Disc sub-menu.
6. Choose Start from the VR sub-menu.
7. Press ENTER to begin formatting the DVD-RW disc.
!
Formatting the disc erases any existing content.
10.2.2 Video Format Disc
Follow the directions below to initialize a Video-formatted disc.
1. Press the SETUP button to access the main menu.
2. Use the joystick to highlight Disc Setup.
3. Press ENTER to access the menu.
117
PRV-9000 Operating Instructions
4. Use the joystick to highlight Initialize.
5. Select the Video Disc sub-menu.
6. Choose Start from the Video sub-menu.
7. Press ENTER to begin formatting the DVD-RW disc.
!
10.3
Formatting the disc erases any existing content.
Finalize Disc Settings
The Finalize settings available under Disc Setup include the following options:
Finalize – default: n/a
Undo Finalize – default: n/a
10.3.1 Finalize Disc
Follow the directions below to finalize a disc (VR or Video).
1. Press the SETUP button to access the main menu.
2. Use the joystick to highlight Disc Setup.
3. Press ENTER to access the menu.
4. Use the joystick to highlight Finalize.
5. Select Finalize on the sub-menu.
6. Choose Start from the finalize sub-menu.
7. Press ENTER to begin finalizing the disc and exit the menu.
10.3.2 Undo Finalized Disc
To edit or record additional material on to a finalized DVD-RW disc (finalized
on another recorder), you must first Undo the finalization. The Undo Finalize
command is unavailable in the following situations.
Disc was finalized on the current recorder rather than another recorder
Disc is DVD-R media
118
PRV-9000 Operating Instructions
1. Press the SETUP button to access the main menu.
2. Use the joystick to highlight Disc Setup.
3. Press ENTER to access the menu.
4. Use the joystick to highlight Finalize.
5. Select Undo Finalize on the sub-menu.
6. Choose Start from the Finalize sub-menu.
7. Press ENTER to begin to un-finalizing the disc and exit the menu.
10.4
Video Adjust Menu
Use the Video Adjust menu to alter picture
quality for the built-in TV-tuner, the
external inputs, disc playback and for
recording
The following sections detail the various
settings available under the Video Adjust
menu.
SETUP
ENTER / Joystick
INPUT SELECT
DISPLAY
10.4.1 Set Picture Quality for Tuner and External Inputs
Use the Picture Creation option to set picture quality for the built-in TV tuner
and the external inputs. There are multiple preset values suitable for various
sources and devices. As an alternative, create up to three setting groups for
your specific equipment.
Follow the directions below to specify picture quality settings on a TV tuner or
other external inputs.
1. STOP any disc playback on the recorder.
119
PRV-9000 Operating Instructions
2. Press SETUP to access the menu.
3. Use the joystick to highlight Video Adjust on the Setup menu.
4. Press ENTER to confirm your selection.
5. Press ENTER to select the first option, Picture Creation.
6. Use the joystick to scroll left and right to change the preset option.
The six preset options are as follows:
TV Program – suitable for general broadcasts
VCR – suitable for video cassettes
LDP – suitable for Laserdiscs (LDs)
Memory1 – user preset 1
Memory2 – user preset 2
Memory3 – user preset 3
7. Press INPUT SELECT to toggle between the built-in TV tuner and the
external inputs when/if necessary.
8. Press ENTER to select the preset and continue with adjustments.
10.4.2 Create Personalized Settings
There are three user presets available for saving personalized picture quality
settings. Follow the directions below to create user-specific settings.
1. STOP any disc playback on the recorder.
2. Press SETUP to access the menu.
3. Use the joystick to highlight Video Adjust on the Setup menu.
4. Press ENTER to confirm your selection.
5. Press ENTER to select the first option, Picture Creation.
6. Select one of the three user presets (Memory1, Memory2, or Memory3).
7. User the joystick to highlight Detailed Settings.
8. Select the picture quality to be adjusted.
Prog. Motion – adjusts motion and still-picture quality when using
progressive scans (only setting available when using DV IN/OUT)
3-D Y/C – adjusts brightness/color separation
Detail – adjusts how sharp edges appear
White AGC – automatically adjusts white level
120
PRV-9000 Operating Instructions
White Level – adjusts intensity of white
Black Level – adjusts intensity of black
Hue – adjusts overall balance between red and green
Chroma Level – adjust how rich colors appear
9. Move the joystick left/right to adjust the current picture quality.
10. Press ENTER to lock in the new picture quality.
11. Repeat steps 8 through 10 until all changes are locked in.
12. Press SETUP to register the settings and exit the menu.
Note: To see more of the picture during adjustments, select a setting and
press ENTER.
10.4.3 Set Noise Reduction for Recording
To improve the recorded picture quality, change both the brightness and the
color noise reduction levels. Use the Preview feature to see how adjustments
effect recordings.
Follow the instructions below to adjust the noise level for recordings.
1. STOP any disc playback on the recorder.
Must be an unfinalized recordable disc
2. Press SETUP to access the menu.
3. Use the joystick to highlight Video Adjust on the Setup menu.
4. Press ENTER to confirm your selection.
5. Use the joystick to highlight Rec NR.
6. Press INPUT SELECT to toggle between built-in TV tuner and external
inputs when/if necessary.
7. Select the setting to be adjusted.
Rec YNR – applied to video signal brightness component
Rec CNR – applied to video signal color component
8. Adjust settings with left/right joystick movements.
9. Scroll to Play Qual to preview current settings.
10. Select a playback option to view recording.
11. Use joystick to highlight Preview on the menu.
12. Press ENTER to view recording with picture quality adjustments.
121
PRV-9000 Operating Instructions
13. Press ENTER to return to the settings screen after viewing.
14. Press SETUP to exit the menu.
10.4.4 Set Picture Quality for Disc Playback
This settings determines how the picture appears when playing from a disc.
Follow the directions below to adjusting the picture quality for a disc.
Change a Preset Settings Group:
1. Press SETUP on the remote control.
Disc may be playing or paused.
2. Use the joystick to highlight Video Adjust on the Setup menu.
3. Press ENTER to confirm your selection.
4. Use the joystick to change the setting.
TV (CRT) – suitable for most cathode-ray tube televisions
PDP – suitable for plasma display panels
Professional – suitable for professional monitors
Memory1 – user preset 1
Memory2 – user preset 2
Memory3 – user preset 3
5. Press ENTER to lock in the change(s).
6. Press SETUP to register the settings and exit the menu.
Create a Personal Settings Group:
There are three user presets available for saving personalized picture quality
settings. Follow the directions below to create a group of settings.
1. Press SETUP on the remote control.
Disc may be playing or paused.
2. Use the joystick to highlight Video Adjust on the Setup menu.
3. Press ENTER to confirm your selection.
4. Use the joystick to change the setting.
TV (CRT) – suitable for most cathode-ray tube televisions
PDP – suitable for plasma display panels
122
PRV-9000 Operating Instructions
Professional – suitable for professional monitors
Memory1 – user preset 1
Memory2 – user preset 2
Memory3 – user preset 3
5. Use the joystick to highlight Detailed Settings.
6. Select the picture quality setting to be adjusted.
Prog. Motion – adjusts motion and still-picture quality when using
progressive scans (disc content is unaffected)
Detail – adjusts how sharp edges appear
White Level – adjusts intensity of white
White AGC – White Automatic Gain Control
Black Level – adjusts intensity of black
Black Setup – for correction of floating black color
Hue – adjusts overall balance between red and green
Chroma Level – adjusts how rich colors appear
3D YC – compensates for misalignments of brightness (Y) and color
(C) components
7. Use the joystick to adjust the select picture quality setting.
8. Press ENTER to lock in the change(s).
9. Press SETUP to register the settings and exit the menu.
Note: To see more of the picture during adjustments, select a setting and
press ENTER.
123
PRV-9000 Operating Instructions
11
ADDITIONAL INFORMATION
This section provides the following general information.
• Installation and moving hints
• On-screen messages
• Language Code list
• Disc handling guidelines
• Disc formats
• Screen sizes
• General Maintenance Issues
• General specifications
• Brief glossary
11.1
Installation & Moving Hints
Please use the following guidelines when installing the PRV-9000.
Use in a well-ventilated room
Place on a solid, flat level surface
Avoid exposing to high temperatures, humidity, or direct sunlight
Install in a relatively dust-free, smoke-free environment as possible
Locate away from the top of other equipment such as amplifiers or other
components that become hot
Move away from televisions or monitors if experiencing signal interference
Avoid covering with a cloth or other material that may prevent proper cooling
Verify that all four supports under the unit are touching the mounting surface
To move the recorder, follow the directions below:
1. Remove the disc from the recorder if present.
2. Close the disc tray.
3. Press STANDBY/ON to switch power to Standby.
4. Wait until the message in the display window changes from Power OFF to
the date and time (if this information is programmed in to the unit).
5. Disconnect the power cord.
124
PRV-9000 Operating Instructions
Never lift or move the unit during recording or playback. Discs rotate at a high
speed and may be damaged or damage the optics within the chassis.
11.2
On-Screen Messages
The following chart provides message which may appear on-screen.
Message
Explanation / Action
Initializing disc. Please wait a moment.
Loading a blank DVD-RW disc causes
the recorder to initialize the disc first.
XX seconds before recording stops.
Please wait a moment.
In Video mode, recording is in 30second blocks. When sending a Stop
command, the unit continues recording
until reaching the end of the block.
You cannot record on this disc. Undo
the finalization.
The disc, finalized on a non-Pioneer
recorder, must be un-finalized before
editing or recording may being..
Any of the following:
Cannot play because the disc is
incompatible.
You cannot record on this disc.
Cannot read CPRM information.
Cannot prepare for recording.
Could not record information to disc.
Cannot edit.
The disc may be dirty or damaged.
Take out the disc, clean it and retry.
If the error persists, use a new disc.
If the error appears with the new disc
as well, please contact a Pioneer
Service Center.
Could not initialize disc.
Could not finalize successfully.
Could not undo finalization
successfully.
Could not cancel the disc protection
setting successfully.
This source is copy-protected.
The video source is copy-protect and
may not be recorded.
Either of the following:
Cannot record because the disc is
not CPRM compatible.
This source cannot be recorded with
the Video mode.
This video source is copy-once
protected. Use DVD-RW (VR format)
disc with CPRM for recording.
The recorder failed to read the CPRM
information. Check with a Pioneer
Service Center for assistance.
Incorrect CPRM information.
125
PRV-9000 Operating Instructions
Message
Explanation / Action
Either of the following:
The DV IN/OUT port fails to detect a
signal. This may appear when a blank
section of tape is playing from the
connected camcorder.
No DV input.
Cannot preview because there is no
DV input.
Either of the following:
When recording the DV input, the
recording level is automatically set
to 9.
Recording levels 1 through 8 are not
available when recording from the DV
IN/OUT port.
The recording level has been
temporarily set to 9 for the DV Input.
Audio follows [Dual Mono Recording]
setting because the recording level is 32.
When recording (Video mode or VR
set to level 32) from an external input,
audio is recorded in Linear PCM
format. Record using the left or right
channel rather than both channels.
Repairing the disc. Please wait a
moment.
During recording the power was cut.
This message appears when power is
restored.
Could not repair the disc.
The recorder is unable to repair the
disc after power was cut. The contents
of the recording are lost.
Incompatible region number.
The disc’s region code is incompatible
with the recorder’s region code(s) thus
the disc fails to play.
Any of the following:
Cannot record any more titles.
You cannot do this edit with the
currently loaded disc.
The disc data control limit or the
maximum number of chapters/titles
has been reached. Erase title/chapters
or combine chapters.
Cannot add any more chapter
marks.
11.3
Language Code List
The following chart provides the available languages and accompanying codes.
Language
Code
Language
Code
Language
Code
Japanese (ja)
1001
Hausa (ha)
0801
Qechua (qu)
1721
English (en)
0514
Hindi (hi)
0809
Rhaeto-Romance (rm)
1813
French (fr)
0618
Croatian ((hr)
0818
Kinundi (m)
1814
German (de)
0405
Hungarian (hu)
0821
Romanian (ro)
1815
Italian (it)
0920
Armenian (hy)
0825
Kinyarwanda (rw)
1823
Spanish (es)
0519
Interlingua (ia)
0901
Sanskrit (sa)
1901
126
PRV-9000 Operating Instructions
Language
Code
Language
Code
Language
Code
Dutch (nl)
1412
Interlingua (ie)
0905
Sindhi (sd)
1904
Russian (ru)
1821
Inupiak (ik)
0911
Sangho (sg)
1907
Chinese (zh)
2608
Indonesian (in)
0914
Serbo-Croatian (sh)
1908
Korean (ko)
1115
Icelandic (is)
0919
Sinhalese (si)
1909
Greek (el)
0512
Hebrew (iw)
0923
Slovak (sk)
1911
Afar (aa)
0101
Yiddish (ji)
1009
Slovenian (sl)
1912
Abkhazian (ab)
0102
Japanese (jw)
1023
Samoan (sm)
1913
Afrikaans (af)
0106
Georgian (ka)
1101
Shona (sn)
1914
Amharic (am)
0113
Kazakh (kk)
1111
Somali (so)
1915
Arabic (ar)
0118
Greenlandic (kl)
1112
Albanian (sq)
1917
Assamese (as)
0119
Cambodian (km)
1113
Serbian (sr)
1918
Aymara (ay)
0125
Kannada(kn)
1114
Siswati (ss)
1919
Azerbaijani (az)
0126
Kashmiri (ks)
1119
Sesotho (st)
1920
Bashkir (ba)
0201
Kurdish (ki)
1121
Sundanese (su)
1921
Byelorussian (be)
0205
Kirghiz (ky)
1125
Swedish (sv)
1922
Bulgarian (bg)
0207
Latin (la)
1201
Swahili (sw)
1923
Bihari (bh)
0208
Lingala (ln)
1214
Tamil (ta)
2001
Bislama (bi)
0209
Leothian (lo)
1215
Telugu (te)
2005
Bengali (bn)
0214
Lithuanian (lt)
1220
Tajik (tg)
2007
Tibetan (bo)
0215
Latvian (lv)
1222
Thai (th)
2008
Breton (br)
0218
Melagasy (mg)
1307
Tigrinya (ti)
2009
Catalan (ca)
0301
Maori (mi)
1309
Turkmen (tk)
2011
Corsican (co)
0315
Macedonian (mk)
1311
Tagalog (tl)
2012
Czech (cs)
0319
Malayalam (ml)
1312
Setswana (tn)
2014
Welsh (cy)
0325
Mongolian (mn)
1314
Tonga (to)
2015
Danish (da)
0401
Moldavian (mo)
1315
Turkish (tr)
2018
Bhutani (dz)
0426
Marathi (mr)
1318
Tsonga (ts)
2019
Esperanto (eo)
0515
Malay (ms)
1319
Tatar (tt)
2020
Estonian (et)
0520
Maltese (mt)
1320
Twi (tw)
2023
Basque (eu)
0521
Burmese (my)
1325
Ukrainian (uk)
2111
Persian (fa)
0601
Nauru (na)
1401
Urdu (ur)
2118
Finnish (fi)
0609
Nepali (ne)
1405
Uzbek (uz)
2126
Fiji (fj)
0610
Norwegian (no)
1415
Vietnamese(vi)
2209
Faroese (fo)
0615
Occitan (oc)
1503
Volapuk (vo)
2215
Frisian (fy)
0625
Oromo (om)
1513
Wolof (wo)
2315
Irish (ga)
0701
Oriya (or)
1518
Xhosa (sh)
2408
Scots-Gaelic (gd)
0704
Panjabi (pa)
1601
Yoruba (yo)
2515
Galician (gl)
0712
Polish (pl)
1612
Zulu (zu)
2621
Guarani (gn)
0714
Pashto, Pushto (ps)
1619
Gujarati gu)
0721
Portuguese (pt)
1620
127
PRV-9000 Operating Instructions
11.4
Disc-Handling Guidelines
When holding discs of any type, avoid leaving fingerprints, smears or scratches
on the recording surface. Hold the disc by the edges or supported from the
center hold.
Avoid scratching the labeling side of the disc as well as the recording side.
Although not as fragile as the recording layer, scratches can still affect the media.
To remove fingerprints and dust, use a cloth soaked in alcohol or a commercially
available CD/DVD disc cleaning material to wipe away smudges. Never use
other chemicals to clean a disc. Do NOT wipe with circular strokes. Wipe lightly
from the center out to the edge using straight stokes.
Cracked or warped discs may damage the recorder. If a disc breaks inside of the
unit, pieces are likely to strike the optics.
When storing discs, place carefully in a jewel-case or disc jacket. Avoid storing
discs in locations subject to temperature extremes, moisture and direct sunlight.
To avoid warping, avoid stacking discs. Discs are best maintained when stored
upright.
Do NOT glue or use stickers on a DVD disc. Labels may unbalance the disc
causing it to fail or even to break. Label glue may slip in melt in extreme cases.
Use the appropriate marking pen to write on the labeling side of the disc.
Pencils, ballpoint pens and other sharp-tipped writing instruments may damage
the reflectivity of a disc. Refer to your place of purchase for assistance.
Non-standard disc shapes are unusable on this device. These non-standard
shapes include hearts, diamonds, polygons, etc.
11.5
Screen Sizes & Disc Formats
When viewing on a standard TV or monitor
Disc (screen) format
16:9
Setting
4:3 (letter box)
4:3 (Pan & Scan)
128
Appearance
Shown in widescreen with
black bars on the top and
bottom of the screen
Sides of program are cropped
with altered picture filling
screen
PRV-9000 Operating Instructions
Disc (screen) format
4:3
Setting
16:9 (Wide)
4:3 (Letterbox)
4:3 (Pan & Scan)
Appearance
Appears squished so set to
either 4:3 viewing setting
(Letterbox or Pan & Scan)
Image is correct in either
screen size
When viewing on a widescreen TV or monitor
Disc (screen) format
16:9
Setting
16:9 (Wide)
Appearance
Picture remains unaltered
Disc (screen) format
4:3
Setting
16:9 (Wide)
Appearance
Appears squished so set to
either 4:3 viewing setting
(Letterbox or Pan & Scan)
16:9 Wide)
11.6
The television or monitor
determines image borders or
stretches image to fill screen
(refer to TV or monitor’s
owner’s manual)
General Maintenance Issues
Usually it is best to have the unit serviced by an authorized Pioneer Service
Center; however, some in-house maintenance is possible. The following sections
provide directions for minor in-house maintenance.
11.6.1 Cleaning Pickup Lens
The recorder’s lens should remain clean during normal use. However, if the dust
or dirt adhere to the lens, use an untreated, soft, lint-free cloth to gently wipe the
visible side of the lens.
Although lens cleaners designed for CD players are commercially available,
Pioneer does NOT recommend for cleaning this device.
129
PRV-9000 Operating Instructions
11.6.2 Clearing Condensation
Condensation may form inside the unit if it is brought from a cool environment in
to a warm room, or if the temperature rises suddenly in the room. Condensation
may temporarily impair recorder performance. Leave the recorder alone for
approximately an hour to adjust to a temperature change.
11.7
General Specifications
11.8
Brief Glossary
This section provides a short glossary for terms and acronyms used within this
manual.
Analog Audio
An electrical signal that directly represents sound. Compare this to digital audio
that can be an electrical, signal but is an indirect representation of sound. See
also Digital Audio.
130
PRV-9000 Operating Instructions
Aspect Ratio
The width of a television screen relative to its height. Conventional TVs are 4:3
(screen being close to square) while wide-screen models are 16:9 (screen close
to twice as wide as the height)
Chapter
A title on a DVD is divided in to smaller segments called chapters. See also Title.
Digital Audio
An indirect representation of sound by numbers. During recording, the sound is
measured at discrete intervals (44, 100 times a second for CD audio) by an
analog-to-digital converter. The converter generates a stream of numbers that
represent the sound. On playback, a digital-to-analog converter generates an
analog signal based on these numbers. See also Sampling Frequency and
Analog Audio.
Dolby Digital
With multi-channel audio, this high-quality surround sound system is used in
many modern movie theaters.
DTS
DTS (Digital Theater System) is a surround sound system similar in quality to
Dolby Digital.
Dynamic Range
The difference between the softest and the loudest sounds possible in an audio
signal without distortion or white-noise. Dolby Digital and DTS soundtracks are
capable of a wide dynamic range thus are popular in move theaters.
MPEG Audio
MPEG is an audio format used on Video CDs and some DVD discs. The PRV9000 can convert MPEG audio to the CPM format for wider compatibility with
digital recorders and AV amplifiers. See also PCM.
MPEG Video
MPEG video format is used for Video CDs and DVDs. Video CD uses the older
MPEG-1 standard while DVD uses the higher-quality MPEG-2 standard.
Optical Digital Output
A port or jack that carries digital audio signals as light pulses. The special optical
cord may be purchased from most audio dealers.
PCM (Pulse Code Modulation)
PCM is the most common system of encoding digital audio on to CDs and DAT
sources. PCM provides excellent quality but requires excessive amounts of data
when compared to formats such as Dolby Digital and MPEG Audio. For
compatibility with digital audio recorders (CD, MD, and DAT) and AV amplifiers
with digital inputs, the PRV-9000 can convert Dolby Digital and MPEG Audio in to
PCM. See also Digital Audio.
PBC (PlayBack Control)
131
PRV-9000 Operating Instructions
PBC is a system to navigate a Video CD through on-screen menus recorded onto
the disc. An example of a disc using this technology is a karaoke disc where the
disc is not normally played from beginning to end.
Progressive Scan Video
Also called non-interlaced Video, progressive scan is a method of updating all
lines in a displayed picture in a single pass. The picture is more stable and
flicker-free unlike an interlaced video image.
PureCinema
Video on a DVD disc may be videotaped material (originally shot on video) or film
footage (originally shot on film stock). Video source has a frame rate of 30
frames/second, compared to film with a frame rate of 24 frames/second. This
recorder converts film material to 60 frames/second (in progressive scan mode).
PureCinema adjusts the picture quality comparable to a cinema screen. To
check a sequence for origination (videotape or film), display the transfer rate. If a
pound sign (#) appears above the transfer rate data then the segment is from a
film source.
Regions (DVD only)
Regions associate discs and players/recorders with a particular area of the world.
This unit only plays discs with compatible region codes. The recorder’s region
code is stamped on the back panel close to the serial number. Some discs are
compatible with more than one region.
Sampling Frequency
Sampling frequency refers to the rate at which sound is measured when being
turned in to digital audio data. Higher rates equal better sound quality. However,
more digital information generates with the higher rates. Standard CD Audio has
a sampling frequency of 44.1kHz, which translates to 44,100 samples
(measurements) per second. See also Digital Audio.
Title (DVD only)
A title is a collection of chapters on a DVD disc. See also Chapter.
Track
Audio CDs and Video CDs use tracks to divide content on a disc. The DVD
equivalent is called a chapter. See also Chapter.
For additional technological words and terms, refer to the DVD FAQ website.
(Author: Jim Taylor http://dvddemystified.com/dvdfaq.html)
132
PRV-9000 Operating Instructions
12
TROUBLESHOOTING
The following sections deal with common errors and specific problems when working with
advanced recording devices such as the PRV-9000 DVD recorder.
12.1
General Issues
If you are unable to see a picture or hear the audio through the DV In/Out jack,
check the following points:
Copy-protected source material is blocked from output through the DV jack.
Check the cable between the camcorder or other DV device and the PRV9000.
Toggle the power (turn power Off then On again) to the DV device.
Switch the audio input.
Verify that the Linear PCM audio is set to a value other than 96 kHz.
12.2
Timer Recording Issues
Although the timer is set, the recorder fails to record under the following
conditions:
No discs is loaded
Non-recordable disc is loaded
Loaded disc is protected (see section, Protect/Unprotect an Original Title)
Loaded disc already contains the maximum number of titles (99 titles)
Entering a timer program is unavailable during the following situations:
Recording is already taking place
Clock is not set
Selected recording time has already passed
Eight timer programs already exist
If two or more programs overlap, the following actions occur:
Earlier program takes priority
As the earlier program finishes, the later timer program begins recording
133
PRV-9000 Operating Instructions
(transition requires approximately 30 seconds)
Programs set to start recording at the same time causes the recorder to give
priority to the program entered first
(ex: program line entry 4 and 7 start at the same time, program 4 begins
recording)
Confirmation is unavailable during the following situations:
No discs is loaded
Non-recordable disc is loaded
Loaded disc is protected (see section 7.4.12 Protecting/Unprotecting an
Original Title)
Loaded disc already contains the maximum number of titles (99 titles)
Note: If the disc is damaged, the recording may be incomplete or unsuccessful. The
Confirm field may indicate that the sequence has recorded properly (Rec OK) however
the recording can be defective.
12.3
DV Recording Issues
DV, also known as IEE 1394-1995 and i.LINK®, supports input/output for audio,
video, data and control signals on a single cable.
One of the following messages may appear on-screen when using the DV
IN/OUT port.
No DV camera connected
The camcorder is not connected properly or the camcorder is switched OFF.
DV camera is recording
The camcorder is recording already so recording from the camcorder is
impossible.
Can’t connect more than one DV camera at the same time
The recorder’s DV port supports a single camcorder at any given time.
No tape in the DV camera
A tape is missing from the camcorder.
DV camera is recording or is record-paused
The camcorder is in camera-mode or record-pause mode rather than in VTR.
DV camera playback canceled
Playback unexpectedly stops due to the tape running out or some other
similar occurrence.
134
PRV-9000 Operating Instructions
Cannot operate the DV camera
The recorder fails to control the camcorder, turning the camera OFF then ON
again may solve the problem.
Could not operate the DV camera
The recorder fails to control the camcorder because this feature is
unsupported.
If the picture or sound fails to come through the DV IN/OUT port, check for the
following conditions:
Source signal is copy-protected
DV cable is loose or improperly seated
Connected equipment needs the power cycled to recognize the recorder
(turn the equipment’s power OFF then ON again)
Audio Input is improperly set
Linear PCM audio is set to something other than 96kHz
12.4
DV Editing Issues
Segments less than 5 seconds in duration may not be deleted from the Original
material. For additional help with editing, refer to the following section or contact
your Pioneer representative.
12.5
Frequently Asked Questions (FAQ)
1. Why won’t the recorder turn ON?
Make sure that the recorder is connected properly. Reseat the power
cord if necessary.
2. What happened to the picture (picture missing)?
Check that cables are connected properly.
Confirm that the monitor or AV receiver is set to the correct input(s).
Verify that the disc is NTSC media.
The recorder may be set to Progressive-Scan with an incompatible
television or monitor. Press and hold the PAUSE button then press FL
DIMMER to reset to Interface.
135
PRV-9000 Operating Instructions
3. Why does the disc automatically eject after closing the disc tray?
Confirm that the disc is aligned in the tray properly with the label facing
up.
Remove the disc and clean the recording/recorded surface.
Verify that the region code is compatible with the PRV-9000 recorder.
4. Why won’t my disc play?
The media surface may contain dust or smudges. Clean the disc and
retry.
Verify that a region code on the disc matches the region code on the
recorder.
Check that the disc is aligned properly on the tray and that the label
facing up.
Condensation may have formed within the recorder. Allow the unit to
stabilize at the current room temperature for one to two hours before
attempting to play the disc.
5. Where did my settings go?
If the unit is unplugged or there is a power failure while the recorder is
ON, all settings return to the original default values. Returning the
recorder to Standby mode before unplugging the unit saves your settings.
6. Why did my screen go blank at the same time that all the buttons
stopped working?
The recorder has a command conflict. Press the STOP button on the
front panel of the unit and restart playback.
7. What does this symbol,
, mean?
The symbol means that the operation you want to perform is unavailable
on that disc. The recorder is functioning properly.
8. What does this symbol,
, mean?
The symbol means that the recorder prohibits the operation you want to
perform. The recorder is functioning properly.
9. Why did the remote control stop working?
Change the angle to test the operating range.
When this recorder is connected to other Pioneer devices through the
CONTROL IN/OUT ports, point the remote control at the other device(s).
The remote control’s ID number must match the recorder’s ID number.
136
PRV-9000 Operating Instructions
Replace the battery in the remote control. When the battery runs down,
the ID number automatically resets to ID1.
10. Why is the sound distorted/missing?
Adjust the volume control for the television, monitor or AV device.
Sound is removed during pauses, scans, or slow motion play. Press
PLAY to resume normal playback with sound.
DTS discs require a DTS decoder or DTS-compatible receiver to play
back. Connect a DTS device to the recorder and retry.
If adding a DTS device, verity that the DTS Output option is set to ON.
SETUP > Audio > DTS Output > ON
Some 96kHz discs do not output audio through Digital Out. Switch the
receiver/amplifier’s input to analog.
Verify that the audio cable connections and reseat if necessary.
Check that cable contacts are clean.
11. Why is the picture from my external input distorted?
If the video signal from the external component is copy-protected, the
recorder is unable to relay the signal accurately. Connect the component
directly to the viewing device.
12. How do I return the screen to normal when it’s stretched out
horizontally/vertically?
The recorder’s input automatically switches into wide mode to match the
input signal when necessary. If the connected device is incompatible with
ID-1, set the component to output a 4:3 aspect ratio.
Change the TV Screen Size setting to match the media (disc setting).
Check the aspect ratio setting on the monitor or AV receiver.
13. Why won’t the disc I made on the PRV-9000 play on my (other
manufacturer’s) DVD player?
Material recorded in Video mode must be finalized before being able to
play is on a different DVD device.
Some DVD players are unable to read recordable media. Check with the
manufacturer for recordable media compatibility issues.
Material recorded on a VR formatted disc is playable on devices marked
with the RW Compatibility symbol.
Discs recorded with copy-once material are banned from playing on other
devices.
137
PRV-9000 Operating Instructions
14. Why is the picture so dark and/or distorted during playback?
When a copy-protected disc is played on the recorder but connected to
the television/monitor via a VCR, the picture fails to display correctly.
Connect the recorder directly to the viewing device.
15. How can I control my TV using the PRV-9000’s remote control?
Verify that your television allows other remote controls to operate the set.
Select the appropriate code for your make of TV. Refer to Chapter 4:
GETTING STARTED, section 4.1.7 Setting the Remote to Control a TV.
16. Why can’t I record a particular program?
Check for available recordable space on the disc. Read Chapter 6:
RECORDING FUNCTIONS & OPTIONS, section 6.1.2 Check Available
Disc Space.
Verify that there are less than 99 titles and less than 999 chapters on the
disc (Original titles and chapters only for a VR disc).
Confirm that the source material is not copy-protected.
Check that the disc is not copy-protected.
Set the recorder’s built-in TV tuner to the appropriate channel rather than
setting the channel from the television tuner.
When recording to a Video format disc, programs that are copy-once
protected cannot be recorded. Use a VR formatted disc for copy-once
material.
Verify that separate recording sessions did not overlap.
Check for power interruptions during the recording session.
17. Why is my frame search/time search failing?
The Frame Search option is still set to OFF. To set this option to ON,
refer to Chapter 9: INITIAL SETUP MENU, section 9.2.4 Frame Search.
Searches only work with DVD media. Verify that the disc is a DVD-ROM
or DVD-R/RW disc.
18. Why doesn’t my camcorder (connected through the DV IN/OUT port)
produce a picture or any sound?
The cable may be loose or disconnected. Check the cable seating.
Disconnect then reconnect the cable to clear any interference.
Verify that the source material is not copy-protected or copy-once
protected.
138
PRV-9000 Operating Instructions
Try switching the DV Link option to OFF. For assistance, refer to Chapter
9: INITIAL SETUP MENU, section 9.1.4 Video In/Out Settings.
Try toggling the DV Input. For assistance, refer to Chapter 9: INITIAL
SETUP MENU, section 9.1.5 Audio In Settings.
Switch OFF both the camera and the recorder then power up together.
Confirm that the audio is set to 32kHz or 48kHz before recording. The
44.1kHz recording sampling frequency is unsupported.
19. Why doesn’t the picture and audio transfer from the recorder to my
camcorder when I use the DV IN/OUT port?
The cable may be loose or disconnected. Check the cable seating.
Disconnect then reconnect the cable to clear any interference.
Stop the disc (in the recorder) then restart playback.
Verify that only one digital camcorder is connected to the recorder.
Switch OFF both the camera and the recorder then power up together.
Recording Audio/Video through the DV port from CDs, Video CDs, the
built-in TV tuner or an external component is unsupported.
Verify that the source material is not copy-protected or copy-once
protected.
20. What do I do to control my camcorder using the PRV-9000’s remote?
Some camcorders are not compatible with this remote. Check with the
camcorder manufacturer for details.
21. Can I play my recordable discs in a regular DVD player?
Generally, DVD-R and DVD-RW discs recorded in Video mode are
playable on many manufacturers’ players but the media must be finalized
first. This process fixes the contents thus making the material readable to
various players as DVD Video discs.
DVD-RW discs recorded in VR mode are playable on some players.
Check with the player’s manufacturer for compatibility information.
Note: The RW compatibility symbol (
) indicates that the device recognizes
material recorded on a DVD-RW VR-formatted disc.
22. Is editing a DVD like editing a video tape?
No. When editing a video tape, you need one video deck to play the
original tape and another to record the edits. With DVD, make a Playlist
to play what you want, when you want it. On playback, the recorder only
shows the specified segments from the disc.
139
PRV-9000 Operating Instructions
For additional information or assistance please contact the Support group at Pioneer
Electronics (USA), Inc.
Email: [email protected]
Phone: 310/952-2111 (CA)
201/327-6400 (NJ)
140
PRV-9000 Operating Instructions
(this page intentionally left blank)
141
PRV-9000 DVD Recorder
Pioneer Electronics (USA), Inc.
2265 East 220th Street
Long Beach, California 90810
United States of America
(310) 952-2111
http://www.pioneerelectronics.com