1
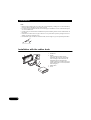
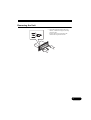
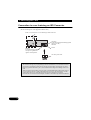
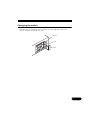
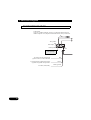
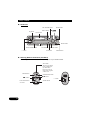
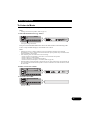
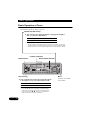
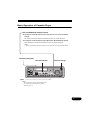
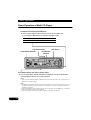
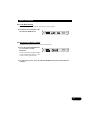
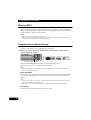
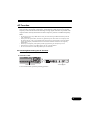
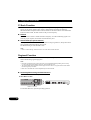
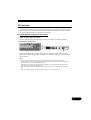
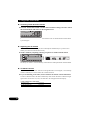
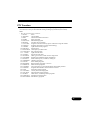
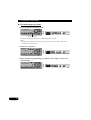
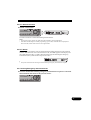
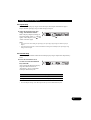
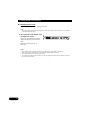
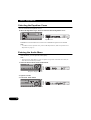
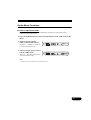
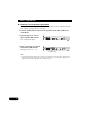
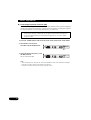
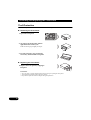
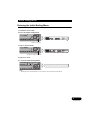
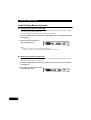
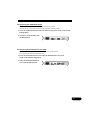
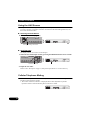
Multi-CD control High power cassette player
with RDS tuner
Manual
KEH-P5900R
KEH-P4930R
KEH-P4900R
&RQWHQWV
Installation ............................................ 4
Installation with the rubber bush ........................ 4
Removing the Unit .............................................. 5
• Local Seek Tuning
• Best Stations Memory (BSM)
Connecting the Units ........................... 6
Using RDS Functions ......................... 20
Connection in a car featuring an
ISO Connector ................................................. 8
Changing the switch ........................................... 9
What is RDS ..................................................... 20
Program Service Name Display ....................... 20
AF Function ..................................................... 21
• Activating/Deactivating the AF Function
PI Seek Function .............................................. 22
• PI Seek
• Auto PI Seek (for preset station)
Regional Function ............................................ 22
• Activating/Deactivating the REG Function
TA Function ..................................................... 23
• Activating/Deactivating the TA Function
• Canceling Traffic Announcements
• Adjusting the TA Volume
• TP Alarm Function
PTY Function ................................................... 25
• PTY Search Setting Function
• PTY Search Function
• PTY Alarm
• Canceling Emergency Announcements
Connection Diagram ........................... 10
Key Finder ........................................... 12
• Head Unit
• Steering Remote Controller (CD-SR77)
Before Using This Product ................. 13
About This Product ........................................... 13
About This Manual ........................................... 13
About Optional Steering Remote Controller
(for KEH-P5900R) ......................................... 13
Precaution ......................................................... 14
In Case of Trouble ............................................ 14
Basic Operation .................................. 15
To Listen to Music ............................................ 15
Basic Operation of Tuner ................................. 16
• Manual and Seek Tuning
• Preset Tuning
• Band
Basic Operation of Cassette Player .................. 17
• Fast Forward/Rewind and Music Search
• Cassette Loading Slot
• Direction Change
• Eject
Basic Operation of Multi-CD Player ................ 18
• Track Search and Fast Forward/Reverse
• Disc Search
• Disc Number Search
(for 6-Disc, 12-Disc types)
Tuner operation ................................... 19
Using the Cassette Player .................. 28
• Repeat Play
• Blank Skip
• Radio Intercept
Using Multi-CD Players .......................29
Initial Setting Menu ............................. 41
• Repeat Play
• Random Play
• Scan Play
• Pause
Disc Title .......................................................... 31
• Disc Title Input
• Displaying Disc Title
Playing Discs on a 50-Disc Type
Multi-CD Player ............................................ 33
Entering the Initial Setting Menu ..................... 41
Initial Setting Menu Functions ......................... 42
• Changing the FM Tuning Step (FM)
• Switching the Auto PI Seek (A-PI)
• Switching the AUX Mode (AUX)
• Selecting the Illumination Color (ILM)
Audio Adjustment ............................... 34
Selecting the Equalizer Curve .......................... 34
Entering the Audio Menu ................................. 34
Audio Menu Functions ..................................... 35
• Balance Adjustment (FAD)
• Equalizer Curve Adjustment
(EQ-LOW/MID/HIGH)
• Loudness Adjustment (LOUD)
• Front Image Enhancer Function (FIE)
• Source Level Adjustment (SLA)
Other Functions .................................. 44
Using the AUX Source .................................... 44
• Selecting the AUX Source
• AUX Title Input
Cellular Telephone Muting .............................. 44
Cassette Player and Care ................... 45
Precaution ........................................................ 45
• About the Cassette Player
• About Cassette Tapes
Cleaning the Head ............................................ 45
Specifications ...................................... 47
Detaching and Replacing the
Front Panel ....................................... 40
Theft protection ................................................ 40
• Detaching the Front Panel
• Replacing the Front Panel
,QVWDOODWLRQ
1RWH
• Before finally installing the unit, connect the wiring temporarily, making sure it is all connected up
properly, and the unit and the system work properly.
• Use only the parts included with the unit to ensure proper installation. The use of unauthorized parts
can cause malfunctions.
• Consult with your nearest dealer if installation requires the drilling of holes or other modifications of
the vehicle.
• Install the unit where it does not get in the driver’s way and cannot injure the passenger if there is a
sudden stop, like an emergency stop.
• If installation angle exceeds 30° from horizontal, the unit might not give its optimum performance.
Installation with the rubber bush
1. Dashboard
2. Holder
After inserting the holder into the
dashboard, then select the appropriate
tabs according to the thickness of the
dashboard material and bend them.
(Install as firmly as possible using the top
and the bottom tabs. To secure, bend the
tabs 90 degrees.)
3. Rubber bush
4. Screw
Removing the Unit
5. Insert the supplied extraction keys into
the unit, as shown in the figure, until they
click into place.
Keeping the keys pressed against the
sides of the unit, pull the unit out.
&RQQHFWLQJWKH8QLWV
1RWH
• This unit is for vehicles with a 12-volt battery and negative grounding. Before installing it in a
recreational vehicle, truck, or bus, check the battery voltage.
• To avoid shorts in the electrical system, be sure to disconnect the battery cable before beginning
installation.
• Refer to the owner's manual for details on connecting the power amp and other units, then make
connections correctly.
• Secure the wiring with cable clamps or adhesive tape. To protect the wiring, wrap adhesive tape
around them where they lie against metal parts.
• Route and secure all wiring so it cannot touch any moving parts, such as the gear shift, handbrake and
seat rails. Do not route wiring in places that get hot, such as near the heater outlet. If the insulation of
the wiring melts or gets torn, there is a danger of the wiring short-circuiting to the vehicle body.
• Don't pass the yellow lead through a hole into the engine compartment to connect to the battery.
This will damage the lead insulation and cause a very dangerous short.
• Do not shorten any leads. If you do, the protection circuit may fail to work when it should.
• Never feed power to other equipment by cutting the insulation of the power supply lead of the unit
and tapping into the lead. The current capacity of the lead will be exceeded, causing overheating.
• When replacing fuse, be sure to use only fuse of the rating prescribed on this unit.
• Since a unique BPTL circuit is employed, never wire so the speaker leads are directly grounded
or the left and right speaker leads are common.
• Speakers connected to this unit must be high-power types with minimum rating of 40 W and
impedance of 4 to 8 ohms. Connecting speakers with output and/or impedance values other than those
noted here may result in the speakers catching fire, emitting smoke or becoming damaged.
• When this product's source is switched ON, a control signal is output through the blue/white lead.
Connect to an external power amp's system remote control or the car's Auto-antenna relay control
terminal. (Max. 300 mA 12 V DC.) If the car features a glass antenna, connect to the antenna booster
power supply terminal.
• When an external power amp is being used with this system, be sure not to connect the blue/white
lead to the amp's power terminal. Likewise, do not connect the blue/white lead to the power terminal
of the auto-antenna. Such connection could cause excessive current drain and malfunction.
• To avoid short-circuiting, cover the disconnected lead with insulating tape. Especially, insulate the
unused speaker leads without fail. There is a possibility of short-circuiting if the leads are not
insulated.
• To prevent incorrect connection, the input side of the IP-BUS connector is blue, and the output side
is black. Connect the connectors of the same colors correctly.
• If this unit is installed in a vehicle that does not have an ACC (accessory) position on the ignition
switch, the red lead of the unit should be connected to a terminal coupled with ignition switch
ON/OFF operations. If this is not done, the vehicle battery may be drained when you are away from
the vehicle for several hours.
ACC position
No ACC position
• The black lead is ground. Please ground this lead separately from the ground of high-current products
such as power amps. If you ground the products together and the ground becomes detached, there is
a risk of damage to the products or fire.
• Cords for this product and those for other products may be different colors even if they
have the same function. When connecting this product to another product, refer to the
supplied Installation manuals of both products and connect cords that have the same
function.
&RQQHFWLQJWKH8QLWV
Connection in a car featuring an ISO Connector
You can connect the car stereo power cord as it is.
(Do not use the power cord supplied with this unit.)
Refer to "Connection in a car not featuring an ISO Connector."
Accessory
To electric terminal controlled by ignition
switch (12 V DC)
ON/OFF.
Back-up
To terminal always supplied
with power regardless of
ignition switch position.
Switch
Car stereo power cord.
Attention:
The connector wiring may vary depending on the car manufacturer, even when ISO connectors
are used. We recommend to check the car’s wiring provision before connecting the car stereo.
Please pay particular attention to pin 5, where a misconnection might cause damage to the car or
radio.
Take special care when installing into ’98 or later VW/Audi/Skoda/Seat models as there may be
a 12 V connection on Pin 5, which could damage the car stereo or into Ford from ’97 or later,
with an ISO connector, on which damage to the car’s microcomputers is possible if
misconnected. Use of ISO connector adapters available on the market may facilitate installation.
Changing the switch
With some cars, it may be necessary to change the switch on the rear of this unit. Refer to the
illustration above to confirm the power cord. With cars in which Back-up and ACC are
reversed, insert the switch in the lower side.
Not used.
Fuse
Switch
&RQQHFWLRQ'LDJUDP
This product conforms to new cord colors.
Yellow/black
If you use a cellular telephone, connect it via the Audio Mute lead on the
cellular telephone. If not, keep the Audio Mute lead free of any connections.
This product
Rear output
Antenna jack
Fuse
Multi-CD player
(sold separately)
To electric terminal controlled by
ignition switch (12 V DC) ON/OFF.
To terminal always supplied with power
regardless of ignition switch position.
To vehicle (metal) body.
Red
Yellow
Black (ground)
Connecting cords with RCA pin plugs
(sold separately).
To system control terminal of the
power amp or Auto-antenna relay
control terminal.
(Max. 300 mA 12 V DC.)
System remote control
Left speaker
Right speaker
White
Front
Power amp
(sold separately)
White/Black
Green
Gray
Gray/Black
Front
Violet
Rear
Rear
Green/black
Rear
With a 2 speaker system, do not
connect anything to the speaker leads
that are not connected to speakers.
Violet/black
Rear
Perform these connections
when using a different amp
(sold separately).
.H\)LQGHU
Head Unit
BAND button
LOCAL/BSM button
EJECT button
EQ button
buttons
Cassette door
Detach button
Buttons 1–6
SOURCE/OFF button
TA/AF button DISPLAY button
+/– button
PTY button
AUDIO button
Steering Remote Controller (CD-SR77)
The steering remote controller (CD-SR77) is an option only for KEH-P5900R.
ATT button
This lets you quickly
lower volume level
(by about 90%).
Press once more to
return to the original
volume level.
BAND button
buttons
FUNCTION button
Not Used.
SOURCE/OFF button
button
+/– button
AUDIO button
%HIRUH8VLQJ7KLV3URGXFW
About This Product
• This product complies with the EMC Directives (89/336/EEC, 92/31/EEC) and CE
Marking Directive (93/68/EEC).
The tuner frequencies on this product are allocated for use in Western Europe, Asia, the Middle
East, Africa and Oceania. Use in other areas may result in improper reception.
The RDS function operates only in areas with FM stations broadcasting RDS signals.
About This Manual
This product features a number of sophisticated functions ensuring superior reception and
operation. All are designed for the easiest possible use, but many are not self-explanatory. This
operation manual is intended to help you benefit fully from their potential and to maximize
your listening enjoyment.
We recommend that you familiarize yourself with the functions and their operation by reading
through the manual before you begin using this product. It is especially important that you read
and observe the “Precaution” on the next page and in other sections.
This manual explains head unit operation. You can perform the same operations with the
steering remote controller (CD-SR77) only when operating KEH-P5900R. The steering remote
controller offers the convenience of ATT, a function not provided on the head unit.
About Optional Steering Remote Controller
(for KEH-P5900R)
Optional steering remote controller (CD-SR77) for KEH-P5900R has a switch inside the cover
on the back. Use the steering remote controller in the MAIN UNIT position without switching.
(Initially, it is already set to the MAIN UNIT position.) This product will not work properly in
the other positions.
%HIRUH8VLQJ7KLV3URGXFW
Precaution
•
•
•
•
•
The Pioneer CarStereo-Pass is for use only in Germany.
Keep this manual handy as a reference for operating procedures and precautions.
Always keep the volume low enough for outside sounds to be audible.
Protect this product from moisture.
If the battery is disconnected, the preset memory will be erased and must be reprogrammed.
In Case of Trouble
Should this product fail to operate properly, contact your dealer or nearest authorized Pioneer
Service Station.
%DVLF2SHUDWLRQ
To Listen to Music
The following explains the initial operations required before you can listen to music.
1RWH
• Loading a cassette in this product. (Refer to page 17.)
6HOHFWWKHGHVLUHGVRXUFHHJ7XQHU
Each press changes the Source ...
Each press of the SOURCE/OFF button selects the desired source in the following order:
Tuner 3 Tape 3 Multi-CD player 3 External Unit 3 AUX
1RWH
• External Unit refers to a Pioneer product (such as one available in the future) that, although
incompatible as a source, enables control of basic functions by this product. Only one External Unit
can be controlled by this product.
• In the following cases, the sound source will not change:
* When a product corresponding to each source is not connected to this product.
* When no tape is set in this product.
* When no magazine is set in the Multi-CD player.
* When the AUX (external input) is set to OFF. (Refer to page 43.)
• When this product’s blue/white lead is connected to the car’s Auto-antenna relay control terminal, the
car’s Auto-antenna extends when this product’s source is switched ON. To retract the antenna, switch
the source OFF.
5DLVHRUORZHUWKHYROXPH
7XUQWKHVRXUFH2))
Hold for 1 second
%DVLF2SHUDWLRQ
Basic Operation of Tuner
This product’s AF function can be switched ON and OFF. AF should be switched OFF for
normal tuning operations. (Refer to page 21.)
Manual and Seek Tuning
<RXFDQVHOHFWWKHWXQLQJPHWKRGE\FKDQJLQJWKHOHQJWKRI
WLPH\RXSUHVVWKHEXWWRQ
Manual Tuning (step by step)
0.5 seconds or less
Seek Tuning
0.5 seconds or more
1RWH
• If you continue pressing the button for longer than 0.5 seconds, you can skip
broadcast stations. Seek Tuning starts as soon as you stop pressing the button.
• Stereo indicator " " stereo indicator lights when a stereo station is selected.
Frequency Indicator
Preset Number Indicator
Band Indicator
Preset Tuning
Band
<RXFDQPHPRUL]HEURDGFDVWVWDWLRQVLQEXWWRQV
WKURXJKIRUHDV\RQHWRXFKVWDWLRQUHFDOO
Preset station recall
2 seconds or less
Broadcast station preset memory
2 seconds or more
1RWH
• Up to 18 FM stations (6 in FI (FM1), FII (FM2) and FIII
(FM3)) and 6 MW/LW stations can be stored in memory.
• You can also use the or buttons to recall broadcast
stations memorized in buttons 1 through 6.
FI (FM1) 3 FII (FM2)
3 FIII (FM3)
Basic Operation of Cassette Player
Fast Forward/Rewind and Music Search
(DFKSUHVVRIWKHEXWWRQVHOHFWV)DVW)RUZDUGRU)RUZDUG0XVLF
6HDUFK
FF (Fast Forward) 3 F-MS (Forward-Music Search) 3 Normal Playback
(DFKSUHVVRIWKHEXWWRQVHOHFWV5HZLQGRU5HZLQG0XVLF6HDUFK
REW (Rewind) 3 R-MS (Rewind-Music Search) 3 Normal Playback
1RWH
• Fast Forward/Rewind and Music Search can be canceled by pressing the BAND button.
Cassette Loading Slot
Direction Indicator
Direction Change
Eject
1RWH
• The Tape function can be turned ON/OFF with
the cassette tape remaining in this product.
(Refer to page 15.)
%DVLF2SHUDWLRQ
Basic Operation of Multi-CD Player
This product can control a Multi-CD player (sold separately).
Track Search and Fast Forward/Reverse
<RXFDQVHOHFWEHWZHHQ7UDFN6HDUFKRU)DVW)RUZDUG5HYHUVH
E\SUHVVLQJWKHEXWWRQIRUDGLIIHUHQWOHQJWKRIWLPH
Track Search
0.5 seconds or less
Fast Forward/Reverse
Continue pressing
Play Time Indicator
Disk Search
Disk Number
Track Number Indicator
Indicator
Disc Number Search (for 6-Disc, 12-Disc types)
<RXFDQVHOHFWGLVFVGLUHFWO\ZLWKWKHWREXWWRQV-XVWSUHVVWKHQXPEHU
FRUUHVSRQGLQJWRWKHGLVF\RXZDQWWROLVWHQWR
1RWH
• When a 12-Disc Multi-CD Player is connected and you want to select disc 7 to 12, press the 1 to 6
buttons for 2 seconds or longer.
1RWH
• The Multi-CD player may perform a preparatory operation, such as verifying the presence of a disc
or reading disc information, when the power is turned ON or a new disc is selected for playback.
"READY" is displayed.
• If the Multi-CD player cannot operate properly, an error message such as "ERROR-14" is displayed.
Refer to the Multi-CD player owner’s manual.
• If there are no discs in the Multi-CD player magazine, "NO DISC" is displayed.
7XQHURSHUDWLRQ
Local Seek Tuning
This function selects only stations with especially strong signals.
6ZLWFKWKH/RFDO212))ZLWK
WKH/2&$/%60EXWWRQ
Best Stations Memory (BSM)
The BSM function stores stations in memory automatically.
3UHVVWKH/2&$/%60EXWWRQ
IRUVHFRQGVWRVZLWFK
%6021
The stations with the strongest signals
will be stored under buttons 1– 6 and
in order of their signal strength.
7RFDQFHOWKHSURFHVVSUHVVWKH/2&$/%60EXWWRQEHIRUHPHPRUL]DWLRQLV
FRPSOHWH
8VLQJ5'6)XQFWLRQV
What is RDS?
RDS (Radio Data System) is a system for transmitting data along with FM programs. This data,
which is inaudible, provides a variety of features such as: program service name, program type
display, traffic announcement standby, automatic tuning and program type tuning, intended to
aid radio listeners in tuning to a desired station.
1RWH
• RDS service may not be provided by all stations.
• RDS functions, like AF (Alternative frequencies search) and TA (Traffic Announcement standby),
are only active when your radio is tuned to RDS stations.
Program Service Name Display
With this function, the names of networks/stations providing RDS services replace the
frequency on the display a few seconds after they are tuned in.
:KHQ\RXZDQWWRNQRZ37<,QIRUPDWLRQRUWKHIUHTXHQF\RIWKHFXUUHQW
VWDWLRQFKDQJHWKHGLVSOD\
Each press changes the Display ...
Each press of the DISP button selects the display in the following order:
Program Service Name 3 PTY Information 3 Frequency
1RWH
• After switching displays, if you do not perform an operation within 8 seconds, the Program Service
Name is automatically displayed.
PTY Information
PTY (Program Type ID code) information for the currently tuned station appears on the display
for 8 seconds. The information is correlated with the list in the section "PTY Function" on
page 25.
1RWH
• If a PTY code of zero is received from a station, "NONE" will be displayed. This indicates that the
station has not defined its program contents.
• If the signal is too weak for this product to pick up the PTY code, "NO PTY" will be displayed.
Frequency
The frequency of the current station appears on the display.
AF Function
The AF (Alternative Frequencies search) function is used to search for other frequencies in the
same network as the currently tuned station. It automatically retunes the receiver to another
frequency in the network which is broadcasting a stronger signal when there are problems with
reception of the currently tuned station or better reception is possible on a different frequency.
1RWH
• AF tunes the receiver only to RDS stations when you use Seek tuning or BSM Auto Memory with the
"AF " indicator ON.
• When you recall a preset station, the tuner may update the preset station with a new frequency from
the station's AF list. (This is only available when using presets on the FM1 band.) No preset number
appears on the display if the RDS data for the station received differs from that for the originally
stored station.
• Sound may be temporarily interrupted by another program during an AF frequency search.
• When the tuner is tuned to a non-RDS station, the "AF " indicator flashes.
• AF can be switched ON or OFF independently for each FM band.
Activating/Deactivating the AF Function
AF is set to ON by default.
7XUQ$)WR2))
Hold for 2 seconds
"AF" disappears
To turn AF back ON, repeat the preceding operation.
8VLQJ5'6)XQFWLRQV
PI Seek Function
The tuner searches for another frequency broadcasting the same programming. "PI SEEK"
appears on the display and the radio volume is muted during a PI Seek. The muting is
discontinued after completion of the PI Seek, whether or not the PI seek has succeeded. If the
PI Seek is unsuccessful, the tuner returns to the previous frequency.
PI Seek
If the tuner fails to locate a suitable alternative frequency or if the broadcasting signal is too
weak for proper reception, the PI Seek will automatically start.
Auto PI Seek (for preset station)
When preset stations cannot be recalled, as when traveling long distances, this product can be
set to perform PI Seek also during preset recall.
The default setting for Auto PI Seek is OFF.
1RWH
• Refer to "Initial Setting" for details on how to switch Auto PI Seek ON/OFF.
Regional Function
When AF is used to retune the tuner automatically, REG (regional) limits the selection to
stations broadcasting regional programs.
1RWH
• Regional programming and regional networks are organized differently depending on the country
(i.e., they may change according to the hour, state or broadcast area).
• The preset number may disappear on the display if the tuner tunes in a regional station which differs
from the originally set station.
• REG can be switched ON or OFF independently for each FM band.
Activating/Deactivating the REG Function
The REG function is set to ON by default.
7XUQ5(*WR2))
Hold for 2 seconds
To turn REG back ON, repeat the preceding operation.
TA Function
The TA (Traffic Announcement standby) function lets you receive traffic announcements
automatically, no matter what source you are listening to. The TA function can be activated for
either a TP station (a station that broadcasts traffic information) or an EON TP station (a station
carrying information which cross-references TP stations).
Activating/Deactivating the TA Function
7XQHLQD73RU(2173VWDWLRQ
The "TP" indicator lights when the tuner is tuned to a TP station or an EON TP station.
$FWLYDWHWKH7$IXQFWLRQ
"TA"
The "TA" indicator lights, indicating that the tuner is waiting for traffic announcements.
Repeat the preceding operation when no traffic announcement is being received to deactivate
the TA function.
1RWH
• The system switches back to the original source following traffic announcement reception.
• The TA function can be activated from sources other than tuner if the tuner was last set to the FM
band but not if it was last set to the MW/LW band.
• If the tuner was last set to FM, turning on the TA function lets you operate other tuning functions
while listening to the sources other than tuner.
• Only TP or EON TP stations are tuned in during the Seek Tuning mode when the "TA" indicator is
ON.
• Only TP or EON TP stations are stored by BSM when the "TA" indicator is ON.
8VLQJ5'6)XQFWLRQV
Canceling Traffic Announcements
3UHVVWKH7$$)EXWWRQZKLOHDWUDIILFDQQRXQFHPHQWLVEHLQJUHFHLYHGWRFDQFHO
WKHDQQRXQFHPHQWDQGUHWXUQWRWKHRULJLQDOVRXUFH
The announcement is canceled but the tuner remains in the TA mode until the TA/AF button
is pressed again.
Adjusting the TA Volume
When a traffic announcement begins, the volume adjusts automatically to a preset level to
enable you to hear the announcement clearly.
6HWWKHYROXPHE\DGMXVWLQJLWGXULQJUHFHSWLRQRIDWUDIILFDQQRXQFHPHQW
The newly set volume is stored in memory and recalled for subsequent traffic announcements.
TP Alarm Function
About 30 seconds after the "TP" indicator is extinguished due to a weak signal, a 5 second beep
sounds to remind you to select another TP or EON TP station.
,I\RXDUHOLVWHQLQJWRWKHWXQHUWXQHLQDQRWKHU73VWDWLRQRU(2173VWDWLRQ
In sources other than tuner, the tuner automatically seeks out the TP station with the strongest
signal in the current area 10 (or 30)* seconds after "TP" disappears from the display.
7LPHWDNHQEHIRUH6HHNEHJLQV
TA function ON
10 seconds
TA, AF functions ON
30 seconds
PTY Function
The PTY function enables you to select stations by the type of programming they broadcast
(PTY Search). It also provides automatic tuning to emergency broadcasts (PTY Alarm).
1RWH
• PTY code program types are as follows:
1.
2.
3.
4.
5.
6.
7.
8.
9.
10.
11.
12.
13.
14.
15.
16.
17.
18.
19.
20.
21.
22.
23.
24.
25.
26.
27.
28.
29.
NEWS:
AFFAIRS:
INFO:
SPORT:
EDUCATE:
DRAMA:
CULTURE:
SCIENCE:
VARIED:
POP MUS:
ROCK MUS:
EASY MUS:
L. CLASS:
CLASSIC:
OTH MUS:
WEATHER:
FINANCE:
CHILDREN:
SOCIAL:
RELIGION:
PHONE IN:
TOURING:
LEISURE:
JAZZ:
COUNTRY:
NAT MUS:
OLDIES:
FOLK MUS:
DOCUMENT:
News.
Current affairs.
General information and advice.
Sports programs.
Educational programs.
All radio plays and serials.
Programs concerned with any aspect of national or regional culture.
Programs about nature, science and technology.
Light entertainment programs.
Popular music.
Contemporary modern music.
Easy listening music.
Light classical music.
Serious classical music.
Other types of music, which can’t be categorized.
Weather reports/Meteorological information.
Stock market reports, commerce, trading etc.
Children’s programs.
Social affairs programs.
Religion affairs programs or services.
Phone in based programs.
Travel programs, not for announcements about traffic problem.
Programs about hobbies and recreational activities.
Jazz music based programs.
Country music based programs.
National music based programs.
Oldies music, ’Golden age’ based programs.
Folk music based programs.
Documentary programs.
8VLQJ5'6)XQFWLRQV
PTY Search Setting Function
(QWHUWKH37<6HDUFKVHWWLQJPRGH
Hold for 2 seconds
The name of a program type appears on the display for 5 seconds.
1RWH
• CURRENT sets desired PTY to the program type of the current station (only for RDS stations
broadcasting PTY information).
6HOHFWRQHRIWKH37<V
:KHQWKHGHVLUHGSURJUDPPLQJW\SHDSSHDUVRQWKHGLVSOD\UHWXUQWRWKH
QRUPDOGLVSOD\
PTY Search Function
,QLWLDWHD37<VHDUFK
The tuner searches for a station broadcasting the desired PTY.
1RWH
• The program of some stations may differ from that indicated by the transmitted PTY.
• If no station broadcasting the selected programming type is found, "NOTFOUND" is displayed for
about 2 seconds, and the tuner returns to the original station.
PTY Alarm
PTY Alarm is a special PTY code for announcements regarding emergencies such as natural
disasters. When the tuner receives the radio alarm code, "ALARM" appears on the display and
the volume adjusts to the TA volume. When the station stops broadcasting the emergency
announcement, the system returns to the previous source.
1RWH
• The system switches back to the original source following emergency announcement reception.
Canceling Emergency Announcements
3UHVVWKH7$$)EXWWRQGXULQJHPHUJHQF\DQQRXQFHPHQWUHFHSWLRQWRFDQFHOWKH
DQQRXQFHPHQWDQGUHWXUQWRWKHSUHYLRXVVRXUFH
8VLQJWKH&DVVHWWH3OD\HU
Repeat Play
The repeat mode lets you hear the same song over again.
6ZLWFKWKH5HSHDW3OD\212))
ZLWKWKH37<EXWWRQ
“RPT
”
Blank Skip
This function fast-forwards to the next song automatically if there is a long period of silence
(12 seconds or longer) between songs.
6ZLWFKWKH%ODQN6NLS212))
ZLWKWKHEXWWRQ
Radio Intercept
This function allows you to listen to the radio during tape fast-forwarding/rewinding.
1RWH
• The radio intercept function does not work during a Music Search operation.
6ZLWFKWKH5DGLR,QWHUFHSW
212))ZLWKWKHEXWWRQ
8VLQJ0XOWL&'3OD\HUV
Repeat Play
There are three repeat play ranges: One-track Repeat, Disc Repeat and Multi-CD player
Repeat. Default repeat play range is Multi-CD player Repeat.
6HOHFWWKHGHVLUHGUHSHDWSOD\
UDQJHZLWKWKH37<EXWWRQ
Multi-CD player Repeat (Nothing) 3
One-track Repeat (“RPT
” indicator
lights) 3 Disc Repeat (“RPT
” and
“DISC” indicators light)
“RPT
”
1RWH
• If you select other discs during the repeat play, the repeat play range changes to Multi-CD player
Repeat.
• If you perform Track Search or Fast Forward/Reverse during One-track Repeat, the repeat play range
changes to Disc Repeat.
Random Play
Tracks are played at random within the selected repeat play range as explained in “Repeat Play”
above.
3UHVVWKH37<EXWWRQIRU
VHFRQGVWRVZLWFKWKH5DQGRP
3OD\212))
After selecting the desired repeat play
range from those referred to in
“Repeat Play” above, switch MultiCD Player Random Play ON.
,QGLFDWRU
3OD\UDQJH
“RPT” + “DISC”
Disc Repeat
Nothing
Multi-CD player Repeat
1RWH
• One-track Repeat changes to the Disc Repeat when you switch the Random Play ON.
8VLQJ0XOWL&'3OD\HUV
Scan Play
In the Disc Repeat, the beginning of each track on the selected disc is scanned for about 10
seconds. In the Multi-CD player Repeat, the beginning of the first track on each disc is scanned
for about 10 seconds.
3UHVVWKH/2&$/%60EXWWRQ
IRUVHFRQGVWRVZLWFKWKH6FDQ
3OD\21
After selecting the desired repeat play
range from those referred to in
“Repeat Play” on page 29, switch
Multi-CD Player Scan Play ON.
:KHQ\RXILQGWKHGHVLUHGWUDFN
RUGLVFFDQFHOWKH6FDQ3OD\E\
SUHVVLQJWKH/2&$/%60
EXWWRQIRUVHFRQGV
,QGLFDWRU
3OD\UDQJH
“RPT” + “DISC”
Disc Repeat
Nothing
Multi-CD player Repeat
1RWH
• Scan Play is canceled automatically after all the tracks or discs have been scanned.
• One-track Repeat changes to the Disc Repeat when you switch the Scan Play ON.
Pause
Pause pauses the currently playing track.
6ZLWFKWKH3DXVHSOD\212))
ZLWKWKH/2&$/%60EXWWRQ
Disc Title
Disc Title Input
You can input Titles up to 8 letters long for up to 100 discs. Using this function lets you easily
search for and select a desired disc for play.
3OD\WKHGLVF\RXZLVKWRLQSXWWKHGLVFWLWOH
6HOHFWWKH'LVF7LWOH,QSXWPRGHE\SUHVVLQJWKH',63/$<EXWWRQIRUVHFRQGV
1RWH
• When playing a CD TEXT disc on a CD TEXT compatible Multi-CD player, you cannot switch to
this mode.
• A CD TEXT disc is a CD featuring recorded text information such as Disc Title.
6HOHFWOHWWHUVQXPEHUVDQG
V\PEROVZLWKWKHEXWWRQV
To insert a space, select the flashing
cursor “_”.
0RYHWKHER[OHIWDQGULJKWZLWK
WKHEXWWRQV
:KHQ\RXKDYHFRPSOHWHGWLWOH
LQSXWPDNHWKHWKOHWWHUIODVK
WKHQPHPRUL]HE\SUHVVLQJWKH
EXWWRQ
1RWH
• Titles remain in memory, even after the disc has been removed from the magazine, and are recalled
when the disc is reinserted.
• After the titles for 100 discs have been entered, data for a new disc will overwrite the data for the disc
that has not been played back for the longest time.
• You can display the disc title of the disc currently playing. For details, refer to “Displaying Disc Title”
on page 32.
8VLQJ0XOWL&'3OD\HUV
Displaying Disc Title
You can display the currently playing Disc Title.
1RWH
• You can also display the currently playing Disc Title when playing a CD TEXT disc on a CD TEXT
compatible Multi-CD player.
6ZLWFKWKH'LVF7LWOH'LVSOD\ZLWK
WKH',63/$<EXWWRQ
Each press of the DISPLAY button
changes the display in the following
order:
Playback mode (Play Time) 3
Disc Title
1RWH
•
•
•
•
If you switch displays when disc titles have not been input, “NO TITLE” is displayed.
When playing a CD TEXT disc on a CD TEXT compatible Multi-CD Player:
You can use the Disc Title display function only.
You cannot scroll the display. Therefore you can only display the first 8 letters of the title even if the
title is more than 8 letters.
Playing Discs on a 50-Disc Type Multi-CD Player
When a magazine is loaded into a 50-Disc type Multi-CD Player, information on all the discs
in the magazine is read.
If you start playing a disc on a 50-Disc type Multi-CD Player before reading of information on
all discs has been completed, reading of information stops part way through.
1RWH
• “LOAD” will be displayed in the following cases:
* If the disc in the extra tray is selected.
* If the disc is moved from the extra tray to the magazine.
(Refer to the 50-Disc type Multi-CD player owner’s manual.)
• You cannot use the “Ejecting a Single Disc”, “Frequency Play”, “Music Group Play” or “ABC Disc
Title Search” functions with this product.
Disc Number Rough Search
This handy function lets you select discs loaded in a 50-Disc Multi-CD Player using the 1 to 5
buttons. The 50 discs are divided into five blocks, with each of the 1 to 5 buttons assigned to a
block.
6HOHFWWKHGHVLUHGEORFNZLWKWKHWREXWWRQV
1RWH
• After completing a rough search, use the and buttons to select a desired disc.
$XGLR$GMXVWPHQW
Selecting the Equalizer Curve
You can switch between Equalizer curves.
0RYHWKH(4EXWWRQXSRUGRZQWRVHOHFWWKHGHVLUHG(TXDOL]HUFXUYH
Equalizer curve
POWERFUL 4 NATURAL 4 VOCAL 4 CUSTOM 4 EQ FLAT 4 S-BASS
1RWH
• “CUSTOM” stores an equalizer curve you have made adjustments to. (Refer to “Equalizer Curve
Adjustment” on page 36.)
Entering the Audio Menu
With this Menu, you can adjust the sound quality.
1RWH
• After entering the Audio Menu, if you do not perform an operation within about 30 seconds, the
Audio Menu is automatically canceled.
6HOHFWWKHGHVLUHGPRGHLQWKH$XGLR0HQX
Each press changes the Mode ...
2SHUDWHDPRGH
&DQFHOWKH$XGLR0HQX
Audio Menu Functions
The Audio Menu features the following functions.
Balance Adjustment (FAD)
This function allows you to select a Fader/Balance setting that provides ideal listening
conditions in all occupied seats.
3UHVVWKH$8',2EXWWRQDQGVHOHFWWKH)DGHU%DODQFHPRGH)$'LQWKH$XGLR
0HQX
$GMXVWIURQWUHDUVSHDNHU
EDODQFHZLWKWKHEXWWRQV
“FAD F15” – “FAD R15” is displayed
as it moves from front to rear.
$GMXVWOHIWULJKWVSHDNHUEDODQFH
ZLWKWKHEXWWRQV
“BAL L9” – “BAL R9” is displayed as
it moves from left to right.
1RWH
• “FAD 0” is the proper setting when 2 speakers are in use.
$XGLR$GMXVWPHQW
Equalizer Curve Adjustment (EQ-L/M/H)
You can adjust the currently selected equalizer curve settings as desired. Adjusted equalizer
curve settings are memorized in “CUSTOM”.
3UHVVWKH$8',2EXWWRQDQGVHOHFWWKH(TXDOL]HUPRGH(4/0+LQWKH
$XGLR0HQX
6HOHFWWKHEDQG\RXZDQWWR
DGMXVWZLWKWKHEXWWRQV
EQ-L 4 EQ-M 4 EQ-H
%RRVWRUDWWHQXDWHWKHVHOHFWHG
EDQGZLWKWKHEXWWRQV
The display shows “+6” – “- 6”.
“– (CUSTOM EQ)”
1RWH
• If you make adjustments when a curve other than “CUSTOM” is selected, the newly adjusted curve
will replace the previous adjusted curve. Then a new curve with “– (CUSTOM EQ)” appears on the
display while selecting the equalizer curve. (Refer to page 34.)
Loudness Adjustment (LOUD)
The Loudness function compensates for deficiencies in the low and high sound ranges at low
volume. You can select a desired Loudness level.
3UHVVWKH$8',2EXWWRQDQGVHOHFWWKH/RXGQHVVPRGH/28'LQWKH$XGLR
0HQX
6ZLWFKWKH/RXGQHVVIXQFWLRQ
212))ZLWKWKHEXWWRQV
“
LOUD”
6HOHFWWKHGHVLUHGOHYHOZLWKWKH
EXWWRQV
LOW 3 MID 3 HI
$XGLR$GMXVWPHQW
Front Image Enhancer Function (FIE)
The F.I.E. (Front Image Enhancer) function is a simple method of enhancing front imaging by
cutting mid- and high-range frequency output from the rear speakers, limiting their output to
low-range frequencies. You can select the frequency you want to cut.
3UHFDXWLRQ
• When the F.I.E. function is deactivated, the rear speakers output sound of all frequencies,
not just bass sounds. Reduce the volume before disengaging F.I.E. to prevent a sudden
increase in volume.
3UHVVWKH$8',2EXWWRQDQGVHOHFWWKH),(PRGH),(LQWKH$XGLR0HQX
6ZLWFKWKH),(IXQFWLRQ
212))ZLWKWKHEXWWRQV
“FIE”
6HOHFWWKHGHVLUHGIUHTXHQF\ZLWK
WKHEXWWRQV
100 4 160 4250 (Hz)
1RWH
• After switching the F.I.E. function ON, select the Fader/Balance mode in the Audio Menu, and adjust
front and rear speaker volume levels until they are balanced.
• Switch the F.I.E. function OFF when using a 2-speaker system.
Source Level Adjustment (SLA)
The SLA (Source Level Adjustment) function prevents radical leaps in volume level when
switching between sources. Settings are based on the FM volume level, which remains
unchanged. (Since the FM volume is the control, SLA is not possible in the FM modes.)
The MW/LW, cassette, CD, External Unit and AUX levels can all be adjusted.
&RPSDUHWKH)0YROXPHZLWKWKHYROXPHRIWKHRWKHUVRXUFH
HJ&DVVHWWHSOD\HU
3UHVVWKH$8',2EXWWRQDQGVHOHFWWKH6/$PRGH6/$LQWKH$XGLR0HQX
,QFUHDVHRUGHFUHDVHWKHOHYHO
ZLWKWKHEXWWRQV
The display shows “+4” – “-4”.
'HWDFKLQJDQG5HSODFLQJWKH)URQW3DQHO
Theft Protection
The front panel of the head unit is detachable to discourage theft.
Detaching the Front Panel
(MHFWWKHIURQWSDQHO
7RUHPRYHWKHIURQWSDQHOSXOOLWV
ULJKWKDQGVLGHWRZDUG\RX
Take care not to grip it tightly or drop it.
8VHWKHSURWHFWLYHFDVHSURYLGHGWR
VWRUHFDUU\WKHGHWDFKHGIURQWSDQHO
Replacing the Front Panel
5HSODFHWKHIURQWSDQHOE\FOLSSLQJLW
LQWRSODFH
3UHFDXWLRQ
• Never use force or grip the display tightly when removing or replacing the front panel.
• Avoid subjecting the front panel to excessive shocks.
• Keep the front panel out of direct sunlight and high temperatures.
,QLWLDO6HWWLQJ0HQX
Entering the Initial Setting Menu
With this menu, you can perform initial settings for this product.
6ZLWFKWKHVRXUFH2))
(QWHUWKH,QLWLDO6HWWLQJ0HQX
Hold for 2 seconds
6HOHFWDGHVLUHGPRGH
Each press changes the Mode...
2SHUDWHDPRGH
&DQFHOWKH,QLWLDO6HWWLQJ0HQX
1RWH
• Holding down the AUDIO button for 2 seconds also cancels the Initial Setting Menu.
,QLWLDO6HWWLQJ0HQX
Initial Setting Menu Functions
Changing the FM Tuning Step (FM)
Normally set at 50 kHz during Seek tuning in the FM mode, the tuning step changes to 100 kHz
when the AF or TA mode is activated.
It may be preferable to set tuning step to 50 kHz in the AF mode.
3UHVVWKH$8',2EXWWRQDQGVHOHFWWKH)07XQLQJ6WHSPRGH)0LQWKH,QLWLDO
6HWWLQJ0HQX
6HOHFWWKHGHVLUHGWXQLQJVWHS
ZLWKWKHEXWWRQV
1RWH
• The tuning step remains set at 50 kHz during Manual tuning.
• The tuning step returns to 100 kHz if the battery is temporarily disconnected.
Switching the Auto PI Seek (A-PI)
During Preset Station PI Seek operation, you can switch the Auto PI Seek function ON/OFF.
(Refer to “PI Seek Function” on page 22.)
3UHVVWKH$8',2EXWWRQDQGVHOHFWWKH$XWR3,6HHNPRGH$3,LQWKH,QLWLDO
6HWWLQJ0HQX
6ZLWFKWKH$XWR3,6HHN212))
ZLWKWKHEXWWRQV
Switching the AUX Mode (AUX)
It is possible to use auxiliary (AUX) equipment with this product.
Activate the AUX mode when using external equipment with this product.
3UHVVWKH$8',2EXWWRQDQGVHOHFWWKH$8;6HWWLQJPRGH$8;LQWKH,QLWLDO
6HWWLQJ0HQX
6ZLWFKWKH$8;212))ZLWK
WKHEXWWRQV
Selecting the Illumination Color (ILM)
KEH-P5900R is equipped with two illumination colors, green and red.
You can select the desired illumination color.
3UHVVWKH)81&7,21EXWWRQDQGVHOHFWWKH,OOXPLQDWLRQ&RORUPRGH
,/0LQWKH,QLWLDO6HWWLQJ0HQX
6HOHFWWKHGHVLUHGLOOXPLQDWLRQ
FRORUZLWKWKHEXWWRQV
2WKHU)XQFWLRQV
Using the AUX Source
It is possible to use auxiliary (AUX) equipment with this product.
To listen to auxiliary equipment, switch the AUX mode in the Initial Setting Menu ON, and
then select the desired source.
Selecting the AUX Source
6HOHFW$8;5HIHUWRSDJH
Each press changes the Source ...
AUX Title Input
The display title for AUX source can be changed.
6HOHFWWKH$X[7LWOH,QSXWPRGHE\SUHVVLQJWKH',63/$<EXWWRQIRUVHFRQGV
Hold for 2 seconds
,QSXWWKH$X[7LWOH
Refer to “Disc Title Input” on page 31, and perform procedures 3 to 5 in the same way.
Cellular Telephone Muting
Sound from this system is muted automatically when a call is made or received using a cellular
telephone connected to this product.
• The sound is turned off, “MUTE” is displayed and no audio adjustment is possible.
Operation returns to normal when the phone connection is ended.
&DVVHWWH3OD\HUDQG&DUH
Precaution
About the Cassette Player
• A loose or warped label on a cassette tape may interfere with the eject mechanism of the unit
or cause the cassette to become jammed in the unit. Avoid using such tapes or remove such
labels from the cassette before attempting use.
• The music search and repeat functions may not work properly with the following kinds of
recorded tapes because the gap between songs cannot be found correctly.
* A tape with a gap of 4 seconds or less between songs.
* A tape containing dialog, etc., with pauses lasting for 4 seconds or longer.
* A tape with an extremely quiet passage in the music lasting for 4 seconds or longer.
About Cassette Tapes
• Do not use tapes longer than C-90 type (90 min.) cassettes. Longer tapes can interfere with
tape transport.
• Storing cassettes in areas directly exposed to sunlight or high temperatures can distort them
and subsequently interfere with tape transport.
NOT
DED
MEN
M
O
REC
• Store unused tapes in a tape case where there is no danger of them becoming loose or being
exposed to dust.
Cleaning the Head
If the head becomes dirty, the sound quality will deteriorate and there will be sound dropouts
and other imperfections in performance. In this case, the head must be cleaned.
6SHFLILFDWLRQV
General
FM tuner
Power source .............. 14.4 V DC (10.8 – 15.1 V allowable)
Grounding system ........................................... Negative type
Max. current consumption ........................................... 8.5 A
Dimensions
(mounting size) ........ 178 (W) L 50 (H) L155 (D) mm
(front face) ................. 188 (W) L 58 (H) L 20 (D) mm
Weight ........................................................................ 1.2 kg
Frequency range ......................................... 87.5 – 108 MHz
Usable sensitivity
..................... 11 dBf (1.0 µV/75 , mono, S/N: 30 dB)
50 dB quieting sensitivity ........ 16 dBf (1.7 µV/75 , mono)
Signal-to-noise ratio ....................... 70 dB (IEC-A network)
Distortion ............................ 0.3% (at 65 dBf, 1 kHz, stereo)
Frequency response ........................ 30 – 15,000 Hz (±3 dB)
Stereo separation .......................... 40 dB (at 65 dBf, 1 kHz)
Amplifier
Maximum power output ........................................ 40 W L 4
Continuous power output ....................................... 22 W L 4
.............................................. (DIN45324, +B = 14.4 V)
Load impedance .............................. 4 (4 – 8 allowable)
Preout maximum output level/output impedance
........................................................................ 2.2 V/1
Equalizer (3-Band Equalizer)
(Low) ................................................................ ±12 dB
(Mid) ................................................................. ±12 dB
(High) ............................................................... ±12 dB
Loudness contour
(Low) ..................... +3.5 dB (100 Hz), +3 dB (10 kHz)
(Mid) .................... +10 dB (100 Hz), +6.5 dB (10 kHz)
(High) ................... +11 dB (100 Hz), +11 dB (10 kHz)
(volume: –30 dB)
MW tuner
Frequency range ......................................... 531 – 1,602 kHz
Usable sensitivity .................................. 18 µV (S/N: 20 dB)
Selectivity .................................................... 50 dB (±9 kHz)
LW tuner
Frequency range ............................................ 153 – 281 kHz
Usable sensitivity .................................. 30 µV (S/N: 20 dB)
Selectivity .................................................... 50 dB (±9 kHz)
Cassette player
Tape ........................... Compact cassette tape (C-30 – C-90)
Tape speed .......................................................... 4.8 cm/sec.
Fast forward/rewinding time ....... Approx. 100 sec. for C-60
Wow & flutter ............................................. 0.09% (WRMS)
Frequency response ........................ 30 – 16,000 Hz (±3 dB)
Stereo separation ......................................................... 45 dB
Signal-to-noise ratio ....................... 61 dB (IEC-A network)
1RWH
• Specifications and the design are subject to possible
modification without notice due to improvements.
France: tapez 36 15 PIONEER
PIONEER ELECTRONIC CORPORATION
1-4-1 MEGURO, MEGURO-KU, TOKYO 153-8654, JAPAN
PIONEER ELECTRONICS (USA) INC.
P.O. Box 1760, Long Beach, California 90801, U.S.A.
TEL: (800) 421-1404
PIONEER ELECTRONIC (EUROPE) N.V.
Haven 1087 Keetberglaan 1, 9120 Melsele, Belgium
TEL:(0) 3/570.05.11
PIONEER ELECTRONICS AUSTRALIA PTY. LTD.
178-184 Boundary Road, Braeside, Victoria 3195, Australia
TEL: (03) 580-9911
PIONEER ELECTRONICS OF CANADA, INC.
300 Allstate Parkway, Markham, Ontario L3R 0P2, Canada
TEL: (905) 479-4411
PIONEER ELECTRONICS DE MEXICO, S.A. de C.V.
San Lorenzo Num 1009 3er piso Desp. 302
Col. Del Valle, Mexico D.F. C.P. 03100
TEL: 5-688-52-90
Published by Pioneer Electronic
Corporation. Copyright © 1999 by Pioneer
Electronic Corporation. All rights reserved.
Printed in Belgium
<99H00F0P01>
MAN-KEH-P4959R-GB/B