1
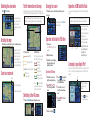
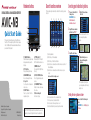
Hardware buttons
DVD MULTIMEDIA AV NAVIGATION SERVER
AVIC-N3
Quick Start Guide
This guide is intended to guide you though the basic
functions of this navigation system. For details, please
refer to the Operation Manual and Hardware Manual
provided with the product.
1 Press or touch in the fol-
(2)
(3)
(4)
(5)
(3)
lowing order.
NAVI MENU button
➔ Destination tab
➔ Address Search
4 Select the street name
from list.
2 Input the house number
and then touch “OK”.
(2)
(1)
When route calculation is complete, navigation guidance
begins.
(10)
(4)
(7)
(1) NAVI/AV button
Switch between navigation map
displays and audio operation
displays.
(2) POS button
Display the navigation map.
(3) NAVI MENU button
Access the navigation menu.
(4) Joystick
Use for operation of audio and
video source.
(5) EJECT button
Press to eject a disc from the
navigation system.
<CRB2248-A/U> UC
Printed in China
Searching your destination by address
This navigation system has multiple methods for entering your destination.
(1)
(9) (8)
Published by Pioneer Corporation.
Copyright © 2006 by Pioneer Corporation.
All rights reserved.
<KYGHX> <06A00001>
Search function overview
(6)
(7)
(8)
(9)
(6)(5)
(6) TRFC button *1
Preset button for XM Instant
Traffic & Weather audio service.
(7) MEMO button *1
Press and hold for MyMix functionality.
(8) SRC (SOURCE) button
Press to toggle between audio
sources.
(9) VOLUME/ATT button
Rotate to increase or decrease
the volume.
(10) Disc loading slot
Insert a disc to play.
*1 GEX-P10XMT XM Digital Satellite Data & Audio Receiver (sold
separately) is required, together with an active subscription.
(1)
(2)
(3)
(4)
Search by address
Shortcut key for home address
Shortcut key for favorite destination
Search stores, restaurants, and other businesses in points of
interest database
(5) Search stores, restaurants, and other businesses in your
vicinity
3 Input the street name.
5 Begin driving in accordance with navigation
guidance.
Search result list for vicinity search
This navigation systems gives
you route guidance both visually
and by voice.
(6)
(7)
(8)
(9)
Select a destination from your address book
Select a previously routed destination
Select a route to freeway entrance or exit
Search destination by business telephone number
Setting the voice guidance volume
Press or touch the following in
order.
NAVI MENU button ➔ Settings tab
➔ Volume
Switching the view mode
Press
(POS) button.
This navigation system
allows you to select different view modes
depending on your preference.
Traffic information on the map
Changing the source
Operation of XM Satellite Radio
Traffic conditions can be overlaid on the map when the optional
GEX-P10XMT is connected, together with an active XM subscription.
1 Touch the source icon and then select desired source.
You can use the navigation system to control a XM satellite digital
tuner.
Source icon
GEX-P10XMT XM Digital Satellite Data & Audio Receiver (sold
separately) is required, together with an active subscription.
(1)
You can also press the SRC button
to switch sources.
GEX-P10XMT XM Digital Satellite Data & Audio Receiver (sold
separately) is required, together with an active subscription.
(2)
Operation of the built-in DVD drive
Scrolling the map
1 Insert a disc.
Touch where you would like to scroll to on the map screen.
Tapping it once will activate the shortcut keys.
Touching it a second
time will begin map
scroll. To scroll the map,
keep touching the map.
(1) Traffic event
Stopped traffic
Stop and go traffic
Closed/blocked roads
Zoom in or zoom out
Other event
(e.g., accident)
(1) (2)
(1) Direct scale change
(2) Gradual scale change
(2) Traffic flow
The following items represent
the traffic flow for the road.
5-15 mph
(8-24 km/h)
20-40 mph
(32-64 km/h)
45 mph or faster
(72 km/h or faster)
The icon
indicates that the
average speed of the road is
over 45 mph (72 km/h).
Touch “YES” to begin the disc
playback.
(1)
2 Adjust the volume.
3 Touch the screen to display
Operating the DVD menu
play the touch panel keys.
2 Touch “MENU” or “TOP
M.” to display the DVD
menu.
4 Touch
to display the
touch panel keys to operate the DVD menu.
1 Press the NAVI/AV button to change the screen.
.
(1)
5 Touch 5, ∞, 2 or 3 to
6 Touch “ENTER” to start
(1) Touch
to display
the search categories.
playback.
3 Touch ➔ to display
You can control your iPod with Dock connector via the touch screen
when it is connected to this navigation system via CD-IB100 iPod
adapter.
CD-IB100 iPod adapter
(sold separately) is
required.
select the desired menu
item.
Switching to the AV screen
(3)
Listening to your Apple iPod®
the touch panel keys for
additional control.
1 Touch the screen to dis-
(2)
(1) Shows detailed information of current song
(2) Use to enter the channel
number directly
(3) Use to toggle between
the following displays:
Detail information display – Ch Name List –
Song Title List
– Artist Name List