1
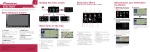
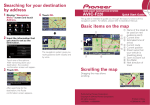
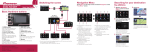
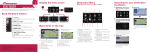
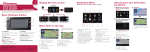
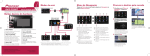
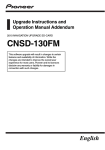
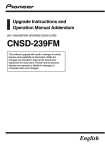
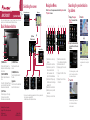
Navigation Menu
Switching the screen
GPS NAVIGATION AUDIO SYSTEM
AVIC-F320BT
Map screen
Audio operation screen
Quick Start Guide
Touch Home on the map screen and touch Navigation on the
“Top Menu” screen.
Searching for your destination
by address
1 Display “Navigation
Menu” screen and touch
Address.
This guide is intended to guide you through the basic functions of this navigation system. For details, please refer to Operation Manual.
Basic Hardware buttons
1
2
3
4
8
9
a
4
Touch OK.
b
6
Top Menu
(Classic menu)
1
2 Input the information that
2
you want to set as the destination.
Shortcut Menu
3
5
4
5
1 MODE button
Press to switch between the
map screen and the audio operation screen.
2 MULTI-CONTROL
Rotate to adjust the audio volume.
Press left or right to select the previous or next song, files, etc. when
the audio source is selected.
3 LIST button
Press to display a list of songs
or folders, when an iPod or
other audio source is selected.
Published by Pioneer Corporation.
Copyright © 2010 by Pioneer Corporation.
All rights reserved.
<KYTNX> <10B00000>
4 SRC/OFF button
Press to select the audio
source.
5 BAND/ESC button
Press to change the band for
the radio.
button
6
Press to remove the detachable
device from the head unit.
Navigation Menu
*
Printed in China
<CRB3290-A/S> EU
Phone Menu
Applications Menu*
You can launch applications downloaded to an SD memory card via the
utility programme navgate FEEDS.
For details, please refer to Operation Manual.
6
7
1 Searches for a location by
address
2 Calculates the route home
3 Searches for a place from
stores, restaurants, and
other businesses in the
points of interest database
4 Searches for POIs by using
the data on external storage
devices (SD)
5 Selects the stored location
6 Selects a previously routed
destination
7 Cancels your current route
c
8 Sets the accurate location
from a latitude and longitude
9 Estimates the fuel cost
a Displays a graph for eco-driving
b Displays the traffic information
c Displays the current route
information
The navigation system gives you
route guidance both visually and
by voice.
3
Touch one of the options.
After narrowing down your destination, the Location confirmation screen will appear.
Touch OK.
After searching for the destination, the Route confirmation
screen appears.
Basic items on the map
1
2
3
9
4
5
8
7
6
1 Name of the street to
be used (or next
guidance point)
2 Current time
3 Estimated time of
arrival
4 Current route
5 Current position
6 Street name that
your vehicle is travelling along
7 Zoom in/Zoom out
8 Eco-Meter
9 Next direction of travel
Scrolling the map
Selecting the audio source
1 Press the MODE button
2
when the map of the current location is displayed.
Press the SRC/OFF button
repeatedly to switch
between the following
sources.
1
2
3
“Top Menu” screen.
2 Touch Sound.
3 Touch + or – to change the
volume of the route guidance.
1 Shows which band the radio
is tuned to
2 Shows the selected preset
channel
3 Shows the programme service name (when available)
4
1 Touch Settings on the
1 Shows the song title, the
artist name, etc.
1
2 Switches the strings in the
text area
2
3 Sets iPod control mode.
You can operate the functions from your iPod
3
4
5
4 Plays songs in random order
5 Plays songs related to the
currently playing song
Pairing your
phone
Transferring
the phone book
1 Activate the Bluetooth
1 Connect the mobile phone.
2 Touch Transfer on the
function on your phone.
2 Touch the keys in the following order on the “Top
Menu” screen;
Phone
Settings.
select On.
4 Stores and recalls broadcast
frequencies
Playing your Apple iPod
You can control an iPod by connecting the USB interface cable for
iPod (CD-IU50) (sold separately) to the navigation system.
3 Touch OK.
3 Operate iPod with MULTI-CONTROL.
• Pressing MULTICONTROL right or left
Skips the track forward or
backward.
• Pressing and holding
MULTI-CONTROL right or
left
Performs fast forward or
reverse.
• Pressing the centre of
MULTI-CONTROL
Selects the desired item.
• Rotating MULTICONTROL
Adjusts the audio source volume.
Note:
In this manual, iPod and
iPhone will be referred to as
iPod.
“Phone Menu”.
3 Touch Bluetooth On/Off to
Using the radio (FM)
Dragging the map allows
scrolling.
Setting the volume of the route
guidance
TUNER (tuner) CD (built-in
CD player) USB (USB
storage device)/iPod (iPod
connected using USB
input) AUX (auxiliary device)
Note:
The audio source is disabled
if the equipment is not connected or inserted.
2 Switch the audio source to iPod.
4 Touch the keys in the fol-
lowing order;
Connections Add
Search devices.
The system tries to find and
lists nearby devices.
5 Touch your phone on the
list.
4 Check that the following
screen is displayed, and
operate your mobile phone
to transfer the phone book
entries.
1 Connect your iPod.
USB
connector
USB interface
cable for iPod
6 Enter the PIN code from
your phone. (The PIN code
is “1111”.)
When the pairing is successful, a message will appear.
5 After transferring, touch
OK.
When the transfer is successful, “Completed data
loading!” will appear.