1
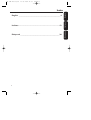
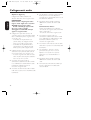
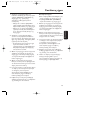
XP SBC HC 850/00
15-03-2002 11:50
Pagina 1
850
HC
Surround Sound
Stereo Wireless Headphone
XP SBC HC 850/00
15-03-2002 11:50
Pagina 2
English
Figure 1
Figure 2
13
3
14
10
Italiano
9
1
2
12
11
3
AUDIO
EL
CHANN3
AUDIO
-
IN 2
IN 1
1 2
+
4
12V DC
16
R
L
5
8
15
6
7
Figure 4
Figure 3
TRANSMITTER
2
12V DC
1
AUDIO IN 1
3
+
-
AUDIO IN 2
CHANNEL
R
L
STEREO AUDIO CABLE
(INCLUDED)
RIGHT (RED)
(WHITE) LEFT
R
+
+
TV, Hi Fi or PC
RIGHT
CHANNEL
(RED)
OUT
LEFT
CHANNEL
(WHITE)
-
Figure 5
TRANSMITTER
-
AUDIO IN 2
1
2
AUDIO IN 1
3
+
12V DC
CHANNEL
R
L
RIGHT CHANNEL
(RED)
L
VOLUME
-
-
+
+
LEFT CHANNEL
(WHITE)
HEADPHONE
STEREO AUDIO CABLE
(INCLUDED)
STEREO ADAPTER PLUG
(INCLUDED)
3
XP SBC HC 850/00
15-03-2002 11:50
Pagina 3
2
Italiano _____________________________________________12
Italiano
___________________________________________20
English ______________________________________________4
English
Index
XP SBC HC 850/00
15-03-2002 11:50
Pagina 4
Introduction
English
Congratulations!
You have just bought the most
sophisticated FM wireless stereo sound
system. This system uses the latest FM
wireless technology, which gives you
complete freedom of movement while
enjoying your favorite music and movies.
No more inconvenience from cables or
headphone wires! To ensure you get the
best performance from your FM wireless
stereo sound system please read this
manual carefully.
IMPORTANT
Read these instructions.All the safety
and operating instructions should be
read before using the wireless
headphone system.
Check if the voltage indicated on the
type plate of the adapter corresponds
to the local mains voltage before
connecting to the mains power supply.
Remove the batteries from the
headphone’s battery compartment and
disconnect the adapter from the mains
if the system is not in use for a long
period.
Prevent fire or shock hazard: do not
expose this equipment to humidity,
rain, sand or excessive heat caused by
heating equipment or direct sunlight.
Radio equipment for wireless audio
applications is not protected against
disturbance from other radio services.
General information
IMPORTANT
Before using the FM headphone for the
first time, please ensure that the
batteries are fully charged for about
16 hours.This will guarantee a longer
operating lifetime of the batteries.
Benefits of Philips latest
RF/FM wireless technology
Wireless transmission
The FM transmitter transmits the stereo
audio signal from your audio or video source
to your FM headphone without wires.
Wide transmission range
Your FM headphone can receive signals up
to 100 meters away.
High-frequency radio system
The FM headphone set uses a high radio
frequency as the signal carrier, ensuring a
very clear, sharp reception.
Mute function
Reduces the noise disturbance when the
sound signal is too low or not available.
Surround Sound
The FM headphone features SRS
headphone™ to enjoy full surround
experience without disturbing others.
Automatic power on/off indicator
The FM transmitter automatically switches
on and starts transmitting when audio
signals are detected at the audio input
(red LED). When no audio signals are
detected the FM transmitter automatically
switches off after a few minutes.
Automatic tuning
The FM headphone automatically tunes to
the right transmission frequency if you push
the tuning button.
4
15-03-2002 11:50
Pagina 5
General information
Automatic rechargeable system
The FM transmitter automatically recharges
the headphone’s built-in rechargeable
R03/AAA NiMH batteries. Just position the
headphone on the transmitter and contact.
The green LED lights up during charging.
Easy transmission
The FM headphone is able to receive signals
from the transmitter, even through barriers
such as doors, walls and windows.
Multiple headphones with one
transmitter
An additional number of headphones
and/or wireless speakers can be used with a
single transmitter if they:
- operate in the 433 MHz band
- can detect a 19 kHz pilot tone
Please consult the appliance’s electrical
specification sheets for confirmation on
compatibility.
Kit contents
This FM headphone system consists of the
following accessories:
1 x SBC HC852 FM transmitter
1 x SBC HC855 FM headphone
1 x SBC CS030/00 12Volt / 200mA AC/DC
adapter (for UK: SBC CS030/05 12 Volt/
200 mA AC/DC adapter)
Controls
English
XP SBC HC 850/00
Transmitter (figure 1)
1 Power indicator – lights up when audio
signals are detected at the audio input.
2 Recharging indicator – lights up when
headphone is replaced on the
FM transmitter. Completely flat batteries
will be fully charged after about 16 hours.
3 Recharging contact – make sure you
align your headphone to this contact for
recharging.
4 DC power – connect to the
12 Volt/200 mA AC/DC adapter
5 Line audio input – alternative connection
to an audio source.
6 3.5 mm stereo headphone audio
input – connects your FM transmitter to
an audio source
IMPORTANT
Use only 1 of the audio inputs:
3.5 mm stereo headphone audio input
OR the line audio input!
Using both audio inputs at the same
time may damage your FM wireless
system or your audio source!
7 Channel switch – select one of
3 channels for best reception.We advise
you to select channel 1 as a first option.
8 Controls plate
2 x rechargeable batteries R03/AAA
(NiMH), 550 mAh
1 x 3.5 mm stereo plug to 2x RCA audio
cable (2 m)
1 x 3.5 mm plug to 6.3 mm stereo adapter
plug
5
XP SBC HC 850/00
15-03-2002 11:50
Pagina 6
Controls
English
Headphone (figure 2)
9 Power indication – lights up when in use.
When batteries are low, the power
indicator flashes, and you should recharge
the headphone for about 16 hours before
the next use.
10 Power On/Off – push the button to
switch the headphone on/off.
11 Recharging contacts – align headphone
to the transmitter, green recharging LED on
the transmitter’s front must switch on,
indicating that the headphone is being
recharged.
12 Volume – adjust volume to your desired
listening level.
13 SRS™ On/Off – push the button to
switch the SRS™ surround sound mode
on/off.
14 SRS™ indication – lights up when the
SRS™ surround sound mode is activated.
15 Tuning – press and hold the button for
about 1 second.The headphone
automatically tunes to the right transmission
frequency and the tuning indicator will light
up. If not, repeat this step.
16 Tuning indicator – lights up when
receiving optimal transmission.
Installation
Transmitter power supply
IMPORTANT
Use only Philips SBC CS030/00
12 Volt/200 mA AC/DC adapter.
(For UK, use only Philips SBC CS030/05)
1 Make sure the adapter’s rated voltage
corresponds to the mains socket voltage.
2 Connect the DC connector of the AC/DC
adapter to the 12 Volt DC power input
connector located at the rear of the
transmitter.
3 Connect the 12 Volt/200 mA AC/DC
adapter to the mains socket.
– Always disconnect the AC/DC adapter if
the transmitter is not to be used for a
long period of time.
Headphone power supply
IMPORTANT
Use only rechargeable R03/AAA NiMH
batteries (preferably Philips).
Do not use NiCd batteries or
alkaline batteries as these may damage
your FM wireless system!
1 Check if the power button of the
FM headphone is in the on position.
2 When the red power indicator on the
FM headphone starts flashing, it indicates
that the batteries are running low.
3 To recharge the headphone’s built-in
rechargeable R03/AAA NiMH batteries,
position the headphone on the transmitter
and contact.
Environmental Information
All redundant packing material has been omitted.We have done our best to make the
packaging easily separable into two materials: cardboard and polyethylene
Your unit consists of materials which can be recycled if disassembled by a specialized
company. Please observe the local regulations regarding the disposal of packing
materials, exhausted batteries and old equipment.
6
15-03-2002 11:50
Pagina 7
Installation
Notes:
Completely flat batteries need approximately
16 hours to recharge.
The FM headphone will switch off
automatically during recharging.
Always remove the batteries if the
headphone is not to be used for a long period
of time.
Batteries contain chemical substances,
so they should be disposed of properly.
Headphone battery
replacement (figure 3)
IMPORTANT
Use only rechargeable R03/AAA NiMH
batteries (preferably Philips).
Do not use NiCd batteries or
alkaline batteries as these may damage
your FM wireless system!
1 Remove the earcushions.
2 Take out the batteries and dispose of them
properly.
3 Insert new batteries. Only use R03/AAA
NiMH batteries (preferably Philips).
4 Make sure the batteries are correctly
inserted as indicated by the engraved
symbols in the battery compartment.
5 Put the earcushions back on the earshells.
IMPORTANT
Before using the FM headphone for the
first time, please ensure that the
batteries are fully charged for about
16 hours.This will guarantee a longer
operating lifetime of the batteries.
Audio Connections
Audio Connections
IMPORTANT
Use only 1 of the audio inputs:
3.5 mm stereo headphone audio input
OR the line audio input!
Using both audio inputs at the same
time may damage your FM wireless
system or your audio source!
Option 1 (figure 4)
Connecting the FM transmitter to a line
output of an audio source, e.g. REC OUT,
LINE OUT.
1 Connect the 3.5mm stereo plug of the
stereo audio cable to the FM transmitter’s
3.5mm headphone input.
2 Connect the 2 RCA plugs of the stereo
audio cable to a line output (REC OUT or
LINE OUT) of an audio source, e.g.TV, HiFi
or PC:
– Check if the red RCA plug (right
channel) is connected to the right
channel (red) of the audio source.
– Check if the white RCA plug (left
channel) is connected to the left channel
(white) of the audio source.
3 Switch on your audio source.The red
power indication LED of the transmitter
lights up if receiving an audio signal.
4 In case the line output of the audio source
has an adjustable output level, adjust the
line output level of the audio source to the
highest acceptable undistorted level.
5 Switch on the headphone.You may hear a
hissing sound through the headphone if the
headphone is not yet properly tuned to the
transmitter.
6 To tune, press and hold the tuning control
button for about 1 second. Repeat if
necessary until the red tuning indication
lights up.
7
English
XP SBC HC 850/00
XP SBC HC 850/00
15-03-2002 11:50
Pagina 8
Audio Connections
English
7 Adjust the volume to the desired level with
the headphone volume control.
Option 2 (figure 5)
Connecting the FM transmitter to a
headphone output of an audio source
IMPORTANT
Use only 1 of the audio inputs:
3.5 mm stereo headphone audio input
OR the line audio input!
Using both audio inputs at the same
time may damage your FM wireless
system or your audio source!
1 Connect the 2 RCA plugs of the stereo
audio cable to the FM transmitter’s audio
input 2:
– Check if the red RCA plug (right
channel) is connected to the right
channel (red) of the FM transmitter’s
audio input 2.
– Check if the white RCA plug (left
channel) is connected to the left channel
(white) of the FM transmitter’s audio
input 2.
2 Connect the 3.5mm stereo plug of the
stereo audio cable to the headphone
output of an audio source, such as TV, HiFi
or PC.
– In case your audio source has a 6.3 mm
headphone output, use the supplied
3.5 mm to 6.3 mm stereo adapter plug.
3 Switch on your audio source and carefully
increase the volume of the audio source.
The red power indication LED of the
transmitter lights up if receiving an audio
signal.
4 Switch on the headphone.You may hear a
hissing sound through the headphone if the
headphone is not yet properly tuned to the
transmitter.
8
Basic operation
5 To tune, press and hold the tuning control
button for about 1 second. Repeat if
necessary until the red tuning indication
lights up.
6 Adjust the volume to the desired level with
the headphone volume control.
Basic operation
When the FM transmitter is connected to a:
- line output of an audio source, such as
REC OUT or LINE OUT or
- headphone output of an audio source.
1 Switch on your audio source and carefully
increase the volume of the audio source.
The red power indication LED of the
transmitter lights up if receiving an audio
signal.
2 Switch on the headphone.You may hear a
hissing sound through the headphone if the
headphone is not yet properly tuned to the
transmitter.
3 To tune, press and hold the tuning control
button for about 1 second. Repeat if
necessary until the red tuning indication
lights up.
4 Adjust the volume to the desired level with
the headphone volume control.
5 Push the SRS™ on/off button to switch the
SRS™ surround sound mode on or off.
XP SBC HC 850/00
15-03-2002 11:50
Pagina 9
If a fault occurs, first check the points listed below before taking the set for repair.
If you are unable to remedy a problem by following these hints, consult your dealer or
service centre.
WARNING: Under no circumstances should you try to repair the set yourself, as this
would invalidate the warranty.
Problem
Remedy
No sound
– Check if the AC/DC adapter is fully inserted into the
AC outlet and that its DC connector is properly inserted
into the 12 Volt DC input connector located at the rear
of the transmitter.
– Check if the headphone’s on/off switch is in the on
position.
– Headphone batteries running low.
Position the headphone on the transmitter and contact.
(See Headphone power supply)
– Check if the audio source is switched on and tuned to
a channel with audio.
– Volume not adjusted. Adjust the volume on the audio
source/ headphone to a higher level.
– Adjust the headphone’s tuning frequency. Press and
hold the tuning control button for about 1 second.
– Make use of the HC852 transmitter.
Some transmitters already built into other equipment
may not be compatible with the HC855 headphone
because of the advanced technologies used in the
HC855 headphone.
Distorted sound
– Adjust the headphone’s tuning frequency. Press and hold
the tuning control button for about 1 second.
Repeat if necessary until the red tuning indication lights up.
– Adjust the transmitter’s frequency.
Select any of the 3 channels of the transmitter.
Next adjust the headphone’s frequency by pressing and
holding the tuning button for about 1 second.
– Headphone batteries running low.
Position the headphone on the transmitter and contact.
(See Headphone power supply)
9
English
Troubleshooting
XP SBC HC 850/00
15-03-2002 11:50
Pagina 10
Troubleshooting
English
Distorted sound
– Check if the volume on audio source/ headphone is
not set at too high a level. Reduce the volume.
– Distance from the transmitter is too large.
Move closer to the transmitter.
– Interference from fluorescent lamps/ other radio
sources. Move transmitter or headphone elsewhere/
change the transmitter’s channel.
– Make use of the HC852 transmitter. Some transmitters
already built into other equipment may not be
compatible with the HC855 headphone because of the
advanced technologies used in the HC855 headphone.
– The SRS™ surround sound mode works best on
normal stereo signals. Make sure that the surround
modes on the audio source are switched off when
listening to the HC855 headphone.
Maintenance
– If the headphone will not be used for a long time,
please remove the batteries to prevent leakage and
corrosion.
– Only replace the batteries with R03/AAA NiMH
batteries (preferably Philips).
– Do not leave the headphone near heat sources.
Do not expose to direct sunlight, excessive dust,
moisture, rain or any kind of mechanical shock.
– Do not use alcohol, thinner or petroleum-based
substances to clean the headphone or transmitter. Use a
slightly dampened chamois cloth to clean the housing.
– Do not use cleaning agents containing alcohol, spirits,
ammonia or abrasives as these may harm the housing.
Hearing Safety! Continuous use at a high volume may permanently
damage your hearing.
10
15-03-2002 11:50
Pagina 11
Specifications*
Regulations
System:
Radio Frequency (RF)
Carrier Frequency:
(Transmitter HC852)
Channel 1: 433.5 MHz
Channel 2: 434.0 MHz
Channel 3: 434.5 MHz
Carrier Frequency:
(Headphone HC855)
433.0 to 435.0 MHz (Auto tuning)
Modulation:
Frequency Modulation (FM)
Radiated Output Power:
<10m Watt
Effective Transmission Range:
up to100 meters, omni directional (360º)
Input level:
500 mVrms (1 kHz sine wave)
Power supply – transmitter:
12Volt / 200 mA DC, centre positive
Power supply – headphone:
2 x R03 (AAA) batteries (NiMH)
Frequency range
(Headphone):
10 – 22,000 Hz
Signal/Noise ratio:
> 60 dB (1 kHz sine wave , A-weighted)
Distortion:
< 0.5% THD
Channel separation:
> 30 dB
English
XP SBC HC 850/00
*) All specifications are subject to change without prior notice.
European Regulations
This product has been designed, tested and manufactured according the European
R&TTE Directive 1999/5/EC.
Following this Directive, this product can be brought into service in the following
states:
R&TTE Directive 1999/5/EC
SBC HC 850/00
B
✘
DK ✘
E
✘
GR ✔
F
✘
IRL ✘
I
✔
L
✘
NL ✘
A
✘
P
✘
SU ✘
S
✘
UK ✘
N
✘
D
✘
CH ✘
This product complies with class 3 requirements
as set down in EN 301 489-9
11
XP SBC HC 850/00
15-03-2002 11:50
Pagina 12
Introduzione
Congratulazioni!
Italiano
Avete appena acquistato il più sofisticato
sistema audio stereo MF senza fili. Questo
sistema utilizza la più recente tecnologia
MF senza fili, che vi offre completa libertà di
movimento mentre vi godete la vostra
favorita musica e film. Niente più fastidi
derivanti da cavi o fili della cuffia! Al fine di
assicurarsi di ottenere la migliore
performance dal vostro sistema audio
stereo vi preghiamo di leggere
attentamente il presente manuale.
IMPORTANTE
Leggete queste istruzioni. Prima di
usare il sistema di cuffie senza fili
bisogna leggere le istruzioni per l’uso e
di sicurezza.
Prima di collegare all’alimentazione
di rete, controllate che la tensione
indicata sulla targhetta dati
dell’adattatore corrisponda alla
tensione della rete locale.
Se il sistema non deve essere usato
per un lungo periodo di tempo, togliete
le batterie dal loro scomparto e
scollegate l’adattatore dalla rete.
Prevenzione di incendi o di scosse
elettriche: non esporre l’apparecchio a
umidità, pioggia, sabbia o eccessivo
calore derivanti da attrezzature di
riscaldamento o dalla luce solare
diretta.
Apparecchi radio per applicazioni
audio senza fili non sono protetti da
disturbi provenienti da altri servizi radio.
IMPORTANTE
Prima di usare le cuffie MF per la
prima volta, assicuratevi che le batterie
siano state completamente caricate
per circa 16 ore. Questo garantisce una
più lunga durata operativa delle
batterie.
12
Informazioni generali
Vantaggi della più recente
tecnologia senza fili RF/FM
Trasmissione senza fili
La trasmittente MF trasmette il segnale
audio stereo dalla sorgente audio o video
alla vostra cuffia MF senza fili.
Vasta gamma di trasmissione
La vostra cuffia MF può ricevere segnali fino
a 100 metri di distanza.
Sistema radio ad alta frequenza
L’apparecchio a cuffia MF utilizza una radio
ad alta frequenza come vettore del segnale,
garantendo una chiara e marcata ricezione.
Funzione di silenzio
Riduce i disturbi di rumori quando il segnale
audio è troppo basso o non disponibile.
Audio surround
La cuffia MF è caratterizza da
SRS headphone™ per godersi la
completa esperienza di surround senza
disturbare gli altri.
Indicatore automatico
alimentazione inserita/disinserita
La trasmittente MF si accende
automaticamente ed inizia a trasmettere
quando i segnali audio vengono rilevati
all’ingresso audio (LED rosso). Quando non
vengono rilevati segnali audio, la
trasmittente MF si spegne automaticamente
dopo pochi minuti.
Sintonizzazione automatica
La cuffia MF si sintonizza automaticamente
sulla giusta frequenza di trasmissione se
premete il tasto di sintonizzazione.
Sistema automatico ricaricabile
La trasmittente MF carica automaticamente le
batterie R03/AAA NiMH ricaricabili
incorporate. Basta posizionare la cuffia sulla
trasmittente e contatto. Durante il
caricamento, si accende il LED verde.
15-03-2002 11:50
Pagina 13
Informazioni generali
Comandi
Facile trasmissione
La cuffia MF può ricevere segnali dalla
trasmittente, anche attraverso barriere
come porte, pareti e finestre.
Trasmittente (figura 1)
1 Indicatore di alimentazione –
si illumina quando vengono rilevati dei
segnali audio all’ingresso audio.
Cuffie multiple con una sola
trasmittente
Si può usare un numero addizionale di
cuffie e/o altoparlanti senza fili con una
singola trasmittente se:
- funzionano nella banda di 433 MHz
- si può rilevare un suono pilota di 19 kHz.
2 Indicatore di carica – si illumina quando
la cuffia viene riposta nella trasmittente MF.
Batterie completamente scariche saranno
cariche dopo circa 16 ore.
Vi preghiamo di consultare la scheda della
specifica tecnica dell’apparecchio per
confermare la compatibilità.
Contenuto del kit
Questo sistema di cuffia MF consiste dei
seguenti accessori:
1 x trasmittente MF, SBC HC852
1 x cuffia MF, SBC HC855
1 x adattatore CA/CC 12 volt/200 mA,
SBC CS30/00
2 x batterie ricaricabili R03/AAA (NiMH),
550 mAh
1 x cavo audio (2m) con spina stereo di
3,5 mm e 2 spine RCA
1 x spina adattatrice stereo da 3,5 mm a
6,3 mm
3 Contatto della ricarica – assicuratevi di
allineare la cuffia con questo contato per la
carica.
4 Alimentazione CC – collegate
l’adattatore CA/CC di 12 volt /200 mA
5 Ingresso linea audio – collegamento
alternativo ad una sorgente audio.
6 Ingresso mm audio cuffia stereo di 3,5
– collega la trasmittente MF ad una
sorgente audio.
IMPORTANTE
Usate soltanto 1 degli ingressi audio:
Ingresso audio cuffia stereo di 3,5 mm
OPPURE l’ingresso linea audio!
Usando entrambi gli ingressi audio
allo stesso tempo potrebbe
danneggiare il sistema MF senza fili
oppure la sorgente audio!
7 Cambio di canale – selezionate uno di
3 canali per la migliore ricezione.Vi
consigliamo di selezionare canale 1 come
prima opzione.
8 Pannello di controllo
Informazione ecologica
Tutto il materiale d’imballaggio non necessario è stato omesso Abbiamo fatto il
nostro meglio per rendere l’imballaggio facile da separare in due tipi di materiali
mono: cartone e polietilene.
L’apparecchio consiste di materiale che può essere riciclato se smontato da
un’azienda specializzata Si prega osservare i regolamenti locali riguardanti lo
smaltimento di materiale da imballaggio, batterie scariche e vecchi apparecchi.
13
Italiano
XP SBC HC 850/00
XP SBC HC 850/00
15-03-2002 11:50
Pagina 14
Comandi
Italiano
Cuffia (figura 2)
9 Indicazione di alimentazione – si
accende quando in uso. Quando le batterie
sono scariche, l’indicatore di alimentazione
lampeggia, e dovete ricaricare la cuffia per
circa 16 ore prima di usarla di nuovo.
10 Alimentazione inserita/disinserita –
premere il tasto per accendere/spegnere la
cuffia.
11 Contatti per la ricarica – allineate la
cuffia con la trasmittente, il LED verde sulla
parte anteriore della trasmittente si deve
illuminare, indicando che la cuffia si sta
caricando.
12 Volume – regolate il volume al livello di
ascolto desiderato.
13 SRS™ di inserimento – push the button
to switch the SRS™ premete il tasto per
inserire/disinserire la modalità di audio
surround SRS™.
14 Indicazione SRS™ – si illumina quando
viene attivata la modalità surround SRS™.
15 Sintonizzazione – premete e tenete
premuto il tasto per circa 1 secondo. La
cuffia si sintonizza automaticamente sulla
giusta frequenza di trasmissione e il relativo
indicatore si illumina. Nel caso contrario,
ripetete quest’operazione.
16 Indicatore di sintonizzazione– si
illumina quando la ricezione della
trasmissione è ottimale
Alimentazione della
trasmittente
IMPORTANTE
Usare solamente l’adattatore Philips
CA/CC 12 volt/200 mA, SBC CS30/00
1 Assicuratevi che la tensione nominale
dell’adattatore corrisponda a quella della
presa.
14
Installazione
2 Collegate il connettore CC dell’adattatore
CA/CC al connettore d’ingresso
dell’alimentazione CC che si trova sul retro
della trasmittente.
3 Collegate l’adattatore CA/CC di 12
Volt/200 mA alla presa della rete.
– Scollegate sempre l’adattatore CA/CC
se la trasmittente non viene usata per un
lungo periodo di tempo.
Alimentazione della cuffia
IMPORTANTE
Usate solo batterie R03/AAA NiMH
ricaricabili (preferibilmente Philips).
Non usate batterie NiCd o alcaline
poiché potrebbero danneggiare il
sistema MF senza fili!
1 Controllate che il tasto dell’alimentazione
della cuffia MF sia in posizione.
2 Quando l’indicatore rosso di alimentazione
della cuffia MF inizia a lampeggiare, è
indicazione che le batterie si stanno
scaricando.
3 Per ricaricare le batterie R03/AAA NiMH
incorporate della cuffia, posizionate la cuffia
sulla trasmittente e sul contatto.
Note:
Batterie completamente scariche hanno
bisogno di circa 16 ore di ricarica.
La cuffia MF si spegnerà automaticamente
durante la ricarica.
Rimuovete sempre le batterie se la cuffia
non viene usata per un lungo periodo di tempo.
Le batterie contengono delle sostanze
chimiche, quindi vi raccomandiamo di
smaltirle nel modo adeguato.
15-03-2002 11:50
Pagina 15
Installazione
Sostituzione delle batterie
della cuffia (figura 3)
IMPORTANTE
Usate solo batterie R03/AAA NiMH
ricaricabili (preferibilmente Philips).
Non usate batterie NiCd o alcaline
poiché potrebbero danneggiare il
sistema MF senza fili!
1 Rimuovete i cuscini auricolari.
2 Estraete le batterie e smaltitele in modo
adeguato.
3 Inserite nuove batterie. Usate solo batterie
R03/AAA NiMH ricaricabili (preferibilmente
Philips).
4 Assicuratevi che le batterie vengano inserite
correttamente come indicato dai simboli
incisi nella sede delle batterie.
5 Riponete i cuscini auricolari nei loro gusci.
IMPORTANTE
Prima di usare le cuffie MF per la
prima volta, assicuratevi che le batterie
siano completamente caricate per
16 ore. Questo garantisce una più
lunga durata operativa delle batterie.
Collegamenti audio
IMPORTANTE
Usate soltanto 1 degli ingressi audio:
Ingresso audio cuffia stereo di 3,5 mm
OPPURE l’ingresso linea audio!
Usando entrambi gli ingressi audio
allo stesso tempo potrebbe
danneggiare il sistema MF senza fili
oppure la sorgente audio!
Collegamenti audio
1 Collegate la spina stereo di 3,5mm del cavo
audio stereo all’ingresso di 3,5mm della
cuffia della trasmittente.
2 Collegate le 2 spine RCA del cavo del
connettore (20 cm) ad un’uscita linea (REC
OUT o LINE OUT) di una sorgente audio,
es.TV, Hi-fi o PC:
– Controllate che la spina RCA rossa
(canale destro) sia collegata al canale
destro (rosso) della sorgente audio.
– Controllate che la spina RCA bianca
(canale sinistro) sia collegata al canale
sinistro (bianco) della sorgente audio.
3 Accendete la sorgente audio. Il LED rosso
dell’indicatore di alimentazione della
trasmittente si illumina quando sta
ricevendo un segnale audio.
4 Nel caso in cui l’uscita della sorgente audio
abbia un livello regolabile di uscita linea,
regolatelo al più alto livello accettabile non
distorto.
5 Accendete la cuffia. Potreste udire un sibilo
nella cuffia se questa non è sintonizzata sulla
trasmittente.
6 Per sintonizzare - premete e tenete
premuto il tasto per circa 1 secondo.
Ripetete se necessario fino a quando
l’indicatore rosso di sintonizzazione si
illumina.
7 Regolate il volume al livello desiderato,
utilizzando il controllo del volume della
cuffia.
Opzione 1 (figura 4)
Collegamento di una trasmittente MF ad
un’uscita linea di una sorgente audio, es.
REC OUT, LINE OUT.
15
Italiano
XP SBC HC 850/00
XP SBC HC 850/00
15-03-2002 11:50
Pagina 16
Collegamenti audio
Opzione 2 (figura 5)
Collegamento della trasmittente MF
all’uscita della cuffia di una sorgente audio.
Italiano
IMPORTANTE
Usate soltanto 1 degli ingressi audio:
Ingresso audio cuffia stereo di 3,5 mm
OPPURE l’ingresso linea audio!
Usando entrambi gli ingressi audio
allo stesso tempo potrebbe
danneggiare il sistema MF senza fili
oppure la sorgente audio!
1 Collegate le 2 spine RCA del cavo del
connettore (20 cm) ad un’uscita linea (REC
OUT o LINE OUT) di una sorgente audio,
es.TV, Hi-fi o PC:
– Controllate che la spina RCA rossa
(canale destro) sia collegata al canale
destro (rosso) della sorgente audio.
– Controllate che la spina RCA bianca
(canale sinistro) sia collegata al canale
sinistro (bianco) della sorgente audio.
2 Collegate la spina stereo di 3,5mm del cavo
audio stereo (2 m) all’uscita della cuffia di
una sorgente audio, come TV, Hi-fi o PC.
– In caso la sorgente audio abbia un’uscita
cuffia di 6,3mm, usate la spina adattatrice
stereo da 3,5 mm a 6,3 mm.
3 Accendete la sorgente audio ed
aumentatene cautamente il volume. Il LED
rosso dell’indicatore di alimentazione della
trasmittente si illumina quando sta
ricevendo un segnale audio.
4 Accendete la cuffia. Potreste udire un sibilo
nella cuffia se questa non è sintonizzata sulla
trasmittente.
16
5 Per sintonizzare - premete e tenete premuto
il tasto per circa 1 secondo. Ripetete se
necessario fino a quando l’indicatore rosso di
sintonizzazione si illumina.
6 Regolate il volume al livello desiderato,
utilizzando il controllo del volume della
cuffia.
Funzionamento di base
Quando la trasmittente MF è collegata a:
- un’uscita di una sorgente audio, come REC
OUT o LINE OUT o
- un’uscita di cuffia di una sorgente audio.
1 Accendete la sorgente audio ed
aumentatene cautamente il volume. Il LED
rosso dell’indicatore di alimentazione della
trasmittente si illumina quando sta
ricevendo un segnale audio.
2 Accendete la cuffia. Potreste udire un sibilo
nella cuffia se questa non è sintonizzata sulla
trasmittente.
3 Per sintonizzare - premete e tenete
premuto il tasto per circa 1 secondo.
Ripetete se necessario fino a quando
l’indicatore rosso di sintonizzazione si
illumina.
4 Regolate il volume al livello desiderato,
utilizzando il controllo del volume della
cuffia.
5 Premete il tasto di inserimento SRS™ per
inserire o disinserire la modalità audio
surround SRS™.
XP SBC HC 850/00
15-03-2002 11:50
Pagina 17
Ricerca dei guasti
In caso di guasto, prima di portare l’apparecchio a riparare, controllate i punti
sottoelencati.
Se non si è in grado di risolvere il problema seguendo questi suggerimenti, rivolgetevi
al proprio rivenditore o al centro di assistenza.
Italiano
AVVERTENZA: In nessuna circostanza bisogna tentare di riparare personalmente
l’apparecchio; tali interventi annullano la garanzia.
Problema
Rimedio
Assenza di suono
– Controllate che l’adattatore CA/CC sia tutto inserito
nella presa CA e che il connettore CC sia inserito
correttamente nel connettore d’ingresso di 12 Volt CC
che si trova sul retro della trasmittente.
– Controllate che l’interruttore di alimentazione della
cuffia sia acceso.
– La batteria della cuffia è scarica. Posizionate la cuffia sulla
trasmittente e contatto. (Vedi alimentazione della cuffia)
– Controllate che la sorgente audio sia accesa e
sintonizzata su di un canale con audio.
– Volume non regolato. Regolate il volume della sorgente
audio/cuffia ad un livello più alto.
– Regolate la frequenza di sintonizzazione della cuffia.
Premete e tenete premuto il tasto di controllo di
sintonizzazione per circa 1 secondo.
– Utilizzate la trasmittente HC852. Alcune trasmittenti
già incorporate nell’attrezzatura potrebbero non essere
compatibili con la cuffia HC855 a causa dell’alta
tecnologia utilizzata in questo modello.
Suono distorto
– Regolate la frequenza di sintonizzazione della cuffia.
Premete e tenete premuto il tasto di controllo di
sintonizzazione per circa 1 secondo. Ripetete se necessario
fino a quando l’indicatore rosso di sintonizzazione si
illumina.
– Regolate la frequenza della trasmittente. Selezionate
qualsiasi dei 3 canali della trasmittente. Quindi regolate la
frequenza della cuffia premendo e tenendo premuto il
tasto di sintonizzazione per circa 1 secondo.
– La batteria della cuffia è scarica. Posizionate la cuffia sulla
trasmittente e contatto. (Vedi alimentazione della cuffia)
17
XP SBC HC 850/00
15-03-2002 11:50
Pagina 18
Ricerca dei guasti
– Controllate che il volume della sorgente audio/cuffia
non sia stato impostato ad un livello troppo alto.
Riducete il volume.
– La distanza dalla trasmittente è troppo grande.
Portatevi più vicino alla trasmittente.
– Interferenza da lampade fluorescenti/altre sorgenti
radio. Spostate la trasmittente o la cuffia ad un altro
posto/cambiate il canale della trasmittente.
– Utilizzate la trasmittente HC852. Alcune trasmittenti
già incorporate nell’attrezzatura potrebbero non essere
compatibili con la cuffia HC855 a causa dell’alta
tecnologia utilizzata in questo modello.
– La modalità di audio surround SRS™ funziona meglio
con segnali stereo normali. Assicuratevi che le modalità
di surround della sorgente audio siano disattivate
durante l’ascolto delle cuffia HC855.
Manutenzione
– Se la cuffia non deve essere usata per un lungo
periodo di tempo, vi preghiamo togliere le batterie per
impedire perdite e corrosione.
– Sostituite le batterie soltanto con R03/AAA NiMH
(preferibilmente Philips).
– Non lasciate la cuffia vicino alla sorgente. Non
esponetela alla diretta luce del sole, ad eccessiva polvere,
alla pioggia o a qualsiasi sorta di urto meccanico.
– Non usate alcool, diluente o sostanze a base di
petrolio per pulire la cuffia o la trasmittente. Usate un
panno di pelle di camoscio per pulire l’alloggiamento.
– Non usate detersivi che contengono alcool, alcool
depurato, ammoniaca o abrasivi poiché potrebbero
danneggiare l’alloggiamento.
Italiano
Suono distorto
Sicurezza d'ascolto!
Un uso continuo ad alto volume può provocare danni permanenti all'udito.
18
15-03-2002 11:50
Pagina 19
Caratteristiche*
Regolazioni
Sistema:
Frequenza Radio (RF)
Frequenza vettore:
(Trasmittente HC852 )
Canale 1: 433.5 MHz
Canale 2: 434.0 MHz
Canale 3: 434.5 MHz
Frequenza vettore:
(Cuffia HC855)
433.0 a 435.0 MHz (Sintonizzazione automatica)
Modulazione:
Modulazione di Frequenza (FM)
Potenza di uscita irradiata:
<10m Watt
Gamma di trasmissione
effettiva:
fino a 100 metri, multidirezionale (360º)
Livello d’ingresso:
500 mVrms (1 kHz oscillatore sinusoidale)
Italiano
XP SBC HC 850/00
Alimentazione – trasmittente: 12Volt / 200 mA CC, positivo al centro
Alimentazione – cuffia:
2 x R03 (AAA) batterie (NiMH)
Gamma della frequenza
(Cuffia):
10 – 22,000 Hz
Rapporto segnale/rumore:
> 60 dB (1 kHz oscillazione sinusoidale, ponderato A)
Distorsione:
< 0.5% THD
Separazione dei canali:
> 30 dB
*) Tutte i dati tecnici sono soggetti a modifiche senza previo avviso.
Regolazioni Europee
Questo prodotto è stato progettato, collaudato e prodotto secondo la direttiva
europea R&TTE 1999/5CE.
Ai sensi della suddetta Direttiva, questo prodotto può essere acquistato e messo in
servizio nei seguenti stati:
Direttiva R&TTE 1999/5/CE
SBC HC 850/00
B
✘
DK ✘
E
✘
GR ✔
F
✘
IRL ✘
I
✔
L
✘
NL ✘
A
✘
P
✘
SU ✘
S
✘
UK ✘
N
✘
D
✘
CH ✘
This product complies with class 3 requirements
as set down in EN 301 489-9
19
XP SBC HC 850/00
15-03-2002 11:50
Pagina 20
")
!
p p
FM. p p FM, p p
p
p p . S
"# "! % FM p##
# p, # p
#.
SIO
. pp p
p .
! p
p p
p p .
B p p #
p $ p
p p p .
%pp p
p!: # , , p # p
p p #
.
O !p p
$ p p p.
20
*+ p,
SIO
) p p
FM, p p $
p 16 pp
. , p
- -$ $ p.
p
" RF/FM Philips
" #"
O pp FM ## p p
FM #.
p #"
S FM p
p 100 .
$#" " % "
&
S " FM p
) # # , #* +
, #
).
'
""
" p #.
( Surround
S FM # SRS headphone™ p p
surround
.
XP SBC HC 850/00
15-03-2002 11:50
Pagina 21
*+ p,
& "
"&
S FM *
# p p
.
& p,0&
" "
O pp FM p
* p
*
p
R03/AAA NiMH ". p p pp p. 5
p
#+ #
.
& "
"
"
" FM
p p +
:
1 x pp FM, SBC HC852
1 x FM, SBC HC855
1 x # 12Volt/200mA ACDC,
SBC CS030/00
2 x p
* p
R03/AAA (NiMH), 550 mAh
1 x "# 3,5 mm 2 RCA (2 m)
1 x p
p 3,5 mm 6,3 mm
#"
S FM p pp
#p
p# p
p.. p
, p
.
p " + pp&
pp p
p p
p / , :
- *" 433 MHz
- p
p
19 kHz.
<
p
#
p
p " .
21
-#. & p"/
pp" " O pp FM p * # +#
( #+). 4 #
, pp
FM p p.
XP SBC HC 850/00
15-03-2002 11:50
Pagina 22
1"
p& (& 1)
1 -#. " – p
.
2 -#. ,&" – p pp
FM. p
#, p
p 16 p
p "
.
3 p, ,&" – p p .
4 S,#" "
(DC) – # #
12 Volt/200 mA AC/DC
5 "# – # p .
6 ,) "# ": 3,5 mm – # pp FM p SIO
.p p : $
3,5 mm !
3 $ $ $ p p!
FM p !
7 =&p – p+ p 3 ). B p+ 1 p
" p.
8 p) 1"
" (& 2)
9 -#. " – . p
" , #+
p
p p
p
16
p
p "
p
p .
10 p"/ pp" –
p p
p/ p
p .
11 p,+ ,&" – p pp. C p
p ) p
#+ p
pp, #
p
* .
12 -" – p .
13 p"/ pp"
SRS™ – p p
p/ p
p surround SRS™.
14 -#. SRS™ – p surround SRS™.
) p
4 p# # p . 5 # pp#
$ : p
#
.
3 p p p
p $# p
# p p p
! . 6
p p
$ p p $ , $ $ p $ p .
22
XP SBC HC 850/00
15-03-2002 11:50
Pagina 23
""
16 -#. "
" – D
) .
S,#" pp
SIO
.p Philips SBC CS030/00 12 Volt/200 mA
AC/DC.
1 B # #.
2 B# (DC) # AC/DC # # 12 Volt DC, p
p pp.
3 B# # 12 Volt/
200 mA AC/DC #.
– C p
p p p# # AC/DC pp
# p
p #.
S,#" ":
SIO
.p p- p R03/
AAA NiMH ( p Philips).
, p p NiCd
p, p
p!
FM!
1 F+ p p
" FM.
2 4 #+ FM, p
"
.
3 % p
p
*
p
R03/AAA NiMH ", p pp p.
:
p p pp 16 p.
p p pp 16 p.
p p pp 16 p.
,p p $
- pp
16 p.
"" ) p:
) ": (& 3)
SIO
.p p- p R03/
AAA NiMH ( p Philips).
, p p NiCd
p, p
p!
FM!
1 +
".
2 B p
D
) .
3 Sp p
.
G
p p
R03/
AAA NiMH ( p
Philips).
23
15 "& – p p
p p
p
#
p. S * # ) #+ . # , p .
XP SBC HC 850/00
15-03-2002 11:50
Pagina 24
#+" 4 H
p p
", p # p
".
5 I +
.
SIO
) p p
FM, p p $
p 16 pp
. , p
- -$ $ p.
#+" SIO
.p p : $
3,5 mm !
3 $ $ $ p p!
FM p !
p 1 (& 4)
B# pp FM +#
p , p.. REC OUT,
LINE OUT.
1 B# 3,5 mm
# # " 3,5 mm pp FM.
2 B# 2 RCA # # (20 cm) +#
(REC OUT LINE OUT) p , p.. ,
HiFi p:
– F+ RCA
(#+ ) ## #+ () p .
24
– F+ p
RCA
(
) ##
(p
) p .
3 C p .
5 #+ pp
p .
4 B p
p p +# p *
+#, +# p )
p# p # p
p
".
5 C .
p
p
# #.
6 % , p
p
p p
p
#
p. Fp , ) #+ .
7 J p
p" ".
p 2 (& 5)
B# pp FM +#
" p SIO
.p p : $
3,5 mm !
3 $ $ $ p p!
FM p !
XP SBC HC 850/00
15-03-2002 11:50
Pagina 25
#+" 2 B# 3,5 mm #
+# " p
, p.. , HiFi
p.
– B p
p p p +# " 6,3 mm,
p p
##
p
p 3,5 mm 6,3 mm.
3 C p p
p . 5 #+ pp ) p .
4 C .
p
p
# #.
B" 4 pp FM ## :
- +# p , p
# REC OUT LINE OUT - +# " p .
1 C p p
p . 5 #+ pp ) p .
2 C .
p
p
# #.
3 % , p
p
p p
p
#
p. Fp , ) #+ .
4 J p
p" ".
5 < p
p/
p
p SRS™ p/ p
p surround SRS™.
5 % , p
p
p p
p
#
p. Fp , ) #+ .
6 J p
p" ".
25
1 B# 2 RCA # # (20 cm) +#
(REC OUT LINE OUT) p , p.. ,
HiFi p:
– F+ RCA
(#+ ) ## #+ () p .
– F+ p
RCA
(
) ##
(p
) p .
XP SBC HC 850/00
15-03-2002 11:50
Pagina 26
p
" pB)
6 pp$ p
$p p p, p p p
, ! p p
p$.
# p p # , p
#
# p p !
p.
)9O IO)OI363: 6 pp$ # pp pp# p
, # p .
26
&B
p
"
= p – B # AC/DC ## p
* (DC) ## p# 12 Volt
DC p p pp.
– B #p p/
p
p " p.
– 5 p
" " .
Sp pp p.
(K S
# ")
– B p .
– K . J )
p / ".
– J ".
< p
p 1 p
p #
p.
– G
p pp HC852. O
pp p p
HC855, p
" p p HC855.
,)+ – J ".
< p
p
1 p
p #
p. Fp ) #+ .
– J DD. FD D
3 DD. B , " D* D
" so D 1 D
D
de
D.
XP SBC HC 850/00
15-03-2002 11:50
Pagina 27
,)+ – 5 D
" " eiai .
OD sa DD jai D
(K O
# ")
– F D/ ajo" a i ) DD#. " .
– 5 p p pp p .
< pp.
– <
p p
/ p. pp / + pp.
– 5 surround SRS™ .
B surround p
p
p p HC855.
"
– B p
p p # p
p #, p
p
p #
# .
– p
p
R03/AAA NiMH ( p
Philips).
– p .
, p
,
, p#p #.
– p , p
" pp. % p
,
p #
p .
– p p p
, p, , # p
# p
p
.
"" ajo! G " ) D
D
+ .
27
p
" pB)
XP SBC HC 850/00
15-03-2002 11:50
Pagina 28
#,+*
"
":
J# (RF)
G+"
":
(DD HC852)
Ja 1: 433.5 MHz
Ja 1: 434.0 MHz
Ja 3: 434.5 MHz
G+"
": ( HC855)
)
433.0 435.0 MHz (A
=&,)":
K
(FM)
HH+ :
<10m Watt
B+:
100 D
(360°)
HH# "&#"
:
500 mVrms (1 kHz )
S,#" " – transmitter:
12Volt / 200 mA DC, S,#" " – headphone:
2 p
R03 (AAA) (NiMH)
"
& (
"):
10 – 22,000 Hz
'& "/ 1 B
:
> 60 dB (1 kHz ,
A)
&,)":
< 0.5% THD
=)"& ::
> 30 dB
*) ? p p pp $ p
p.
$p; 5
%
p; , $ $p; O 9!p Sp$
S !p 1999/5/ 5.
6$ p O, p; p # # :
O 9!p Sp$ S
p 1999/5/ 5.
SBC HC 850/00
B
✘
DK ✘
E
✘
GR ✔
F
✘
IRL ✘
I
✔
L
✘
NL ✘
A
✘
P
✘
SU ✘
S
✘
UK ✘
N
✘
D
✘
CH ✘
This product complies with class 3 requirements
as set down in EN 301 489-9
28
XP SBC HC 850/00
15-03-2002 11:50
Pagina 29
Contact details
Country Covered
Telephone Number
Austria
0810-001203
Belgium
070 222303
France
Philips: 08 25 88 97 89
Radiola: 08 25 07 65 24
Schneider: 08 25 32 47 46
PSTN
Germany
0180 53 56 767
Greece
00800 31221280
Free phone
Italy
800 820026
Free phone
Netherlands
0900-8406
Shared tariff
Portugal
021 4163063
United Kingdom
0208 665 6350
PSTN
29
XP SBC HC 850/00
15-03-2002 11:50
Pagina 136
Meet Philips at the Internet
English
http://www.philips.com
Italiano
SBC HC 850
Printed in China /CMM DL/RM 0205