1
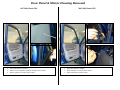
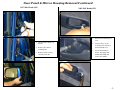
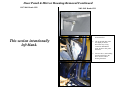
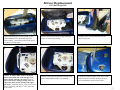
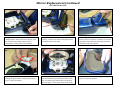
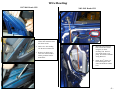
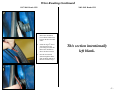
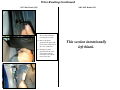
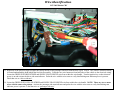
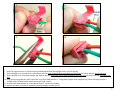
®
Signal® Mirror Installation Instructions
Honda CRV 1997-2003
THE safety accessory of the 21st Century.™
P/N 210-0032-0
Rev B2 (6-26-04), GG
© 2003 Muth Mirror Systems, LLC.
Note: Professional Installation Recommended
Warranty does not cover damage to the vehicle or mirror housing due to improper installation. The
following installation instructions are to be considered as a guide only. Door removal procedures,
indicator wire color and location may have changed since publication of these instructions. The installer
is responsible for any damage that may occur during installation.
INCLUDED ITEMS:
1 left and 1 right Signal® mirror
1 left and 1 right wire harness
2 rubber tubes
2 rubber grommets
2 wire taps
1 ring connector
1 instruction manual
REQUIRED TOOLS:
Ratchet with extension or ratcheting screwdriver
8mm socket, 10mm socket
Small Philips screwdriver
Medium Philips screwdriver
Small pry bar
Small utility knife
Power drill, 5/16" drill bit
Wire crimper and stripper
Needle nose pliers
Masking tape
Multimeter
Sturdy gloves
Safety glasses or goggles
Please read instructions prior to installation.
PROBLEMS OR QUESTIONS?
Technical Assistance is available by calling
Muth Mirror Systems Technicians at:
1-800-844-6616
Monday through Friday
Between 8:00 a.m. and 5:00 p.m. CST
Or through the Muth web site:
www.muthco.com
Or via E-mail: [email protected]
Door Panel & Mirror Housing Removal
1997-2001 Honda CRV
1
2
2002-2003 Honda CRV
2
1
3
4.
5.
6.
Open door and lower window.
Remove screw and plastic grommet on inside corner of door.
Remove plastic cover from corner of door.
3
1.
2.
3.
Open door and lower window.
Remove plastic cover from corner of door.
Pop-out and remove plastic inserts.
Door Panel & Mirror Housing Removal Continued
1997-2001 Honda CRV
2002-2003 Honda CRV
4
4
5
5
4.
6
Disconnect the mirror wire
harness.
5.
Remove three mirror
mounting nuts.
6.
Remove mirror housing
assembly from door.
4.
Remove door handle plastic
cover.
5.
Unscrew the (2) screws
revealed by the removal of
the door handle cover.
6.
Pry out door handle as
shown. Disengage latch
behind door handle and
remove door handle.
6
-2-
Door Panel & Mirror Housing Removal Continued
1997-2001 Honda CRV
2002-2003 Honda CRV
7
7.
Remove the (2) screws
beneath armrest.
8.
Lift up and pull door panel
out slightly as shown.
Disconnect any wiring
connection behind door
panel. Remove door panel
from door.
9.
Unscrew the (3) nuts holding
the mirror housing to the
door. Remove mirror
housing from door.
8
This section intentionally
left blank.
9
Mirror Replacement
1997-2003 Honda CRV
1
2
3
While using sturdy gloves, insert a small pry bar
underneath the mirror at the bottom edge of the
mirror housing. Lift up on the bottom of the mirror
to release it from the snaps.
Pivot the mirror upward on its top edge and lift the
mirror out of the mirror housing.
Carefully remove the foam insulation from the
mirror housing sail.
4
5
6
Continue cutting down alongside the left edge of the
mirror mount and discard the excess molding.
Carefully peel back the plastic screw covers on the
bottom of the mirror bracket. Remove the three
screws that hold the mirror bracket in place.
NOTE: In order to make room for the Signal®
mirror optics about 1/4" of the left edge of the
mirror mount will need to be removed. Use a
pair of side cutters and begin cutting at the left
edge of the mirror mount, starting in the upper
left corner. Continued removal of any mirror mount
surface (interfering with Signal® mirror optic) may
be necessary.
-3-
Mirror Replacement Continued
1997-2003 Honda CRV
7
8
9
Using the shorter of the two wires from the kit,
starting from the inside of the mirror housing, guide
the end without the mating connector down
alongside the existing factory mirror harness.
Leave about 7 inches of wire exposed in the mirror
housing. Guide the wire harness through the mirror
bracket and remove any slack.
Replace the three screws and screw covers on the
bottom of the mirror bracket. Guide the wire harness
through the foam insulation and reposition the foam
insulation on the mirror bracket.
10
11
12
Lay the Signal® mirror on a clean, flat surface.
Connect the Signal® mirror mating connector to the
Signal® mirror wire harness.
Position the guides on the top of the Signal® mirror
into the slots on the top of the mirror mount. Tuck
the wire harness to the back of the mirror housing.
Pivot the Signal® mirror down on the mirror mount.
Firmly press down on the bottom edge of the Signal®
mirror to snap it into position.
Wire Routing
1997-2001 Honda CRV
2002-2003 Honda CRV
1
2
3
1
1.
Pull out a portion of the
rubber door insulation above
the mirror mount.
2.
Drill a 5/16" hole leading
into the mirror mount area.
3.
Remove any debris and
insert one of the included
rubber grommets into the
drilled hole.
2
1.
Mount the mirror housing
back onto the door frame
using the (3) mirror
mounting nuts. Remove
door frame plastic cover
partly. Re-connect all OEM
wiring harnesses.
2.
Guide Signal® mirror wire
harness through the door
frame and inside the rubber
boot.
-4-
Wire Routing Continued
1997-2001 Honda CRV
2002-2003 Honda CRV
4
5
6
3
4.
Pass the Signal® mirror wire
harness into the mirror
mounting area and up
through the rubber
grommet. Remove any
slack.
5.
Bolt the mirror housing on
the door using the three
mirror mounting nuts.
6.
Reconnect the factory
mirror wire harness.
3.
Remove the footrest on the
driver side floorboard by
removing the two bolts.
4.
Remove the plastic
grommet in the upper right
corner of the plastic trim in
the corner of the door.
5.
Dislodge the plastic
grommet from the center
of the plastic trim and
remove the trim from the
corner of the door. Route
the Signal® mirror wire
harness from inside the
rubber boot into the
vehicle.
4
5
Wire Routing Continued
1997-2001 Honda CRV
2002-2003 Honda CRV
7
7.
Cut a small slit in the
rubber door insulation,
level with the rubber boot,
between the door and door
frame.
8.
Guide the Signal® mirror
wire harness into the
preexisting slit (under the
rubber door insulation)
above the mirror mount.
9.
Pass the wire harness
down through the rubber
door insulation and out of
the hole created in step 7.
8
This section intentionally
left blank.
9
-5-
Wire Routing Continued
1997-2001 Honda CRV
2002-2003 Honda CRV
10
11
10. Remove the footrest on the
driver side floorboard by
removing the two bolts.
11. Remove the plastic
grommet in the upper right
corner of the plastic trim in
the corner of the door.
12. Dislodge the plastic
grommet from the center
of the plastic trim and
remove the trim from the
corner of the door.
12
This section intentionally
left blank.
Wire Routing Continued
1997-2001 Honda CRV
2002-2003 Honda CRV
13
13. Slide the provided rubber
tubing over the wire
harness and guide 1 inch
of tubing into the rubber
door insulation.
14
14. There is a small hole in the
top corner of the plastic
trim piece along the door
frame. Guide the wire
harness and rubber tubing
into the hole and pass the
wire harness into the
vehicle.
This section intentionally
left blank.
-6-
Wire Identification
1997-2003 Honda CRV
16
6
3
15. Repeat all of the previous steps to replace the factory mirror on the passenger side door with the new Signal® mirror. The vehicle's electrical wiring
is located underneath the dash behind the fuse block assembly. Guide the new wire harnesses from both sides of the vehicle to the electrical wiring.
Locate the GREEN WITH RED STRIPE and SINGLE GRAY RINGED wire from within the wire bundle. Turn the ignition key so that electrical
power is on and activate the driver side turn indicator. Probe the wire with the wire tester to verify that flashing turn indicator power is present.
Label that wire as ‘driver side turn’.
16. Locate the GREEN WITH YELLOW STRIPE and SINGLE GRAY RINGED wire from within the wire bundle. NOTE: There are two or more
wires with the same color pattern. Activate the passenger side turn indicator and probe the wire with the wire tester to verify that flashing turn
indicator power is present. Label that wire as ‘passenger side turn’.
1
2
3
4
USE THE INCLUDED WIRE TAPS AND FOLLOW THE FOUR STEPS ABOVE TO SPLICE INTO THE TURN INDICATOR WIRES
7. Make sure the harnesses are routed securely underneath the dash and enough slack is left for splicing.
8. Splice the RED wire from the driver side harness into the green with red stripe and single gray ring wire previously labeled ‘driver side turn’.
9. Splice the RED wire from the passenger side harness into the green with yellow stripe and single gray ring wire previously labeled ‘passenger side
turn’.
10. Strip and twist together the ends of the black wires from both harnesses. Crimp them together in the supplied ring connector and ground to a
suitable nearby location on the metal framework of the vehicle.
11. Activate each turn indicator to verify that the Signal® mirrors are working.
12. Replace any door accessories, insulation, plastic moldings, and trim pieces.
-7-