1
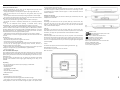
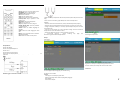
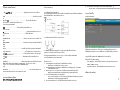
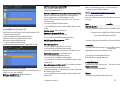
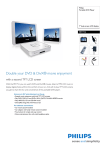
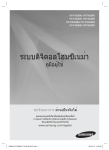
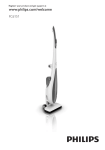
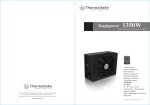
Portable DVD Player Register your product and get support at www.philips/welcome User manual PET100 Safety and maintenance • Do not disassemble the unit for laser rays are dangerous to eyes. Any service should be done by qualified service personnel. • Unplug the AC adaptor to cut the power if liquid or objects get inside the unit. • Take care not to drop the unit or subject it to strong shocks, which may cause malfunction. • Do not expose to excessive heat caused by heating equipment or direct sunlight. • This product is not waterproof: do not allow your player to be submersed in water. Water entering the player may cause major damage. • Do not turn up the volume so high that you can’t hear what’s around you. • You should use caution or temporarily discontinue use in potentially hazardous situations. • Do not use headphones while operating a motorized vehicle, cycling, skateboarding, etc.; it may create a traffic hazard and is illegal in many areas. • Important (for models with by‐packed headphones): Philips guarantees compliance with the maximum sound power of its audio players as determined by relevant regulatory bodies only with the original model of provided headphones. In case this one needs replacement, we recommend that you contact your retailer to order a model identical to that of the original provided by Philips. • Traffic safety: do not use while driving or cycling as you may cause an accident. • When the player is in use for a long period of time, the surface will be heated. This is normal. Handling discs • Do not attach paper or tape to the disc. • Keep the disc away from direct sunlight or heat sources. • Store the disc in a disc case after playback. • To clean, wipe the disc outwards from the center with a soft, lint‐free clean cloth. • Do not use any cleaning agents containing alcohol, ammonia, benzene, or abrasives as these may harm the player. • Apparatus shall not be exposed to dripping or splashing. Do not place any sources of danger on the apparatus (e.g. liquid filled objects , lighted candles) • Do not touch the lens! Your Portable DVD Player cleaning methods may destroy the lens. • Always keep the disc door closed to avoid dust on the lens. The lens may cloud over when the player is suddenly moved from cold to warm surroundings. It is then not possible to play a CD/DVD. Leave the player in a warm environment until the moisture evaporates. Playable disc formats In addition to DVD‐Video disc, you will also be able to play all Video CDs, CDs, CDR, CDRW,DVD±R and DVR±RW. DVD‐Video Depending on the material on the disc (a movie, video clips, a drama series, etc.) these discs may have one or more Titles, and each Title may have one or more Chapters. To make access easy and convenient, your player lets you move between Titles, and also between Chapters. Video CD Depending on the material on the disc (a movie, video clips, a drama series, etc.) these discs may have one or more Tracks, and tracks may have one or more indexes, convenient, your player lets you move between tracks and between indexes. Audio CD / Mp3 Audio CDs /Mp3 contain music tracks only .You can play them in the conventional way through a stereo system using the keys on the remote control and/or main unit, or via the TV using the On Screen Display (OSD). Music bought from on‐line music stores are not supported because they are secured by Digital Rights Management protection (DRM). Picture: This device only support picture file with the following file extension: .jpg Overview Main unit controls Use the controls only as started in this user manual Main unit controls Your portable DVD player plays digital video discs conforming to the universal DVD Video standard. With it, you will be able to enjoy full‐length movies with true cinema picture quality, and stereo or multichannel sound (depending on the disc and on your playback set‐up). The unique features of DVD‐Video, such as selection of soundtrack and subtitle languages, and of different camera angles (again depending on the disc), are all included. Unpacking First check and identify the contents of your package, as listed below: • Portable DVD player • Remote Control • Car adaptor (12V,AY4196) • User manual • AC power adaptor(12V,AY4196) • Audio/Video cable Placement • Place the player on a firm, flat surface. • Keep away from domestic heating equipment and direct sunlight. • If the player cannot read CDs/DVDs correctly, try using a commonly available cleaning CD/DVD to clean the lens before taking the player to be repaired. Other 1 , Up/down cursor 2 , Skip to previous/next chapter, track or title 3 Start interrupt playback 4 Menu enter or exit the disc contents menu 5 Stop playback or erase a program 6 setup enter or exit the system menu 7 Power switch the power on/off 8 Open: open the disc door to insert or remove disc 9 AV out: Audio/Video output 10 IR power: power remote sensor 11 Dc in: power supply socket 1 Remote Control Audio SET UP: setup enter or exit the system menu DVD MENU: return to the DVD menu Navigation key: Up/down/left/right OK: Confirm a selection OSD: view the playback status Title: Return to the Title menu of DVD disc Previous/ Next: Skip to previous or next chapter track Play/Pause: Start interrupt playback Mute: cut the sound out Stop: Stop playback or erase a program Number Keypad (0‐9): input the password or select the track Subtitle: select the subtitle language for DVD disc Audio: select the audio language for DVD disc Return: return to the PBC menu for VCD disc A‐B: repeat playback Zoom: zoom in or zoom out the picture 1 Open the battery compartment. Remove the protective plastic tab (first time users only). 2 Insert 1 x lithium 3V battery, type CR2025, then close the compartment. CAUTION • Batteries contain chemical substances, so they should be disposed of properly. • Batteries shall not be exposed to excessive heat such as sunshine, fire or the like. • Danger of explosion if battery is incorrectly replaced. Replace only with the same or equivalent type. • Incorrect use of batteries can cause electrolyte leakage and will corrode the compartment or cause the batteries to burst. • Remove the batteries if the set is not to be used for a long time. • Per‐chlorate Material – special handling may apply. See www.dtsc.ca.gov/hazardouswaste/perchlorate. Dobly (Downmix) : LT/RT Stereo Set the digital output format Setup Video Press SETUP. List of features is shown. Preparation: Connect AC adaptor Connect the supplied adaptor to the set and the main power supply Connect to TV You should connect the player to a TV and enjoy your DVD. If the picture can't display normally . please try to change the TV system under the TV Type menu Sharpness: It allows you to adjust the color of the screen Brightness: It allows you to adjust the brightness of the screen Contrast: It allows you to adjust the contrast of the screen Powering your remote control Use Left/Right to highlight your selection. Use the navigation keys to highlight your desired setting The SETUP menu includes: General TV display: Set screen display aspect ratio OSD Lang: Language Set On Screen Display (OSD) languages PBC: ON/OFF. Screen Saver: ON/OFF. Preference 2 function is available by pressing either the ZOOM key. This function is only available for playbacks DVD video, Jpeg file. A‐B Repeat: Set repeat loop playback. Press A‐B to set the starting point and press A‐B again to set the ending point. Then, the player will repeat the loop playback. Press A‐B to cancel the loop layback. This function is only available for playbacks DVD,CD,MP3. Troubleshooting TV type: Set video output format to TV system Audio: Set the audio language Subtitle: Set the subtitle language Disc Menu: Set the disc menu language Parental: Parental Set parental options Password: Set password Change password (default: 9999) Default: Factory settings Restore factory settings Playback Picture‐CD The player can only read pictures in JPEG format. 1 Connect the player to a TV 2. POWER on the main control of the player to switch on the set. 3. Open the disc door and insert the disc. • The set will start to play the disc automatically. 4. Use navigation keys to select the folder and JPEG file to be played. Playback DVD 1 Connect the player to a TV 2 POWER on the main control of the player to switch on the set. 3 Open the disc door and insert the disc. The player will start to play the disc automatically. Use navigation keys to select an item from the DVD disc menu, such as play now, select languages and subtitle. Playback VCD or Super (S)VCD 1 connect the player to a TV 2 POWER on the main control of the player to switch on the set. 3 Open the disc door and insert the disc. The player will start to play the disc automatically. Playback Audio CD or MP3‐CD 1 connect the player to a TV 2. POWER on the main control of the player to switch on the set. 3. Open the disc door and insert the disc. • The set will start to play the disc automatically. 4. Use navigation keys to select the folder and MP3 or CD file to be played. Tip: the following functions are available during playback: Depends on different disc and different playback status, some function may disabled Pause: To pause playback. You can resume playback by pressing Pause again Previous/Next : Briefly press Previous (or) Next once or several times to select your desired chapters Fast backward / Fast forward: Keep pressing or to initiate backward/forward when 2x is shown on screen, press backward (or) forward briefly to change speed to 4x, 8x, 16x, 32x or resume normal playback. You may also press to resume normal playback. This function is only available for playbacks DVD, CD, MP3 discs. Stop: Briefly press to stop playback Subtitle: To change subtitle display. The function is available by pressing either the SUBTITLE key OSD: Briefly press to check the playback status Language: You can change the language using this function. The function is available by pressing AUDIO NOTE: Some VCDs only contain 2 languages for selection. Zoom: Zoom in the screen, and then use the navigation keys to pan the screen. The If you encounter problems when using this DVD player, check the following points before requesting service. if the problem remains unsolved ,go to the Philips web site www.welcome.philips/us_en/. Or contact Philips(see contact information).When you contact Philips, ensure that your micro system is nearby and the model number and serial number are available. To Keep the warranty valid, never try to repair the system your self No picture Ensure the connection is right from the player to TV Disc can’t be played • Ensure the disc label is upwards. • Clean the disc.,and check if the disc is defective by trying another disc. The player does not respond to the remote control •Aim the remote control directly at the sensor on the front of the player. •Avoid all obstacles that may interfere with the signal path. •Inspect or replace the batteries. Distorted or B/W picture with DVD •Use only discs formatted according to the TV‐set used (PAL/NTSC). Player feels warm When the player is in use for a long period of time, the surface will be heated. •This is normal. No power • Check if both plugs of the mains cord are properly connected. • Check if there is power at the AC outlet by plugging in another appliance. Distorted picture • Check the disc for fingerprints and clean with a soft cloth, wiping from centre to edge. • Sometimes a small amount of picture distortion may appear. This is not a malfunction. Completely distorted picture / no colour in •the TV screen The NTSC/PAL setting may be in the wrong status. Match your TV’s setting with the player’s setting. Disc can’t be played • Ensure the disc label is upwards and clean the disc. • Check if the disc is defective by trying another disc. the brightness in the SETUP menu 3 Technology Information Dimensions Weight Power supply DC 12V 1A Power Consumption ≤20W Operating temperature range 0 ‐ 50°C (32 ‐ 122°F) Laser wavelength 650nm Video system NTSC / PAL / AUTO PHILIPS reserves the right to make design and specification changes for product for product improvement without priornotice Modifications not authorized by the manufacturer may void users authority to operate this device All rights reserved 4 เครื่องเลนดีวีดีแบบพกพา PET100 ลงทะเบียนผลิตภัณฑของทานและขอคําแนะนําชวยเหลือไดที่ www.philips.com/welcome ดานความปลอดภัยและดูแลรักษา • อยาถอดแยกตัวเครื่องเนื่องจากแสงเลเซอรจะทําอันตรายใหกั บดวงตาได การบริการใดๆ ควรดําเนินการโดยชางผูชํานาญจากศูนยบริการเทานั้น • ถอดปลั๊กไฟฟาเอซี ออกจากแหลงจายไฟ หากมีของเหลวหรือวัตถุหลนเขาภายในตัวเครื่อง • ระมัดระวังอยาใหตัวเครื่องหลนหรือกระทบกระเทือนแรงๆ อาจทําใหการทํางานผิดพลาดได • อยาวางตัวเครื่องไวในสถานที่ที่มีความรอนสูงจากอุปกรณที่ให ความรอนหรือแสงอาทิตยโดยตรง • ผลิตภัณฑนี้ไมกันน้ํา: อยานําเครื่องเลนของทานแชลงในน้ํา น้ําที่เขาภายในตัวเครื่องอาจทําใหเกิดความเสียหายอยางยิ่ง • อยาเปดเสียงไวในระดับสูงๆ ทําใหทานไมไดยินเสียงโดยรอบ • ทานควรใชดวยความระมัดระวังหรือหยุดใชชั่วคราว หากอยูในสถานที่ๆ อาจเปนอันตรายได • อยาใชหูฟงขณะที่ใชรถจักรยานยนต, จักรยาน, สเกตบอรด, เปนตน อาจทําใหเกิดอันตรายจากการจราจรและยังผิดกฏหมายในหล ายพื้นที่ • ขอสําคัญ (สําหรับรุนที่มีหูฟง) บริษัท ฟลิปสรับประกันเครื่องเลนในการใชงานรวมกับอุปกรณตอพวง ที่กําลังขับเสียงสูงสุดของเครื่องเลนที่เทาเทียมกับกําลังเสียงที่ไ ดจากการใชหูฟงที่ใหมากับเครื่องเลนเทานั้น กรณีที่ตองการนําเครื่องเลนไปตอพวงกับเครื่องขยายหรืออุปก รณอื่นๆ กรุณาติดตอรานคาหรือตัวแทนจําหนาย • ความปลอดภัยดานการจราจร: อยาใชในขณะขับหรือขี่ อาจทําใหทานเกิดอุบต ั ิเหตุได • เมื่อใชเครื่องเลนเปนระยะเวลานานๆ สวนผิวของตัวเครื่องจะมีความรอน ซึ่งเปนเรื่องปกติ การถือแผนดิสก • อยาติดกระดาษหรือเทปลงบนแผนดิสก • เก็บรักษาแผนดิสกใหหางจากแสงแดดหรือแหลงความรอน • เก็บแผนดิสกไวในกลองบรรจุหลังจากเลนเสร็จ • ทําความสะอาด โดยเช็ดจากตรงกลางออกดานนอกแผนดิสกดวยผานุม, ผาสําลีสะอาด • อยาใชน้ํายาทําความสะอาดที่มีสวนผสมของแอลกอฮอล, แอมโมเนีย, หรือผงขัดซึ่งอาจเปนอันตรายกับเครื่องเลน • ไมควรใหของเหลวหยดหรือหกใสตัวเครื่อง อยาวางสิ่งใดที่เปนอันตรายไวบนตัวเครื่อง(เชนภาชนะบรร จุน้ํา, เทียนไข เปนตน) • อยาสัมผัสกับเลนส เครือ ่ งเลนดีวีดแ ี บบพกพาของทาน เครื่องเลนดีวีดีแบบพกพาของทานสามารถเลนไดกับแผนดีวีดี ภาพยนตร ที่ไดมาตรฐานสากลทั่วไป ดังนั้นทานจึงสามารถเพลิดเพลินไปกับภาพยนตรเรื่องยาวดวยภา พที่คมชัดดุจโรงภาพยนต, และเสียงระบบสเตอริโอหรือเสียงมัลติแชนแนล (ขึ้นอยูกับแผนดิสกและการปรับตั้งการเลนของทาน) ดวยคุณสมบัติพิเศษที่รวมอยูในแผนดีวีดี ภาพยนตร เชนการเลือกเสียงพากยและภาษาคําบรรยายใตภาพ และมุมกลองตางๆ (ขึ้นอยูกับแผนดิสกเชนกัน) เปดกลองบรรจุ สิ่งแรกคือสํารวจและตรวจสอบรายการทั้งหมดในกลองบรรจุ ตามรายการดานลางนี้: • เครื่องเลนดีวีดีพกพา • รีโมท คอนโทรล • • • • อุปกรณแปลงไฟสําหรับรถยนต (12V) คูมือการใชงาน อุปกรณแปลงไฟ เอซี สายสัญญาณภาพ/เสียง ตําแหนงการวางเครือ ่ ง • วางเครื่องเลนไวบนพื้นที่มั่นคงและผิวราบเรียบ • วางไวใหหางจากอุปกรณที่ใหความรอนภายในบานและแสงแ ดด • ถาเครื่องเลนไมสามารถอานแผนซีดี/ดีวีดี ไดถูกตอง ลองใชแผนซีดี/ดีวีดี สําหรับทําความสะอาด ทําความสะอาดเลนกอนนําเครื่องเลนไปซอมแซม การทําความสะอาดดวยวิธีอื่นอาจทําใหเลนสเสียหายได 5 • ปดฝาเครื่องเลนไวตลอดเวลาเพื่อปองกันฝุนจับบนตัวเลนส เลนสอาจเกิดฝาขึ้นไดเมื่อยายเครื่องเลนจากที่เย็นไปยังที่ร อนโดยทันทีนเหตุใหเครื่องเลนไมสามารถเลนแผนซีดี/ดีวีดี ได างเครื่องเลนไวในที่ที่มีอากาศอุนกระทั่งความชื้นระเหยไป แผนดิสกทส ี่ ามารถเลนได นอกจากเลนแผนดีวีดี ภาพยนตรไดแลว ซีดภ ี าพ 3 ปุม • เครื่องเลนนี้รองรับเฉพาะไฟลภาพที่มีนามสกุล .jpg 4 ปุม MENU .................เขาหรือออกจากเมนูแผนดิสก 5 ปุม .........................หยุดเลนหรือลบรายการ .......................เริ่มเลนหรือหยุดเลนชั่วคราว 6 ปุม SETUP ................เขาหรือออกจากเมนูระบบ 2.3 รายการปุมควบคุมบนตัวเครือ ่ ง ใชควบคุมเฉพาะตามที่กําหนดในคูมือการใชงานนี้ 2.3.1 ปุมควบคุมบันตัวเครือ ่ ง 7 ปุม POWER ................เปด/ปดเครื่องเลน 8 ปุม OPEN ………………………เปดฝาชองบรรจุแผนดิสกเพื่อใสห รือนําแผนดิสกออก 9 ชอง AV OUT ……………………จายสัญญาณภาพ/เสียง 10 ทานยังสามารถเลนแผนวิดีโอ ซีดี, ซีดีเพลง, CDR, CDRW, DVD/R และ DVD/RW POWER/IR/CHR ………..ไฟสถานะเปดเครื่อง/รับสัญญาณ รีโมท คอนโทรล/ชารจไฟ ดีวีดี ภาพยนตร 11 ชอง DC IN ……………..ชองตอแหลงไฟฟา ขึ้นอยูกับเนื้อหาที่บรรจุภายในแผนดิสก (ภาพยนตร, คลิปวิดีโอ, ภาพยนตรซีรี่ส เปนตน) ซึ่งอาจมีเพียงหนึ่งหัวเรื่องหรือมากกวา และในแตละหัวเรื่องอาจมีหนึ่งหัวตอนหรือมากกวา เขาถึงรายการงายและสะดวกจากเครื่องเลน โดยจะสลับเปลี่ยนไปมาระหวางหัวเรื่องและระหวางหัวตอน วิดีโอซีดี ขึ้นอยูกับเนื้อหาที่บรรจุภายในแผนดิสก (ภาพยนตร, คลิปวิดีโอ, ภาพยนตรซีรี่ส เปนตน) ซึ่งอาจมีเพียงหนึ่งหัวตอนหรือมากกวา และในแตละหัวตอนอาจมีหนึ่งดัชนีหรือมากกวา สะดวกตอการเขาถึงรายการจากเครื่องเลน โดยสลับเปลี่ยนไปมาระหวางหัวตอนและระหวางดัชนี ซีดเี พลง/Mp3 ซีดีเพลง/Mp3 จะประกอบดวยเฉพาะแทร็คเพลงเทานั้น ทานสามารถเลนรายการเหลานี้ไดอยางสะดวกดวยระบบเสียงสเต อริโอ ดวยปุมตัวเลขบนรีโมท คอนโทรล และ/หรือจากปุมบนตัวเครื่อง หรือผานทางหนาจอโทรทัศน (ระบบ OSD) ไมรองรับการซื้อเพลงจากผูบริการเพลงทางอินเทอรเนต เนื่องดวยมีการปองกันดวยระบบ Digital Rights Management (DRM) 1 ปุม , ....................เลื่อนเครื่องหมายขึ้นบน/ลาง 2 ปุม , .............เพื่อขามไปยังหัวตอน, เรื่องหรือหัวเรื่องที่ผานมา/ถัดไป 6 รีโมท คอนโทรล ปุม , , , .............................ปุมลูกศรบน/ลาง/ขวา/ซาย ปุม OK ………………………………………………..ยืนยันการเลือ ก ปุ4 ปุม ..........................................ขามไปยังหัวตอน, เรื่อง/เพลง, หรือหัวตอนที่ผานมา ตออุปกรณแปลงไฟที่จัดมาใหเขากับเครื่องเลนและกับเตาจายไฟ (ดังภาพแสดง) • สารตั้งตน Chloride เปนสารควบคุมพิเศษ ดู การเชื่อมตอกับโทรทัศน ทานเพียงเชื่อมตอเครื่องเลนไปยังโทรทัศนและพรอมที่จะเพลิดเพ ลินไปกับดีวีดี ภาพยนตรของทาน การปรับตั้ง www.dtsc.ca.gov/hazardouswaste/perchlorate กดปุม SETUP จะแสดงรายการสําคัญๆ ปุม PLAY/PAUSE …………………….เริ่มหรือหยุดเลนชั่วคราว ปุม STOP ………………………………………หยุดเลนหรือลบรายการ ปุมตัวเลข ......................................เพื่อใสตัวเลข ปุม SUBTITLE ................................เลือกภาษาคําบรรยายใตภาพ ปุม การใสแบตเตอรี่ รีโมท คอนโทรล RETURN .................................แสดงหนาเมนูสําหรับแผนวิดีโอ ซีดี ปุม A-B ......................................เลนซ้ําชวงที่กําหนดบนแผนดิสก ปุม SETUP ..................................เขาหรือออกจากระบบเมนู ปุม ........................................ขามไปยังหัวตอน, เรื่อง/เพลง หรือหัวตอนถัดไป ปุม .......................................ปดเสียงเครื่องเลนชั่วคราว ปุม 1 เปดชองบรรจุแบตเตอรี่ นําแถบพลาสติกปองกันออก (เฉพาะการใชงานครั้งแรกเทานั้น) AUDIO ................................เลือกภาษาเสียงพากยเมื่อเลนแผน ดีวีดี หรือเลือกรูปแบบเสียง (สเตอริโอ, โมโน-ซาย หรือ โมโน-ขวา) เมื่อเลนแผนวิดีโอ ซีดี/ซีดีเพลง ปุม ขอควรระวัง • แบตเตอรี่ประกอบดวยสารเคมีเปนสวนใหญ ดังนั้นควรกําจัดทิ้งอยางเหมาะสม • แบตเตอรี่ไมควรอยูในสถานที่ที่มีความรอนสูงเชน แสงแดด, ไฟหรือที่คลายกัน • อันตรายจากการระเบิด หากเปลี่ยนแบตเตอรี่ไมถูกตอง เปลี่ยนแบตเตอรี่เฉพาะชนิดเดียวกันหรือเหมือนกัน • การใชแบตเตอรี่อยางไมถูกตอง สามารถทําใหเกิดการรั่วไหลและเปนสนิมในชองบรรจุแบต เตอรี่หรือทําใหแบตเตอรี่ระเบิดได • นําแบตเตอรี่ออก ถาไมไดใชเครื่องเลนเปนเวลานาน ZOOM ……………………………………..ขยายหรือลดขนาด ของภาพหรือแสดงภาพภาพบนจอ TFT การเตรียมเครื่อง: 3.4 การตออุปกรณแปลงไฟเอซี 2 ใสแบตเตอรี่ลิเธียม 3V จํานวน 1 กอน ชนิด CR2025 จากนั้นปดชองบรรจุแบตเตอรี่ ใชปุมลูกศรซาย/ขวา ใหรายการที่เลือกเปนแถบสวาง ใชปุมลูกศรเลือกรายการที่ตองการปรับตั้งเปนแถบสวาง เมนูปรับตั้ง (SETUP MENU) ประกอบดวย ขอมูลทั่วไป (General) TV display: ปรับตั้งอัตราสวนการแสดงของจอภาพ PBC: PBC on/off Screen Saver: เปดหรือปดระบบถนอมจอภาพ เสียง (Audio) 7 ขอมูลอางอิง (Preference) 3 เปดชองฝาชองบรรจุแผนดิสกและใสแผนดิสก เครื่องเลนจะเริ่มเลนแผนดิสกอัตโนมัติ การทํางานที่ใชไดระหวางเลน ปุม Pause (หยุดชั่วคราว): เพื่อหยุดเลนชั่วคราว กดปุมอีกครั้งเพื่อเลนตามปกติ ปุม Previous/Next (ยอนกลับ/ถัดไป): กดปุม Previous สั้นๆ (หรือ) ปุม Next หนึ่งครั้งหรือมากกวา เพื่อเลือกหัวตอนที่ทานตองการ ปุม Fast backward/Fast forward (ถอยหลังเร็ว/เดินหนาเร็ว): กดปุมคางไวหรือถอยหลังเร็ว/เดินหนาเร็วไปยังจุดเริ่มตน เมื่อ 2x แสดงบนจอภาพ กดปุมถอยหลังเร็ว (หรือ) รูปแบบเสียง (Downmix) : (โมโนซาย/โมโนขวา) LT/RT Stereo (สเตอริโอ) ภาพ (Video) ระบบสัญญาณภาพ (TV type): ตั้งรูปแบบการจายสัญญาณภาพไปยังระบบโทรทัศน เดินหนาเร็วสั้นๆ เพื่อเปลี่ยนความเร็วเปน 4x, 8x, 16x, 32x หรือเลนตามปกติ ทานอาจตองกดเพื่อกลับไปเลนตามปกติ ปุม Stop (หยุด): กดสั้นๆ เพื่อหยุดเลน เสียง (Audio): ตั้งภาษาเสียงพากย คําบรรยายใตภาพ (Subtitle): ตั้งภาษาคําบรรยายใตภาพ เมนูแผนดิสก (Disc Menu): ตั้งภาษาเมนูของแผนดิสก ระบบล็อคปองกัน (Parental): ปรับตั้งระดับการปองกัน การเลนซีดีเพลง หรือซีดี MP3 1 ตอเครื่องเลนไปยังโทรทัศน คาเริ่มตน (Default): เพื่อปรับใหกลับไปยังคาปรับตั้งจากโรงงาน 2 กดปุม POWER บนตัวเครื่อง เพื่อเปดเครื่องเลน 3 เปดชองฝาชองบรรจุแผนดิสกและใสแผนดิสก เครื่องเลนจะเริ่มเลนแผนดิสกอัตโนมัติ • เครื่องจะเริ่มเลนแผนดิสกอัตโนมัติ การเลนดีวีดี 4 ใชปุมลูกศรเลือกโฟลเดอรและไฟล MP3 หรือไฟลเพลงที่ตองการเลน รหัสผาน (Password): ตั้งรหัสผานเพื่อเปลี่ยนรหัสผาน (คาเริ่มตน: 9999) 1 ตอเครื่องเลนไปยังโทรทัศน 2 กดปุม POWER บนตัวเครื่อง เพื่อเปดเครื่องเลน 3 เปดชองฝาชองบรรจุแผนดิสกและใสแผนดิสก เครื่องเลนจะเริ่มเลนแผนดิสกอัตโนมัติ ความชัด (Sharpness): ใหทานปรับสีบนจอภาพ ความสวาง (Brightness): ใหทานปรับความสวางจอภาพ การเลนแผนวิดีโอ ซีดีและซูเปอร วิดีโอซีดี คอนทราสต (Contrast): ใหทานปรับคอนทราสตจอภาพ 1 ตอเครื่องเลนไปยังโทรทัศน 2 กดปุม POWER บนตัวเครื่อง เพื่อเปดเครื่องเลน 8 ปุม Previous/Next (ยอนกลับ/ถัดไป): กดปุม Previous สั้นๆ (หรือ) ปุม Next หนึ่งครั้งหรือมากกวา เพื่อเลือกหัวตอนที่ทานตองการ ปุม Fast backward/Fast forward (ถอยหลังเร็ว/เดินหนาเร็ว): กดปุมคางไวหรือถอยหลังเร็ว/เดินหนาเร็วไปยังจุดเริ่มตน เมื่อ 2x แสดงบนจอภาพ กดปุมถอยหลังเร็ว (หรือ) เดินหนาเร็วสั้นๆ เพื่อเปลี่ยนความเร็วเปน 4x, 8x, 16x, 32x หรือเลนตามปกติ ทานอาจตองกดเพื่อกลับไปเลนตามปกติ การเลนซีดีภาพ (Picture CD) การทํางานนี้ใชไดเฉพาะกับการเลนแผนดีวีดี, ซีดีเพลง, MP3 เทานั้น ปุม Stop (หยุด): กดสั้นๆ เพื่อหยุดเลน เครื่องเลนสามารถอานไดเฉพาะภาพในรูปแบบ JPEG เทานั้น 1 ตอเครื่องเลนไปยังโทรทัศน ปุม Subtitle (คําบรรยายใตภาพ): เพื่อเปลี่ยนการแสดงคําบรรยายใตภาพ, 2 กดปุม POWER บนตัวเครื่อง เพื่อเปดเครื่องเลน 3 เปดชองฝาชองบรรจุแผนดิสกและใสแผนดิสก เครื่องเลนจะเริ่มเลนแผนดิสกอัตโนมัติ • เครื่องจะเริ่มเลนแผนดิสกอัตโนมัติ การทํางานนี้สามารถใชไดโดยกดปุม SUBTITLE 4 ใชปุมลูกศรเลือกโฟลเดอรและไฟล JPEG ที่ตองการเลน ปุม OSD (แสดงขอมูลบนจอภาพ): กดสั้นๆ เพื่อตรวจสอบสถานะการเลน ปุม Language (ภาษา): ทานสามารถเปลี่ยนภาษาไดดวยการทํางานนี้ การทํางานนี้สามารถใชไดโดยกดปุม AUDIO หมายเหตุ: แผนวิดีโอ ซีดี บางแผนจะมีภาษาใหเลือก 2 ภาษา ปุม ZOOM (ขยายภาพ): ขยายภาพบนจอภาพ และจากนั้นใชปุมลูกศรเพื่อเลื่อนภาพบนจอ การทํางานนี้สามารถใชไดโดยกดปุม ZOOM การทํางานนี้สามารถใชไดเฉพาะกับแผนดีวีดี ภาพยนตร, ไฟล การทํางานที่ใชไดระหวางเลน ขึ้นอยูกับความแตกตางของแผนดิสกและความแตกตางสถานะกา รเลน บางการทํางานอาจใชไมได ปุม Pause (หยุดชั่วคราว): เพื่อหยุดเลนชั่วคราว กดปุมอีกครั้งเพื่อเลนตามปกติ ถาทานพบปญหาเมื่อใชเครื่องเลนดีวีดี ใหทําการตรวจสอบตามคําแนะนํา กอนเรียกศูนยบริการ หากปญหายังคงอยูใหไปที่เว็บไซตของ ฟลิปส ที่ www.welcome.philips.com/us_en/.or หรือติดตอศูนยบริการฟลิปส (ดูขอมูลการติดตอ) เมื่อทานติดตอกับบริษัท ฟลิปส ตองแนใจวาเปนระบบไมโครและหมายเลขรุนและหมายเลขเครื่อง ปรากฏอยู ปญหา การแกไข ไมมไ ี ฟฟาเขาเครือ ่ ง ตรวจสอบวาเสียบปลั๊กไฟทั้งสองดานของสายไฟฟาถูกตองแลว ตรวจสอบวามีกระแสไฟฟาอยูภายในเตาจายไฟเอ.ซี. โดยลองเสียบปลั๊กไฟของอุปกรณอื่น ตรวจสอบวาตออุปกรณแปลงไฟฟาภายในรถยนตถูกตองแลว ภาพผิดเพีย ้ น ตรวจสอบรอยนิ้วมือบนแผนดิสก และทําความสะอาดแผนดิสก โดยใชผานุมๆ เช็ดแผนดิสกจากตรงกลางออกไปยังขอบแผน ในบางครั้งภาพอาจเกิดผิดเพี้ยนเล็กนอย สิ่งนี้ไมไดเปนความผิดปกติแตอยางใด JPEG เทานั้น ภาพผิดเพีย ้ นทัง้ หมด/ ปุม A-B Repeat (เลนซ้าํ ชวง A-B): ตั้งการเลนซ้ําแบบวนไปมา โทรทัศนไมไดถูกตั้งไวในระบบ PAL ไมมส ี บ ี นจอโทรทัศน ใหตรงกับระบบของเครื่องเลนดีวีดี กดปุม A-B เพื่อตั้งจุดเริ่มตนและกดปุม A-B อีกครั้งเพื่อตั้งจุดสิ้นสุด จากนั้นเครื่องเลนจะเลนซ้ํา กดปุม A-B อีกครั้งเพื่อยกเลิกการเลนวน การทํางานนี้ใชไดเฉพาะกับแผนดีวีดี ภาพยนตร, ซีดีเพลงและ MP3 เทานั้น 9. ปญหาและการแกไข ตั้งระบบของโทรทัศน ไมมเี สียง ตรวจสอบวาตอสายสัญญาณเสียงถูกตองแลว 9 ไมสามารถเลน ตรวจสอบวาหันดานฉลากของแผนดิสกขึ้นดานบน แผนดิสกได - ทําความสะอาดแผนดิสก ตรวจสอบวาแผนดิสกชํารุดเสียหายหรือไม ดวยการลองเลน แผนดิสกแผนอื่น เครื่องเลนไมรบ ั คําสัง่ ชี้รีโมทไปที่ตัวรับสัญญาณรีโมทบนดานหนาเครื่องเลนโดยตรง จากรีโมท คอนโทรล หลีกเลี่ยงสิ่งกีดขวางทั้งหมดซึ่งอาจรบกวนวิถีสัญญาณ ตรวจสอบและเปลี่ยนแบตเตอรี่ในรีโมท ภาพผิดเพีย ้ นหรือภาพเปนสีขาว-ดํา ใชเฉพาะแผนดิสกซึ่งมีรูปแบบที่ตรงกับระบบของโทรทัศน เมือ ่ เลนแผนดีวีดี (PAL/NTSC) ระหวางเลนแผนดิสก การทํางานบางอยางอาจถูกจํากัดโดยแผนดิสก เครื่องเลนไมตอบสนองบางการทํางาน อางอิงคําแนะนําที่จัดมาใหพรอมกับแผนดิสก ขอมูลดานเทคโนโลยี ขนาด น้ําหนัก กําลังไฟที่ใช DC12V 1A ใชกําลังไฟ <20 วัตต อุณหภูมิขณะใชงาน 0 ถึง 50 ํ C (32 ถึง 122 ํF) ความยาวคลื่นของเลเซอร 650 นาโนเมตร ระบบภาพ NTSC/ PAL/ AUTO บริษัทฟลป ิ สมส ี ิทธิอยางถูกตองในการเปลีย ่ นแปลงการออกแบบแ ละขอมูลจําเพาะได โดยไมตอ งแจงใหทราบลวงหนา เพือ ่ การพัฒนาเครือ ่ ง การเปลีย ่ นแปลงหรือแกไขใดๆ ั อนุญาตจากผูผ ลิต จะทํา กับอุปกรณนี้โดยไมไดรบ ใหทา นหมดสิทธิใ ์ นการเปนผูใ ชอป ุ กรณนท ี้ ันที สงวนลิขสิทธิ์ทงั้ หมด เครื่องเลนอุน ขึน ้ เมื่อใชงานเครื่องเลนเปนระยะเวลานานติดตอกัน พื้นผิวของ เครื่องเลนจะรอนขึ้น ซึ่งเปนการทํางานปกติ เครื่องเลนดีวีดเี ครือ ่ งนี้ทาํ ตามมาตรฐานอุปกรณรบกวนคลืน ่ วิทยุข องสหภาพยุโรป 10 Need help? Online Go to www.philips.com/support Royal Philips Electronics N.V.2007 Meet Philips at the Internet Http://www.philips.com Printed in China