1
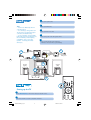
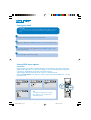
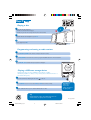
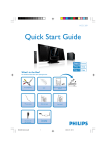
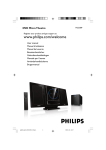
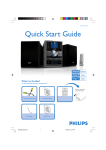
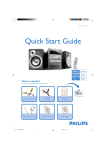
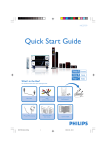
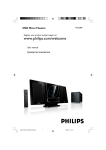
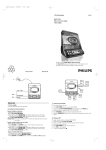
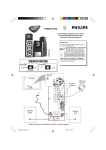
MCD 289
Quick Start Guide
What’s in the Box?
You should find these items upon opening the box.
STANDBY-ON
SLOW
ANGLE
Remote control with two AAA
batteries
DISPLAY
A/V cord (R/W/Y)
Stand
Quic
MUTE
2
Use
1
rM
k Sta
anu
rt G
uide
FM wire antenna
Quick start guide
AC power cord
Power adapter
(for main set)
al
User manual
(for subwoofer)
MCD289 QUG_Eng-12
1
2008.3.19, 16:16
1
Connect the speaker cables.
2
Tips
Connect the FM antenna.
– See the User Manual for other TV
connection options.
– For connecting to a Progressive Scan
TV, refer to the user manual for proper
connections and detailed setup.
– In case of wireless connection failure
between the main set and subwoofer, see
the User Manual for manual pairing
(“Installation - Step 1: Connecting
speakers - Connecting the wireless
subwoofer”).
4
3
Connect the A/V cord to a TV.
4
Connect the power cords of the system and TV.
5
Power on both the main set and subwoofer.
➜ Wireless connection will set up automatically.
4
AUDIO
IN
AC power
S-VIDEO
IN
TV IN
VIDEO IN
AUDIO
IN
S-VIDEO
IN
TV IN
VIDEO IN
AC power
5
3
Speaker
(right)
Speaker
(left)
2
White
FM antenna
Red
1
STANDBY-ON
SLOW
Setting up the TV
1
ANGLE
Press SOURCE (DISC on the remote control) to select disc source.
DISPLAY
MUTE
2
Turn on the TV and set it to the correct Video In channel.
MCD289 QUG_Eng-12
2
2008.3.19, 16:16
Setting the clock
IMPORTANT!
– To set clock in the Eco Power mode, press and hold STANDBY-ON/ECO POWER 2 on the set for
3 seconds or more to switch to normal standby mode first before proceeding with the procedures
below.
1
In standby mode, press and hold CLOCK on the remote control.
2
When the hour digits flash, press VOLUME-/+ (VOL+/- on the remote control) to set the
hours.
3
Press CLOCK again and the minute digits flash. Then press VOLUME-/+ (VOL+/- on the
remote) to set the minutes.
4
Press CLOCK again to confirm the time setting.
Setting DVD menu options
IMPORTANT!
If the progressive scan feature is activated but the connected TV does not support progressive
signals or the cables are not connected accordingly, see the user manual for proper progressive
scan setup or deactivate the progressive scan feature as below:
1) Turn off your TV progressive scan mode or turn on to interlaced mode.
2) Press SYSTEM MENU on the remote to exit the system menu and then DISC and “1” to exit
progressive scan.
STANDBY-ON
SLOW
ANALOG AUDIO SETUP
DIGITAL AUDIO SETUP
PICTURE SETTING
DIVX (R) VOD
3D
ANGLE
DISPLAY
MUTE
Tip
See chapters "Preparations" and "System
Menu Options" in the User Manual for
detailed descriptions.
MCD289 QUG_Eng-12
3
RDS
2008.3.19, 16:16
Playing a disc
d
e
1
P
Insert a disc into the slot loader.
➜ Make sure the label side is facing you.
➜ Make sure you have removed any other disc from the slot loader.
rin
S
i
ted
2
Playback will start automatically. If not pressÉÅ.
3
To stop playback, press 9.
Programming and tuning to radio stations
1
Press SOURCE (TUNER on the remote control) to select tuner source.
2
Press PROGRAM for more than two seconds to program all available stations in order of waveband.
3
Press PRESET ¡ / ™ until the desired preset station is displayed.
Playing a USB mass storage device
With the Hi-Fi system, you can use USB flash memory (USB 2.0 or USB1.1),
USB flash players (USB 2.0 or USB1.1), memory cards (requires an additional card reader to
work with this Hi-Fi system).
1
Insert the USB device’s USB plug into the socket
on the set.
2
IMPORTANT!
Slide down to
expose some
buttons and jacks on
the front panel!
Press SOURCE once or more to select USB (or USB on the remote control).
3
Play the USB’s audio files as you do with the albums/tracks on a CD,
Tip
Detailed playback features and additional functions are
described in the accompany owner's manual.
PDCC-JS/JW-0804
MCD289 QUG_Eng-12
4
2008.3.19, 16:16