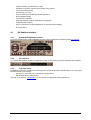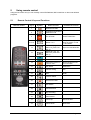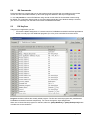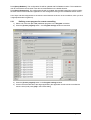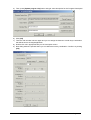
1
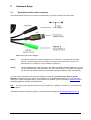
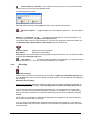
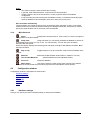
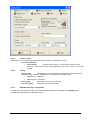
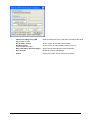
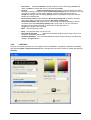
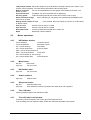
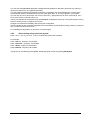
RadioXtreme USB Radio Model: FMU-100 User Manual (Version 1.0) User Manual Page 1 Table of contents 1 Introduction ................................................................................................................. 4 1.1 1.2 1.3 1.4 2 Hardware Setup........................................................................................................... 5 2.1 3 Introduction.......................................................................................................................................4 Specifications ...................................................................................................................................4 Minimum System Requirements .....................................................................................................4 Package Contents.............................................................................................................................4 Description of the radio connectors...............................................................................................5 Software Setup ............................................................................................................ 6 3.1 Installation.........................................................................................................................................6 3.1.1 Choosing the installer language .............................................................................................6 3.1.2 Welcome screen .......................................................................................................................6 3.1.3 Choosing components.............................................................................................................7 3.1.4 Installation folder......................................................................................................................7 3.1.5 Shortcuts folder ........................................................................................................................8 3.1.6 Installation progress ................................................................................................................8 3.1.7 Completing setup window .......................................................................................................8 3.2 Detail features, function and usage of RX Radiator......................................................................8 3.3 Detail features, function, programming and usage of RX Commander and RX Keycom .........8 4 RX Radiator.................................................................................................................. 8 4.1 RX Radiator interface .......................................................................................................................9 4.1.1 Standard RX Radiator window ................................................................................................9 4.1.2 Thin window ..............................................................................................................................9 4.1.3 Tray icon menu .........................................................................................................................9 4.1.4 Volume settings area..............................................................................................................10 4.1.5 Tuning ......................................................................................................................................10 4.1.6 Scanning..................................................................................................................................10 4.1.7 Stations storing and setting ..................................................................................................10 4.1.8 Recording ................................................................................................................................11 4.1.9 Miscellaneous .........................................................................................................................12 4.2 Configuration window ....................................................................................................................12 4.2.1 Hardware settings...................................................................................................................12 4.2.2 Recording settings .................................................................................................................15 4.2.3 Options ....................................................................................................................................17 4.2.4 Stations list .............................................................................................................................19 4.2.5 Schedule ..................................................................................................................................20 4.2.6 Menu.........................................................................................................................................21 4.2.7 Script editor.............................................................................................................................22 4.2.8 Script........................................................................................................................................23 4.2.9 LCD Editor ...............................................................................................................................24 4.3 Mouse operations ...........................................................................................................................25 4.3.1 RX Radiator window ...............................................................................................................25 4.3.2 Menu button ............................................................................................................................25 4.3.3 RX Radiator label ....................................................................................................................25 4.3.4 Station numbers .....................................................................................................................25 4.3.5 Sleep timer button ..................................................................................................................25 4.3.6 Thin LCD label.........................................................................................................................25 User Manual Page 2 4.3.7 Time LCD label in full window ...............................................................................................25 4.3.8 Frequency LCD label in full window .....................................................................................26 4.3.9 Tray icon ..................................................................................................................................26 4.4 Controlling RX Radiator from keyboard.......................................................................................26 4.4.1 List of hot keys (shortcuts)....................................................................................................26 4.4.2 Direct tuning using numerical keypad .................................................................................27 5 Using remote control ................................................................................................ 28 5.1 Remote Control: Keys and Functions ..........................................................................................28 5.2 RX Commander...............................................................................................................................29 5.3 RX KeyCom .....................................................................................................................................29 5.3.1 Defining a new program for remote controlling ..................................................................30 6 Getting Help............................................................................................................... 32 6.1 FAQ for RX Radiator.......................................................................................................................32 6.1.1 Computer freezes when recording using Mpeg Layer-3 codec, why?..............................32 6.1.2 How can I schedule recording? ............................................................................................32 6.1.3 I have created the script, set the time and date but script did not run. Why? .................32 6.1.4 Buttons bitmaps are sometimes framed by the black line, how to get rid off it? ............33 6.1.5 Why the mouse wheel does not work? ................................................................................33 6.1.6 Why the volume setting does not work?..............................................................................33 6.1.7 Always when starting RX Radiator I have to skip error message There is no media in drive. Insert disc \Device\... twice. Can I solve it somehow? .............................................................33 6.1.8 How to enable other language and LCD font?.....................................................................33 6.1.9 How can I switch off the annoying window on closing asking me whether mute or leave? ..................................................................................................................................................33 6.1.10 How to expand the frequency range? ..................................................................................33 6.2 Contacting support.........................................................................................................................33 6.3 Website for Update .........................................................................................................................33 6.4 Acknowledgement ..........................................................................................................................33 Appendix 1: Command-line switches ............................................................................ 34 Appendix 2: Using command line utility for remote controlling RX Radiator ............ 35 List of parameters.......................................................................................................................................35 Tuning ......................................................................................................................................................35 Stations....................................................................................................................................................35 Sound.......................................................................................................................................................35 Recording ................................................................................................................................................36 Other ........................................................................................................................................................36 Appendix 3: Messages for remote controlling RX Radiator ........................................ 37 User Manual Page 3 1 Introduction 1.1 Introduction RadioXtreme USB brings to you a totally new breeze of experience that livens up your daily computing routine. Working on the PC will never be as monotonous with your favorite radio channels on the latest news updates and music. RadioXtreme USB comes equipped with an IR Remote Control to provide the full remote steering possibilities over the radio functions and more. Listen and record your favorite music channel is simply a button away. It even lets you shut down the PC with the embedded Auto Windows shutdown function. For the business executive, RadioXtreme USB remote control comes preprogrammed for MS PowerPoint. Impress your colleagues and business associates by controlling your MS PowerPoint presentation remotely without any additional expensive equipment. If that is not enough, the RX Remote Control has reserved four additional program groups that you can configure to work with your other favorite applications. 1.2 Specifications • USB 1.1, HID Class • VHF Bank II, Frequency range: 87 MHz to 108 MHz • Philips Digital FM Tuner • 75ohm Antenna Input • Audio Line Output • ECC Compliant: FCC, CE and C-Tick • Dimensions: 5.4 x 8.8 x 2.1 cm (without cable) • Weight: 110g (with cable) 1.3 Minimum System Requirements • IBM PC or 100% compatible PC • USB 1.1 / 2.0 port • Pentium CPU with 128 MB RAM or above • Windows XP, Windows 2000, Windows ME, Windows 98SE • 20 MB free hard disc space • Earphones or Active speakers • CD-ROM or DVD-ROM drive • Soundcard (optional) for recording to PC HDD 1.4 Package Contents • RadioXtreme USB Radio (Model: FMU-100) • Remote Control Unit • 75ohm Dipole Antenna • USB Extension Cable (1.5m) • Line-out Extension Cable (1.5m) • 2 x AAA Batteries • Installation CD • Quick Installation Guide User Manual Page 4 2 2.1 Hardware Setup Description of the radio connectors The diagram below shows the connection of RadioXtreme. It can be connected in 2 easy steps: RadioXtreme connection diagram Step 1: Connect the earphones or active speakers to the “Audio-Out”. To enable the recording function, use the provided Line-out cable and connect from “Audio-Out” to the Line-In, Microphone-In or Auxiliary-In of your desktop or laptop PC. Step 2: Connect RadioXtreme USB connector to the desktop or laptop available USB port (you may use the USB extension cable provided if your PC is further away). The system will recognize this HID (Human Interface Device), and install the appropriate device driver automatically. You can verify if RadioXtreme is properly installed by looking into Control Panels | System | Device Manager if HID device driver is found. If the HID device is not installed automatically, you may remove it, reboot your system and repeat Step 2. Once the device is installed, you may proceed to Software Setup to install the application software for RadioXtreme. TIP: You may connect the dipole antenna to the “Antenna-In”, spread the antenna to a T-like shape for best reception. If Windows still does not detect it, please, contact the technical support at [email protected]. User Manual Page 5 3 Software Setup The software that is bundled with the RadioXtreme USB consists of several components: • RX Radiator – the main application that allows controlling the RadioXtreme. See also What is RX Radiator description. • RX Commander – program that receives commands from the remote control unit to control RadioXtreme USB Radio and PowerPoint presentation (and other programs defined in RX KeyCom application). See also What is RX Commander description • RX KeyCom – program that allows you to configure the remote control for various applications. See also What is RX KeyCom description. 3.1 Installation RX Radiator, RX Commander and RX Keycom applications are shipped in single installation file. All you need to install it is to run setup.exe file and follow the instructions. You can quit the installation any time by pressing [Cancel] button. 3.1.1 Choosing the installer language Choose the language in which the installer will communicate with you and press [OK]. 3.1.2 Welcome screen The Welcome screen will show. Press [Next >] to continue. User Manual Page 6 3.1.3 Choosing components In this dialog you can select the components that you want to install. Press [Next >] to continue. 3.1.4 Installation folder Here you can define the target directory where RadioXtreme software will be installed. Press [Next >] to continue. User Manual Page 7 3.1.5 Shortcuts folder In this dialog you can choose name and location of the folder for RadioXtreme shortcuts in the Start menu. Press [Install] to continue. 3.1.6 Installation progress While copying files the installation progress dialog is shown. The installer will check if another session of radiator.exe is running and close it if so. The program files will be copied into the target directory. Press [Next >] to continue. 3.1.7 Completing setup window You can choose to run Radiator immediately from this dialog. Press [Finish] to proceed. 3.2 Detail features, function and usage of RX Radiator For detail description of features, functions and usage of RX Radiator please see the RX Radiator chapter. 3.3 Detail features, function, programming and usage of RX Commander and RX Keycom For detail description of features, functions and usage of RX Commander and RX KeyCom please see the RX Commander and RX KeyCom chapter. 4 RX Radiator RX Radiator is program for listening to and recording from RadioXtreme. It offers: - easy and intuitive use User Manual Page 8 - 4.1 4.1.1 support of all key operations by hot keys possibility to record in various sound quality using codecs mouse use include wheel optional tray icon view easy-to-use frequency editing and sorting stations direct keyboard tuning command-line switches language modules support, large range of languages scheduling and scripting easy to control from another applications via documented messages and much more RX Radiator interface Standard RX Radiator window This is the standard look of the RX Radiator window. All the operations can be done within its interface. 4.1.2 Thin window You can set RX Radiator window to smaller ‘thin’ mode. In this mode, only basic operations are available. 4.1.3 Tray icon menu RX Radiator main menu contains the most important commands and list of stored stations. You can popup the menu either by left clicking: - the tray icon (when tray icon is enabled in configuration). - RX Radiator label or menu button The look of the menu is customizable, so you can set a background, fonts properties etc. User Manual Page 9 4.1.4 - 4.1.5 - 4.1.6 - 4.1.7 Volume settings area Volume up Mute/Unmute Volume down Increases the volume Mutes/unmutes the sound. Decreases the volume Tuning Tune down Tunes to lower frequency. The target frequency is: current frequency – tuning step (1 MHz by default) Fine tune down Tunes to lower frequency using finer step. The target frequency is: current frequency – fine tuning step (100 kHz by default) Fine tune up Tunes to higher frequency. The target frequency is: current frequency + tuning step (1 MHz by default) Tune up Tunes to higher frequency using finer step. The target frequency is: current frequency + fine tuning step (100 kHz by default) Scanning Scan down Scan up Scan downward for stations. Scan upward for stations. Stations storing and setting User Manual Page 10 - Store frequency in favorites Once a station had been pick-up, you can press this button to store it into any one of the user definable station The following dialog is shown: Enter the desired name and press [OK]. The station will be stored in that position. - More/Less stations #13 - #24. - Stations 1 – 12, Stations 13 – 24 Two sets of numbered buttons of the stored stations. You can switch between them using [More/Less stations] button. Left click the station button to tune its frequency, right click it to popup the context menu where you can Rename station, Delete station or Sort stations (by their frequencies). - Previous station Selects previous stored station. Next station Selects next stored station. Channel surf Each preset station is being playback for several seconds. You can interrupt ‘surfing’ by pressing the [Channel surf] button. - Last station Tunes to the last played station (for example if you listened to station # 7, then switched to # 3, then this command will tune back to # 7 again.) 4.1.8 - - Toggles between two sets of stations: stations #1 - #12 and stations Recording Start/stop recording Starts or stops recording to the temporary file on the disk. If [Save and name automatically] button is not pressed down, then you have to specify the target location of the recorded file after stopping of the recording. Start/stop loop recording What is loop recording: Automatic recording of last minutes into buffer with defined length/size - no more missing beginnings of songs. Loop recording works only when recording using codecs. If you have been using uncompressed Wave PCM till now, you can get the same results using codecs - just select PCM coded with appropriate properties - and furthermore - you will be able to use loop recording. Nevertheless not all of the codecs that you can see in the selection dialog are suitable. Some codecs or combination of codec and its parameters are supposed to be used for decoding only so they would not work for recording. If you try codec (in RX Radiator) that creates wave file that cannot be playback, it is necessary to close RX Radiator and start it again. Otherwise, it would create non-playable files even with codecs that should work. User Manual Page 11 Notes: o CPU load is nearly the same as while file recording o In general, PCM, IMA ADPCM etc. require less CPU time than MP3 o Length of buffer is shown as the last item in Codec properties field in RX Radiator configuration o If loop recording was active during last RX Radiator session, it will start automatically again when RX Radiator is launched again (even when active only as tray icon) - 4.1.9 Save and name automatically Toggles between two modes of saving of the recorded file. When the button is down, it will assign name and save the recorded file without showing save dialog automatically. Otherwise you have to specify the target location and /or the name of the recorded file. Miscellaneous - Setup Configuration window launcher. Click it when you want to change the configurations of the RX Radiator. - Sleep timer Using this button you can directly schedule RX Radiator to switch off in stipulated period of time (10, 20, 30, 60, 120, 300 minutes). You can also opt to shutdown Windows after that period. Small LCD display displays the remaining time and sleep mode (S for RX Radiator shutdown, W for Windows shutdown. Stay on top window. Toggles Always on top and ‘standard’ mode of the RX Radiator main - Minimize - Thin window/Maximize - Power off - 4.2 Minimizes the RX Radiator window either in taskbar or into tray. Switches between thin and standard window. Closes RX Radiator. Menu button Left clicking shows the main context menu with list of the stations and several commands that have the same purpose as the RX Radiator window buttons. Configuration window Configuration window is separated into several tabs: - Hardware settings - Recording settings - Options - Stations list - Schedule - Menu - About 4.2.1 Hardware settings Here you can specify the basic hardware settings to setup the RX Radiator. User Manual Page 12 4.2.1.1 Volume control In this section you can define what device should be used for controlling the volume. o Line-in (sound-card) Line-in device Choose a line-in device, i.e. the input to the sound card where you connect to the audio out of RadioXtreme. (Eg: Line-In, Mic-In, Aux-In and so fore). 4.2.1.2 Tuning o o o 4.2.1.3 Tuning range This allows you to choose either the standard or the enhanced FM frequency range. However. RadioXtreme only support the standard range. Standard (87 – 108 MHz) Enhanced (60 – 160 MHz) Tuning step Select the ‘normal’ tuning step here. Fine tuning step Select the ‘fine’ tuning step here. RadioXtreme plugin configuration You can get some information about radio card and set LED status for recording using [Setup] button. This launches RadioXtreme configuration dialog. User Manual Page 13 - Indicate recording using LED RX Radiator records. Get firmware version Get DLL version communicate with radio) More information about the plugin Save and exit Cancel User Manual When checked then LED on the radio card body blinks while Shows version of the radio card firmware. Shows version of vrlib.dll (library used by plugin to Shows text file describing the plugin properties. Stores the current LCD settings. Closes the window without saving the changes. Page 14 4.2.2 Recording settings In this tab you can defines various settings related to recording. Some of the settings related to recording are also to be specified in Options tab. - - - - Recording source Choose here the recording source, i.e. the source that soundcard should record from (usually with the same name as Line-in device). Remember, as long as you don’t check box Check the recording source in the Options tab, this selection is not used by RX Radiator while recording. File size limit Defines how much space (if any) should be left free while RX Radiator records. Drive for recorder temporary file Select the drive to be used for temporary recording. While recording, RX Radiator continually saves the recording radrecxx.tmp into root directory of the selected drive. Note: Use the same drive for temporary file and for target files. When the disk is the same, the temporary file needs only to be renamed (which is very fast operation). Whereas when the disks are different, then the file needs to be copied first and then temporary file is deleted (so this operation can last quite long for big files). Default directory for recorded audio The designated directory where the recorded files are stored. Use default naming convention You can overwrite the syntax of the file name that will be used for recordings. When checked, the default convention is used. When unchecked, you can define your own convention using following variables: %y (Year), %m (Month), %d (Day), %h (Hour), %n (miNutes), %s (Seconds), %f (Frequency in MHz - e.g. 89_70), %b (station numBer), %a (station nAme), %l (Login name in Windows), %c (Codec name). Click the eye icon to preview how the naming structure. User Manual Page 15 4.2.2.1 Recording format Here you can choose whether you want to record to standard uncompressed PCM (.wav file) or using socalled Windows ACM (Audio Compression Manager) codecs. Usually, recording using ACM codecs can either result in finer quality while the file size stays the same or even lower. There are several ACM drivers that are automatically installed with the system. There are drivers that provide support for the compressed formats MS-ADPCM, IMA ADPCM, the GSM 6.10 standard and the TrueSpeech voice-coding format. Furthermore, there are other codecs that can be downloaded, installed and then used in RX Radiator. o Record to PCM wave format (no compression) • Channels • Bits per sample Stereo or mono. ‘Resolution’ of one sample. • Sample rate The sampling rate (in samples per second) at which each channel should be played. Windows audio codecs (smaller than PCM) o User Manual • Codec Using this button you can display a codec selection dialog where you can choose appropriate codec and its properties. • ID3 tag Optionally, you can append an ID3 tag that will contain name of the station, login name, RX Radiator version, year and date + time of the recording. It is particularly useful when you record using MP3 ACM codec and change the extension of the saved files to .mp3 in RX Radiator configuration • Loop recording Recording chapter. • Buffer size Reserved memory where RX Radiator stores the sound while loop recording is in progress. The higher the Buffer size is the longer is the loop recording time. Enables [Loop recording] button. See also Estimated recording time Shows approximate recording time for currently selected recording condition (disk, current disk space, wave format). Page 16 4.2.3 Options Here you can adjust various settings to adapt RX Radiator to your needs. 4.2.3.1 Miscellaneous o o o o o o o o o User Manual On power off Specifies whether the sound should be switched off on each RX Radiator shutdown automatically, or if it shall stay in its current status, or if RX Radiator asks each time Use external language file When checked you can select appropriate language file from the combobox. Language is loaded after pressing [Apply] or [OK] buttons. Surf latency Specifies a time interval between switching of the stations in the Channel surf mode. LCD settings This button shows separate dialog window where you can specify LCD properties. Minimize to system tray If checked then RX Radiator is minimized into tray icon instead of taskbar. Tray icon always visible If checked then tray icon is shown always when RX Radiator is running. Hide taskbar icon (Disabled if Minimize to system tray is not checked.) If checked then taskbar icon is not shown at all. Scroll text on taskbar icon (Disabled if Hide taskbar icon is checked.) When checked, then taskbar icon caption scrolls showing the station name (or frequency). Show hints When checked, hints are shown for each main window control. Page 17 o o o o 4.2.3.2 Dock radio to screen edges If checked then when you are moving the main window (by dragging it on RX Radiator label) it docks to screen edges when the distance is lower than 10 pixels. Show warning on shutdown When checked the warning window is shown on scheduled shutdown. Beep on Windows shutdown When checked then when the sleep timer is about to show warning window the warning sound is played. Allow multiple instances By default, only one instance of RX Radiator can run in the same time. When you run the second one, it will simply bring the already running one into foreground. You can allow several instances of RX Radiator to run in the same time by checking this checkbox. Other recording options There are different settings for Playback and for Recording in Windows. Every volume device has its own volume slider and own checkbox. The checkbox provides muting in Playback (e.g. LineIn), in Recording this checkbox determines if the final recording will contain sound from this source. Some soundcards can have more than one source checked for recording simultaneously; some soundcards can have only one at the same time. The checkbox Check the recording source automatically temporarily selects the source when recording in RX Radiator. Correct recording source can be set on page Recording settings in Recording source. When RX Radiator finishes the recording, all previous soundcard settings are restored. Example: SoundForte 256 PCS Extreme Theatre 5.1 soundcard has the following recording sources: Mix, CD, Mic, LineIn, Aux, Video, Phone. It allows checking of only one recoding source at the same time. Let's assume that it has LineIn set (checked) by default. We set Recording source to Aux in RX Radiator configuration (this is the source to which is radio connected). When recording using RX Radiator it will automatically check the Aux source (so recording will contain radio sound). After recording it will automatically check LineIn source (as it was checked before recording). Checking the ... and uncheck other sources checkbox causes automatic temporary unplugging of all the other sources while recording (useful when you are watching TV on PC at the same time and don't want to include its sound in the final recording). The only checked source will be the one set in RX Radiator configuration. Associated program is an application set in Windows as standard for playing WAV files (or another extension if you overwrite it in naming convention area of the Recording settings tab. It can either be a standard file player or Winamp etc. If you check Launch associated program checkbox, then after recording and saving the file will the program be launched which will play it immediately. o o o o o o User Manual Check the recording source … Temporarily selects the source when recording in RX Radiator. … and uncheck other sources Temporarily unplugs all the other sources while recording. Use master mute while recording Soundcard master mute is used instead of radio card muting - the advantage is that only output is muted while recording itself still contains sound. Disallow muting & vol. setting Disallows muting and volume changing while recording Disallow tuning while recording Checking this checkbox will block tuning to other frequency when recording. Launch associated program After recording and saving the file will be launched the program associated with the extension of the saved file, and play it immediately. Page 18 4.2.4 Stations list Here you can create or modify your list of stations, select which of them you want to appear in menu, set their mono/stereo properties etc. - - Load Loads the stations either from .rsd (RX Radiator Station Definition) file or from Radiator.ini file. Save Saves the current list of the stations into .rsd (RX Radiator Station Definition) file. Publish After clicking this button; you have to first select a file containing station to be published. The e-mail will be created. It is necessary to specify the town and country of the station and send to the author. Download Opens a web page with the .rsd (RX Radiator Station Definition) files available for download. Stations list sheet Contains four columns where you can modify station properties. You can change the station sequence by dragging the row by its number. o Number Number assigned to station. o Frequency Frequency in MHz, use dot ‘.’ as decimal separator. o Name Name of the station shown on LCD and in menu. o Stereo If ‘Leave as is’ is selected, then the station plays in mono/stereo mode as defined by current state of [Set mono/stereo] button. However, you can force certain station to be played in mono or stereo. o In menu Defines if the current station is shown in menu or only as numbered button. User Manual Page 19 4.2.5 Schedule RX Radiator uses very strong tool - scripts for scheduling of the recordings. It is not necessary to write commands in some obscure programming language - everything is intuitive, easy and pleasant. Both Global scheduling active and Current script enabled checkboxes have to be checked for script to run. Scripts have following (intentional) restrictions: - only one script can run at the same time (You can define as many scripts as you want. Nevertheless when the 1st script is set to start at 8:00 and will run for 2 minutes and the second one is set to start at 8:01, the second one will not run.) - recording commands are ignored if you are currently recording something - recording stops sleep timer See also Script editor description. - Global scheduling active Turns on/off the scheduling system. When disabled then no script will run. When to run This section changes for each script chosen in List of created scripts o Current script enabled If checked and Global scheduling active is checked too, then script will run in its scheduled time. When unchecked then only this script will not run. o List of created scripts Select a script to modify here. o How often Periodicity of repeating of the script. o Time Set time for script to run. When Hourly is chosen in How often combo box then only minutes and seconds part is used – i.e. in this case 12:00:00 and 15:00:00 has the same result. User Manual Page 20 o o o - 4.2.6 Now Date Run between should run. Create new Edit Remove Sets the Time to the actual time. Set date for script to run Set start and end time of the interval in which the script Creates new blank script. Modifies the script chosen in List of created scripts. Deletes the script chosen in List of created scripts. Menu Here you can modify the look of main menu and all the context menus. - Show background background of the menu. 4.2.6.1 If checked you can browse for a bitmap file that will be used for Menu bar o o o o o 4.2.6.2 Show menu bar Color Font Size Width Specifies if the main menu bar is visible. Specifies a color of the menu bar font. Choose a font for menu bar. Size of the menu bar font. Width of the menu bar. Menu items o User Manual Color Specifies a color of the menu item font. Page 21 Font Size Bold Italic Underline o o o o o 4.2.6.3 Divider o o o o o o - 4.2.7 Choose a font for menu item. Size of the menu item font. Specifies if the font is bold. Specifies if the font is italic. Specifies if the font is underlined. Color Font Size Bold Italic Underline Reset Test Specifies a color of the menu divider font. Choose a font for menu divider. Size of the menu divider font. Specifies if the font is bold. Specifies if the font is italic. Specifies if the font is underlined. Resets the menu to the default values. Shows sample menu with the values set now in the window. Script editor In this window shown after pressing either [Create new] or [Edit] button in the Schedule tab you can actually build the script. Script is saved after pressing [Save changes and return] button, changes in script are lost and script editor is closed after pressing [Cancel]. - Script name (Disabled for predefined sample scripts). If enabled, you can type the name of the active script that is then shown in the List of created scripts. User Manual Page 22 4.2.7.1 Available commands In this tree, you can choose among command that can be inserted into the script. Command can be inserted in the script list either by using [Add] button, by dragging and dropping or using context menu. o Tuning Tune Tunes the specified frequency. Station # Tunes stored station identified either by its name or number. Station up Selects station with the nearest higher number than current station. Station down Selects station with the nearest lower number than current station. Last station Tunes to the previous frequency (for example if you listened to station # 7, then switched to # 3, then this command will tune # 7 again. Channel surf Each station is tuned for several seconds. You can interrupt ‘surfing’ by pressing the [Channel surf] button. o Volumes Mute Mutes the sound. Unmute Unmutes the sound. Set volume Sets mute/checked state and volume for audio card source. Volume up Increases the volume (in 10% steps for line-in source or in defined steps when internal volume control is selected). Volume down Decreases the volume (in 10% steps for line-in source or in defined steps when internal volume control is selected). o o 4.2.8 Recording Record Starts recording using ‘standard’ PCM compression. Record using codecs Starts recording using compression based on selected codec. Other Wait Pauses the script for the specified time (i.e. the next command will be executed after the time passes). Beep Beeps using internal PC speaker. Minimize Minimizes RX Radiator window. Thin window Shows RX Radiator window in thin mode. Normal window Shows full RX Radiator window. Run external program Executes specified executable program. Send message Obsolete, for backward compatibility only. Close RX Radiator Closes RX Radiator. Can only be the latest command in the script list. Shutdown Windows Shutdowns Windows. Can only be the latest command in the script list. Script Here the final script is shown. The script is processed in order in which the command are shown here. You can modify the commands sequence either by dragging and dropping them or by using a context menu. - Add Remove 4.2.8.1 Adds selected command from Available command list into Script list. Removes selected command from Script list. Properties area Some script command are to be defined, their properties are shown after selecting them in Script list. o Tune Specify a frequency in MHz. o Station # Choose station identified either by its name or number User Manual Page 23 o o o o o o o 4.2.9 Set volume Choose destination (usually Volume control or Recording), device and value of volume for audio card source or mute/checked state. Record Name automatically determines if the current naming convention specified in naming convention area of the Recording settings tab is to be used, or you can overwrite it. Preview, how the naming will look, is shown after clicking the eye icon. Length is the length of the recording; quality sets the combination of channels, bits per sample and a sample rate. Record using codecs Codec defined in Recording settings tab is used for recording (even when codec recording is not active in Recording settings tab). Name automatically determines if the current naming convention specified in naming convention area of the Recording settings tab is to be used, or you can overwrite it. Preview, how the naming will look, is shown after clicking the eye icon. Length is the length of the recording. Wait Set here the time to wait. Beep Choose what beep you want to use. Run external program Browse for executable program and choose a way how it should run (minimized, maximized). Shutdown Windows You can select/deselect here the sound warning (it overwrites the setting in the Options tab). LCD Editor Here you can define properties of ‘LCD’ displays used in RX Radiator. Changes are reflected immediately after pressing [Save changes and return] button. Changes are lost and LCD editor is closed after pressing [Cancel]. User Manual Page 24 - 4.3 LCD preview window Shows the sample of the LCD based on settings currently set in editor. If you click the LCD it will pause. The next clicking will make the text scrolling again. Built-in LCD fonts You can choose between two code pages of the installed LCD fonts. The default is ASCII. Use external fonts If installed, you can use another font for displaying. Scrolling speed LCD text scrolling interval (text scrolls when it does not fit in LCD). Show welcome message When checked you can specify own greeting that RX Radiator uses each time on its start. Display station names on LCD If not checked, then only frequency is shown on LCD instead of station names. Pixel on color Pick the color for pixel in on state. Pixel off color Pick the color for pixel in off state. Date label format Choose the date format displayed in small LCD. Reset Resets the values to default. Mouse operations 4.3.1 - 4.3.2 - 4.3.3 - 4.3.4 - 4.3.5 - 4.3.6 - 4.3.7 - RX Radiator window mouse wheel up increases volume mouse wheel down decreases volume Alt + mouse wheel up next station Alt + mouse wheel down previous station Shift + mouse wheel up tunes up Shift + mouse wheel down tunes down Ctrl + mouse wheel up fine tunes up Ctrl + mouse wheel down fine tunes down Menu button left click right click about menu tray icon menu RX Radiator label right click tray icon menu Station numbers right click stations menu Sleep timer button left click right click start/stop sleep timer when Sleep timer button is pressed, then sleep timer menu appears Thin LCD label switching between station and date-time modes Time LCD label in full window if recording, left click switches view mode, right click popup the menu; if not recording, left click shows the date, double click launches time&date control panel User Manual Page 25 4.3.8 - Frequency LCD label in full window left click shows the frequency for current station 4.3.9 - Tray icon right button ... menu left button... mute/unmute doubleclick ... restore window 4.4 Controlling RX Radiator from keyboard 4.4.1 List of hot keys (shortcuts) • M, Space, * mute/unmute • S force mono/stereo (if card supports it) • F1 - F12 stations 1 - 12 • Shift + F1 - F12 stations 13 - 24 • left fine tune down • right fine tune up • Ctrl + left scan down • Ctrl + right scan up • up increase volume • down decrease volume • PageUp tune up • PageDown tune down • Home jump to the start of frequency range • End jump to the end of frequency range • Esc minimize, stopping surfing • + next station • - previous station • / switch between time/station mode of small LCD • Backspace last station • Ctrl+R start/stop recording • Ctrl+L start/stop loop recording • Ctrl+A save and name automatically • Ctrl+T always on top • Ctrl+S setup • Ctrl+B about • Ctrl+F switching between thin and 'full screen' panel • Ctrl+G enabling/disabling global scheduling • Ctrl+C canceling currently running script • Ctrl+V station surfing • Ctrl+Q ‘presses’ the [Store frequency in favorites] button so you can store the frequency using keyboard. Press <Ctrl+Q> followed by F1 - F12 for stations 1 – 12 or Shift + F1 F12 for stations 13 – 24. • Ctrl+Del deletes the current station from the station list • Ctrl+F4 RX Radiator closes but keeps playing • Shift + clicking on close button RX Radiator closes but keeps playing User Manual Page 26 You can also use RTControl application installed with RX Radiator for Windows global hot key control (i.e. the shortcut works from any application/window). You can assign messages (special kind of Windows "commands" sent to RX Radiator) to hot-keys (keys combinations) and they will be activated from any other application, ie. hot-key is global in your system. You can use up to four control keys: Alt, Control, Shift, Win + appropriate key for each command (ie. Ctrl + F9 to mute, Alt+F9 to unmute and so on). The keys combinations are defined at first in RTControl configuration window (in menu [RX Radiator menu] | Addons | Global hot key | Configure RTControl) Changes are reflected immediately after closing the configuration. Then the global hot key controlling application has to be started via [RX Radiator menu] | Addons | Global hot key | Load-unload RTControl menu. For unloading the application run this menu command again. 4.4.2 Direct tuning using numerical keypad press 1 or 6, 7, 8 or 9 (1xx or 6x, 7x, 8x or 9x MHz) and press other numbers. For example: press 1 0 6 2 5 - frequency 106.25 MHz press 1 0 6 Enter - frequency 106.00 MHz press 1 Enter - frequency 100.00 MHz press 9 8 Enter - frequency 98.00 MHz Typing can be cancelled by pressing Esc, delete last typed number by pressing Backspace. User Manual Page 27 5 Using remote control Using remote control unit you can remotely control RX Radiator, MS PowerPoint or other user-defined programs. 5.1 Remote Control: Keys and Functions Remote control Key # Symbol Radio function 1 Mute/unmute radio 2 Set Sleep and Windows shutdown mode 3 Turn off radio Close PowerPoint 4 to 12 Station 1 to 9 Jump to Slide # (for slide 23, press “2” and ‘3’ and ‘Enter’ 13 15 16 Station 10+ (e.g. for station 12, press ‘10+’ and ‘2’) Station 20+ (e.g. for station 20, press ‘20+’ and ‘0’) Open the last edited file Launch RX Radiator 17 User Manual PowerPoint function Launch PowerPoint 18 Reserved program P1 to P4 for user Reserved program P1 to P4 for user 22 Last station SlideShow 23 Channel surfing Esc 24 Minimize/maximize radio Enter 25 Previous station 26 Record from radio 27 Next station 28 Scan backward 29 Stop recording 30 Scan forward 31 Volume up Previous slide 32 Volume down Next slide Page 28 5.2 RX Commander RX Commander is a program that runs on the background and receives the commands from the remote control unit and controls RX Radiator (or also other programs defined in RX Keycom application). I.e. it is not possible to control RX Radiator using remote control while RX Commander is not running. By default, it is copied into Startup folder so it is launched automatically upon Windows startup. However, you can run it manually from the Start menu within the RadioXtreme folder. 5.3 RX KeyCom Using KeyCom application you can: - overview the default assignment of remote-control for RX Radiator and MS PowerPoint applications - define or modify up to four additional programs (P1 to P4) to be controlled via remote control Program combobox defines the actually edited program. The first and second programs are predefined as RX Radiator and MS PowerPoint respectively. You cannot change the keys assignments. When one of these first two programs is selected, either the [Setup Radiator] or [Setup Powerpoint] button is visible next to the combobox. User Manual Page 29 Press [Setup Radiator]. The configuration file will be updated with RX Radiator location. This enables the user to work with the remote when user did not install Radiator in the default location. Press [Setup Powerpoint]. The configuration file will be updated with real MS PowerPoint exe file location; the class name of the PowerPoint application is also changed according to the installed MS Office version. List of keys and their assignments to the remote control buttons are shown in the combobox; when you click it, appropriate button is lighten up. 5.3.1 Defining a new program for remote controlling 1) Select one of the four (P1 to P4) additional programs in the Program combobox 2) Press the [Preset program] button – the Program settings window is launched 3) Press the [Preset program] button in the Program settings window 4) Choose the executable file of the target application (the application that should be controlled via remote control) and press [OK] in the browse dialog User Manual Page 30 5) Then, press [Update program info] button and type some description for the ‘Program Description’. 6) Click [OK] 7) Then the main window is shown again and you can assign the buttons to certain keys combination that will be sent to the target application 8) Double-click cell in appropriate Key row in Description column 9) New dialog window is opened where you can define the hot-key combination. Confirm it by clicking [OK] User Manual Page 31 10) Repeat steps in 8 and 9 for each buttons you want to define. 11) Finally, save the configuration either using [Save settings] – saves the settings and leaves the dialog opened, or using [Save and exit] – saves the settings and closes the KeyCom dialog window. 6 Getting Help 6.1 FAQ for RX Radiator 6.1.1 Computer freezes when recording using Mpeg Layer-3 codec, why? Mpeg Layer-3 codec may causes system halting on Windows 98 - the blue screen. Restart is necessary. 6.1.2 How can I schedule recording? Example: Station Asia 3 broadcasts it’s well known hit parades from 2100 to 2200 every Sunday. We want to record it using audio codecs and then switch off the computer. 1. At first we have to set correct codec (codec which is set in RX Radiator configuration is then used during scheduled recording). You can set codec using this procedure: open tab Recording settings, in combo box Record to select Windows audio codecs ... After clicking the [Codec] button will the list of codecs and their properties be shown. You can choose one, and then click [OK]. Then click [Apply] to save your choice. 2. We will create the new script: open tab Schedule, click on [Create new] button. 3. Type name of the script Asia 3 hit parade in the Script editor. 4. There is a list of usable commands available on the left side of the Script editor. Choose following commands and add them to the script list using [Add[ button: Station #, Volume up, Record using codecs, Shutdown Windows. 5. The commands in script list can be moved (resp. their sequence can be changed). You can not move these commands from the end of the list: Close RX Radiator and Shutdown Windows (it would be strange to shutdown Windows and then save the recording …) 6. When the (...) sequence is appended to command in the script list it means that properties of the command could be set - click on command Station # and choose station Asia 3, click on Record using codecs and Codec recording properties window appears in the bottom. Item Name automatically means that file will be saved as Rad sch yearmonthday hourminutesecond.waw.If the checkbox is not checked you can use your own name, e.g. Asia 3 hit parade.waw. Let's set length (of the recording) to 01:00:00 (1 hour). 7. After setting properties click [Save changes and return]. This will return us to Schedule tab - there is new item in the List of created scripts. Choose Run on Sundays in the list How often, fill 21:00:00 in Time and Odd and even weeks in Weeks combo box. 8. To run script in the planned time, following conditions must be fulfilled: Global scheduling active (it means enabling/disabling of running all the scripts) must be checked - enabled and also current script must be enabled (i.e. Asia 3 hit parade ). 9. Click [OK] and script should run at time you specified. 6.1.3 I have created the script, set the time and date but script did not run. Why? Please check whether the correct time was set and both Global scheduling active and Current script enabled checkboxes are checked. Scripts have following (intentional) restrictions: • only one script can run at the same time (You can define as many scripts as you want. Nevertheless when the 1st script is set to start at 800 and will run for 2 minutes and the second one is set to start at 801, the second one will not run.) • recording commands are ignored if you are currently recording something • recording stops sleep timer User Manual Page 32 6.1.4 Buttons bitmaps are sometimes framed by the black line, how to get rid off it? Sometimes this problem arises when the color depth is set to 16 bits (65.535 colors). After switching to 24 or 32 bits color depth everything should be OK. 6.1.5 Why the mouse wheel does not work? Some mouse drivers (e.g. Logitech etc.) are sometimes causing problems - probably compatibility issue with standard IntelliMouse interface. You can uninstall original drivers and install IntelliPoint - download at http://www.microsoft.com/mouse/mouse.htm 6.1.6 Why the volume setting does not work? You have probably selected wrong device - on tab Hardware settings in section Volume control choose Line -in and then choose the correct device in Line-in device. The device is the input to the soundcard which connected to the audio out of RadioXtreme. 6.1.7 Always when starting RX Radiator I have to skip error message There is no media in drive. Insert disc \Device\... twice. Can I solve it somehow? You have probably removable disk drive installed (ZIP, Jazz etc.); this message can be avoided by inserting some media to the drive (i.e. presence of the media in drive when RX Radiator starts). Next possibility: Change letter for the removable disk drive using Control panels. 6.1.8 How to enable other language and LCD font? Example (for Czech): Go to the RX Radiator configuration, tab Options and check Use external language file checkbox. Select Cesky.lng in the language files list. On LCD settings tab choose Central European code page. 6.1.9 How can I switch off the annoying window on closing asking me whether mute or leave? Go to the RX Radiator configuration, tab Options and select either Mute or Leave in current state in the On power off list. 6.1.10 How to expand the frequency range? RadioXtreme can only work within the standard band (87Mhz – 108MHz). 6.2 Contacting support For further technical support, email to [email protected] 6.3 Website for Update http://www.mediaforte.com.sg 6.4 Acknowledgement RX Radiator 2003 Miroslav Fleško (Czech Republic) http://flesko.cz MS Windows 98SE/ME/2000/XP is registered trademarks of Microsoft Corporation RadioXtreme is registered trademark of MediaForte Products Pte Ltd All other company or product names are trademarks or service marks of their respective owners. User Manual Page 33 Appendix 1: Command-line switches - -tray -thin -full -mute User Manual run in tray run as thin window run as normal window run muted Page 34 Appendix 2: Using command line utility for remote controlling RX Radiator If you have RX Radiator running and want to control it for example from another application, from batch file and so on, you can do that by utilizing small application rc.exe (22 kB). It is placed in the following folder [RX Radiator base path]\Add-ons\Command line\rc.exe (for example D:\Program Files\RX Radiator\Add-ons\Command line\rc.exe). List of parameters Parameters are separated by spaces: rc command1 command 2 Example: rc fr8970 x vu (tune frequency 89.70 MHz, maximize RX Radiator and set volume one step up). Tuning fr tune frequency (fr10685 for 106.85 MHz) finetuneup, fu fine tune up finetunedown, fd fine tune down tuneup, tu coarse tune up tunedown, td coarse tune down scanup, scu scan up scanup, scd scan down Stations no station number (no11 for switching to station No. 11) statup, su station up statdown, sd station down last, l last station surf, f station surfing Sound muteunmute, mu toggle mute/unmute mute, m mute sound unmute, u unmute sound volup, vu volume up voldown, vd volume down monostereo, ms toggle mono/stereo stereo, st stereo mono, mo mono User Manual Page 35 Recording loopon, lo set loop recording on loopoff, loffset loop recording off toggleloop, tl toggle loop recording on/off record, r begin/stop recording (when stopping recording it will ask for name of the recorded file) sr stop recording and save it with given name (Example sr"C:\Music\My Name Of The File.wav" or srMyFile.wav or sr without parameter for automatical naming. Use quotation marks " " when filename contains one or more spaces. You can use variables in filename: %y (year), %m (month), %d (day), %h (hour), %n (minutes), %s (seconds), %f (frequency in MHz - e.g. 89_70), %b (station number), %a (station name), %l (login name in Windows), %c (codec name). (Example sr"C:\Music\Show from %a on %d-%m (%y) at %h-%n by %l.wav" could result in: C:\Music\Show from Radio Life on 25-10 (2001) at 15-03 by Mirek.wav) Make sure that length of the filename (including path) will not exceed file name length limitation of OS (for example file names are limited to 255 characters in Windows 95). Other lcd set LCD text (lcd"Give me a break ...") locklcd, ll prevent LCD from being updating by any other way than by WM_MyLCD message releaselcd, lr unlock LCD previously locked by WM_MyLockLCD refreshlcd, lf force RX Radiator to refresh LCD min, n minimize max, x maximize thin, t thin window togglethin, tt toggle thin/full size window toggletray, ttr toggle minimized (tray)/window modes restore, e restore from tray icon ontop, ot toggle on/off always on top sleep sleep (0, 10, 20, 30, 60, 120, 300 minutes) close, c close RX Radiator terminate, ter shutdown User Manual Page 36 Appendix 3: Messages for remote controlling RX Radiator const WM_MyVolUp=WM_USER + 1001; WM_MyVolDown=WM_USER + 1002; WM_MyMute=WM_USER + 1003; WM_MyUnmute=WM_USER + 1004; WM_MyStatUp=WM_USER + 1005; WM_MyStatDown=WM_USER + 1006; WM_MyLastStat=WM_USER + 1007; WM_MySurf=WM_USER + 1008; WM_MyTuneStatNo=WM_USER + 1009; WM_MyTuneFr=WM_USER + 1010; volume up volume down mute unmute station up station down last station starts/stops surfing wPar= 1 .. 24 wPar= 06000 to 13000 (for example wPar=8970 for fr. 89.7 MHz) WM_MyMin=WM_USER + 1011; minimize WM_MyMax=WM_USER + 1012; maximize WM_MyThin=WM_USER + 1013; thin window WM_MyRecord=WM_USER + 1014; starts/stops recording WM_MyRadClose=WM_USER + 1015; close RX Radiator WM_MyRestore=WM_USER + 1016; restores from minimized state WM_MyMonoStereo=WM_USER + 1017; toggles mono/stereo WM_MyStereo=WM_USER + 1018; stereo on WM_MyMono=WM_USER + 1019; mono on WM_MyMuteUnmute=WM_USER + 1020; toggles mute/unmute mode WM_MyToggleThin=WM_USER + 1021; toggles thin/maximized window WM_MyToggleTray=WM_USER + 1022; toggles tray icon/normal window WM_MyFineTuneUp=WM_USER + 1023; fine tune up WM_MyFineTuneDown=WM_USER + 1024; fine tune down WM_MyCoarseTuneUp=WM_USER + 1025; tune up WM_MyCoarseTuneDown=WM_USER + 1026; tune down WM_MyScanUp=WM_USER + 1027; scan up WM_MyScanDown=WM_USER + 1028; scan down WM_MyToggleOnTop=WM_USER + 1029; toggless on/off always on top WM_MyLCD=WM_USER + 1030; set LCD text WM_MyRecordName=WM_USER + 1031; stop recording and save it with given name WM_MyLockLCD=WM_USER + 1032; prevent LCD from being updating WM_MyReleaseLCD=WM_USER + 1033; unlock LCD WM_MyRefreshLCD=WM_USER + 1034; force RX Radiator to refresh LCD WM_MyLoopOn=WM_USER + 1035; loop recording on WM_MyLoopOff=WM_USER + 1036; loop recording off WM_MyToggleLoop=WM_USER + 1037; toggles loop recording on/off WM_MySleep=WM_USER + 1038; toggles sleep timer on/off, parameters wPar: 0 for switching off and 10, 20, 30, 60, 120, 300 (minutes); If lPar = 1, then Windows will be shut down Example: You can use it in some programming language (example in Delphi): User Manual Page 37 PostMessage(FindWindow('TMainRadioForm',nil),WM_MyMute,0,0); //mutes radio PostMessage(FindWindow('TMainRadioForm',nil),WM_MyTuneStatNo,7,0); //station #7 PostMessage(FindWindow('TMainRadioForm',nil),WM_MySleep,30,0); //sets sleep timer to 30 minutes PostMessage(FindWindow('TMainRadioForm',nil),WM_MySleep,0,0); //turns off sleep timer PostMessage(FindWindow('TMainRadioForm',nil),WM_MySleep,30,1); //sets shutdown Windows timer to 30 minutes User Manual Page 38