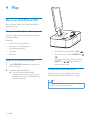
1
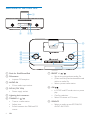
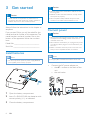
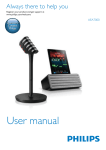
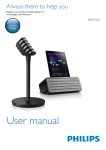
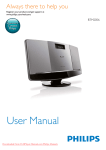
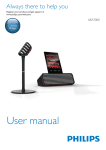
Always there to help you
Register your product and get support at
www.philips.com/welcome
Question?
Contact
Philips
User manual
DTB297
English
Contents
1Important2
Safety2
Notice3
2 Your Docking Entertainment System5
Introduction5
What’s in the box
5
Overview of the main unit
6
3 Get started8
Install batteries
Connect power
Set time and date
Turn on
8
8
9
9
4Play10
Play from iPod/iPhone/iPad
10
Play from a Bluetooth device
11
Play from Philips DigitalRadio application 11
Play from an external device
11
5 Listen to radio12
Store DAB radio stations automatically 12
Basic operations
12
Use the menu
12
6 Other features14
Adjust volume level
Set the alarm timer
Set the sleep timer
Adjust display brightness
14
14
14
14
7 Product information15
Specifications
RDS program types
15
16
8Troubleshooting17
EN
1
1Important
Safety
Know these safety symbols
e Do not use this apparatus near water.
f Clean only with dry cloth.
g Do not block any ventilation openings.
Install in accordance with the
manufacturer’s instructions.
h Do not install near any heat sources such
as radiators, heat registers, stoves, or
other apparatus (including amplifiers) that
produce heat.
i Protect the power cord from being
walked on or pinched, particularly at
plugs, convenience receptacles, and the
point where they exit from the apparatus.
j Only use attachments/accessories
specified by the manufacturer.
This ‘bolt of lightning’ indicates uninsulated
material within your unit may cause an electrical
shock. For the safety of everyone in your
household, please do not remove product
covering.
The ‘exclamation point’ calls attention to
features for which you should read the enclosed
literature closely to prevent operating and
maintenance problems.
WARNING: To reduce the risk of fire or electric
shock, this apparatus should not be exposed to
rain or moisture and objects filled with liquids,
such as vases, should not be placed on this
apparatus.
CAUTION: To prevent electric shock, match
wide blade of plug to wide slot, fully insert.
Important Safety Instructions
a Read these instructions.
b Keep these instructions.
c Heed all warnings.
d Follow all instructions.
2
EN
k Use only with the cart, stand, tripod,
bracket, or table specified by the
manufacturer or sold with the apparatus.
When a cart is used, use caution when
moving the cart/apparatus combination to
avoid injury from tip-over.
l Unplug this apparatus during lightning
storms or when unused for long periods
of time.
m Refer all servicing to qualified service
personnel. Servicing is required when
the apparatus has been damaged in any
way, such as power-supply cord or plug
is damaged, liquid has been spilled or
objects have fallen into the apparatus, the
apparatus has been exposed to rain or
moisture, does not operate normally, or
has been dropped.
n Battery usage CAUTION – To prevent
battery leakage which may result in bodily
injury, property damage, or damage to
the unit:
• Do not mix batteries (old and new or
carbon and alkaline, etc.).
• Remove batteries when the unit is not
used for a long time.
• Batteries (battery pack or batteries
installed) shall not be exposed to
excessive heat such as sunshine, fire or
the like.
o Apparatus shall not be exposed to
dripping or splashing.
p Do not place any sources of danger on
the apparatus (e.g. liquid filled objects,
lighted candles).
q Where the plug of the Direct Plug-in
adapter is used as the disconnect device,
the disconnect device shall remain readily
operable.
Warning
•• Never remove the casing of this apparatus.
•• Never lubricate any part of this apparatus.
•• Never place this apparatus on other electrical
equipment.
•• Keep this apparatus away from direct sunlight, naked
flames or heat.
•• Ensure that you always have easy access to the power
cord, plug or adaptor to disconnect the apparatus from
the power.
Notice
This product complies with the radio
interference requirements of the European
Community.
Any changes or modifications made to this
device that are not expressly approved by
WOOX Innovations may void the user’s
authority to operate the equipment.
Specifications are subject to change without
notice. WOOX reserves the right to change
products at any time without being obliged to
adjust earlier supplies accordingly.
English
• Install all batteries correctly, + and - as
marked on the unit.
Your product is designed and manufactured
with high quality materials and components,
which can be recycled and reused.
When this crossed-out wheeled bin symbol is
attached to a product it means that the product
is covered by the European Directive 2002/96/
EC.
Please inform yourself about the local separate
collection system for electrical and electronic
products.
Please act according to your local rules and
do not dispose of your old products with your
normal household waste. Correct disposal of
your old product helps to prevent potential
negative consequences for the environment and
human health.
Your product contains batteries covered by
the European Directive 2006/66/EC, which
cannot be disposed with normal household
waste.Please inform yourself about the local
rules on separate collection of batteries
because correct disposal helps to prevent
negative consequences for the environmental
and human health.
EN
3
Environmental information
All unnecessary packaging has been omitted.
We have tried to make the packaging easy to
separate into three materials: cardboard (box),
polystyrene foam (buffer) and polyethylene
(bags, protective foam sheet.)
Your system consists of materials which can
be recycled and reused if disassembled by
a specialized company. Please observe the
local regulations regarding the disposal of
packaging materials, exhausted batteries and old
equipment.
iPod and iPhone are trademarks of Apple Inc.,
registered in the U.S. and other countries. iPad
is a trademark of Apple Inc.
Class II equipment symbol:
CLASS II apparatus with double insulation, and
no protective earth provided.
Note
•• The type plate is located on the bottom of the
apparatus.
The Bluetooth® word mark and logos are
registered trademarks owned by Bluetooth
SIG, Inc. and any use of such marks by WOOX
Innovations is under license.
“Made for iPod,” “Made for iPhone,” and “Made
for iPad” mean that an electronic accessory
has been designed to connect specifically to
iPod, iPhone, or iPad, respectively, and has
been certified by the developer to meet
Apple performance standards. Apple is not
responsible for the operation of this device
or its compliance with safety and regulatory
standards. Please note that the use of this
accessory with iPod, iPhone, or iPad may affect
wireless performance.
4
EN
English
2 Your Docking
Entertainment
System
Congratulations on your purchase, and
welcome to Philips! To fully benefit from the
support that Philips offers, register your product
at www.philips.com/welcome.
Introduction
With this unit, you can:
• listen to FM/DAB radio.
• enjoy audio from iPod/iPhone/iPad, a
Bluetooth-enabled device.
• enjoy audio from an external device
through 3.5mm audio connection.
• set two alarms.
• wake up by buzzer alarm, DAB/FM
radio, or iPod/iPhone/ipad.
What’s in the box
Check and identify the contents of your
package:
•
Main unit
•
AC power adapter (with three types of
detachable plugs)
•
Printed materials
EN
5
Overview of the main unit
a
DC IN
7.5 V
2.5 A
d
cb
e
f
q
p
g
o
n
m
h
i
j
k
l
a Dock for iPod/iPhone/iPad
g PRESET +/-
/
• Skip to the previous/next audio file.
b FM antenna
• Improve FM reception.
c AUDIO IN
• 3.5mm audio input socket.
d DC IN (7.5V 2.5A)
• Power supply socket.
• (Press and hold) fast backward/forward
within an audio file.
• Select a preset radio station.
h OK/
• In DOCK and BT mode, start or pause
play.
e Lightning dock connector
• Confirm selection.
f TUNING +/-
• Select FM stereo or FM mono.
/
• Tune to a radio station.
• Adjust time.
• Switch between the DAB and FM
menus.
6
EN
i SOURCE
• Select an audio source: BT, DAB, FM,
AUDIO IN, DOCK.
j ALARM 1/ALARM 2
English
• Set the alarm timer.
• Turn off the alarm tone.
• View alarm settings.
k REPEAT ALARM/BRIGHTNESS
CONTROL
• Repeat the alarm.
• Adjust the display brightness.
l Display panel
• Show the current status.
m
• Turn on the unit or switch to standby
mode.
• Deactivate the sleep timer.
• Stop alarm.
n VOL +/-
/
• Adjust volume.
o SLEEP
• Set the sleep timer.
p MENU/INFO/SET TIME/
• (Press and hold ) in dock mode, fast
backward within an audio file.
• (Press and hold) access the FM/DAB
menu.
• Select display information during play.
• In Standby mode, set the clock and
date.
q SCAN/PROG/
• (Press and hold) in dock mode, fast
backward within an audio file.
• (Press and hold) disconnect all the
existing Bluetooth connections.
• Search for available FM or DAB radio
stations.
• Program radio stations.
EN
7
3 Get started
Caution
•• Remove battery if it is exhausted or will not be used
for a long time.
Caution
•• Use of controls or adjustments or performance of
procedures other than herein may result in hazardous
radiation exposure or other unsafe operation.
Always follow the instructions in this chapter in
sequence.
If you contact Philips, you will be asked for the
model and serial number of this apparatus. The
model number and serial number are on the
bottom of the apparatus. Write the numbers
here:
Model No. __________________________
Serial No. ___________________________
•• Batteries contain chemical substances, so they should
be disposed of properly.
•• Risk of explosion! Keep batteries away from heat,
sunshine or fire. Never discard batteries in fire.
Connect power
Caution
•• Risk of product damage! Ensure that the power voltage
corresponds to the voltage printed on the back or
underside of the unit.
•• Risk of electric shock! When you unplug the AC power
cord, always pull the plug from the socket. Never pull
the cord.
•• Before connection of the AC power cord, make sure
that you have completed all other connections.
Install batteries
Note
Note
•• You can only use AC power as power supply. Batteries
•• The type plate is located at the bottom of the unit.
(not supplied) are for backup purpose.
•
Connect the AC power adapter to:
• the AC ~ socket on the back of the
unit.
• the wall outlet.
DC IN
7.5 V
1
2
Open the battery compartment.
3
Close the battery compartment.
8
EN
Insert 2 x R6/UM-3/AA size batteries with
correct polarity (+/-) as indicated.
2.5 A
1
In standby mode, press and hold
MENU/INFO/SET TIME/
for 2 seconds.
»» The unit beeps once.
»» [24H] starts to blink.
2
Press TUNING +/- / to select the
12/24 hour format, then press OK/
to
confirm.
»» The hour digits start to blink.
3
Repeat steps 2 to set the hour, minute, day,
month, and year.
»» After confirmation of the year setting,
the unit beeps once again.
English
Set time and date
Tip
•• In 12 hour format, [MONTH--DAY] is displayed.
•• in 24 hour format, [DAY--MONTH] is displayed.
Turn on
•
Press .
»» The unit switches to the last selected
source.
Switch to standby
•
Press again to switch the unit to standby
mode.
»» The time and date (if set) appear on
the display panel.
EN
9
4Play
Play from iPod/iPhone/iPad
You can enjoy audio from iPod/iPhone/iPad
through this unit.
Compatible iPod/iPhone/iPad
The unit supports the following iPod, iPhone,
and iPad models:
Made for:
•
iPod nano (7th generation)
•
iPod touch (5th generation)
•
iPad (4th generation)
•
iPad mini
• To pause/resume play, press OK/
•
iPhone 5
• To skip to a track, press PRESET +// .
Listen to the iPod/iPhone/iPad
1
Press SOURCE repeatedly to select the
DOCK source.
2
Load the iPhone/iPod/iPad.
»» Once the iPod/iPhone/iPad is
recognized, the clock on your unit is
synchronized with your iPod/iPhone/
iPad automatically.
• To search during play, press and hold
PRESET +/- / , then release to
resume normal play.
Charge the iPod/iPhone/iPad
When the unit is connected to power, the
docked iPod/iPhone/iPad begins to charge.
Tip
•• For certain iPod models, it may take up to a minute
before the charging indication appears.
10
EN
.
Note
•• Before you connect a Bluetooth-enabled device to the
unit, familiarize yourself with the Bluetooth capabilities
of the device.
•• Keep the unit away from other electronic devices that
may cause interference.
•• The effective operation range between the unit and the
paired device is approximately 10 meters (30 feet).
•• Any obstacle between the unit and the device can
reduce the operational range.
1
2
3
4
Press SOURCE repeatedly to select the
BT (Bluetooth) source.
»» The on the display panel starts blinking.
Activate the Bluetooth function on your
Bluetooth device (see the device user
manual).
Select ‘PHILIPS DTB297’ on your device
for pairing.
»» After successful pairing and connection,
the unit beeps twice and the stops
blinking.
To disconnect the Bluetooth-enabled device:
•
Deactivate Bluetooth on your device;
•
Move the device beyond the
communication range; or
•
Press and hold SCAN/PROG/
.
Play from Philips DigitalRadio
application
An application Philips DigitalRadio is available
on Apple App Store and Google Play.
To fully enjoy features of this unit, download and
install the application onto your smart device.
With this application, after connection of your
iPod/iPhone/iPad or your Bluetooth-enabled
device to this unit, you can control BT, DAB,
TUNER, and AUDIO IN play modes from your
smart device.
Tip
•• When you switch to the dock source, the Bluetooth
connection disconnects automatically and the Philips
DigitalRadio app stops working.
• For some devices, you may need to
input “0000” as the pairing password.
Start music play on your Bluetooth
enabled device.
English
Play from a Bluetooth device
Play from an external device
You can also listen to an external audio device
through this unit.
DTB297
Press SOURCE repeatedly to select the
AUDIO IN source.
2
Connect a 3.5mm audio link cable (not
supplied) to:
• the AUDIO IN socket (3.5mm) on the
back of the unit.
PIN
0000
Tip
•• The unit can memorize up to 8 previously connected
Bluetooth devices.
1
• the headphone socket on an external
device.
»» the screen displays text message
[AUDIO IN] and the current time.
3
Start to play the device (see the device
user manual).
EN
11
5 Listen to radio
Note
•• For optimal reception, fully extend the antenna and
adjust its position, or connect an outdoor antenna.
•• This product does not support MW (medium wave)
radio reception.
•• You can program a maximum of 20 DAB radio stations
and 20 FM radio stations.
•• Check with local retailer or go to www.WorldDAB.org
for the applicable DAB radio frequencies in your area.
•• Refer to "Product information" > "RDS program types"
for more information about RDS radio stations.
Store DAB radio stations
automatically
If no DAB radio station is stored, this product
can search and store DAB radio stations
automatically.
1
2
Press SOURCE repeatedly to select the
DAB source.
»» [FULL SCAN] (full scan) scrolls on the
display panel.
Press OK/
to start auto installation.
»» This product automatically stores DAB
radio stations with sufficient signal
strength.
»» After all available DAB radio stations
are stored, the first stored DAB radio
station is broadcast automatically.
Basic operations
Follow the instructions below for more
functions.
Tune to the next FM radio station with
sufficient signal strength at the lower/higher
frequency:
Press and hold TUNING +/- / to start
auto search.
12
EN
Tune to the FM radio station at a specific
frequency:
Press TUNING +/- / repeatedly until the
frequency digitals are displayed.
Program FM radio stations automatically:
Press SCAN/PROG/
to start auto
programming.
Program DAB radio stations automatically:
Press SCAN/PROG/
to start auto
scanning and programming.
Program radio stations manually:
1) Tune to a radio station.
2) Press and hold SCAN/PROG/
to
activate programming.
3) Press PRESET +/- / to assign a
sequence number to the radio station.
4) Press OK/
to confirm.
5) Repeat steps 1-4 to program more radio
stations.
Tune to a preset radio station:
Press PRESET +/- / repeatedly.
Switch the audio mode between [STEREO]
(stereo) and [MONO] (monophonic) for FM
radio:
Press OK/
repeatedly.
Display available information about the
current radio station:
Press MENU/INFO/SET TIME/
repeatedly.
Use the menu
When you listen to radio, you can access the
menu for control options.
1
Press and hold MENU/INFO/SET TIME/
.
»» FM mode: [SCAN] (scan) is displayed.
»» DAB mode: [FULL SCAN] (full scan)
is displayed.
2
Press TUNING +/- / to select a
menu option, and then press OK/
to
confirm the option or enter the lower-level
menu.
FM mode:
[AUDIO]
(audio)
Search and store radio stations
automatically: [STRONG] (strong)
for radio stations with strong
signal only, [ALL] (all) for all radio
stations.
Select a sound mode: [STEREO]
(stereo) or [MONO] (mono).
English
[SCAN]
(scan)
DAB mode:
[FULL
SCAN] (full
scan)
[MANUAL]
(manual)
[PRUNE]
(prune)
[SYSTEM]
(system)
3
Scan and store DAB radio
stations within full range.
Tune to a DAB radio station
manually.
Remove invalid stations from the
station list.
[RESET] (reset): Reset all radio
settings to the factory default
status.
[SW VER] (software version):
Display the version of the
current firmware.
[BT UPGRD] (Bluetooth
upgrade): Upgrade the Bluetooth
software if available.
[UPGRADE] (upgrade): Upgrade
the firmware if available.
[BT RESET] (Bluetooth reset):
Reset Bluetooth to the default
setting.
[BT ON] (Bluetooth on): When
the [BT ON] option on the app
is set to 'ON', the Bluetooth
connection remains active in
standby mode. As a powersaving feature, when it is set to
'OFF', the Bluetooth connection
disconnects automatically in
standby mode and the Philips
DigitalRadio app stops working.
Press MENU/INFO/SET TIME/
the menu.
to exit
EN
13
6 Other features
Repeat alarm
•
Adjust volume level
1
During play, press VOL +/- to increase/
decrease the volume level.
Stop alarm ringing
•
Set the alarm timer
You can set two alarms which go off at different
time.
1
Make sure that you have set the clock
correctly (see ‘Set time and date’ on page
9).
2
Press and hold ALARM 1 or ALARM 2 for
2 seconds.
»» The unit beeps.
»» [SET AL] (set alarm), or , and the
hour digits start to blink.
3
Press TUNING +/- / to set the hour,
then press OK/
to confirm.
»» The minute digits start to blink.
4
Repeat step 3 to set the minute, alarm
date (work day, daily, or weekend), source
(DOCK, BUZZ, DAB, or TUNER), and
volume.
»» After confirmation of the volume
setting, the unit beeps once again.
Activate and deactivate the alarm
timer
1
Press ALM 1 or ALM 2 repeatedly to
activate or deactivate the timer.
»» If the timer is activated, or is
displayed.
»» If the timer is deactivated, or
disappears.
14
EN
When the alarm rings, press
BRIGHTNESS/REP ALM.
»» The alarm repeats ringing in several
minutes.
When the alarm rings, press the
corresponding ALARM 1 or ALM 2
button.
»» The alarm stops but the alarm settings
remain.
View the alarm settings
•
Press ALARM 1 or ALM 2.
Set the sleep timer
This unit can switch to standby automatically
after a set period of time.
Press SLEEP repeatedly to select a set
period of time (in minutes).
»» When the sleep timer is activated, the
display shows , and the volume will
gradually decrease in the last 5 minutes.
To deactivate sleep timer
•
•
Press SLEEP repeatedly until [OFF] (off) is
displayed.
»» When the sleep timer is deactivated,
disappears on the display.
Adjust display brightness
•
Press BRIGHTNESS/REP ALM repeatedly
to select different levels of display
brightness.
Speakers
Speaker Impedance
Speaker Driver
Sensitivity
4 ohm
57mm
>84dB/m/W
Note
•• Product information is subject to change without prior
notice.
Bluetooth®
Bluetooth® version
Frequency band
Range
Specifications
V2.1 + EDR
2.402-2.480 GHzISM
Band
10m (free space)
General information
Amplifier
Rated Output Power
Frequency Response
2 x 5 W RMS
80Hz - 16kHz,
±3dB
>67 dBA
600mV RMS
22kohm
Signal to Noise Ratio
AUDIO IN
FM
Tuning Range
Tuning grid
- Mono, 26dB S/N Ratio
- Stereo, 46dB S/N Ratio
Search Sensitivity
Total Harmonic Distortion
Signal to Noise Ratio
FM 87.5 108 MHz
50 KHz
<22 dBf
<43 dBf
<28dBf
<2%
>55 dB
AC/DC switching
adapter
Operation Power
Consumption
Standby Power
Consumption (clock
display)
Dimensions
-M
ain Unit (W x H
x D)
Weight
- Main Unit
Model: OH1018E0752500U
Input: 100-240V~
50/60Hz 650mA;
Output: 7.5 V
2.5 A
19 W
<1 W
263 x135 x 165
mm
1.18 kg
DAB Tuner
Tuning Range
Sensitivity
174–240 MHz (Band III)
> 90 dB
EN
15
English
7Product
information
RDS program types
NO TYPE
NEWS
AFFAIRS
INFO
SPORT
EDUCATE
DRAMA
CULTURE
SCIENCE
VARIED
POP M
ROCK M
MOR M
LIGHT M
CLASSICS
OTHER M
WEATHER
FINANCE
CHILDREN
SOCIAL
RELIGION
PHONE IN
TRAVEL
LEISURE
JAZZ
COUNTRY
NATION M
OLDIES
FOLK M
DOCUMENT
TES
ALARM
16
EN
No RDS programme type
News services
Politics and current affairs
Special information programs
Sports
Education and advanced
training
Radio plays and literature
Culture, religion and society
Science
Entertainment programs
Pop music
Rock music
Light music
Light classical music
Classical music
Special music programs
Weather
Finance
Children’s programs
Social Affairs
Religion
Phone In
Travel
Leisure
Jazz Music
Country Music
National Music
Oldies Music
Folk Music
Documentary
Alarm Test
Alarm
Warning
•• Never remove the casing of this apparatus.
To keep the warranty valid, never try to repair
the system yourself.
If you encounter problems when using this
apparatus, check the following points before
requesting service. If the problem remains
unsolved, go to the Philips web site (www.
philips.com/welcome). When you contact
Philips, ensure that the apparatus is nearby
and the model number and serial number are
available.
No power
•• Ensure that the AC power plug of the unit
is connected properly.
•• Ensure that there is power at the AC
outlet.
•• Ensure that the batteries are inserted
correctly.
No sound
•• Adjust the volume.
No response from the unit
•• Disconnect and reconnect the AC power
plug, then turn on the unit again.
Poor radio reception
•• Increase the distance between the unit and
your TV or VCR.
•• Fully extend the FM antenna.
Music playback is unavailable on this unit even
after successful Bluetooth connection.
•• The device cannot be used to play music
through this unit wirelessly.
The audio quality is poor after connection
with a Bluetooth-enabled device.
•• The Bluetooth reception is poor. Move the
device closer to this unit or remove any
obstacle between them.
Cannot connect with this unit.
•• The device does not support the profiles
required for this unit.
•• The Bluetooth function of the device is
not enabled. Refer to the user manual of
the device to find out how to enable the
function.
•• This unit is not in pairing mode.
•• This unit is already connected with another
Bluetooth-enabled device. Disconnect that
device and then try again.
The paired mobile device connects and
disconnects constantly.
•• The Bluetooth reception is poor. Move the
device closer to this unit or remove any
obstacle between them.
•• Some mobile phones may connect and
disconnect constantly when you make
or end calls. This does not indicate any
malfunction of this unit.
•• For some devices, the Bluetooth
connection may be deactivated
automatically as a power-saving feature.
This does not indicate any malfunction of
this unit.
Timer does not work
•• Set the clock correctly.
•• Switch on the timer.
Clock/timer setting erased
•• Power has been interrupted or the power
plug has been disconnected.
•• Reset the clock/timer.
EN
17
English
8Troubleshooting
18
EN
2014 © WOOX Innovations Limited.
All rights reserved.
This product was brought to the market by WOOX
Innovations Limited or one of its affiliates, further referred
to in this document as WOOX Innovations, and is the
manufacturer of the product. WOOX Innovations is the
warrantor in relation to the product with which this booklet
was packaged. Philips and the Philips Shield Emblem are
registered trademarks of Koninklijke Philips N.V.
DTB297_UM_10_V2.0