1
BDP7100
English
BLU-RAY DISC PLAYER
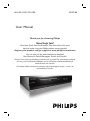
User Manual
Thank you for choosing Philips.
Need help fast?
Read your Quick Start Guide and/or User Manual first for quick
tips that make using your Philips product more enjoyable.
Register your product and get support at www.philips.com/welcome
You can also visit the above website to download
User Manual in Danish/Norwegian, Finnish and Swedish.
Du kan hente en brugerhåndbog på dansk/norsk og svensk fra ovenstående websted.
Du kan gå till ovanstående webbplats om du vill hämta användarhandboken på
danska/norska och svenska.
Voit ladata edellä mainitusta osoitteesta myös käyttöoppaan norjan-, ruotsin- tai
tanskankielisen version.
Important notes for users in the
U.K.
Mains plug
This apparatus is fitted with an approved 13
Amp plug. To change a fuse in this type of
plug proceed as follows:
Italia
DICHIARAZIONE DI CONFORMITA’
Si dichiara che l’apparecchio BDP7100, Philips
risponde alle prescrizioni dell’art. 2 comma 1
del D.M. 28 Agosto 1995 n. 548.
Fatto a Eindhoven
Philips Consumer Electronics
Philips, Glaslaan 2
5616 JB Eindhoven, The Netherlands
1 Remove fuse cover and fuse.
2 Fix new fuse which should be a BS1362
5 Amp, A.S.T.A. or BSI approved type.
3 Refit the fuse cover.
If the fitted plug is not suitable for your socket
outlets, it should be cut off and an appropriate
plug fitted in its place.
If the mains plug contains a fuse, this should
have a value of 5 Amp. If a plug without a fuse
is used, the fuse at the distribution board
should not be greater than 5 Amp.
Typeskilt finnes på apparatens underside.
Note: The severed plug must be disposed of to
avoid a possible shock hazard should it be
inserted into a 13 Amp socket elsewhere.
Observer: Nettbryteren er
sekundert innkoplet. Den innebygde
netdelen er derfor ikke frakoplet
nettet så lenge apparatet er
tilsluttet nettkontakten.
How to connect a plug
For å redusere faren for brann eller elektrisk
The wires in the mains lead are coloured with
the following code: blue = neutral (N),
brown = live (L).
z As these colours may not correspond with the
colour markings identifying the terminals in
your plug, proceed as follows:
– Connect the blue wire to the terminal
marked N or coloured black.
– Connect the brown wire to the terminal
marked L or coloured red.
– Do not connect either wire to the earth
terminal in the plug, marked E (or e) or
coloured green (or green and yellow).
Before replacing the plug cover, make certain
that the cord grip is clamped over the sheath
of the lead - not simply over the two wires.
Copyright in the U.K.
Recording and playback of material may
require consent. See Copyright Act 1956 and
The Performer’s Protection Acts 1958 to
1972.
2
Norge
støt, skal apparatet ikke utsettes for regn eller
fuktighet.
ATTENTION!
For Customer Use:
Read carefully the information located at the
bottom or rear of your Blu-ray Disc Player and
enter below the Serial No. Retain this
information for future reference.
Model No.
BDP7100
Serial No.
_______________
DK
Advarsel: Usynlig laserstråling ved
åbning når sikkerhedsafbrydere er ude
af funktion. Undgå utsættelse for
stråling.
Bemærk: Netafbryderen er sekundært
indkoblet og ofbryder ikke strømmen
fra nettet. Den indbyggede netdel er
derfor tilsluttet til lysnettet så længe
netstikket sidder i stikkontakten.
S
Klass 1 laseraparat
Varning! Om apparaten används på
annat sätt än i denna bruksanvisning
specificerats, kan användaren utsättas
för osynlig laserstrålning, som
överskrider gränsen för laserklass 1.
Observera! Stömbrytaren är sekundärt
kopplad och bryter inte strömmen från
nätet. Den inbyggda nätdelen är därför
ansluten till elnätet så länge
stickproppen sitter i vägguttaget.
SF
Luokan 1 laserlaite
Varoitus! Laitteen käyttäminen muulla
kuin tässä käyttöohjeessa mainitulla
tavalla saattaa altistaa käyttäjän
turvallisuusluokan 1 ylittävälle
näkymättömälle lasersäteilylle.
Oikeus muutoksiin varataan. Laite ei
saa olla alttiina tippu-ja roiskevedelle.
Huom. Toiminnanvalitsin on kytketty
toisiopuolelle, eikä se kytke laitetta irti
sähköverkosta. Sisäänrakennettu
verkko-osa on kytkettynä
sähköverkkoon aina silloin, kun pistoke
on pistorasiassa.
CAUTION
VISIBLE AND INVISIBLE LASER RADIATION
WHEN OPEN. AVOID EXPOSURE TO BEAM
ADVARSEL
SYNLIG OG USYNLIG LASERSTRÅLING VED
ÅBNING UNDGÅ UDSÆTTELSE FOR
STRÅLING
VARNING
SYNLIG OCH OSYNLIG LASERSTRÅLNING
NÄR DENNA DEL ÄR ÖPPNAD BETRAKTA
EJ STRÅLEN
VARO!
AVATTAESSA OLET ALTTIINA NÄKYVÄLLE
JA NÄKYMÄTTÖMÄLLE LASER SÄTEILYLLE.
ÄLÄ KATSO SÄTEESEEN
VORSICHT
SICHTBARE UND UNSICHTBARE
LASERSTRAHLUNG WENN ABDECKUNG
GEÖFFNET NICHT DEM STRAHL
AUSSETZEN
ATTENTION
RAYONNEMENT LASER VISIBLE ET
INVISIBLE EN CAS D’OUVERTURE
EXPOSITION DANGEREUSE AU FAISCEAU
This product complies with the radio
interference requirements of the
European Community.
This product complies with
the requirements of the
following directives and
guidelines: 2006/95/EC +
2004/108/EC
3
Disposal of your old product
Your product is designed and manufactured with high quality materials
and components, which can be recycled and reused.
When this crossed-out wheeled bin symbol is attached to a product it
means the product is covered by the European Directive 2002/96/EC.
Please inform yourself about the local separate collection system for
electrical and electronic products.
Please act according to your local rules and do not dispose of your old products with
your normal household waste. The correct disposal of your old product will help
prevent potential negative consequences for the environment and human health.
‘CONSUMERS SHOULD NOTE THAT NOT ALL HIGH
DEFINITION TELEVISION SETS ARE FULLY
COMPATIBLE WITH THIS PRODUCT AND MAY CAUSE
ARTIFACTS TO BE DISPLAYED IN THE PICTURE. IN
CASE OF 525 OR 625 PROGRESSIVE SCAN PICTURE
PROBLEMS, IT IS RECOMMENDED THAT THE USER
SWITCH THE CONNECTION TO THE ‘STANDARD
DEFINITION’ OUTPUT. IF THERE ARE QUESTIONS
REGARDING OUR TV SET COMPATIBILITY WITH THIS
MODEL 525p AND 625p DVD PLAYER, PLEASE
CONTACT OUR CUSTOMER SERVICE CENTER.’
4
This product incorporates copyright protection
technology that is protected by method claims of
certain U.S. patents and other intellectual property
rights owned by Macrovision Corporation and
other rights owners. Use of this copyright
protection technology must be authorized by
Macrovision Corporation, and is intended for
home and other limited viewing uses only unless
otherwise authorized by Macrovision Corporation.
Reserve engineering or disassembly is prohibited.
English ------------------------------------ 6
Français
Manufactured under license from Dolby
Laboratories. “Dolby” and the double-D
symbol are trademarks of Dolby Laboratories.
English
Index
Deutsch
Español
Manufactured under license under U.S.
Patent #’s: 5,451,942; 5,956,674; 5,974,380;
5,978,762; 6226,616; 6,487,535 & other U.S.
and worldwide patents issued & pending.
DTS is a registered trademark & the DTS
logos and Symbol are trademarks of DTS,
Inc. © 1996−2007 DTS, Inc. All Rights
Reserved.
HDMI, and HDMI logo and High-Definition
Multimedia Interface are trademarks or
registered trademarks of HDMI licensing LLC.
5
Table of contents
English
General
General Information ........................................................................................................ 8
Setup precautions.................................................................................................................................................8
Accessories supplied ...........................................................................................................................................8
Cleaning discs ........................................................................................................................................................8
About recycling .....................................................................................................................................................8
Your Product ..................................................................................................................... 9
BDP7100 Blu-ray Disc player ............................................................................................................................9
Product Overview
Main Unit ................................................................................................................... 10~11
Remote Control ........................................................................................................ 12~14
Preparing the remote control.........................................................................................................................14
Connections
Connect .......................................................................................................................15-19
Connect to the TV......................................................................................................................................15~17
Option 1 - HDMI (best quality) ..............................................................................................................15
Option 2 - HDMI to DVI (best quality) ................................................................................................15
Option 3 - Component video (good quality) ......................................................................................16
Option 4 - Composite video (standard quality) .................................................................................16
Option 5 - S-Video (standard quality) ..................................................................................................17
Connect to the audio system (optional) .............................................................................................17~19
Option 1 - Digital audio, optical connection (good quality) ..........................................................17
Option 2 - Digital audio, coaxial connection (good quality) ..........................................................18
Option 3 - 5.1 analog audio (standard quality) ...................................................................................18
Option 4 - Stereo analog audio (standard quality) ............................................................................19
Connect to the power outlet ........................................................................................................................19
Basic Setup
Set Up ........................................................................................................................ 20-28
Set the TV connection .................................................................................................................................... 20
Set the audio connection ............................................................................................................................... 20
On-Screen menu navigation .......................................................................................................................... 20
Open the Settings menu .................................................................................................................................21
Configure the languages ...........................................................................................................................21~22
Open the language menu .........................................................................................................................21
Change the preferred audio language ..................................................................................................21
Change the preferred subtitle language ............................................................................................. 22
Change the preferred disc menu language.......................................................................................... 22
Change the player language .................................................................................................................... 22
Configure the audio output ................................................................................................................... 22~24
Open the audio menu .............................................................................................................................. 22
Change the format of the digital audio signal ...................................................................................23
Enable PCM downsampling .....................................................................................................................23
Enable dynamic range compression .......................................................................................................23
Change the set up of your speakers .....................................................................................................24
6
Configure the video output ................................................................................................................... 24~26
Open the video menu ...............................................................................................................................24
Change the aspect ratio ...........................................................................................................................24
Enable 24fps (frame per second) .......................................................................................................... 25
Change the resolution ..............................................................................................................................26
Enable screen messages ...........................................................................................................................26
Configure the front display .....................................................................................................................26
About HDMI CEC (Consumer Electronics Control) .............................................................................27
Enable HDMI Setup ...................................................................................................................................27
Change the parental setup ............................................................................................................................. 28
Open the parental setup menu ............................................................................................................. 28
Enable the PIN ........................................................................................................................................... 28
Change the rating level ............................................................................................................................. 28
Change the PIN .......................................................................................................................................... 28
Playback Functions
Enjoy .......................................................................................................................... 29-33
Turn on the Blu-ray disc player .....................................................................................................................29
Load a disc ...........................................................................................................................................................29
Videos ...................................................................................................................................................................29
Play a title .....................................................................................................................................................29
Control titles ............................................................................................................................................. 30
Jump to the next or previous title ....................................................................................................... 30
Jump to the next or previous chapter ................................................................................................ 30
Jump to a point of time..............................................................................................................................31
Search through a chapter ........................................................................................................................31
Play a title in slow motion .......................................................................................................................31
Change the audio language ......................................................................................................................31
Change the camera angle .........................................................................................................................31
Change the subtitle language ..................................................................................................................31
Music .....................................................................................................................................................................32
Play a track ...................................................................................................................................................32
Control tracks ............................................................................................................................................32
Pictures ........................................................................................................................................................ 32~33
View a picture .............................................................................................................................................32
Start a slideshow ........................................................................................................................................32
Rotate a picture ..........................................................................................................................................33
Zoom in and out on a picture ................................................................................................................33
Set to stand-by ...................................................................................................................................................33
Others
Troubleshooting ....................................................................................................... 34~35
Specifications ...........................................................................................................36~37
Glossary..................................................................................................................... 38~39
7
English
Table of contents
General Information
English
WARNING!
This product does not contain any
user-serviceable parts. Please leave
all maintenance work to qualified
personnel.
Accessories supplied
– 1 Remote control with batteries
– 1 Audio/Video cable
– 1 Quick Start Guide
Setup precautions
Cleaning discs
Finding a suitable location
– Place this product on a flat, hard and
stable surface. Never place the product
on a carpet.
– Never place this product on top of
other equipment that might heat it up (e.
g., receiver or amplifier).
– Never put anything under this product
(e.g., CDs, magazines).
– Never place any equipment or heavy
objects on top of this product.
– Install this product near the AC outlet
where the AC power plug can be easily
reached.
Space for ventilation
– Place this product in a location with
adequate ventilation to prevent internal
heat build up. Allow at least 10 cm (4”)
clearance from the rear and the top of
this product and 5cm (2”) from the left
and right to prevent overheating.
Avoid high temperature, moisture,
water and dust
– This product must not be exposed to
dripping or splashing.
– Never place any object or items that
can damage this product (e.g., liquid filled
objects, lighted candles).
8
To clean a disc, use a micro fiber cleaning
cloth and wipe the disc from the centre
to the edge in a straight line.
CAUTION!
Never use solvents such as benzene,
thinner, commercially available cleaners,
or anti-static sprays intended for discs.
About recycling
These operating instructions have been
printed on non-polluting paper. The
electronic equipment contains a large
number of materials that can be recycled.
If you are disposing of an old machine,
please take it to a recycling centre.
Please observe the local regulations
regarding disposal of packaging materials,
exhausted batteries and old equipment.
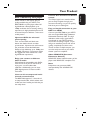
BDP7100 Blu-ray Disc player
Watch movies in the highest picture
quality available for your HDTV The
BDP7100 Blu-ray Disc player offers full
high-definition video playback up to
1080p resolution for an amazing viewing
experience. A highly detailed picture and
increased sharpness delivers a more trueto-life picture.
Upconvert DVDs for enhanced
picture quality
Your current DVDs will look even
better than before thanks to video
upconversion. Upconversion will increase
the resolution of standard definition
DVDs to high definition up to 1080p over
an HDMI connection. The picture will be
less jagged and more realistic for a near
high-definition experience.
Enjoy your content on different
kinds of media
Full backwards compatibility with DVDs,
CDs ensures that you can continue to
enjoy your current audio-video
collection. Additionally, you can view
JPEG digital pictures or listen to MP3
music files.
Intuitive User interface and Remote
control
The Philips logical user interface allows
you to easily navigate through your
content and settings, so you can quickly
find what you are looking for.
Easy and simple connection to your
HDTV via HDMI
Connect your BDP7100 to your HDTV
with one single HDMI (High Definition
Multimedia Interface) cable. The high
definition video output signal will be
transferred to your HDTV without
conversion to analogue signals, so you
will get an excellent picture and sound
quality, completely free from noise.
Thanks to other multiple outputs, you
can also easily connect to your home
theater system or amplifier.
About HDMI CEC (Consumer
Electronics Control)
HDMI CEC allows linked functions of this
player with HDMI CEC compliant TVs.
Note:
Philips does not guarantee 100%
interoperability with all HDMI CEC
devices.
Listen to rich uncompressed multichannel surround sound
The BDP7100 supports 5.1 channels of
uncompressed audio, which realizes realto-life sound and makes you feel that you
are really there.
9
English
Your Product
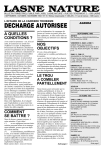
Main Unit
English
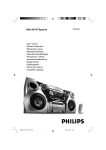
Front panel
a
b
c
d
e
k
a 2 STANDBY-ON
Turns on the player or turns off to
standby mode.
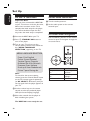
b Standby-on light
Shows the on/off status of the player.
y Off - Not connected to a power
supply
y Red - Stand-by mode
y Blue - On
c Disc tray
d OPEN/CLOSE ç
Opens and closes the disc tray.
e Front display
Shows information about the player and
the disc.
f Cover
Opens the user access panel.
10
jihg
f
g ë (Next/Forward)
y Videos, music, pictures - Next (short
press)
y Videos, music - Forward (long press)
h í (Previous/Rewind)
y Videos, music, pictures - Previous
(short press)
y Videos, music - Rewind (long press)
i x (Stop)
j B (Play)
k Video output lights
The video output lights show the video
output.
l mno
s
p
r
English
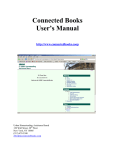
Main Unit (continued)
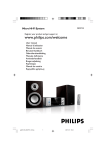
Back panel
q
l 5.1CH ANALOG AUDIO OUT
q DIGITAL AUDIO OUT - OPTICAL
Connects the audio output to an
amplifier.
Connects the audio output to an
amplifier.
m Stereo analogue audio sockets
r HDMI OUT
Connects the audio output to an
amplifier or TV.
Connects the video and audio signals to a
HDMI TV or HDTV.
n Composite VIDEO socket (CVBS)
s S-VIDEO socket
o COMPONENT OUT (YPbPr)
sockets
p DIGITAL AUDIO OUT - COAXIAL
Connects the audio output to an
amplifier.
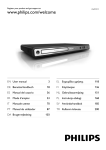
Display
b
a
e
d
c
a Title/Track indicator
c Disc type indicator
b Status indicator
d Video output resolution indicator
Shows the information about playing
time, clock and status.
e Play mode indicator
11
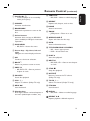
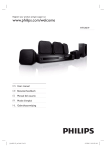
Remote Control
English
1
16
2
17
3
18
4
5
19
6
7
8
20
21
9
22
10
23
24
11
25
12
26
13
12
14
27
15
28
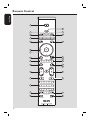
a Standby-On 2
y Turns the player on or to standby
mode (short press).
b CANCEL
Activates cancel action.
c BOOKMARK
Bookmarks a position or scene on the
disc.
d Colour buttons
Activates short cut keys on BD-ROM
(when available) or BD-Java’s interactive
operations.
e DISC MENU
y BD, DVD – Access disc menu.
f Cursor keys – Up, down, left and
right
Navigates on screen display and menu.
g OK
Confirms a choice or selection.
h BACK 2
Returns to previous screen or menu.
i PREV í
y BD, DVD, CD – Goes to previous
chapter or track.
j PAUSE II
Pauses disc playback.
k VOL +Adjusts TV volume. (Philips TV only)
l REW m
Scans backward.
m Number keys
Enter digits: Selects numbered options in
the menu (title/chapter numbers, etc.)
n SUBTITLE
y BD, DVD – Selects a subtitle language.
o REPEAT
Repeats title, chapter, track or disc.
p HOME
Access home menu.
q ZOOM
y JPEG picture – Zoom in or out.
r OPEN/CLOSE ç
Opens and closes the disc tray.
s INFO
Access information menu.
t TITLE MENU/POP-UP MENU
y BD – Access pop-up menu.
y DVD – Access title menu.
u PLAY B
Starts disc playback.
v NEXT ë
y BD, DVD, CD – Goes to next chapter
or track.
w STOP x
Stops disc playback.
x MUTE H
Mutes or restores the TV volume.
(Philips TV only)
y TV CH +Selects TV channel. (Philips TV only)
z FFW M
Scans forward.
AUDIO
y BD, DVD – Selects an audio language.
REPEAT A-B
Repeats playback a defined sequence.
13
English
Remote Control (continued)
Remote Control (continued)
English
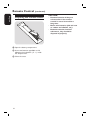
Preparing the remote control
A Open the battery compartment.
B Insert two batteries type R06 or AA,
following the indications (+-) inside
the compartment.
C Close the cover.
14
CAUTION!
y Remove batteries if they are
exhausted or if the remote
control is not to be used for a
long time.
y Never mix batteries (old and new
or carbon and alkaline, etc.).
y Batteries contain chemical
substances, they should be
disposed of properly.
Connect
This player is designed for high-definition
televisions (HDTV).
Need help?
Refer to the documentation that came
with your TV for information about:
y The devices that you can connect to
your TV.
y The type of cables that you can
connect to your TV.
English
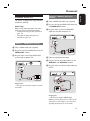
Option 2 - HDMI to DVI (best
quality)
Connect to the TV
A Take a HDMI-DVI cable (not supplied).
B Plug one end of the HDMI-DVI cable into
the HDMI OUT socket.
C Plug the other end of the HDMI-DVI
cable into the HD compliant TV.
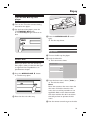
Option 1 - HDMI (best quality)
A Take a HDMI cable (not supplied).
2
3
B Plug one end of the HDMI cable into the
HDMI OUT socket.
1
HDTV
C Plug the other end of the HDMI cable
into the HD compliant TV.
D Take the supplied audio cable.
E Plug one end of the audio cable into the
AUDIO-L and AUDIO-R sockets.
F Plug the other end of the audio cable into
the TV.
2
3
1
5
HDTV
Helpful Hint:
– This type of connection requires no audio
connection.
6
4
HDTV
Helpful Hint:
– HD TV must support HDCP (High
definition content protection) in order for the
connection to work. Refer to your television
operating instructions for more details.
15
Connect (continued)
English
Option instructions
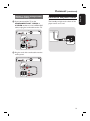
3 - Component
operating
for morevideo
details.(good
quality)
Note:
When a BD with Image Constraint Token
or Digital Only Token is played, the
output is disabled.
A Take a component video cable (not
Option 4 - Composite video
(standard quality)
A Take the supplied composite video cable.
B Plug one end of the composite video
cable into the VIDEO socket.
C Plug the other end of the composite
supplied).
video cable into the TV.
B Plug one end of the component video
cable into the Y, Pb and Pr sockets.
C Plug the other end of the component
video cable into the TV.
2
2
1
3
TV
3
1
D Take the supplied audio cable.
E Plug one end of the audio cable into the
TV
AUDIO-L and AUDIO-R sockets.
F Plug the other end of the audio cable into
D Take the supplied audio cable.
the TV.
E Plug one end of the audio cable into the
AUDIO-L and AUDIO-R sockets.
F Plug the other end of the audio cable into
5
the TV.
6
5
TV
6
TV
16
4
4
Option 5 - S-Video (standard
quality)
Connect to the audio system
(optional)
A Take an S-Video cable (not supplied).
B Plug one end of the S-Video cable into
the S-VIDEO socket.
C Plug the other end of the S-Video cable
into the TV.
Need help?
Refer to the documentation that came
with your audio system for information
about:
y The devices that you can connect to
your audio system.
y The type of cables that you can
connect to your audio system.
Option 1 - Digital audio, optical
connection (good quality)
2
A Take an optical audio cable (not supplied).
1
3
B Plug one end of the optical audio cable
into the OPTICAL socket.
C Plug the other end of the optical audio
TV
cable into the audio system.
D Take the supplied audio cable.
E Plug one end of the audio cable into the
AUDIO-L and AUDIO-R sockets.
F Plug the other end of the audio cable into
the TV.
2
1
3
5
6
4
TV
17
English
Connect (continued)
Connect (continued)
English
Option 2 - Digital audio, coaxial
connection (good quality)
Option 3 - 5.1 analogue audio
(standard quality)
A Take a coaxial audio cable (not supplied).
B Plug one end of the coaxial audio cable
into the COAXIAL socket.
C Plug the other end of the coaxial audio
A If you connected the TV to the
COMPONENT OUT, VIDEO or
S-VIDEO sockets or used a HDMI-DVI
cable, remove the audio cable between
the Blu-ray Disc player and the TV.
cable into the audio system.
2
1
3
1
TV
B Take the supplied audio cable.
C Take another two audio cables (not
supplied).
D Plug the three audio cables into the
5.1CH ANALOG AUDIO OUT
sockets.
E Plug the other ends of the three audio
cables into the audio system.
4
2
3
18
5
Option 4 - Stereo analogue audio
(standard quality)
A If you connected the TV to the
COMPONENT OUT, VIDEO or
S-VIDEO sockets or used a HDMI-DVI
cable, unplug the audio cable on the TV.
1
Connect to the power outlet
The Standby-on light on the front of the
player comes on as red.
AC
TV
B Plug the ends of the audio cable into the
audio system.
2
19
English
Connect (continued)
Set Up
English
Set the TV connection
Important Note:
After you have connected the BDP7100
to your TV and turn on for the first time,
follow the instructions on the TV to
complete the initial setup for this player.
You will not be able to open the disc
tray unless the initial setup is completed.
Set the audio connection
A Turn the audio system on.
B Set the audio system to the correct
external input.
On-screen menu navigation
A Connect the BDP7100 to your TV.
B Press 2 STANDBY-ON button to
turn on this player.
Use the following buttons on the remote
control to open and navigate through the
on-screen menus.
C Turn on your TV and set it to the
correct viewing channel. You should see
the { MENU LANGUAGE
SELECTION } appearing on the TV.
MENU LANGUAGE SELECTION
Press 1 for English
Pulsar 2 para Español
Touche 3 pour Français
Drücken Sie 4 für Deutsch
Premere 5 per Italiano
Druk op 6 voor Nederlands
Prima 7 para Português
Note:
To search for the correct viewing
channel, press the Channel Down button
on the TVs remote control repeatedly
(or AV, SELECT, ° button) until you
see the signal from the player appears on
your TV.
D Use the number keys on the remote
control to select the preferred player
OSD (On Screen Display) language.
E Wait a few seconds for the player to
finish initialising the system.
The BDP7100 is now ready for use.
20
Action
Go up or down in a
list
Move a cell in the
list
Confirm a selection
Button
cursor keys:
up/down
cursor keys:
left/right
OK
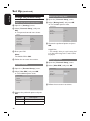
Open the Settings menu
With the Settings menu, you can change
the set up of this player.
A Press the HOME button on the remote
control.
Î The home menu shows.
English
Set Up (continued)
Configure the languages
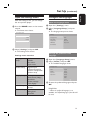
Open the language menu
A Open the { Settings } menu.
B Select { Language Setup } and press
OK.
Î The language setup menu shows.
Blu-ray Disc player
Settings
Disc
Video
Language Setup
Audio
Pictures
Audio Setup
Subtitle
Settings
Display Setup
Disc menu
HDMI Setup
Player menu
Music
Parental Setup
B Select { Settings } and press OK.
Î The settings menu shows.
Settings menu overview
Language
Setup
Audio Ssetup
Display Setup
Audio
Subtitle
Disc menu
Player menu
Digital output
PCM downsampling
Dynamic compression
Speaker setup
TV shape
Movie frame (24fps)
Resolution
Screen message
Front display
HDMI Setup
HDMI CEC
Format
Parental Setup
Use PIN
Rating level
New PIN
Change the preferred audio
language
A Open the { Language Setup } menu.
B Select { Audio } and press OK.
Î The available languages show.
Language setup
Audio
Original
Subtitle
English
Disc menu
Français
Player menu
Deutsch
Español
Italiano
C Choose the preferred language and press
OK.
Helpful Hint:
– When the preferred language is not
available, the default language of the disc will
be used.
21
Set Up (continued)
English
Change the preferred subtitle
language
A Open the { Language Setup } menu.
B Select { Subtitle } and press OK.
Î The available languages show.
Change the player language
A Open the { Language Setup } menu.
B Select { Player menu } and press OK.
Î The available languages show.
Language setup
Language setup
Audio
English
Audio
Automatic
Subtitle
Español
Subtitle
English
Disc menu
Français
Disc menu
Français
Player menu
Deutsch
Player menu
Deutsch
Italiano
Español
Nederlands
Italiano
C Choose the preferred language and press
C Choose the preferred language and press
OK.
OK.
Helpful Hint:
– When the preferred language is not
available, the default language of the disc
will be used.
Configure the audio output
Open the audio menu
Change the preferred disc menu
language
A Open the { Language Setup } menu.
B Select { Disc menu } and press OK.
Î The available languages show.
Language setup
B Select { Audio Setup } and press OK.
Î The audio setup menu shows.
Settings
Language Setup
Digital output
Audio Setup
PCM downsampling
Display Setup
Dynamic compression
Speaker setup
Audio
English
HDMI Setup
Subtitle
Français
Parental Setup
Disc menu
Deutsch
Player menu
Español
Italiano
Nederlands
C Choose the preferred language and press
OK.
Helpful Hint:
– When the preferred language is not
available, the default language of the disc
will be used.
22
A Open the { Settings } menu.
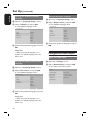
Change the format of the digital
audio signal
Option
On
If the format of the digital
audio signal is 96 kHz
PCM, the audio is
downsampled to 48 kHz.
Off
Regardless of the sampling
frequency of the digital
audio signal, the audio is
never downsampled.
A Open the { Audio Setup } menu.
B Select { Digital output } and press OK.
Î The available options show.
Audio setup
Digital output
PCM
PCM downsampling
Bitstream
Description
Dynamic compression
Speaker setup
Enable dynamic range compression
A Open the { Audio Setup } menu.
C Choose the preferred option and press
OK. See ‘Audio Output’ on Specification
chapter for details.
Option
PCM
Description
The format of the digital
audio signal is PCM.
B Select { Dynamic compression } and
press OK.
Î The available options show.
Audio setup
Digital output
On
PCM downsampling
Off
Dynamic compression
Bitstream
The format of the digital
audio signal is bitstream.
Enable PCM downsampling
A Open the { Audio Setup } menu.
B Select { PCM downsampling } and
press OK.
Î The available options show.
Audio setup
Digital output
On
PCM downsampling
Off
Speaker setup
C Choose the preferred option and press
OK.
Option
Description
On
The dynamic range
compression is enabled.
Off
The dynamic range
compression is disabled.
Dynamic compression
Speaker setup
C Choose the preferred option and press
OK.
23
English
Set Up (continued)
Set Up (continued)
English
Change the set up of your speakers
Configure the video output
A Open the { Audio Setup } menu.
B Select { Speaker setup } and press OK.
Open the video menu
Audio setup
A Open the { Settings } menu.
Digital output
B Select { Display Setup } and press OK.
Î The display setup menu shows.
PCM downsampling
Dynamic compression
Settings
Speaker setup
C Select the speakers to change and press
OK.
Option
Front
Centre
Rear
Subwoofer
TV shape
Audio Setup
Movie frame (24fps)
Display Setup
Resolution
HDMI Setup
Screen message
Parental Setup
Front display
Description
Choose between
large or small
speakers.
Choose between no
speaker, a large or a
small speaker.
Choose between no
speakers, large or
small speakers.
Choose between on
or off. Available when
front speakers are set
to large.
D Change the size of your speakers and
press OK.
Helpful Hint:
– When the front speakers are set to large
and the subwoofer is on, the subwoofer is
used for the output of bass sounds (below
100 Hz). Set the subwoofer to off for output
of the bass sounds through the front
speakers.
24
Language Setup
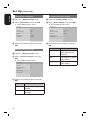
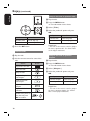
Change the aspect ratio
A Open the { Display Setup } menu.
B Select { TV shape } and press OK.
Î The available options show.
Display setup
TV shape
4:3 Letterbox
Movie frame (24fps)
4:3 Panscan
Resolution
16:9 Widescreen
Screen message
Front display
C Choose the preferred option and press
OK.
Option
4:3 Letterbox
4:3 Panscan
16:9
Widescreen
A
Description
The TV shape is 4:3.
The top and bottom
parts of widescreen
images show black
bars. Refer to A.
The TV shape is 4:3.
The left and right
parts of widescreen
images do not show.
Refer to B.
The TV shape is 16:9
(widescreen). Refer
to C.
Enable 24fps (frame per second)
Movies are usually filmed at 24fps.
It only applies to TV which can support
24fps. If your TV does not support this
frame rate, this menu cannot be selected.
Setting the 24fps feature to { On }
enables the 24fps for smooth movement
in Blu-ray disc film material video. This
menu can only be selected in 1080i or
1080p HDMI output resolution mode.
A Open the { Display Setup } menu.
B Select { Movie frame (24fps) } and
press OK.
Î The available options show.
Display setup
TV shape
On
Movie frame (24fps)
Off
Resolution
Screen message
Front display
B
C Choose the preferred option and press
OK.
Option
C
Description
On
Enables 24fps output.
Off
Disable 24fps output.
25
English
Set Up (continued)
Set Up (continued)
English
Change the resolution
Configure the front display
A Open the { Display Setup } menu.
A Open the { Display Setup } menu.
B Select { Resolution } and press OK.
B Select { Front display } and press OK.
Î The available options show.
Display setup
Î The available options show.
Display setup
TV shape
1080p
TV shape
Automatic
Movie frame (24fps)
1080i
Movie frame (24fps)
Dim
Resolution
720p
Resolution
Bright
Screen message
576p/480p
Screen message
Front display
576i/480i
Front display
C Choose the preferred option and press
OK.
C Choose the preferred option and press
OK.
Enable screen messages
Option
Low brightness of the
front display during
playback.
Dim
Low brightness of the
front display.
Bright
High brightness of the
front display.
A Open the { Display Setup } menu.
B Select { Screen message } and press
OK.
Î The available options show.
Display setup
TV shape
On
Movie frame (24fps)
Off
Resolution
Screen message
Front display
C Choose the preferred option and press
OK.
Option
26
Description
On
The screen messages are
enabled.
Off
The screen messages are
disabled.
Description
Automatic
About HDMI CEC
(Consumer Electronics
Control)
HDMI CEC allows linked functions of this
player with HDMI CEC compliant TVs.
Connect the Blu-ray player to a HDMI
CEC complaint TV with a HDMI cable.
Enable HDMI Setup
A Open the { Settings } menu.
B Select { HDMI Setup } and press OK.
Î The HDMI setup menu shows.
Settings
Language setup
HDMI CEC
Audio setup
Format
Display setup
HDMI Setup
D Choose the preferred option and press
OK.
Option
Description
On
The HDMI CEC enable.
Off
The HDMI CEC disabled.
If HDMI CEC is set to { On }:
y When the player is turned on, the
HDMI CEC compliant TV will be
turned on automatically and switch to
HDMI mode.
y The connected HDMI CEC compliant
TV can be turn off by press and hold
the 2 button on the Blu-ray player
remote control.
Note:
Philips does not guarantee 100%
interoperability with all HDMI CEC
devices.
Parental setup
C Select { HDMI CEC } and press OK.
Î The HDMI CEC menu shows.
HDMI Setup
HDMI-CEC
On
Off
27
English
Set Up (continued)
Set Up (continued)
English
Change the parental setup
Change the rating level
A Open the { Parental Setup } menu.
Open the parental setup menu
A Open the { Settings } menu.
B Select { Parental Setup } and press
OK.
Î The parental control menu shows.
B Select { Rating level } and press OK.
Î The available options show.
Parental Setup
Use PIN
8 (Adults)
Rating level
7
New PIN
6
Settings
5
4
Language Setup
Use PIN
Audio Setup
Rating level
Display Setup
New PIN
3
C Choose the preferred option and press
HDMI Setup
Parental Setup
OK.
C Enter your PIN.
Note:
The default PIN is 0000.
D Follow the on-screen instructions.
Helpful Hint:
– For example, when you set the rating level
to 6, discs with rating levels 7 and 8 cannot
be played.
Change the PIN
A Open the { Parental Setup } menu.
Enable the PIN
B Select { New PIN } and press OK.
A Open the { Parental Setup } menu.
Parental Setup
B Select { Use PIN } and press OK.
Use PIN
Î The available options show.
Enter new PIN
Rating level
New PIN
Parental Setup
Use PIN
On
Rating level
Off
New PIN
C Follow the on-screen instructions.
C Choose the preferred option and press
OK.
Option
28
Description
On
The PIN is enabled.
Off
The PIN is disabled.
English
Enjoy
Turn on the Blu-ray disc
player
A Turn on the TV to the correct viewing
channel for this player.
B On the front of the player, press the
2 STANDBY-ON button.
Î The Standby-on light comes on as
blue.
C Press the OPEN/CLOSE ç button
again.
Î The disc tray closes.
Videos
Play a title
A Turn on the Blu-ray disc player.
Load a disc
Before you load a disc into the Blu-ray
Disc player, make sure that the disc type
is supported. See ’Playable discs’ on
Specifications chapter.
A Press the OPEN/CLOSE ç button.
B Load the video disc.
Î The home menu shows.
Blu-ray Disc player
Disc
Video
Music
Pictures
Settings
Î The disc tray opens.
C From the home menu, select { Video }.
Î The title list shows.
B Place the disc in the disc tray.
Note:
Discs that contain a disc menu show the
disc menu. If the disc contains a disc
menu, the rest of the procedure is not
applicable. Refer to the documentation
that came with the disc for instructions
that tell you how to operate the disc
menu.
D Use the remote control to go to the title.
29
Enjoy (continued)
English
Jump to the next or previous title
A Play the title.
B Press the INFO button.
Î The information menu shows.
C Select { Title }.
D Select the preferred option and press
OK.
Option
Action
Button
Previous title
cursor key: up
Next title
cursor key: down
cursor key: left
Next title
cursor key: right
Helpful Hint:
– You can use the remote control to jump to
the next or previous title. See ‘Control titles’
on the left for instructions.
E Press the OK button.
Control titles
A Play the title.
B Use the remote control to control the
title.
Jump to the next or previous
chapter
A Play the title.
Action
Button
C Select { Chapter }.
Pause the title
D Select the preferred option and press
Stop the title
OK.
Jump to the previous
title/chapter
Option
Jump to the next
title/chapter
Repeat the title/
chapter
Button
Previous chapter
cursor key: left
Next chapter
cursor key: right
Helpful Hint:
– You can use the remote control to jump to
the next or previous chapter. See ‘Control
titles’ on the left for instructions.
Repeat a defined
selection
Bookmark a point on
the disc and press
OK to confirm.
B Press the INFO button.
Î The information menu shows.
Play/restart the title
30
Button
Previous title
Î
Enjoy (continued)
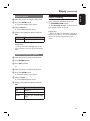
Change the audio language
A Play the title.
A Play the title.
B Press the INFO button.
B Press the AUDIO button.
Î The Information menu shows.
Î The on-screen display shows.
C Select { Playing time }.
C Select the audio language.
D With the number keys, enter the point of
D Press OK.
time.
Action
E Press OK.
Search through a chapter
When you search through a chapter, the
audio is muted.
B Go to the chapter.
cursor key: up
Down
cursor key: down
Change the camera angle
A Play a title.
C Set the speed.
B Press the POP-UP MENU button.
Button
Î The disc menu shows.
C Select { Angle }.
Search forwards
Î If this is unable to activate angle
option, refer to the instruction that
comes with the disc for more details.
Search backwards
Play a title in slow motion
When you play a title in slow motion, the
audio is muted. For Blu-ray discs, only
jump slow forward is possible.
Change the subtitle language
A Play the title.
B Press the SUBTITLE button.
Î The on-screen display shows.
A Pause the title.
C Select the subtitle language.
B Set the speed.
Action
Button
Up
This feature is not applicable to all video
discs.
A Play the title.
Action
English
Jump to a point of time
Button
D Press OK.
Action
Slow forward
Button
Up
cursor key: up
Down
cursor key: down
31
Enjoy (continued)
English
Helpful Hint:
– The player automatically switches to stop
mode if pausing playback for more than 5
minutes. When you press PLAY button, the
track will playback from the beginning.
Music
Play a track
A Turn on the Blu-ray disc player.
B Load the audio disc.
Pictures
Î The home menu shows.
C From the home menu, select { Music }.
Î The music list shows.
D Use the remote control to go to the
track.
View a picture
A Turn on the Blu-ray disc player.
B Load the disc.
Action
Button
Next track
cursor key: up
Previous track
cursor key: down
Î The home menu shows.
C From the home menu, select { Picture }.
Î The picture list shows.
D Use the remote control to go to the
E Press OK.
picture.
E Press OK.
Control tracks
Start a slideshow
A Play the track.
B Use the remote control to control the
track.
B Press the INFO button.
Action
Button
Î The information menu shows.
Play/restart the
track
C Select { Slideshow }.
Pause the track
D Choose the preferred speed and press
Î The available options show.
OK.
Stop the track
Play the previous
track
Play the next track
32
A View the first picture of the slideshow.
Repeat the track
(1x)
Repeat the audio
disc
(2x)
Play the tracks in
random order
(3x)
Rotate a picture
Set to stand-by
A View the picture or stop the slide show.
B Press the INFO button.
Î The information menu shows.
C Select { Rotate }.
z On the front of the player, press the
2 STANDBY-ON button.
Î The Standby-on light on the front of
your player comes on as red.
Î The available options show.
D Choose the preferred option and press
OK.
Option
Rotate
Description
cursor keys: up/down
Helpful Hint:
– When the player is switched to stand-by, it
still uses some power. To turn the player off,
remove the power cord from the power
outlet.
Helpful Hint:
– You can use cursor left/right keys of the
remote control to move to the previous/next
slide.
Zoom in and out on a picture
A View the photo or stop the slide show.
B Press ZOOM button.
C Press OK to zoom.
or
A View the photo or stop the slide show.
B Press the INFO button.
Î The information menu shows.
C Select { Zoom }.
Î The available options show.
D Choose the preferred option and press
OK.
Option
Description
On
Zoom in
Off
Normal size (100%)
Scroll
cursor keys: up/down/left/
right
33
English
Enjoy (continued)
Troubleshooting
English
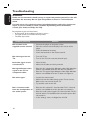
WARNING!
Under no circumstances should you try to repair this product yourself, as this will
invalidate the warranty. Do not open this product as there is a risk of electric
shock.
If a fault occurs, first check the points listed below before taking this product for
repair. If you are unable to solve a problem by following these instructions,
consult your dealer or Philips for help.
Be prepared to give this information:
– A description of the problem and when it occurs
– The type number on the label of the product
– The date of purchase
Problem (General)
Solution
No reaction to the
supplied remote control.
– Connect the player to the power outlet.
– Point the remote control directly at the sensor of the
player.
– Insert the batteries correctly.
– Insert new batteries in the remote control.
No video signal on the
TV.
– Turn the TV on.
– Turn on the TV to the correct external input.
Bad video signal on the
connected TV.
– Clean the disc.
– Make sure all cables are firmly inserted.
No high-definition video
signal on the TV via
component video.
– Does the disc contain high-definition video? High-definition
video is not available when the disc does not contain it.
– Does the TV support high-definition video? High-definition
video is not available when the TV does not support it.
No audio signal.
– Increase the volume level.
– Make sure that the audio settings of the TV are correct.
Refer to the user manual of your TV.
– Try another track or the disc.
No 5.1-channel audio
from the loudspeakers of
the audio system.
– Does the disc contain 5.1-channel audio? The 5.1-channel
audio is not available when the disc does not contain it.
– Does the audio system support 5.1-channel audio? The 5.1channel audio is not available when the audio system does
not contain it.
– In the ‘Settings’ menu, set Digital out to PCM.
34
Problem (General)
Solution
Cannot play a disc.
– Make sure that the Blu-ray Disc player supports the disc
type.
– Make sure that the Blu-ray Disc player supports the region
code of the DVD or BD.
– Clean the disc.
Red cross in the upper
right hand corner of the
screen.
– The operation is not possible.
Cannot find a JPEG file.
– Make sure that the selected folder does not contain more
than 1500 files. Only the first 1500 files are shown.
– Make sure that the file extension is .jpg, .JPG, .jpeg or
.JPEG.
Cannot find an MP3 file.
– Make sure that the selected folder does not contain more
than 1500 files. Only the first 1500 files are shown.
– Make sure that the file extension is .mp3 or .MP3
The player gives no
response to any control.
– Press and hold the 2 STANDBY-ON button for 5
seconds to set the player to stand-by.
35
English
Troubleshooting (continued)
Specifications
English
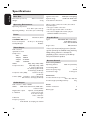
Main Unit
Dimensions (w x d x h):
Weight:
430 x 319 x 79 mm
4.3 kg
Operating Environment
Operating temperature:
41 to 104 °F (+5 to 40 °C)
Operating humidity: 10 to 75 % (non-condensing)
Signal-to-noise ratio:
Dynamic range:
120dB (None Weighting)
103dB with DVD Video
Total harmonic distortion:
0.004%
When you play a video from a disc, the audio is
dependent upon:
y The type of audio connection
y The disc type and the audio on the disc
y The selected digital audio format (only for
S/PDIF and HDMI connections)
Power
Mains power:
220~230 V, 50 Hz
STANDBY-ON switch:
Power consumption:
29 W (< 1.1 W stand-by)
Standby-On light:
Red/blue
Playable Discs
Types
Region codes
Video Output
D/A convertor:
Quatization: 12 bit
Sample rates:
- 480i :
54MHz
- 480p60: 108MHz
- 720p60: 74.25MHz
- 1080i:
74.25MHz
HDMI:
480p, 720p, 1080i, 1080p
Component video:
480i, 480p, 720p, 1080i
Y: 1.0 Vp-p (75 Ω load),
Pb: 0.70 Vp-p (75 Ω load),
Pr: 0.70 Vp-p (75 Ω load)
Composite video (480i):
1 channel: 1.0 Vp-p
(75 Ω load)
S-Video (480i): Luminance: 1.0 Vp-p (75 Ω load),
Chrominance: 0.3 Vp-p (75 Ω load)
Audio Output
D/A converter : 24bit / 192kHz
HDMI:
PCM multi-channel audio, PCM audio,
bitstream audio
Digital audio output:
Optical, coaxial (S/PDIF)
5.1-Channel:
Front and rear left,
front and rear right,
centre, subwoofer
2-Channel:
Left, right
Frequency response:
4 Hz~44 kHz at sampling rate 96 kHz
36
BD-ROM/R*/RE*, DVD-Video,
DVD-R/RW (Video),
Audio CD, CD-R/RW
BD: B; DVD: 2
* Due to the intentional progression of the Bluray Disc format by its standard setting authority,
Philips cannot guarantee or warrant the
playability of future extensions of the Blu-ray
Disc format with this product.
Remote Control
Infra-red capabilities
Operating distance
Transmitting LEDs
Carrier frequency range
Transmission angle
6000 mm (maximum)
1
36 kHz
± 15 degrees
Dimensions
Product dimensions (w x d x h)
237 x 46 x 24.5 mm
Product weight (excluding batteries)
176 g
Power
Number of batteries
Battery type
2
AA
Specifications (continued)
English
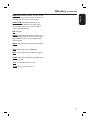
PRODUCT IS COMPATIBLE WITH THE
FOLLOWING CURRENT FORMATS:
y BD-ROM/R*/RE*
y DVD-Video, DVD-R/RW (Video),
y Audio CD, CD-R/RW
PRODUCT WILL NOT PLAY DISCS WITH
THE FOLLOWING FORMATS:
y HD DVD
y Any other
* Due to the intentional progression of the
Blu-ray Disc format by its standard setting
authority, Philips cannot guarantee or
warrant the playability of future extensions
of the Blu-ray Disc format with this product.
Notes:
– Specifications are subject to change
without prior notice.
– Weight and dimensions are approximate.
37
Glossary
English
AUDIO-CD: Audio CD.
BD: Blu-ray Disc.
BD-R: BD Recordable. You can record a
BD-R once and you cannot erase it.
BD-RE: BD Rewritable. You can record a
BD-RE over and over again. For example, you
can use a BD-RE to make sequential back-ups.
BD-ROM: BD Read Only Memory.
A BD-ROM contains recorded data. For
example, high-definition videos.
CD: Compact Disc.
CD-R: CD Recordable. You can record a
CD-R once and you cannot erase it. For
example, you can use it to archive data.
CD-RW: CD Rewritable. You can record a
CD-RW over and over again. For example,
you can use a CD-RW to make sequential
back-ups.
Chapter: Sections of a video or a music
track.
CVBS: Composite video. A type of video
signal.
Dolby Digital: A surround sound system
developed by Dolby Laboratories containing
up to six channels of digital audio (front left
and right, surround left and right, centre and
subwoofer).
38
Dolby Digital Plus: The next-generation
audio technology that delivers ‘better-thanDVD’ sound for all high-definition media
providing up to 7.1 channels of audio. It is for
the future, but remains fully compatible with
existing Dolby Digital home entertainment
systems.
Dolby TrueHD: Dolby’s next-generation
lossless technology developed for highdefinition disc-based media that delivers true
high-definition sound, while providing up to
7.1 channels of lossless audio that is bit-for-bit
identical to the studio master.
DTS: Digital Theater Systems. This is a
surround sound system, but it is different
from the Dolby Digital. The formats were
developed by different companies.
DTS-HD High Resolution Audio: Offers
sound quality significantly better than current
DVD, providing up to 7.1 channels of audio
and secondary audio streams. It is also fully
compatible with existing DTS capable home
entertainment systems.
DVD: Digital Versatile Disc.
DVD-VIDEO: DVD Video.
Glossary (continued)
English
DVD+/-R: DVD Recordable. You can record
a DVD+/-R once and you cannot erase it. For
example, you can use it to archive data.
DVD+/-RW: DVD Rewritable. You can
record a DVD+/-RW over and over again.
For example, you can use a DVD+/-RW to
make sequential back-ups.
GB: Gigabyte.
HDMI: High Definition Media Interface. It is a
direct digital connection that can carry digital
high-definition video as well as digital multichannel audio.
JPEG: Data compression standard for digital
images.
kbps: Kilobit per second (1000 bit/s).
MP3: Data compression standard for digital
audio.
PCM: Pulse Code Modulation. A digital audio
encoding system.
Title: A complete video on a disc.
Track: A music track on a disc.
39
Meet Philips at the Internet
http://www.philips.com/welcome
BDP7100
CLASS 1
LASER PRODUCT
AK68-01471A
Sgpjp-0735/12-1