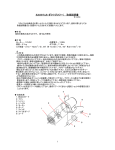
1
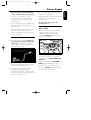
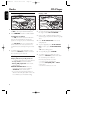
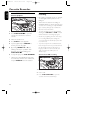
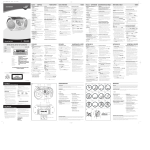
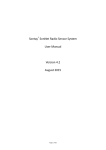
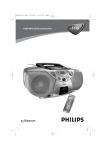
AZ1080/01
03/07/02 11:31
Page 1
CD Soundmachine
1080
AZ 1081
AZ
Audio
AZ1080/01
03/07/02 11:31
Page 2
Index
English
English ________________________________________________6
Français
Français______________________________________________14
Español
Español ______________________________________________22
∑
∑ __________________________________________________30
Guarantees
å Australia __________________________________________38
∫ Brasil _____________________________________________39
µ México ________________________________________40-41
ˆ New Zealand______________________________________42
2
Page 3
3 4 1
5
English
2
Français
1
AZU1N0DM8A0CHINE
IBLE
LE CO M PAT
TO
WRITAB
OPE N
C D SO
CD RE
LI F T
TUNING
T O O PE N
E
PA U S
STOP
SEARC
N
• OPE
H
CH
P L AY
VOL
UM
E
REPEAT
CK
CD TRA
ST
O
P
SHUFFLE
R
SEA CH
AT
PE
Español
CD
MW
FM
TAP F
OF
SEAR
RE
T
S BOOS
IC BAS
AM
N
DBB
X
E
REFL
BASS YSTEM
RS
SPEAKE
6 7
8
9 0 !
∑
L IF T
DY
03/07/02 11:31
Y/ PAUSE
P LA
AZ1080/01
@
#
$
A C M AI N S ~
%
^
3
AZ1080/01
03/07/02 11:31
Page 6
Controls
English
Top and front panels
1 LIFT TO OPEN – opens/ closes the CD
door
2 Source selector: CD, AM (MW), FM,
TAPE/OFF
– selects CD source of sound, tuner
waveband or tape source of sound
– power on/ off switch
3 CASSETTE RECORDER:
PAUSE ; – pauses recording or playback
STOP•OPEN 9/ – stops the tape; opens
the cassette door
SEARCH 5 or 6 – fast rewinds / winds
the tape
Power Supply
Back Panel
13 Telescopic aerial – to improve FM
reception
14 Battery door – open to insert 6 x 1.5V
R14/UM2/ C-cell batteries
15 AC MAINS – inlet for mains lead
16 Voltage selector – (inside the battery
compartment, not all versions) adjust the
selector to match the local mains.
Disconnect the mains lead if this selector
has to be reset.
Power Supply
Whenever convenient, use the power
supply if you want to conserve battery life.
PLAY 1 – starts playback
A C M AI N S ~
RECORD 0 – starts recording
4 CD display – shows the CD functions
5 TUNING
6 x 1.5V R14/ UM2/ C CELL
6 PLAY•PAUSE 2; – starts or pauses CD
playback
7 STOP 9 – stops CD playback
8 SEARCH ∞ , §
CD: skips or searches a passage/track
backwards or forward
9 DBB (Dynamic Bass Boost) –
enhances bass response
10 REPEAT – repeats a track/CD
11 SHUFFLE – plays all CD tracks in
random order
12 VOLUME – adjusts volume level
6
Make sure you remove the plug from the
set and wall socket before inserting
batteries.
Batteries (not included)
1 Open the battery compartment and insert
six batteries, type R-14, UM-2 or C-cells,
(preferably alkaline) with the correct
polarity as indicated by the "+" and "–"
symbols inside the compartment.
2 Close the compartment door, and make
sure the batteries are firmly and correctly in
place.The set is now ready to operate.
AZ1080/01
03/07/02 11:31
Page 7
Batteries contain chemical substances,
so they should be disposed of properly.
4 To switch off completely, unplug the mains
lead from the wall socket.
Incorrect use of batteries can cause
electrolyte leakage and will corrode the
compartment or cause the batteries to
burst.Therefore:
• Unplug the mains lead from the wall socket
to protect your set during heavy
thunderstorms.
~
WRITAB
IBLE
LE CO MPAT
LI F T
TUNING
L IF T
T O O PE N
CD
MW
FM
TAP F
OF
E
PA U S
N
• OPE
STOP
SEARC
H
SEAR
P L AY
CH
VOL
UM
E
REPEAT
CK
CD TRA
ST
O
SHUFFLE
R
SEA CH
AT
PE
S BOOS
IC BAS
AM
N
T
DY
A
AZU1N0DM8A0CHINE
C D SO
CD RE
P
1 Check if the mains voltage, as shown on
the type plate located on the bottom
of the set, corresponds to your local
power supply. If it does not, consult your
dealer or service centre.
OPE N
Using AC Mains
Whether you are using mains or battery
supply, to avoid unnecessary energy
consumption always adjust the source
selector to TAPE/OFF and check if the
cassette keys are released.
TO
• Remove the batteries if the set is not to be
used for a long time.
Switching power on/off:
Save energy
RE
• When inserting new batteries, do not try to
mix old batteries with the new ones.
The type plate is located on the
bottom of the set.
Y/ PAUSE
P LA
• Do not mix battery types: e.g. alkaline with
carbon zinc. Only use batteries of the same
type for the set.
DBB
General operation
1 To select your sound source adjust the
source selector to CD, AM (MW), FM or
TAPE/OFF.
2 Connect the mains lead to the AC MAINS
inlet and the wall socket.The power supply
is now connected and ready for use.
3 If your set is equipped with a voltage
selector, located inside the battery
compartment, adjust the selector to match
the local mains. Disconnect the mains lead if
this selector has to be reset.
2 Adjust the sound with the VOLUME and
DBB (Dynamic Bass Boost) controls.
3 To switch off the set, adjust the source
selector to TAPE/OFF position and check
the cassette keys are released.
7
English
Power Supply
AZ1080/01
03/07/02 11:31
Page 8
Radio
CD-Player
English
Radio reception
Playing a CD
AZU1N0DM8A0CHINE
CD RE
IBLE
LE CO M PAT
TO
WRITAB
LI F T
OPE N
TUNING
TO
CD R
AT IB L E
BLE COMP
EWRITA
OPE N
C D SO
AZU1N0DM8A0CHINE
C D SO
LI F T
TUNING
L IFT
L IF T
T O O PE N
CD
MW
FM
TAP F
OF
E
PA U S
STOP
N
• OPE
SEARC
H
SEAR
CH
T O O PE N
CD
MW
FM
TAP F
OF
P L AY
E
PA U S
STOP
•
OPEN
SEARC
H
SEAR
VOL
UM
E
VOL
UM
E
REPEAT
RE
AT
PE
DY
SHUFFLE
N
AT
PE
S BOOS
IC BAS
AM
N
DBB
T
S BOOS
IC BAS
AM
R
SEA CH
T
R
SEA CH
PROGRAM
ST
O
RE
P
SHUFFLE
DY
REPEAT
CK
CD TRA
ST
O
P
Y/ PAUSE
P LA
CK
CD TRA
Y/ PAUSE
P LA
P L AY
CH
DBB
1 Adjust the source selector to AM (MW)
or FM to select your desired waveband.
2 Turn TUNING to tune to a radio station.
To improve reception
– For FM, pull out the telescopic aerial. Incline
and turn the aerial. Reduce its length if the
signal is too strong (very close to a transmitter).
– For AM (MW) the set is provided with a
built-in aerial so the telescopic aerial is not
needed. Direct the aerial by turning the whole
set.
3 To switch off the radio, adjust the source
selector to TAPE/OFF position and check
the cassette keys are released.
CD Player
Display indication for CD functions:
– --: flashes when CD source just selected
– In stop mode: total track number
– During CD playback: 2 and current
track number
REPEAT/ REPEAT ALL: when the
respective repeat mode is activated
– : SHUFFLE when shuffle active
– Er: no disc/ error in CD operation or
with the CD/ CD-(R) is blank or the disc
is not finalised (see Troubleshooting)
8
1 Adjust the source selector to CD.
2 To open the CD door, lift the CD door at
the edge marked LIFT TO OPEN.
3 Insert a CD or CD-(R) with the printed
side facing up and press the CD door gently
close.
4 Press PLAY•PAUSE 2; on the set to
start playback.
5 To pause playback press PLAY•PAUSE
2;.To resume, press PLAY•PAUSE 2;
again.
➜ 2 flashes during pause
6 To stop CD play, press STOP 9.
7 To switch off the set, adjust the source
selector to TAPE/OFF position and check
the cassette keys are released.
Note: CD play will also stop when:
– you open the CD compartment;
– you select AM (MW), FM or TAPE
sound source;
– the CD has reached to the end.
AZ1080/01
03/07/02 11:31
Page 9
Selecting a different track
During playback you can use the
SEARCH buttons to select a particular
track.
AZU1N0DM8A0CHINE
C D SO
OPE N
W
TO
CD RE
CO M PATIB LE
RITABLE
LI F T
TUNING
L IFT
T O O PE N
CD
MW
FM
TAP F
OF
E
PA U S
N
• OPE
STOP
SEARC
H
SEAR
CH
P L AY
VOL
UM
E
English
CD-Player
Repeat play modes
REPEAT can be selected or changed
during playback in the following sequence:
REPEAT – plays the current track
continuously
REPEAT ALL – plays the entire CD
continuously
AZUNDMACHINE
WRITAB
IBLE
LE CO MPAT
TO
CD RE
OPE N
CK
CD TRA
LI F T
ST
O
TUNING
P
SHUFFLE
RE
Y/ PAUSE
P LA
C D SO
REPEAT
R
SEA CH
AT
PE
DY
T
S BOOS
IC BAS
AM
N
L IF T
T O O PE N
CD
MW
FM
TAP F
OF
E
PA U S
STOP
N
• OPE
SEARC
H
SEAR
P L AY
CH
VOL
UM
E
DBB
REPEAT
ST
O
P
SHUFFLE
RE
Y/ PAUSE
P LA
CK
CD TRA
R
SEA CH
DY
T
• If you have selected a track number in the
stop or pause position, press
PLAY•PAUSE 2; to start playback.
AT
PE
S BOOS
IC BAS
AM
N
DBB
• Press SEARCH § once briefly for the
next track, or press repeatedly until the
desired track number appears in the display.
1 During playback, press REPEAT once or
more until the desired REPEAT mode is
shown.
• Press SEARCH ∞ once briefly to return
to the beginning of a current track.
• You can use SEARCH ∞ or § to skip
tracks during the repeat modes.
• Press SEARCH ∞ more than once briefly
for a previous track.
• The REPEAT play options can be
combined and used with shuffle: e.g.
REPEAT ALL SHUFFLE– repeats the
entire CD in random order.
Finding a passage within a track
1 During playback, press and hold down
SEARCH ∞ or §.
• The CD is played at high speed and low
volume.
2 When you recognize the passage you want
release the SEARCH button.
➜ Normal playback resumes.
Note:When searching within a final track and
you reach the end of the last track, the CD
goes to stop mode.
2 To return to normal playback press
REPEAT until the REPEAT modes are no
longer shown.
• You can also press STOP 9 to quit the
play mode.
3 During playback, press SHUFFLE once.
• All tracks are played in random order.
9
AZ1080/01
03/07/02 11:31
Page 10
Cassette Recorder
English
CASSETTE RECORDER
General information on
recording
Cassette playback
• Recording is permissible insofar as copyright
or other rights of third parties are not
infringed.
AZU1N0DM8A0CHINE
IBLE
LE CO MPAT
TO
WRITAB
OPE N
C D SO
CD RE
LI F T
TUNING
CD
MW
FM
TAP F
OF
E
PA U S
STOP
N
• OPE
SEARC
H
SEAR
VOL
UM
E
REPEAT
CK
CD TRA
ST
O
P
SHUFFLE
RE
Y/ PAUSE
P LA
P L AY
CH
R
SEA CH
AT
PE
T
DY
S BOOS
IC BAS
AM
N
DBB
1 Adjust the source selector to TAPE/OFF.
2 Press STOP•OPEN 9/ to open the
cassette door and insert a recorded
cassette.
3 Close the cassette door.
4 Press PLAY 1 to start playback.
5 To pause playback press PAUSE ;.To
resume, press the key again.
6 By pressing SEARCH 5 or 6, fast
winding of the tape is possible in both
directions.To stop fast winding, press
STOP•OPEN 9/.
7 To stop the tape, press STOP•OPEN 9/.
• The keys are automatically released at the
end of the tape, and the set is switched off,
except if PAUSE ; has been activated.
• This deck is not suited for recording on
CHROME (IEC II) or METAL (IEC IV) type
cassettes. For recording, use only NORMAL
type cassettes (IEC type I) on which the
tabs have not been broken.
• The best recording level is set automatically.
Altering the VOLUME and DBB controls
will not affect the recording in progress.
• At the very beginning and end of the tape,
no recording will take place during the
7 seconds when the leader tape passes the
recorder heads.
• To protect a tape from accidental erasure,
have the tape in front of you and break out
the left tab. Recording on this side is no
longer possible.To record over this side
again, cover the tabs with a piece of
adhesive tape.
Synchro Start CD recording
AZU1N0DM8A0CHINE
C D SO
CD RE
WRITAB
IBLE
LE CO MPAT
OPE N
T O O PE N
TO
L IF T
LI F T
TUNING
L IF T
T O O PE N
CD
MW
FM
TAP F
OF
E
PA U S
STOP
N
• OPE
SEARC
H
SEAR
VOL
UM
E
REPEAT
CK
CD TRA
ST
O
P
SHUFFLE
RE
Y/ PAUSE
P LA
P L AY
CH
R
SEA CH
AT
PE
T
DY
S BOOS
IC BAS
AM
N
DBB
1 Select CD source.
2 Insert a CD.
3 Press STOP•OPEN 9/ to open the
cassette door. Insert a blank tape.
10
AZ1080/01
03/07/02 11:31
Page 11
4 Close the cassette door.
5 Press RECORD 0 to start recording.
• Playing of the CD starts automatically. It is
not necessary to start the CD player
separately.
Recording from the Radio
1 Adjust the source selector to MW or FM to
select your desired waveband.
2 Tune to the desired radio station (see
Radio reception).
6 For brief interruptions press PAUSE ;.To
resume recording, press PAUSE ; again.
3 Press STOP•OPEN 9/ to open the
cassette door. Insert a blank tape.
7 To stop recording, press STOP•OPEN 9/.
➜ The CD player goes to pause mode.
Press PLAY•PAUSE 2; to resume CD
playback, or press STOP 9 to stop CD
play.
4 Close the cassette door.
Selecting and recording a particular
passage
• During CD playback, press and hold down
the SEARCH buttons ∞ or § on the set
to find your passage.
7 To stop recording,
press STOP•OPEN 9/ .
5 Press RECORD 0 to start recording.
6 For brief interruptions, press PAUSE ;.To
resume recording, press PAUSE ; again.
• Press PLAY•PAUSE 2; to put the CD
player on pause at the selected passage.
➜ Recording will begin from this exact
point in the track when you press
RECORD 0.
Note: If you press RECORD 0 during
playback, recording starts automatically from
the beginning of the current track.
11
English
Recording
AZ1080/01
03/07/02 11:31
Page 12
Maintenance
English
Precautions &
General Maintenance
• Place the set on a hard and flat surface so
that the system does not tilt.
• Do not expose the set, batteries, CDs or
cassettes to humidity, rain, sand or excessive
heat caused by heating equipment or direct
sunlight.
• Do not cover the set. Adequate ventilation
with a minimum gap of 6 inches between
the ventilation holes and surrounding
surfaces is necessary to prevent heat buildup.
• The mechanical parts of the set contain
self-lubricating bearings and must not be
oiled or lubricated.
• To clean the set, use a soft, slightly
dampened chamois leather. Do not use any
cleaning agents containing alcohol,
ammonia, benzene or abrasives as these
may harm the housing.
Tape deck maintenance
To ensure quality recording and playback of
the tape deck, clean parts A, B and C
shown in the diagram below, after approx.
50 hours of operation, or on average once
a month. Use a cotton bud slightly
moistened with alcohol or a special head
cleaning fluid to clean the deck.
C
B
A
2 Press PLAY 1 and clean the rubber
pressure roller C.
3 Press PAUSE ; and clean the magnetic
heads A, and also the capstan B .
4 After cleaning, press STOP•OPEN 9/.
– Cleaning of the heads can also be done by
playing a cleaning cassette through once.
CD player and CD handling
• The lens of the CD player should never be
touched!
• Sudden changes in the surrounding
temperature can cause condensation to
form and the lens of your CD player to
cloud over. Playing a CD is then not
possible. Do not attempt to clean the lens
but leave the set in a warm environment
until the moisture evaporates.
• Use only Digital Audio CDs.
• Always close the CD door to keep the CD
compartment dust-free.To clean, dust the
compartment with a soft dry cloth.
• To take a CD out of its box, press the
centre spindle while lifting the CD. Always
pick up the CD by the edge and replace
the CD back in its box after use to avoid
scratching and dust.
• To clean the CD, wipe in a straight line from
the centre towards the edge using a soft,
lint-free cloth. Do not use cleaning agents as
they may damage the disc.
• Never write on a CD or attach any stickers
to it.
1 Open the cassette door by pressing
STOP•OPEN 9/.
12
AZ1080/01
03/07/02 11:31
Page 13
If a fault occurs, first check the points listed below before taking the set for repair. Do
not open the set as there is a risk of electric shock.
If you are unable to remedy a problem by following these hints, consult your dealer or
service centre.
WARNING: Under no circumstances should you try to repair the set yourself, as this
will invalidate the guarantee.
Problem
Solution
No sound
– Adjust the VOLUME
No power
– Mains lead not securely connected.
Connect AC mains lead properly
– Batteries exhausted /incorrectly inserted.
Insert (fresh) batteries correctly
Display does not function
properly/ No reaction to
operation of any of the
controls
– Electrostatic discharge
Switch off and unplug the set. Reconnect after a few
seconds.
Er indication
– No CD inserted, insert a CD
– CD badly scratched/ dirty.
Replace/ clean CD (see maintenance)
– CD-R(W) is blank or the disc is not finalized.
Use a finalized CD-R(W)
– Laser lens steamed up.
Wait until lens has cleared/acclimatized
CD playback does not work
– CD badly scratched/ dirty. Replace/ clean CD (see
maintenance)
The CD skips tracks
– CD damaged or dirty. Replace or clean CD.
– Shuffle is active. Quit shuffle mode
Poor cassette sound quality
– Dust and dirt on the heads, etc.
Clean deck parts, see maintenance.
– Use of incompatible cassette types (METAL or
CHROME). Only use NORMAL (IEC I) for recording
Recording does not work
– Cassette tab(s) may be broken. Apply a piece of
adhesive tape over the missing tab space.
13
English
Troubleshooting
AZ1080/01
03/07/02 11:31
Page 38
Australia - Philips product warranty for Australia only
Warranty conditions valid for Colour Television,
Video Cassette Recorders, CD Recordable,
DVD Players, Audio Systems, and Portable Audio.
The benefits given to the purchaser by this
warranty are in addition to all other rights and
remedies which the purchaser has in respect of
the product under the Trade Practices Act or
other Commonwealth or State Law.
Philips Consumer Electronics warrants its
products to the purchaser as follows and
subject to the stated conditions.
12 months free service
Conditions of warranty
1. All claims for warranty service should be made to
your nearest Philips Authorised Service Centre.
Reasonable evidence of date of purchase must be
provided.
2. This warranty extends only to defects occurring
under normal use of the product when operated
in accordance with the instructions.
3. Home service within the normal service area of
our Philips Authorised Service Centres will be
provided for television receivers with screen size
48cm and above. All other products are to be
brought or sent to your nearest Philips
Authorised Service Centre.
d) Cleaning of video or audio heads.
e) Inadequate receiving antennae.
f) Replacement of worn or used batteries,
styli or other consumables.
The conditions contained in this warranty card
replace and override the provisions of the
World-Wide Guarantee for Products sold in
Australia.
Philips Authorised Service Centres
To contact your nearest Philips Authorised
Service Centre call 1300 36 1392 from
anywhere in Australia.
Sydney
Newcastle
Perth
Melbourne
Brisbane
Adelaide
Hobart
Wollongong
Canberra
Service is provided through 350 accredited
service dealers throughout Australia.To find out
about your nearest centre, call 1300 36 1392.
Please record the following information for your
records and keep in a safe place.
Model No: ....................................................
Serial No: ....................................................
4. This warranty does not cover:
a) Mileage or traveling time, pickup or delivery,
cost of insurance.
b) Service costs arising from failure to correctly
adjust the controls of the product or to observe
the instructions, or inspections that reveal that
the product is in normal working order.
c) Product failures caused by misuse, neglect,
normal wear and tear, accidental breakage, transit
damage, inexpert repairs or modification by
unauthorised persons, lightning strikes, vermin
infestation or liquid spillage.
38
Please retain your purchase
receipt which is required to
claim service under warranty.
Philips Consumer Electronics Australia Limited
ACN 008 445 743, 3 Figtree Drive
Homebush NSW 2140
Version 4, 03/99, FPCP–030
AZ1080/01
03/07/02 11:31
Page 42
New Zealand - Guarantee and Service for New Zealand
Thank-you for purchasing this quality Philips
product.
Philips New Zealand Ltd guarantees this product
against defective components and faulty
workmanship for a period of 12 months. Any
defect in materials or workmanship occurring
within 12 months from the date of purchase
subject to the following conditions will be
rectified free of charge by the retailer from
whom this product was purchased.
Conditions
1. The product must have been purchased in New
Zealand. As proof of purchase, retain the original
sales docket indicating the date of purchase.
2. The guarantee applies only to faults caused by
defective components, or faulty workmanship on
the part of the manufacturer.
3. The guarantee does not cover failures caused by
misuse, neglect, normal wear and tear, accidental
breakage, use on the incorrect voltage, use
contrary to operating instructions, or
unauthorised modification to the product or
repair by an unauthorised technician.
4. Reasonable evidence (in the form of a sales
docket) must be supplied to indicate that the
product was purchased no more than 12 months
prior to the date of your claim.
5. In the event of a failure, Philips shall be under no
liability for any injury, or any loss or damage
caused to property or products other than the
product under guarantee.
This guarantee does not prejudice your rights
under common law and statute, and is in addition
to the normal responsibilities of the retailer and
Philips.
42
How to claim
Should your Philips product fail within the
guarantee period, please return it to the retailer
from whom it was purchased. In most cases the
retailer will be able to satisfactorily repair or
replace the product.
However, should the retailer not be able to
conclude the matter satisfactorily, or if you have
other diffi-culties claiming under this guarantee,
please contact
The Guarantee Controller
Philips New Zealand Ltd.
4 P.O. Box 41.021
Auckland
3 (09) 84 94 160
fax 3 (09) 84 97 858
AZ1080/01
03/07/02 11:31
Page 43
Meet Philips at the Internet
English
http://www.philips.com
Français
Español
∑
AZ 1080
AZ 1081
CLASS 1
LASER PRODUCT
3140 115 2941.1