1
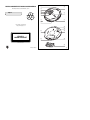
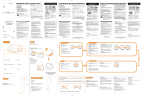
AX5311
AX5312
AX5319
Portable CD Player
User manual
Manuel d’utilisation
Manual del usuario
RTAN
PO
1-800-531-0039
or visit us on the web at www.philips.com
E
Return
your Warranty
Registration Card
within 10 days
S
CALL US BEFORE YOU CONSIDER
RETURNING THE PRODUCT!
IM
Philips representatives are ready to help you
with any questions about your new product.
T!
Need help? Call us!
1
EE
WH
Y INS
ID
2
3
6
4
5
2
IMPORTANT SAFETY INSTRUCTIONS
1. Read these instructions.
2. Keep these instructions.
3. Heed all warnings.
4. Follow all instructions.
5. Do not use this apparatus near water.
11. Refer all servicing to qualified service personnel. Servicing is
required when the apparatus has been damaged in any way, such
as if the power-supply cord or plug is damaged, liquid has been
spilled or objects have fallen into the apparatus, or when the apparatus has been exposed to rain or moisture, does not operate normally, or has been dropped.
6. Clean only with a dry cloth.
12. Battery usage CAUTION – To prevent battery leakage which
may result in bodily injury, property damage, or damage to the unit:
7. Do not block any of the ventilation openings. Install in
accordance with the manufacturers instructions.
• Install ALL batteries correctly, + and - as marked on the unit.
8. Do not install near any heat sources such as radiators, heat
registers, stoves, or other apparatus (including amplifiers) that
produce heat.
9. Only use attachments/accessories specified by the manufacturer.
10.
Use only with a cart, stand, tripod, bracket, or table
specified by the manufacturer or sold with the apparatus. When a cart is used, use caution when moving the
cart/apparatus combination to avoid injury from
tip-over.
• Do not mix batteries (OLD and NEW or CARBON and ALKALINE,
etc.).
• Remove batteries when the unit is not used for a long time.
13. Apparatus shall not be exposed to dripping or splashing.
14. Do not place any sources of danger on the apparatus. (e.g. liquid
filled objects, lighted candles).
15. This product may contain lead and mercury. Disposal of these material may be regulated due to environment considerations. For disposal or recycling information, please contact your local
authorities or the Electronic Industries Alliance:
www.eiae.org.
EL 6597-E001: 04/01
PHILIPS LIMITED WARRANTY
One (1) Year Free Product Exchange
PHILIPS CONSUMER ELECTRONICS
Warrants this product against defect in material or workmanship, subject to any
conditions set forth as follows:
PROOF OF PURCHASE:
You must have proof of the date of purchase to exchange the product. A sales receipt or
other document showing the product, the date that you purchased the product, as well as
the authorized retailer included, is considered such proof.
COVERAGE:
Warranty coverage begins the day you buy your product. For a period of one (1) year
from the date of purchase, if the product is determined to be defective, Philips will
exchange the defective product with a new or renewed product, at its option, at no
charge. The replacement product is covered only for the warranty period of the original
product. When the warranty on the original product expires, the warranty on all replaced
products also expires. When it is necessary for you to ship the product to Philips for
exchange, you will pay the shipping cost for shipment to Philips. Philips will pay the
shipping costs when returning a product to you.
Note: The exchange model supplied will be the most comparable one in Philips current
inventory. Shipping of your product to Philips implies intent to follow the specified
requirements of the warranty and exchange program. Product received by Philips cannot
be returned. Replacement product can only be sent if all warranty requirements are met.
Failure to follow all requirements can result in delay of exchange process.
EXCLUDED FROM WARRANTY COVERAGE
Your warranty does not cover:
• Shipping charges to return defective product.
• Labor charges for installation or setup of the product, adjustment of customer
controls on the product, and installation or repair of antenna systems outside of the
product.
• Product repair and/or part replacement because of improper installation, connections
to improper voltage supply, abuse, neglect, misuse, accident, unauthorized repair or other
cause not within the control of Philips.
Philips, P.O. Box 520890, Miami,
FL 33152 (402) 536-4171
• Damage occurring to product during shipping when improperly packaged or cost
associated with packaging.
• A product that requires modification or adaptation to enable it to operate in any
country other than the country for which it was designed, manufactured, approved
and/or authorized, or repair of products damaged by these modifications.
• A product used for commercial or institutional purposes (including but not limited to
rental purposes).
• Products lost in shipment and no signature verification of receipt can be provided.
• Products sold AS IS or RENEWED.
Where Warranty Exchange is available:
Exchange is available in all countries where Philips officially distributes the product. In
countries where Philips does not distribute the product, the local Philips organization will
attempt to exchange the product, although there may be a delay if the appropriate
product is not readily available, or special customs processes are implied.
For Exchange in the U.S.A., Puerto Rico, or U.S.Virgin Islands…
Contact Philips Customer Care Center at:
1-800-531-0039
For Exchange in Canada…
1-800-661-6162 (French Speaking)
1-800-531-0039 (English or Spanish Speaking)
REPLACEMENT AS PROVIDED UNDER THIS WARRANTY IS THE EXCLUSIVE
REMEDY OF THE CONSUMER. PHILIPS SHALL NOT BE LIABLE FOR ANY
INCIDENTAL OR CONSEQUENTIAL DAMAGES FOR BREACH OF ANY EXPRESS OR
IMPLIED WARRANTY ON THIS PRODUCT. EXCEPT TO THE EXTENT PROHIBITED
BY APPLICABLE LAW, ANY IMPLIED WARRANTY OF MERCHANTABILITY OR
FITNESS FOR A PARTICULAR PURPOSE ON THIS PRODUCT IS LIMITED IN
DURATION TO THE DURATION OF THIS WARRANTY.
Some states do not allow the exclusions or limitation of incidental or consequential
damages, or allow limitations on how long an implied warranty lasts, so the above
limitations or exclusions may not apply to you. In addition, if you enter into a service
contract agreement with the PHILIPS partnership within ninety (90) days of the date of
sale, the limitation on how long an implied warranty lasts does not apply.
MODEL #
____________________________________
SERIAL #
____________________________________
This warranty gives you specific legal rights. You may have other rights which vary
from state/province to state/province.
EL6587E001 / 01-04
El aparato cumple las normas FCC, Parte 15 y 21 CFR 1040.10. Funcionamiento
dependiente de dos condiciones siguientes:
1. Este aparato no puede provocar interferencia dañina, y
2. Este aparato debe aceptar cualquier interferencia recibida, incluyendo las
interferencias que pueden provocar un funcionamiento insuficiente.
CAUTION
Use of controls or adjustments or performance of procedures other than herein may result in hazardous radiation exposure or other unsafe operation.
Return your Product Registration Card today
to get the very most from your purchase.
Registering your model with PHILIPS makes you eligible for all of the valuable benefits listed below, so
don't miss out. Complete and return your Product Registration Card at once to ensure:
*Proof of
Purchase
*Product Safety *Additional
Benefits of
Notification
Product
Ownership
Returning the enclosed card
By registering your product, you'll
Registering your product guaran-
guarantees that your date of
receive notification - directly
tees that you'll receive all of the
purchase will be on file, so no
from the manufacturer - in the
privileges to which you're enti-
additional paperwork will be
rare case of a product recall or
tled, including special money-sav-
required from you to obtain war-
safety defect.
ing offers.
ranty service.
Know these
Canada
English: This digital apparatus does not exceed the Class B limits for radio noise
emissions from digital apparatus as set out in the Radio Interference Regulations
of the Canadian Department of Communications.
Français : Cet appareil numérique n'émet pas de bruits radioélectriques dépassant les limites applicables aux appareils numériques de Classe B prescrites dans
le Règlement sur le Brouillage Radioélectrique édicté par le Ministère des
Communications du Canada.
safetysymbols
CAUTION
RISK OF ELECTRIC SHOCK
DO NOT OPEN
CAUTION: TO REDUCE THE RISK OF ELECTRIC SHOCK, DO NOT
REMOVE COVER (OR BACK). NO USER-SERVICEABLE PARTS
INSIDE. REFER SERVICING TO QUALIFIED SERVICE PERSONNEL.
t
This “bolt of lightning” indicates
uninsulated material within your
unit may cause an electrical
shock. For the safety of everyone in
your household, please do not remove
product covering.
s
The “exclamation point” calls
attention to features for which
you should read the enclosed
literature closely to prevent operating
and maintenance problems.
For Customer Use
Enter below the Serial No. which is
located on the rear of the cabinet.
Retain this information for future reference.
Model No. ______________________
Serial No. ______________________
WARNING: TO PREVENT FIRE OR
SHOCK HAZARD, DO NOT EXPOSE
THIS EQUIPMENT TO RAIN OR
MOISTURE.
CAUTION: To prevent electric shock,
match wide blade of plug to wide slot,
fully insert.
PHILIPS CONSUMER ELECTRONICS NORTH AMERICA
Knoxville, Tennessee 37914-1810, U.S.A.
4
5
6
7
8
English
3
MODE
PROGRA
M
vo
l DB
B
prog
sh
uf
repefle re
at sum
all e
ram
2
STOP
9
1
/
+
0
Meet Philips at the Internet
http://www.philips.com
PO
WE
R SA
VE
%
$
#
ESP
ON
!
CLASS 1
LASER PRODUCT
^
@
+
+
&
-
3140 115 3131 3
Printed in China
1
English
2
1
1.
2.
-
+
p
Controls ( see figure 1 )
1 LINE OUT/p........3.5 mm headphone socket, socket to connect the player to
another audio input of an additional appliance, remote
control socket (not on all versions)
2 2; ......................switches the player on, starts or pauses CD play
3 MODE .................selects the different playing possibilities: shuffle,
shuffle repeat all, repeat, repeat all and SCAN
4 PROGRAM ..........programs tracks and reviews the program
5 ............................display
6 ∞ .......................skips and searches CD tracks backwards
7 § .......................skips and searches CD tracks forwards
8 STOP ..................stops CD play, clears a program or switches the player off
9 DBB.....................switches the bass enhancement on and off. This button also
switches acoustic feedback (the beep) on/off when it is
pressed for more than 2 seconds
0 VOL −/+ ..............adjusts the volume
! 4.5V DC...............socket for external power supply
@ OPEN 2 ..............opens the CD lid
# ESP ON /
POWER SAVE .......to select between the battery powersave mode and
Electronic Skip Protection (ESP). ESP ensures continuous
CD playback regardless of vibrations and shocks
$ OFF......................switches RESUME and HOLD off
RESUME .............stores the last position of a CD track played
HOLD...................locks all buttons on the set only
% ............................typeplate
^ ............................battery compartment
& ............................AAA battery door
-+
#
3
OP
+
+
/
+
/
/
HOLD ➟ OFF
5
PLAY 2;
6
VOL
vo
l
R SA
VE
4
PR
B
DB
ram
ESP
prog
e
um
res all
ffle
shu repeat
ON
M
E
D
O
M
RA
PO
WE
G
O
ST
OP
!!!
vol
DBB
MODE
RAM
PROG
vol
DBB
DE
M
MO
GRA
PRO
DBB
program
shuffle resume
repeat all
P
STO
vol
E
program
resume
shuffle all
repeat
e
resum
all
ram
MOD
M
GRA
PRO
prog
shuffle
repeat
STO
P
STO
P
CONTROLS
+
/
+
+
/
/
2
This set complies with the radio interference requirements of the
European Union.
Batteries (supplied or optionally available)
CONTROLS / POWER SUPPLY
Remote Control AY 3785 ( see figure 2 )
p.........................3.5 mm headphone plug to connect to headphones socket
2; ......................switches the set on, starts playback and interrupts playback
9.........................stops playback and switches the set off
∞ / § ...............skips and searches forward / backward tracks
HOLD...................locks all buttons (on the remote control only)
VOLUME −/+ ......adjusts the volume
+
Inserting AAA (LR03, UM4) or AY 3363 batteries
1 Open the AAA battery door.
2 Insert AAA batteries as shown onto the back of the
door.
3 Replace the battery-loaded AAA door back onto the AAA (LR03, UM4)
set.
M4
A /U
/AA
LR03
-
1
2
3
4
5
6
For convenience, this model is designed with 2 different detachable battery doors.
This allows you to operate the player using 2 choices of battery size. You can use
the following batteries with this CD-player:
• alkaline batteries type AAA (LR03, UM4) or AA (LR6, UM3) preferably
Philips.
Notes:– Old and new or different types of batteries should not be combined.
– Remove batteries if they are empty or if the player is not going to be used for
a long time.
Connecting the remote control
Use the AY 3785 cord remote control.The buttons
on the remote control have the same functions as
the corresponding buttons on the set.
MODE
PROGRAM
vol
DBB
progr
am
shuffle
repeatresum
all e
STOP
1 Press 9 twice to switch off the set.
p
/
+
2 Firmly connect the remote control to LINE
OUT/p on the set.
3 Firmly connect the headphones to the plug on
the remote control.
4 On the remote control press 2; to switch on the set and to start playback.
5 Adjust the volume on the CD player or your remote control.
Notes: – Check the HOLD switch on the remote control is adjusted to the off
position if you wish to operate the player using the remote control.
Inserting AA (LR6, UM3) batteries
To double playback time, insert AA batteries into the battery compartment and use the AA marked battery door.
• Open the battery compartment and insert either 2
normal or alkaline batteries.
+
-
AA SIZE
LR6 / UM3
AA (LR6, UM3)
Battery indication
The approximate power level of your batteries is shown in the display.
Battery full
Battery two-thirds full
Battery one-third full
Battery dead or empty. When the batteries are
dead or empty, the symbol
flashes, bAtt
is displayed, and the beep tone sounds
repeatedly.
-
+
+
POWER SUPPLY / GENERAL INFORMATION
Average playing time of batteries under normal conditions
Battery type
ESP on
Power Save
Alkaline AA
24 hours
42 hours
Alkaline AAA
10 hours
16 hours
Rechargeable ECO-PLUS NiMH battery
8.5 hours
13 hours
Batteries contain chemical substances, so they should be disposed
of properly.
ECO-PLUS NiMH battery information (for versions supplied with the
rechargeable ECO-PLUS NiMH battery AY 3363)
Recharging works only on players supplied with the rechargeable ECO-PLUS
NiMH battery AY 3363.
Recharging the ECO-PLUS NiMH battery on board
1 Insert the rechargeable ECO-PLUS NiMH battery AY 3363.
2 Connect the mains adapter to the 4.5V DC socket of
the player and then to the wall socket.
y
is pulsing.
Handling instructions
• Recharging already charged or half-charged batteries will shorten their
lifetime. We therefore recommend that you let the rechargeable ECO-PLUS
NiMH battery run till it is completely empty before you recharge it.
• To avoid a short circuit, do not let the battery touch any metal object.
• If the battery becomes empty soon after recharging, then either its contacts
are dirty or it has reached the end of its lifetime.
Mains adapter (supplied or optionally available)
Use only the AY 3170 adapter (4.5 V / 300 mA direct
current, positive pole to the center pin). Any other product
may damage the player.
1 Make sure the local voltage corresponds to the power
adapter’s voltage.
4.5V DC
2 Connect the power adapter to the 4.5V DC socket of
the player and to the wall socket.
Note: Always disconnect the adapter when you are not using it.
• Recharging stops after a maximum of 7 hours, or when you start playback.
3 When the battery is fully recharged, FULL appears
in the display.
Notes: – It is normal for the batteries to become warm
during recharging.
– If the batteries become too warm, recharging
will be interrupted for approximately 30 minutes .
– To ensure proper recharging on board, take care that contacts are clean.
– Use only the ECO-PLUS NiMH battery AY 3363.
Environmental information
• All redundant packing material has been omitted. We have done our utmost to
make the packaging easily separable into two mono materials: cardboard (box)
and polyethylene (bags, protective foam sheet).
• Your set consists of materials which can be recycled if disassembled by a
specialized company. Please observe the local regulations regarding the
disposal of packing materials, exhausted batteries and old equipment.
GENERAL INFORMATION
CD player and CD handling
• Do not touch the lens A of the CD player.
• Do not expose the unit, batteries or CDs to humidity,
rain, sand or excessive heat (caused by heating
equipment or direct sunlight).
• You can clean the CD player with a soft, slightly
dampened, lint-free cloth. Do not use any cleaning
agents as they may have a corrosive effect.
• To clean the CD, wipe it in a straight line from the
center toward the edge using a soft, lint-free cloth. A
cleaning agent may damage the disc! Never write on a CD or attach a sticker
to it.
• The lens may cloud over when the unit is moved suddenly from cold to warm
surroundings. Playing a CD is not possible then. Leave the CD player in a warm
environment until the moisture has evaporated.
• Active mobile phones in the vicinity of the CD player may cause malfunctions.
• Avoid dropping the unit as this may cause damage.
Headphones HE570
• Connect the supplied headphones to the LINE OUT/p
socket of the player.
+
Note: LINE OUT/p can also be used for
connecting this set to your HiFi system.To adjust the
sound and volume, use the controls on the connected
audio equipment and on the CD player.
IMPORTANT!
Hearing safety: Do not play your headphones at a high volume. Hearing experts advise
that continuous use at high volume can permanently damage your hearing.
Traffic safety: Do not use headphones while driving a vehicle. It may create a hazard
and it is illegal in many countries. Even if your headphones are an open-air type
designed to let you hear outside sounds, do not turn up the volume so high that you
cannot hear what is going on around you.
In-car use (connections supplied or optionally available)
Only use the AY 3545 or AY 3548 car voltage converter (4.5 V DC, positive pole to
the centre pin) and the AY 3501 car cassette adapter. Any other product may damage the set.
1
Put the set on a horizontal, vibration-free and
stable surface. Make sure it is in a safe place,
where the set is neither a danger nor an
obstacle to the driver and the passengers.
2
Plug the voltage converter into the
cigarette lighter socket (only for 12 V car
battery, negative grounding), then connect
the wired end with 4.5V DC input socket on the
set.
12 V DC
4,5 V DC
MODE
PROGRAM
vol
DBB
prog
ram
shuffl
e resum
repea
t all e
STOP
/
+
3
If necessary, clean the cigarette lighter socket to obtain a good electrical
contact.
4
Turn down the volume and connect the cassette adapter plug to LINE OUT/p
on the set.
5
Carefully insert the cassette adapter into the car radio’s cassette compartment.
6
Make sure the cord does not hinder your driving.
7
Decrease the volume on the set if necessary. Start playback on the set and
adjust the sound with the car radio controls.
• Always remove the voltage converter from the cigarette lighter socket
when the set is not in use.
Note: If your car radio has a LINE IN socket, it is better to use it for the
car radio connection instead of the adapter cassette. Connect the signal
lead to this LINE IN socket and to LINE OUT/p on the set.
Playback information
CD PLAY
• If a CD-Recordable (CD-R) or a CD-Rewritable (CDRW) is not recorded properly, NF dISC is
displayed, indicating that the CD has not been
finalized. In that case, use FINALIZE on your CD
recorder to complete the recording.
• When playing a CD-Rewritable (CD-RW), please note
that it takes 3–15 seconds after pressing 2; for
sound reproduction to start.
Playing a CD
This CD-player can play all kinds of Audio Discs such
as CD-Recordables and CD-Rewritables. Do not try to
play a CD-ROM, CDi, VCD, DVD or computer CD.
1 Push the OPEN 2 slider to open the player.
OP
• Playback will stop if you open the CD lid.
+
/
2 Insert an audio CD, printed side up, by pressing the
CD onto the hub.
sh
uff
rep le re
ea sum
ta
ll e
3 Close the player by pressing the lid down.
4 Press 2; to switch the player on and start playback.
yThe current track number and elapsed playing
time are displayed.
STOP
• While the CD is read, 1 --:-- flashes in the display.
Volume and bass
Volume adjustment
• Adjust the volume by using VOL −/+ on the CD player
or your remote control.
• You can pause playback by pressing 2;.
yThe time at which playback was paused starts
flashing.
vol
• You can continue playback by pressing 2; again.
5 Press STOP to stop playback.
yThe total number of tracks and the total playing
time of the CD are displayed.
6 Press STOP again to switch the player off.
• To remove the CD, hold it by its edge and press the
hub gently while lifting the CD.
Note: If there is no activity, the set will automatically
switch off after a while to save energy.
Bass adjustment
• Press DBB to switch the bass enhancement on or
off
y
is shown if the bass enhancement is
activated.
FEATURES
2 Release the button when you reach the desired passage.
yPlayback continues from this position.
Notes: – If the player is in SCAN mode (see MODE chapter), searching is not
possible.
B
Searching for a passage during playback
1 Keep ∞ or § pressed to find a particular passage in
a backward or forward direction.
ySearching starts while playback continues at low
volume. After 2 seconds the search speeds up.
B
2 Press 2; to start CD play.
yPlayback starts with the selected track.
PRO
GR
AM
D
Selecting a track when playback is stopped
1 Briefly press ∞ or § once or several times to select
the desired track. The track number is displayed.
l
Selecting a track during playback
• Briefly press ∞ or § once or several times to skip to
the current, previous or next track.
yPlayback continues with the selected track, and
the track’s number is displayed.
You can store up to 30 tracks to play in a program.
A single track may be stored more than once in the
program.
vo
Selecting a track and searching
Programming track numbers
1 While playback is stopped, select a track with
∞ or §.
pr
2 Press PROGRAM to store the track.
yprogram lights up; the track number
programmed and P with the total number of
stored tracks are displayed.
o
program
3 Select and store all desired tracks in this way.
4 Press 2; to start playback of your selected tracks.
yprogram is shown and playback starts.
program
• You can review the program by pressing PROGRAM
for more than 2 seconds.
yThe display shows all the stored tracks in
sequence.
Notes: – If you press PROGRAM and there is no track selected, SEL is
displayed.
– If you try to store more than 30 tracks, FULL is displayed.
Clearing the program
• While playback is stopped, press STOP to clear
program.
y CLRis displayed once, program goes off,
and the program is cleared.
Note:
program
The program will also be cleared if the power supply is interrupted, or if
the CD-player lid is opened, or if the set switches off automatically.
With a conventional portable CD-player you might have experienced that the music
stopped e.g. when you were jogging. The ELECTRONIC SKIP PROTECTION
prevents loss of sound caused by light vibrations and shocks. Continuous playback is
ensured. However ESP does not prevent playback interruptions during vigorous running.
It also does not protect the unit against any damage caused by dropping!
The power save mode helps to extend battery lifetime for longer playback.
• Switch the slider to ESP ON during playback to activate the shock protection.
y
is shown and the protection is activated.
• To deactivate the shock protection and enter the power save mode, switch the
slider to POWER SAVE.
y
goes off
PO
WE
RS
AV
E
It is possible to play tracks in random order, to repeat a single track or the entire
CD, and to play the first few seconds of each track.
1 Press MODE during playback as often as required in
order to activate one of the following ‘modes’. The
active mode is shown in the display.
yshuffle : All tracks of the CD are played in
PRO
MO
DE
GR
AM
random order until all of them have been played
once.
yshuffle repeat all : All tracks of the CD
are played repeatedly in random order.
yrepeat : The current track is played repeatedly.
yrepeat all : The entire CD is played repeatedly.
ySCAN: The first 10 seconds of each of the
remaining tracks are played in sequence.
shuffle
repeat all
2 Playback starts in the chosen mode after 2 seconds.
• To return to normal playback, press MODE repeatedly until the display shows
no active modes.
ESP / Power Save Mode
You can interrupt playback and continue (even after an
extended period of time) from the position where
playback stopped (RESUME) and you can lock all buttons
of the set so that no action will be executed (HOLD).
Use the OFF–RESUME–HOLD slider for these functions.
ON
Selecting different playing possibilities−MODE
RESUME and HOLD
ESP
FEATURES
RESUME – continuing from where you have stopped
1 Switch the slider to RESUME during playback to activate RESUME.
yresume is shown.
2 Press STOP whenever you want to stop playback.
3 Press 2; whenever you want to resume playback.
yresume is shown and playback continues
from where you have stopped.
resume
• To deactivate RESUME, switch the slider to OFF.
yresume goes off.
HOLD – locking all buttons
This model offers a double lock function to prevent buttons from being
accidentally pressed and activated. You can choose to lock all buttons on
either your set, remote control or even both! Simply adjust the respective
HOLD slider to HOLD on or off position as desired. For example :
1 Switch the OFF–RESUME–HOLD slider to HOLD to activate HOLD on the set.
yAll buttons are locked and HOLd is shown
when you press any button.on the set If the set
is switched off, HOLd will be shown only
when 2; is pressed.
resume
2 To deactivate HOLD, switch the slider to OFF.
hold
Note:
– If you deactivate HOLD by switching the slider
on the set to RESUME, you will be activating the RESUME function.
– No HOLd display indication is available if you have activated the
HOLD command on the remote control.
TROUBLESHOOTING
Troubleshooting
WARNING: Under no circumstances should you try to repair the set yourself as
this will invalidate the warranty. If a fault occurs, first check the points listed,
before taking the unit for repair. If you are unable to solve a problem by following
these hints, consult your dealer or service center.
The CD player has no power, or playback does not start
• Check that your batteries are not dead or empty, that they are inserted
correctly, that the contact pins are clean.
• Your adapter connection may be loose. Connect it securely.
• For in-car use, check that the car ignition is on. Also check player’s batteries.
Troubleshooting
No sound or bad sound quality.
• PAUSE might be active. Press 2;.
• Loose, wrong or dirty connections. Check and clean connections.
• Volume might not be appropriately adjusted. Adjust the volume.
• Strong magnetic fields. Check player’s position and connections. Also keep
away from active mobile phones.
• For in-car use, check that the cassette adapter is inserted correctly, that the car
cassette player’s playback direction is correct (press autoreverse to change),
and that the cigarette lighter jack is clean. Allow time for temperature change.
The indication NO dISC is displayed
• Check that the CD is clean and correctly inserted (label-side upward).
• If your lens has steamed up, wait a few minutes for this to clear.
The indication NF dISC is displayed
• CD-RW (CD-R) was not recorded properly. Use FINALIZE on your CD-recorder.
The indication HOLD is on and/or there is no reaction to controls
• If HOLD is activated, then deactivate it.
• Electrostatic discharge. Disconnect power or remove batteries for a few seconds.
The CD skips tracks
• The CD is damaged or dirty. Replace or clean the CD.
• resume, shuffle or program is active. Switch off whichever is on.
CAUTION
Use of controls or adjustments or performance of
procedures other than herein may result in hazardous
radiation exposure or other unsafe operation.