1
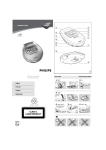
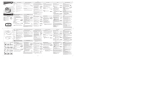
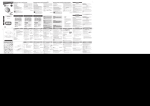
g
Audio
Portable CD Player
AX
AX
1100
1101
Portable CD Player
English
Français
Español
Deutsch
Meet Philips at the Internet
http://www.philips.com
CLASS 1
LASER PRODUCT
AX1100
AX1101
Printed in China
1
2
3
0
4
9
5
8
6
7
QUICK START
1
MISE EN SERVICE RAPIDE
OPEN
2
AA
LR6
UM3
1.
2.
2.
1.
CD
6
PLAY
4
5 HOLD➟OFF
p
/L
IN
E
O
UT
OFF
RESU
ME H
OLD
p
/L
IN
E
O
UT
3
p
/L
IN
E
O
UT
7 VOLUME
!!!
English
CONTROLS
1 MODE .................selects the different playing possibilities: SHUFFLE,
SHUFFLE REPEAT ALL, REPEAT and REPEAT ALL
2 BASS...................switches the bass enhancement on and off. This button also
switches acoustic feedback (the beep) on/off when it is
pressed for more than 2 seconds
3 2; ......................switches the player on, starts or pauses CD play
4 9.........................stops CD play, clears a program or switches the player off
5 ............................display
6 ∞ .......................skips and searches CD tracks backwards
7 § .......................skips and searches CD tracks forwards
8 OPEN 2 ..............opens the CD lid
9 VOL E ............adjusts the volume
0 p/LINE OUT........3.5 mm headphone socket, socket to connect the player to
another audio input of an additional appliance
BATTERIES (supplied or optionally available)
You can use the following batteries with this CD-player:
• normal batteries type LR6, UM3 or AA (preferably Philips), or
• alkaline batteries type LR6, UM3 or AA (preferably Philips).
Note:
– Old and new or different types of batteries should not be used in combination. Remove batteries if they are empty or if the player is
not going to be used for a long time.
Inserting batteries
• Open the battery compartment and insert either
2 normal or alkaline batteries.
Battery indication
The approximate power level of your batteries is shown
in the display.
• If
is shown or flashing (depending on the
version) and bAtt is displayed, the batteries are
empty.
! OFF......................switches RESUME and HOLD off
RESUME .............stores the last position of a CD track played
HOLD...................locks all buttons
Average playing time of batteries under normal conditions
Battery type
Playing time
Normal
7 hours
@ PROGRAM ..........programs tracks and reviews the program
Alkaline
20 hours
# 4.5V DC...............socket for external power supply
$ ............................typeplate
Batteries contain chemical substances, so they should be disposed
of properly.
% ............................battery compartment
CD PLAYER AND CD HANDLING
• Do not touch the lens A of the CD player.
• Do not expose the unit, batteries or CDs to humidity,
rain, sand or excessive heat (caused by heating
equipment or direct sunlight).
• You can clean the CD player with a soft, slightly
dampened, lint-free cloth. Do not use any cleaning
agents as they may have a corrosive effect.
• To clean the CD, wipe it in a straight line from the center toward the edge
using a soft, lint-free cloth. A cleaning agent may damage the disc! Never
write on a CD or attach a sticker to it.
• The lens may cloud over when the unit is moved suddenly from cold to warm
surroundings. Playing a CD is not possible then. Leave the CD player in a warm
environment until the moisture has evaporated.
• Active mobile phones in the vicinity of the CD player may cause malfunctions.
• Avoid dropping the unit as this may cause damage.
ENVIRONMENTAL INFORMATION
• All redundant packing material has been omitted. We have done our best to
make the packaging easily separable into two materials: cardboard and
polyethylene.
• Your unit consists of materials which can be recycled if disassembled by a
specialized company. Please observe the local regulations regarding the
disposal of packing materials, exhausted batteries and old equipment.
CAUTION
Use of controls or adjustments or performance of procedures other than
herein may result in hazardous radiation exposure.
POWER ADAPTER (supplied or optionally available)
Use only the AY 3170 adapter (4.5 V/300 mA direct
current, positive pole to the centre pin). Any other
product may damage the player.
1 Make sure that the adapter’s voltage corresponds to
the local voltage.
4,5V DC
2 Connect the adapter to the 4.5V DC socket of the player and to the wall socket.
Note: Always disconnect the adapter when you are not using it.
HEADPHONES HE 035
• Connect the supplied headphones to the p/LINE OUT
socket of the player.
Note: p/LINE OUT can also be used for connecting the
player to your HiFi system (with a signal lead) or to
your car radio (with a cassette adapter or signal
lead). In both cases, the volume of the player must
be set to position 8.
IMPORTANT!
Hearing safety: Do not play your headphones at a high volume. Hearing experts
advise that continuous use at high volume can permanently damage your hearing.
Traffic safety: Do not use headphones while driving a vehicle. It may create a
hazard and it is illegal in many countries. Even if your headphones are an open-air
type designed to let you hear outside sounds, do not turn up the volume so high
that you cannot hear what is going on around you.
PLAYING A CD
SELECTING A TRACK AND SEARCHING
This CD player can play all kinds of Audio Discs such as
CD-Recordables and CD-Rewritables. Do not try to play a
CD-ROM, CDi, VCD, DVD or computer CD.
Selecting a track during playback
• Briefly press ∞ or § once or several times to skip
to the beginning of the current, previous or next track.
yPlayback continues with the selected track, and
its number is displayed.
1 Push OPEN 2 to open the CD compartment lid.
2 Insert an audio CD, printed side up, by pressing the
CD center onto the hub.
MO
DE
PR
OG
RA
M
Selecting a track when playback is stopped
1 Briefly press ∞ or § once or several times.
yThe selected track number is displayed.
3 Close the player by pressing the lid down.
MO
2 Press 2; to start CD play.
yPlayback starts with the selected track.
DE
4 Press 2; to switch the player on and start
CD playback.
yThe current track number and the elapsed
playing time are displayed.
Searching for a passage during playback
1 Keep ∞ or § pressed to find a particular passage in
a backward or forward direction.
ySearching is started and playback continues at
low volume. After 2 seconds the search speed increases.
• You can pause playback by pressing 2;.
yThe time where playback was paused will flash.
• You can continue playback by pressing 2; again.
2 Release the button when you reach the desired passage.
yNormal playback continues from this position.
5 Press 9 to stop playback.
yThe total number of tracks and the total playing
time of the CD are displayed.
Notes: – During SHUFFLE, SHUFFLE REPEAT ALL, REPEAT
or while playing a program, searching is only
possible within the particular track.
6 Press 9 again to switch off the player.
• To remove the CD, hold it by its edge and press the
hub gently while lifting the CD.
Note: If there is no activity, the unit will automatically
switch off after a while to save energy.
0
PLAYBACK INFORMATION
PROGRAMMING TRACK NUMBERS
• If a CD-Recordable (CD-R) or a CD-Rewritable (CD-RW) is not recorded
properly, nF dISC is displayed. In that case, use FINALIZE on your CDrecorder to complete the recording.
You can select up to 15 tracks to play in a program.
A single track may be played more than once in
the program.
• If you want to play a CD-Rewritable (CD-RW), it takes 3–15 seconds for sound
reproduction to start once you have pressed 2;.
1 While playback is stopped, select a track with
∞ or §.
• Playback will stop if you open the CD lid.
2 Press PROGRAM to store the track.
y PROGRAM lights; the track number
programmed and P, with the total number of
stored tracks, are displayed.
• While the CD is being read, 1 -:- flashes in the display.
OG
RA
M
4 Press 2; to start playback of your selected tracks.
y PROGRAM is shown and playback starts.
Volume adjustment
Adjust the volume by using VOL E.
• You can review the program by pressing PROGRAM
for more than 2 seconds.
yThe display shows all stored tracks in sequence.
Bass adjustment
• Press BASS to switch the bass enhancement on or off
is shown if the bass enhancement is
activated.
DE
PR
3 Select and store all desired tracks in this way.
VOLUME AND BASS
y
MO
MO
DE
PR
OG
RA
M
Notes: – If you press PROGRAM and no track is selected, SELECt is displayed.
– If you try to store more than 15 tracks, FULL is displayed.
Clearing the program
• While playback is stopped, press 9 to clear program.
yCLEAr is displayed once, PROGRAM
disappears, and the program is cleared.
Notes: – The program also will be cleared if you
– interrupt the power supply, or
– open the CD compartment lid, or
– if the unit switches off automatically.
This product complies with the radio interference requirements of the
European Union.
Both the model number and production number are located on the
bottom of the set.
MODE
TROUBLESHOOTING
It is possible to play tracks in random order, to repeat a
single track or the entire CD.
MO
DE
PR
1 Press MODE during playback as often as required in
order to activate one of the following ‘modes’. The
active mode is shown in the display.
OG
y SHUFFLE: All tracks of the CD are played in random
order until all of them have been played once.
y SHUFFLE REPEAT ALL: All tracks of the CD are played
repeatedly in random order.
y REPEAT: The current track is played repeatedly.
y REPEAT ALL: The entire CD is played repeatedly.
RA
M
If a fault occurs, first check the points listed below before taking the set for repair.
If you are unable to remedy a problem by following these hints, consult your dealer or
service centre.
WARNING: Under no circumstances should you try to repair the set yourself, as this
will invalidate the guarantee. Do not open the set as there is a risk of
electric shock!
No power, playback does not start
Batteries
– Batteries inserted incorrectly
• Insert the batteries correctly
– Batteries are empty
• Change the batteries
– Contact pins are dirty
• Clean them with a cloth
Mains adapter
– Loose connection
• Connect the adapter securely
2 Playback starts in the chosen mode after 2 seconds.
• To return to normal playback, press MODE repeatedly
until the display shows no active modes.
no diSC indication
–
•
–
•
–
•
nF diSC indication
RESUME
– CD-RW (CD-R) is not recorded
• Use FINALIZE on the properly. CD recorder to complete the recording
OFF
RES
UME
HOL
D
You can interrupt playback and continue (even after an
extended period of time) from the position where
playback stopped (RESUME) and you can lock all buttons
of the set so that no action will be executed (HOLD). Use
the RESUME–HOLD–OFF slider for these functions.
1 Switch the slider to RESUME during playback to
activate RESUME.
y RESUME is shown.
The CD is badly scratched or dirty
Replace or clean the CD
CD is not or incorrectly inserted
Insert a CD, label upwards
The laser lens is steamed up
Wait until the lens has cleared
p
NE
/LI
HoLd indication and/or no reaction to controls
–
•
–
•
T
OU
HOLD is activated
Deactivate HOLD
Electrostatic discharge
Disconnect the set from power supply or take out the batteries for a few seconds
The CD skips tracks
2 Press 9 whenever you want to stop playback.
3 Press 2; whenever you want to resume playback.
y RESUME is shown and playback continues from
where you have stopped last.
– The CD is damaged or dirty
• Replace or clean the CD
– RESUME, SHUFFLE or PROGRAM is active
• Switch RESUME, SHUFFLE or PROGRAM off
• To deactivate RESUME, switch the slider to OFF.
y RESUME goes off.
No sound or bad sound quality
You can lock the buttons of the set by switching the
slider to HOLD. Now, when a key is pressed, no action
will be executed. This is of use, for example, when
transporting the player in a bag. With HOLD activated,
you can avoid accidental activation of other functions.
1 Switch the slider to HOLD to activate HOLD.
yAll buttons are locked. HoLd is shown when
you press any button. If the set is switched off,
HoLd will be shown only when 2; is pressed.
2 To deactivate HOLD, switch the slider to OFF.
Note: If you deactivate HOLD by switching the slider to
RESUME, you will be activating the RESUME
function.
OFF
RES
UME
HOL
D
HOLD
p
NE
/LI
T
OU
–
•
–
•
–
•
–
•
–
•
PAUSE is activated
Press 2;
Loose, wrong or dirty connections
Check and clean connections
Volume is not adjusted
Adjust the volume
Malfunctions due to nearness of active mobile phones
Keep the player away from active mobile phones
Strong magnetic fields near the player
Change the player’s position or connections