1
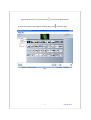
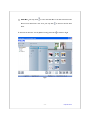
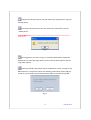
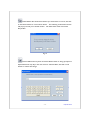
Philips PhotoFrame Photo Manager Update Procedure Document Version 1.0.1.4 Release date: Jan 29, 2007 Reason for software update: Software version 1.0.1.4 will provide the following improvements: - Improved overall performance & speed - improved user interface What is needed before software update 1. 2. PC with Internet access If you have Photo Manager already installed in your PC, please make sure that the software is earlier than version 1.0.1.4 ( press Setup Tool icon in the Photo Manager to see the software version) Software update procedure 1. 2. 3. 4. 5. 6. Download PhotoManager_1014.zip to PC Unzip the zip file If an earlier version of Photo Manager is already installed, please uninstall it first Double click the setup.exe file to install it After finished installation, connect your Photo Frame to the PC with USB cable The new Photo Manager start running 豬± Ú®¿³» 豬± Ó¿²¿¹»® º±® 豬± Ú®¿³» øß«¬± Ϋ² ÐÝ -±º¬©¿®»÷ Ë-»® ³¿²«¿´ çÚÚî Content Philips. © 2006 2006.7 First Version V06.07.1 1. 2. Welcome to Auto Run PC Software ...........................................................- 3 Whats New in Auto Run PC Software .......................................................- 3 - 3. 3.1. 3.2. Getting Started ............................................................................................- 4 System Requirement ....................................................................................- 4 About the Auto Run PC Software User Interface.......................................- 4 - 4. 5. The PC Area Pane ........................................................................................- 6 The Photo Frame Area Pane......................................................................- 10 - 6. The Command Keys Pane..........................................................................- 12 - 2 Philips Electronics 1. Welcome to Auto Run PC Software Philips Auto Run Program for Photo Frame is a windows based application for user to manage photos between Philips Photo Frame and PC. It provides easy-to-use user interface for user to browse and preview the photos in both PC directories and Photo Frame albums, and for user to perform operations, such as copying, moving and deleting photo(s). 2. Whats New in Auto Run PC Software This is the first version of the Philips Auto Run Program for Photo Frame. Sharing photos between PC and Philips Photo Frame. Automatically resizing the photos to match Photo Frame resolution. Copying the Photos between PC and Philips Photo Frame by using drag-and-drop functions. Retrieving removed photos from Auto Run Recyle Bin. Automatically detecting Philips Photo Frame. -3- Philips Electronics 3. Getting Started 3.1. System Requirement Computer Hardware Basic Requirements: Minimum: Pentium III 500MHz processor or equivalent or above, 128MB RAM, 100MB free HDD space, 16-bit High Color display adapter. Supported PC Operating System: MS Windows XP, and MS Windows 2000. Supported Languages: Chinese Simplified, Chinese Tranditional, English, French, German, Italian, Japanese, and Spanish. 3.2. About the Auto Run PC Software User Interface After installing this Auto Run Program, this application will start automatically and reside at taskbar as tray icon when each time user login into his/her account. You may find this tray icon in the Windows taskbar. You can bring up the Auto Run Program main window manually by right-clicking this tray icon and selecting Show Photo Manager. You may also terminate this application by selecting Terminate Photo manager options. Fig.1 -4- Philips Electronics Auto Run Program will show up its main window automatically while Philips Photo Frame connecting to your PC through USB cable. You may also double click double-click destop shortcut to bring up this application as shown below. 2 1 3 Fig.2 The PC Area Pane On the left side of Auto Run Program, the PC Area Pane displays the folder tree structures in the very same way as Windows File Manager, and also shows photos in the selected folder in thumbnail views. The thumbnail view in this area will display No Photo if there is no qualified photo for Philips Photo Frame, which can only display standard JPEG format files. [CAUTION] Please be aware that even this view showsNo Photo, this folder might contain other files, and might not be empty. The Photo Frame Area Pane On the right side of Auto Run Program, the Photo Frame Area Pane displays Photos in albums or folders of the Photo Frame and its external memory cards. Its thumbnail view will show Disconnectedmessage while Philips Photo Frame is not connected to your PC. You may copy photos between PC and Photo Frame by drag-and-drop photos between The PC Area Paneand The Photo Frame Area Pane. -5- Philips Electronics Command Keys Pane Command Key Pane is just beneath PC/Photo Frame Panes, and contains the functional button for Photo Copy, Cut, Past and Delete operations. Within the Command Key Pane, you may click setup button to setup desired language, and use recyle bin button to bring back the deleted photos. 4. The PC Area Pane 3 1 4 2 Fig.3 Folder Tree View Display all folders and recyle bin in tree structures similar to Windows File Manager. If user clicks the desired folder, all photos in the folder will be shown in Photo Thumbnail View (2). Photo Thumbnail View Display all photos in thumbnail view based on the user selected folder from folder tree view (1). Photo Preview Area Display the user selected picture with detail information, wuch as file name, file size and photo resolution. Slide Bar You may click to move the Slide Bar left and increase the Photo -6- Philips Electronics Frame Area Pane.Vice versa, you may click to increase the PC Area Pane. To incase the browser view of [Photo On PC], please click , as shown in Fig.4 Fig.4 -7- Philips Electronics Auto Run Program can perform auto resizing for all photos copyied to Photo Frame. You are also free to crop photos of more than 540x720 or 720x540 pixels, in Crop Photo window by double clicking the photos in thumbnail view as shown in Fig 5. 1 2 3 4 Fig.5 Preview of cropped photo In this preview area, Auto Run will show cropped photo results. (1) Cropped Area Display the original photo in thumbnail view and cropping area in red rectangle, which presents the cropping area with 540x720 or 720x540 pixels. You may use a mouse to drag this rectangle area into your desired area. Photo Information Display all the information releated to this current selected photo, including Album Name, Date Time, and Photo Description. Command Keys Close Button: Close this window without performaning any actions. Crop Photo: Perform the crop action, and save the cropped file in the same folder. The saved file will carry the same filename plus a number index. For example, if the original filename is orginal.jpg, the saved file will be crop(1).jpg [Notice] If Photo size is of less than 540x720 or 720x540 pixels, it will display the following warning message. -8- Philips Electronics Fig.6 -9- Philips Electronics 5. The Photo Frame Area Pane 3 1 2 4 Fig.7 Photo Frame While Auto Run Program connects to 9 , Photo Frame will display all the supporting memory card format in 9 Photo Frame. You may click on the target storage devices, e.g. Photo Frame, SD/MMC, CF Card, MS, and XD. Album When you select one of storage devices, this area will display all albums belonging to this device. Once you choose the album, all photos belonging to this album will be shown in (3). [CAUTION] Please do not disconnect USB connection between PC and Photo Frame, while you use Auto Run Program to copy, move or delete photos in Photo Frame. It may cause the loss of data or photo if the user unplugs USB cable while Auto Run Program is still transmitting data. Photo Thumbnail View Display all photos in thumbnail view based on the album from Photo Frame (1) selected by the user. Photo Preview Area Display the user selected picture with detailed information, such as file name, file size and photo resolution. - 10 - Philips Electronics Slide Bar You may click to move the Slide Bar to the left and increase the Photo Frame Area Pane. Vice versa, you may click to increase the PC Area Pane. To increase the browser view of [Photo Frame], please click , as shown in Fig.8. Fig.8 - 11 - Philips Electronics 6. The Command Keys Pane Fig.9 Recycle Bin You may click on Recyle Bin button to switch the target folder to the recycle bin folder. You may browse those removed photos and move them back to desired folders. Setup Tool You may setup application execution preferences and language preferences. AutoRun: You may select Yes radio button to execute the Philips Photo Frame Manager automatically, or select No to execute the Philips Photo Frame Manager manually. Please press OK to confirm the change you have just made as shown below in Fig.10. - 12 - Philips Electronics Fig.10 Language: You may select a desired language from the language pickup list. Please click OK to confirm the change you have just made. [CAUTION] If your computer doesnt support the language you select, program may not display characters correctly. To solve this problem, please update language service packages from Miscrosoft Website. Fig.11 - 13 - Philips Electronics Copy:You should select photos first, then click on the Copy button to copy the selected photos. Cut: You should select photos first, then click on the Cut button to cut the seleted photos. [CAUTION] Photos can be cut from a memory card to a PC, but cannot be cut from PC to a storage device. Fig.12 Paste: Right after you click on Copy or Cut button, Paste button will become available.You can select the target folder from the previous selected photos into the target folder (album). Delete:You should select photos that you would like to remove, and click on the Delete button to remove those photos. The following confirmation window will pop up and ask you to double confirm. All deleted files will be moved into Recycle Bin. . Fig.13 - 14 - Philips Electronics Delete Album: You should select albums you would want to remove, and click on the Delete button to remove those albums. The following confirmation window will pop up and ask you to double confirm. All deleted files will be moved into Recycle Bin. Fig.14 Rename Album: You may click on Rename Album button to bring up Keyboard Input Window.You may key in the new name for selected album, and click on OK button to confirm this change. - 15 - Philips Electronics Fig.15 New Album: To create a new album, you may select the target memory card first, and click on New Album button to bring up Keyboard Form window to input name for the album. Fig.16 Close:You can click on Close button to minimize this application, which will be shown as a tray icon in taskbar.Your can always bring back this application by right-clicking on this tray icon and selecting Show Photo Manager option. Alternatively, you may terminate this application by selecting Terminate Photo Manager. Fig.17 - 16 - Philips Electronics