1
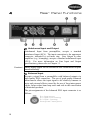
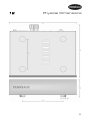
SX60m
60W Mono-Aural Power Amplifier
Owners Manual
Perreaux Industries Limited makes no warranty for the use of its products, other
than those expressly contained in the warranty detailed herein. The Company
assumes no responsibility for any errors which may appear in this document,
reserves the right to change products or specifications detailed herein at any time
without notice, and does not make any commitment to update the information
contained herein. No licenses to patents or other intellectual property of Perreaux
are granted by the Company in connection with the sale of Perreaux products,
expressly or by implication.
mboob^ru® is a registered trademark of Perreaux Industries Ltd.
Terms and product names in this document may be trademarks of others.
1
This page has intentionally been left blank.
2
i
Introducing the
Perreaux Silhouette Series
Designed as a range of high quality, yet affordable modules; the
‘Silhouette’ series will compliment and enhance your existing
system.
Drawing on our extensive knowledge gained from more than a
quarter of a century of developing highest quality audio products,
the ‘Silhouette’ concentrates our legendary design and build
quality into a compact package without sacrificing performance.
The Perreaux ‘Silhouette’ series provides performance levels
never before seen in its class.
Key Features
à
à
à
à
à
à
à
à
Class A signal stages
Highest quality internal power supply featuring a custom
designed, fully shielded toroidal transformer and 17600µF
of smoothing capacitance
Enhanced audio design featuring highest quality PCB and
minimal internal wiring
Balanced (XLR) input
Balanced and Unbalanced line out connections for daisy
chaining and bi-amping
High current drive
Compact
Stylish
The Perreaux “Silhouette” series takes you even closer to the
elusive goal of “The Perfect Re-Creation of a Musical
Event”.
From all of us at Perreaux Industries Limited, thank you for
choosing the Perreaux Silhouette Series SX60m Mono-Aural
Power Amplifier.
3
ii
Important Safety Instructions
Note:
Please read all instructions carefully before attempting to
operate your Perreaux “Silhouette” SX60m Mono-Aural
Power Amplifier.
ALWAYS switch off power to your system before attempting to
connect or disconnect cables.
ALWAYS disconnect your system from the mains before
attempting to clean your unit.
ALWAYS keep electrical equipment out of reach of children.
ALWAYS unplug sensitive electronic equipment during
electrical storms.
NEVER disconnect the mains earth from the system.
NEVER operate the SX60m with the cover removed.
NEVER use any liquid inside the SX60m.
NEVER bypass any fuse.
NEVER attempt to repair the SX60m. In the event of a problem,
please contact your Perreaux dealer.
NEVER expose the SX60m to extremely high or low
temperatures.
NEVER operate this product in an explosive atmosphere.
4
iii
i
ii
iii
1
2
3
4
5
6
7
8
9
10
11
12
13
Table of Contents
Introducing the Perreaux Silhouette Series.................................... 3
Important Safety Instructions............................................................ 4
Table of Contents................................................................................. 5
Unpacking and Placement................................................................. 6
Instant Install ........................................................................................ 7
Front Panel Functions......................................................................... 9
Rear Panel Functions ........................................................................10
Special Design Philosophies ............................................................13
Special Design Features....................................................................15
Care and Maintenance .....................................................................17
Warranty Information.......................................................................18
Extended Warranty Registration Form.........................................19
Troubleshooting Guide ....................................................................20
Specifications......................................................................................22
Physical Dimensions..........................................................................25
Contact Details ...................................................................................26
5
1
Unpacking and Placement
Unpacking
Procedure
Note:
Box
Contents
Placing Your
SX60m
Ventilation
Requirements
The SX60m is packaged for maximum protection. To open, sit
the box upright and cut the reinforced tape at the top of the box.
The product can now be removed.
Pull the foam protecting end-caps off either side of the unit and
remove the black material covering.
The SX60m Mono-Aural power amplifier is now unpacked and
ready for further installation.
Please retain all packaging material for future transport.
1 x SX60m Mono-Aural power amplifier
1 x Product manual
3 x Performance analysis charts
1 x Detachable AC power cord
The SX60m should generally be placed close to your source
equipment, thus keeping interconnect cabling between the
SX60m and associated components as short as practical. This
will reduce the systems susceptibility to radio frequency
interference and the negative effects associated with long cables.
The SX60m is a convection cooled amplifier. For optimal
performance, the unit MUST receive adequate ventilation.
à
Please do not cover the product with a cloth or similar.
à
Please do not mount the SX60m directly onto carpeted
surfaces.
In the event that the SX60m is to be incorporated into custom
cabinetry, please refer to the dimensional information provided in
the Physical Dimensions section of the manual (Chapter 12).
Note:
6
Please take all necessary steps to ensure that the unit
receives adequate ventilation
2
Instant Install
If you are like us, the first thing you will want to do is to play
your favourite piece of music through your new SX60m. The
following instructions are written to enable you to achieve this as
quickly as possible. These are not comprehensive instructions,
but are designed to enable you to play music now!
Note:
Please take the time to read the SX60m manual thoroughly
as it incorporates many features, which will enhance its
operation.
Placement
The SX60m is a convection cooled amplifier and best results will
be achieved when placed on a solid surface with adequate
ventilation. DO NOT place on a carpeted floor or cover the
amplifier!
Place the SX60m close or near the source component in order to
make as short a connection as possible.
Turn off associated components
This minimises the potential to damage any other components
when connecting your SX60m into the system.
Connect source to preamplifier
Connect the audio output from the source component to the input
of the preamplifier.
Connect preamplifier to SX60m
Connect the audio output from the preamplifier to the unbalanced
(RCA) input at the rear of the SX60m. Refer to Chapter 4 for
Rear Panel information.
Connect loud speaker cable to SX60m
Connect your loudspeaker lead to the bindng posts at the rear of
the amplifier. Refer to Chapter 4 for Rear Panel information.
Note:
Make sure the nominal impedance of the loudspeakers is
not lower than 4Ω.
7
Switch on SX60m
Caution!
Prior to connecting the AC mains, please check the voltage
label on the rear panel to ensure that your unit conforms to
the power supply in your area. Never attempt to connect
the unit to the incorrect voltage.
Insert the power cord supplied into the rear of the SX60m and
into the wall. Switch on the socket at the wall and turn on the
power of the SX60m by setting the power switch down.
Switch on preamplifier and source component
Turn on the preamplifier. Power up your source component and
start your favourite recording. Slowly increase the preamplifier
volume to achieve a comfortable listening level.
CONGRATULATIONS!
Now that you have achieved your first objective, sit back, relax
and please read the rest of the manual at your own pace in your
favourite armchair whilst sipping a hot cup of coffee. You’ll find
the whole experience much more pleasurable whilst listening to
music.
8
3
Front Panel Functions
Power LED
This blue LED indicates the power status of your SX60m MonoAural Power Amplifier.
9
4
Rear Panel Functions
Unbalanced Input and Output
Unbalanced Input from preamplifier, accepts a standard
unbalanced input (RCA). The input connection is the uppermost
connector, indicated by red inner ring. Line Output to other
amplifiers (e.g. bi-amping), accepts a standard unbalanced input
(RCA). For more information on Line Input and Output
specifications, please refer to Chapter 11.
Caution!
Never apply signal to the Balanced and Unbalanced inputs
simultaneously.
Balanced Input
Accepts a signal from a preamplifier with balanced outputs via
high quality XLR connectors. The use of good quality balanced
interconnects allows the input signal to be relatively immune to
noise and external effects caused by the use of long interconnect
cables, helps reduce hum loop noise and aids in the cancellation
of distortion products.
The pin assignments of the balanced XLR input connector is as
follows:
Pin 1: Signal ground
Pin 2: Signal + (non-inverting)
Pin 3: Signal – (inverting)
Shield ground: Chassis ground
10
For more information on line input specifications, please refer to
Chapter 11.
Note:
Please refer to the operating manual of your preamplifier
to verify that the pin assignments of the balanced output
connectors correspond to the SX60m balanced inputs. In
the event that they are not compatible, the
interconnecting cable will need to be altered to suit.
Balanced Output
Balanced Output to other amplifiers (e.g. bi-amping), accepts a
standard balanced connector (XLR).
The pin assignments of the balanced XLR output connectors are
as follows:
Pin 1: Signal ground
Pin 2: Signal + (non-inverting)
Pin 3: Signal – (inverting)
Shield ground: Chassis ground
For more information on line output specifications, please refer
to Chapter 11.
Note:
Please refer to the operating manual of your amplifier to
verify that the pin assignments of the balanced input
connectors correspond to the SX60m balanced outputs. In
the event that they are not compatible, the
interconnecting cable will need to be altered to suit.
Speaker Binding Posts
Binding posts are clearly marked and colour coded RED Positive
(+) and BLACK Negative (-). This polarity must be observed
when connecting loudspeakers, i.e. positive terminal of the
SX60m to the positive terminal of the loudspeaker and negative
terminal of the SX60m to the negative terminal of the
loudspeaker.
Caution!
Never connect either of the output terminals to ground.
Never connect the amplifier’s output terminals to any
device other than a loudspeaker.
Please do not short-circuit the amplifier’s output terminals.
Never connect the output of one amplifier to the output
terminals of another amplifier.
Do not over-tighten the binding posts on your amplifier.
11
Serial Number/Voltage Label
The serial number is unique to your SX60m. Please record this
number and store it in a safe place. For any service related
enquiry, please be prepared to quote the product serial number to
Perreaux personnel or their service representative.
The voltage displayed in this area is the ONLY voltage that can
be accepted by the unit.
Caution!
Never attempt to connect the unit to the incorrect voltage.
On/Off Switch
When operating the switch down, power is applied to the
SX60m.
AC Mains Input
An IEC-standard mains input is provided at the rear of the unit.
The AC cord set is removable, allowing it to be upgraded at your
will.
12
5
Minimalist
Design
Special Design Philosophies
Perreaux has been designing and manufacturing only the highest
quality audio componentry for more than a quarter of a century.
Technology has continued to evolve rapidly over that time and
our knowledge and application of design, materials and
manufacturing techniques has advanced in tandem with this.
Today’s Perreaux range comes closer to fulfilling our shared
vision than at any other time in the past.
The SX60m has been developed to meet customer demands for
compact higher quality products. Careful attention has been
taken throughout the development phase, not to make
compromises that would degrade the high quality of reproduction
that the unit is capable of delivering.
To follow is a discussion on some of Perreaux design
philosophies that have been incorporated into the entire range.
Leading British architect, John Pawson, writes:
“The Minimum can be defined as the perfection
that an object achieves when it is no longer
possible to improve it by subtraction. This is the
quality that an object has when every component,
every detail, and every junction has been reduced
or condensed to the essentials. It is the result of
the omission of the inessentials”.
Perreaux has historically embraced the minimalist ethic from an
audio design perspective only. The concept of “less equating to
more” has been at the heart of all Perreaux audio designs for
more than a quarter of a century. Our current product offering
takes the minimalist ethic to new levels by totally embracing the
concept.
Minimalist Electronics
We wish to maximise the quality of your listening pleasure by
keeping the componentry and signal path as uncluttered, short
and clean possible. All components in the signal path, even those
of the highest quality have an effect on the signal, thereby
altering the quality of the reproduction in some way. Our aim is
to recreate in its entirety, the original performance by not adding
or subtracting anything, irrespective of the source.
13
Minimalist Aesthetics
Our products appeal to those who seek the ultimate in audio
exclusivity, namely the perfect blend of “form and function”.
“Form and function” are both tough masters. We make no
excuses for producing some of the most distinctive high-end
audio products on the planet. We let “form and function” blend
together in perfect harmony. This surely is the essence of true
minimalist utilisation.
Minimalism in a Wider Context
John Pawson writes:
“Clearly simplicity has dimensions to it that go
beyond the purely aesthetic: it can be seen as the
reflection of some innate, inner quality, or the
pursuit of philosophical or literary insight into the
nature of harmony, reason, and truth”.
14
6
Special Design Features
Construction
The SX60m is stylish and unobtrusive. The front panel is made
from high quality solid 6.0mm (0.2”) thick aluminium extrusion
featuring our trademark machined Perreaux logo and large
volume control knob. These are finished in durable and stylish
satin chrome finish electroplate. On/off status is provided via a
discreet blue LED inset into the front panel. The chassis and
cover are both manufactured from heavy gauge steel. No cover
fixing screws are visible. These minimalist styling cues combine
seamlessly to allow form and function to blend in harmony and
are typical hallmarks of the Perreaux brand.
Circuit
Topology
Compact
Unsurpassed
Performance
Signal
Ground
At 216mm (8.5”) wide x 58mm (2.3”) high x 178mm (7.0”) deep
the SX60m is extremely compact.
Capable of continuously delivering 60W into an 8Ω load, the
SX60m is powerful. When correctly matched to loudspeakers,
the SX60m will deliver unsurpassed performance in its class and
will effortlessly drive a vast array of loudspeakers with the
control and authority that people have come to expect from
Perreaux products.
Special attention has been paid to ground planes to maintain
sonic purity. All signal grounding is optimised to provide a
platform for a black background and increased dynamic range.
15
Finest
Quality
Components
Used
Throughout
The Power
Supply
Simple
control
functionality
The SX60m features a 98VA toroidal mains transformer directly
soldered to the PCB, Wima and Elna capacitors, highest quality
Zobel network and customized internal heat sink solution. The
PCB is double-sided and constructed from the highest quality
fibreglass base stock featuring 2oz copper.
Perreaux has specially developed a fully shielded 98VA internal
toroidal based power supply. No fewer than eight filter
capacitors are coupled in parallel providing a total of 17,600uF of
power supply smoothing, keeping ripple to a minimum. As a
result the power supply is extremely rigid, capable of delivering
instantaneous power requirements demanded by musical
transients.
The result is significantly improved dynamic
capabilities.
Front panel features on/off LED indication. The rear panel
comprises a mains input receptacle, allowing the cord set to be
upgraded if desired, mains switch, high quality speaker binding
posts, unbalanced (RCA) and balanced (XLR) line inputs and
line outputs.
Block
Diagram
Ultra Short
Signal path
Input Stage
PCB Layout
16
Careful attention has been paid to the signal path within the
amplifier. It is ultra short, guarded by ground planes where
necessary and carefully routed to avoid contamination from
power supply and high current bearing sections.
Utilising a stable current source, along with accurate current
mirroring circuitry, the input stage of the SX60m, in combination
with the overall circuit topology, provides precise detail
resolution and definitive sonic transparency.
Special attention has been lavished on the PCB layout to keep
sensitive signal stages away from power supply and filtering
circuitry. The super clean custom designed power supply is
physically segregated from the rest of the sensitive electronics.
7
Care and Maintenance
Note:
Please switch the unit off and remove the cord set from the
rear of the Amplifier before attempting to clean your
SX60m in the manner described below.
Never apply liquid directly to the SX60m.
Never use abrasives.
Never rub in a circular motion.
Cover
The cover features a durable high quality powder coat finish. To
remove finger marks and dirt, lightly rub the surface with a soft
cloth.
If the dirt is not removed, dip your cloth in a mild solution of
soap and water, squeeze excess moisture from it and then gently
reapply to the surface.
Stubborn dirt may be removed by the application of a small
quantity of isopropyl alcohol, applied directly to the cleaning
cloth only, and reworking the effected area.
Front Panel
The SX60m front panel features a high quality electroplate
finish. Over time the surface may retain finger marks and may
need to be cleaned to restore it to original condition.
Regular Cleaning
Gently wipe the front panel with a very clean cotton cloth. Wipe
across the surface and never in a circular motion.
Removing Stubborn Marks
Only attempt this infrequently, as too regular or vigorous
application may damage the surface.
Apply a small quantity of any car polish containing carnauba
wax to a very clean cotton cloth.
Note:
The car polish must state “Safe for Clear Coats” as the polish
will therefore contain the absolute minimum amount of
abrasive compound.
Gently wipe over the front panel in lateral motion, allow to dry
then gently wipe off with a very clean cotton cloth.
17
8
Warranty Information
1 Year
Limited
Warranty
3 Year
Extended
Warranty
Obtaining
Service
18
The Perreaux SX60m is warranted free from defects in material
and workmanship under normal use for a period of 1-year (365
days) from the date of purchase.
To extend the warranty of the Perreaux SX60m to three (3) years
from date of purchase, please return a fully completed warranty
registration form along with a copy of the original receipt of
purchase to:
Perreaux Industries Ltd
PO Box 305
Mosgiel
Dunedin 9032
New Zealand
For the Extended Warranty Registration Form, please refer to
Chapter 9.
The extended warranty for the Perreaux SX60m is three (3) years
from the date of purchase. If during the warranty period the
SX60m exhibits defects in materials and/or workmanship, it will
be repaired or replaced, at our option, without charge for either
parts or labour, at our factory in Dunedin, New Zealand. The
warranty does not apply to any unit that has been misused,
abused or altered.
Any unit that is not performing satisfactorily may be returned to
the factory in Dunedin, New Zealand for evaluation. Return
authorisation must first be obtained by either calling or writing to
Perreaux prior to shipping the unit. Perreaux Industries Ltd and
it’s authorised distributors and dealers shall not be held liable for
any freight or insurance charges. Freight and insurance charges
to and from the Perreaux factory will be the sole responsibility of
the owner of the unit.
There is no other express warranty on the SX60m. Neither this
warranty nor any other warranty, express or implied, including
any implied warranties of merchantability of fitness, shall extend
beyond the warranty period. No responsibility is assumed for
any incidental or consequential damages.
In the event that you are experiencing difficulty with your SX60m,
please as a first step consult the troubleshooting guide in Chapter
10. For further assistance, please contact your Perreaux dealer.
9
Extended Warranty
Registration Form
Please complete this form and either fax, mail or e-mail it, along
with a copy of the original receipt, to Perreaux Industries Ltd.
Fax:
+64 3 489 2976
Mail:
Perreaux Industries Ltd
PO Box 305
Mosgiel
Dunedin 9032
New Zealand
E-mail: [email protected]
Alternatively, complete the online Warranty Registration Form
on our website – www.perreaux.com.
3 Year Extended
Warranty Form
Name:
Address:
Suburb:
City:
Country:
Telephone:
E-mail:
Website:
Product:
S I L H O U E T T E
S X 6 0 m
Serial No:
Dealer:
Purchase Date:
/
d
d
/
m m
y
y
y
y
19
10
There is no
output from
my system
Troubleshooting Guide
Please use this guide if you are experiencing any problems with
the SX60m in your system. It will provide possible solutions for
some given symptoms.
SX60m not turned on
Make sure the SX60m power switch is in the DOWN position.
AC cord not plugged in
Check that the AC cord is plugged into the IEC socket on the rear
of the SX60m.
Mains power not turned on
Check if the power is turn on at the mains socket on the wall.
Interconnect cables not connected
Make sure that the input and output interconnect cables are
plugged in and are connected to the respective RCA sockets on
the rear of the SX60m.
Source not turned on
Check that your source component is plugged in to the mains and
the power is turned on.
Source not set to play
Ensure that your source component is playing the recording you
would like to listen to, and that pause is not pressed.
No volume setting
Make sure that the volume on your preamplifier is set to a
suitable level.
SX60m set to incorrect input
Confirm that the input on your SX60m is connected to the
appropriate preamplifiers output.
Loud speakers not connected
Check that your loud speakers are firmly connected via cables
into the binding posts on the rear of the SX60m.
20
I can hear a
hum coming
through my
loud
speakers
Input sockets and/or output binding posts corroded
Check that the input and output RCA sockets and binding posts
on the rear of the SX60m are free from corrosion.
Interconnect cables damaged
Make sure that the integrity of your interconnect cables is sound
and they are firmly connected to your source and the SX60m.
SX60m is close to external interference
Check the proximity of your SX60m to any possible source of
EMI and/or RF interference, for example computers, televisions,
amplifiers, speakers, etc. Ideally the SX60m should be placed as
close as possible to your source.
21
11
Specifications
The correlation between published specifications and sonic
quality can be unreliable. A list of numbers reveals virtually
nothing. All technical measurements must be subject to
qualitative as well as quantitative interpretation. Measurements
of the SX60m reveal excellent results by any standards. Tested
at 115V and 230V after a 10 minute warm up period.
Specifications
in Brief
Rated Power Output............................................. 60WRMS into 8Ω
........................................................................... 75WRMS into 4Ω
Short Term Peak Power Output .............................. 255W into 8Ω
.............................................................................. 350W into 4Ω
Voltage Swing ................................................................ 110.4Vp-p
Input Sensitivity:
Balanced....................................................................... 0.37VRMS
Unbalanced................................................................... 0.27VRMS
Gain:
Balanced...........................................................................35.6dB
Unbalanced.......................................................................38.2dB
Input Impedance:
Balanced............................................................................. 20kΩ
Unbalanced......................................................................... 10kΩ
Total Harmonic Distortion (THD+N):
Typically .............................................0.002%, @ 1kHz into 8Ω
20Hz to 20kHz ................................................................<0.02%
Frequency Response:
20Hz–20kHz.........................................................+0dB, -0.05dB
5Hz–60kHz...........................................................+0dB, -0.25dB
Signal to Noise Ratio:
Rated Output (unweighted) ....................................................100dB
Dynamic Headroom (rated with music) .................................. >2.0dB
Power Consumption:
Idle........................................................................................10W
Maximum (at 75W into 4Ω) ......................................................85W
Audio Connections
Inputs ..................................................2 line level (RCA and XLR)
Outputs ...............................................2 line level (RCA and XLR)
.........................................................1 pair speaker binding posts
22
Other Connections
IEC AC mains input receptacle
Mains Input Voltage
115V or 230V AC at 50Hz/60Hz
(Set within the SX60m at time of manufacture)
Internal Mains Fuse Rating
1 x 2SB 500mA slow blow
(NOT user serviceable)
Internal Output Fuse Rating
2 x 2SB 4A normal blow
(NOT user serviceable)
Overall Dimensions
Width .......................................................................216mm (8.5”)
Depth .......................................................................178mm (7.0”)
Height ........................................................................58mm (2.3”)
Weight
Gross.......................................................................... 3.0kg (6.6lb)
Net .............................................................................2.4kg (5.3lb)
Specifications
Explained
Rated Power Output ............................................ 60WRMS into 8Ω
This is the optimum operating level of the unit, offering the best
performance whilst allowing a large enough buffer to
accommodate the unpredictable nature of music. It is the
reference output level to which other specifications, such as
sensitivity and gain, are referred. The Rated Output does not
indicate the full capability of the SX60m.
Short Term Peak Power Output........................... 255W into 8Ω
Having the capability to provide high levels of short term peak
power enables the SX60m to faithfully recreate the greater
musical dynamics of today’s low noise, high-resolution formats.
This high level of short term peak power is what gives the
SX60m the clout to punch well above its weight.
Voltage Swing.................................................................... 110.4Vp-p
Loud transients call for a sudden burst of power from the
amplifier to drive the speakers. This force is voltage. Peak-topeak voltage is a more useful specification than Watts when it
comes to delivering power to a speaker.
23
Input Sensitivity................................................................... 0.37VRMS
The Input Sensitivity figure indicates the input voltage required
to achieve “rated” output (60WRMS into 8Ω).
Gain ........................................................................................... 35.6dB
The amount of amplification the amplifier is asserting on the
input signal. Gain can be calculated by dividing the rated output
by the input sensitivity.
Input Impedance .......................................................................20kΩ
The resistance “load” that is presented to the source component
that is driving the SX60m.
THD+N.....................................................0.002%, @ 1kHZ into 8Ω
Total Harmonic Distortion + Noise is the percentage of output
signal which is made up of frequencies added due to harmonics
of the fundamental frequency and noise. By using low-noise
input circuitry and Class A signal stages, Perreaux engineers
have kept this figure to a minimum.
Frequency Response ................. 20Hz to 20kHz, +0dB -0.05dB
Describes the frequency range where the amplitude or strength of
the output signal deviates by no more than 0.05dB.
Signal to Noise Ratio (unweighted) ....................................... 100dB
The ratio of desired signal to noise signals in the output.
Perreaux engineers have designed the SX60m to maintain a low
noise floor.
Dynamic Headroom ..............................................................>2.0dB
This indicates the SX60m can provide more than enough extra
power to cope with the sharpest musical transients. Without
adequate headroom, an amplifier can become unstable under
clipping conditions. Perreaux amplifiers are intrinsically stable
under all dynamic conditions.
24
12
Physical Dimensions
25
13
Contact Details
For more information please contact your Perreaux dealer, or
contact:
Perreaux Industries Ltd
PO Box 305
Mosgiel
Dunedin 9032
New Zealand
Ph:
Fax:
+64 3 489 2975
+64 3 489 2976
E-mail:
[email protected]
Internet: www.perreaux.com
26
Installation Notes
27