1
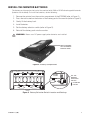
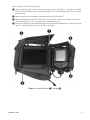
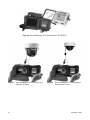
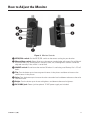
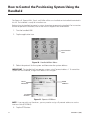
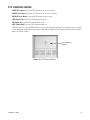
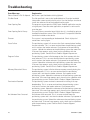
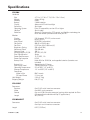
INSTALLATION/OPERATION
Integrated Positioning
System
Remote Monitor Kit
IPS-RMK
C2453M-D (2/06)
Contents
Welcome . . . . . . . . . . . . . . . . . . . . . . . . . . . . . . . . . . . . . . . . . . . . . . . . . . . . . . . . . . . . . . . . . . . . . . . 5
Getting Started . . . . . . . . . . . . . . . . . . . . . . . . . . . . . . . . . . . . . . . . . . . . . . . . . . . . . . . . . . . . . . . . . . 6
Test the Handheld to Ensure It Is Ready for Use . . . . . . . . . . . . . . . . . . . . . . . . . . . . . . . . . . . . 6
Install the Monitor Batteries . . . . . . . . . . . . . . . . . . . . . . . . . . . . . . . . . . . . . . . . . . . . . . . . . . . 7
How to Assemble the Remote Monitor Kit . . . . . . . . . . . . . . . . . . . . . . . . . . . . . . . . . . . . . . . . . . . . . 8
How to Adjust the Monitor . . . . . . . . . . . . . . . . . . . . . . . . . . . . . . . . . . . . . . . . . . . . . . . . . . . . . . . . 11
How to Control the Positioning System Using the Handheld . . . . . . . . . . . . . . . . . . . . . . . . . . . . . . 12
PTZ Control Menu . . . . . . . . . . . . . . . . . . . . . . . . . . . . . . . . . . . . . . . . . . . . . . . . . . . . . . . . . . . 13
How to Upload Software . . . . . . . . . . . . . . . . . . . . . . . . . . . . . . . . . . . . . . . . . . . . . . . . . . . . . . . . . . 14
How to Download Software to the Handheld . . . . . . . . . . . . . . . . . . . . . . . . . . . . . . . . . . . . . 15
Troubleshooting . . . . . . . . . . . . . . . . . . . . . . . . . . . . . . . . . . . . . . . . . . . . . . . . . . . . . . . . . . . . . . . . . 16
Specifications . . . . . . . . . . . . . . . . . . . . . . . . . . . . . . . . . . . . . . . . . . . . . . . . . . . . . . . . . . . . . . . . . . 17
List of Illustrations
1
2
3
4
5
6
7
8
9
10
11
12
13
14
IPS-RMK Remote Monitor Kit . . . . . . . . . . . . . . . . . . . . . . . . . . . . . . . . . . . . . . . . . . . . . . . . . . 5
Battery Compartment . . . . . . . . . . . . . . . . . . . . . . . . . . . . . . . . . . . . . . . . . . . . . . . . . . . . . . . . . 7
Battery Selection Switch Location and Settings . . . . . . . . . . . . . . . . . . . . . . . . . . . . . . . . . . . . 7
Assembly Steps Through . . . . . . . . . . . . . . . . . . . . . . . . . . . . . . . . . . . . . . . . . . . . . . . . 8
Assembly Steps Through . . . . . . . . . . . . . . . . . . . . . . . . . . . . . . . . . . . . . . . . . . . . . . . . 9
Remote Monitor Kit Connected to an IPS-RDPE-2 . . . . . . . . . . . . . . . . . . . . . . . . . . . . . . . . . . 10
Remote Monitor Kit Connected to a Spectra III Dome . . . . . . . . . . . . . . . . . . . . . . . . . . . . . . . 10
Remote Monitor Kit Connected to a Spectra Mini Dome . . . . . . . . . . . . . . . . . . . . . . . . . . . . 10
Monitor Controls . . . . . . . . . . . . . . . . . . . . . . . . . . . . . . . . . . . . . . . . . . . . . . . . . . . . . . . . . . . 11
Handheld Main Menu . . . . . . . . . . . . . . . . . . . . . . . . . . . . . . . . . . . . . . . . . . . . . . . . . . . . . . . 12
Spectra III Menu . . . . . . . . . . . . . . . . . . . . . . . . . . . . . . . . . . . . . . . . . . . . . . . . . . . . . . . . . . . 12
PTZ Control Menu . . . . . . . . . . . . . . . . . . . . . . . . . . . . . . . . . . . . . . . . . . . . . . . . . . . . . . . . . . 13
Handheld Main Menu . . . . . . . . . . . . . . . . . . . . . . . . . . . . . . . . . . . . . . . . . . . . . . . . . . . . . . . 14
Enter Software Title . . . . . . . . . . . . . . . . . . . . . . . . . . . . . . . . . . . . . . . . . . . . . . . . . . . . . . . . . 15
C2453M-D (2/06)
3
4
C2453M-D (2/06)
Welcome
Thank you for purchasing Pelco's IPS-RMK, the remote monitor kit designed to assist in the
installation and servicing of Spectra III ™ SE/Spectra III, Spectra ® Mini, Esprit®, or ExSite™ systems.
Use the remote monitor kit to observe video, verify operation of the PTZ controls, check the address
and baud settings, and program the positioning system. Software upgrades can also be performed
with Spectra III SE/Spectra III, Spectra Mini, and ExSite systems.
The IPS-RMK is supplied with the following equipment:
1
Carrying case (refer to Figure 1)
1
1
1
1
1
2
5.9-inch TFT-LCD monitor
Handheld loaded with the control/upload utility
Serial cable for the handheld
IPS-CABLE interface cable for the RJ-45 port of the dome system
IPS-MINIADPT adapter cable for Spectra Mini dome system
Straps
1
Remote Monitor Kit Resource CD
1
Handheld box
1
1
1
Cradle
Handheld software CD
Handheld operation manual
MONITOR
COMPARTMENT
HANDHELD
CABLE COMPARTMENT
POUCH
Figure 1. IPS-RMK Remote Monitor Kit
C2453M-D (2/06)
5
Getting Started
Before using the remote monitor kit, do the following:
1. Test the handheld to make sure it is ready for use.
2. Install the batteries for the monitor.
TEST THE HANDHELD TO ENSURE IT IS READY FOR USE
Batteries and software for the handheld were installed at the factory before the IPS-RMK was
shipped. Before using the remote monitor kit check the battery gauge of the handheld to ensure that
the batteries are still functioning.
To check the batteries refer to the operation manual supplied with the handheld.
NOTE: The Spectra III, Spectra Mini, Esprit, and ExSite application programs are installed on the
handheld at the factory. If the batteries of the handheld are functioning, the handheld should be ready
for immediate use.
6
C2453M-D (2/06)
INSTALL THE MONITOR BATTERIES
The battery pack located on the back of the monitor holds 8 AA or 10 NiCad rechargeable batteries
(batteries not included). To install the batteries, do the following:
1. Remove the mointor from the monitor compartment of the IPS-RMK (refer to Figure 1).
2. Press the tab located on the bottom of the battery pack of the monitor (refer to Figure 2).
3. Gently lift the battery back.
4. Install batteries.
5. Set the battery selection switch (refer to Figure 3).
6. Reinstall the battery pack onto the monitor.
WARNING: Never use a DC power supply when batteries are installed.
PRESS TAB AND
LIFT TO REMOVE
BATTERY BACK.
Figure 2. Battery Compartment
ALKALINE X 8EA
NICAD X 1OEA
ALKALINE X 8EA
NICAD X 1OEA
SET THE
BATTERY
SELECTION
SWITCH
= ALKALINE
= NICAD
Figure 3. Battery Selection Switch Location and Settings
C2453M-D (2/06)
7
How to Assemble the Remote Monitor Kit
Refer to Figure 4 for the following steps.
Lift the handheld compartment.
Open the bottom flap of the cable pouch. Pull the serial cable for the handheld out through the
bottom of the pouch and connect to the bottom of the handheld. Secure excess cable and place
back into pouch.
Open the top flap of the cable pouch. Pull the BNC connector out through the top of the pouch.
Connect to the VIDEO IN connector located on the top of the monitor.
Pull the interface cable (IPS-CABLE) out of the pouch, and plug the RJ-45 connector into the RJ- 45
port of the Spectra III SE/Spectra III or IPS-RDPE-2 remote data port.
If you have a Spectra Mini dome, remove the IPS-MINIADPT adapter cable from the pouch.
Connect the RJ-45 connector to the mating connector on the IPS-CABLE. Remove the trim ring
and lower dome from the Spectra Mini dome by prying down on the trim ring at one of the Pelco
logos. Plug the six-pin connector on the adapter cable into the mating connector on the dome.
Figure 4. Assembly Steps Through 8
C2453M-D (2/06)
Refer to Figure 5 for the following steps.
Open the monitor compartment. Connect the top flap to the side flap. This will reduce the glare
of the sun on the monitor when using the kit outdoors. This step is not required if there is no glare
on the monitor.
Fold the loose part of the bottom flap under and attach to the Velcro®.
Open the handheld compartment. Attach the two side Velcro strips to the Velcro strips on the
monitor compartment. This will support the handheld during use.
Attach the side flaps of the handheld compartment to the top and bottom flaps. Refer to Figure 6,
Figure 7, and Figure 8 for final views of the kit assembly.
Figure 5. Assembly Steps Through C2453M-D (2/06)
9
Figure 6. Remote Monitor Kit Connected to a IPS-RDPE-2
Figure 7. Remote Monitor Kit Connected to a
Spectra III Dome
10
Figure 8. Remote Monitor Kit Connected to a
Spectra Mini Dome
C2453M-D (2/06)
How to Adjust the Monitor
Figure 9. Monitor Controls
NTSC/PAL switch: Set the NTSC/PAL switch to the correct setting for your location.
Manual/Auto switch: Select Auto to use the preset standard color adjustment. Set to Manual
to set the color, tint, and brightness manually. Color, tint, and brightness controls cannot be
adjusted manually if the switch is set to Auto.
ON/OFF switch: Do not leave the monitor ON when it is not being used. Battery life is 2.5 to 3
hours.
Tint: Turn the button up to increase greenish tones in the picture and down to increase the
reddish tones in the picture.
Color: Turn the button up to increase the color saturation level and down to decrease the color
saturation level.
Bright: Turn the button up to increase brightness and down to decrease brightness.
DC 12 VDC jack: Power jack for optional 12 VDC power supply not included.
C2453M-D (2/06)
11
How to Control the Positioning System Using the
Handheld
The Spectra III, Spectra Mini, Esprit, and ExSite utilities are installed on the handheld contained in
this kit. The handheld is ready for immediate use.
Before using the handheld to control a system, know how to operate the handheld. For instructions
on how to operate the handheld, refer to the manual shipped in the handheld box.
1. Turn the handheld ON.
2. Tap the application icon.
APPLICATION
ICON
Figure 10. Handheld Main Menu
3. Select the protocol for the system and then enter the system address.
IMPORTANT: The handheld will not operate systems using P protocol address 1. To control the
system with the handheld, change the P address to 2 or higher.
DOME
ADDRESS
SELECT
PROTOCOL
PTZ
BUTTON
Figure 11. Spectra III Menu
NOTE: If you normally use Coaxitron ®, you may need to assign a D protocol address to use the
interface cable (IPS-CABLE).
4. Tap the PTZ button.
12
C2453M-D (2/06)
PTZ CONTROL MENU
OPEN (Iris Open): Tap the OPEN button to make a selection.
CLOSE (Iris Close): Tap the CLOSE button to cancel a selection.
NEAR (Focus Near): Tap the NEAR button to focus near.
FAR (Focus Far): Tap the FAR button to focus far.
IN (Zoom In): Tap the IN button to zoom near.
OUT (Zoom Out): Tap the OUT button to zoom far.
PGM (Preset 95) - Tap the PGM button to access the programming menu for the dome system. Refer
to the operation and programming manual supplied with Spectra III SE/Spectra III dome, Spectra Mini
dome, or ExSite system.
CONTROLLER
MENU
Figure 12. PTZ Control Menu
C2453M-D (2/06)
13
How to Upload Software
Operating software and language files can be uploaded to a Spectra III Series, Spectra Mini, or ExSite
system. The latest version of the control/upload utility is installed on the handheld. To upload future
revisions, refer to How to Download Software to the Handheld .
To upload software using the IPS-RDPE-2 remote data port the following software must be installed:
•
Spectra III dome drive must have operating software version 1.2 or higher installed.
•
ExSite explosionproof system must have operation software version 1.13 or higher installed.
NOTE: Software and language files cannot be uploaded to an Esprit system.
Perform system upgrades only when necessary. Software upgrades do not need to be performed if the
system is operating properly.
WARNING: To prevent damage to the system, never cycle power or attempt control of the
unit during the upload process. The upload process is not complete until the system reboots
and the 'Configure Done' message appears on the monitor.
1. Assemble the remote monitor kit. Refer to How to Assemble the Remote Monitor Kit.
2. Tap the application icon.
APPLICATION
ICON
Figure 13. Handheld Main Menu
14
C2453M-D (2/06)
3. Enter the name of the software title where the blinking cursor appears on the screen.
SOFTWARE
FILE NAME
INDICATES
UPLOAD IS
COMPLETE
UPLOAD
BUTTON
Figure 14. Enter Software Title
4. Tap the Upload button. The software upload starts.
5. Wait until "Done" appears on the screen before unplugging the RJ-45 cable.
WARNING: Do not cycle power to the system during the upload process. The "Done"
message on the handheld indicates only that the first part of the upload is done. The upload
process is not complete until the system reboots and the "Configure Done" message appears
on the monitor.
HOW TO DOWNLOAD SOFTWARE TO THE HANDHELD
1. Download the latest application software from the Remote Monitor Kit Resource CD or
Pelco's website (www.pelco.com) onto a desktop computer.
2. Use the HotSync® function to install the software file onto the handheld. Refer to the
manual supplied with the handheld for instructions on how to perform a HotSync
operation.
C2453M-D (2/06)
15
Troubleshooting
Error Message
Please Choose a File To Upload
Explanation
No file was specified before clicking Upload.
File Not Found
The file specified is not on the handheld device. Go to the handheld
information screen to verify the file exists. Use the HotSync function to
install the software file to the handheld and try again.
Error Opening Port
The program cannot open the COM 1 port. Another application may be
using the port. Close the other application, or perform a soft reset to
reset the port.
Error Opening Serial Library
The serial library cannot be found. Verify that it is installed by going to
handheld information screen. Palm OS version 3.5 compatible software
should be installed on the device.
Timeout
The system is not responding to the download. Check all physical
connections and try again.
Erase Failure
The positioning system fails to erase the flash memory before loading
the new software. This is an error received from the positioning system
and is not from the loader software. Cycle power to the positioning
system . Upload the software to the positioning system one more time.
If the message appears again, there may be a problem with the
positioning system. Contact Pelco's Product Support Department.
Program Failure
The positioning system failed to program the flash memory with the
new software. This is an error received from the positioning system
and is not from the loader software. Cycle power to the positioning
system. Upload the software to the positioning system one more time.
If the message appears again, there may be a problem with the
positioning system. Contact Pelco's Product Support Department.
Memory Allocation Failure
The positioning system failed to allocate memory correctly during the
download process. This is an error received from the positioning
system and is not from the loader software. Cycle power to the
positioning system. Upload the software to the positioning system one
more time. If the message appears again, there may be a problem with
the positioning system. Contact Pelco's Product Support Department.
Termination Received
The positioning system received a command instructing it to stop
downloading. This is an error received from the positioning system
itself and is not from the loader software. Cycle power to the
positioning system. Upload the software to the positioning system one
more time. If the message appears again, there may be a problem with
the positioning system. Contact Pelco's Product Support Department.
An Unknown Error Occurred
An unknown error occurred. This is an error received from the
positioning system and is not from the loader software. Cycle power to
the positioning system. Upload the software to the positioning system
one more time. If the message appears again, there may be a problem
with the positioning system. Contact Pelco's Product Support
Department.
16
C2453M-D (2/06)
Specifications
IPS-RMK
Handheld
Size
Weight
Memory
Battery
Display
Expansion
Operating System
HotSync®
Software
Monitor
Display
Backlight
Input Signal
Dot Format
Dot Pitch
Brightness Rating
Number of Pixels
Contrast Ratio
Viewing Angle L/R/T/B
Pixel Configuration
Power Requirements
Power Consumption
Battery Pack
Battery Life
Input Signal Level
Operating Temperature
Storage Temperature
Connectors
Video In/Out
DC Input Power
Unit Weight
Shipping Weight
IPS-CABLE
Connectors
Receiver
Video
Control
Length
4.7" H x 3.1" W x .7" D (11.9 x 7.9 x 1.8 cm)
4.4 oz (.20 kg)
8 MB
2 AAA batteries
Advanced LCD with backlight
Serial port
Palm OS compatible, version 3.5 or higher
Serial cradle
Spectra III Programming, PTZ control, and HotSync technology for
local and remote synchronization with your PC
5.6" diagonal, TFT-LCD, active matrix
Built-in (CCFT)
NTSC/PAL (selectable)
960 (H) x 234 (V) dots
0.120 mm (H) x 0.360 mm (V)
200 cd/m2 (Nit)
224,640 dots
100:1
40°/40°/10°/30°
Stripe
12-15 VDC, 1 A
6.5 W
Holds 8 AA or 10 NiCad, rechargeable batteries (batteries not
included)
Approximately 2.5 hours
1.0 Vp-p (positive) 75 ohms
23° to 104°F (-5° to 40°C)
-13° to 108°F (-25° to 60°C)
BNC, female
2.1 mm jack
2.9 lb (1.3 kg)
6 lb (2.7 kg)
One RJ-45 serial interface connector
One BNC, male connector
One serial DB-9 female connector (mating cable required for Palm
OS-compatible handheld and iPaq PC applications)
48" (122 cm)
IPS-MINIADPT
Connectors
One RJ-45 serial interface connector
One 6-pin serial interface connector
Length
6.25” (15.87cm)
C2453M-D (2/06)
17
PRODUCT WARRANTY AND RETURN INFORMATION
WARRANTY
Pelco will repair or replace, without charge, any merchandise proved defective in material or workmanship for a period of one year after the date of
shipment.
Exceptions to this warranty are as noted below:
• Five years on FT/FR8000 Series fiber optic products.
• Three years on Genex® Series products (multiplexers, server, and keyboard).
• Three years on Camclosure® and fixed camera models, except the CC3701H-2, CC3701H-2X, CC3751H-2, CC3651H-2X, MC3651H-2, and
MC3651H-2X camera models, which have a five-year warranty.
• Three years on PMCL 200/300/400 Series LCD monitors.
• Two years on standard motorized or fixed focal length lenses.
• Two years on Legacy®, CM6700/CM6800/CM9700 Series matrix, and DF5/DF8 Series fixed dome products.
• Two years on Spectra®, Esprit®, ExSite™, and PS20 scanners, including when used in continuous motion applications.
• Two years on Esprit® and WW5700 Series window wiper (excluding wiper blades).
• Two years (except lamp and color wheel) on Digital Light Processing (DLP®) displays. The lamp and color wheel will be covered for a period of
90 days. The air filter is not covered under warranty.
• Eighteen months on DX Series digital video recorders, NVR300 Series network video recorders, Endura™ Series distributed network-based video
products, and TW3000 Series twisted pair transmission products.
• One year (except video heads) on video cassette recorders (VCRs). Video heads will be covered for a period of six months.
• Six months on all pan and tilts, scanners or preset lenses used in continuous motion applications (that is, preset scan, tour and auto scan modes).
Pelco will warrant all replacement parts and repairs for 90 days from the date of Pelco shipment. All goods requiring warranty repair shall be sent freight
prepaid to Pelco, Clovis, California. Repairs made necessary by reason of misuse, alteration, normal wear, or accident are not covered under this
warranty.
Pelco assumes no risk and shall be subject to no liability for damages or loss resulting from the specific use or application made of the Products. Pelco’s
liability for any claim, whether based on breach of contract, negligence, infringement of any rights of any party or product liability, relating to the Products
shall not exceed the price paid by the Dealer to Pelco for such Products. In no event will Pelco be liable for any special, incidental or consequential
damages (including loss of use, loss of profit and claims of third parties) however caused, whether by the negligence of Pelco or otherwise.
The above warranty provides the Dealer with specific legal rights. The Dealer may also have additional rights, which are subject to variation from state
to state.
If a warranty repair is required, the Dealer must contact Pelco at (800) 289-9100 or (559) 292-1981 to obtain a Repair Authorization number (RA), and
provide the following information:
1. Model and serial number
2. Date of shipment, P.O. number, Sales Order number, or Pelco invoice number
3. Details of the defect or problem
If there is a dispute regarding the warranty of a product which does not fall under the warranty conditions stated above, please include a written
explanation with the product when returned.
Method of return shipment shall be the same or equal to the method by which the item was received by Pelco.
RETURNS
In order to expedite parts returned to the factory for repair or credit, please call the factory at (800) 289-9100 or (559) 292-1981 to obtain an authorization
number (CA number if returned for credit, and RA number if returned for repair).
All merchandise returned for credit may be subject to a 20% restocking and refurbishing charge.
Goods returned for repair or credit should be clearly identified with the assigned CA or RA number and freight should be prepaid. Ship to the appropriate
address below.
If you are located within the continental U.S., Alaska, Hawaii or Puerto Rico, send goods to:
Service Department
Pelco
3500 Pelco Way
Clovis, CA 93612-5699
If you are located outside the continental U.S., Alaska, Hawaii or Puerto Rico and are instructed to return goods to the USA, you may do one of the
following:
If the goods are to be sent by a COURIER SERVICE, send the goods to:
Pelco
3500 Pelco Way
Clovis, CA 93612-5699 USA
If the goods are to be sent by a FREIGHT FORWARDER, send the goods to:
Pelco c/o Expeditors
473 Eccles Avenue
South San Francisco, CA 94080 USA
Phone: 650-737-1700
Fax: 650-737-0933
This equipment contains electrical or electronic components that must be recycled properly to
comply with Directive 2002/96/EC of the European Union regarding the disposal of waste electrical
and electronic equipment (WEEE). Contact your local dealer for procedures for recycling this
equipment.
REVISION HISTORY
Manual #
C2453M
C2453M-A
C2453M-B
C2453M-C
C2453M-D
Date
7/02
4/03
1/04
7/05
2/06
Comments
Original version.
Added Esprit and IPS-RDPE-2 information.
Revised per ECO# 03-9497 for software revision.
Added ExSite system information.
Added Spectra Mini system information.
Pelco, the Pelco logo, Spectra, Genex, Coaxitron, Esprit, Camclosure, and Legacy are registered trademarks of Pelco.
Velcro is a registered trademark of Velcro Industries.
HotSync and Palm OS are registered trademarks of Palm, Inc.
ExSite, Spectra III, and Spectra III SE are trademarks of Pelco.
DLP is a registered trademark of Texas Instruments, Inc.
Palm is a trademark of Palm, Inc.
© Copyright 2006, Pelco. All rights reserved.
Worldwide Headquarters
3500 Pelco Way
Clovis, California 93612 USA
USA & Canada
Tel: 800/289-9100
Fax: 800/289-9150
International
Tel: 1-559/292-1981
Fax: 1-559/348-1120
www.pelco.com
ISO9001
United States | Canada | United Kingdom | The Netherlands | Singapore | Spain | Scandinavia | France | Middle East